I felt that a forum was missing its daily dosage of aquarium-- and we needed a better aquarium. Much better >:D
So last week I decided I was fed up with the way my aquarium looked, and the design was going nowhere fast. So, I bought some new plants last weekend, and prepped to stage a massive overhaul (today). All in all, I have to say things went swimmingly :)

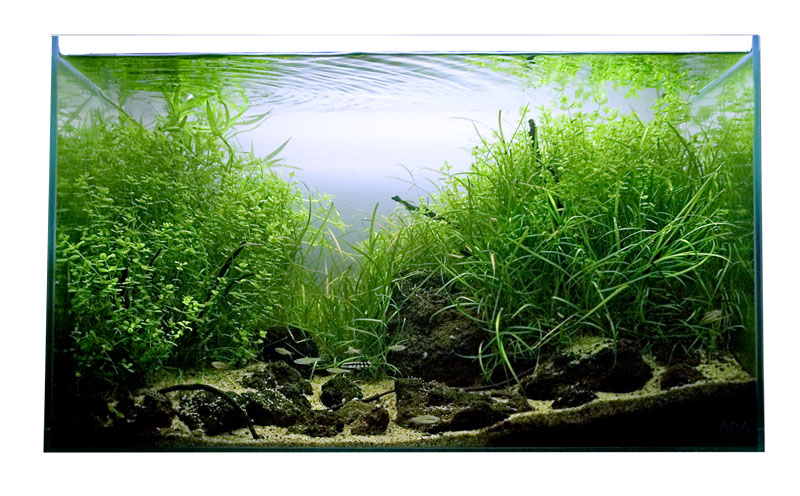
First off, I'll say that my tank was a mess :( I went back to Hawaii for an entire month after the earthquake here in Japan, and a month of neglect is hard to come back from. Algae, was everywhere, the plants I had left floating at the top had gone bonkers, and everything else was suffering underneath its shadow.

Pretty yes, but also downright unruly! You can see I really let things go, because EVERYTHING is growing out of the water and putting out "terrestrial foliage" (most aquarium plants are amphibious, and given the chance, will send out waxy-leaved growth meant for above-water life. Air has more CO2 than water, making amphibious life the best in the wild). Most of the times we don't let plants grow up and out of the water.
So, it's time to dig in. First thing is to assemble the tools of the trade! >:D

So much German-crafted stainless steel beauty :D
From right to left... Tooth brushes, for scrubbing (pretty self-explanatory). ADA pro pick, meant for scraping algae off wood and rocks. 2 types of ADA tweezers, the dainty and precise pincettes, and the tough hooked pro-tweezers. Different plants and areas call for one or the other, but their combined work solidly affixes just about any plant into the substrate. ADA Sand leveler, meant for... leveling sand, as well as coming in handy for a multitude of subtle miscellaneous adjustments. ADA Glass scraper, it has a sharp razer that works like nothing else for cleaning the glass. I really like ADA's hooked Scizors, subtle, sharp, gentle to plants, and capable of reaching any part of the tank. Finally a net-- obviously useful for scooping out fish, but also debris and plant clippings.
So, the first steps were to empty the tank, and get my rocks/plants together and ready for use.

So last week I decided I was fed up with the way my aquarium looked, and the design was going nowhere fast. So, I bought some new plants last weekend, and prepped to stage a massive overhaul (today). All in all, I have to say things went swimmingly :)


Pretty yes, but also downright unruly! You can see I really let things go, because EVERYTHING is growing out of the water and putting out "terrestrial foliage" (most aquarium plants are amphibious, and given the chance, will send out waxy-leaved growth meant for above-water life. Air has more CO2 than water, making amphibious life the best in the wild). Most of the times we don't let plants grow up and out of the water.
So, it's time to dig in. First thing is to assemble the tools of the trade! >:D

So much German-crafted stainless steel beauty :D
From right to left... Tooth brushes, for scrubbing (pretty self-explanatory). ADA pro pick, meant for scraping algae off wood and rocks. 2 types of ADA tweezers, the dainty and precise pincettes, and the tough hooked pro-tweezers. Different plants and areas call for one or the other, but their combined work solidly affixes just about any plant into the substrate. ADA Sand leveler, meant for... leveling sand, as well as coming in handy for a multitude of subtle miscellaneous adjustments. ADA Glass scraper, it has a sharp razer that works like nothing else for cleaning the glass. I really like ADA's hooked Scizors, subtle, sharp, gentle to plants, and capable of reaching any part of the tank. Finally a net-- obviously useful for scooping out fish, but also debris and plant clippings.
So, the first steps were to empty the tank, and get my rocks/plants together and ready for use.

So for this layout I decided to give Wabi-Kusa a shot. I knew I wanted a "high tech" layout with lots of fast growing stem plants. I haven't tried Wabi Kusa, so I decided to give them a shot (in addition to using that massive wad from earlier. There are 4 of them in there.

So what is a Wabi-Kusa (詫び草)? Well first of off, it's another product by ADA (Aqua Design Amano). Basically, it's a ball of terrestrially cultivated aquarium plants that have grown to tightly attach themselves to a core ball. This ball sinks, and also has nutrients and is a great cultivation root. Wabi-kusa is meant to also be used by beginners, and makes things incredibly simple. I didn't even need my tweezers! just plop in the plants and be ready to go. "Wabi" comes from "wabi-sabi," a Japanese aesthetic sense that finds beauty in imperfection-- basically "beauty of chaos/nature" or "beauty with age," (sabi means "to rust"). "Kusa" means weeds, and it certainly gives you a lot of weeds!
I'm not really familiar with the terrestrial foliage of many aquarium plants, but I could recognize Ludiwigia arcuata, Cardamine lyrata, Riccia fluitons, Rotala rotundifolia, Rotala rotundifolia "green", and a few stems of Rotala najenshan. There are some other plants I couldn't recognize (at least 1 other species of Ludwigia, and another Rotala and others) but... heck, that's the fun of Wabi-kusa-- you're not quite sure what you're getting, so you really feel the "chaos of nature"!
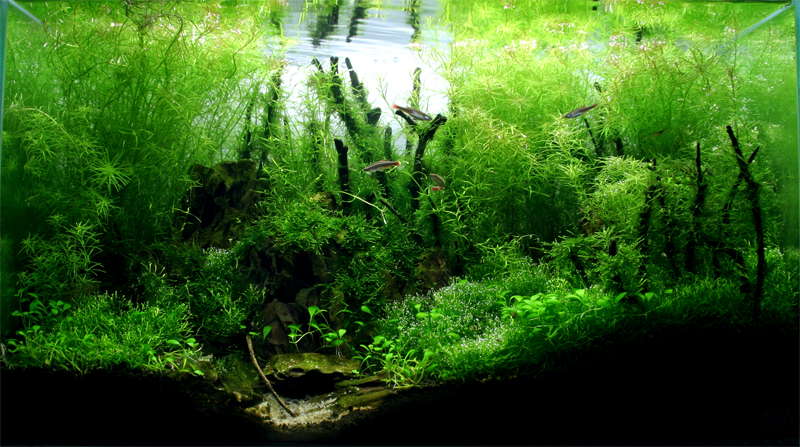
So, I brought in some awesome rocks I've collected and planted the plants. In addition to the the Wabi-kusa, I stuck in that mass of plants in the fore-midground, as well as some moss rocks.

I had some beautiful Java moss rocks left from my old layout. Even if all things go to shit, you can be sure that Java moss will pull through for you. Beautiful growth here. Once thought to be Vesicularia Dubyana (now commonly known as "Singapore Moss"), Java moss is actually a Taxiphyllum sp., specifically Taxiphyllum Barnieri. Who would have known?? (k, well you can't know really, without a some expertise in bryophytes and a microscope...). Anyway, moss is awesome. It adds something special to almost every layout. :D

That mess of plants is in. I just through a bunch of dirt on it and sifted it until the it somewhat fell through the leaves and over the roots. Even if leaves are buried, in time they will push themselves through the dirt and right themselves. Mostly it's a Hydrocotyle sp., "Penny Wort," it's got beautiful round leaves and makes an ideal mid-foreground plant. There's also a bunch of Rotala rotundifolia "green" and Rotala rotundifolia mixed in. Maybe some Hemianthus callitrichoides too (though I doubt such a small plant will come through that mess).


So what is a Wabi-Kusa (詫び草)? Well first of off, it's another product by ADA (Aqua Design Amano). Basically, it's a ball of terrestrially cultivated aquarium plants that have grown to tightly attach themselves to a core ball. This ball sinks, and also has nutrients and is a great cultivation root. Wabi-kusa is meant to also be used by beginners, and makes things incredibly simple. I didn't even need my tweezers! just plop in the plants and be ready to go. "Wabi" comes from "wabi-sabi," a Japanese aesthetic sense that finds beauty in imperfection-- basically "beauty of chaos/nature" or "beauty with age," (sabi means "to rust"). "Kusa" means weeds, and it certainly gives you a lot of weeds!
I'm not really familiar with the terrestrial foliage of many aquarium plants, but I could recognize Ludiwigia arcuata, Cardamine lyrata, Riccia fluitons, Rotala rotundifolia, Rotala rotundifolia "green", and a few stems of Rotala najenshan. There are some other plants I couldn't recognize (at least 1 other species of Ludwigia, and another Rotala and others) but... heck, that's the fun of Wabi-kusa-- you're not quite sure what you're getting, so you really feel the "chaos of nature"!
So, I brought in some awesome rocks I've collected and planted the plants. In addition to the the Wabi-kusa, I stuck in that mass of plants in the fore-midground, as well as some moss rocks.

I had some beautiful Java moss rocks left from my old layout. Even if all things go to shit, you can be sure that Java moss will pull through for you. Beautiful growth here. Once thought to be Vesicularia Dubyana (now commonly known as "Singapore Moss"), Java moss is actually a Taxiphyllum sp., specifically Taxiphyllum Barnieri. Who would have known?? (k, well you can't know really, without a some expertise in bryophytes and a microscope...). Anyway, moss is awesome. It adds something special to almost every layout. :D

That mess of plants is in. I just through a bunch of dirt on it and sifted it until the it somewhat fell through the leaves and over the roots. Even if leaves are buried, in time they will push themselves through the dirt and right themselves. Mostly it's a Hydrocotyle sp., "Penny Wort," it's got beautiful round leaves and makes an ideal mid-foreground plant. There's also a bunch of Rotala rotundifolia "green" and Rotala rotundifolia mixed in. Maybe some Hemianthus callitrichoides too (though I doubt such a small plant will come through that mess).

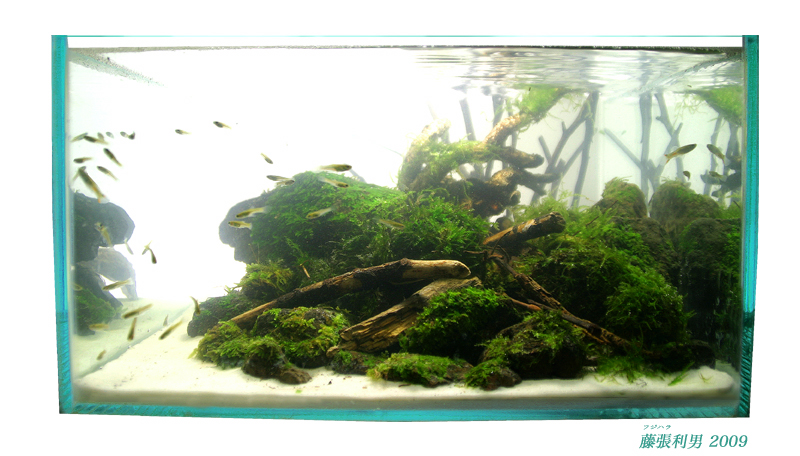
And there it is with everything in! All that's left is to hook up the equipment and fill her up!
Now let's talk about some more fun stuff-- specs/equipment! >:D

First the lighting! ADA's Solar II is a sleek and sexy pendant light that houses 2 powerful 36 Watt Power Compact Florescent bulbs. That's a bit "low" lighting for a tank of this size, but I prefer not to "blast" the tank. The higher power you lights are, the more you have to be on top of your CO2/Dosage game to keep things in balance. Plus, the nice thing about having a hanging pendant light is you can adjust the strength by raising or lowering the light. I lowered the light quite a bit because of the high growth rates of my current plants.

Next, I'll take you "under the hood" of my baby. There's a large CO2 canister, and the filter. I use an Eheim 2213 Canister filter.
Canister filters are ideal for the planted tank, providing an external source of bio and mechanical filtration. The great thing about canister filters is that the outflow can be fed back well under the water surface (or adjusted above the water surface). While most tanks want "ripples"/"bubbles" to oxygenate the water, planted tanks are just the opposite. You want as little breaking of the surface as possible, ie. as little aeration as possible. Why you ask? To preserve CO2. Ever shake a soda bottle? Well, you know that CO2 does not like staying in water-- but plants need a high saturation of CO2 in the water in order to perform photosynthesis efficiently. An underwater outflow that doesn't break the water helps preserve CO2 saturation, while the photosynthesis of the plants does more than enough to oxygenate the water to keep the fish healthy and happy.
Water doesn't contain enough CO2 to keep plants healthy and happy. In nature, most plants have some above-water growth to absorb CO2 from the air, or else live in areas with rapid water movement (and thus continuous CO2 replenishment, even at low levels). In the closed confines of an aquarium, man must fertilize CO2 to keep the water well saturated with CO2 for the plants to use. Of course the CO2 canister is equipped to adjust the flow of CO2 into the aquarium. It's also attached to a timer (along with the lights), so that the lights and CO2 will automatically come on and off every day, controlling the photo period for the plants (plants can only maintain their photosynthesis at top efficiency for certain periods. Usually, 6-8 hours is ideal, but even less could be used). Longer light periods will invite algae... :S
Moving on with the CO2 equipment...

A Glass Bubble counter helps gauge the rate of CO2 flow... It also looks sexy...

The CO2 is fed through a glass CO2 Diffuser into the Aquarium. The diffuser breaks the CO2 into tiny bubbles, maximizing its surface area to enhance its absorption into the water.


More sexy looking glass. This glass PH checker gives an easy visual cue to the hardness/softness of the water. Right now, it looks to be really hard (but hey, right out of the tap). Hopefully, the CO2 and substrate will bring that down soon :D (slightly acidic is ideal for most plants, meaning you want a yellowish-green color, not blue).


Stainless steel in and outflow pipes finish this tour through the equipment. This outflow's nozzle gives the filter a very high-powered fast flow. While a fast flow can be disruptive, used effectively, it is a great asset to the tank's balance. A fast flow blast CO2 and Oxygen around the tank, making sure these vital gasses are well distributed throughout the tank. It also reduces the amount of detritus (dead leaves, fish poo, uneaten fish food, shrimp shells, etc.) from getting caught in-between plant leaves, which can get in the way of photosynthesis. Shrimp and algae-eating fish also help to clear up clog, kicking debris into the flow to get sucked up by the filter, in addition to their algae-eating duties. A fast flow also forces fish to work harder, keeping them from getting fat and lazy xD


'n there she is folks! Hope you enjoyed this little tour of the set up. :)
I'll post more pics as the water clears :D
I'll post more pics as the water clears :D