
Allowed by: shiny finder.
Previous version by: Light Sanctity.
Pokémon Sword and Shield offer both familiar and novel mechanics through which players can obtain a shiny. This guide’s objective is to describe the shiny hunting methods found in these games in relation to each specific type of encounter. Additionally, peer-reviewed routines, teams, and guides for certain hunts will be highlighted throughout the sections.
READ ME: This guide will utilize a symbol key system; these symbols will be found on each applicable header. This way users can learn if the encounter is affected by the Shiny Charm, is most likely a star/square shiny, can be synchronized, can have marks, etc. before embarking on a project.
Symbol key
 - Can have marks
 - Can be synchronized
 - Is affected by Shiny Charm
 - Mostly star shiny (15/16 shinies)
 - Mostly square shiny (65521/65536 shinies)
Directory
General information
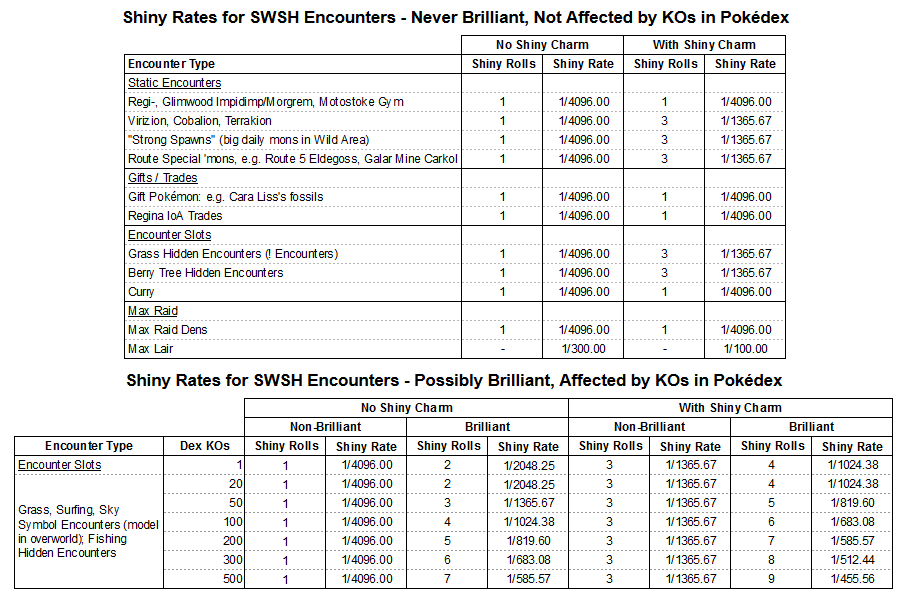
KOs (or captures) boost shiny odds through extra rerolls shown as Brilliant Aura Pokémon (source), empirical brilliant rates match the table on the official site, plus the official site's extra shiny rerolls match Kaphotics' extra reroll table (see: Brilliant aura for a revised, corrected version). KOs only work for overworld grass encounter slots and fishing, as only these two types of encounters can have Brilliant Aura Pokémon. Regarding chaining, fishing is the only type of encounter that shows a chain-like behavior in the game data. The following calculations were done by denvoros:

This table by Anubis serves as a summary of the applied shiny rates seen throughout Galar:
The only encounters that can have Brilliant Auras are the overworld Pokémon that spawn in grass and fishing spots. These two images from the official site show the respective appearances of both:
The following table indicates the percent chances of encountering Brilliant Aura Pokémon. Taken from Anubis's revision of Kaphotics's extra reroll table. The chain count is only valid when fishing.


The following Pokémon from past generations are more likely to be square shinies (65521/65536):


Players are awarded with a Mark Charm if they complete the Isle of Armor expansion Pokédex; this charm gives the player 2 extra rerolls. Anubis calculated the actual mark rates in the Pokémon Sword and Shield games, including important technicalities that had been previously ignored. Users are also encouraged to use this weather document made by Anubis and Skadiv to evaluate weather mark availability between areas. For a list of marks and the titles they give, please visit this Bulbapedia page.
It is important to note that spawning Pokémon will utilize the weather that the player is standing in as a reference for what weather mark to have. This allows players to spawn Pokémon with weather from beyond area borders without using advanced techniques. This video shows an example of weather bleed from Training Lowlands into Warm-Up Tunnel, and this video shows an example of "weather lag" to obtain usually unavailable marked Pokémon.
"Static encounters" which involve overworld static encounters, scripted encounters (including curry and tree encounters), gifts, and in-game trades have been separated to avoid the misuse of the term "static." Dynamax Adventures are classified as raids because they utilize the same RNG. They are forced shiny like the guaranteed distribution events except instead of forcing a square shiny, it forces a star shiny.
For a more visual interpretation of Sword and Shield Pokémon classifications, users are welcome to utilize this picture guide as a complementary resource.
Spawn Increase
Example 1: Storm Drain in the Route 2 fishing spot. (Yes, there are 2 Magikarp slots)
Explanation: Guaranteed 50% divided into 4 slots (they're all Water-types) + 1/2 of the original spawn chances.
Example 2: Harvest in overworld Route 9 - Circhester Bay (Sword)
Explanation: Guaranteed 50% divided into 1 slot (there's only 1 Grass-type) + 1/2 of the original spawn chances.
Example 3: Combee distribution with a Male Cute Charm lead
Explanation: Guaranteed 66% opposite gender + normal ratio for the remaining 34%.
There are two points where abilities can affect Pokémon: at spawn and at the moment of encountering. Cute Charm and Type-related encounter boosting abilities (Magnet Pull, Static, Flash Fire, Harvest, Lightning Rod, and Storm Drain) will affect the Pokémon upon spawning, which is represented by the Pokémon appearing in the overworld or by the fishing spot. On the other hand, Synchronize will affect the Pokémon upon encountering it. This allows players to hunt gendered Pokémon such as female Combee with ease, permitting them to save before each encounter to change into a Synchronize lead in case the Pokémon is shiny (the Pokémon remain the same when saved next to). In the case of trees, both act at the same time. Additionally, Illuminate has been shown to be ineffective.

Recommendations have a 50% chance of activating, split between the 4 species, and fail if the bonus lands on an unavailable encounter since Dex recs aren't area-specific; the explanation can be found here. It is important to note that Dex recs work globally in regards to a species. If a Glimwood Tangle Sinistea gets boosted alongside other Glimwood Pokémon, the Sinistea in the Old Cemetery will receive a boost without affecting the other spawns. However, using this same example, if a species from Glimwood asides from Sinistea would receive the bonus, the dex rec would fail as it wouldn't be able to proc in Old Cemetery. Additionally, Dex recs only work on the first listed slot of a species if alt-forms are present. In the case of Sinistea, only the Phony version would be favored by this boost, meaning that the Authentic form cannot benefit from it. It would be counterproductive to boost Sinistea at all if hunting for Authentic forms as it would decrease the encounter rate of them by increasing the Phonies.
A tweet by Anubis suggests that users with an incomplete Pokédex could force a Dex rec. for rare Pokémon of interest (eg. Route 2 Feebas) by leaving them to last and only once the Dex rec. is active, transfer one from HOME to get the Shiny Charm before starting the hunt. In order to roll for Dex recs with a completed Pokédex, the player must advance dates through the den skip method. Once a suitable recommendation is found, it can be kept by saving and keeping the clock from rolling past midnight during shiny hunting. If the fast skip glitch isn't active, the player can also change the date to alter the weather and spawns as long as the clock doesn't tick past midnight. If that were to happen, the recommendations can be restored by closing the game (without saving) and loading the original date of the save.
Breeding |
Breeding remains one of the most popular methods to get competitively flawless shinies. This is mainly due to the high shiny rates and to the different items like Everstone and Destiny Knot which allow the offspring to maintain both the nature and 5/6 IV values from their parents, respectively. The main way to guarantee a good shiny rate is through the Masuda Method. The base shiny odds for breeding are 1/4096, but if the player utilizes two parents from different regions, the odds for a shiny become 1/683 without the Shiny Charm and 1/512 with it. Egg shininess is determined when received. For more information about how to use these effects, ball inheritance, and other important topics please refer to the Smogon Gen 8 Breeding Guide. Players might also be interested in ball legality information.
Encounter slots


Example of a hunt: Route 2 Feebas (Dex Recommendation + Storm Drain)
By rolling a Pokédex recommendation to Feebas, the base spawn rate would increase from 1% to a value detailed in this Excel by Atrius97 depending on the number of species boosted in the fishing pool. Combined with Storm Drain, which gives a 50% chance to get Feebas 25% of the time (100%/4 fishing slots), the expected encounter rate for Feebas should be 0.5(25)+0.5(excel value)%. Storm Drain on its own would give a 13% chance of encountering a Feebas (0.5(25)+0.5(1)). If the player has defeated or caught at least one Feebas and gets a fishing chain, they would have better odds for encountering a shiny due to Brilliant Aura mechanics.

Example of a hunt: Female Dreepy in the Lake of Outrage (1-2% spawn rate depending on weather).
Save next to a Dreepy in the overworld and proceed to KO it with a Male Cute Charm lead. If the next spawn is a Dreepy (50% chance due to the KO respawn streaks), save and KO it as well. If it isn't, reload and repeat. This way, the number encountered of Dreepy increases, allowing Brilliant Aura Pokémon to spawn with more frequency, which increases the odds for a shiny. Players can also roll a Pokédex recommendation which would boost the Dreepy spawn by a percentage found on this Excel sheet by Atrius97, meaning that if KO respawn streaks do not proc a Dreepy, the Dex rec would increase the chance of it next before utilizing base rates. See combining mechanisms for clarification. If one of the Dreepy turns out shiny, the player is also able to reload the game if they wish to Synchronize the nature or if they fail to catch it the first time since the characteristics of the Pokémon are saved (shininess, gender, mark, stats, etc. are predetermined upon spawn; only nature can be altered through Synchronize).


Abilities like Harvest could be utilized to boost tree Applin/Flapple/Appletun spawns as well as Pokédex recommendations (when soft resetting).
Overworld static encounters

There are three main ways to reset the Swords of Justice:
Camp Method (The faster method)
In none of these examples are the SoJ KOed. It is a waste of time since they do not benefit from Brilliant Aura bonuses.

There is one way to reset for Strong Spawns:

Utilizing Eldegoss as an example, players could save their game before the left start of the bridge and run down to encounter Eldegoss, resetting the game with each attempt. The distance is needed because Eldegoss spawns right as the player crosses an initial part of the bridge, way before they run into it if they were to keep walking right. If the player saves after that point, the stats for this Pokémon would be locked and the SRs would find the same Pokémon every time.
Scripted encounters
Regice: Set a Cryogonal as the party leader. Walk over all of the floor panels.
Regirock: Give an Everstone to the party leader. Walk over all of the floor panels.
Registeel: Whistle at the door to open it. Walk over all of the floor panels.
Regidrago/Regieleki: Have Regirock, Regice, and Registeel in your party after completing the other temples. Walk over the panels to mimic the markings of the titan you wish to encounter. You have to choose between the two of them, the other will become unavailable to capture.
Regigigas: Have all of the Regis in your team (including a traded Regieleki or Regidrago) and interact with the den located south of Snowslide Slope. Players can save and reset before activating the den, which acts as an encounter and cannot be RNGd (shown below).


Curry hunting |
Campsite curry cooking is a mechanic introduced in Pokémon Sword and Shield. Players can cook for their team of Pokémon to increase their Friendship and Sociability values. Curry cooking also has a chance to attract a wild visiting Pokémon from that area's hidden grass slots, ignoring the original appearance rates. The attracted Pokémon has a guaranteed curry mark, randomized IVs, and may be shiny. They only appear when the player has at least one of the three basic Balls in their inventory (Poké, Great, Ultra) and will automatically select the first of the available three in that order.


The probability for a Pokémon to visit a campsite after curry cooking is affected by several variables. Pokémon will visit more often with higher Curry Ratings and will only appear when the party has high sociability values. Sociability is a new individual stat introduced in Pokémon Sword and Shield which increases through curry cooking or campsite interactions, isn't reset when trading, ranges from 0-255, and provides different dialogue options between party members. Visitors will appear with as little as 1 party member as long as its sociability stat is high. The following Pokémon both have max Sociability values, as the Best Friends text only appears when both Pokémon are at 255:


In order to shiny hunt, players should first increase the sociability values of their chosen party through high rating cooking; the strength of the flames has been shown to be the most important contribution to get better results. The following tables are a summary of the campsite visitor rates and sociability increase values found through community data and research:
Note: Koffing and Wobbuffet classes aren't listed due to a lack of data
Fossil revival |
Found in Route 6, Cara Liss allows the player to utilize fossils in order to revive Dracovish, Dracozolt, Arctovish, and Arctozolt. These fossils can be found through the Digging Duo near to the Bridge Field Nursery (most commonly through the Skill Brother), and different combinations of the four (Fossilized Bird, Dino, Drake, Fish) result in specific Pokémon. It is important to note that the Galarian Fossil Pokémon can be found through dens in the Crown Tundra as well.

Regina trades |
Found within the Isle of Armor, Regina will trade Pokémon from their original regions to the player in exchange for Galarian forms. All of her Pokémon can be shiny and will display so during the trade. She will offer: Kantonian Meowth, Ponyta (Shield only), Farfetch'd (Sword only), Exeggutor, Marowak, Mr. Mime, and Weezing; Johtonian Corsola (Shield only); Hoennian Zigzagoon; Unovan Darumaka (Sword only) and Stunfisk. She can spawn at several locations in the Isle of Armor, and her location will change daily. It can also be reset by buying Apricorns or Pokédex entries from the second rotating female NPC with a blue shirt or by date skipping. Players can save next to her and attempt the trade until they receive a shiny.

Raids


Max Raid dens are divided into two main categories: stock and distribution dens. Stock dens utilize predetermined Pokémon slots which vary between rock clusters, even if they are found within the same area. Distribution dens utilize Pokémon slots which depend on the active event. A single rock cluster can provide both stock and distribution event raids; however, stock dens can only have red (common) and purple (rare) beams while distribution events only display as red beams. The chance of getting a distribution den varies with the event and with locations, like how the Crown Tundra (CT) has worse odds to get one than mainland Galar or the Isle of Armor (IoA). For example, some events have had a 1/16 chance of spawning an event den in the CT, while mainland Galar and the IoA had a 1/8 chance. Some of the distribution events will also have guaranteed square shinies.
Pokemon within the dens will have different star ranges, which will determine their level and minimum IVs. Once a player has an activated den, they will be able to share it with people online or enter the venue by themselves. Hosts have guaranteed catch rates on stock dens, while participants are subject to normal rates. Distribution event dens provide no bonuses to catch rates. It is also important to note that not all dens are available to players from the start, as the amount of badges determines which difficulty level (amount of stars) the player can access as well as whether they will be able to encounter a shiny in it or not. The following table by fatcanfan from reddit portrays these limitations:
Simple den date skips:
The best method to shiny hunt DA Legends is to coordinate with 3 other users and follow existing guides to tackle difficult paths. Users are encouraged to utilize guides such as Tatertot's Zygarde guide to ensure a succesful run with the options provided.
Recommendations
2. A Pokémon with Trick + Safety Goggles to prevent weather-based damage from KOing targets.
3. A Trevanant with a Leppa Berry + Bestow + Skill Swap + Harvest to prevent struggle KOs in long catches.
4. Sleep Inducers: Amoonguss (Spore), Venusaur, and Buttefree.
5. Terrain. Some Terrains block sleep, so a setter can be useful to bypass them.
Acknowledgements and credits
Previous version by: Light Sanctity.
Pokémon Sword and Shield offer both familiar and novel mechanics through which players can obtain a shiny. This guide’s objective is to describe the shiny hunting methods found in these games in relation to each specific type of encounter. Additionally, peer-reviewed routines, teams, and guides for certain hunts will be highlighted throughout the sections.
READ ME: This guide will utilize a symbol key system; these symbols will be found on each applicable header. This way users can learn if the encounter is affected by the Shiny Charm, is most likely a star/square shiny, can be synchronized, can have marks, etc. before embarking on a project.
Symbol key


Directory
- General information
- Shiny rates
- Brilliant Aura
- Star vs square shinies
- Shiny locks
- Mark availability and rates
- Weather
- Technicalities
- Spawn increase
- KO respawn streaks
- Abilities
- Pokédex recommendations
- Combining mechanisms
- Breeding |
- Encounter slots
- Fishing |
- Overworld grass |
- Hidden [!] grass |
- Tree |
- Fishing |
- Overworld static encounters
- Swords of Justice - Camp method and SRs |
- Strong spawns - Den exploit SRs |
- One-Time encounters |
- Swords of Justice - Camp method and SRs |
- Scripted encounters
- Regis |
- Motostoke Gym Pokémon |
- Glimwood Impidimp |
- Regis |
- Curry hunting |
- Fossil revival |
- Regina trades |
- Raids
- Max raid den |
- Den skipping
- Dynamax Adventures | Forced star shinies
- Watchtower crystal dens |
- Max raid den |
- Recommendations
- Team options
- Acknowledgements and credits
General information
Shiny rates
The base rate for shiny encounters in Pokémon Sword and Shield is 1/4096. Having the Shiny Charm increases it to 1/1366 when not affected by mechanics like the Masuda Method (1/683 no Shiny Charm, 1/512 with Shiny Charm) when breeding or by the number encountered of a species through the presence of Brilliant Aura Pokémon.KOs (or captures) boost shiny odds through extra rerolls shown as Brilliant Aura Pokémon (source), empirical brilliant rates match the table on the official site, plus the official site's extra shiny rerolls match Kaphotics' extra reroll table (see: Brilliant aura for a revised, corrected version). KOs only work for overworld grass encounter slots and fishing, as only these two types of encounters can have Brilliant Aura Pokémon. Regarding chaining, fishing is the only type of encounter that shows a chain-like behavior in the game data. The following calculations were done by denvoros:


Brilliant Aura
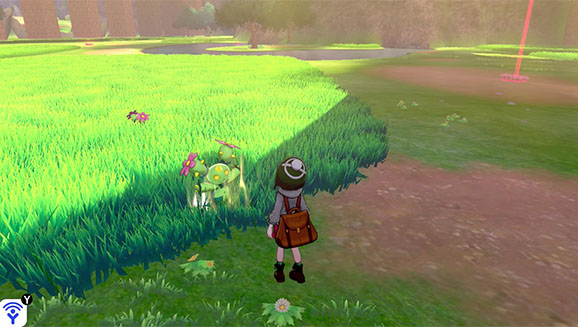
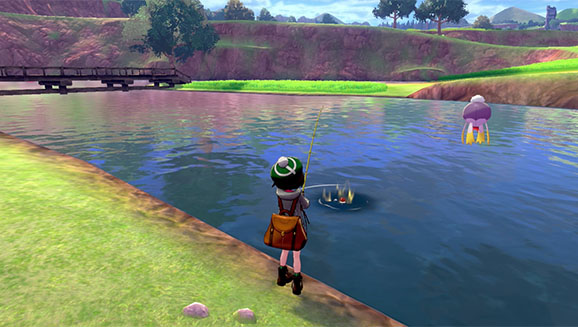
Brilliant Aura Pokémon are a new addition in the Sword and Shield titles. The official site states that "Finding brilliant Pokémon can lead to finding shiny Pokémon", and the relationship between them is explained in the "Shiny rates" section of this guide. Shiny hunters will find it beneficial to run into as many Brilliant Aura Pokémon as they can to maximize the effectiveness of their hunts. It is important to note that if there is more than one Brilliant Aura Pokémon in the overworld, only the one closest to the player will display the particle effect. Additionally, these Pokémon will have 2-3 guaranteed perfect IVs, be the highest level possible for their encounter slot, award Watts upon KO or capture, and know an Egg Move.The only encounters that can have Brilliant Auras are the overworld Pokémon that spawn in grass and fishing spots. These two images from the official site show the respective appearances of both:


| Chain Count #Encountered | 0-2 | 3-6 | 7-14 | 15-24 | 25+ |
| 1 | 1.5% | 3.5% | 6.5% | 11.5% | 26.5% |
| 20 | 2% | 4% | 7% | 12% | 27% |
| 50 | 2.5% | 4.5% | 7.5% | 12.5% | 27.5% |
| 100 | 3% | 5% | 8% | 13% | 28% |
| 200 | 3% | 5% | 8% | 13% | 28% |
| 300 | 3% | 5% | 8% | 13% | 28% |
| 500 | 3% | 5% | 8% | 13% | 28% |
Star vs square shinies
There are two different types of shiny animations in Pokémon Sword and Shield, as opposed to the traditional singular animation from past generations. One has the classic star sparkle effect while the other shows squared bluish sparkles. The symbol key in this guide indicates which Galarian Pokémon are more likely to be star shiny (15/16) or square shiny (65521/65536). Here are two examples:

The following Pokémon from past generations are more likely to be square shinies (65521/65536):
- Fateful encounters (events, Virtual Console (VC) Celebi, etc.), Pokémon GO transfers, LGPE overworld shinies, VC Gen 1/2 shinies, and Gen 7 wormhole shiny non-legends.
Shiny locks
The following Galarian Pokémon are unable to be shiny when encountered:- Any mainland Galar NPC-traded Pokémon.
- Calyrex, Eternatus, Galarian Articuno, Galarian Moltres, Galarian Zapdos, Glastrier, Keldeo, Spectrier, Zacian, and Zamazenta.
- Gifts: Alolan Pokémon from the Alolan Diglett Isle of Armor quest rewards, Cosmog, initial Galarian starters, Eevee, Kantonian G-Max starters, Kubfu, Pikachu, Poipole, Porygon, Toxel, and Type: Null.
- One-Time encounters: Route 3 Corvisquire, train station Galarian Slowpoke.
Mark availability and rates
Marks are a new mechanic introduced in Galar, furthering the options for shiny hunting projects and customization. These can be found on wild Pokémon, as signaled by this guide's symbol key, and provide different titles if equipped. They are displayed in the last summary page of a Pokémon and are divided into uncommon, weather, time, curry, fishing, personality, and rare marks. Here's an example of a personality marked Scyther and a shiny rare marked Lopunny:

Players are awarded with a Mark Charm if they complete the Isle of Armor expansion Pokédex; this charm gives the player 2 extra rerolls. Anubis calculated the actual mark rates in the Pokémon Sword and Shield games, including important technicalities that had been previously ignored. Users are also encouraged to use this weather document made by Anubis and Skadiv to evaluate weather mark availability between areas. For a list of marks and the titles they give, please visit this Bulbapedia page.
It is important to note that spawning Pokémon will utilize the weather that the player is standing in as a reference for what weather mark to have. This allows players to spawn Pokémon with weather from beyond area borders without using advanced techniques. This video shows an example of weather bleed from Training Lowlands into Warm-Up Tunnel, and this video shows an example of "weather lag" to obtain usually unavailable marked Pokémon.
Weather
It is important to note that in Galar, weather plays a major role in shiny hunting. Not only are the type and rate of marks determined by it, but the spawns are also altered (see PokemonSlots by shiny finder). There are several dates for global weathers in each of the three areas, with some exceptions such as Sandstorm in the Isle of Armor and Rain or Thunderstorm in the Crown Tundra, which don't have a global date but are scattered throughout the year. Weather can be rolled by simply changing the date on the console with no need for a special mechanic.Technicalities
Classification
The Pokémon classification shown in this guide utilizes this writeup by Anubis to define whether the encounter uses seeded overworld RNG or truly random Cryptographically-Secure RNG (CSRNG). Additionally, this tweet by SciresM backs up some of the information provided."Static encounters" which involve overworld static encounters, scripted encounters (including curry and tree encounters), gifts, and in-game trades have been separated to avoid the misuse of the term "static." Dynamax Adventures are classified as raids because they utilize the same RNG. They are forced shiny like the guaranteed distribution events except instead of forcing a square shiny, it forces a star shiny.
For a more visual interpretation of Sword and Shield Pokémon classifications, users are welcome to utilize this picture guide as a complementary resource.
Overworld generation
Symbol encounters (Pokémon with overworld models that you can walk into to start a battle) and fishing spots are both spawned with a determined mark (or lack of one), shininess, IVs, nature, and gender amongst components. This means that if the player saves next to a group of Pokémon or a fishing spot and restarts the game, all of those values will remain the same. Only nature can be altered through the use of a Synchronize lead.Spawn Increase
KO respawn streaks
After every KO on an overworld grass encounter slot Pokémon, there is a 50% chance that the next spawn will be of the same form and species. This means that the possibility of encountering the same Pokémon afterwards will be 50% + 1/2 of the usual spawn rate. In the case of rare spawns like Lake of Outrage Dreepy or Old Cemetery Authentic Sinistea, this is the best method to utilize. Users are encouraged to save next to the spawn and to keep KOing until the spawned Pokémon isn't desired, only to then reload the game next to the initial desired spawn. In the case of Authentic Sinistea, the user must first identify the Authentic stamp, which can be seen when the Pokémon rotates mid-battle (See: Tea smasher method application). It is also important to note that the next spawn bonus gets interrupted if a [!] hidden grass encounter appears before the spawn.Abilities
Similarly to past generations, abilities have the effect of increasing the spawn rate of specific Pokémon types and gender by keeping a specific Pokémon in the first party slot, with some new additions to this generation. These abilities work by guaranteeing a 50% fraction of the spawn chance divided into the applicable slots, followed by the second 50% which is the original spawn rate divided by two. In the case of Cute Charm, it increases the chance by a guaranteed 66% but every overworld Pokémon in the game has a 50:50 Male to Female ratio regardless of the species.Example 1: Storm Drain in the Route 2 fishing spot. (Yes, there are 2 Magikarp slots)
| Route 2 | Magikarp | Chewtle | Magikarp | Feebas |
| Original | 50% | 40% | 9% | 1% |
| Storm Drain | 37.5% | 32.5% | 17% | 13% |
Example 2: Harvest in overworld Route 9 - Circhester Bay (Sword)
| Circhester Bay | Clobbopus | Octillery | Toxapex | Barbaracle | Bergmite | Dhelmise |
| Original | 30% | 24% | 20% | 10% | 15% | 1% |
| Harvest | 15% | 12% | 10% | 5% | 7.5% | 50.5% |
Example 3: Combee distribution with a Male Cute Charm lead
| Gender ratios | Male | Female |
| Original | 50% | 50% |
| Cute Charm (Male lead) | 17% | 83% |
There are two points where abilities can affect Pokémon: at spawn and at the moment of encountering. Cute Charm and Type-related encounter boosting abilities (Magnet Pull, Static, Flash Fire, Harvest, Lightning Rod, and Storm Drain) will affect the Pokémon upon spawning, which is represented by the Pokémon appearing in the overworld or by the fishing spot. On the other hand, Synchronize will affect the Pokémon upon encountering it. This allows players to hunt gendered Pokémon such as female Combee with ease, permitting them to save before each encounter to change into a Synchronize lead in case the Pokémon is shiny (the Pokémon remain the same when saved next to). In the case of trees, both act at the same time. Additionally, Illuminate has been shown to be ineffective.
Pokédex recommendations
These refer to the "Current Recommendations" section below the different collections inside the Pokédex menu icon. The list will prioritize those species who still haven't been registered. Recommendations will increase the encounter rates for Pokémon in the wild, be them from fishing, trees, overworld grass, or hidden grass encounters. This section can also be empty stating "Let's find some Pokémon!" if the recommendation lands on a previously registered set of species and the Pokédex hasn't been completed.
Recommendations have a 50% chance of activating, split between the 4 species, and fail if the bonus lands on an unavailable encounter since Dex recs aren't area-specific; the explanation can be found here. It is important to note that Dex recs work globally in regards to a species. If a Glimwood Tangle Sinistea gets boosted alongside other Glimwood Pokémon, the Sinistea in the Old Cemetery will receive a boost without affecting the other spawns. However, using this same example, if a species from Glimwood asides from Sinistea would receive the bonus, the dex rec would fail as it wouldn't be able to proc in Old Cemetery. Additionally, Dex recs only work on the first listed slot of a species if alt-forms are present. In the case of Sinistea, only the Phony version would be favored by this boost, meaning that the Authentic form cannot benefit from it. It would be counterproductive to boost Sinistea at all if hunting for Authentic forms as it would decrease the encounter rate of them by increasing the Phonies.
A tweet by Anubis suggests that users with an incomplete Pokédex could force a Dex rec. for rare Pokémon of interest (eg. Route 2 Feebas) by leaving them to last and only once the Dex rec. is active, transfer one from HOME to get the Shiny Charm before starting the hunt. In order to roll for Dex recs with a completed Pokédex, the player must advance dates through the den skip method. Once a suitable recommendation is found, it can be kept by saving and keeping the clock from rolling past midnight during shiny hunting. If the fast skip glitch isn't active, the player can also change the date to alter the weather and spawns as long as the clock doesn't tick past midnight. If that were to happen, the recommendations can be restored by closing the game (without saving) and loading the original date of the save.
Combining mechanisms
Thanks to Kaphotics, the order by which these mechanisms activate is now understood. KO respawn streaks act first, followed by type-pulling abilities, and finally by Dex recs; if all three fail to proc, normal rates are used. Users are encouraged to utilize this species spawn rate bonus calculator by Atrius97 combined with PokemonSlots by shiny finder to maximize the efficiency of their hunts. The Pokémon that "can spawn" in the species spawn rate calculator refer to how many out of the 4 dex recommendations are found in the desired slots (e.g. if the Pokédex recommends 1 overworld grass spawn + 3 fishing Pokémon and a user is hunting that one overworld grass spawn, they should utilize the "1 slot can spawn" under the "Target is recommended" section).Breeding |
Breeding remains one of the most popular methods to get competitively flawless shinies. This is mainly due to the high shiny rates and to the different items like Everstone and Destiny Knot which allow the offspring to maintain both the nature and 5/6 IV values from their parents, respectively. The main way to guarantee a good shiny rate is through the Masuda Method. The base shiny odds for breeding are 1/4096, but if the player utilizes two parents from different regions, the odds for a shiny become 1/683 without the Shiny Charm and 1/512 with it. Egg shininess is determined when received. For more information about how to use these effects, ball inheritance, and other important topics please refer to the Smogon Gen 8 Breeding Guide. Players might also be interested in ball legality information.
Encounter slots
Fishing |
Fishing spots can be found throughout lakes, rivers, and beaches in Galar. These will despawn if the player approaches with a bike and they represent a spawned Pokémon, meaning that the stats and shiny status are determined once the spot appears just like an overworld grass encounter. Fishing is commenced by pressing A while next to a spot; the player then has to wait and press A again once there's a bite.


By rolling a Pokédex recommendation to Feebas, the base spawn rate would increase from 1% to a value detailed in this Excel by Atrius97 depending on the number of species boosted in the fishing pool. Combined with Storm Drain, which gives a 50% chance to get Feebas 25% of the time (100%/4 fishing slots), the expected encounter rate for Feebas should be 0.5(25)+0.5(excel value)%. Storm Drain on its own would give a 13% chance of encountering a Feebas (0.5(25)+0.5(1)). If the player has defeated or caught at least one Feebas and gets a fishing chain, they would have better odds for encountering a shiny due to Brilliant Aura mechanics.
Overworld grass |
Grass patches in Pokémon Sword and Shield have two different types of encounters: overworld and hidden. Overworld grass Pokémon can be seen walking in and around the grass patches within a limited distance of them. They despawn after a certain amount of time or distance from the patch, and the models do not appear as shiny even if they are so. The behavior of the spawns affect the time they remain in the patch, and it is species dependent; some charge at you while others are indifferent or attempt to escape. Please refer to Technicalities for more information.

Example of a hunt: Female Dreepy in the Lake of Outrage (1-2% spawn rate depending on weather).
Save next to a Dreepy in the overworld and proceed to KO it with a Male Cute Charm lead. If the next spawn is a Dreepy (50% chance due to the KO respawn streaks), save and KO it as well. If it isn't, reload and repeat. This way, the number encountered of Dreepy increases, allowing Brilliant Aura Pokémon to spawn with more frequency, which increases the odds for a shiny. Players can also roll a Pokédex recommendation which would boost the Dreepy spawn by a percentage found on this Excel sheet by Atrius97, meaning that if KO respawn streaks do not proc a Dreepy, the Dex rec would increase the chance of it next before utilizing base rates. See combining mechanisms for clarification. If one of the Dreepy turns out shiny, the player is also able to reload the game if they wish to Synchronize the nature or if they fail to catch it the first time since the characteristics of the Pokémon are saved (shininess, gender, mark, stats, etc. are predetermined upon spawn; only nature can be altered through Synchronize).
Hidden [!] grass |
Within the grass patches in Galar, exclamation mark or hidden grass encounters represent a different way of finding Pokémon. These encounters use different spawn slots from those found wandering in the overworld and have a set amount of time before they disappear. In order to run into one, the player must walk through the grass until an exclamation mark appears; the grass will then rustle, and the player will be able to start the battle if they walk within a certain distance of it. These encounters do not benefit from next spawn KOs or Brilliant Aura bonuses and will not despawn if the player accesses their X-Menu or Y-Comm interface.


Tree |
Aside from being a source of Apricorns and Berries, trees also host several Pokémon species in Galar. The encounter slots vary by area and engage the player after a series of interactions. Trees have two speeds for leaf rustling: slow and fast. The player can shake the tree for items while the leaves rustle slowly and will only encounter a Pokémon if they proceed to shake it two times after fast rustling begins. Once a Pokémon is encountered, the tree loses its items and cannot be engaged with until the next day. Players can advance a day by using any of the den skip methods to restore the interaction.

Abilities like Harvest could be utilized to boost tree Applin/Flapple/Appletun spawns as well as Pokédex recommendations (when soft resetting).
Overworld static encounters
Swords of Justice - Camp method and SRs |
The Swords of Justice (SOJ) work differently than regular strong spawns due to how they're programmed to respawn if KOed or fled from. They will reappear with any action that reloads the area, such as reloading the game, flying from and back to the spawn zones, or by entering/exiting the campsite. The only other Pokémon that share this behavior are the Galarian Bird Trio, but they are shiny locked and thus not included in this guide. In order to find the SoJ for the first time, the player must register all footprint clues in the Crown Tundra for them individually (the player can spawn them in any order) after speaking with Professor Sonia.

There are three main ways to reset the Swords of Justice:
Camp Method (The faster method)
1. Encounter and run from the SoJ
2. Move on top of the spawn point then enter/exit the campsite
3. A new SoJ will spawn right on top of the player
4. Repeat as needed
Camp Method (The safer method)1. Encounter and run from the SoJ
2. Move away from the spawn point then enter/exit the campsite
3. A new SoJ will spawn close to the player, but the encounter won't be immediate
4. Save the game
5. Repeat as needed
These resets allow the player to retry the SoJ encounter as many times as needed since its characteristics will be saved.
This also permits changing party members and trading for additional balls while the SoJ is in their vicinity.
Soft Resets (The less effort method)1. Encounter and run from the SoJ
2. Move on top of the spawn point, save, then close/open the game
3. A new Sword will spawn right on top of the player
4. Repeat as needed
In none of these examples are the SoJ KOed. It is a waste of time since they do not benefit from Brilliant Aura bonuses.
Strong Spawns - Den exploit SRs |
Strong Spawns are defined as Symbol static encounters that are always the same level/species/form and require a day skip to respawn. They have overworld models and are limited to movement within a radius of their spawn point. The spawns also vary with weather and they are not affected by Brilliant Aura bonuses.

There is one way to reset for Strong Spawns:
Den exploit SRs
1. Encounter and run away from a Strong Spawn. Note it's exact location
2. Perform a simple den date skip. Any den is usable regardless of the distance from the spawn
3. Return to the spawn location and stand above where the Pokémon initially appeared
4. Save
5. Close and open the game. The Pokémon will spawn on top of the player
6. Soft reset if not shiny
One-Time encounters |
Some Galarian encounters are peculiar in the sense that they will take unpredictably long periods to respawn (from months to years) or simply never do so. Examples of these encounters include the Isle of Armor Wailord and the Route 5 Bridge Eldegoss amongst others. If players wanted to, they could SR and hunt for these Pokémon as long as the game save point is before their spawn time.

Utilizing Eldegoss as an example, players could save their game before the left start of the bridge and run down to encounter Eldegoss, resetting the game with each attempt. The distance is needed because Eldegoss spawns right as the player crosses an initial part of the bridge, way before they run into it if they were to keep walking right. If the player saves after that point, the stats for this Pokémon would be locked and the SRs would find the same Pokémon every time.
Scripted encounters
Regis |
There are six Regis encounterable in the Crown Tundra: Regice, Regirock, Registeel, Regidrago/Regieleki, and Regigigas. All six Pokémon can be shiny and require different steps to encounter. The shiny hunting method for all of them except for Regigigas is the same: the player first unlocks the respective temple and then completes the puzzle inside. They can then save before interacting with the middle statue that commences the encounter and SR if the Regi isn't shiny. The puzzles are summarized below:
Regice: Set a Cryogonal as the party leader. Walk over all of the floor panels.
Regirock: Give an Everstone to the party leader. Walk over all of the floor panels.
Registeel: Whistle at the door to open it. Walk over all of the floor panels.
Regidrago/Regieleki: Have Regirock, Regice, and Registeel in your party after completing the other temples. Walk over the panels to mimic the markings of the titan you wish to encounter. You have to choose between the two of them, the other will become unavailable to capture.
Regigigas: Have all of the Regis in your team (including a traded Regieleki or Regidrago) and interact with the den located south of Snowslide Slope. Players can save and reset before activating the den, which acts as an encounter and cannot be RNGd (shown below).

Motostoke Gym Pokémon |
Within the Motostoke gym challenge, players are able to encounter a Sizzlipede, a Litwick, and a Vulpix. All three of these Pokémon can be shiny and are not locked to a specific spread in the overworld. The encounters are triggered by proximity, which makes saving right next to one and SRing until a shiny is found the best method to hunt them.
Glimwood Impidimp |
Within the Glimwood Tangle, there are several ledges which show mushrooms surrounded by Impidimp. If the player approaches one of these mushrooms and interacts, a hidden Impidimp will reveal itself and start an encounter. The best method to shiny hunt them is to save next to one and SR if the Impidimp is not shiny.

Curry hunting |
Campsite curry cooking is a mechanic introduced in Pokémon Sword and Shield. Players can cook for their team of Pokémon to increase their Friendship and Sociability values. Curry cooking also has a chance to attract a wild visiting Pokémon from that area's hidden grass slots, ignoring the original appearance rates. The attracted Pokémon has a guaranteed curry mark, randomized IVs, and may be shiny. They only appear when the player has at least one of the three basic Balls in their inventory (Poké, Great, Ultra) and will automatically select the first of the available three in that order.


The probability for a Pokémon to visit a campsite after curry cooking is affected by several variables. Pokémon will visit more often with higher Curry Ratings and will only appear when the party has high sociability values. Sociability is a new individual stat introduced in Pokémon Sword and Shield which increases through curry cooking or campsite interactions, isn't reset when trading, ranges from 0-255, and provides different dialogue options between party members. Visitors will appear with as little as 1 party member as long as its sociability stat is high. The following Pokémon both have max Sociability values, as the Best Friends text only appears when both Pokémon are at 255:


In order to shiny hunt, players should first increase the sociability values of their chosen party through high rating cooking; the strength of the flames has been shown to be the most important contribution to get better results. The following tables are a summary of the campsite visitor rates and sociability increase values found through community data and research:
| Curry class | Visitor appearence rate |
| Milcery | 1/7 |
| Copperajah | 1/5 |
| Charizard | 1/4 |
| Curry Class | Sociability increase |
| Koffing | 5 |
| Wobbuffet | 7 |
| Milcery | 10 |
| Copperajah | 15 |
| Charizard | 20 |
Fossil revival |
Found in Route 6, Cara Liss allows the player to utilize fossils in order to revive Dracovish, Dracozolt, Arctovish, and Arctozolt. These fossils can be found through the Digging Duo near to the Bridge Field Nursery (most commonly through the Skill Brother), and different combinations of the four (Fossilized Bird, Dino, Drake, Fish) result in specific Pokémon. It is important to note that the Galarian Fossil Pokémon can be found through dens in the Crown Tundra as well.

Regina trades |
Found within the Isle of Armor, Regina will trade Pokémon from their original regions to the player in exchange for Galarian forms. All of her Pokémon can be shiny and will display so during the trade. She will offer: Kantonian Meowth, Ponyta (Shield only), Farfetch'd (Sword only), Exeggutor, Marowak, Mr. Mime, and Weezing; Johtonian Corsola (Shield only); Hoennian Zigzagoon; Unovan Darumaka (Sword only) and Stunfisk. She can spawn at several locations in the Isle of Armor, and her location will change daily. It can also be reset by buying Apricorns or Pokédex entries from the second rotating female NPC with a blue shirt or by date skipping. Players can save next to her and attempt the trade until they receive a shiny.

Raids
Max Raid den |
Scattered throughout the wild areas of Galar, Max Raid dens provide the players with a novel mechanic for shiny hunting. Players are able to interact with the rock clusters, which may have a naturally active den (shown as a beam of light) or may be activated by depositing a Wishing Piece to spawn one. Spawned dens are able to be RNGd with the use of certain tools; users are encouraged to revise the SS raid rng guide by shiny finder for more details on shiny hunting and den management.


Pokemon within the dens will have different star ranges, which will determine their level and minimum IVs. Once a player has an activated den, they will be able to share it with people online or enter the venue by themselves. Hosts have guaranteed catch rates on stock dens, while participants are subject to normal rates. Distribution event dens provide no bonuses to catch rates. It is also important to note that not all dens are available to players from the start, as the amount of badges determines which difficulty level (amount of stars) the player can access as well as whether they will be able to encounter a shiny in it or not. The following table by fatcanfan from reddit portrays these limitations:

Den skipping
Den skips are utilized both to progress through a den's seed and to reset daily resources or respawn timers in Galar. There are two methods for den skipping: the simple method and the battle exploit for fast skipping. The battle exploit is outlined in the SS RNG guide and will not be used for any shiny hunting method aside from den rng.Simple den date skips:
1. Spawn a den by throwing in a Wishing Piece.
2. Click "Invite Others" while offline. Do not ready up.
3. While on the lobby screen, minimize the game by pressing the home button and increase the date by 1 on the console. (Settings > System > Date and Time).
4. Go back to your game and exit the lobby. The den will shine again, indicating a succesful skip.
Dynamax Adventures | Forced star shinies
Found in the Crown Tundra, Dynamax Adventures (DA) allow players to embark on expeditions in parties of 4 to battle and catch legendary Pokémon. The shiny rates are 1/100 and 1/300 with and without the Shiny Charm, respectively. The catch rate in this venue is always 100% and the players must navigate through 3 encounters before reaching the Legend. Players are given Pokémon to choose from at the start and may not utilize their own. All Pokémon in the venue have a minimum amount of 4 Best IVs. It is important to note that players may only save up to three legendary paths at once and that the game penalizes quitting expeditions.The best method to shiny hunt DA Legends is to coordinate with 3 other users and follow existing guides to tackle difficult paths. Users are encouraged to utilize guides such as Tatertot's Zygarde guide to ensure a succesful run with the options provided.
Watchtower crystal dens |
Even though the Watchtower crystal dens might seem like a regular den, these differ in the sense that they cannot be RNGd through date skips. The seed for these dens is generated upon creating a new game and can only be advanced by spending a crystal and capturing/KOing. The only way to hunt these Pokémon to be shiny is to create new save files until the first frame (or whichever frame reachable by the amount of available crystal events) is shiny.
Recommendations
Team options
1. A strong sweeper such as Pangoro with Scrappy and False Swipe.2. A Pokémon with Trick + Safety Goggles to prevent weather-based damage from KOing targets.
3. A Trevanant with a Leppa Berry + Bestow + Skill Swap + Harvest to prevent struggle KOs in long catches.
4. Sleep Inducers: Amoonguss (Spore), Venusaur, and Buttefree.
5. Terrain. Some Terrains block sleep, so a setter can be useful to bypass them.
Acknowledgements and credits
- Anubis for general research and revisions
- Atrius97 for the species spawnrate sheet
- denvoros for the shiny rate calculations
- Lego for general help and revisions
- Light Sanctity for the previous version of this guide and the "Team options" section
- shiny finder for revisions
- Smogon Wi-Fi crew for their support
- SpikeOriundo for the curry information revision
Last edited:


