Challenge Boltund's (and friends) Eggscellent Adventure - Playing through Sword with only egg moves (Isle of Amor complete)

Egg moves have been a long-standing mechanic of Pokemon, being introduced in Gen 2. For the most part, they exist to expand a Pokemon's flavor without bloating their Level-Up movepool. Since they tend to be weird amalgamations of moves, I've always thought it would be a fun challenge concept to limit Pokemon to only their egg moves. That is, until I thought about how insanely awful it would actually be in practice. Eggs hatch at Level 5 or 1 depending on the game, so Pokemon would have to be trained up from minimum Level. And if I wanted to get more egg moves on a Pokemon, I would need to hatch a new egg and then raise that up yet again from minimum level. Furthermore, prior to Gen 6, egg moves are littered with compatibility issues since only the father could pass them. All in all, it added up to a very tedious run.

Enter Sword and Shield. They brought a litany of quality of life improvements with them, like ease of access to name-changing and move modification, as well as portable boxes. One change that has comparatively gone under the radar, though, is the ability to pass egg moves in the daycare. For those unaware, if you have two Pokemon of the same species (gender does not matter) in the daycare, they will pass any egg moves they have to each other provided there are empty moveslots. This means that egg moves are actually feasible to obtain during the main story. So since this is finally a viable run concept, it's time to play Pokemon Sword with only egg moves!

The rules, formally laid out:
  • Egg moves only. In battle, I can only attack with egg moves. I am free to have whatever else in my party gaining exp.
  • Galar Pokemon only. This one might seem a little strange, so let me explain. While it's still largely true that egg moves are flavor supplements, GameFreak also often uses them to add useful moves to Pokemon when doing generational updates. While this doesn't mean Pokemon have completely functional movesets from their egg moves, it does, as a whole, make Pokemon much more functional than I'd like for this kind of run. So to remove the fine polish of generational updates, I'm sticking with only the new Pokemon.
  • Team size matching. This means that I only use up to as many Pokemon as my opponent uses. Since there's very little downside to having a large team with Exp Share (and my team will fill up quick), I thought this would be a good, immersive restriction to keep things more interesting. I will point out that I don't really care about this restriction for normal trainers, mainly for dumb scenarios where a trainer only has 1 Pokemon and I have a bad lead for it. Not that anyone would be able to verify this anyways since I'm not recording normal fights, but still, full disclosure.
  • No Dynamaxing. This is an extremely powerful mechanic that the player takes far more advantage of than the AI (mainly since they use it at fixed points only), so it's an unfair advantage for me. At least as far as the main story goes, I've hard far more fun treating Dynamax as an AI-only mechanic to give them a much-needed edge.
  • No in-battle items & Set mode. Standard stuff.

Picking a Starter

Let's get started. The first choice is the starter. At a glance:


Sobble is clearly pretty awful, so the choice is between Grookey and Scorbunny. While Scorbunny's fast, strong High Jump Kick and Super Fang are very nice, they're obtained late (or rather, the parents learn these moves at high levels only). Grookey, while being arguably worse at endgame, blooms much earlier with Leech Seed, a set-up move in Growth, and an okay damaging move in Strength, all obtainable roughly around the first gym. So I'll go with it. Since Ditto is not obtainable for a long time, I need to make sure my Grookey is female. Thankfully I can check this before the cutscenes afterwards by going to the nickname screen, so it doesn't take too long.

Getting an Egg Move

The first battle with Hop is standard since I can't get any egg moves yet. Afterwards, though, the run can start. While a daycare isn't available yet, the “Brilliant Aura” mechanic still lets me obtain egg moves now. Pokemon on the overworld have a small chance of having this aura around them, which guarantees them at least 2 max IVs and a random egg move. But, consider that most Pokemon don't actually have that many damaging egg moves, and a problem quickly emerges – BA Pokemon are pretty unlikely to even be able to damage Pokemon for me. Factoring that in, my ideal target is Wooloo. It's a common encounter and has a relatively high chance of having a STAB Stomp, at 1/3 odds. Though, since I don't have to commit to chaining a particular Pokemon, I'll still catch any BA Pokemon I see. After an unlucky 20 minutes of circling around Route 1, I finally encounter a BA Wooloo. My luck turns around when I realize my first BA Pokemon is the very Stomp Wooloo I wanted. It even has Fluffy, though this isn't too important. While a more versatile team would be appreciated right now, this process is frankly awful and I have no desire to do it again unless absolutely necessary.

Route 2

Before advancing, I catch future team members Skwovet and Rookidee. While I can't use them yet, there's no reason they and Grookey shouldn't still be getting EXP. I also buy a bunch of Oran Berries from the Wedgehurst berry shop. Moving on to Route 2, Stomp is better than the usual Tackle a Wooloo would have at this point, so things progress smoothly and Wooloo reaches Level 8. After some cutscenes at Magnolia's lab, I can do the first boss fight of this run.

Hop (Route 2)

(Full playlist)

...not that it will be a very interesting one, since my options are literally: Stomp. And Stomp I do. This fight actually wouldn't be winnable with my current level if Hop had smart AI, since Sobble easily wins if it just spams Water Gun. But since he just uses random moves, Wooloo just needs to get a bit lucky. His own Wooloo and Rookidee provide almost no resistance, so the fight is basically just Sobble.

(Team: Wooloo/___/___)
(I thought these post-battle team summaries would be nice to quickly visualize how taxing a battle was, especially since team-matching can be easy to forget which shrinks my team. Text color denotes health remaining, struckthrough names fainted, and “___” are slots I could have used but didn't need.)

The Wild Area

With that out of the way, this run can really start as I access the Wild Area. For whatever reason, there's a fully functional daycare here, even though the one on Route 5 is clearly what they intend for you to use for breeding. So now I can start getting a team going. While my options are still a bit limited, expanding my team past a Stomp Wooloo is much appreciated.

I have a pretty large catch list of Pokemon for now and in the future. The first thing I check out is a fixed Hoothoot raid that seems to always be there on the first day you start the game. I'm very disappointed to find that mine is a female, though, since I needed this to father a move for my Rookidee. While I can still find Hoothoots in the Wild Area, the raid catch is Level 20 which would put it only one level away from evolving into Noctowl. Oh well. I catch a normal Hoothoot at Level 15 instead. It's worth noting that Sword and Shield have an annoying mechanic where trying to catch a Pokemon higher-leveled than your lead drastically lowers the catch rate. This is unavoidable for catches in the Wild Area right now (all are at least Level 11), so catching this Hoothoot is quite annoying, especially since only Wooloo can weaken it. For future catches here, I send out Hoothoot after Wooloo has weakened them to throw balls. While not technically a violation of my rules as I've phrased them, I do consider this against the spirit of the run. But after how annoying this first of many catches was, I decide to keep my sanity instead. After Hoothoot, I also catch a Roselia, Oddish, Electrike, and Nuzleaf.

Now to start breeding. I use the unlimited move relearner to get a couple moves for this purpose: Defense Curl on Wooloo, and Rollout on Nuzleaf. I also delete all but one move on Grookey and Skwovet. I start my breeding with Roselia and Grookey, who will pass Worry Seed and Leech Seed to the offspring. If I was smart, I would have also relearned Growth on Roselia to pass that too, though it's not relevant right now. Hatching eggs isn't a terribly fast process right now, unfortunately, since I lack both a Bike and Flame Body. I mitigate the time it takes by double-tasking: exploring the Wild Area as I wait for eggs to hatch. I collect a Fire Stone, a Thunder Stone, Leftovers, and various sellables as I do this. Eventually my Grookey egg hatches, and I put it in the daycare with my trained Grookey to transfer moves over. After this, I use Wooloo and Nuzleaf to get two Skwovet eggs with Defense Curl and Rollout respectively, and have those offspring transfer their moves to my main Skwovet. Now that I've described it in full, I'll truncate this process a bit when describing it in the future (i.e. Wooloo passes Defense Curl to Skwovet > Wooloo passes Defense Curl to a Skwovet offspring, who then passes it to my main Skwovet).

With that done, I now have a Worry Seed/Leech Grookey and Defense Curl/Rollout Skwovet to add to my Stomp Wooloo. Rookidee will get moves eventually... I move on for now, but I keep Hoothoot and Oddish in my last two slots since they need to be trained up for moves. The Team Yell Grunts in Motostoke aren't any trouble, and so I go to another Hop battle.

Hop (Motostoke)


Hop doesn't update his team at all, really, but I've got several new toys to play with. Grookey leads and Leech Seeds his Wooloo, and then I swap to Skwovet. With Leech Seed and the Defense Curl I start with, it's almost invincible right now, so I get Rollout going. Wooloo is annoying as possible with Growls, using a whopping four of them, but Rollout gets so crazy that it still muscles through. Sobble is more threatening since it's special and I'm at -4 attack now, but Oran Berry with Cheek Pouch lets Skwovet tank it. I do have to start a second Rollout chain, though. Last is Rookidee, which is just as terrible as last time and goes down easily.

(Team: Grookey/Skwovet/___)

Route 3

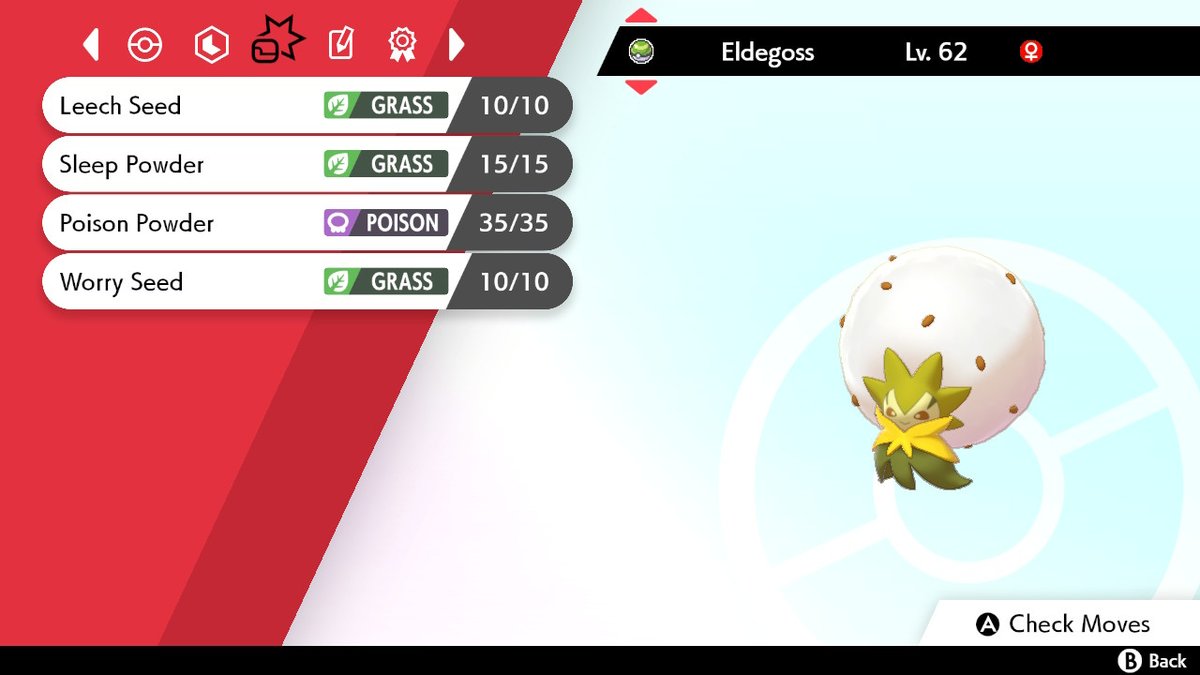
Onto Route 3, where I can find my next Pokemon, Gossifleur! Wooloo can easily scout out Cotton Down with Stomp, which I want to avoid in favor of Regenerator. I catch a few and settle on the best one. Gossifleur's support movepool is amazing from egg moves, but it has one issue: it learns absolutely no attacking moves at all. Still, its incredible array of support moves is too good to ignore. Like Grookey, it gets Worry Seed and Leech Seed from Roselia, and it can also get Poison Powder and Stun Spore from Oddish.

One issue is that I don't have a free slot to put Gossifleur in. For now, I get rid of Rookidee, who's just along for the exp. It has the same Medium Slow exp curve the starters have, so it levels up quickly at these levels anyways and can afford a bit of a break. Now to progress. I always try to lead with Gossifleur, then swap to Skwovet after I've set up Leech Seed and maybe statused the opponent. With Leftovers, Leech Seed recovery, and Regenerator, Gossifleur rarely actually has lost health after a battle. Skwovet is also fairly low maintenance, since I just make sure it always has an Oran Berry for Cheek Pouch as they cost virtually nothing. While Wooloo is still on the team, I'm avoiding using it when possible since it has no long-term future.

This set-up goes off without too many hitches. One trainer's Pancham is an ass since I miss my initial Leech Seed and it then takes my team on a rollercoaster with Circle Throw, and I can't switch in safely with my zero Fighting resists and two Fighting weaknesses. Another fight, I end up in a bit of an embarassing predicament. When I set up Leech Seed with Gossifleur, I get Wrapped by a Sizzlipede and can't switch out. I have to slowly whittle it down with Leech Seed and Poison Powder. Amazingly, despite it having Ember as well, Gossifleur is victorious.

Near the end of Route 3, Grookey gets to Level 16 where it would evolve, but I hold it back. Remember that egg moves can only be passed among members of the same species – being part of the same evolutionary line does not count. So once it evolves into Thwackey, any new egg move offspring will need to be trained to Level 16 before I can pass the move onto my Thwackey. One other perk of holding Grookey back is that Pokemon get a 20% exp boost once they're past their evo level.

Galar Mine 1

Galar Mine 1 has a lot of Fighting types which Skwovet is awful at dealing with, so I generally use Wooloo for those with Gossifleur's help. Not that it's great for this either, but it's better than being outsped with a resisted Rollout! Soon into the mine Oddish gets to Level 18 and learns Sleep Powder, so I swap it out for Rookidee to get exp again. After a bit, I run into Bede.

Bede (Galar Mine 1)


I was a bit worried for this fight with my zero Psychic-resists, but Bede's team is too fragile for it to matter that much. With the Silk Scarf, Wooloo can 2HKO his entire team, but it only has enough health to survive Solosis's and Gothita's attacks. Hatenna finishes off Wooloo, and Skwovet gets back at it with three Rollouts.

(Team: Wooloo/Skwovet/___)

Catching on Route 4

While there's not a lot of new Pokemon available in Route 4, almost everything that is there is very important. First off is the adorable Yamper, who will be my next Pokemon. It was available back in Route 2, but without moves the only point in catching it there would be exp, which is unnecessary since it's at a fine level here. I also catch a Pikachu and Meowth, who are simple enough to find.

And then there's Eevee.

Eevee is a 1% overworld encounter on Route 4. Pretty bad, but fortunately it's overwhelmingly likely to be male for egg move passing. Eevee says damn the odds, though, and the first one I find after 15 minutes is a female. I consider catching it since I can breed a male with it, but since eggs are pretty slow to hatch without a bike, I decide it's probably quicker to just find another one. Oh, how wrong I was...after forty minutes I finally find another, and the worst part?

It's another female!

This time I learned from my mistake and just catch it. Hatching an egg might not be quick, but it's better than this shit.

Supercharging My Team

I have one more substantially easier Pokemon to find. When I go in the mine from the back, I can intercept the roaming Carkol, which I catch because it's the first Pokemon that can have Flame Body, an obvious winner with all the breeding I do! Before I do that, though, I prepare the Pokemon I caught. First, I trade the Meowth for a Kantonian Meowth in Turffield. In-game trades in this game often come with egg moves, and this Meowth has something very nice – Last Resort. I then use my Thunder Stone to evolve my Pikachu. This game also made it so that no Pokemon has a move locked to a prevo, as they simply get added to the next stage's relearn list. This is kind of stupid with Stone evos though, since every move from their initial stage, including those learned even up into the 50s, are available the instant they evolve. In this case, it lets me teach Raichu Discharge immediately. I also use a Leaf Stone on my Nuzleaf and evolve it into Shiftry, letting me easily get Nature Power. I would do a similar thing with Eevee right now if I had a male, but that will have to wait a little bit...

Flying back to the daycare, I first use the Kantonian Meowth to pass Last Resort onto Skwovet, and delete Rollout on it. I then have Raichu pass Discharge onto Yamper, and the Electrike from earlier passes Howl onto it. I also breed the female Eevee and hatch a male on the first egg. I get into a battle to level it up to 5 to learn Sand Attack, then use the Fire Stone to evolve it into Flareon. This lets me relearn Eevee's would-be Level 50 Double-Edge. I take it back to the daycare and have it pass Sand Attack and Double Edge onto Yamper. I also have my Shiftry pass Growth, Fake Out, and Nature Power to Grookey, forgetting Worry Seed. Lastly, Gossifleur forgets Stun Spore and gets Sleep Powder from Oddish. While keeping Worry Seed over Stun Spore might seem weird, I think Stun Spore is redundant with two other status moves. Sleep is obviously the best, and poison can help Gossifleur whittle Pokemon down. Worry Seed can at least be ability suppression that can stack with poison.

To say the least, my team has undergone a massive improvement. Yamper is rocking endgame moves, Skwovet has an unwieldy but still feasible 140 BP move to use, and Gossifleur has the always amazing Sleep Powder. Wooloo is pretty out of place now, so I ditch it, making my team Grookey/Skwovet/Gossifleur/Yamper/Rookidee/Hoothoot. Route 4 is simple enough to deal with, though Yamper's stats being pretty terrible do offset how incredibly good its set is right now. Last Resort from Skwovet is also incredibly strong, but the 5 PP already proves to be an issue – I've never disliked seeing Growl so much...

Turffield Gym

The gym trainers are easy enough and after the very last one Hoothoot evolves into Noctowl. Noctowl can learn Sky Attack from the move relearner which it can then pass to Rookidee. While the forced charge makes it much worse than its 140 BP suggests, it still basically works as an awkward 70 BP Flying move that should make this gym easy. Initially, since I didn't want to leave the gym, I wanted to see if I could beat Milo without Sky Attack while keeping all restrictions intact. Besides Rookidee, almost everything on my team is pretty bad versus Grass types. Gossifleur is useless, Grookey is mediocre, Yamper's Discharge is resisted, and only Skwovet is all that useful. This all adds up to not being able to beat Milo without extreme luck, and I would have to lift the team matching restriction to feasibly do it. If you're interested, the gist of the no team matching strategy is that Grookey beats his Gossifleur, then it and my Gossifleur stall out his Eldegoss's Dynamax turns while Skwovet and Yamper finish it off. Regardless, I do decide to leave the gym and have Rookidee learn Sky Attack. Surprisingly, even that is not enough to do it with team matching, since Rookidee's stats don't even hold a candle to Eldegoss's. So I use the Exp Candy from Motostoke to get it to Level 19 and evolve. I wanted to hold off on its evolution since it's getting new moves right after this gym, but oh well. I need to actually beat the gym to get that far!

Milo


Corvisquire leads off and OHKOs Gossifleur with Sky Attack, while Gossifleur retaliates with Rapid Spin on the charging turn. I give it Leftovers to keep its health high, since it always needs to spend 2 turns to attack. Eldegoss is out, and I swap to Grookey. Dynamax Eldegoss deals way too much damage for Corvisquire to deal with, especially since Max Strike will make it slower. With Sitrus Berry, Grookey almost always survives two attacks. Here, it lives with 1 HP as Eldegoss uses Max Overgrowth into another one. The final Dynamax turn is wasted as Grookey faints. While it could technically peck at Eldegoss's HP with Nature Power (Tri Attack normally, Energy Ball in Grassy Terrain), it does such little damage that the Grassy Terrain heals it back up. So I save time with failed Leech Seeds. Corvisquire comes back in and 2HKOs with Sky Attack. I get very lucky with a flinch and seeing Leafage (why does it know this?), but with the Leftovers Corvisquire has ample HP to survive whatever it sees.

(Team: Corvisquire/Grookey)

With that, I finally obtain my first badge! Sorry for this being so long. Between the road to the first gym being really long and all the breeding to keep track of, it's very dense. But I really didn't want to end the first post without even getting to the first gym. With my team much more composed and the pacing of the game getting a bit better, updates should be a more reasonable length in the future.

Team Status:

Grookey
Level 21
Leech Seed/Fake Out/Nature Power/Growth

Skwovet Level 20 @ Oran Berry
Defense Curl/Last Resort

Gossifleur Level 19 @ Leftovers
Leech Seed/Sleep Powder/Worry Seed/Poison Powder

Corvisquire Level 20 @ Sharp Beak
Sky Attack

Yamper Level 20 @ Silk Scarf
Discharge/Sand Attack/Double-Edge/Howl
 
Last edited:
I always love reading your challenge runs, and this one's gimmick seems really interesting!
I'm liking all the planning and issues you're already running into, looking forward to how it all shakes out in the end.
 
Route 5

Now that I've beaten Milo, I can go to Route 5, where a second, more convenient daycare is located. And more importantly, I can get the Bike! With the Bike and Flame Body, hatching eggs is painless now. And what good timing, since there's a few Pokemon to catch on this route to breed. First is Stufful, who will have Strength if caught at Level 20+, which it can pass to Grookey (replacing Nature Power). I can also catch Farfetch'd, who has Rock Smash and Sand Attack to pass to Corvisquire. Unfortunately, since Corvisquire is evolved, I will have to evolve the Rookidee offspring before I can pass it to mine. I have an open slot in my party, though, so it's not a big deal.

After a few trainers, Gossifleur evolves into Eldegoss. Not terribly important for normal trainers (not like Leech Seed will do any more damage), but nice for boss fights. Grookey gets the same reward and finally evolves into Thwackey. While un-STAB Strength is a pretty unassuming move, between Thwackey's high attack stat, being able to set up with Growth, and chip for free with Fake Out, Thwackey has no trouble dealing with anything that doesn't resist Normal.

Hop (Route 5)


And Hop has nothing that resists Normal, so... He's upgraded his team a bit with some evolutions, but it's still nothing for Thwackey. Strength flat out OHKOs his Wooloo (it doesn't have Fluffy), then I set up 2 Growths on his Corvisquire. I can take 2 Plucks, but he uses Fury Attack then Leer. At +2, Thwackey can then OHKO both Corvisquire and Drizzile.

(Team: Thwackey/___/___)

Hulbury

Moving on to Hulbury, there's a very handy Magnet for Yamper here, that I completely miss until I looked up where the Magnet was when I got to Ballonlea. Oops. Well, at least Yamper doesn't need it too much for now, since the Expert Belt is basically the same for all the Water types around here.

Nessa


While Yamper can easily zap through Nessa's first two Pokemon, I need to keep it healthy for Drednaw. So Thwackey takes the reigns instead. With a Fake Out and a Growth, it can KO Goldeen while only taking a weak Horn Attack in return. Arrokuda simply goes down to a +1 Strength. Her last is the significantly more threatening Drednaw. Thwackey's Strength does barely any damage to it, so setting up Leech Seed is a better use of its last turn. While Drednaw's Max Strike doesn't KO, the speed drop lets it get the jump on Thwackey next turn. Still, two Dynamax turns down.

Eldegoss comes out, and takes a Max Strike while using Sleep Powder. While it's not impossible for Eldegoss to stall out Drednaw, Razor Shell's 50% defense drop and Headbutt's 30% flinch chance make it a dicier proposition than it initially appears. So, because I used a slower Sleep Powder, I can instead make a free switch to Yamper. Razor Shell puts quite a damper on my Yamper if Drednaw wakes up now (around 80%), but here I get a lucky 3-turn sleep and Yamper beats Drednaw with 2 Discharges+Leech Seed damage, unscathed. It's guaranteed to get off 1 Discharge, though, which is enough damage to have Eldegoss reliably stall Drednaw out before the aforementioned luck problems can set in.

(Team: Thwackey/Eldegoss/Yamper)

A Quick Pit Stop

At the end of the battle, the Rookidee offspring with Sand Attack and Rock Smash evolves, so I pass those moves onto my Corvisquire. Rock Smash is more useful than you might think. It has very good coverage with Flying, and the defense drop is great for setting up Sky Attack OHKOs. Since it's a two-turn move, missing KOs really sucks with it. Even if it's only a 50% chance of getting a defense drop, it still saves a lot of time in the long run.

Before I move on, I make a brief trip to the Wild Area. Defeating Nessa raises the catching cap to Level 30, which lets me catch the standard Pokemon in the higher level area. For now, I only catch a Level 28 Hoothoot. I should've just waited for a Level 30 one, but after the Eevee debacle I wanted to minimize time running around looking for Pokemon. Regardless, Hoothoot takes my 6th slot to get exp. I have a number of other catches to do here, but some of them are pretty dangerous. Remember that higher Level Pokemon have drastically reduced catch rates, and my only Pokemon to match their level is the very fragile Hoothoot. So I'll wait a bit for more levels on my party. Time to move on!

Bede (Galar Mine 2)


I almost immediately run in to Bede. His team is pretty similar to last time, though. Thwackey could probably sweep, but I want some of my other team members to catch up to its level, so I lead with Skwovet instead. It takes a lot from Psybeam when it uses Defense Curl, triggering its Oran Berry, but in a rare moment it's actually faster and OHKOs with Last Resort on the next turn. He then sends out Gothita. With Cheek Pouch, Skwovet has enough HP to take 2 Psybeams from it and 2HKO back with Last Resort (Bede uses a Super Potion, but it just wastes time). Skwovet doesn't have enough HP to take Hatenna, though, so I swap to Corvisquire on its Psybeam. Corvisquire takes another Psybeam as it charges Sky Attack, then OHKOs on the next turn. Bede's final Pokemon is Ponyta, which is faster than Corviknight. Its Confusion is very weak, though, and despite getting two of them off, it still leaves Corvisquire with a smidgen of health and gets OHKOd by Sky Attack.

(Team: Skwovet/Corvisquire/___/___)

Back to Motostoke

Right after the battle with Bede, Skwovet evolves into Greedent, getting much beefier. Oran Berries recover very little of its health now, but they still trigger Cheek Pouch so I keep them on. I make my way deeper into the mine, and catch a Stunfisk for later. At the end, I have Greedent show off its new tankiness as it demolishes the pair of Team Yell Grunts. This battle also gets Yamper to evolution level, and it evolves into the significantly uglier, but significantly more useful Boltund. My team is sitting pretty right now, with the only real concern being Eldegoss's passiveness, but there's nothing I can do about that.

Marnie (Motostoke)


A story told in YouTube thumbnail options:


Defense Curl, three Last Resorts. That's the fight.

(Team: Greedent/___/___)

Back to the Wild Area

Now that I've gotten as strong as I can before Kabu, it's time to finish my catches here. My first catch is my next Pokemon, Cramorant. I'll go over its moveset more when I assemble the parents, but to say the least it overachieves for its lackluster stats. It has a very low catch rate of 45, and with it being somewhat dangerous and at a higher level, it's a pain to catch. Since this is a future team member, I have to catch a few to get a decent one too, so this is extra annoying. I decide the best course of action is to Leech Seed it then keep it sleeping as much as possible with Eldegoss, then just spam balls. After three caught, I find a suitable one and move on.

Next is the other dangerous catch, Hawlucha. It can only be found as a 5% random encounter which is obnoxious to start, but it also has very high stats. Its catch rate isnt as low as Cramorant's, though, so it evens out a bit. The rest of my catches are easy to find unevolved Pokemon: Dewpider, Stufful, and Rufflet.

While doing those catches, Hoothoot got to Level 30 and learned Roost. This can be passed to both Corvisquire and Cramorant. For Corvisquire, I pass Roost to a Rookidee, then use the Rufflet to also pass Tailwind, ending up with a Rookidee with both moves so I only have to evolve it once. Since I need two moveslots, I pre-emptively delete Sand Attack on my Corvisquire. I can also get the rest of Cramorant's moveset now. Hawlucha goes to the move relearner to get Aerial Ace, then passes both that and Feather Dance to Cramorant. Lastly, Dewpider passes Aqua Ring to it. Cramorant ends up with a set of Aerial Ace/Feather Dance/Roost/Aqua Ring, which is a very respectable stalling set complete with a decent STAB.

Anyways, before heading to the Motostoke Gym to fight Kabu, I need to ditch another team member, since Cramorant took my 6th slot and now I want to train the Stufful I just caught. Since it's a Fire gym, I decide Thwackey won't be very helpful and leave it in the PC.

Kabu


Kabu's non-Dynamax Pokemon are a bit of a jump from Nessa, but Boltund does very well against them. It's faster, and ignores their physical hate by being special. I give it a Rawst Berry anyways so Ninetales will waste a turn burning it. It does still get a second burn off as I 3HKO it, though. Arcanine is also 3HKOd, but Boltund goes down to burn and two Flame Wheels, leaving it with just bit of health. While Cramorant could finish it, I don't want it to get burned, so I have Corvisquire do the job instead with Rock Smash. Kabu then sends out his Gigantamax Centiskorch. Corvisquire only has 1 turn to attack, so it uses Rock Smash and gets a defense drop. The Centiferno's end of turn damage finishes it off. Cramorant comes in, and its Water/Flying typing is a perfect counter to Centiskorch. It Feather Dances anyways to keep the damage down, then goes for a 2HKO on Centiskorch with Aerial Ace (one hit on Gigantamax, one hit on normal on the next turn). I didn't realize that the defense drop from Rock Smash actually let Aerial Ace do over 50% even on the Gigantamax form though, so I could've skipped the Feather Dance here.

(Team: Boltund/Corvisquire/Cramorant)

And with that, I have my third badge! Says something about the pacing of this game when I can get double the badges in an update half as long as the first one.

Team Status:

Thwackey
Level 27 @ Silk Scarf
Strength/Fake Out/Growth/Leech Seed

Greedent Level 28 @ Oran Berry
Defense Curl/Last Resort

Eldegoss Level 28 @ Leftovers
Leech Seed/Sleep Powder/Worry Seed/Poison Powder

Corvisquire Level 28
Sky Attack/Rock Smash

Boltund Level 28
Discharge/Sand Attack/Double-Edge/Howl

Cramorant Level 29 @ Sharp Beak
Aerial Ace/Feather Dance/Roost/Aqua Ring
 
Last edited:
As I leave Motostoke, Hop gets beaten so badly by Bede that his self-confidence is weakened, and he wonders if he's just damaging his brother's legacy. He was probably in too much of a funk to visit the Battle Cafe when he reached Hammerlocke, then. And that's a good thing, because...

Cafe Master Bernard


...is an absolute monster, and would've shattered his self-confidence. This is a bit of an infamous encounter that throws a lot of players off, since the levels are an enormous jump from Kabu. I thought I was supposed to have spent a ton of time catching Pokemon in the Wild Area, myself. As it turns out, this encounter was probably designed to be fought as you return to Hammerlocke after Opal. Nevertheless, it's available now and provides quite a challenge.

It's especially ridiculous with team-matching, since he only has two Pokemon (team-matching in doubles also means I have to deposit unused party members, since otherwise I can't pretend to be down to my “last” Pokemon like I can in singles). It ends up being pretty luck-based to win this fight with these restrictions, unfortunately. I have no Fairy resists and they have Sweet Veil to negate Sleep Powder, so the overall strategy is just to win as far as possible. Boltund and Greedent take charge for this. Boltund is actually not here to spam its strong spread move, Discharge, as you might expect, but rather to buff Greedent with Howl. This got a nice buff in Gen 8 where it increases all allies' attack. Boltund needs to stay alive to get off 2 Howls, which lets Greedent OHKO Alcremie with Last Resort, and then it 2HKOs Slurpuff after that. Boltund is at least faster than both foes, so it only needs to survive one turn to do this.

A ton can wrong with no real contingency plan, though. Helping Hand+Dazzling Gleam is an instant loss, a high roll Play Rough can OHKO Boltund, Round double targetting, Attract infatuation... It's not pretty. From resetting a bunch to see what could go wrong, the odds of success were about 1 in 3. What ends up happening is that Alcremie Attracts Boltund on turn 1 while Slurpuff almost OHKOs with Play Rough. Boltund breaks through the infatuation and gets off the second Howl, but falls to Alcremie's Round right after. Slurpuff then Rounds Greedent for about 40%, and Greedent OHKOs Alcremie. At this point Greedent is fine since it has Sitrus Berry and Cheek Pouch, though Slurpuff wastes a turn using Helping Hand anyways. Overall, I'm not sure I'd recommend this cafe...

(Team: Boltund/Greedent)

Planning for the Future

I have a full team of six Pokemon now. However, there's still viable team candidates left to encounter. So at this point I started to think more intently about what I wanted my endgame team to look like, and if all of my current team was actually worth keeping until the end. Sadly, I came to the conclusion that they weren't. The earliest decision was between Thwackey and Eldegoss. The most important aspect of both of these Pokemon is Leech Seed, so having both is redundant. Thwackey has some set-up potential and infinitely more immediate power, while Eldegoss has other awesome support options. Ultimately, I decided that while I would appreciate Thwackey (and later Rillaboom) for easier fights, Eldegoss would be much better for the harder fights. Nothing exemplifies this better than Leon. Rillaboom's offense is worthless versus him, being hard walled by Aegislash and Dragapult while having no way to even get a chance to attack Cinderace and Charizard. Eldegoss, meanwhile, can at least use Sleep Powder and has a much higher special defense.

Route 6 & Stow-on-Side

I use my newly vacated sixth slot to train my Rookidee offspring with Tailwind and Roost into a Corvisquire. As I progress along the route, I find another reason why sticking to team matching for normal fights would be stupid: a Backpacker here has a single Throh that's virtually impossible to OHKO and loves to spam Circle Throw. This Throh and another trainer's Sawk can be pretty dangerous even ignoring team matching, but Cramorant's Feather Dance keeps them in check.

Once Rookidee evolves, I pass Tailwind and Roost onto Corvisquire, but now I don't really have anything purposeful to use my sixth slot for. I put in Stufful, who I caught to pass Hammer Arm to Thwackey, which is obviously not that important now. Still, may as well use my 6th slot for something. It gets to 32 near the end and learns the move, and I put Thwackey back in to at least get half exp in case I change my mind about it.

When I reach Stow-on-Side, I find a very nice item, the Rocky Helmet. This is most useful for Cramorant, who can Feather Dance physical attackers into nothing while also really needing the extra damage.

Hop (Stow-on-Side)


Hop totally revamps his team, but it doesn't mean much. He has his own Cramorant, but it gets obliterated by Boltund's Discharge. He then sends out Silicobra, so I have an easy swap to Corvisquire on Dig. I use Tailwind on the underground turn, but it doesn't matter. When Silicobra comes back up, it uses Rock Smash and gets a defense drop, letting it KO over the next two turns with Sky Attack while avoiding a Super Potion. He sends out Drizzile and I do a somewhat painful switch back to Boltund, but it's all worth as it OHKOs with Discharge, then OHKOs the Toxel that comes out last with Double-Edge.

(Team: Boltund/Corvisquire/___/___)

Glimwood Tangle?

This area is actually available before beating Bea (or Allister if Shield), but it has some caveats. You can only access the very beginning, which has a single patch of grass where only random encounters spawn, and you also can't actually catch the highest level Pokemon since they're past the catching cap. Regardless of these caveats, Indeedee can still be caught before Bea. And it was a pretty high consideration for me, at least as a male. It gets Fake Out and a solid STAB option in Extrasensory! Technically Psych Up too, but I can't actually get the Aromatisse needed to pass that in Sword. Anyways, as nice as having another strong no-bullshit STAB move would be, I couldn't really justify using Indeedee long term. Psychic is simply not that useful of a type, and Indeedee has no utility moves to make it really stand out. And while my damaging options may be a bit unwieldy, they can still be pretty useful. So it's not like having another easy damaging move is really a necessity, just a convenience.

Bea


While I do end up doing this fight under the team match limit (3 of mine versus 4 of hers), this is still one of the more difficult fights and gave me some trouble before it all clicked. Revenge is a very strong move that's not always easy to avoid, and all of her Pokemon are good. My dual birds are a godsend, though. I lead with Corvisquire, and Sky Attack has a rare moment where its charging mechanic is actually beneficial. By only doing one superstrike, it avoids triggering Revenge's boost on the charge turn. This doesn't help as much as it could versus Hitmontop who still has Technician, but it still leaves Corvisquire with enough HP for what it needs to do. The Sky Attack OHKOs Hitmontop on the next turn, and Pangoro is sent out. Corvisquire has a Sitrus Berry to prevent Bullet Punch from sniping it after a Night Slash, though here Pangoro uses Work Up instead. The Sky Attack doesn't quite OHKO this time, and Corvisquire goes down to a +1 Night Slash. Cramorant finishes it off.

Sirfetch'd is next and quite problematic. Even if Corvisquire were still here, Sirfetch'd has Detect which makes hitting it with Sky Attack a total crapshoot. And since it has Swords Dance, I can't afford any stally strategies versus it. Cramorant can beat it 1v1, but it desperately needs to keep its health maxed for Machamp. So I need to get rid of it fast with minimal Cramorant usage. Surprisingly, the best Pokemon for this ends up being Greedent. Since it won't Revenge immediately on the switch (Fighting-resist Cramorant was out) and Revenge goes last, it can safely switch in and use Defense Curl then Last Resort. Sirfetch'd uses Revenge for about 40% on the Defense Curl turn, and the boosted Revenge Greedent takes when it Last Resorts KOs it. Nevertheless, the Last Resort did around 70%, letting Cramorant revenge kill again without taking damage.

Machamp is last, and Cramorant can solo it. Feather Dance is obviously the starter move, and Machamp still does around 40% with Max Darkness. Cramorant uses another Feather Dance, and this time Machamp uses Max Strike causing it to outspeed on the next turn and almost KO Cramorant with Max Darkness. Cramorant lives and Roosts back up though, and Machamp's Gigantamax is gone. From here it's just a matter of not getting crit (thankfully, Machamp isn't inclined to use Chi Strike due to Cramorant resisting it). Aerial Ace can 2HKO with Rocky Helmet damage (only 1 recoil turn since it gets Knocked Off), but here I miss the range and need to heal up and attack a third time.

(Team: Corvisquire/Cramorant/Greedent/___)

And that's half the gyms down! Since 4/5 current members are already at their final evolution and moveset, the second half ramps up a bit as they get better and I stay mostly the same.

Team Status:

Greedent
Level 33 @ Silk Scarf
Defense Curl/Last Resort

Eldegoss Level 33 @ Leftovers
Leech Seed/Sleep Powder/Worry Seed/Poison Powder

Corvisquire Level 33
Sky Attack/Rock Smash/Tailwind/Roost

Boltund Level 34 @ Wise Glasses
Discharge/Sand Attack/Double-Edge/Howl

Cramorant Level 34 @ Rocky Helmet
Aerial Ace/Feather Dance/Roost/Aqua Ring

Thwackey Level 30 (Likely gone)
Strength/Hammer Arm/Growth/Leech Seed
 
Last edited:
With you getting an open slot soon, may I suggest using Sirfetch'd? It has a nice egg move selection allowing a set of Curse/Double Edge/Night Slash/Quick Attack. I think it could do well, and you can use it since you're playing Sword.
 
With you getting an open slot soon, may I suggest using Sirfetch'd? It has a nice egg move selection allowing a set of Curse/Double Edge/Night Slash/Quick Attack. I think it could do well, and you can use it since you're playing Sword.
Thanks for the suggestion, but I already have another Fighting-type lined up to use. It's actually kind of similar to Sirfetch'd, now that I'm comparing their sets.
 
Thanks for the suggestion, but I already have another Fighting-type lined up to use. It's actually kind of similar to Sirfetch'd, now that I'm comparing their sets.
The Galar Pokedex has many pure Fighting types: Machamp, the Hitmons, Throh, Sawk, Conkeldurr, Passimian, Clobbopus, Sirfetch'd, and Falinks. Evidently the best way for a Pokemon to survive in Galar is to practice martial arts.


It's always nice to see another sb879 playthrough. They require much more planning than my "wait until you can find the right TR, then slap on Eviolite" solos. My favorite is probably the Misfits in Crystal. Blaine really is terrible if you can beat him with a Surfing Sneasel.
 
Bede (Stow-on-Side)


Bede finally evolves his Pokemon but so have I, so he remains simple enough. Boltund leads and 2HKOs his Duosion with Discharge while taking a meaty Psyshock in return. Hattrem is next, and Boltund almost OHKOs it with a crit Discharge before going down to Psybeam. Greedent comes out and sets up Defense Curl as Bede heals with a Super Potion (not to full). Last Resort then KOs it while taking a crit Psybeam, and he sends out Gothorita. It uses Fake Tears as Greedent almost OHKOs it with Last Resort. Bede would heal here if I didn't get the earlier crit, and ironically it would actually help – since he doesn't heal to full, Last Resort would just KO Gothorita as he healed. It uses its extra turn to use another Fake Tears before fainting. Ponyta is last, but can't finish off Greedent with Psybeam at -4 and gets OHKOd by Last Resort.

(Team: Boltund/Greedent/___/___)

To Ballonlea

I always think it's Balloonlea...Going through Glimwood Tangle, Eldegoss still usually leads off to support and get exp. Sky Attack and Last Resort's PP are becoming more of an issue with stronger Pokemon to fight, but the routes are mercifully short. When I reach Ballonlea, I trade the old man the letter for a Choice Scarf. Sword and Shield have a lot of really good items spread throughout the story – Leftovers and Choice Scarf so far, with many more to come.

Opal


With a Magnet (I had to look up where this was, not sure how I missed it...), Boltund can 2HKO her Weezing with Discharge while taking a Sludge. It could easily handle the Mawile that comes after too, but I need to think ahead to deal with Togekiss, who's very difficult to deal with. With Draining Kiss's healing, Discharge ends up being a 3HKO, and the STAB Air Slash and Ancient Power are troublesome for the rest of my team. However, I can use Opal's quizzes to great effect here. At the end of turn 9, I need to 100% correctly state that Opal is 16 years old to get a free +2 boost to both offenses (bit of trivia: Opal asks her questions at the end of turns 1, 4, and 9, which are successive squares). Mawile is easy enough to stall, but I have another goal while I'm wasting time: to lower Boltund's health as much as possible. I start by having Boltund throw out a Double-Edge to take some recoil and then a Crunch from Mawile. I then go to Cramorant who takes a defense drop from Crunch that is immediately outdone by answering Opal's quiz correctly. After that I Feather Dance it twice, and weaken it a bit with Rocky Helmet recoil. I switch back to Boltund and take a -4 Crunch into red HP, then KO the weakened Mawile with Discharge. At the end of the turn, Togekiss is sent in and Boltund gets its offenses doubled, providing it with an easy OHKO from Discharge.

Opal now sends out her Gigantamax Alcremie, and my +2 Double-Edge does half its health. Because Boltund was so low, it KOs itself and negates Alcremie's Finale to prevent it from healing. Greedent actually could 2HKO it from here even with the Finale healing it would get, but surviving the 3 attacks necessary is dicey for a dumb reason. Finale deals roughly 50%, which means if it gets a lower roll, it won't trigger Sitrus Berry and can then KO with a higher roll. So to be safe, I send out Eldegoss instead. It wastes the last two Gigantamax turns while using Leech Seed and Poison Powder (Sweet Veil negates Sleep Powder), and I swap to Greedent. Alcremie is arguably even worse when out of Gigantamax, though. With Acid Armor, Draining Kiss (with no Fairy resists), and Sweet Kiss, it can be a huge pain in the ass – even Greedent quickly becomes helpless without support. Leech Seed and poison do keep it in check, though. I actually get lucky and don't see Acid Armor at all and ignore Sweet Kiss's confusion, but with all the passive damage it wouldn't last long anyways.

(Team: Boltund/Cramorant/Eldegoss/Greedent)

Hop (Route 7)

(There are only so many unique thumbnails of Hop. Have a happy Greedent instead.)

Hop has again rearranged his team. This time the results are a little more favorable, but still not good. He leads with Trevenant, which Corvisquire OHKOs with Sky Attack. It has a Persim Berry to negate Confuse Ray, though Trevenant uses Shadow Claw instead. Boltund is sent out and loves to be annoying with Roar. It shuffles my team around a bit (including a Cramorant cameo) since I miss Sleep Powder with Eldegoss, but I get it the next time around. Boltund sleeps long enough for me to go to Greedent and use Defense Curl and OHKO with Last Resort. He then sends out Snorlax, but Greedent's the new fat cat and shows it what's what with a Last Resort 2HKO. Heatmor has an even more anticlimactic battle as it gets OHKOd by Last Resort (such is the life of Heatmor). Last is Inteleon, which deals a heavy hit to Boltund with Snipe Shot as I switch, then gets outsped and OHKOd by Discharge.

(Team: Corvisquire/Eldegoss/Cramorant/Greedent/Boltund)

Both Corvisquire and Thwackey evolve from this battle. Rillaboom is still on the chopping block, only getting exp for lack of anythig else to train, but Corviknight's new Steel typing will be incredibly useful.

To Circhester

Before going ahead, I make a trip to the Wild Area and catch a Tyrogue. I waited to do this since I need one with higher defense than attack for Hitmonchan, and it's a bit of a pain. Insultingly, I get a Bold Tyogue, but it still has much higher attack than defense (17 vs 15). It takes 6 Tyrogues to get one with higher defense... With that out of the way, I replace Rillaboom with the Tyrogue to train it up to evolution.

Back on Route 7, I find the first tree with stat-raising berries – Liechi and Ganlon. These are niche, but definitely nice to have around. After the very brief Route 7, I'm onto Route 8. It's mostly unremarkable (Tyrogue does evolve into Hitmonchan), until the double battle at the end. They start with an Excadrill and Hippowdon combo, which is about as tough as you'd expect. I have Cramorant and Greedent, so the goal is to nerf their attacks with Feather Dance while Greedent does its thing. That proves to be difficult though, because Excadrill's Rock Slide flinches Greedent four times in a row! Cramorant remains unflinched, though, so it weakens both Pokemon. Hippowdon also came to the hax party though! All 3 of its initial Crunches lower defense – 2 on Greedent, 1 on Cramorant. While Cramorant can at least weather all of this bullshit with Roost, Greedent eventually succumbs just before it got a chance to actually attack with Last Resort.

After that, I abandon any pretense of honor and go off with lots of stalling. Naturally, Eldegoss replaces Greedent. Sleep Powder, Leech Seed, Feather Dance, Aqua Ring, Roost...Eldegoss and Cramorant are quite a pair for this. Hippowdon goes down first, and Perrserker comes out (this is one of the occasional instances of a Hidden Ability: it has Steely Spirit to buff its allies). Perrserker actually Taunts Eldegoss, so I swap to Corviknight and spam Rock Smash. After a long fight my stalling trinity emerges victorious, in spite of the ridiculous start.

As I enter the snowy part just before Circhester, I seek out a Snom. While Sword and Shield are controversial games in a number of aspects, I think we can all agree on the cutest new Pokemon: Cufant!


(This and Copperajah are my favorite new line of this gen. Coincidentally, Copperajah would be #879 in a National Dex.)

Anyways, I use my Friend Ball to catch this Snom. Yes, these balls do have purposes besides aesthetics! The Friend Ball automatically sets happiness to 200, which is a great boon for happiness evos like Snom (threshold is 220). I put it in my sixth slot, then go ahead to the Circhester Gym.

Circhester Gym

Rock types have always been ironic: glorified as defensive behemoths, in reality best suited as glass cannons. With the way my team is set up, though, they actually live up to their reputation. Corviknight, Greedent, and Cramorant deal little damage to them, and Boltund has some trouble with their tankiness (Eldegoss remains its usual self). While the trainers here aren't quite dangerous, they do take a while to slug through.

Gordie


Gordie is a typical Rock Gym Leader – goes down easy enough with a bucket of water. As mentioned earlier, though, I have no such bucket and have to have a real fight with him (I could have Aqua Jet Inteleon, but that's more of a squirtgun). He leads with Barbaracle, which is fortunately weak to Electric. However, Boltund only has a 50/50 KO with Magnet Discharge, and Barbaracle can use Shell Smash into a Razor Shell OHKO. Eldegoss could finish it off while taking a lot of damage, but this is an awful way to start. I was initially resigned to go for this damage roll, but I realized there was a better strategy: the Choice Scarf! With this, Boltund remains faster than Barbaracle after a Shell Smash and safely 2HKOs.

Next is Shuckle, which is frankly awful. Not in general, but Gordie's has a complete do-nothing set (Power Split / Stone Edge / Struggle Bug / Rock Tomb). It can lower your stats a bit, and...nah, that's it. I go to Eldegoss and use a Leech Seed on it, then go to Corviknight. With all the Leech Seed damage, 1 Sky Attack finishes it off, and Corviknight takes no net damage due to the healing. Stonjourner is next, and still pretty bad. It first sets up Wonder Room, swapping its great defense and abysmal special defense. Not a great idea in front of a physical attacker, though! Rock Smash is able to 2HKO its now 20 base defense, and Stonjourner just sets up Stealth Rock on its final turn.

It's a good thing Gordie's previous two Pokemon were a bit of a joke, though, since his ace Coalossal is truly monstrous. Rock/Fire is actually one of the absolute worst type combos for this team right now. It's faster than Corviknight (go Shuckle!!!), and uses Max Flare and almost OHKOs, and Corviknight retaliates with a weak Rock Smash. Another Max Flare downs Corviknight. I send in Eldegoss in hopes that it will Max Flare as I suicide Leech Seed, but annoyingly it uses Volcalith and sets up continuous damage for my team. On the upside, Eldegoss lives another turn and uses Poison Powder as well. Cramorant comes out, and avoids the SR damage with the Heavy-Duty Boots. It uses Feather Dance while taking a lot from Rock Tomb and Volcalith damage, and also stalls out the last turn of sun from Max Flare. With -2 attack, no sun, and 2 sources of continous damage, it's finally time for Boltund to come back in. At this point, it takes only one Discharge to finish Coalossal off (2 if it didn't get a chance to be poisoned).

(Team: Boltund/Corviknight/Eldegoss/Cramorant)

Snom would have evolved after this battle, but this game has incredibly dumb day/night mechanics. Even though it was night time, Snom failed to evolve because until you beat the game, everywhere besides the Wild Area (as far as I know) is fixed to daytime. I was hoping being inside the gym would get around this, but sadly it didn't. So I have to go the Wild Area and use a Rare Candy to get my Frosmoth.

And that's another 2 badges down! Next time, I'll finally fill that sixth slot with something meaningful, and finish off the gym challenge.

Team Status:

Greedent
Level 41 @ Oran Berry
Defense Curl/Last Resort

Eldegoss Level 42 @ Amulet Coin
Leech Seed/Sleep Powder/Worry Seed/Poison Powder

Corviknight Level 42 @ Sharp Beak
Sky Attack/Rock Smash/Tailwind/Roost

Boltund Level 43 @ Choice Scarf
Discharge/Sand Attack/Double-Edge/Howl

Cramorant Level 42 @ Heavy-Duty Boots
Aerial Ace/Feather Dance/Roost/Aqua Ring

Rillaboom Level 36 (Basically gone)
Strength/Hammer Arm/Growth/Leech Seed
 
Last edited:
I think there is a night area somewhere. I want to say it's right when you get out of the second Galar Mine, that it's just night time. Or maybe Route 9?
Might've just been overcast though

Also YES glad you mentioned that Route 8 double battle. That one stands out a lot in this game because it's a fairly large number of pokemon fought and there's actual strategy deployed to make them dangerous. Like what happened here and why didn't it happen more often.
 
I sometimes think of Sword/Shield as a "Game Boy Color game wearing a Switch's skin", but that may be insulting to the Game Boy Color. At least GSC got the day and night mechanics right!

Also, it's nice to see a use for the Heavy-Duty Boots in a story mode playthrough. You have to watch out for that Stealth Rock, even when dealing with pathetic AI trainers.
 
Also YES glad you mentioned that Route 8 double battle. That one stands out a lot in this game because it's a fairly large number of pokemon fought and there's actual strategy deployed to make them dangerous. Like what happened here and why didn't it happen more often.
Yeah, it's fun. Reminiscent of the route bosses Alola had, which I really liked.
Also, it's nice to see a use for the Heavy-Duty Boots in a story mode playthrough. You have to watch out for that Stealth Rock, even when dealing with pathetic AI trainers.
Tbh they're not really needed for Gordie since Cramorant survives with >25% HP, but I thought it was cute. There's actually two other fights where they could be used as well, surprisingly.
 
Hop (Circhester)


Hop finally decides on a team, and the results...aren't great. Should've stuck with that Toxel and Silicobra, honestly. He brings back his Wooloo as a Dubwool, complete with its 5-straight IVs (the game is remarkably consistent about keeping his Pokemon's IVs and natures straight). Boltund is able to get an easy 2HKO with Discharge while taking a Take Down in return. Snorlax is sent out, and I go to Greedent to overpower it again. Since I'll end up taking 4 Body Slams, I use a Cheri Berry for the virtually inevitable paralysis. It still triggers Cheek Pouch, which is nice. Paralysis procs on the first turn, but Greedent heals it and is victorious after Defense Curl and 2 Last Resorts. Inteleon is next, and I let it finish Greedent off since Boltund is too weak to switch in. I have it revenge KO with Discharge.

He sends out his new Pincurchin, and I swap to Eldegoss. It can easily stall Pincurchin by itself, but after setting up Leech Seed and poison I go back to Boltund and KO with Double-Edge to speed things up. All he has left is Corviknight, which is OHKOd by Discharge (dicey damage roll, but the hail will finish for sure).

(Team: Boltund/Greedent/Eldegoss/___/___)

Filling in the Sixth Slot

Rillaboom has been sitting pointlessly in my last slot for a while now, but now I finally have a suitable replacement at Route 9: Clobbopus! While I could just catch a Grapploct in Circhester Bay, I don't really want to. Not for any tactically optimal reason, mind you – just because it's way too overleveled, being Level 50. I'd much rather catch one that's actually around my team's level because I prefer having my team at roughly even levels. Exp Share also makes it take forever for a team to catch up to an overleveled Pokemon. Anyways, I need to catch at least two Clobbopuses because of its annoying evolution requirement, which is leveling up with Taunt. This means I can only have 3 egg moves on it before evolving, so in order to get the fourth I need to have another Grapploct pass it after evolution. Thankfully, the wild Clobbopus already know Taunt, so I only need to level it once to evolve it. So the goal is to get 3 egg moves on the Clobbopus I intend to use, and my desired final move onto another Clobbopus.

To finish collecting the parents for all these moves, I go back to the Wild Area and catch a Pancham that's at least Level 13, then go to Route 9 and catch a Pyukumuku. I then take my Hitmonchan to the move relearner and get Power-Up Punch and pass it to Clobbopus. The Stunfisk I caught in Galar Mine 2 and the Pancham I just caught then pass Sucker Punch and Circle Throw, respectively. These 3 moves are the main part of my eventual Grapploct's moveset. Power-Up Punch and Sucker Punch synergize particularly well, KOing a lot of Pokemon as a one-two punch. I'm actually not entirely sure what my desired 4th move should be, so I pass two different options to my alternative Clobbopus. My earlier Dewpider passes Soak, and the Pyukumuku passes Pain Split. Since I need to give this Clobbopus a level, I need it in my party, so I replace Boltund for now since it's the highest level.

Surfing Detour

But before I go on to fight the trainers in Circhester Bay, I loot all the Surf areas. There's several goodies to obtain, mainly the Choice Band and the Assault Vest. There's also new berries on the Wild Area trees in these Surf areas that have Salac, Petaya, Maranga, Kee, and type-resist Berries which are also pretty nice. While I'm in the Wild Area, I also catch some Pokemon for later, namely a Vanillite and a Dwebble. Lastly, there's a PP Max, which I use on Corviknight's Sky Attack. While Greedent could use it more, I've already used one 1 PP Up on Last Resort so it would be a bit wasteful.

Circhester Bay

The Black Belts here are pretty tough, but Cramorant as usual is a godsend for Fighting types. Greedent actually almost beats a Grapploct here with help from hail, but it's left with a sliver of health and Greedent has to switch out. Oh well. Clobbopus can't really compete here with its stats, but it and the other Clobbopus evolve soon enough. Now fighting with a base 118 attack, Grapploct has little trouble dealing with normal trainers even with its weak moves. Trainers with multiple Pokemon are especially nice, since they let Grapploct snowball with Power-Up Punch. For its fourth slot, I decide on Soak for now. The order of the parents' moves in their movelist determines which has priority to pass down, so I can just swap the order of Soak/Pain Split to pass Pain Split if I change my mind.

Marnie (Route 9)


Marnie's back, and has now evolved all of her Pokemon and gotten a Liepard. And yet...


Everything's coming up Greedent, again. Both Scrafty and Toxicroak have Swagger, which I can use to my advantage with a Persim Berry. At +2, even her bulky Scrafty is OHKOd. I get the ideal fight with Scrafty using Swagger and Toxicroak not, but it's pretty unlikely for Greedent to faint regardless. 4 Last Resorts and Marnie loses again.

(Team: Greedent/___/___/___)

Piers


Piers gives a wonderful avant-garde performance, quite literally showing how voiceless the impoverished citizens of Spikemuth are. Once he's done, the battle begins with an Intimidate Scrafty. I have Greedent lead to absorb Intimidate, then swap over to Cramorant on Fake Out. Cramorant 2HKOs with Choice Band Aerial Ace while taking a Payback in return. Piers sends out Malamar, and Cramorant's able to dent it with another Aerial Ace before going down. Grapploct comes out and takes a heavy hit from Psycho Cut (and recovers with a Sitrus Berry), but is able to finish Malamar off with a Power-Up Punch into Sucker Punch.

He sends out Obstagoon, which starts with Obstruct and lowers my defense, which would let Shadow Claw KO if I didn't have the Sitrus Berry. It uses Counter instead afterwards, which amusingly Circle Throw ignores due to even more negative priority. Circle Throw OHKOs anyways, but not as easily as you'd expect. His Obstagoon has the honor of being the only EV-trained Pokemon in a boss fight (the others are the Eviolite Dottler and the Rotom trainer). With its maxed HP and Defense, Grapploct actually needs the +1 boost to OHKO with Circle Throw despite being 4x effective. Skuntank is last, and finishes off Grapploct with Toxic and 2 Sucker Punches. Grapploct would have been able to win, but it misses one of its Circle Throws. Boltund finishes the job with Discharge.

(Team: Greedent/Cramorant/Grapploct/Boltund)

After beating Piers, there's a very easy to miss but also very important item back in Spikemuth: the Choice Specs! Boltund will get a lot of use out of these, to say the least.

Hammerlocke Gym

Each of the gym trainers specializes in a different weather, and they're all double battles. The first is rain, which Cramorant and Corviknight deal with pretty well. At one point their Pelipper uses Tailwind, which I essentially negate with my own Tailwind. It's actually only functional use of Tailwind I've had so far... Next is sun, which Grapploct and Greedent take over for. Circle Throw's negative priority has another use here – it totally ignores Turtonator's Shell Trap. Even though Ninetales burns both of my Pokemon, this lets me get through the fight without triggering very dangerous Shell Traps. Last is hail, which Grapploct and Corviknight deal with. Abomasnow sets up Aurora Veil, but Sky Attack still OHKOs Hakamo-o. Grapploct also has no trouble with Abomasnow.

Raihan


And now, the sand trainer. He leads with Flygon and Gigalith, and Flygon is particularly annoying. Breaking Swipe neuters my physical offense, and it's immune to my only special move. While it doesn't deal much damage, I also have to deal with Gigalith and the sandstorm, so becomes a big problem very quickly. To avoid seeing it, I bait it into using Thunder Punch instead with Cramorant as my lead. My other lead is Grapploct, which uses Power-Up Punch on Flygon as Cramorant switches into Boltund. Boltund takes little damage from the Thunder Punch, and Gigalith sets up Stealth Rock. This sets up for a quick way to blitz through Flygon. Both Boltund and Grapploct can now attack Flygon before it attacks with Double-Edge and Sucker Punch, removing Breaking Swipe from the equation. Gigalith is still around, though, and it uses Body Press on Grapploct.

Sandaconda replaces Flygon, and it's not too much of a threat. Boltund buffs Grapploct with Howl and almost gets KOd by Sandaconda's Earth Power (lol). Gigalith Body Presses Grapploct again, and Grapploct then OHKOs it with +2 Circle Throw. The sandstorm finishes Boltund off, and it's replaced with Cramorant. Raihan now sends out his mighty Gigantamax Duraludon, but I'm primed to get rid of it quickly. With a Choice Scarf, Cramorant outspeeds Duraludon and Feather Dances it. The goal is to let weakened Grapploct survive a Max Wyrmwind, though honestly Duraludon seems to prefer going for Cramorant with Max Rockfall, probably because it's super-effective. Sandaconda Glares Cramorant, and then Grapploct deals a heavy hit to Duraludon with Circle Throw. On the next turn, Grapploct snipes it with Sucker Punch and I switch out Cramorant for Greedent (I'm not really sure why, it's actually slightly detrimental). Sandaconda then finishes Grapploct off, but its job is done. When Cramorant comes back in its slot, it faints to Stealth Rock damage. This leads to a 1v1 with Sandaconda and Greedent which Greedent easily wins. The match-up is dominant enough that Greedent still wins even with two unlucky full paralysis turns.

(Team: Cramorant/Grapploct/Boltund/Greedent)

And that's all the gyms down! Next time, I'll move on to the endgame, where one more party member awaits. But who gets left behind...?

Team Status:

Greedent
Level 49
Defense Curl/Last Resort

Eldegoss Level 48 @ Leftovers
Leech Seed/Sleep Powder/Worry Seed/Poison Powder

Corviknight Level 48 @ Sharp Beak
Sky Attack/Rock Smash/Tailwind/Roost

Boltund Level 49 @ Amulet Coin
Discharge/Sand Attack/Double-Edge/Howl

Cramorant Level 49 @ Choice Scarf
Aerial Ace/Feather Dance/Roost/Aqua Ring

Grapploct Level 49 @ Muscle Band
Power-Up Punch/Sucker Punch/Circle Throw/Soak
 
Last edited:
more like Greedent & Friends' eggcelent adventure, am i right?


It didn't occur to me until watching it this time but...Raihan doesnt really take advantage of the sand at all, huh? Like yeah his pokemon are all immune to it but Sand only passively buffs his Gigalith. There's no one with sand rush, power OR veil. And his typing dissuades you from bringing any "gotchas" like Solarbeam having its power nerfed or whatever.
This is all a fairly halfhearted gimmick for this gym, you could replace the Gigalith & Sandaconda with any 2 dragons and nothing would really change.
 
Wait, you can get Choice Specs in Spikemuth?! Not that it would have really helped my solos much, but I thought the only Choice item you could find in the campaign was the Choice Scarf from delivering the letter in Ballonlea. Then again, I also failed to find Leftovers in the Wild Area, meaning several playthroughs relied on the Shell Bell for the early game.


"Piers gives a wonderful avant-garde performance, quite literally showing how voiceless the impoverished citizens of Spikemuth are."


That line by itself justifies the time spent reading this playthrough. Every time I see Hop talking in battle, I flap my lips silently like he does to mock the low production values.


EDIT: Greedent may be a candidate for being abandoned because of the Bea rematch and Leon's Ghosts.
 
Route 10

The final route of the game, and not a particularly long one – my low PP team welcomes the lack of a conventional Victory Road. I'm very thankful to have Grapploct when I run into a trainer with Gigalith and Rhydon. Rock-types are nowhere near as annoying as they were back in Circhester Gym. I also have a bit of a scare with a Darmanitan, as I realize I somehow have no ice resists. It flinches Grapploct twice with Icicle Crash, but I avoid disaster by having Grapploct Sucker Punch on its final turn and have Boltund revenge KO. The remaining Fighting types this trainer has are no match for Cramorant, thankfully.

The Final Pokemon

Upon arriving at Wyndon, I can trade a Frosmoth for Duraludon, my final Pokemon. They can also be found on Route 10 and the Wild Area, but they either have awful encounter rates or are crazy overleveled (Level 65). The trade Duraludon is Adamant with 15-straight IVs and comes with Night Slash, one of its egg moves. Between this and Raihan's Duraludon, I'm not really sure why the game tries to sell you so hard on a physical set when special is clearly better, but it works out here since it has no special egg moves. Speaking of, the remaining egg moves to get for it are Slash and Mirror Coat. It shouldn't be terribly surprising that un-STAB Night Slash and Slash don't accomplish much at this point, so Duraludon's niche is using its poor special defense to destroy special attackers.

And it is, unfortunately, a niche I think is more useful than Greedent's at this point (adman2 was right). While Greedent put up several impressive fights against the various rival battles, these fights aren't that difficult anyways. And since Greedent needs to Defense Curl before attacking, it hates switching out, something that will be more common against tougher trainers. As adorably chunky as it might be, I don't think Greedent is powerful enough at this point to offset its lack of flexibility.

But before Duraludon can complete its moveset, I need a way to breed it since the trade is male. Rather than catching a wild female, I avoid the terrible encounter rates and go for a Ditto instead. It's more annoying to catch than I anticipate, though. It's higher level than my team and also has a low catch rate of 35. I have it first transform into my Duraludon, but I forget that Transform only gives you 5 PP of each move. Since Duraludon only knows Night Slash right now, Ditto quickly struggles. Ironically, Greedent would have been the best option for it to Transform into. Everything else has its issues: Cramorant/Corviknight (Roost), Grapploct (Circle Throw), Eldegoss (Sleep Powder immunity), and Boltund (Double-Edge). I decide Boltund is the best option, with Sand Attack and Sleep Powder greatly lowering the risk of Double-Edge self-KO. I get lucky and catch the Ditto in only 3 balls. With Ditto caught, I use my Dwebble to pass Slash and my Vanillite to pass Mirror Coat onto Duraludon. Now, for the Pokemon League!

Marnie (Semi-Finals)


Marnie adds a Gigantamax Pokemon, and now I don't even have Greedent...I'm doomed! Well, not really. The level curve gets kind of weird at this point, and my team outlevels the next few fights. Grapploct can puts in a lot of work here in Greedent's stead. It barely misses an OHKO on Liepard with Power-Up Punch, but this is actually beneficial since it causes Marnie to use her Full Restore, letting Grapploct pick up the KO for free with its extra attack. Scrafty wastes its turn with Scary Face, then gets OHKOd by Circle Throw. Toxicroak resists my entire moveset (it even absorbs Soak), but Grapploct can still overpower it. It starts with Venoshock as I Power-Up Punch, then uses Swagger (again used for my own benefit with Persim Berry) and gets KOd by Circle Throw. Morpeko isn't able to finish off Grapploct either, so it gets punched into next year with Power-Up Punch.

Grapploct gives Grimmsnarl a light tap with 4x resisted Sucker Punch, then gets destroyed by Max Starfall. Cramorant comes in and stalls out the other two Gigantamax turns with Feather Dance. While one is enough, I don't want to switch to anything else while Snooze is operational. Cramorant falls asleep, and I let it snooze away and swap to Corviknight, who finishes off Grimmsnarl with a vicious Choice Band Sky Attack.

(Team: Grapploct/Cramorant/Corviknight/___/___)
(Kind of late to start now, but I thought these post-battle team summaries would be nice to quickly visualize how taxing a battle was, especially since team-matching can be easy to forget which shrinks my team. Text color denotes health remaining, struckthrough names fainted, and “___” are slots I could have used but didn't need.)

Hop (Semi-Finals)


I lead with Cramorant and give a light peck to his Dubwool with Aerial Ace, then swap to Boltund on Body Slam. With the Magnet instead of Choice Specs, Boltund stops just shy of KOing Dubwool and takes another Body Slam. This is on purpose so that Hop wastes his Full Restore early. The Magnet Discharge is still strong enough to 2HKO, so it does just that when Hop heals. Snorlax is sent out, and I switch to Leftovers Grapploct on High Horsepower. Grapploct 2HKOs Snorlax with Power-Up Punch and takes a Heavy Slam. Corviknight comes in afterwards. With the Leftovers recovery, Grapploct has enough HP to survive its Drill Peck, and retaliate with its trademark Power-Up Punch into Sucker Punch for a KO.

Pincurchin is next, and Grapploct almost OHKOs it with +3 Sucker Punch. Circle Throw's negative priority is definitely anoying sometimes... Duraludon finishes it off with Night Slash. If the Full Restore wasn't used earlier, Hop would have healed Pincurchin now. While Duraludon can beat Pincurchin, it needs full HP for the Inteleon that's about to come out. With full HP and the Assault Vest, Duraludon can barely survive its Max Quake (it's only based off Mud Shot), and deliver the first of many OHKOs with Mirror Coat.

(Team: Cramorant/Boltund/Grapploct/Duraludon/___)

Macro Cosmos

nothing about this section makes any sense

Oleana


(Annoyingly, Duraludon learned Flash Cannon on the elevator ride and I couldn't delete it before this fight. Inconsequential, but it bugs me.)

Duraludon leads with a Rawst Berry, which lets it 2HKO Froslass with Night Slash as it uses Will-o-Wisp twice (one normal, one while burned). She then sends out Salazzle, which has an ironic way to defeat Duraludon. With Incinerate, it deals just little enough damage to avoid a Mirror Coat OHKO while still 2HKOing Duraludon with the burn. Whereas Flamethrower would have just been a simple Mirror Coat OHKO. Well played, I guess! Cramorant finishes it off while getting poisoned from Poison Gas.

Tsareena's next, and Cramorant's able to 2HKO it with Aerial Ace while taking a lot from Acrobatics. Milotic comes out and I switch to Boltund on Surf, which is a 3HKO. Boltund almost OHKOs it back with Specs Discharge, and it just uses Aqua Ring on its last turn. Boltund fries it for good on the following turn. Gigantamax Garbodor rounds out her squad (???), and Boltund gets off a Discharge for around 40% before going down to Max Quake. CB Sky Attack from Corviknight finishes it off over the following turns. Garbodor even speeds up its own demise by summoning sand from Max Rockfall, heh.

(Team: Duraludon/Cramorant/Boltund/Corviknight/___)

Next time, I'll go through the Finals of the Champion C-wait, what's this?!

Bede (Finals?)


Bede's last stand gets off to a poor start as his Mawile gets OHKOd by Specs Discharge. It perks up a bit with Gardevoir, though, which avoids a 2HKO from Discharge by using Calm Mind. On its next turn, it almost OHKOs Boltund with Psychic. Bede then uses a Full Restore, and Discharge only does a little over a third now. After another Discharge, Gardevoir gets fully paralyzed. To neutralize my good luck, I use a Paralyze Heal (oh no, an item!) to waste a turn. It uses Psychic to finish Boltund on the turn it should've had, but Cramorant swiftly gets revenge with Aerial Ace. Rapidash is next, and Cramorant 2HKOs it with CB Aerial Ace while almost going down to 2 Psycho Cuts.

Last but certainly not least is Hatterene, which Gigantamaxes and is incredibly powerful. I also don't really have enough fodder to waste away its Gigantamax turns since I'm matching his small team size. Cramorant gets a light hit off before taking divine retribution from Smite. While Duraludon could technically survive Smite with the Assault Vest and then Mirror Coat, I'm then at the mercy of confusion. So instead I have Grapploct Soak Hatterene (of course, it gets obliterated in the process) to remove the Fairy STAB, which lets Duraludon survive Smite while using a Persim Berry. It's important that sun isn't up at this point, or else Hatterene would still OHKO Persim Duraludon with Max Flare. This is why I had Cramorant fighting Rapidash instead of the much bulkier Corviknight – Hatterene would use Max Flare on Corviknight, setting up sun. With this set-up, Duraludon can safely take whatever Hatterene throws at it and reflect its ludicrous power back at it with Mirror Coat.

(Team: Boltund/Cramorant/Grapploct/Duraludon)

Okay, now I'm done, and next time I shall indeed finish up the Champion Cup with Leon at the end! Bonus points for finally being a Hop-free update.

Team Status:

Eldegoss
Level 55 @ Leftovers
Leech Seed/Sleep Powder/Worry Seed/Poison Powder

Corviknight Level 54 @ Sharp Beak
Sky Attack/Rock Smash/Tailwind/Roost

Boltund Level 56 @ Choice Specs
Discharge/Sand Attack/Double-Edge/Howl

Cramorant Level 55 @ Choice Band
Aerial Ace/Feather Dance/Roost/Aqua Ring

Grapploct Level 55 @ Amulet Coin
Power-Up Punch/Sucker Punch/Circle Throw/Soak

Duraludon Level 55 @ Persim Berry
Night Slash/Slash/Mirror Coat

Greedent Level 50 (RIP)
Defense Curl/Last Resort

 
Last edited:
Definitely didn't expect physical mirror coat duarludon to round out the roster. I'm really loving this leg of the challenge, though it's funny to see the levels continue to rise and rise on yoru end despite your movesets.

Macro Cosmos

nothing about this section makes any sense
i laughed
 
And now, the Finals of the Pokemon League!

Nessa (Finals)


Admittedly, it gets off to a boring start. Nessa has no real defense against Boltund, and with the Choice Specs it zaps straight through her team. She might have some hope if she actually sent out her Drizzle Pelipper before her Swift Swim Pokemon, but alas...She also ditches Swift Swim on her Drednaw, so Boltund is faster and gets off a heavy hit with Discharge before fainting to Stonesurge. I have several Pokemon left to deal with this, but the quickest way is to use the new Utility Umbrella of all things. This negates the rain damage boost, which lets Grapploct survive Stonesurge and finish it off with Power-Up Punch.

(Team: Boltund/Grapploct/___/___/___)

Bea (Finals)


While Nessa is understandably easy, Bea is also annoyingly simple. Boltund doesn't even need the Choice Specs here. It quickly Discharges her Hawlucha lead, then 2HKOs Falinks as well. It retaliates with Rock Tomb, but the speed drop isn't enough to stop Boltund's lightning speed. Sirfetch'd is also 2HKOd and almost finishes off Boltund with Brick Break. Boltund's surprisingly long reign of terror ends with her Grapploct's Submission, and I send out Corviknight. It finishes off with Sky Attack while getting Octolocked. Thankfully the effect goes away when Grapploct faints, so Corviknight only ends up lightly weakened with -1 Defense. This leaves it with enough defense to survive Machamp's Max Flare, so it's able to charge up another Sky Attack and OHKO with the Choice Band even against its massive Gigantamax HP.

(Team: Boltund/Corviknight/___/___/___)

Raihan (Finals)


Raihan, not content with just sand, now adds the power of rain and sun to his team. Of course, anyone with a basic grasp of team-building knows this is a terrible way to build a team. Against all odds though, Raihan makes it work and is a bit tricky to deal with. This is mainly because he has more actual Dragons now, which aren't easy for my team. He starts with his only non-Dragon, Torkoal. This is an ideal time to use Boltund before the myriad of Electric resists, so it 2HKOs with Discharge while getting Yawned. A Chesto Berry negates this, though. Flygon is next, and Boltund uses Double-Edge before getting rocked by Earthquake. Corviknight takes little damage from Flygon's Crunch and finishes it off with Sky Attack.

Turtonator is next, and pretty dangerous. It likes to use Shell Trap, which only goes off if hit by a physical move. I tried having Boltund in earlier strats BS its way with Discharge through failed Shell Traps, but Turtonator would eventually get the hint and start using other moves. The hard way it is, then. I switch to Eldegoss, who just needs to use Leech Seed. Turtonator uses Shell Trap then Sunny Day, so Eldegoss is spared. I then go to Cramorant. Leech Seed healing and its Fire resistance lets it safely attack Turtonator with Aerial Ace even with Shell Trap, and a Maranga Berry buffs its special defense further. I get a bit lucky with damage rolls and don't trigger Raihan's Full Restore, but it gets used elsewhere. Once Turtonator goes down, Goodra comes out. It exclusively uses special moves, so this is a job for Duraludon. It dodges a Thunder on the switch (50% accuracy in sun), then Mirror Coats nothing as Goodra sets up rain. After that it Mirror Coats 2 Surfs back and wins. Duraludon has a Sitrus Berry so it can survive three hits if needed, though.

Raihan's last Pokemon is his towering Duraludon, and it quickly shows mine who's boss with Depletion. Cramorant is sent in, and now naturally outspeeds with no need for the Choice Scarf like last time. At -2 attack from Feather Dance, his Duraludon is now a lot closer to mine. It fails to KO Cramorant with Max Rockfall, then I swap to Eldegoss and Leech Seed, before going back to Corviknight. Unfortunately, I've run out of slots for this battle and can't use the much stronger Grapploct. Once out of Gigantamax, Duraludon can actually ignore the Feather Dance by using Body Press instead. This hits into Corviknight's Rocky Helmet, which in tandem with Leech Seed and Rock Smash quickly whittles its health down. Raihan does use his Full Restore though, and Rock Smash's defense drops weaken Body Press, causing Duraludon to switch to Stone Edge and ignore the Rocky Helmet. Nevertheless, Corviknight is in no danger at this point and eventually wins.

(Team: Boltund/Corviknight/Eldegoss/Cramorant/Duraludon)

It's time for the plot, I guess...

Rose


Rose's Escavalier lead is honestly his most dangerous Pokemon, with a non-existent weakness and crazy offensive prowess. Corviknight “walls” it typing-wise, but it's not as safe as you'd expect. It takes 3 hits as it 2HKOs with Sky Attack, and Escavalier's Swords Dance and 2 Iron Heads does around 2/3rds of it's HP. And Roosting is a bad idea when Swords Dance is around. Klinklang comes out, and Corviknight gets a lucky damage roll and survives Wild Charge, and again gets lucky with a Rock Smash defense drop. None of this really matters, though – Grapploct KOs with Power-Up Punch into Sucker Punch regardless, so this only saves time by ignoring the Sucker Punch turn. Klinklang's Wild Charge doesn't do too much to Grapploct. The AI tends to poorly weigh the viability of multi-hit moves like Gear Grind, only looking at the listed power, which is only 50 in this case.

Ferrothorn is next and gets 2HKOd by Power-Up Punch since Grapploct started at +1. Ferrothorn uses Gyro Ball for a decent amount of damage. It would do much more if it used Power Whip, which Grapploct actually needs its Sitrus Berry to survive with the prickly addition of Iron Barbs. The extra HP Grapploct is left with is pointless, though, since the oncoming Perrserker still KOs with Iron Head. So Grapploct gets off a Sucker Punch before Perrserker destroys it. Boltund finishes the job with Discharge, and Rose sends out his Gigantamax Copperajah. I get a free switch to Cramorant on Max Quake, then Feather Dance twice while taking Max Mindstorms. Copperajah's back to normal, so I go back to Boltund. It just barely 2HKOs with Choice Specs Discharge while taking a -4 Zen Headbutt and High Horsepower.

(Team: Corviknight/Grapploct/Boltund/Cramorant/___)

Eternatus


This is really more of a cutscene than anything, but here we go anyways. Honestly, I don't really care about “team-matching” with Eternatus, but it's feasible with Duraludon's Mirror Coat. Eternatus's random AI actually makes the fight harder, since only Dynamax Cannon does enough damage to deliver an OHKO back with Mirror Coat. On my winning attempt I see an ineffective Cross Poison, then reflect its Dynamax Cannon back at it for a swift OHKO.

Now for Eternamax Eternatus (what a mouthful). Duraludon survives its Max Wyrmwind and Mirror Coats it back for one of the only hits you'll ever see that deals more damage than Zacian or Zamazenta. After that they do basically all the work as Night Slash's damage is pathetic. On the third turn, Duraludon gets targetted by Max Wyrmwind again (second turn is always Max Flare on one of the dogs) and faints, so I send in Grapploct who's really just there to sit back and let the dogs finish the job. They do just that on the next turn, then jump off into the skyline. Cool plot. Honestly I wish Zacian and Zamazenta weren't here for this fight, I think it would be pretty intense as a 12v1 with Hop.

Champion Leon


Anyways...back to the main attraction. Leon rounds off the game with a much-needed level bump and a team that puts everyone else in the Pokemon League to shame. He starts with Sword and Shield's spiritual mascot Aegislash. If piloted correctly, Aegislash is absurdly difficult for this team to deal with (most teams, really). Fortunately, Leon suffers from the same AI deficiency I abused years ago in my Untrained NFE Run versus Wikstrom. If Aegislash can pick up a KO, it will go for that at the expense of King's Shield, leaving it in the frail Blade forme. Boltund capitalizes on this by doing around 40% with Choice Specs Discharge, then taking around 80% from Shadow Ball. This gives a pretty good idea of how ridiculous Aegislash could be, heh. But since it's too bloodthirsty to leave Blade forme, Boltund KOs it next turn.

Next is his Haxorus, which wrecks most people with its coverage and godly offense. However, Corviknight has one of the few typings good versus it, and gets a free switch-in on Earthquake. Outrage still deals around 30% though, so it can be hard to actually attack with Sky Attack's charge turn and needing to survive another hit to Roost. However, since my first Rock Smash gets a defense drop, I can go for a quick KO instead that forgoes the need to Roost. I charge up Sky Attack immediately after, so I've taken two Outrages so far. Haxorus's third Outrage on the next turn brings me to critical HP and triggers Liechi Berry, which lets Sky Attack (virtually) OHKO his -1 defense Haxorus.

Leon then counterpicks my absent Rillaboom with his Cinderace. This is way too dangerous to switch anything in to, so Corviknight takes one for the team in a fatal game of football. Cramorant comes in to play instead. Acrobatics deals around 60%, which lets Cramorant barely survive a second one after Feather Dancing and Roost back up. Cramorant then does another round of Feather Dance and Roost, and it's safe barring a crit. Since it had the Rocky Helmet for 4 Acrobatics, Cinderace has lost 2/3rds of its health, and it goes down next turn to another bit of recoil and an Aerial Ace. Dragapult is next, and I let it demolish Cramorant with Thunderbolt. Grapploct actually has a really good match-up versus it, since Sucker Punch 2HKOs while getting around its speed, and Shadow Ball only does around half.

Leon's next Pokemon is Seismitoad, which is another choice affected by starter. While not a conscious decision when picking Grookey, Seismitoad is definitely the easiest. Mr. Rime's coverage (Freeze-Dry, Psychic, Thunderbolt) is awful for this team and necessitates a Mirror Coat which is problematic for later, and Rhyperior is fucking invincible. It would probably need some kind of Leech Seed and Corviknight stall (EDIT: thinking on it more there's the cheeky strat of Soaking it with Grapploct then KOing it with Boltund, hehehe). Thankfully it would be paired with Rillaboom, the easiest starter to deal with. Anyways, back to Seismitoad! I go to Eldegoss who unfortunately has no damaging Grass moves to beat Seismitoad with. Toxic and Drain Punch ruin any chance of stalling, so Eldegoss just acts as a pivot with Leech Seed then Sleep Powder, and I go back to Grapploct. The switch back in is guaranteed safe due to the slower Sleep Powder, and the Leech Seed gives Grapploct enough HP to survive Earthquake if it wakes up. It does ASAP, but uses Toxic since it can't KO with Earthquake. Power-Up Punch into Sucker Punch KOs it with the Leech Seed damage that's been accumulating.

And now for the finale, Charizard. This gets some mockery from fans for being a bit of an anemic ace compared to the rest of his team, but for my team? Holy shit, Charizard is king. Its Fire/Flying STABs rend Corviknight/Eldegoss/Grapploct asunder, and passive Cramorant gets quickly overwhelmed by Air Slash flinches. Boltund does okayish, but it can't even OHKO Charizard with Specs Discharge after the Gigantamax ends, and only does around half when it's up. And the problem with waiting until after Gigantamax is that if Max Airstream is used, Charizard is now faster and OHKOs Boltund with Fire Blast. One hope remains: Duraludon. Except, it's actually OHKOd by Wildfire even with the Assault Vest. So Gigantamax needs to be “stalled” out. If the picture I've painted describes anything, though, it's that stall doesn't exist here, and so I make three sacrifices to the vengeful Kanto gods: Grapploct, Boltund, then Eldegoss. Duraludon is all that remains of my team, and it survives the now-normal Charizard's Fire Blast and deals the ultimate blow with Mirror Coat.

(Fun fact: if Charizard misses Fire Blast at the end, the Wildfire damage causes Duraludon to just faint from the next successful Fire Blast. Even more fun fact: this would be a nightmare if Leon just had a normal Dynamax Charizard that set up sun, lol.)

(Team: Boltund/Corviknight/Cramorant/Grapploct/Eldegoss/Duraludon)

And so, my eggy companions and I are crowned the champions of Galar. I've had a pretty champion time so far, but I'm not quite done! Next time I'll do the postgame quest.

Team Status:

Eldegoss
Level 58 @ Zoom Lens
Leech Seed/Sleep Powder/Worry Seed/Poison Powder

Corviknight Level 57
Sky Attack/Rock Smash/Tailwind/Roost

Boltund Level 60 @ Choice Specs
Discharge/Sand Attack/Double-Edge/Howl

Cramorant Level 58 @ Rocky Helmet
Aerial Ace/Feather Dance/Roost/Aqua Ring

Grapploct Level 58 @ Black Belt
Power-Up Punch/Sucker Punch/Circle Throw/Soak

Duraludon Level 60 @ Assault Vest
Night Slash/Slash/Mirror Coat
 
Last edited:
The post game starts with a vision of the Slumbering Weald, but there's something I have to take care of in Circhester before investigating that.

Game Freak's Morimoto


Shigeki Morimoto's team has improved significantly from the Gen 5 games (monkeys, Liepard, Swoobat...) and is now quite threatening. He leads with Grapploct and Cursola. The general goal of this fight is to keep Grapploct alive as long as possible since it's the least threatening Pokemon. It has a weird set of Octolock/Dig/Body Slam/Detect, which leaves it with no STAB, Detect which doesn't matter if you're ignoring it, and Dig which is a two-turn move. Octolock quickly ruins anything it touches, but that's par for the course with anything else in this fight, and at least Octolock isn't always used.

So naturally I start by focusing on Cursola. It's easy to remove with its low defense and speed, so Cramorant and Choice Band Duraludon focus-fire on it with Aerial Ace and Night Slash. Perish Body triggers on both hits (this isn't a random ability), and Grapploct Octolocks Cramorant. Morimoto replaces Cursola with Stonjourner. Cramorant Feather Dances it, and I swap Duraludon for Boltund. Stonjourner's Stone Edge is so strong that Cramorant still needs a Charti Berry to survive even after the Feather Dance, which it does with around 25% health remaining. Grapploct then Octolocks Boltund as well, leaving both my active Pokemon trapped. Boltund uses Discharge on the next turn and does around half of Stonjourner's HP, weakens Grapploct, and KOs Cramorant. Since Cramorant was at -2 defenses, a perish count of 2, and 25% HP, it's not a big loss. Stonjourner then does around 75% to Boltund with Stone Edge, and Grapploct Digs underground. I replace Cramorant with Duraludon on the following turn and Discharge again, finishing off Stonjourner and denting my Duraludon. Duraludon Slashes at nothing before Grapploct emerges from the ground and KOs Boltund.

Morimoto sends out Coalossal, and I send out Eldegoss. I swap out Duraludon for Grapploct who will make great use of Eldegoss's support, and his Grapploct wastes its turn with Detect. Eldegoss abuses Coalossal's slow speed to waste its turn with Sleep Powder. Next turn, Eldegoss Leech Seeds his Grapploct as it retaliates with Octolock. My Grapploct starts boosting its attack by Power-Up Punching Coalossal for around a third of its health. Now, this fight goes fine if Coalossal sleeps for two or more turns, but sadly it wakes up after one turn here and OHKOs Eldegoss with Flare Blitz, so I'm in for a bumpier ride. Duraludon comes back in. With the Flare Blitz recoil from obliterating Eldegoss, I'm pretty sure Grapploct can finish off Coalossal by itself with Power-Up Punch, but I have Duraludon chip at it with Slash to be safe. His Grapploct Body Slams mine for a comparatively tepid hit of 40% to end the turn. He sends out Dragapult, and this is mainly what Grapploct set up for. At +2, it can simply OHKO with Sucker Punch. Before that, though, Morimoto wastes time with Detect and Protect from his Pokemon, which is purely to his detriment since Leech Seed is ticking away at Grapploct's health (it's at around half health now). After that waste of time, I resume my plan and swat Dragapult away with Sucker Punch while Slashing his Grapploct. Unfortunately, it barely holds on and Octolocks Duraludon. Since Morimoto is about to send out his last Pokemon, there's no merit in keeping the relatively tame Grapploct around, so I now want it gone as soon as possible.

That final Pokemon is a Dynamaxing Snorlax. I know Morimoto will use a Full Restore on Grapploct, so while my Grapploct can deal a lot of damage to Snorlax, I focus on his Grapploct instead since Corviknight can deal with Snorlax later. I have Grapploct Circle Throw and Duraludon Slash, which would KO but Circle Throw misses... Duraludon then gets OHKOd by Snorlax's Max Quake, and I send in Corviknight. It uses Tailwind to have my Grapploct move before his with the new speed mechanics and use Power-Up Punch, which brings his Grapploct to around a third. Both of Morimoto's Pokemon target my Grapploct and KO it. Since my Grapploct would have gotten to attack anyways, the Tailwind didn't really help at all – just poor improvisation on my part. I definitely should have Rock Smashed instead. I do that on the next turn and barely miss the KO, but I get a nice reversal of fortune and it only Body Slams instead of Octolocking. This triggers Corviknight's Kee Berry, raising its defense for Snorlax. It uses its last Dynamax turn on Max Knuckle, raising its attack, and Leech Seed finally finishes Grapploct off at the end of the turn. Now, Corviknight actually would be in a tricky situation with Snorlax, since it deals little damage and can't Roost safely due to becoming weak to Fighting when it does so. However, because said Fighting move is Superpower, it only has 5 PP, or basically 3 due to Pressure. So with the Kee Berry, Corviknight can survive without Roosting until the PP is stalled out. Once that's done, it can safely Roost as needed and defeat Snorlax with Rock Smash.

(Team: Cramorant/Duraludon/Boltund/Eldegoss/Grapploct/Corviknight)

Because this fight is totally optional for progressing the postgame quest, I actually reset upon finishing it to keep my levels a bit lower. It's not a big difference, but I may as well keep the challenge up. The first two fights of said quest are Hop followed by Sordward in the Slumbering Weald, but both have more difficult versions in this very questline so I'm not going to bother covering either. The initial Dynamax Pokemon assaulting the gyms are also trivial since I have 3 allies for them. Which makes the first fight to cover...

Sordward and Shielbert


The double battle in Wedgehurst. There's a lot of Pokemon here I really, really, want to Discharge, but the spread nature of the move means I'll annihilate Hop's team in the process. While Hop isn't an amazing ally, it's definitely better to keep him around as long as I can. So I lead with Corviknight instead alongside Hop's Dubwool, while Sordward and Shielbert lead with Golisopod and Bronzong. Golisopod First Impressions Dubwool for a lot of damage (no Fluffy), and it strikes back with Double-Edge. My Corviknight uses the Power Herb from Route 10 to instantly use Sky Attack and finish Golisopod off. Bronzong goes last and sleeps Dubwool with Hypnosis. Bisharp replaces Golisopod. On the next turn, Bisharp finishes off Dubwool, and Corviknight Rock Smashes Bisharp for around 40%. Bronzong sets up Light Screen, and Hop sends out Inteleon at the end of the turn. If I had gotten a defense drop with Rock Smash, Inteleon would KO Bisharp with Liquidation before it could abuse Defiant. But since I didn't, Inteleon has no target preference and goes for Bronzong instead with Sucker Punch. Corviknight Rock Smashes Bisharp again (and triggers Defiant this time), and both Bisharp and Bronzong target Inteleon, very narrowly missing a KO on it. Inteleon finishes off the weakened Bisharp and Corviknight Rock Smashes Bronzong, and Bronzong defeats Inteleon.

Hop sends out his last Pokemon, his own Corviknight, and Sordward also sends out his last Pokemon, Doublade. Our Corviknight duo does terrible damage to these Steel types, but at this point all I really need for them to do is weaken Doublade a little and finish off Bronzong. They do so after a few turns, and Klinklang is sent in. With Wild Charge, it's not long before it finishes them off, with my Corviknight going down first. With Hop's team mostly finished, Boltund is now free to be as reckless as it wants with Discharge. The first one KOs Doublade and weakens Klinklang, who just does a Wild Charge. Shielbert's alone now, and another Discharge finishes Klinklang off. Falinks is last, and gets 2HKOd by Discharge while aptly using No Retreat.

(Team: Corviknight/Boltund/___)

Galar Gym Dynamax Crisis

Now there's more Dynamax Pokemon to deal with, which means my allies are busy and I have to 1v1. I tried to keep “team” matching for all of them, but it's just not possible against Conkeldurr...it has way too diverse type coverage. So I just use 2 Pokemon. Choice Band Corviknight deals a heavy blow with Sky Attack while going down to Max Lightning and Stone Edge, then Cramorant swoops in and finishes it off. The other two can be soloed, though. Choice Band Grapploct 3HKOs Gigalith, while Corviknight stalls out the Haxorus with the Rocky Helmet and Roost. The Fairy Gym has already been taken care of by Bede who challenges us, but this fight is basically just an easier version of the Finals match (no Gigantamax) so I'm not going to bother covering it either. After the gyms are under control, it's time to see what lies at the Energy Plant...

Sordward


Our favorite classist dickhead, of course. He leads with a Sirfetch'd, and I opt for a bird battle with Cramorant. I outspeed and 2HKO with Aerial Ace while taking a hefty Meteor Assault for 60%. Bisharp is next, and deceptively dangerous. It likes to Swords Dance if it can't get a KO, at which point it can outspeed and OHKO Grapploct. So to counteract this I bait it in with Cramorant who gets OHKOd by Stone Edge which Grapploct easily switches in on. Grapploct beats Bisharp as it Swords Dance with Power-Up Punch into Sucker Punch. Doublade comes out and gets Soaked, which neuters its STABs and sets it up for an easy KO with Boltund. I swap it in next turn on Sacred Sword and OHKO with Discharge. Since Boltund got hit (Doublade often just Swords Dances on the switch), Golisopod snipes it with First Impression. Cramorant's typing counters Golisopod as well though, so it gets the job done easily enough.

(Team: Cramorant/Grapploct/Boltund/___)

Atop the Energy Plant lies the twin dogs, the first of which is Zamazenta charging at me for a simple fight. Corviknight can easily outstall it with the Rocky Helmet and Roost. Its random AI prevents it from spamming Crunch to get defense drops, thankfully. More notably, there's also a dog with a sword up here.

Catching Zacian


Zacian is infamous for being one of the most absurd Pokemon ever created, as it completely dismantles everything. While I could just Master Ball it, that's no fun. The first order of business is to weaken it. Boltund dons the Choice Scarf here and finally finds a use for Sand Attack. Zacian's attack may be absurd, but a miss is a miss. After my first Sand Attack, Boltund actually barely survives Crunch (it usually doesn't) and gets off another Sand Attack. After that, I send in Corviknight, who wants Zacian to run into its Rocky Helmet as many times as possible before it Swords Dances up. Unfortunately, it Swords Dances immediately, so I Tailwind upon seeing it and Rock Smash until Corviknight faints. Zacian gets off another Swords Dance in the meantime. There's one turn of Tailwind left, so Cramorant uses its one turn to be faster on Feather Dance. It's a pointless gesture, though, only dropping Zacian to +3. I hope for a miss on Grapploct, but it just faints. I do get a crucial miss on Eldegoss, though, who uses Sleep Powder. After that, I use Leech Seed then start spamming Dusk Balls. I get the maximum 3-turn sleep, but my catches aren't successful yet. After the third turn I know Zacian will wake up, so I try to use Sleep Powder. Unfortunately I don't get another miss from Zacian and Eldegoss goes down. Duraludon is my only Pokemon left, and my last-ditch Dusk Ball is successful. Zacian is mine, but I don't need some worthless Pokemon that can't learn egg moves. Once that's resolved, Hop calls from the Slumbering Weald about having one last battle.

Final Hop Battle


Hop still leads with his trusty Dubwool, and it still gets 2HKOd by Choice Specs Discharge from Boltund. It does retaliate with a pretty strong Double-Edge, though. Next is Snorlax, which prompts a switch to Eldegoss on Earthquake. I Leech Seed it, then take a full-power Heavy Slam which brings me to around 40%. However, with the Leech Seed healing and the HP I get from Regenerator from switching out, Eldegoss is almost back up to full HP. I go to Corviknight, who quickly stalls out Snorlax with Rock Smash, Rocky Helmet, and Leech Seed. Like Morimoto, Roosting here is dangerous since he's using Hammer Arm, but Leech Seed heals so much HP that Corviknight doesn't need to do so. Hop also burns his Full Restore here. While it's easy to prevent him from using it on Snorlax, it's not so easy later and this is the ideal time to burn it since Snorlax is basically harmless.

Then he sends out Pincurchin, which is more annoying than you'd expect. Its Electric STAB is obviously a problem for Corviknight and Cramorant, Poison Jab messes up Eldegoss, Boltund's Double-Edge doesn't do that much damage and has to deal with recoil and Recover, and while Duraludon walls Pincurchin it slowly loses because its damage output is terrible and Pincurchin has Recover. This leaves Grapploct, who wins 1v1 but can't switch in. Since I need to sacrifice something anyways, I make the most of it. I use Eldegoss to pivot off of Zing Zap to Cramorant, letting it safely come in on Poison Jab. Then I Feather Dance it as I faint. Grapploct comes in and 3HKOs with Power-Up Punch while taking 2 Zing Zaps. The first triggers the Kee Berry to raise Grapploct's defense. Corviknight comes in, and with the defense boost it can't quite OHKO with Drill Peck. Unfortunately, I can't quite OHKO either with Power-Up Punch into Sucker Punch like last time due to Hop's increased levels, so Grapploct goes down to another Drill Peck. Duraludon picks up the KO with Night Slash.

Next is Inteleon, who now outspeeds Boltund and would be an issue for it. Thankfully Duraludon is fine, though. The Assault Vest is actually detrimental here since it prevents Mirror Coat from OHKOing, so instead I use an Aspear Berry to protect against Ice Beam's freeze chance. Duraludon takes Ice Beam for around 70% and gets the Mirror Coat OHKO. Last is Hop's...Zamazenta?! Ubers being added to normal teams like this is pretty cool; I wish they'd do it more often. Anyways, Zamazenta easily finishes off Duraludon with Play Rough. I send in Eldegoss, who takes a lot from Behemoth Bash, but survives and uses Leech Seed. I swap to Corviknight without taking too much damage from another bash. Zamazenta's strongest move on Corviknight is Crunch, so between Leech Seed and the Rocky Helmet it's not too hard to stall it out with Roost. Zamazenta gets an early defense drop with Crunch, so it's good to have the Full Restore used earlier before it can overwhelm Corviknight with a little luck. Without that Full Restore, it only lasts 3 turns against Corviknight before going down.

(Team: Boltund/Eldegoss/Corviknight/Cramorant/Grapploct/Duraludon)

An Alternate Timeline

I'm playing Sword version, but in Shield version Zacian and Zamazenta swap roles, which most notably means in Shield version that Hop has Zacian instead. Zacian is far more dangerous than Zamazenta, partially because of its stats and ability but also because Hop's has Wild Charge to hit Corviknight. So I thought it would be interesting to theorymon how the fight would go if he had Zacian.

Everything up to Snorlax is the same, but diverges a bit when I get to Pincurchin. Instead of pivoting to Cramorant, I simply sacrifice Boltund to it instead. Grapploct 3HKOs it with much less HP remaining, and I swap to my own Corviknight when he sends out his. I should be victorious with Rocky Helmet and Roost, though his knowing Swagger might get annoying since I would want to finish with as close to max HP as possible. Inteleon would be sent out next, and should do around half with Snipe Shot as I use Tailwind. On the following turn I would sacrifice Grapploct. The next action would require some pre-battle set up – I would want Duraludon weakened enough so it survives Ice Beam, but then faints to its own Life Orb recoil. Unlike a lot of fights you aren't healed before here, so it's possible. With this HP set-up, Duraludon would still OHKO it with Mirror Coat, but faint in the process. We both send out new Pokemon, mine being Cramorant and his being Zacian. Since Duraludon didn't need to faint to Zacian, one turn of Tailwind remains, so Cramorant is faster and can Feather Dance Zacian before going down.

In its weakened state, Zacian can't OHKO Eldegoss with Behemoth Blade, so I would use Leech Seed. From here, Eldegoss and Corviknight's types complement each other nicely. Corviknight can switch in on Behemoth Blades meant for Eldegoss, and Eldegoss switches on Wild Charges meant for Corviknight. If Corviknight had about half of its HP remaining, I think it could do this routine twice (Eldegoss can do it indefinitely with Regenerator), which should be enough damage to KO Zacian between the Wild Charge recoil on Cramorant, 2 Rocky Helmet turns and 4 turns of Leech Seed damage. If it could only do this routine once, I'm positive taking the time to find a Sticky Barb for Cramorant to pass on would seal the deal, though.

Hall of Fame

I'll be ranking my team from most to least valuable here. Not to downplay anyone too much, though – everyone played their part.

Boltund Level 64 Discharge Sand Attack Double-Edge Howl


Boltund has 4 moves, but by and large it is a simple Pokemon – it Discharges, Pokemon faint. Having a no-nonsense move on a fast Pokemon like this proved to be a godsend. It especially took off once it got the Choice Specs, unsurprising for a Pokemon focused on one move. Its other moves did still have some niche uses, though, especially Howl.

Grapploct Level 61 Power-Up Punch Sucker Punch Circle Throw Soak


Grapploct starts off slow, but Power-Up Punch and Sucker Punch is an amazing combo that was consistently able to tear holes in my opponents' teams. While it usually required careful timing to be used at its best, the results were always worth it.

Corviknight Level 62 Sky Attack Rock Smash Tailwind Roost


While Sky Attack and Rock Smash are very unwieldy attacking moves, Corviknight's stats, typing, and Roost were simply way too good to not add up to a great Pokemon.

Cramorant Level 62 Aerial Ace Feather Dance Roost Aqua Ring


Cramorant's niche came down to Feather Dance, but that's an instrumental move in nerfing the myriad of physical Dynamax Pokemon. Water/Flying is also a really good typing that found several uses throughout the game.

Duraludon Level 66 Night Slash Slash Mirror Coat


Duraludon was very one-note, but it was a very useful note that acted as a complement to Cramorant. Cramorant nerfed problematic physical attackers, while Duraludon outright KOd problematic special attackers.

Eldegoss Level 62 Leech Seed Sleep Powder Poison Powder Worry Seed


Eldegoss provided support, mainly Leech Seed and Sleep Powder. These moves were amazing to have around, but being stuck on a Pokemon with zero offensive presence was always annoying and sometimes even dangerous.

Honorable mentions go to Greedent, who chunked its way through several fights, Rillaboom, who was a great Pokemon in the early game, and Wooloo, who got this run started.

Conclusion

This run was pretty satisfying. It took a lot of planning to find a team that worked at all stages of the game, and overall I think my routing went well. I was very surprised at how little training was required for egg move parents. In total, I needed to raise a Hoothoot, Oddish, Stufful, and Tyrogue, and that's against a total of 36 egg moves passed. So despite needing to frequently pass egg moves to Pokemon, the pacing of the run was pretty brisk outside of the initial Wild Area trip (and that's true even on a normal run). As far as difficulty goes, I'd say this run was pretty moderate. While the rival fights were consistently easy (except the last Hop fight), the other boss fights generally provided a solid challenge, with some peaks in the end and post game. The off-beat movesets most of my team had to use were definitely what I was looking for in this run, and the various moveset inadequacies they had contribued to the challenge. Overall, while I think this run could've used a little more oomph, it was still satisfying to route and play out.

If you want more reading, I've done a bunch of other challenge runs you can find in my signature, but the most similar run to this one would be the Type Misfit Run I did in Crystal a few months ago, where I also force moveset restrictions on my team in the form of adhering to only my off-stats.

Thanks for reading!

?

Sword and Shield have expansion passes announced for later in the year! The exact contents of them are still pretty vague, but if they can act as more post-game content I'm happy to continue this run when they release.
 
Last edited:
Very well done and entertaining as always! I never did the Morimoto fight before...I knew it was there, but I never knew it was a double battle and that he could dynamax. That's pretty interesting.
 
Hey, Sky Attack was good enough for Twitch Plays Pokemon! Congratulations for completing the playthrough. You find ways to make a team playthrough challenging without relying on permadeath. It was also nice to see the Morimoto battle, since I never fought him with any of my solos.


Sordward and Shielbert remind me of American genealogists who think they're entitled to land because they bought some phony papers saying they are descendants of early colonists.
 
It's been a while! The first DLC expansion, The Isle of Armor, released over a week ago. To be perfectly honest, it's...just okay (I wrote a bit about it here), but there's still some interesting stuff for this run on the tail end. Reading between the lines, I'll straight up say that all of the battles that aren't explicitly postgame content are not worth discussing at all. GameFreak tried to scale them up for postgame files, but they did it in frankly the laziest (and I don't use that word lightly) way possible and changed nothing but the levels, so the teams are filled with unevolved Pokemon with 50-60 BP moves. Anyways, enough gloom, let's go to what's actually interesting.

Quick refresher on the rules, though the big one's in the thread title:
  • Egg moves only. In battle, I can only attack with egg moves. I am free to have whatever else in my party gaining exp.
  • Galar Pokemon only. This one might seem a little strange, so let me explain. While it's still largely true that egg moves are flavor supplements, GameFreak also often uses them to add useful moves to Pokemon when doing generational updates. While this doesn't mean Pokemon have completely functional movesets from their egg moves, it does, as a whole, make Pokemon much more functional than I'd like for this kind of run. So to remove the fine polish of generational updates, I'm sticking with only the new Pokemon.
  • Team size matching. This means that I only use up to as many Pokemon as my opponent uses. Since there's very little downside to having a large team with Exp Share (and my team will fill up quick), I thought this would be a good, immersive restriction to keep things more interesting. I will point out that I don't really care about this restriction for normal trainers, mainly for dumb scenarios where a trainer only has 1 Pokemon and I have a bad lead for it. Not that anyone would be able to verify this anyways since I'm not recording normal fights, but still, full disclosure.
  • No Dynamaxing. This is an extremely powerful mechanic that the player takes far more advantage of than the AI (mainly since they use it at fixed points only), so it's an unfair advantage for me. At least as far as the main story goes, I've hard far more fun treating Dynamax as an AI-only mechanic to give them a much-needed edge.
  • No in-battle items & Set mode. Standard stuff.

Exploring the Isle of Armor

While there's nothing that I couldn't get before in some fashion, some important items are significantly easier to get. EV reducing berries all have specific trees that makes it much easier to stock up and re-EV my team with vitamins if need be. And speaking of retooling my team, there's an island with respawning Mints. These are available at the Battle Tower for 50 BP, but that's quite a grind even for a normal team, and especially so for my sad little team (they do their best, though). I thought you had to be Level 100 to use these like Hyper Training, but turns out any Level will do. Some of my natures are pretty poor (Lonely Boltund, Calm Cramorant, Brave Eldegoss), so this is a nice potential upgrade.

Then there's the Cram-o-matic. While most players flocked to it for Apricorn Balls (and how disappointed they were...), everything else about it is deterministic. It can't generate every item (the highly useful but consumable Focus Sash is a sad exception), but I can use it to potentially get extras of useful items like Assault Vest and Life Orb, as well as Battle Tower-only items like Weakness Policy and Red Card. Definitely a good system to keep in mind!

Moving on to the story, while I said the battles weren't discussing for a while, there are still two choices to keep in mind. The Kanto starter picked influences Honey's team, while the tower picked for Kubfu influences Mustard's. Picking Squirtle gives her Venusaur which Corviknight totally walls, but as we'll see later this choice doesn't matter at all. The Kubfu choice does, though. I go up the Dark Tower so Mustard gets the Water Urshifu, which is easier to deal with since it's weak to Boltund's Discharge. On that note, since Kubfu is unfortunately a legendary (…why?) and therefore unbreedable with no egg moves, it's not a potential team member, nor does it have any relevance to this challenge for the tower. Fun fact, though: as a way to prevent players from getting stuck due to releasing Kubfu, if you have no Kubfu in your save file you can climb the towers with whatever Pokemon you please, even able to have a full team. Needless to say this makes the whole ordeal a joke. The Dojo trainers aren't happy about it, either. All of them either have no dialogue, or sound disappointed. Hey, it's not my fault Kubfu doesn't have egg moves!

In good news, climbing the towers is the last thing you can do before postgame, and thus all content from here on is dedicated postgame content. We can finally get into some sweet battles!

Goddess Vespiquen, Keeper of Honey

This, believe it or not, is really rough. Vespiquen is Level 80 with permanent Dynamax, EVs, percent damage reduction, and wide coverage with Attack Order/Acrobatics/Reversal. It's an absolute truck right out the gate, and quickly ascends to omnipotence with attack boosts from Max Knuckle, speed boosts from Max Airstream, and defense boosts from Defend Order. It's at least weak to everything under the sun and has wonky AI, but this fight still got me very close to using a Focus Sash.

Anyways, before it gets speed boosts I lead with Eldegoss to Leech Seed. I noticed Vespiquen always started with Max Knuckle against Eldegoss even though it can OHKO. This might sound helpful, but honestly Vespiquen getting started with an attack boost is unfortunate and Eldegoss can't utilize the extra turn very well. I use Poison Powder which will get cleared soon from the debuff clear wave (it doesn't get rid of Leech Seed, though), and I get a bad start as Vespiquen uses Defend Order on its second turn. Eldegoss can't do anything on the third turn, so this only buys some Leech Seed chip and makes life harder for my attackers. Once Vespiquen KOs it with Acrobatics, I send in Boltund before Vespiquen gets too bulky. I get off one Choice Specs Discharge for maybe 15% before getting OHKOd by Max Knuckle.

I send in Choice Scarf Cramorant, who outspeeds even if Vespiquen has gotten a speed boost. Rather than attack with Aerial Ace, I nerf its attack with Feather Dance. While I can't actually get it to negative attack, I can at least temporarily clear its attack buffs. As I do this, Cramorant gets OHKOd by Acrobatics even at normal attack. This is fine, though, as the stage is set for Corviknight. The goal is to get two Choice Band Sky Attacks off, one of the only moves that can scratch Vespiquen's impenetrable bee armor. While Vespiquen could theoretically KO Corviknight over these four turns with optimal plays (Max Knuckle early, always Acrobatics on the non-max turns), I ran through this fight several times and never saw Vespiquen KO Corvinight if it started at +0 attack. In this run, it used Acrobatics, Attack Order, Max Knuckle, and Acrobatics again, leaving Corviknight with just enough health to use its Sky Attacks. In tandem with all the Leech Seed damage over these turns, Vespiquen loses around 60% of its health as I do all this. I get a slight bit of extra luck as Vespiquen uses Defend Order on the fifth turn Corviknight is out. While it faints the next turn to Max Knuckle and can't get off a third Sky Attack, this gets another turn of Leech Seed. Vespiquen has maybe 10% of its health remaining at this point.

As encouraging as that sounds, Vespiquen is now nearly unstoppable. It's at +2 attack, +2 defenses, and +1 speed. And keep in mind Leech Seed doesn't tick on the turns a Pokemon faints. All I have are Grapploct and Duraludon left, both of which just get annihilated. To say the least, I'm scraping the bottom of the barrel now. However, I can be tricky with Duraludon's Steel typing by starting with Grapploct then switching to it. This makes Vespiquen more likely to use a Flying move that Duraludon resists and survives, getting another turn of Leech Seed and potentially Rocky Helmet recoil if Vespiquen uses a contact move. Unfortunately, it uses Attack Order instead of the contact Acrobatics, but Duraludon still survives this. On the next turn it uses Reversal and KOs Duraludon, but the Rocky Helmet recoil finishes it off. The only other way to damage it at that point was Grapploct's Sucker Punch, so this was quite close to the edge!

(Team: Eldegoss/Boltund/Cramorant/Corviknight/Grapploct/Duraludon)

Mustard

Now it's time for the final showdown with Mustard. His team is filled with strong, high-leveled Pokemon that nothing can deal with all that easily. In fact, this is the first battle I'm dipping into the money I've accumulated to buy vitamins, 17 Irons in total. I remove Cramorant's 60+ special attack EVs with Hondew Berries as well as 20 attack EVs with Kelpsy Berries, and use 9 Irons on it. The remaining 8 go to Grapploct, who hasn't maxed out its EVs yet. I also give it an HP Up I found on the Isle.

To start, I lead with Choice Scarf Cramorant for his Mienshao. I outspeed and 2HKO with Aerial Ace, taking Fake Out and Close Combat in return. While not immediately apparent, this is the reason for Cramorant's Iron kick. It survives the two attacks regardless, but later on in the fight it needs to survive coming back in on Stealth Rock, which the Irons let it do consistenly. For now, though, I swap it out for Duraludon as Luxray comes in with Wild Charge, which recoil from that and Rocky Helmet. Duraludon is faster and does okay damage with Night Slash, though half the damage will come from the Rocky Helmet. It's able to take 2 Play Roughs after the Wild Charge with its high defense and this lets it barely come out on top, and in rare Mirror Coat-less form at that!

Mustard then sends out his Corviknight which Duraludon crits for around 20% with Night Slash (lol), and deals some Rocky Helmet damage as it goes down to Body Press. The crit isn't as inconsequential it seems, since it lets Choice Specs Boltund finish off Corviknight guaranteed with Discharge. But even without the crit, missing the damage range just means Boltund would lose around half its health from Body Press, which usually doesn't matter. Now for Kommo-o, which is Mustard's second most difficult Pokemon to deal with. While it sacrifices its health and defense with its clanging moves, the omniboosting gives me very little time to deal with before my team drowns in its horrible cacophony. I start by swapping to Eldegoss to bait out the negative effects of these moves, and it uses Clangorous Soul to drain some of its health. On the next turn it almost KOs with Clanging Scales (defense drop for Kommo-o), and Eldegoss misses with Poison Powder. Thankfully, this isn't a scenario where it's needed (that would be double Clangorous Soul). Next turn Eldegoss faints to Aura Sphere, and Assault Vest Corviknight takes its place. With that special defense boost, it could survive two +1 Aura Spheres and use Sky Attack to finish it off. Though here Kommo-o used another Clangorous Soul then Aura Sphere, which works too. Had Kommo-o used Clangorous Soul twice on Eldegoss, Corviknight would be unable to survive 2 Aura Spheres and use Sky Attack, but the 3 turns of Poison (2 as Eldegoss uses it and faints the next turn, then 1 when Corviknight takes an attack) would sneakily finish its remaining third of health.

Now Lycanroc comes in for a late spritzing of Stealth Rock. Corviknight is in KO range from Stone Edge, but I get unlucky and Lycanroc uses Stealth Rock anyways. Corviknight faints the next turn to Stone Edge as it should have in the first place. Grapploct comes out, and now because Lycanroc has already set up Stealth Rock, it attacks with Play Rough instead. I survive and heave it out with Choice Band Circle Throw, but the problem arises with Urshifu. The point of Grapploct's Irons were so that it could survive Rapid Flow consistently but now that it's weakened that's not happening, so it goes down unceremoniously. I have to use a slightly different strategy to make up for this with Cramorant. Usually, since Grapploct takes two turns to go down, Cramorant would stall out the final Gigantamax turn and chip with Aerial Ace so Boltund could KO the ordinary Urshifu (and getting hit by Corviknight wouldn't matter). But since there will still be a Gigantamax turn left here, it uses Feather Dance so Boltund can survive. The potential issue is that since Grapploct and Cramorant are weakened, the AI could become unpredictable and use Max Knuckle. Even if Urshifu is at -1 attack, Boltund still faints to Rapid Flow because of Stealth Rock. Thankfully that doesn't happen, and Urshifu is at -2 when Boltund comes out. Boltund 2HKOs with Discharge and only takes a Max Ooze for whatever reason, but victory was near-assured at this point regardless.

(Team: Cramorant/Duraludon/Boltund/Eldegoss/Corviknight/Grapploct)

It wasn't until beating Mustard that I remembered the Mint Island was a thing, and I luckily found a Modest Mint which I used on Boltund. This would've guaranteed a KO on Corviknight, but oh well. “THE END” appears, but there's some postgame to this postgame extension to the original postgame.

Klara

This is the only Klara fight worth discussing, and it's still a bit of step down from Mustard. Klara has sadly become an honorable fighter and no longer sneaks Toxic Spikes on the field for free, but the rest of her team is substantially improved. She starts with Drapion, and Choice Specs Boltund outspeeds and 2HKOs with Discharge, as it often does. Crunch only does around 40%. Scolipede is sent out, and I swap to Cramorant on Megahorn. It still has the Choice Scarf to let it outspeed and 2HKO with Aerial Ace. Cramorant is very likely to get poisoned after its first Aerial Ace between Poison Point and Poison Jab, and precisely that happens on the jab. In fact, since Klara got high damage rolls she actually could let Cramorant succumb to poison by using Protect, but that didn't happen. Boltund could just finish instead, though.

Cramorant faints after it KOs the Scolipede, and I send in Duraludon since Weezing has to come out. It takes a lot from Strange Steam, and resumes its usual duties with a Mirror Coat. Her last Pokemon is Slowbro, which has an awkward typing and one obnoxious quality: Quick Draw, an inherent and improved Quick Claw. Duraludon gets no chance to Night Slash because of it and goes down without a fight. Assault Vest Corviknight is the best choice after that due to its Steel-typing and fighting neutrality. Two Sky Attacks and Night Slash would KO Slowbro, but things never go quite as planned versus this Slow?bro and back-ups are needed. This rears its head again where, before its second Sky Attack, Corviknight is sniped with a Quick Draw Scald burn. Slowbro's effective Quick Draws let it beat Corviknight with 40% health remaining. Boltund enters into a final stand-off with Slowbro, but thankfully it's not quick on the draw for once and Boltund Discharges its own weapon for a victory.

(Team: Boltund/Cramorant/Duraludon/Corviknight)

Honey

This is the last fight, and I mentioned earlier that influencing her team doesn't actually matter. That's not because the difference is irrelevant, but because I'm not actually unlocking this fight on this file. The condition is absurd; she requires a literal million watts before she'll let you battle her. There's an exploit to refresh raid dens without waiting 24 hours or clearing them, but it still takes nearly 7 and a half hours to farm this many watts, and hell if I care to do that a second time. So I'm going to transfer this team to my main file where she's going to have a Blastoise regardless.

Anyways, she leads with Blissey who doesn't do much. Light Screen could be problematic but I never saw her use it. She Blizzards my Grapploct, and I miss the KO I usually get with Life Orb Power-Up Punch, but I use Sucker Punch to make up for it (and as a quick aside, goddamn at that exp). Darmanitan comes in and hits like a truck, but I can thankfully deal with it quickly by softening it up with +1 Sucker Punch then having Choice Specs Boltund revenge kill it. In an extremely fortunate turn of events, she sends out Togekiss to meet Boltund (Togekiss does have the strongest move versus it of her remaining valid choices). Boltund 2HKOs with Discharge, and nearly goes down to a crit Dazzling Gleam. I ponder if it can survive hail later because of this (it actually couldn't at this exact moment, but it'll level up and be fine), then finish Togekiss off with the second Discharge.

Now she sends in Gallade. This would be really dangerous if it had Close Combat, but it actually lacks a Fighting move entirely so Corviknight isn't in too much danger before descending from the heavens with Sky Attack to smite Gallade. Salazzle is out now, and it's actually pretty dangerous so I just let Corviknight get roasted by Flamethrower. Duraludon is the only Pokemon that can deal with this, so it takes a Flamethrower and fires back with Mirror Coat. Blastoise is her final Pokemon, complete with its own Gigantamax. Duraludon is able to scratch at its magnificent shell with Night Slash before going down to Max Hailstorm. Blastoise is hurt by this hail, though. To stall out the rest of the Gigantamax, I go to Eldegoss who survives Max Hailstorm despite being weak to it, and Sleep Powder. Slow Sleep gives a free switch, so I do just that to go to Boltund as Blastoise goes back to normal. With Duraludon's mighty Night Slash and the hail damage, Boltund is able to finish the fight, and this DLC chapter, with a final Discharge.

(Team: Grapploct/Boltund/Corviknight/Duraludon/Eldegoss/-)

Well, that's it for now. Isle of Armor starts out very poor, but definitely offered this team some great battles once it got going. I don't really have any big conclusion since I did that last time, but hopefully Crown Tundra gives some more content for this run in a few months. The focus on legendaries could be interesting, though I suspect Vespiquen will ultimately be the queen to rule over these so-called legendaries...
 
Fun fact, though: as a way to prevent players from getting stuck due to releasing Kubfu, if you have no Kubfu in your save file you can climb the towers with whatever Pokemon you please, even able to have a full team. Needless to say this makes the whole ordeal a joke. The Dojo trainers aren't happy about it, either. All of them either have no dialogue, or sound disappointed. Hey, it's not my fault Kubfu doesn't have egg moves!
hahah wow I was wondering how that would work. That's genuinely hilarious.

And another impressive showing all around. Honey not having a fighting move on her Gallade is odd; the move set it has (SD, Psycho Cut, Leaf Blade, Throat Chop) isn't bad or anything but is a bit odd. Salazzle also lacks an actual poison attack instead opting for Toxic/Protect (cheeky if it ever happened), Flamethrower & Dragon Pulse.


I think Crown Tundra will, if nothing else, provide you with something to do in its post post psot game. The Galar Stars tournament will probably at least bump the levels of all the opponenets, even if you do have to drag a mutli battle partner along.
 

Users Who Are Viewing This Thread (Users: 1, Guests: 1)

Top