


Introduction
Every generation, collectors and battlers alike seek out the best Pokemon to add to their collections and teams. Often, these perfection-seeking trainers look to random number generator (RNG) abuse, which is a method to influence the game using only in-game mechanics to produce Pokemon with your desired traits—whether that be nature, ability, perfect IVs, or even shininess! Recent changes to the game mechanics have made RNG abuse only possible for Pokemon captured in raids in Pokemon Sword and Shield. The goal of this guide is to teach you how to manipulate the RNG to acquire your dream Pokemon from raids.
Prerequisites
Abusing the RNG used to generate raid Pokemon in the Wild Area can be broken into 3 sections: finding your seed, advancing the frames, and resetting for your desired Pokemon. I’ll begin with finding your seed.
Note: Throughout this process, it is important to not let the day roll over by passing midnight on the Switch's clock. You may want to turn off synchronizing the clock with the internet in the Switch settings and to change the clock on your Switch to 00:01 so that this does not occur during the process. You can keep changing the clock to keep your raid indefinitely.
Finding your Seed
The traits of the Pokemon you receive from a den—whether they be species, ability, gender, IVs, or nature—may seem to be random; however, everything the game generates is governed by a set of rules, all of which are derived from a "seed." Think of a seed as a recipe: It contains all the information you need to create a final product. In this case, the final product is a Pokemon in a den. Once we know our seed, we know the final Pokemon.
The process of finding your seed manually is restricted to using Lean’s Seed Searcher since it has been optimized to work with (certain) GPUs, significantly decreasing the time needed to return a seed. If you don't have a GPU in your computer, this process will still work, albeit more slowly. Because RaidFinder is a common choice among users, I will outline the process using that program as well. Note that it doesn't support seed calculations at this time, so if you have to find your seed manually, you are restricted to using Seed Searcher.
Spawning a Raid
I'll pause to comment on resetting for the raid type. Raids are broken up into three different categories: normal, rare, and event. Each den has two different pools associated with it: a normal pool (indicated by a red beam coming out of the den) and a rare pool (purple beam). Rare Pokemon, such as non-promoted Gigantamax Pokemon, only appear when a rare raid has spawned. The rarity of a raid is fixed for as long as that raid is active. So if you have a rare raid, you will only spawn Pokemon from the rare pool; if you have a normal raid, you will only get Pokemon from the normal pool. Similarly for event raids; event raids will continue to only spawn event Pokemon.
Event raids are unique in that they can spawn in any den. The Pokemon available in the promoted raids often change when new Wild Area News is available. Event raids will only be in raids with a red beam. You can't tell the difference between an event raid or a normal rarity raid from the overworld, but you should be able to determine which is active based on the silhouette of the Pokemon when you interact with the den.
Choosing which den you want to RNG in or which pool you aim for is not in the scope of this guide. Note that if you use resources such as this map to search for your desired den and rarity, you'll need to match where the den is on the map with the map in Seed Searcher or RaidFinder by cycling through the den drop-downs in the tools. Lean also offers an online list of dens to help you determine your target den.
Raids can be spawned by throwing a Wishing Piece into your desired den. Natural dens (dens that already have an active raid without using a Wishing Piece) cannot be used in this process. If your desired den already has an active raid, defeat/capture the Pokemon to clear the den and use a Wishing Piece to spawn a new raid. If you are trying to RNG an event raid Pokemon, it does not matter which den you choose: keep throwing Wishing Pieces into different dens until it spawns a promoted raid. Don’t worry about which Pokemon comes up; we’ll reset for that later.
You cannot control which rarity is spawned; however, you can reset your game to acquire your desired beam rarity using a single Wishing Piece. Here is how:
Configuring Seed Searcher
Open Seed Searcher. It will look something like this:
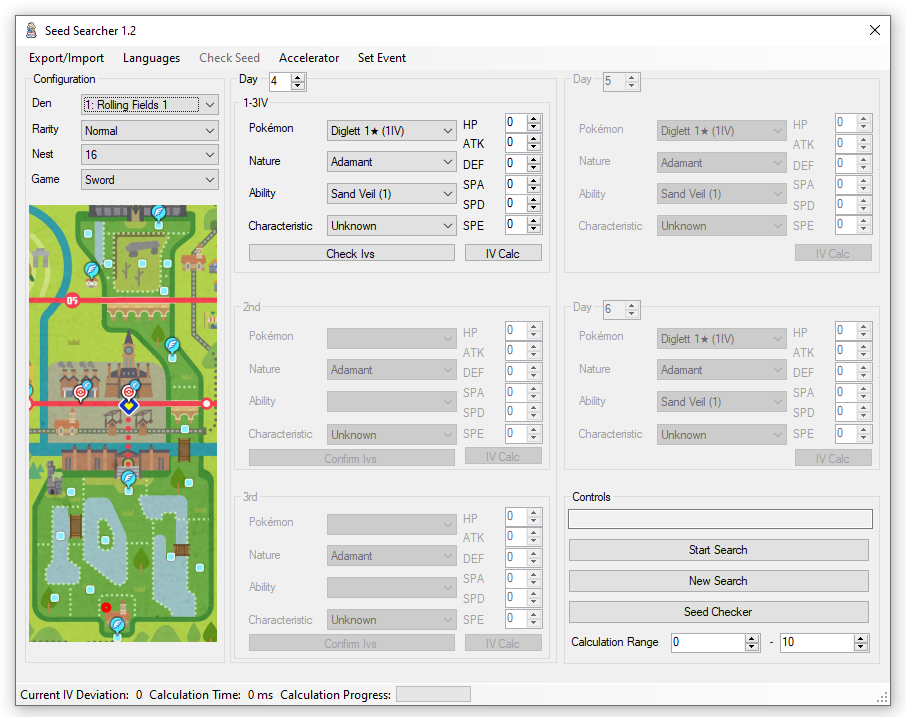
In the Configuration section, choose your desired den from the drop-down and confirm that the right one is highlighted on the map by a thick, red circle. Event raids are listed first in the drop-down; in this case, you can ignore which den is highlighted on the map. To update the event den info, on the top toolbar click Set Event > Update Event Database to download the latest promoted raid information. The event can then be chosen from the list under the Set Event menu. The den rarity refers to whether the beam coming out of the den is red or purple. Red beams are normal/event rarity; purple are rare. Finally, select your game from the drop-down. The Nest information can be ignored and is updated automatically when the den is selected.
Configuring RaidFinder
Open RaidFinder. It will look something like this:
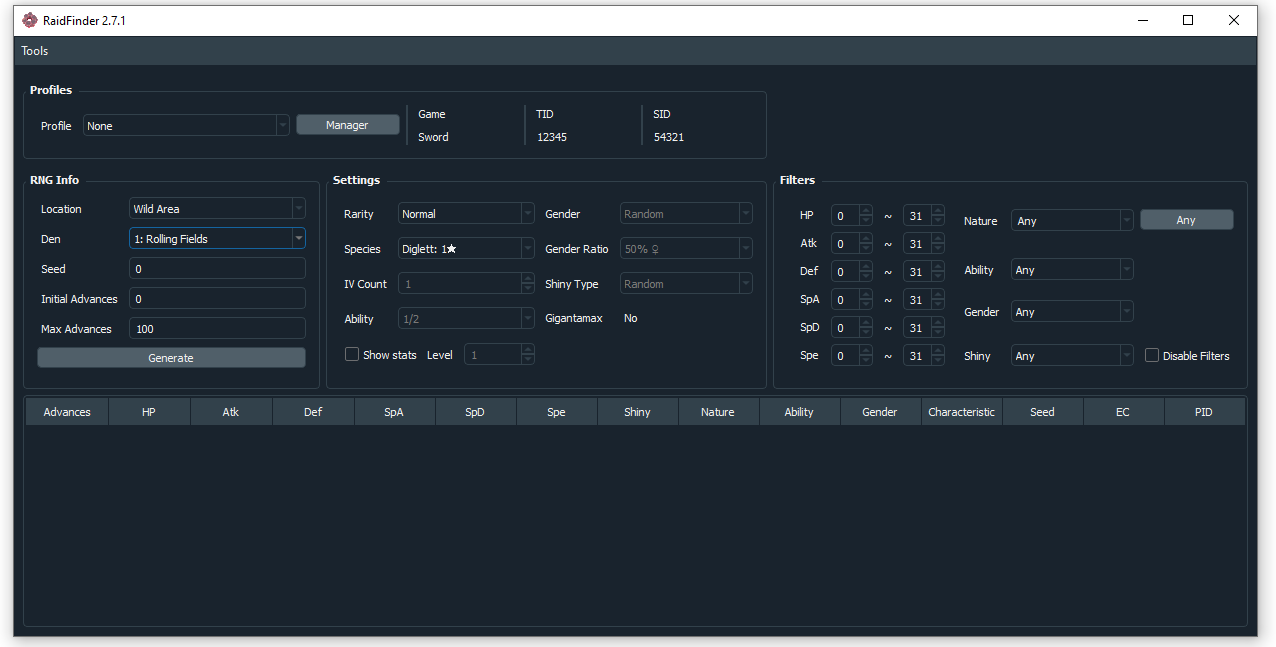
Begin by clicking "Manager" to create a profile for your game. The TID and SID aren't important here, so you can enter whatever you want. The important bit is the game version. With your new profile created, make sure it is selected in the profile drop-down. If your target Pokemon is from an event den, make sure your even data is up to date by downloading the appropriate event information (Tools > Download Event Data. The events are listed in YY-MM-DD format).
In the RNG Info section, choose the location (Wild Area or DLC) and den from the drop-downs you would like to RNG in (event raids can be found in any den and are listed first in the Den drop-down; you may need to download event data first to get it to show up in the drop-down). The proper den can be identified by looking at the map under Tools > Den Map. Match the den highlighted by the red circle on the map to the location of the den you would like to RNG in-game; once you identify the den, enter the number in the main window. If you know the Pokemon you'd like to RNG but don't know its location, you can use the tool under Tools > Encounter Lookup to determine your desired den.
Changing the Date
The process of determining your seed is based upon establishing a sequence of Pokemon captured from your den. To change the Pokemon, you’ll be changing the date on your Switch, causing the game to re-roll what is in the den. Simply changing the date, however, is not enough for this to work properly. You need to change the date after enabling a glitch, which means this method could be patched at any time and no longer work. The fastest method is to:
Note that only changing the day into the future with respect to the Switch's date will work, and the days can only be changed one at a time before confirming the change in the system settings (i.e. advancing the month by 1 or the days by 30 before hitting OK to confirm the date change counts as 1 advancement, not 30). Moving the day into the past will have no effect, but advancing the day from that point onward will resume frame advancements.
For example, let's say today is February 8, 2020, and we enabled the time-skipping glitch. Changing the date to February 9, 2020, will advance the frame by 1, as will changing the date from February 8, 2020, to February 29, 2020, or to March 8, 2020. Changing the date from February 8, 2000, to February 1, 2000, will not advance the frame. However, then proceeding to change the date from February 1, 2000, to February 2, 2000, will advance the frame by 1.
At no point is moving the date backwards required, unless you care about what date you capture the Pokemon on. You can simply continue to advance the date for as long as the process takes.
If you do not have online capabilities, you can still enable this glitch by:
Capturing Pokemon
Seed Searcher
To begin, you’ll need to capture the Pokemon from 4 days after the current date in your Switch. This number can be changed to anything from 4-10, but it is recommended to leave the default value of 4 in the first "Day" field of Seed Searcher. Using your preferred method to enable the glitch, advance the day by 3 in your Switch’s system settings (the current day counts as Day 1). If you are using the online version of the glitch, you do not need to reenter the game between date changes. You can simply confirm the date change on your Switch three times before entering back into the game. You cannot advance the date by 3 before confirming the date change; this only counts as 1 day advancement for the sake of RNG.
Once you have changed the date on your Switch, reenter the game and check which Pokemon is in the den. To begin this process, you’ll need to capture a Pokemon with at most 3 perfect IVs. This means you are limited to 3-4 star raids if you have beaten the game. If the Pokemon in your den is not in the drop-down in the 1-3IV section of Seed Searcher, you’ll need to re-do the time skipping glitch, advance the date 3 more days, and check again. Repeat this process until you find a Pokemon that matches the options of the Pokemon drop-down.
After you find the proper 4th day Pokemon, proceed to clear the den and capture the Pokemon. For the easiest clears, it is recommended to battle with either Eternatus, Zacian, or Zamazenta, since their exclusive moves deal double damage to Dynamaxed Pokemon. It is also recommended to capture the Pokemon using your Master Ball, since it is a guaranteed capture. You will not be saving the game, so you will get it back when you reset. Once you capture the Pokemon, raise its level to 100 so you can check the IVs. The fastest way is to use Exp. Candy XL, which can be farmed from 5-star raids. If you do not have enough candies or need to level up through battling, continue to level the Pokemon until you are able to determine its IVs exactly.
Seed Searcher comes equipped with an IV calculator, which can be found from the main menu. Click the IV Calc button in the 1-3IV section of Seed Searcher to open the IV calculator. Enter the species, nature, level, and stats of the Pokemon you just captured from the den. Upon clicking Calculate, the fields on the right should update with the IVs of your Pokemon. Click Apply to send the IVs back to the main window.
Within the 1-3IV section, enter in the information for the Pokemon you captured from the den. Once everything has been filled, click Check Ivs.
Do not save. Reset your game.
At this point, a couple of different outcomes will occur. The first is that the program returns "NOK! No follow up possible.", as shown in the left half of the image below. This does not mean you did anything wrong, but rather this Pokemon is not a good jumping off point for determining your seed. If you get this message, I recommend using a new Wishing Piece to reset the den, then re-saving your game (only do this after resetting your game so you don’t lose your Master Ball and Candy). If you are trying to RNG an event den, you can go to any other den until the promoted raid appears. Otherwise, use a Wishing Piece in any other den, then return to your desired den and use another.
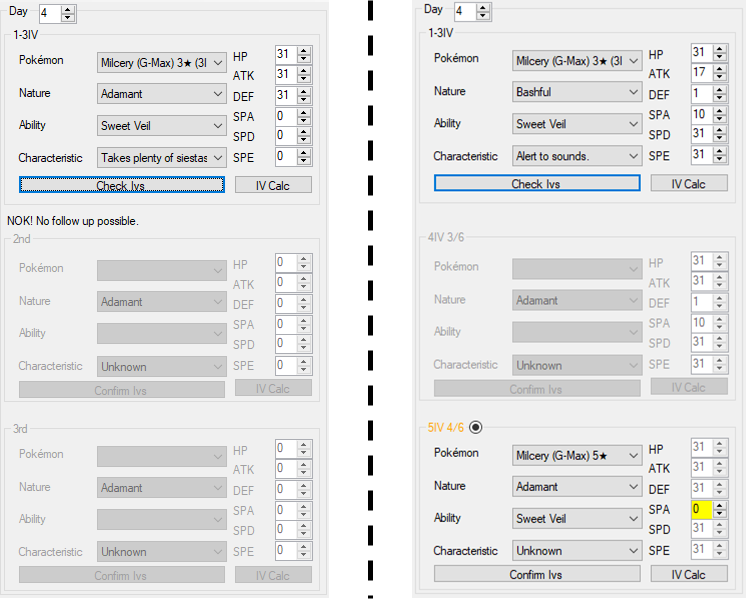
The second scenario is that the program accepts your input and enables a new set of fields for you to enter information into, as shown in the right half of the image above. Do not worry about the #/6, as you can’t control it. The higher the number in the numerator, the faster your search will be. The important bit is the IVs it is now asking for: 4IV or 5IV. That means that the second Pokemon in your series should have either 4 or 5 perfect (31) IVs. If the random IVs (highlighted in yellow) it rolls happen to be 31, you should reset your den and start the process over. To see if your next Pokemon matches this criteria, reset your game, then go through the day-skipping process again to capture another 4th day Pokemon. That’s right, we’re redoing the process of enabling the time-skipping glitch, advancing 3 days, and capturing a new raid Pokemon. Continue to do this until you find a raid that matches of one the possibilities in the drop-down of the newly-enabled section. We won’t be touching the 1-3IV section again. It's possible that either the middle or bottom section of the above image are enabled when you click Check IVs. It doesn't matter which is made active.
You may find that it requires you to capture a 5-star raid Pokemon for your second Day 4 entry, like in the image above. It is up to you whether you want to proceed or throw in a new Wishing Piece and begin the process over. 5-star raids are often difficult to clear with the AI as partners, so either enlist the help of some friends or start over if the required raid is too difficult to beat.
Once you have found a second 4th day Pokemon to your and the program’s liking, capture it and determine its IVs like you did before, and enter its details into the main window. Click Confirm Ivs.
Do not save. Reset your game.
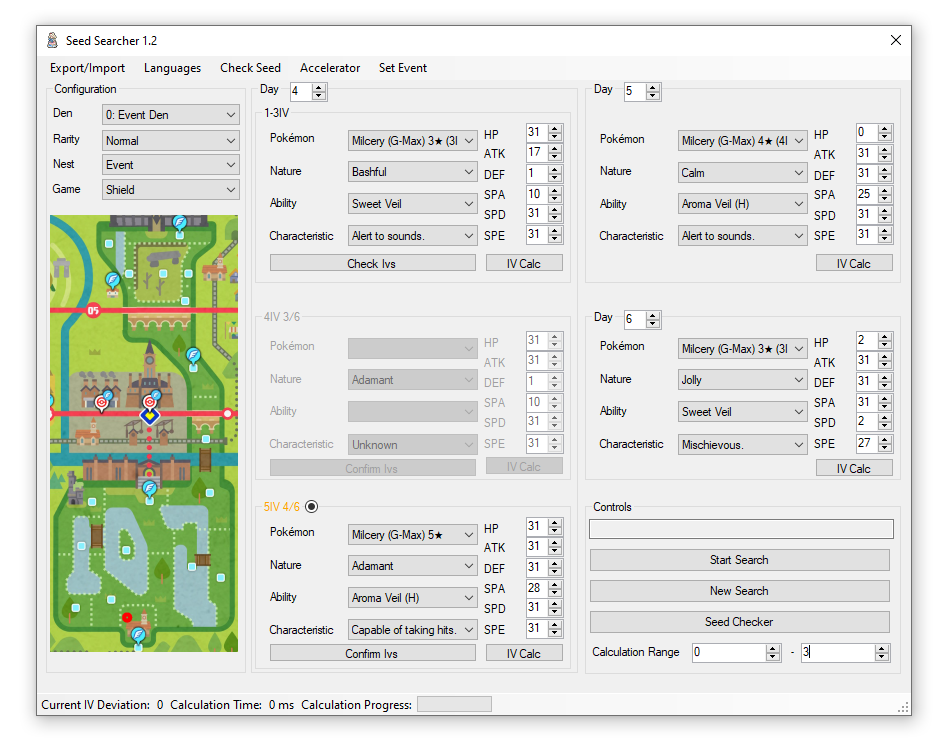
At this point, the Day 5 and Day 6 sections will be editable. These sections require the information of a raid Pokemon captured after advancing the clock 4 days and 5 days, respectively. (Keep in mind the Pokemon that is currently locked into the raid is considered the Day 1 Pokemon. So by advancing the clock 4 days, you are capturing the Day 5 Pokemon.) Repeat the process of capturing the raid Pokemon, checking its IVs, resetting your game (without saving!), and entering its details into the program until you have entered data for all the editable fields. At this point the Seed Searcher should look something like this:
Once you have entered data for two Day 4 Pokemon, a Day 5 Pokemon, and a Day 6 Pokemon, you are almost ready to start searching for your seed. The last set of fields is the Calculation Range. These fields essentially broaden the search the program uses to find your seed. In general, a range of 0-3 should work. However, if your search completes and you do not find anything, you may want to consider increasing the upper bound of the range. In the top toolbar, make sure your GPU is selected in the Accelerator menu. If this does not apply to you, or for some reason your CPU is faster (it shouldn’t be in most cases), you can select CPU instead. Now, click Start Search. The program will run and search for your seed, which will be displayed in the Control text box above the Start Search button. The program will stop searching when it finds a result, and your calculation time will be displayed along the bottom of the program. A new text file is also created in the installation folder called "results.txt," which contains your seed.
If no seed is found, try widening your calculation range. If you are sure you entered everything correctly and still nothing is found, you’ll need to start the process over by throwing in a new Wishing Piece. If you find a seed, congratulations! You are ready to move on.
Checking what you have available
Once you have found your seed, the next step is to look at the different frames and see if there are any targets you are interested in. Each frame is associated with a certain IV spread, nature, ability, gender, and shininess. The information for each frame changes with the seed. So, once you find your seed you then have to see what each of the frames hold to find anything worth pursuing.
Seed Searcher
To check the frame information, click the Seed Checker button in the bottom right of Seed Searcher. This will open up a new menu, shown below.
Enter the seed you just found into the corresponding box of the Results menu that just opened (it should populate automatically), and choose your target species from the drop-down. This is the Pokemon you ultimately want to catch, which is not necessarily any of the Pokemon you caught when searching for your seed. The left frame input is the starting frame for your search, and the right input is the number of results. To begin, keep the starting frame at 0 and enter the maximum number of advances you are willing to do (1 day skip = 1 frame advancement). Click Show.
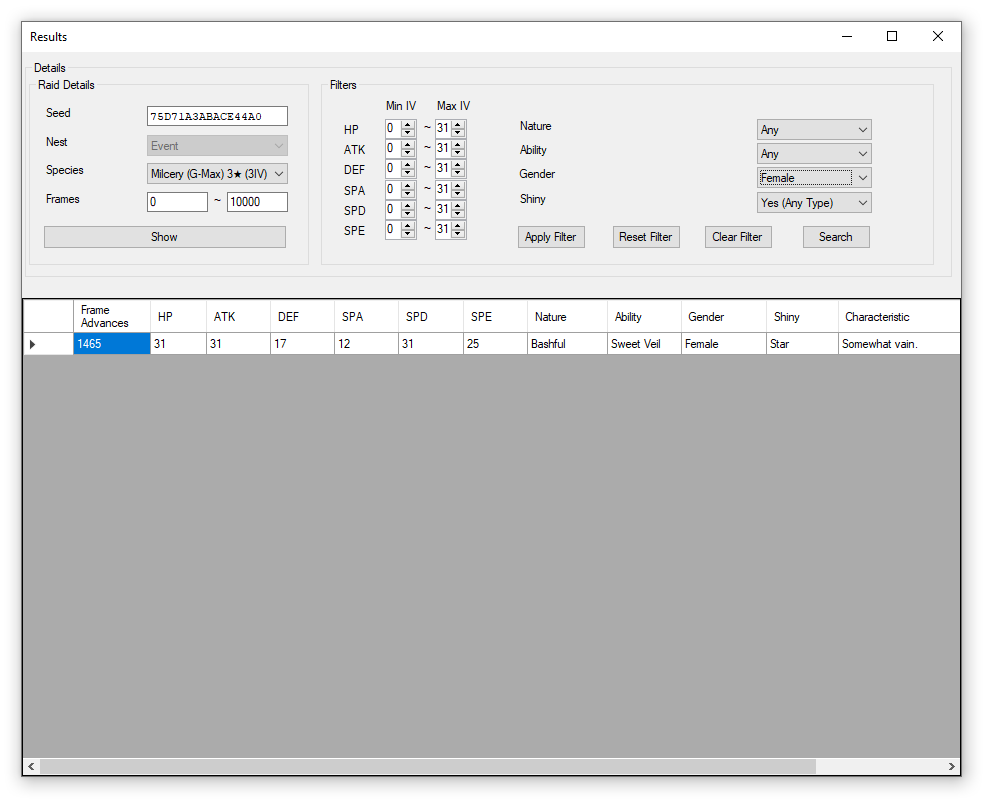
The bottom of the menu will populate with all of the information saved on each frame. To quickly find one that you’d be interested in, you can use the filters in the upper right of the Results menu to filter the frame information. Apply Filter will filter the frames based on the information you provided in the filter inputs. Reset Filter will re-show unfiltered frames (same as clicking Show). Clear Filter will not change what frames are displayed, but will reset the filters to their default values. Finally, clicking Search will search through all of the frames for your seed and return the first result that matches your filters. Here, I've filtered the results searching for any shiny within the first 10000 frames.
Filter the frames to see if you have anything requiring reasonable advances. If you are after a shiny Pokemon, it is not uncommon for the first shiny frame to be in the thousands, even tens of thousands. So, be prepared to re-roll your seed by using another Wishing Piece and redoing this process of determining your seed if you don’t find anything that you want to pursue.
RaidFinder
To check the frame information, return to the main window of RaidFinder. Enter your seed into the corresponding box of the RNG Info section. If you do not know your seed, download Seed Searcher and follow the steps in section Capturing Pokemon. Leave the Initial Advances set to 0, and set the Max Advances to a reasonable number based on the number of frame advancements you're willing to do. If you are going after a shiny raid, this number will likely need to be in the thousands.
Proceeding to the Settings section, enter the rarity of your desired raid and the species of the Pokemon you are after. A raid with a higher star rating will have more guaranteed IVs but will be harder to defeat. The other drop-downs are for informational purposes and cannot be edited. If you wish to see the stats of the Pokemon you'll find instead of its IVs, you can enable the corresponding checkbox and enter the level of the Pokemon you caught.
Lastly, the Filters section can be used to limit the results shown to you upon clicking Generate. As an example, let's say I'm after a shiny Pokemon, but I don't particularly care about anything else. I would filter the results by selecting the kind of shiny I would like from the drop-down ("Any" does not apply a filter, meaning it can be shiny or non-shiny; the remaining options select whether you want to filter by a Star Shiny, Square Shiny, or both). I'm not picky, so I'll select Star/Square, increase my max results to 3000 because I'll likely need to do a lot of frame advancements, and click Generate to get the following:
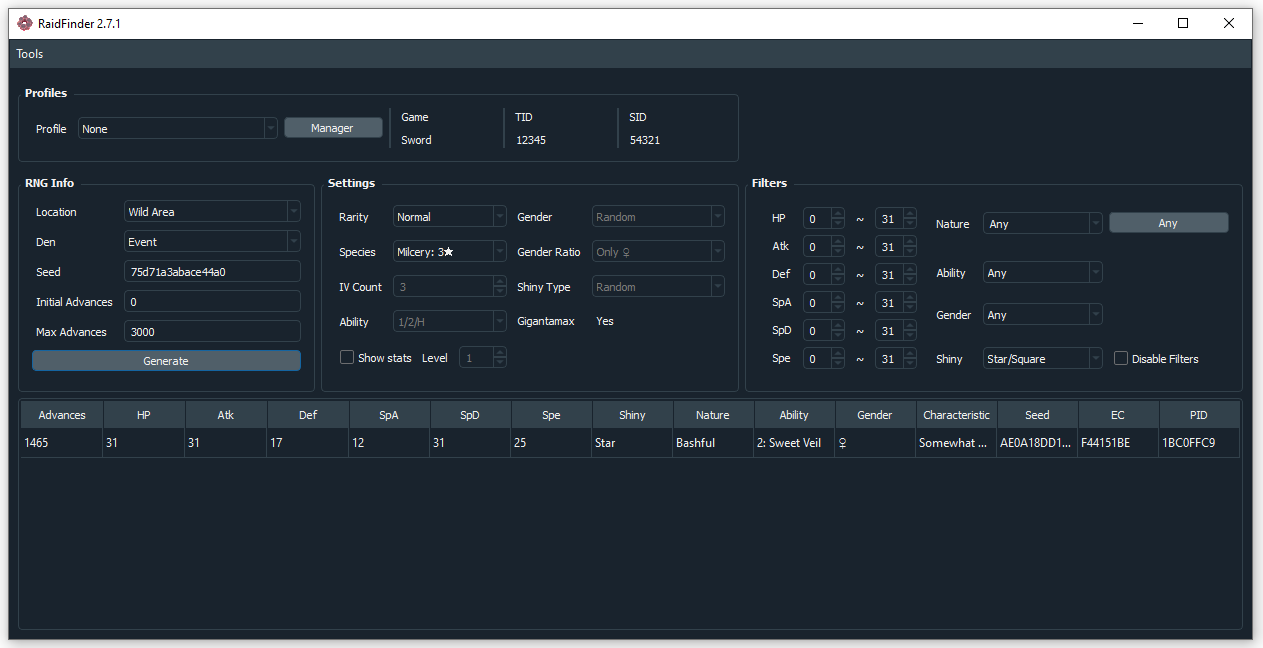
The above image tells me that I'll find a (star) shiny 3-star Milcery after 1465 advances with 31/31/17/12/31/25 IVs. If you aren't happy with the results, you may consider changing the Species in the Settings section to a different Pokemon or star rating to see what other options you have available. You may find something you like better if you fight a different raid! After you tweak the settings, you'll need to reclick Generate to see the new results. You can quickly see every frame without changing your filters by enabling the "Disable Filters" checkbox and re-clicking Generate. If nothing shows up when you click generate, use less-restrictive filters, increase your Max Advances, or start over with a different raid.
Filter the frames to see if you have anything requiring reasonable advances. If you are after a shiny Pokemon, it is not uncommon for the first shiny frame to be in the thousands, even tens of thousands. So, be prepared to re-roll your seed by using another Wishing Piece and redoing this process of determining your seed if you don’t find anything that you want to pursue.
Advancing Frames
I’ll pause to say that there is a very small chance the seed you received from searching is incorrect (this is not a problem with the tool, but rather the method in which you must determine your seed). To verify, capture the Pokemon currently saved in the den while doing 0 advancements. Its information should match up with the first entry, corresponding to 0 frame advancements. Make sure you don't have filters enabled! If it's wrong, you'll need to restart the entire process, including using a new Wishing Piece. Everything look ok? Great. Reset your game, and let’s move on.
Once you find a nice frame that requires few advancements, take note of the Frame Advances (called Advances in RaidFinder) column. This indicates the number of times you’ll need to advance the date on your Switch, as moving 1 day into the future causes 1 frame advancement. Since the date moving forward is the only way to advance the frame, it is important to not let the date roll over naturally by passing midnight. As long as you don’t let the clock read midnight, you can span your frame advancements out over several days if you wanted!
As shown in the image, our target frame requires 1465 frame advancements. This ultimately means we’ll have to go into the game, enable the time skipping glitch, and then change the date 1465 days into the future. Since it’s easy to lose track of a large number of frame advancements, I recommend using a date calculator to determine what the final day will be on your Switch. Simply enter the current date on your Switch and add the number of frames you have to advance in the days column to determine what the end date will be.
Enter the game. Because there is a small chance the game will crash if you advance the frame by a large number in the Wild Area, I recommend moving to a Pokemon Center if you are using the online method so that the sudden weather changes don’t cause your game to crash. Enable the time skipping glitch, and proceed to advance the date on your Switch one day at a time. I recommended going back into the game and saving every once in a while so you don’t lose your progress, re-enabling the glitch to be sure it hasn't accidentally been deactivated (if you don't close the game, you shouldn't have to re-enable it).
Now, at this point you might be wondering how you know what Pokemon species you’ll find. I’ll explain the process soon, but it’s imperative that you stop three frames before your target. Since our target requires 1465 advances, that means we need to do 1462 advances, then save the game. I’ll reiterate since this is so important:
If you want to be safe, you can do 10 fewer advances than the number required to check where you are. Overshooting your target will ruin the attempt, and you'll need to start over from the beginning by using a new Wishing Piece. For example, I would stop after 1452 advancements, save the game, then catch the Pokemon in the den. After confirming the number of advancements I've actually done by comparing with the Pokemon data shown in the Seed Searcher (i.e. comparing the IVs, nature, gender, and ability), I'd reset the game and adjust the remaining advancements accordingly until I've done 1462 advancements, then save the game.
If you get lost at any time while performing the advancements, you can save, catch the Pokemon in the den, compare its details to those in Seed Searcher/RaidFinder to determine the number of advancements you've done, and reset your game. You'd then reenter the game, re-enable the glitch, and continue advancing the frame from where you left off.
Once you do the proper number of advancements, save the game.
Rolling for Species
Once you have saved your game 3 frames from your target, it is now time to reset for your desired Pokemon species. We’ll be using the same trick as we did for capturing the Day 4 Pokemon at the beginning of this process: enabling the time-skipping glitch, advancing the day 3 times, then checking what Pokemon is in the den. If the Pokemon spawned is not correct, don’t save and reset your game. Repeat the process of enabling the glitch and skipping 3 days until your find your desired Pokemon. If the Pokemon is correct, you can save your game. Now, whenever you load up the game (assuming you don't let the date roll over naturally by passing midnight), your desired Pokemon will be the first one you encounter! You are now free to keep battling the Pokemon until you catch it by resetting your game after each failed attempt.
Conclusion
The process to RNG Raid Pokemon is lengthy and at times frustrating, possibly taking several hours. However, when you find your perfect Pokemon, I’m sure you’ll think the process was worth enduring. Good luck!
Every generation, collectors and battlers alike seek out the best Pokemon to add to their collections and teams. Often, these perfection-seeking trainers look to random number generator (RNG) abuse, which is a method to influence the game using only in-game mechanics to produce Pokemon with your desired traits—whether that be nature, ability, perfect IVs, or even shininess! Recent changes to the game mechanics have made RNG abuse only possible for Pokemon captured in raids in Pokemon Sword and Shield. The goal of this guide is to teach you how to manipulate the RNG to acquire your dream Pokemon from raids.
Prerequisites
- Lean’s Seed Searcher OR Admiral-Fish's RaidFinder
- Seed Searcher is required to manually search for your seed
- Download and install latest Microsoft .NET Framework – required to run Seed Searcher
- Download and install latest C++ Redistributable – required to run Seed Searcher
- Copy of Pokemon Shield or Pokemon Sword
- Nintendo Switch
- Disable autosave in-game
- Recommended: Around 40 Exp. Candy XL
- Recommended: Completion of the game and capture of Eternatus and Zacian/Zamazenta
- Recommended: A Nintendo Switch Online subscription
- Recommended: A hefty supply of Wishing Pieces
- Recommended: Master Ball
- Optional: Date calculator
Abusing the RNG used to generate raid Pokemon in the Wild Area can be broken into 3 sections: finding your seed, advancing the frames, and resetting for your desired Pokemon. I’ll begin with finding your seed.
Note: Throughout this process, it is important to not let the day roll over by passing midnight on the Switch's clock. You may want to turn off synchronizing the clock with the internet in the Switch settings and to change the clock on your Switch to 00:01 so that this does not occur during the process. You can keep changing the clock to keep your raid indefinitely.
Finding your Seed
The traits of the Pokemon you receive from a den—whether they be species, ability, gender, IVs, or nature—may seem to be random; however, everything the game generates is governed by a set of rules, all of which are derived from a "seed." Think of a seed as a recipe: It contains all the information you need to create a final product. In this case, the final product is a Pokemon in a den. Once we know our seed, we know the final Pokemon.
The process of finding your seed manually is restricted to using Lean’s Seed Searcher since it has been optimized to work with (certain) GPUs, significantly decreasing the time needed to return a seed. If you don't have a GPU in your computer, this process will still work, albeit more slowly. Because RaidFinder is a common choice among users, I will outline the process using that program as well. Note that it doesn't support seed calculations at this time, so if you have to find your seed manually, you are restricted to using Seed Searcher.
Spawning a Raid
I'll pause to comment on resetting for the raid type. Raids are broken up into three different categories: normal, rare, and event. Each den has two different pools associated with it: a normal pool (indicated by a red beam coming out of the den) and a rare pool (purple beam). Rare Pokemon, such as non-promoted Gigantamax Pokemon, only appear when a rare raid has spawned. The rarity of a raid is fixed for as long as that raid is active. So if you have a rare raid, you will only spawn Pokemon from the rare pool; if you have a normal raid, you will only get Pokemon from the normal pool. Similarly for event raids; event raids will continue to only spawn event Pokemon.
Event raids are unique in that they can spawn in any den. The Pokemon available in the promoted raids often change when new Wild Area News is available. Event raids will only be in raids with a red beam. You can't tell the difference between an event raid or a normal rarity raid from the overworld, but you should be able to determine which is active based on the silhouette of the Pokemon when you interact with the den.
Choosing which den you want to RNG in or which pool you aim for is not in the scope of this guide. Note that if you use resources such as this map to search for your desired den and rarity, you'll need to match where the den is on the map with the map in Seed Searcher or RaidFinder by cycling through the den drop-downs in the tools. Lean also offers an online list of dens to help you determine your target den.
Raids can be spawned by throwing a Wishing Piece into your desired den. Natural dens (dens that already have an active raid without using a Wishing Piece) cannot be used in this process. If your desired den already has an active raid, defeat/capture the Pokemon to clear the den and use a Wishing Piece to spawn a new raid. If you are trying to RNG an event raid Pokemon, it does not matter which den you choose: keep throwing Wishing Pieces into different dens until it spawns a promoted raid. Don’t worry about which Pokemon comes up; we’ll reset for that later.
You cannot control which rarity is spawned; however, you can reset your game to acquire your desired beam rarity using a single Wishing Piece. Here is how:
- Open the in-game menu (X) and navigate to options.
- Set the text speed to slow.
- Save.
- Throw a Wishing Piece into your desired den. The game will ask if you want to save the game; select Yes.
- As soon as you see the beam color, while the "Saving your progress..." text is displaying, press the Home Button. You should have plenty of time to react if you set the text speed to slow.
- If the beam is what you wanted (red: normal or event; purple: rare), resume the game.
- If the beam is NOT what you wanted, close the game and try again from step 4. If the beam is still present when you re-enter the game, you were not fast enough in step 5. Defeat the Pokemon to clear the den, or throw a Wishing Piece into another den to reset it. If you must reset the den, proceed from step 3 after clearing it.
Configuring Seed Searcher
Open Seed Searcher. It will look something like this:
In the Configuration section, choose your desired den from the drop-down and confirm that the right one is highlighted on the map by a thick, red circle. Event raids are listed first in the drop-down; in this case, you can ignore which den is highlighted on the map. To update the event den info, on the top toolbar click Set Event > Update Event Database to download the latest promoted raid information. The event can then be chosen from the list under the Set Event menu. The den rarity refers to whether the beam coming out of the den is red or purple. Red beams are normal/event rarity; purple are rare. Finally, select your game from the drop-down. The Nest information can be ignored and is updated automatically when the den is selected.
Configuring RaidFinder
Open RaidFinder. It will look something like this:
Begin by clicking "Manager" to create a profile for your game. The TID and SID aren't important here, so you can enter whatever you want. The important bit is the game version. With your new profile created, make sure it is selected in the profile drop-down. If your target Pokemon is from an event den, make sure your even data is up to date by downloading the appropriate event information (Tools > Download Event Data. The events are listed in YY-MM-DD format).
In the RNG Info section, choose the location (Wild Area or DLC) and den from the drop-downs you would like to RNG in (event raids can be found in any den and are listed first in the Den drop-down; you may need to download event data first to get it to show up in the drop-down). The proper den can be identified by looking at the map under Tools > Den Map. Match the den highlighted by the red circle on the map to the location of the den you would like to RNG in-game; once you identify the den, enter the number in the main window. If you know the Pokemon you'd like to RNG but don't know its location, you can use the tool under Tools > Encounter Lookup to determine your desired den.
Changing the Date
The process of determining your seed is based upon establishing a sequence of Pokemon captured from your den. To change the Pokemon, you’ll be changing the date on your Switch, causing the game to re-roll what is in the den. Simply changing the date, however, is not enough for this to work properly. You need to change the date after enabling a glitch, which means this method could be patched at any time and no longer work. The fastest method is to:
- Connect to the internet in-game.
- Search for a Singles Link Battle (don’t set a code).
- When the text pops up that says "A trainer has been found. Prepare to battle!", hold down the home button and toggle airplane mode on and off. If you are playing in docked mode, un-dock and re-dock your switch when this text appears. You should get a communication error and no longer be connected to the internet.
- Press the home menu and navigate to the date and time settings (System Settings > System > Date and Time).
- Turn off Synchronize Clock via Internet and advance the day.
- Click "OK" to confirm the date change.
- Repeat steps 5 and 6 as necessary.
- Return to the game.
Note that only changing the day into the future with respect to the Switch's date will work, and the days can only be changed one at a time before confirming the change in the system settings (i.e. advancing the month by 1 or the days by 30 before hitting OK to confirm the date change counts as 1 advancement, not 30). Moving the day into the past will have no effect, but advancing the day from that point onward will resume frame advancements.
For example, let's say today is February 8, 2020, and we enabled the time-skipping glitch. Changing the date to February 9, 2020, will advance the frame by 1, as will changing the date from February 8, 2020, to February 29, 2020, or to March 8, 2020. Changing the date from February 8, 2000, to February 1, 2000, will not advance the frame. However, then proceeding to change the date from February 1, 2000, to February 2, 2000, will advance the frame by 1.
At no point is moving the date backwards required, unless you care about what date you capture the Pokemon on. You can simply continue to advance the date for as long as the process takes.
If you do not have online capabilities, you can still enable this glitch by:
- Click A on the den, and begin searching for partners (invite others).
- While searching, press the home button and navigate to the date and time settings (System Settings > System > Date and Time).
- Turn off Synchronize Clock via Internet and advance the day.
- Click "OK" to confirm the date change.
- Return to the game and back out of the den (return to the overworld).
- Repeat as necessary.
Capturing Pokemon
Seed Searcher
To begin, you’ll need to capture the Pokemon from 4 days after the current date in your Switch. This number can be changed to anything from 4-10, but it is recommended to leave the default value of 4 in the first "Day" field of Seed Searcher. Using your preferred method to enable the glitch, advance the day by 3 in your Switch’s system settings (the current day counts as Day 1). If you are using the online version of the glitch, you do not need to reenter the game between date changes. You can simply confirm the date change on your Switch three times before entering back into the game. You cannot advance the date by 3 before confirming the date change; this only counts as 1 day advancement for the sake of RNG.
Once you have changed the date on your Switch, reenter the game and check which Pokemon is in the den. To begin this process, you’ll need to capture a Pokemon with at most 3 perfect IVs. This means you are limited to 3-4 star raids if you have beaten the game. If the Pokemon in your den is not in the drop-down in the 1-3IV section of Seed Searcher, you’ll need to re-do the time skipping glitch, advance the date 3 more days, and check again. Repeat this process until you find a Pokemon that matches the options of the Pokemon drop-down.
After you find the proper 4th day Pokemon, proceed to clear the den and capture the Pokemon. For the easiest clears, it is recommended to battle with either Eternatus, Zacian, or Zamazenta, since their exclusive moves deal double damage to Dynamaxed Pokemon. It is also recommended to capture the Pokemon using your Master Ball, since it is a guaranteed capture. You will not be saving the game, so you will get it back when you reset. Once you capture the Pokemon, raise its level to 100 so you can check the IVs. The fastest way is to use Exp. Candy XL, which can be farmed from 5-star raids. If you do not have enough candies or need to level up through battling, continue to level the Pokemon until you are able to determine its IVs exactly.
Seed Searcher comes equipped with an IV calculator, which can be found from the main menu. Click the IV Calc button in the 1-3IV section of Seed Searcher to open the IV calculator. Enter the species, nature, level, and stats of the Pokemon you just captured from the den. Upon clicking Calculate, the fields on the right should update with the IVs of your Pokemon. Click Apply to send the IVs back to the main window.
Within the 1-3IV section, enter in the information for the Pokemon you captured from the den. Once everything has been filled, click Check Ivs.
Do not save. Reset your game.
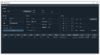
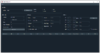
At this point, a couple of different outcomes will occur. The first is that the program returns "NOK! No follow up possible.", as shown in the left half of the image below. This does not mean you did anything wrong, but rather this Pokemon is not a good jumping off point for determining your seed. If you get this message, I recommend using a new Wishing Piece to reset the den, then re-saving your game (only do this after resetting your game so you don’t lose your Master Ball and Candy). If you are trying to RNG an event den, you can go to any other den until the promoted raid appears. Otherwise, use a Wishing Piece in any other den, then return to your desired den and use another.
The second scenario is that the program accepts your input and enables a new set of fields for you to enter information into, as shown in the right half of the image above. Do not worry about the #/6, as you can’t control it. The higher the number in the numerator, the faster your search will be. The important bit is the IVs it is now asking for: 4IV or 5IV. That means that the second Pokemon in your series should have either 4 or 5 perfect (31) IVs. If the random IVs (highlighted in yellow) it rolls happen to be 31, you should reset your den and start the process over. To see if your next Pokemon matches this criteria, reset your game, then go through the day-skipping process again to capture another 4th day Pokemon. That’s right, we’re redoing the process of enabling the time-skipping glitch, advancing 3 days, and capturing a new raid Pokemon. Continue to do this until you find a raid that matches of one the possibilities in the drop-down of the newly-enabled section. We won’t be touching the 1-3IV section again. It's possible that either the middle or bottom section of the above image are enabled when you click Check IVs. It doesn't matter which is made active.
You may find that it requires you to capture a 5-star raid Pokemon for your second Day 4 entry, like in the image above. It is up to you whether you want to proceed or throw in a new Wishing Piece and begin the process over. 5-star raids are often difficult to clear with the AI as partners, so either enlist the help of some friends or start over if the required raid is too difficult to beat.
Once you have found a second 4th day Pokemon to your and the program’s liking, capture it and determine its IVs like you did before, and enter its details into the main window. Click Confirm Ivs.
Do not save. Reset your game.
At this point, the Day 5 and Day 6 sections will be editable. These sections require the information of a raid Pokemon captured after advancing the clock 4 days and 5 days, respectively. (Keep in mind the Pokemon that is currently locked into the raid is considered the Day 1 Pokemon. So by advancing the clock 4 days, you are capturing the Day 5 Pokemon.) Repeat the process of capturing the raid Pokemon, checking its IVs, resetting your game (without saving!), and entering its details into the program until you have entered data for all the editable fields. At this point the Seed Searcher should look something like this:
Once you have entered data for two Day 4 Pokemon, a Day 5 Pokemon, and a Day 6 Pokemon, you are almost ready to start searching for your seed. The last set of fields is the Calculation Range. These fields essentially broaden the search the program uses to find your seed. In general, a range of 0-3 should work. However, if your search completes and you do not find anything, you may want to consider increasing the upper bound of the range. In the top toolbar, make sure your GPU is selected in the Accelerator menu. If this does not apply to you, or for some reason your CPU is faster (it shouldn’t be in most cases), you can select CPU instead. Now, click Start Search. The program will run and search for your seed, which will be displayed in the Control text box above the Start Search button. The program will stop searching when it finds a result, and your calculation time will be displayed along the bottom of the program. A new text file is also created in the installation folder called "results.txt," which contains your seed.
If no seed is found, try widening your calculation range. If you are sure you entered everything correctly and still nothing is found, you’ll need to start the process over by throwing in a new Wishing Piece. If you find a seed, congratulations! You are ready to move on.
Checking what you have available
Once you have found your seed, the next step is to look at the different frames and see if there are any targets you are interested in. Each frame is associated with a certain IV spread, nature, ability, gender, and shininess. The information for each frame changes with the seed. So, once you find your seed you then have to see what each of the frames hold to find anything worth pursuing.
Seed Searcher
To check the frame information, click the Seed Checker button in the bottom right of Seed Searcher. This will open up a new menu, shown below.
Enter the seed you just found into the corresponding box of the Results menu that just opened (it should populate automatically), and choose your target species from the drop-down. This is the Pokemon you ultimately want to catch, which is not necessarily any of the Pokemon you caught when searching for your seed. The left frame input is the starting frame for your search, and the right input is the number of results. To begin, keep the starting frame at 0 and enter the maximum number of advances you are willing to do (1 day skip = 1 frame advancement). Click Show.
The bottom of the menu will populate with all of the information saved on each frame. To quickly find one that you’d be interested in, you can use the filters in the upper right of the Results menu to filter the frame information. Apply Filter will filter the frames based on the information you provided in the filter inputs. Reset Filter will re-show unfiltered frames (same as clicking Show). Clear Filter will not change what frames are displayed, but will reset the filters to their default values. Finally, clicking Search will search through all of the frames for your seed and return the first result that matches your filters. Here, I've filtered the results searching for any shiny within the first 10000 frames.
Filter the frames to see if you have anything requiring reasonable advances. If you are after a shiny Pokemon, it is not uncommon for the first shiny frame to be in the thousands, even tens of thousands. So, be prepared to re-roll your seed by using another Wishing Piece and redoing this process of determining your seed if you don’t find anything that you want to pursue.
RaidFinder
To check the frame information, return to the main window of RaidFinder. Enter your seed into the corresponding box of the RNG Info section. If you do not know your seed, download Seed Searcher and follow the steps in section Capturing Pokemon. Leave the Initial Advances set to 0, and set the Max Advances to a reasonable number based on the number of frame advancements you're willing to do. If you are going after a shiny raid, this number will likely need to be in the thousands.
Proceeding to the Settings section, enter the rarity of your desired raid and the species of the Pokemon you are after. A raid with a higher star rating will have more guaranteed IVs but will be harder to defeat. The other drop-downs are for informational purposes and cannot be edited. If you wish to see the stats of the Pokemon you'll find instead of its IVs, you can enable the corresponding checkbox and enter the level of the Pokemon you caught.
Lastly, the Filters section can be used to limit the results shown to you upon clicking Generate. As an example, let's say I'm after a shiny Pokemon, but I don't particularly care about anything else. I would filter the results by selecting the kind of shiny I would like from the drop-down ("Any" does not apply a filter, meaning it can be shiny or non-shiny; the remaining options select whether you want to filter by a Star Shiny, Square Shiny, or both). I'm not picky, so I'll select Star/Square, increase my max results to 3000 because I'll likely need to do a lot of frame advancements, and click Generate to get the following:
The above image tells me that I'll find a (star) shiny 3-star Milcery after 1465 advances with 31/31/17/12/31/25 IVs. If you aren't happy with the results, you may consider changing the Species in the Settings section to a different Pokemon or star rating to see what other options you have available. You may find something you like better if you fight a different raid! After you tweak the settings, you'll need to reclick Generate to see the new results. You can quickly see every frame without changing your filters by enabling the "Disable Filters" checkbox and re-clicking Generate. If nothing shows up when you click generate, use less-restrictive filters, increase your Max Advances, or start over with a different raid.
Filter the frames to see if you have anything requiring reasonable advances. If you are after a shiny Pokemon, it is not uncommon for the first shiny frame to be in the thousands, even tens of thousands. So, be prepared to re-roll your seed by using another Wishing Piece and redoing this process of determining your seed if you don’t find anything that you want to pursue.
Advancing Frames
I’ll pause to say that there is a very small chance the seed you received from searching is incorrect (this is not a problem with the tool, but rather the method in which you must determine your seed). To verify, capture the Pokemon currently saved in the den while doing 0 advancements. Its information should match up with the first entry, corresponding to 0 frame advancements. Make sure you don't have filters enabled! If it's wrong, you'll need to restart the entire process, including using a new Wishing Piece. Everything look ok? Great. Reset your game, and let’s move on.
Once you find a nice frame that requires few advancements, take note of the Frame Advances (called Advances in RaidFinder) column. This indicates the number of times you’ll need to advance the date on your Switch, as moving 1 day into the future causes 1 frame advancement. Since the date moving forward is the only way to advance the frame, it is important to not let the date roll over naturally by passing midnight. As long as you don’t let the clock read midnight, you can span your frame advancements out over several days if you wanted!
As shown in the image, our target frame requires 1465 frame advancements. This ultimately means we’ll have to go into the game, enable the time skipping glitch, and then change the date 1465 days into the future. Since it’s easy to lose track of a large number of frame advancements, I recommend using a date calculator to determine what the final day will be on your Switch. Simply enter the current date on your Switch and add the number of frames you have to advance in the days column to determine what the end date will be.
Enter the game. Because there is a small chance the game will crash if you advance the frame by a large number in the Wild Area, I recommend moving to a Pokemon Center if you are using the online method so that the sudden weather changes don’t cause your game to crash. Enable the time skipping glitch, and proceed to advance the date on your Switch one day at a time. I recommended going back into the game and saving every once in a while so you don’t lose your progress, re-enabling the glitch to be sure it hasn't accidentally been deactivated (if you don't close the game, you shouldn't have to re-enable it).
Now, at this point you might be wondering how you know what Pokemon species you’ll find. I’ll explain the process soon, but it’s imperative that you stop three frames before your target. Since our target requires 1465 advances, that means we need to do 1462 advances, then save the game. I’ll reiterate since this is so important:
[Number of advances] = [Target Number of Advances] - 3
If you want to be safe, you can do 10 fewer advances than the number required to check where you are. Overshooting your target will ruin the attempt, and you'll need to start over from the beginning by using a new Wishing Piece. For example, I would stop after 1452 advancements, save the game, then catch the Pokemon in the den. After confirming the number of advancements I've actually done by comparing with the Pokemon data shown in the Seed Searcher (i.e. comparing the IVs, nature, gender, and ability), I'd reset the game and adjust the remaining advancements accordingly until I've done 1462 advancements, then save the game.
If you get lost at any time while performing the advancements, you can save, catch the Pokemon in the den, compare its details to those in Seed Searcher/RaidFinder to determine the number of advancements you've done, and reset your game. You'd then reenter the game, re-enable the glitch, and continue advancing the frame from where you left off.
Once you do the proper number of advancements, save the game.
Rolling for Species
Once you have saved your game 3 frames from your target, it is now time to reset for your desired Pokemon species. We’ll be using the same trick as we did for capturing the Day 4 Pokemon at the beginning of this process: enabling the time-skipping glitch, advancing the day 3 times, then checking what Pokemon is in the den. If the Pokemon spawned is not correct, don’t save and reset your game. Repeat the process of enabling the glitch and skipping 3 days until your find your desired Pokemon. If the Pokemon is correct, you can save your game. Now, whenever you load up the game (assuming you don't let the date roll over naturally by passing midnight), your desired Pokemon will be the first one you encounter! You are now free to keep battling the Pokemon until you catch it by resetting your game after each failed attempt.
Conclusion
The process to RNG Raid Pokemon is lengthy and at times frustrating, possibly taking several hours. However, when you find your perfect Pokemon, I’m sure you’ll think the process was worth enduring. Good luck!
Attachments
-
 31.5 KB Views: 2,286
 -
 34.2 KB Views: 2,220
 -
 61.7 KB Views: 2,224
 -
 35.6 KB Views: 2,167
 -
 34.7 KB Views: 2,248
 -
 35.1 KB Views: 227
Last edited:


