Welcome to Smogon! Take a moment to read the Introduction to Smogon for a run-down on everything Smogon, and make sure you take some time to read the global rules.
Hello I'm new the forum but I came across a potentially scientific moment that might be of use to people trying to "figure out" the Battle Arena. This quirk specifically affects the "Body" category as I was shocked to win this even after doing all the calcs. Hopefully this is useful to someone. Pardon the cell phone video of my DS, I don't have a capture card.
TLDR:
For the Body category, it would seem that your health ratios are determined the moment either player sends out their pokemon and they are face to face. Evenbefore the ref says "Commence battling!" therefore you can sneak an extra turn of leftovers heal (6.25% HP) the turn your opponent sends in a pokemon, if you just KO'ed their last pokemon and are not 100% HP. This "Leftovers Overfill" is potentially useful if you could somehow rig your HP to be very low the turn something comes in, as your HP ratio can be greatly impacted by even a small heal like leftovers close to 1HP.
WHAT HAPPENED:
My Kingdra wins Body category in the above and I wasn't sure how. Delayed hit moves Dive/Fly/Dig etc. have already been shown to be very good at the Mind/Skill categories so I stalled and avoided crits from potential Scope Lens Feraligator 3/4 with Dive but I expected to tie overall (ΔOX). Yet after winning (ΔO O), I think there's a quirk with the Body category starting the HP ratio when the two first meet instead of when the referee says "Commence battling"
Per Bulbapedia:
Body judges the amount of HP remaining at the end of the third round compared to their amount at the start of the first. The Pokémon with the better ratio wins the two points in the overall judgment.
In the Video:
My Kingdra has 85/175 (48% HP) when the referee says "Commence battling."
His Earthquake deals 52 dmg*. With Leftovers I finish the fight at 63/175 (36%) HP. My ratio of dmg taken is 63/85. I have ~74.1% HP
My Dive from my Modest 252/31 SpA EV/IV Kingdra does between 14.9% - 17.7% (27-32 dmg of 181 HP) to the 31 IVs Feraligator 3/4 who have identical stats. He has (if I hit max) 149/181 left or ~82.3% HP
How do I win with a ratio of 74.1% HP left vs his 82.3% HP?
If I account for the moment Feraligator is sent out (~21 seconds) before I get the leftovers heal and the ref says "Commence Battling!" I have 75/175 HP. Now the ratio becomes in my favor 63/75 = 84% of my health remaining.
This was Match 7 of Round 5. From what I can find, his Pokemon are now close to 31 IVs. It doesn't matter though, I ran the calcs against a 0 IVs Feraligator 3/4. He can hit me for 52 still, and if I max hit him for 37 that turn he still lives with 129/166 or 77% HP which is still more that my original value of 74.1% HP.
***Perhaps there lies a strategy with being very low HP where leftovers or another heal could provide you with a significant HP overfill (in terms of ratio when the two pokemon meet) to almost always win Body especially combined with any 2 turn attack move like Dive.***
EDIT:
P.S. if there is a more specific forum on Emerald Battle Arena pls move this there
This streak is still active and has been achieved across both my custom modded Game Boy Advance (new screen, new shell) and my Analogue Pocket. I have never used save states and never will because to me, it feels like cheating.
Gen III has always been my favorite. After getting absolutely wrecked by the Battle Tower as an 8-year-old, I made it a mission to return and reclaim my honor, to teach a lesson to the 2004 AI that caused me so much stress and rage as a kid.
After losing back to back streaks to Salon Maiden Anabel at 68 wins, I started to wonder if the Battle Tower had beaten my 24 year old self too.
Without further ado, I present:
Aurora Stampede
Tauros @ Choice Band - TT
Ability: Intimidate
Level: 100
Nature: Adamant
EVs: 252 Atk / 252 Spe / 4 HP
IVs: HP 30 / Atk 31 / Def 30 / SpA 31 / SpD 30 / Spe 31
- Return
- Earthquake
- Hidden Power Ghost
- Double-Edge
Suicune @ Leftovers - T
Ability: Pressure
Level: 100
Nature: Bold
EVs: 252 HP / 252 Def / 4 Spe
IVs: HP 31 / Atk 12 / Def 31 / SpA 31 / SpD 31 / Spe 31
- Surf
- Calm Mind
- Ice Beam
- Substitute
Latios @ Lum Berry - Apollo
Ability: Levitate
Level: 100
Nature: Timid
EVs: 252 SpA / 252 Spe / 4 HP
IVs: HP 31 / Atk 31 / Def 31 / SpA 31 / SpD 31 / Spe 31
- Dragon Claw
- Calm Mind
- Recover
- Thunderbolt
RNG Manipulating / Ace Codes
TT, my Tauros (named after Thierry Henry, French football legend) was my most interesting manip as he is obviously not from Emerald. I ended up catching a Tauros in the safari zone my Fire Red copy and sent it over to my Emerald where I used a number of e-sh4rk's bootstrap codes to effectively create a legitimate Tauros. I started by placing my Tauros in the daycare, I then used a code to instantly hatch an egg and change the PID of the egg to an adamant one, I then used another bootstrap code to change the IV's of the egg to make sure it came out with strong IV's as well as being Hidden Power Ghost. I then lastly changed my SID to one that would match the PID where it would yield a shiny Tauros. I hatched it, used some more bootstrap codes to EV train it perfectly to what I wanted and the rest is history.
T, my Suicine (named after my big bro) was another interesting manip that involved injecting my copy of Emerald with im a blissy's DLC and then following a number of steps to effectively RNG manipulate a legal Suicune from Colosseum while catching Suicune on the iconic Mirage Island. This included changing my SID to one that had a Suicune with the nature, IV's, and was shiny and then having to time travel within 30 or so seconds of the frame that it was at in the future and successfully clicking A on Suicune at the right time for it to appear.
Apollo, my Latios (just a cool name) also had an interesting process where on accident I chose Latios as my roamer by viewing it on the TV after the E4. I had to actually use some more ACE codes to spawn in the Southern Islands and then had to swap Latias from appearing there to Latios. I then followed steps to change my SID to the right one for a timid 6IV latty to appear.
The Strategy is quite simple. Lead with Tauros and then decide:
Physical Attacker:
If the opposing mon is an physical attacker and susceptible to intimidate, decide if they are a major threat to the rest of the team or not and if they are, kill it with double edge or return. If they are not, swap either Suicune or Latty to setup on with 6x calm minds while using either substitute or recover spamming to stay alive and then proceed to sweep.
Special Attacker:
If the opposing mon is a weak special attacker I usually decide if it has enough power to cause damage to the rest of my team, I will kill it with Tauros. If it is weak enough I sub Suicune in to take hits while setting up Calm Mind, usually leftovers can keep Suicune alive while each additional Calm Mind reduces the damage taken significantly. Sometimes I can even swap in on mons with super effective moves like thunder punch and maybe I will take 20% for the first hit, each additional Calm Mind reduces it until it does nothing and I can safely setup substitute somewhere during the Calm Mind's and then finish off the entire team with Surf / Ice Beam. Similarly this also works with Latios but not as well as it is more fragile than Suicune and only has access to Recover and not a Substitute to hide behind.
OHKO'er:
If the opposing team has a mon with Fissure, Sheer Cold, Guillotine, or Horn Drill. I usually try to take the risk and swap into Latios and immediately setup Substitute. This does 2 things, it firstly is a great way to get them to lose PP fast as Suicune has the ability Pressure which increases the amount of PP usage by 2x. Secondly, and most importantly, Suicune has Substitute which can save it from an OHKO move and keep Suicune alive which has saved me a bunch of times.
This has been one hell of a journey. What started as a simple goal to earn a gold symbol and call it a day turned into something much bigger. I had no idea how much effort it would take to truly conquer the Battle Tower or any of the towers for that matter.
I didn’t expect to fall down a rabbit hole of RNG manipulation, ACE codes, and constantly pushing myself to learn and adapt. From long battles on cramped plane rides that stretched up to 15 minutes each, to the tension of prepping for the next opponent, to hours of theory crafting with my boys about which three epic mons could carry the run, this has genuinely become one of the most memorable gaming experiences of my life.
Just want to shoutout my boys: Dr. G and Alpa Chin, without you guys this team would have never existed.
As for what is next, I plan to take this team as far as it can go. I never wanted to create a boring team consisting of stall mons to achieve crazy high wins, that seems mundane but can totally respect the time commitment and grind required. Once this team comes to an end I want to recreate a team with 2 of my favorite mons, shiny Raikou and shiny Registeel, 2 of the best shinies ever and 2 wicked mons. The final mon is undecided but will probably end up being Suicune as it has been one of my favorite mons and is crazy powerful. If you have any suggestions feel free to let me know!
Returning with an ongoing 70 streak in the Lvl 50 Battle Tower using a team of my favorites, Espeon - Charizard - Swampert. (SubTectCM Espeon, SubPetaya Charizard, and CursePert). Will update w/ final score or if I can reach 105. I initially tried really hard to get a baton pass Espeon team going, but it ended up being too inconsistent, will explain more below. A story of the Anabel fight in still frames is attached, my video was too big to upload.
Espeon (F) / Lucy
Timid - Synchronize - Leftovers
IVs: 31-4-31-31-31-31
EVs: 164 HP, 44 Def, 4 SpA, 76 SpD, 220 Speed
Lvl 50 stats: 161-64-86-151-125-173
- Psychic
- Protect
- Calm Mind
- Substitute
EV Notes: EVs allow you to survive 170+ Atk Metagross Shadow Ball, and at +3 Modest Zapdos TBolt cannot break your substitutes.
Charizard (M) / Chef Curry
Timid - Blaze - Petaya Berry
IVs: 31-4-31-30-31-31
EVs: 52 HP, 20 Def, 200 SpA, 4 SpD, 228 Speed
Lvl 50 stats: 160-81-101-154-106-163
- Flamethrower
- Dragon Claw
- Substitute
- Hidden Power Grass [68]
EV Notes: HP divisible by 4 for Petaya berry, investment survives 252+ Atk Ursaring/Absol Double-Edge, only 1/16 chance to die to 252+ SpA Gengar Thunderbolt. 200 SpA +1 Blaze Charizard Flamethrower OHKO Zapdos, Ursaring, Armaldo, Registeel, Metagross, other threats, guaranteed 2HKO 255HP Snorlax after Leftovers. If you forego HP Grass you can get an extra stat point, probably SpD is the best to guarantee surviving the GengarBolt. Try Smokescreen/Growl/Toxic if you can't breed Hidden Power.
Swampert (M) / Shrek
Impish - Torrent - Chesto Berry
IVs: 27-31-30-31-31-30
EVs: 252 HP, 12 Atk, 176 Def, 60 SpD, 8 Speed
Lvl 50 stats: 205-132-132-94-129-81
- Earthquake
- Return
- Curse
- Rest
EV Notes: At least 205HP and 127 Def to guarantee that 170+Atk Metagross EQ cannot 3HKO, current spread takes max 49.7% damage from 252+Atk Rhydon Earthquake, the 12 Atk EVs guarantee that you will 3HKO 255HP Snorlax at base stats, winning the Curse war. You also still outspeed Snorlax after 1 Curse. With current IVs use Impish for an extra stat point, I would recommend Speed so that this set outspeeds Tyranitar in Level 60s/100s.
Originally this was a Baton Pass Espeon team, I tried a variety of mons such as Gengar which is amazing after a boost, or Zapdos. I also played around with Charm which is good but is better for helping your teammates set up rather than helping Espeon set up (My other best Attempt lost in round 68 with a team of Charm Espeon, CursePert and Toxic/Ice Beam/Protect/Rest/Lefovers Articuno. No idea why I toxic the Lum Berry Latios instead of just blasting with Ice beam...?). I found Charizard to be a very good recipient, it has Flamethrower to blast steel types that threaten Espeon and great coverage overall. CursePert and CurseRegisteel also appreciate calm mind boosts and can set up on water types. I really like Swampert because it is able to take on the strong special Fire and Electric attackers that may overwhelm Espeon. Overall many of the teams I tried would peter out somewhere in the 50s and couldn't even achieve the ribbons (although passing CMs is still a lot of fun!). The conceptual problem is that you pass when faced with dark/steel types, bulky normals/Slowbro, and physical attackers. Unfortunately bulky normals and Slowbro are still going to wall the special attacker you pass to, you generally want a strong physical attacker to counter many of these, at which point it is not taking advantage of the SpA CM boosts, especially if you passed in the face of a physical attacker like Rhydon which doesn't care about increased SpD either.
My struggles changed when I replaced Baton Pass with Protect and doubled down on the leftovers Espeon, I managed to get to 70 wins on my 2nd attempt, and only lost the 1st because of misplays on my part. So far the team has felt pretty consistent.
Espeon:
SubTect is a tried and true strategy, combined with Calm Mind and leftovers you can basically set up on almost any special attacker. Once they can't break your substitute you are in stall and set up territory and can easily get to +6. Espeon most likely has the best stat spread to pull this off (minus the Lati@s of course), it's a little bulkier than Alakazam and doesn't have the Ice Beam weakness of the Lati@s so does better against the many water types of the frontier. In fact water types are some of the best setup opportunities because they cannot deal status with their STAB unlike Fire/Ice/Electric attackers. Protect is probably the best move for a lead Pokemon followed by substitute, combined with Espeon's super speed and you generally have a pretty safe opening. You can scout most sets, sometimes it's better to use substitute first against a pokemon like Ludicolo which is liable to Rain Dance or Double Team on turn 1. Other turn1 sub targets include Muk (curse), Jynx, Fire types (Sunny Day and OverHerb), grassy poison double team spammers, and some ghost types. Obviously with Baton Pass you just Sub turn 1 almost every match and can try to pass that along. I can strongly recommend focusing on a more offensive spread and running Cheri Berry if you are going to use Baton Pass or Charm, this opens up Leftovers for some tanky recipient like Articuno and increases your sweep chances with only 1-2 boosts, you can also swap stall confuse rays or swagger without burning your berry. Biggest threats are Snorlax (guaranteed 2HKO at +3), Metagross (can't 2HKO) and Dark Types.
Charizard:
SubPetaya Charizard is basically there to switch into Metagross and other steel types and blast away, it also removes grass types for Swampert. This Pokemon is pretty goated in gen3, no stealth rock and deceptively good bulk that can switch into a huge number of attacks on the frontier, grab a boost + blaze, and then fire away. Earthquake/Fissure immunity is also essential since Espeon and Swampert are hit. The stat spread tries to make the best of Charizard's stats and STAB. When using Charizard often you will beat the check it switched into and then suicide against the next pokemon. You only have a small chance to OHKO the standard 170HP frontier Metagross spreads, but of course after a Petaya boost and/or blaze that doesn't matter. You also OHKO Rhydon before a boost and Swampert after Petaya berry activates. Charizard has so far taken care of all 3 of these mons during the streak and also switched into Latias 8 Shadow ball, ate Psychic for a Petaya boost on the 1st Dragon Claw, and then removed the offending dragon from my screen. Some other options would be to drop HP Grass or Dragon Claw for Smokescreen or Growl, which would help the other two mons set up much more comfortably, but all 3 coverage moves have been useful so far, those might work well on a Lead Charizard. The bulk is also useful, you will survive even the strongest normal STAB attacks, things like Choice Band Absol Double-Edge, and non-stab Thunderbolts. Another note is that zero Flygon sets have a rock type move, so Dragon Claw Charizard counters them well. I think Timid Moltres, such as the stall set seen in this forum and giving Espeon a different item, could be a great replacement and also guarantee the native OHKO on Metagross. An even better option is definitely Choice Band Salamence with Aerial Ace/Earthquake/Flamethrower/Brick Break, having intimidate plus a Snorlax and Dark-type counter would support the rest of the team a lot. Biggest threats are bulky waters, anything with a rock move, and Quick Claw users, unfortunately these have a lot of overlap.
Swampert:
CursePert is great for the frontier, especially because you need much less investment to counter Metagross due to not having Choice Band or 252 attack EVs, and have Charizard backing you up. It is further EVd to basically outspeed and/or win the curse war against enemy Snorlax. I used Careful instead of impish because I originally had a more specially-oriented spread to take better advantage of Calm Mind boosts (205 HP 127 Def 135 SpD extra Atk), but the current physical investment has paid off for sure. Better breeding and Impish could get you 1-4 more points, I would say 1 speed and 3 SpD to round out this mon (205 HP 132 Def 132 SpD 82 Speed) to outspeed Tyranitar in Level 60/100 (obviously this wrecks both Charizard and Espeon). Currently hitting 129 SpD over 128 changes Latios Luster purge from >65% 3HKO to like 29% 3HKO. You can set up to +6 on basically any electric type, and also fire types that don't have SunnyBeam. Against waters often a 1 curse -> resto berry -> 2 attacks sequence can get you past them with a bit of HP to spare. Being at 1 curse is a good place anyways since you still outspeed Snorlax. Return takes care of Salamence and Gyarados at +5. I originally had Rock Slide but it is not a good move, and the team getting walled by Claydol is embarassing. You cannot touch Misdreavus or Gengar, but I was able to PP stall and Struggle a Misdreavus so not too big of a threat, while Espeon cleanly picks off Gengar and Charizard can switch into any of its attacks and set up (minus Gengar 1 of course). Against Anabel set up to +6 on Raikou, EQ at the right moment so Reflect somes offline, then sweep. Biggest threats are grass move users and big physical crits, also psychic special defense drops.
Overall this team is fun, there feels like a good variety of matches, some with slow setup and some with quick sweeps, which keeps things interesting. Definitely would recommend CBMence Aerial Ace/EQ/Flamethrower/Brick Break over Charizard to probably get a more consistent streak going. This team is fairly susceptible to status even with double substitute, so a Lum Berry Pokemon (Moltres?) would also make a great choice over Charizard. CBFlygon could replace Swampert in the role of checking Electric/Fire/Steel types and role compress fire coverage, but cannot set up and sweep.
Ended with a score of 98 (lost round 99). Misplayed against 2nd slot Choice Band Aerodactyl 2 which Ancientpowered my Charizard, then got an omniboost while stalling with Espeon. It ended up doing too much recoil damage and fainted before Swampert could get more than 3 boosts, which was not enough to OHKO 3rd slot Flygon 2 before it hit with Solar Beam. Moral of the story is to just hard switch to Swampert when you see an Aerodactyl. This team can definitely go all the way to 105 so hopefully I can do that soon, not bad for a 2nd attempt though. I also wanted to share this calc I did not intend, but turned out very helpful:
Dewgong 4 Signal Beam vs. 52HP 20Def Charizard: 8-10 damage (5-6.2%)
Dewgong 4 Surf vs. 52HP 4SpD Charizard: 127-150 damage (79.3-93.7%)
Charizard does 44% and 64% with HP grass at +0/+1 so this set is a free setup as long as Dewgong doesn't high roll twice.
Gen 3 Battle Factory Open Level (lvl 100) Streak: 89 Wins
This was played on an emulator.
I don't record or stream anything, but I tried to log my thought process at each decision as I was playing. I still made a lot of misplays but I am generally happy with how I played.
Gen 3 Battle Factory Open Level (lvl 100) Streak: 89 Wins
This was played on an emulator.
I don't record or stream anything, but I tried to log my thought process at each decision as I was playing. I still made a lot of misplays but I am generally happy with how I played.
I like reading this a lot, way better than watching a 2 hour video with long pauses as people make decisions. Also wanted to catch that you listed Endure as having a 1/3 chance of working the second turn you use it- judging by the fact you mixed up some other gen 3 mechanics, I think you may have mixed this up too. Endure uses the same mechanics as Protect, which means you actually had a 50% chance to hit the second endure, not 1/3.
I like reading this a lot, way better than watching a 2 hour video with long pauses as people make decisions. Also wanted to catch that you listed Endure as having a 1/3 chance of working the second turn you use it- judging by the fact you mixed up some other gen 3 mechanics, I think you may have mixed this up too. Endure uses the same mechanics as Protect, which means you actually had a 50% chance to hit the second endure, not 1/3.
Oh yeah, thanks for pointing it out! I have a lot of the game mechanics mixed up as I've only nuzlocked some later games. I'll learn to be patient and use Google in time. If I have some other mishaps on gen 3 mechanics I'd love for people to point them out as well
I like reading this a lot, way better than watching a 2 hour video with long pauses as people make decisions. Also wanted to catch that you listed Endure as having a 1/3 chance of working the second turn you use it- judging by the fact you mixed up some other gen 3 mechanics, I think you may have mixed this up too. Endure uses the same mechanics as Protect, which means you actually had a 50% chance to hit the second endure, not 1/3.
Zapdos is from Pokemon XD and Suicune is from Pokemon Colosseum. All three of my Pokemon were RNG manipped to get decent IVs
Embarrassingly lost to an Exeggutor with Solar Beam, Sunny Day, Synthesis, Light Screen. All of my Pokemon were burned beforehand, but I played awfully and got swept after missing a crucial thunder with Zapdos
I've been working on a tool to visually lay out the Frontier sets, so I can try to score each individual set more accurately to help with my teambuilding for my Factory autoplay setup. It occurred to me that it should be pretty easy to add in some other features that people might find useful, so I wanted to share a screenshot of what I'm calling "Speed Mode", where it sorts all the sets according to speed, combining sets of the same Pokemon into a single box.
(Note: these values are not accurate because I didn't have the right data in my CSV, I'm using doubled Level 50 stats and I don't know the IVs. I cannot be held liable for any lost streaks due to improper usage of this visual.)
There is also a "Scoring Mode" that's the main reason I started working on this tool, which needs some more work, but basically on the left it has a 0-100 y-axis and there are features to group by type or create custom groups. The idea is that you could group all Electric types, for instance, and then directly compare those sets to each other (Raikou vs Jolteon vs Raichu vs Electrode vs Manectric...) within that group before giving them an overall ranking. I'm not sure if Scoring Mode really has any use besides my intended purpose of ranking Factory sets, but there's also a Free Mode where you can just make whatever groups you want (based on things like, Type, Has X Move, or make custom groups but you have to add sets manually) and drag sets around. I'm not sure how many use cases there are for Free Mode either since there's a lot of sets to work with, but maybe people have some ideas about that.
Anyway, I'm mainly just posting this as a preview since I should be able to release this fairly soon, and also to get ideas/suggestions for what features could be useful for this kind of tool. For Speed Mode I'm definitely going to add something to search for a speed value that will either highlight all sets with that value or insert a placeholder where that value would be (the rows in the visual are ranges of 10, sorted highest to lowest from left to right within that row). I'll also be adding the full stats to the info on the right (again, the speed is wrong) as well as an option to change IVs.
Hello everyone, I'm back with two new Battle Palace streaks to share. First, I hit 224 wins in the Level 50 Singles format, which I believe is the current record. For battles 1–42, I ran a Metagross–Latios–Swampert team (with a similar playstyle to the core described below), then switched to a Salamence–Snorlax–Suicune lineup that carried me through the rest. The entire streak was recorded on emulator using 4x speed (occasionally up to 10x for PP stalling), and I showed the team screens at the end of the video for verification.
The second streak reached 146 wins in the Open Level (Level 100) format using a revamped version of a team that had previously achieved 105 wins. This run was also recorded on emulator at 5x speed, and I displayed the team at the start and end of the video for verification.
Latios has increased its bulk – this is to reduce the chance of a Crit OHKO/2HKO from opposing Skarmory 4 Drill Peck and improve general bulk on switches, and to last unwanted Calm Mind turns. This new Swampert is Brave – it attacks more often at full health and still has better behaviors overall vs Relaxed which I was using before. I prefer this team in the early rounds because it is better for getting to 42–63-win streaks very quickly.
Salamence @ Choice Band
Ability: Intimidate
Level: 50
EVs: 252 Atk / 4 SpD / 252 Spe
Sassy Nature
- Aerial Ace
- Earthquake
- Rock Slide
- Brick Break
Snorlax @ Leftovers
Ability: Immunity
Level: 50
EVs: 36 HP / 220 Def / 252 SpD
Brave Nature
- Body Slam
- Amnesia
- Curse
- Rest
The team is inspired by Actaeon’s StruggleLax team, although Suicune and Snorlax both have had their spreads changed for a bit more offensive pressure. At <50%, Calm only having a 25% chance of attacking is too low for my preference. For this reason, I think Modest Suicune is better than Calm Suicune.
Stats at Level 50:
Salamence: 170/187/100/x/111/136
Snorlax: 240/143/113/x/162/45
Suicune: 207/x/161/121/135/112
Salamence - standard Palace CB Mence. Not much else to say, since there’s no other moves worth substituting.
Snorlax - I’ve used two attack Snorlax before and found it underwhelming. I think mono-attacking is much better because of its ability to PP stall and completely nullify many special attackers after one Amnesia boost. The benefit of having Amnesia is that the Palace AI will choose it in the DEF category over Rest at full health. With a two attack Curse-mon, this is not the case – it will probably pick Rest and leave yourself very vulnerable. The SpDef and Def boosts can make it impermeable in many battles. Brave nature is the best for balanced Curse-mons because it will prioritize attacking at full health and Resting below half health. EV spread is a bit arbitrary – I wanted a nice divisible number for the health (240), then maxed SpDef and put the rest in Defense. SpDef over Def because Salamence Intimidate generally already softens the opponent up a bit, and this team is weaker to special threats. It must be Immunity as the nature to counter Toxic stallers; Fire/Ice resistance is already covered by Suicune.
Suicune – RoarCune with speed investment to outspeed the 111 Speed tier. Modest is the best nature for Calm Mind users. Not because it’s optimal (I don’t think it is), but it’s the ‘least bad’. It’s hard to find a nature for Calm Mind because setup and Rest are the same category. The alternative natures are Bold (too much support) and Calm (Not enough offense). At least Modest is unlikely to choose a support-class move at low health (you don’t want Suicune to choose Roar at low health because it will make it move last – making it more susceptible to the opponent). Roar was chosen as the SPT class move simply because all the other choices weren’t very good. I suppose Toxic is viable, but Roar is still okay because it allows phasing/scouting of the rest of the team. Suicune is RNG'ed on retail, with evidence here.
Any discussion of a long streak in Battle Palace must discuss the strategy against Spenser. He is the most common opponent in a streak, as well as one of the more difficult ones. This is why any excessively long streak that doesn’t have a bulky Water type can be suspect imo. A team should already have an idea of how to optimize the Spenser battle so that it can be repeatable and not subject to too much hax. For example, with this team:
Suicune switches into Arcanine – tries to faint it. Almost no chance Arcanine can KO Suicune. If Suicune is Roar’ed out, just switch it back in. If Suicune Roars to Slaking – stay in and see what happens (switch to Salamence on the Truant turn). If Suicune Roars to Spenser’s Suicune – switch to Snorlax.
Snorlax is always the counter to Spenser’s Suicune. It takes several CM boosts for its Surf to do much to Snorlax, plus Snorlax will likely attack/paralyze it with Body Slam. When the opponent Suicune falls below half, your own Suicune counters it, because the opponent will almost always use attacks and no longer set up.
Salamence is good for cleanup on Suicune, getting Intimidate on Slaking, and Brick Breaking it. It’s a bit of a glue Pokemon in this battle. It should not switch into Slaking unless on a Truant turn though.
General Playstyle:
Salamence usually doesn’t stay and attack unless it can OHKO. It’s usually used as a cleaner and just leads to get Intimidate off.
Articuno – Switch to Suicune to stall, then to Snorlax to attack.
Blastoise – Switch to either Suicune or Snorlax. Snorlax if it is Blastoise 4 with Mirror Coat.
Blissey – Switch to Snorlax but use Suicune if it’s Blissey 4 to waste Ice Beam PP and set up.
Cradily – Switch to Suicune to scout. Cradily 3–4 can be handled with Salamence Brick Break.
Dewgong – Switch to Suicune to scout. If not Dewgong 3 or 4, then switch to Snorlax.
Dusclops – Switch to Snorlax for sets 3–4 (offensive), otherwise Suicune is fine.
Gengar – Switch to Snorlax to PP stall, then finish with Salamence.
Granbull – Switch to Snorlax to counteract Intimidate/scout set. With chip, Salamence can come in and KO with Brick Break.
Golem – Attack with Salamence. Generally found on Hiker teams; avoid using Suicune due to risk of Explosion.
Gyarados – Switch to Suicune to reset Intimidate, then back to Salamence. Use Snorlax if it’s Gyarados 2.
Houndoom – Switch to Suicune. If it sets up Sunny Day (set 4), then switch to Salamence to OHKO.
Lapras – Switch to Suicune to scout. If it’s Lapras 4, go to Snorlax.
Quagsire – Switch to Suicune to scout for Water Absorb. Stay in if yes; if Damp, then go to Snorlax. You can rotate back to Salamence on Earthquakes for extra Intimidates.
Salamence – Switch to Suicune to reset Intimidate, then back to Salamence. Rock Slide will 2HKO.
Slaking – Generally switch to Suicune to scout. Intimidate on Truant turns. Snorlax sets up on Slaking 4.
Ursaring – Suicune is good vs Mega Kick set due to low PP. If not Counter, Salamence can return and attack with Brick Break. Often staying in is fine since many sets are OHKO’d by Brick Break.
Wailord – Switch to Suicune to scout, then to Snorlax unless it's the Fissure set.
Walrein – See below, Snorlax handles sets 1–3.
Threatlist:
OHKO users – Dewgong 3, Lapras 7 8, Walrein 4. Lesser extent Whiscash 4 and Wailord 4. The general play is to switch to Suicune to try to Pressure stall the PP from their OHKO moves, but this is a bit risky. Afterwards switch to Snorlax. Whiscash and Wailord are a bit different just because Salamence can be a switch on Fissure in a pinch, but it’s not totally recommended because there’s a random chance that the opponent may select Ice Beam instead.
Espeon – the switch is Snorlax but Espeon’s Psychic can cause a SpDef drop or CM on the switch turn, which would make it do quite a bit of damage.
Gardevoir – the switch is Snorlax, but set 2 is annoying because of CM, Double Team and sets 5-7 can be dangerous because of Destiny Bond.
Marowak – There’s not really a true optimal move here. Suicune isn’t a reliable attacker although it has a good chance to OHKO sets 2-4. On the other hand, Salamence can reliably attack and survive a -1 Rock Slide but it’s not certain to attack next turn to finish it off.
Misdreavus – only set 3. The switch in is Suicune but if it can correctly do Perish Song + Mean Look there could be an issue, since Suicune likes to endlessly CM.
Strong Electric Types – Zapdos, Raikou, Manectric – Snorlax is the switch but one crit, or one para can really threaten the whole team, since Salamence and Suicune are both not good against them. This is a big reason why I chose to max SpDef and add Amnesia over another attacking move.
Counter Users – mainly Ursaring 2, Snorlax 5 6, Registeel 3. Sometimes it’s not possible to scout them and you must attack with Salamence anyways, especially with Ursaring, because it will do huge damage to the rest of the team.
I switched in Salamence on Breloom 2 – thinking that after Intimidate it would still be above 50%. Well also I didn’t check what Breloom set it was with FrontierAssistant. Since the last being Skarmory was already revealed, I probably should’ve sacked Snorlax, but I didn’t think to do that at the time. Anyways, I think the Focus Punch leaves Salamence at exactly half HP (high roll I think) which makes it unable to pick Aerial Ace the next turn, then Breloom can KO after Spore + FP again. Then the match is essentially over because Breloom beats both Suicune and Snorlax.
Recording:
The video is uncut, recorded using OBS desktop capture and uploaded the day it was recorded.
The EVs are basically the same as for Level 50, with slight modification just to optimize Latios’s HP to be divisible by 4 (so two Substitutes will trigger the behavior change). All 3 still outspeed their speed tier as for Level 50. Latios now has gone back to Substitute instead of Calm Mind. I was using Calm Mind for a while, but it really leaves Latios very susceptible to Heracross. In the case of Heracross vs Latios 1 v 1, Latios choosing Calm Mind while Heracross picking Megahorn basically loses the streak entirely since Metagross and Swampert are not good Heracross counters either. With Substitute, it allows Latios to have another chance to choose Psychic, which has an 88% chance to OHKO sets 1, 3, 4 and does a great deal of damage to set 2 (which wouldn’t have been a guaranteed OHKO with max SpA; also set 2 doesn’t choose Megahorn as often as the other sets because it is Jolly). It also just gives some more insulation for the team as Latios may be able to stay in on some turns and get more chip damage on unfavorable matchups if it had Substitute up from a previous matchup. On the other hand, losing Calm Mind makes the Spenser battle much more difficult (more on that below). Latios is also a bit less useful against other bulky waters; with Calm Mind it could previously shrug off Ice Beams.
I do prefer this team for open level better versus the Salamence-Snorlax-Suicune team I used for level 50. The addition of 8 sets each of Dragonite and Tyranitar – both of which are weaker to Metagross and Latios is a big reason why I think this team is probably better suited for open level.
For Spenser I developed a pattern to optimize the battle. Always switch to Swampert on Arcanine and let Swampert KO Arcanine. If it gets some Curses up that’s great, if not, it doesn’t matter. Then stay in with Swampert on Slaking to see how it behaves. Hopefully it can get some chip damage, but if Slaking KO’s it with Hyper Beam that’s ok. Metagross should come in next and try to do some damage with Meteor Mash on the Truant turn. The problem here now is that on the next turn, Slaking outspeeds and its most likely move is Earthquake, which would put Metagross below half. Even if Metagross knocks it out, that leaves Metagross in on Suicune locked into Meteor Mash, which does almost nothing. So, this is not the optimal play. Instead – switch to Latios on the Slaking Earthquake turn. There’s about a 1% chance Slaking will choose Shadow Ball – but Latios isn’t KO’d by it (also 1% chance of Hyper Beam), and this probability is very low.
This is where Substitute is also helpful again – Latios can generally get a free turn on Slaking’s Truant turn where it can either Sub or finish it off with Psychic as below:
252 Atk Choice Band Metagross Meteor Mash vs. 6 HP / 0 Def Slaking: 252-297 (57% min)
180 SpA Latios Psychic vs. 6 HP / 0 SpD Slaking: 199-235 (45% min)
The key is that Latios must already be in vs Spenser’s Suicune. Unless it’s a Cursed up Swampert, most scenarios where Metagross is up against Suicune and must switch to Latios generally do not go well, especially since now Latios no longer has Calm Mind. Previously with Calm Mind it could just boost up alongside it, push it below half, and Metagross still had a good chance to finish it off because Suicune would lock itself into an attacking move. With Sub Latios – hopefully it can actually Thunderbolt and not use Substitute repeatedly as Suicune Calm Minds, but I think this is about as optimized as the battle can get.
General Playstyle:
For most Pokemon, Metagross should stay in and just attack. There’s only a few that switching out would be worthwhile.
Fire/Electric types – switch to Swampert – most can’t really do anything, except for maybe Houndoom/Entei/Rapidash with SunnyBeam. For those you can tell if they have Solarbeam if they set up Sun or charge up, so its easy to switch to Latios then.
Fighting types – switch to Latios – Latios Psychic OHKOs most fighting types, and their moves really don’t do much back.
Opposing Metagross – Switch to Swampert – Earthquake will do much less on Swampert, and generally trainers with Metagross usually have other bulky Pokemon you need to keep your Metagross for.
Blastoise 3 – Switch to Latios. It has a good chance to either use Counter or Earthquake on Metagross, so don’t waste its HP.
Swampert, Whiscash, Quagsire – Switch to Latios. Don’t want Metagross to take an unnecessary Earthquake
Scizor – Switch to Swampert. Two Earthquakes kill all Scizor. Don’t want Metagross to get Counter’ed. Also Scizor often is on Bug Maniac/Catcher teams, which Metagross often has a better matchup for.
Forretress – Switch to Latios on Earthquake and scout. One set (Giga Drain) is countered by Latios. It’s about 50/50 on whether to stay in and attack with Latios vs switching out to Swampert and attacking with Earthquake. Also depends on the trainer (Hiker/Ruin Maniac vs Bug Maniac/Catcher) – Latios is less useful vs the former, Swampert is less useful against the latter.
Gengar – Switch to Latios and KO with Psychic. There’s enough defense to survive a Shadow Ball now as well.
Skarmory – switch to Latios. The defensive investment was made for this matchup, to survive 2 Drill Pecks from Skarmory 4.
Salamence/Gyarados/Dragonite/Flygon – switch to Latios on potential Dragon Dances. It should be able to live a +1 move. Thunderbolt doesn’t OHKO all Gyarados, but Ice Beam will kill all the dragons.
Aerodactyl/Aggron – switch to Swampert. Don’t want Aerodactyl to get a Fire Blast/Earthquake off on Metagross and do big damage when it would barely scratch Swampert. For Aggron – don’t want either a QC activation and big damage on Metagross when Swampert tanks and OHKO with Earthquake.
Steelix – switch to Latios to scout the set. Can stay in one extra turn to see what it uses to attack Latios as well. If it’s set 2 with Dragonbreath, Latios counters quite well. Otherwise, Swampert is a good switch.
Threatlist:
Heracross – Megahorn does huge damage to the whole team. If it’s lead Heracross, Metagross usually will pick the right move and Aerial Ace it. If its Heracross in a later slot, Swampert can be a good sack to a Megahorn to keep Latios/Metagross (if locked into a bad move) alive. Set 2 with Endure/Reversal – just pray it doesn’t execute that combination perfectly, because there really is nothing else you can do.
Houndoom – set 4 with Sunny Beam counters the whole team. Luckily its nature isn’t optimized to attack (it will likely just use Sunny Day repeatedly), but hypothetically it could defeat all three Pokemon quite easily.
Marowak – For lead Marowak the best move is to switch to Latios and Ice Beam, which OHKO all sets except for set 1, which can’t KO Latios back. Still, it is pretty scary seeing it Swords Dance on a switch into Latios. This is another reason why Substitute may be better than Calm Mind here.
Quick Claw users – Whiscash, Walrein, Rhydon. Any QC user that has a super effective move against Metagross or Latios is very threatening, since this team has no recovery for those two. A 2 vs 3 can be a bit difficult, especially because Swampert doesn’t really have much of a physical punch.
Counter users – Regirock, Snorlax, Ursaring. All three of these Pokemon have 8 sets and I still think the best move is to stay in with Metagross and attack, but it really is such a pain when they OHKO back with Counter and make it a 2 vs 3. Generally, the trainer always has some other bulky Pokemon in the back too so I’d really like to preserve Metagross but I really don’t think there’s another way.
I'm really disappointed in myself for losing against Spenser. I was in a bit of a rush because it was a national holiday and I had an event to go to around 11AM when I was recording this. Swampert was Yawned and finished off the Slaking and I thought it would be ok to let it stay in and try to wake up, but it did not wake up in time as Suicune set up and 3-0’ed the team. The proper risk averse play was to switch to Latios on the Truant turn after Yawn immediately, but I had never really gotten this configuration before in the Spenser battle. Also, had Swampert woken and attacked, it certainly would’ve put Suicune below 50% since it had 2 Curses already, which would’ve assured the win for me given the behavior change.
Recording:
As before, done with OBS Desktop Capture, recorded and uploaded on July 4.
Final Thoughts:
First, I'm happy to be back from the long absence. In the time I've been gone I've repeatedly tried to optimize for the Battle Palace and I think I've done that with these two longest recorded streaks for both singles formats. I may go back and try to surpass the Open Level record, but for the Level 50 record I really think I got very, very fortunate and I don't think I will be able to come close to that without an exceptional amount of additional attempts.
When I was testing these teams, I developed a few small python programs for teambuilding and optimizing battles. There's more details in the Addendum below. Please let me know if you used them or if you have any questions.
Thank you all for reading!
There are 3 programs I wrote to improve teambuilding and battling for the Battle Palace. I have attached all the programs and input files below as txt which can be converted to csv for use.
I scraped all the moves in Gen III, then took all most viable Pokemon for Emerald Frontier and created a program called MovesPalace to list out all Pokemon’s learnable moves by category. This can be helpful for Palace teambuilding (no longer having to switch between tabs on Bulbapedia between a Pokemon's learnset and the Battle Palace page).
This program allows you to input your own Pokemon team and it saves its moves with behaviors into a csv called mypokemon.csv based on its nature. This can later be used as an input to the next program, PalaceAssistant, to calculate probabilities of any categorical event happening during a Battle Palace battle.
I've modified this program from FrontierAssistant, first to correctly calculate team probabilities, then to also incorporate the new CSV generated with PalaceGenerate.py to see the probabilities of yourself vs the opponent AI at a given turn. Now you can see the most likely outcome at any turn and plan accordingly. You can also see all possible outcomes with different health levels by scrolling up too, inputting the health status only shifts the most relevant one to the bottom (most visible). Screenshots below:
Very impressive streak. I really like the way the team came together....whenever I would talk to magpie about palace team strategies this type of combination would always come up. Intimidate is just incredible especially with a calm mind user...I can't help but feel like my team approaches this one, but each individual mon of mine is just a worse version of yours.
I've always been secretly hoping suicune wouldn't end up on top in this facility but it looks like the gen 3 stall champ just can never be beat.
Roar is really surprising and something I would have never really considered. You mention toxic in your writeup as another potential move, and it definitely is an easy filler one. Just curious how often it felt like roar actually did something. I kind of wonder if you may as well slap like protect or something more useful and just eat the no move chance, especially with suicune probably changing to the <50% hp percentages most of the time it ends up on the field. Random protects could be pretty devastating into armaldo or marowak type threats so probably not the best specific choice.
The OHKO spammers really seem to give your team a tough time as you just can't really get them off the field that quickly if you aren't already set up. Does that feel like the case?
Finally just curious your experience with the statusing grass types. I feel like my zapdos was basically there just to cover these and some sleeps/paras could put you in a pretty bad spot. Pretty specifically what about vileplume...it got left off the threatlist/lead list but I assume its just attack with mence and if mence is dead just stall it out? Suicune probably needs to get unlucky to lose. Victreebeel feels like it could be in this same place of really threatening if mence is dead or if it gets a lucky turn or two. I do see you lost to a breloom (potential light misplay?) so maybe this is just an area that could be explored for more consistency.
Congrats! I've done a few attempts on my team here and there, but this feels like a pretty high hill for it to climb!
Finally posting after getting Golden Shield. That ended up taking a long time including breeding Slaking from scratch, so I don't remember much of my other records, but I have pictures of the records. I primarily used one of the Emerald Frontier calculators and the entire list of Battle Frontier Pokemon.
Only started going for all Gold Symbols after getting a lucky run in the Battle Factory.
Battle Factory Singles. Win streak: 49. Swaps: 32. Open Level. Retail.
My save cartridge at the time had a level 63 Latios, and by the time I was done with EV training, it ended up at level 65, so my Open level records were done at 65. My initial team was based of Werster's/Exarion's all Gold Symbol speedrun.
Latios @ Lum Berry
Ability: Levitate
Level: 65
Relaxed Nature
EVs: 4 HP / 252 SpA / 252 Spe
IVs: 28 HP / 10 Atk / 5 Def / 29 SpA / 28 SpD / 27 Spe
- Psychic
- Dragon Claw
- Thunderbolt
- Calm Mind
After attempting the Tower, Pike, and Arena, and not getting as far as I had hoped, I began to try a few other Pokemon. I found that since Latios was a minus speed nature and not a plus SpA nature, I was losing some matchups that Werster/Exarion would since such as Houndoom.
I ended up creating a similar team with Starmie instead of Latios to try to make up for the imperfect Latios.
After getting the streak of 81, I also wanted to do a streak with Salamence. My brother had the luck of finding a shiny Bagon in the wild on his Ruby cartridge, so I ended up trying to collect ribbons on a shiny Salamence. While doing the Battle Tower, I noticed that the team of Starmie / Metagross / Salamence was doing better than I expected and even got past floor 70.
For the Battle Palace, I didn't want to bother with RNG, so I bred a team specifically for it. I ended up picking Hasty nature and teaching Protect, since this way, all of my Pokemon would have a 95% chance to click on a move it already had no matter what HP it would be at.
After getting all the Gold Symbols, I decided to try to get the Golden Shield as well, but I did not feel like Starmie was any better than Latios, especially since I went with Timid instead of Modest. However, I found difficulty even getting to a streak of 80 in the Battle Tower. I remembered that Salamence actually felt pretty good even with suboptimal IVs, so I took the Salamence I used for the Palace and leveled it up to 65. Although Hasty was suboptimal, I did not want to train another one. This also prevented me from having Dragon Dance, but I hoped it would be enough anyways.
Although this team did feel better than the last, I still didn't think it was strong enough to reach a streak of 100. I did end up setting a record for the Battle Arena though.
Battle Arena. KOs in a row: 66. Open Level. Retail.
After looking through the Battle Tower records, I decided to train up a Slaking. I ended up running Slaking / Latios / Metagross with Metagross holding Leftovers instead.
Slaking @ Choice Band
Ability: Truant
Level: 65
Adamant Nature
EVs: 4 HP / 252 Atk / 252 Spe
IVs: 278 HP / 0 SpA / 11 SpD
- Earthquake
- Aerial Ace
- Return
- Shadow Ball
While it felt alright, I still was unable to get past a streak in the 80s. Latios just felt too hard to safely bring in and also felt weak even while it was supposed to be tanking Special Attacks. After taking another look at the records and reflecting on my experiences one more time, I decided I did not need a specific Special Attacker and settled on my final team of Slaking / Metagross / Salamence. While attempting to get to a streak past 100, I got streaks of 93, 92, AND 91 with a bunch of other streaks dying before that. I considered switching Slaking's Aerial Ace for Hyper Beam, but Double Team spam was a bit stronger against the Hasty Salamence, so I stuck with Aerial Ace. I did end up swapping Rock Slide out for Flamethrower, since I tended to avoid Rock Slide due to accuracy and Flamethrower worked well against the 4x weak Pokemon.
Slaking @ Choice Band
Ability: Truant
Level: 65
Adamant Nature
EVs: 4 HP / 252 Atk / 252 Spe
IVs: 278 HP / 0 SpA / 11 SpD
- Earthquake
- Aerial Ace
- Return
- Shadow Ball
With this team, I eventually finally received the Golden shield with my final streak.
Battle Tower Singles. Win streak: 117. Open Level. Retail.
The loss was against Swampert / Venusaur / Charizard
Swampert OHKO'd Swampert, but missed the next return on Venusaur after Double Team. I swapped in Salamence and KO'd Venusaur with 2 AA.
It was now 3 full HP Pokemon against Charizard. I AA'd Charizard and dropped it into the yellow as it used Sunny Day. One more AA left it in the red, as Charizard's Fire Blast put me into the Red as well.
One more AA activated Charizard's Foucs band, and Salamence fainted to Fire Blast. Slaking used Return, which triggered Focus band again, and got OHKO'd by Fire Blast. Metagross was outsped and OHKO'd by Fire Blast as well.
Although the loss was kind of disappointing, I was happy to finally acheive everything I set out to do in Emerald. I finished at the end of July, but creating an account to write up everything was daunting and after trying once, found out that the save draft feature didn't work and I lost all my inital progress.
Big thanks to everyone who used a Slaking or Salamence, since those heavily inspired my final team. Special thanks to Churly-Puik since his streak and team made me believe that I could do it as well and his formatted post was helpful for mine, even if I couldn't remember as much detail as he did.
I was thinking of creating a Rollout based set for funsies, but I'm having trouble figuring out the damage calcs...
Everywhere I've looked it says the power doubles after defense curl, but what exactly are the numbers?
Is the base damage 30, 60, 90, 120, 150? Or is it 30, 60, 120, 240, 480?
By that logic defense curled would be 60, 120, 180, 240, 300 / 60, 120, 240, 480, 960
STAB + Defense curled would be 90, 180, 270, 360, 450 / 90, 180, 360, 720, 1440
Am I doing my math correctly here?
And another question, is defense curl even worth it if going for a rollout strategy? Something like a Regirock could learn Curse which boosts its Attack by +1, or a Snorlax with Belly Drum goes to +6... how does this all factor with Rollout? +Defense Curl added on top? So confused...
(I'm well aware it's not a viable move with the shaky 90 accuracy, but still could be fun to do a Baton Pass chain)
Very impressive streak. I really like the way the team came together....whenever I would talk to magpie about palace team strategies this type of combination would always come up. Intimidate is just incredible especially with a calm mind user...I can't help but feel like my team approaches this one, but each individual mon of mine is just a worse version of yours.
I've always been secretly hoping suicune wouldn't end up on top in this facility but it looks like the gen 3 stall champ just can never be beat.
Roar is really surprising and something I would have never really considered. You mention toxic in your writeup as another potential move, and it definitely is an easy filler one. Just curious how often it felt like roar actually did something. I kind of wonder if you may as well slap like protect or something more useful and just eat the no move chance, especially with suicune probably changing to the <50% hp percentages most of the time it ends up on the field. Random protects could be pretty devastating into armaldo or marowak type threats so probably not the best specific choice.
The OHKO spammers really seem to give your team a tough time as you just can't really get them off the field that quickly if you aren't already set up. Does that feel like the case?
Finally just curious your experience with the statusing grass types. I feel like my zapdos was basically there just to cover these and some sleeps/paras could put you in a pretty bad spot. Pretty specifically what about vileplume...it got left off the threatlist/lead list but I assume its just attack with mence and if mence is dead just stall it out? Suicune probably needs to get unlucky to lose. Victreebeel feels like it could be in this same place of really threatening if mence is dead or if it gets a lucky turn or two. I do see you lost to a breloom (potential light misplay?) so maybe this is just an area that could be explored for more consistency.
Congrats! I've done a few attempts on my team here and there, but this feels like a pretty high hill for it to climb!
Thank you! I'll try to address some of the questions as best as I can but it has been a while so I may not be 100% correct:
Roar as the Support move on Suicune - Honestly, not totally sure still if Roar is the best. I think my mindset with covering all move types was to ensure that there would be no randomness (at least with move type selection) and gain experience with my programs for mapping out user vs opponent's combination probabilities. I don't think I've ever made a decision on a turn hoping the 6% Roar chance would save me though. I just thought potentially seeing more of the opponent's team was better than slow death since both Suicune and Snorlax can set up anyways.
OHKO Spam - Yeah I think a lot of this has to do with luck. I've lost in the 60-80 range before because of OHKO spam. It's really just Horn Drill and Sheer Cold you have to worry about, Fissure you can switch to Salamence and try to stall those. Suicune Pressure helps, and OHKO'ers usually with more than one OHKO move like Dewgong 2 and Lapras 7/8 aren't really optimized to attack repeatedly (Bold and Calm Natures)
Grass Types - I don't really remember any real issues with Grass types besides the Breloom and maybe Cradily. The Grass/Poison Types don't really scratch Snorlax at all. Giga Drain PP is really low and even lower if used against Suicune.
I think most of it is probably self-explanatory enough with a bit of messing around. I mention this a couple times in the video, but this is mostly just something I made for myself, but with some features that I think could be useful for other people. So if there's stuff you want me to add (more sets, features, whatever), just let me know, it's definitely a bit underdeveloped. If people actually use this/want to use this I can definitely try to make it better.
Hello everyone, I'm here one last time. Back in 2022, I discovered this thread and became very interested in the Battle Tower Doubles facility since I had played PvP doubles formats in the past. Over time, for various reasons, I completely lost interest in posting in this thread. However, in September of last year, Adedede reached out to me and encouraged me to reconsider posting the streaks I had achieved up until that point, which I had shared on the Discord server. To be 100% honest, I seriously do not care about the leaderboards at this point. The only reason I'm posting again is to share my long journey in the Gen III Battle Tower and Battle Dome, as it might be helpful or interesting for other users.
I'm not bringing anything new. I'm just going to go over the streaks I previously posted here and those shared on the Discord server. I'll expand on them and express myself in more detail this time.
Unlike in other generations, Gen III BT Doubles provides the player with a variety of mechanics to exploit: Using the right Pokemon with the right Speed investment allows the player to outspeed almost everything in the facility (a pseudo Turn 1 Tailwind), Earthquake deals full damage in this generation because it is a move that hits all Pokemon on the field, and the player can take advantage of the insta-switch mechanic (when a Pokemon faints, one of the backline Pokemon enters the field in the same turn). My goal, just like in other generations, was to achieve a 1K streak in Tower. However, I played many more runs after reaching 1K for the first time, just for fun and to explore what modifications the core could benefit from to improve consistency and achieve 1K in fewer attempts.
Battle Tower Doubles
Latios and Choice Band EQ Spammer Lead: Latios is probably the best Pokemon in the Gen III Battle Tower. It is fast, offers a lot of offensive pressure, and has good coverage moves. It secures many OHKOs and, when paired with a partner spamming Earthquake, the team can deal significant damage to backline Pokemon as they enter the field, which is a huge advantage.
Choice Band Swampert vs. Choice Band Tauros: I used both with great success in different teams, but I prefer Tauros. Both are perfectly viable, but each one offers something the other does not:
Intimidate is one of the best abilities in doubles, whereas Torrent, in this context, is useless for Swampert and doesn't support the team in any way.
Tauros is much faster than Swampert, reducing the AI's opportunities to attack and minimizing the chances of crits, freezes, etc.
Swampert often needs to switch out against a wide range of opponents because it is either threatened by a faster Pokemon or unable to deal meaningful damage. Tauros does not face this issue.
Swampert’s Water/Ground typing makes it immune to Thunder Wave, which is very valuable.
Swampert has a stronger Earthquake.
Tauros, using Return and Double-Edge, can deal significant damage to Pokemon like Latios, Latias, Gardevoir, or Porygon2 (when they trace Levitate from Latios), unlike Swampert.
Haze: In this generation, there is a large number of Double Team and setup Pokemon, which, if not handled carefully, can easily lead to a loss. I used teams without Haze but relied on Toxic in the backline to deal with such sets late-game (except the ones immune to Toxic). However, some battles were extremely sketchy. Needless to say, I'm not a fan of teams without Haze.
Articuno vs. Gengar: These are the two best Haze users immune to Ground-type attacks, which is important since most hyper-offensive archetypes rely on spamming EQ:
Gengar, on paper, is the better option because it's a Ghost type, and being immune to Explosion in this generation is extremely valuable. However, it's very fragile, and there are many QC sets with STAB Psychic that won't even let it get a single attack off.
Since Gengar is so fragile, the player is more likely to be punished by the insta-switch mechanic.
Pressure on Articuno does not help in any way. Battles are simply too short to benefit from it, and it even causes allies using EQ to lose more PP.
Thoughts About Streak Lengths: I want to be extremely careful with my words here, as my intention is not to be disrespectful in any way towards the players who have played this facility in the past. If we average the lengths of the submitted streaks, I believe the result would not reflect the facility's true difficulty level. Someone without prior knowledge of Gen III BT might look at the streaks and assume it's a very tough challenge, but that simply wouldn’t be accurate. It is evident that some archetypes are significantly stronger than others in this format. That said, every player should have the right to enjoy their BT experience however they want—using the Pokemon they prefer and aiming for the goals they consider reasonable.
Would I consider, for example, a 300-win streak in BT Doubles a good streak?: It depends. If we’re talking about a player who picks up a team (even a very optimal one) and wants to get a streak going for fun or to try the facility, then it is certainly a decent streak. However, if we’re talking about a player willing to make 8–10 attempts to achieve the highest streak possible with a very optimal team, then 300 is extremely low for this facility—comparable to getting the first 49 wins in the Tower.
Level 50 vs. Open Level: I don’t think I did more than 5 runs in Level 50. I simply dislike the idea of not facing Tyranitar and Dragonite.
This was my first serious team. As you can tell from the members, it’s Haze-less. It’s inspired by waffles101's Lv. 50 team.
I wasn’t the biggest fan of this team; however, that doesn’t change the fact that it is capable of achieving a good number of wins. Any team with this archetype has a high chance of success. Personally, I prefer Tauros as a lead over Swampert and having a Haze user. Toxic as the answer for Double Team sets is far from ideal—many battles were very sketchy and too close for comfort. Additionally, some Double Team sets can’t be countered with Toxic because of Rest or the ability Immunity, so those must be KOed.
Metagross is a Pokemon that covers Swampert's weaknesses and bad matchups fairly well, and Explosion is always a move that can get the player out of trouble in bad scenarios. Metagross, generally speaking, is not particularly outstanding in this facility, but in this context, it’s viable.
Finally, Latias. This Pokemon is one of my favorite backline options, but eventually, I felt the need to replace it with a ground-immune Haze user. I have no doubt that I would’ve used Latias in all of my teams if Double Team sets weren’t so abundant.
He used Latios, Tauros, Gengar, and Metagross. It's a fast and hyper-offensive lead with Haze in the backline. Initially, I kept using Gengar and replaced Metagross with Swampert. I gave Gengar multiple tries, but I simply felt it wasn’t good enough for the reasons I previously described. I lost 2 or 3 times in the following way while using Gengar: Latios would get KOed, then Gengar would come into the field in the same turn, only to get KOed as well by a crit. All of a sudden, Tauros is locked into EQ next to Swampert — the worst-case scenario. Gengar’s fragility makes the team more vulnerable to being punished by the insta-switch mechanic.
This is the first version of the team: HP Fire on Latios, no Protect. This hyper-offensive lead guarantees KOs on all Explosion sets, except for the Regis. It’s worth mentioning that HP Fire + EQ KOs all Metagross and Steelix sets.
The biggest threats to this team are:
OHKO sets with QC, Bright Powder: Lapras, Rhydon, Wailord, Whiscash, Donphan, Walrein, Nidoking, etc.
Regice: The team does not have an actual counter for this Pokemon, and only Tauros and Swampert can do significant damage to it. It’s important for Tauros to get at least one Return or a couple of EQs off to guarantee that Swampert can finish it off late game. Regice should be prioritized when it’s the lead.
EXPLOSION, EXPLOSION, EXPLOSION: This move is the biggest threat to this team by far. There are a lot of QC Explosion mons and some bulky ones that Latios and Tauros can’t KO. T1 QC Explosion is the worst situation to be in, especially if the Explosion Pokemon’s partner is immune to it or resists the attack, as it turns the battle into a 2 vs. 3. Some of the most problematic Explosion mons are: Metagross, Forretress, Registeel, Regirock, Golem, Steelix, Muk, Exeggutor (Brightpowder), etc.
Icy Wind: Articuno and Glalie are the worst. Articuno will use Icy Wind first and then start spamming STAB Modest Ice Beams. Glalie often uses Explosion after Icy Wind.
Thunder Wave: Getting two or three members paralyzed means the team is slower than almost everything in the facility. Combined with the possibility of being unable to move, it’s not something to play around with, as it can very easily lead to a loss.
Counter: Losing Tauros and Swampert to Counter is terrible. Regirock-2 and Registeel-3 are the worst Counter sets, as both hold QC and run Explosion. Blissey-4 is a set I usually try to ignore and deal with late-game using Substitute Swampert. In these kinds of matchups, Substitute on Swampert shines.
The team remains largely the same, except for Latios' fourth move: Protect instead of HP Fire. I considered Protect as an interesting option to play around Explosion and potentially use Latios as bait when it’s at low HP. The value of buying a free turn with Latios, allowing Tauros to get an attack off, should not be underestimated. In my search for consistency with this core, the only change that improved the team's performance was adding Protect to Latios.
Hidden Power Fire vs. Protect on Latios: It's a tough call. As I mentioned before, in my first runs, I used HP Fire, and this move was extremely useful. However, months later, after doing more runs, it became clear that Protect is also a very solid choice since it helps a lot against Explosion and allows Latios, when at low HP, to act as "bait," buying a free turn for the team. In 2023, I said multiple times that I was convinced Protect was better for Latios.
Fast forward to January 2025: I grinded for 1K one last time, but using HP Fire Latios, and achieved the goal after only 3 attempts. I’d probably say both moves are equally viable, but I think I prefer Protect on Latios.
Without HP Fire, Latios and Tauros can't guarantee KOs on all Metagross sets, Forretress, Steelix, Scizor, etc. However, it's undeniable that Protect is one of the best moves Latios can have for the reasons mentioned above.
Emerald File #1: "Team #3 - Open Level" and "Team #3 - Lv. 50" were used. The teams were built in 2023, but these streaks were achieved in 2024. My first streaks in 2022 were done in this file, but were eventually improved by the ones I mentioned from 2024. View attachment 708087 Emerald File #2: The Lv. 50 streak was achieved in 2023 using "Team #3 - Lv. 50," but with Substitute on Articuno instead of HP Grass. It was not continued. The Open Level streak was achieved using "Team #4" this year, 2025. View attachment 708089 Emerald Retail Cardtrige: Once I finally found a way to transfer "Team #3 - Open Level" and "Team #3 - Lv. 50" to retail, I did some runs. Initially, I planned to redo both the Tower and Dome streaks on retail, but I only ended up playing Tower. I managed to achieve 1K in Open Level after a few attempts, but in Lv. 50, I didn’t reach the goal on my first try. Sometime later, I started a new run but eventually abandoned it—I’m just not the biggest fan of Lv. 50. The Open Level streak was achieved in 2023 and the Lv. 50 one in early 2024. View attachment 708090
Some recordings of the streaks and failed attempts can be found on my YouTube channel. While they aren’t meant to serve as proof of the streaks, there are more than enough games to give a clear understanding of how the team works.
In Tower Doubles, no team can currently get into a guaranteed winning position in every game, unlike the top singles team. This means that for a good doubles team to achieve a long streak, it usually requires several attempts. When it comes to reaching 1K wins, I've achieved the goal in as few as one attempt and as many as seven on different occasions using the same team. I've experienced losses as early as just before reaching 100 wins and as late as beyond 1K.
This is a very simple team to use, but it's not hard to misplay, which can lead to a loss. That said, this facility can be very forgiving of misplays, unlike in later generations. A key aspect of success is understanding the threats to the team and identifying other particularly annoying sets. It's important to prioritize KOs on those Pokemon while knowing which other sets can be safely ignored and dealt with in the late game.
The way I enjoy this facility is by playing with a lot of speedup while doing something else, like watching a movie or TV show. While this isn’t exactly ideal, the format is simple and forgiving enough to play this way and still perform decently well—as long as the player understands how to properly use the team.
Taking this kind of archetype to the next level, such as achieving 2K wins (which I believe is likely its ceiling), would require scouting, a precise understanding of AI behavior in every scenario (including on-the-spot research), and carefully analyzing each tough matchup and situation. Essentially, it would require adopting a Factory-like playstyle.
Rambling about items and moves for Tauros, Swampert and Articuno
Leftovers vs. Quick Claw vs. Aspear Berry on Swampert: I used Leftovers in all my runs from 2022 to 2024, since it makes sense on a SubTect set. However, given how short battles tend to be, Swampert is rarely able to take full advantage of the item, making it useless in most battles. For that reason, it doesn’t seem like the best option. Having lost to freezes on Swampert multiple times in the past, I now believe there's no reason not to use Aspear Berry over Leftovers.
However, in 2024, it was discovered that in Gen III, Quick Claw is turn-activated for the Pokemon holding the item on the field, resulting in a "speed tie" that ignores the actual speed of the mons. This means that, for example, if my Swampert is holding a Quick Claw and is facing a Registeel-3, and Quick Claw activates on that turn, it will be a 50-50 chance as to which Pokemon moves first, even though my Swampert is faster. This mechanic could technically save a run against Explosion sets.
So in my opinion, Quick Claw and Aspear Berry are the best items for Swampert.
Substitute vs. HP Grass on Articuno: In my first Level 50 run, I used Substitute on Articuno, intending it as another way to play around Explosion. While that seemed promising on paper, in practice, Substitute was not impactful at all, and I missed Hidden Power Grass significantly. That was the first and only time I used Substitute on Articuno.
Return vs. Double Edge vs. Hyper Beam on Tauros: From the very beginning, I used Return and Double Edge on Tauros, and I’m 100% convinced this is the best STAB combo for it. Return allows Tauros to stay on the field longer, which is crucial.
After hearing about the apparent success of another user with the Double-Edge + Hyper Beam STAB combo, I decided to give it a try. Using Double-Edge as the main STAB move for Tauros is something I did not like at all. The recoil puts Tauros in KO range for many Pokemon, limiting its time on the field. As for Hyper Beam, I absolutely hate it. The move's 90% accuracy makes it unreliable, and the forced recharge turn after use is a major drawback. In my opinion, it is not a good option at all.
Battle Dome
2v2 is not the best format for good stuff teams. There is very little room for a comeback if something goes wrong (misses, QC activations, EXPLOSION, etc.), unlike in the standard Battle Tower Doubles format. However, considering the IV bug on the AI's mons, good stuff can get a very good amount of free wins, but I couldn't find the consistency I was looking for with this kind of archetype.
As long as the player gets the #1 seed in the tournament bracket, a tie is always a win for the player. This opened the possibility for a Perish Song team.
A Perish Song team is only viable thanks to Lapras' Shell Armor ability; otherwise, the run would end at some point due to a crit. Lapras needs Fake Out support, so I chose Kangaskhan because it's decently fast, can offer good offensive pressure with Double-Edge, and is bulky.
The last member is Latios, who is probably the best Pokemon in the Battle Frontier. This way, the team has two modes: Perish Song mode with Lapras + Kangaskhan and full offensive mode with Latios + Kangaskhan.
Back in 2023, when I built this team and did my first couple of runs, I was not scouting at all (because it takes too much time without a tool, and I was not aware of the existence of DomeAssistant at the time), so I decided to assume it could be any set, although I was aware that was not the case. The team works fine without scouting for the most part, but the decision-making might not be optimal in many battles. In 2024, DomeAssistant Web was released, so I felt like running it back in this facility using the tool, but this time with an optimized version of the team (EVs and IVs, thanks Adedede!). Using DomeAssistant Web helps minimize errors and make better decisions against problematic matchups.
The biggest threats to this team are:
Soundproof Pokemon: Electrode, Exploud and Mr. Mime. Perish Song does not work against them, so using the offensive mode is required.
Machamp-7, Breloom-2: Bright Powder and Focus Punch. Offensive mode is used against them.
Teams with multiple Fighting-types: Offensive mode is used.
Attract: This move can be easily overlooked even while scouting. Attract on Lapras can lead to a loss.
EXPLOSION: Explosion from a lead that resists the attack (e.g., Metagross, Steelix) must be handled carefully. Sometimes both Pokemon may run Explosion, so the only solution is to alternate Protects and play around with Substitute after setting up Perish Song.
OHKO moves: Substitute is very useful against them.
Flinches: Rock Slide and King's Rock attacks from fast Pokemon like Aerodactyl, Dugtrio, Salamence, etc. Offensive mode is recommended.
Double Earthquake Spam: Double Flying-types/Levitate Pokemon with EQ. Offensive mode is recommended.
Emerald File #1: I used the Perish Song team core to achieve the Open Level and Lv. 50 streaks in 2023, but the EVs and IVs were not fully optimized, and I didn’t scout. As shown in the picture, I played a lot of tournaments in Open Level with good stuff and bad Perish Song teams before ultimately building the Lapras - Kangaskhan - Latios team, which provided the consistency I was looking for. View attachment 708115 Emerald File #2: I used the optimized version of the team and DomeAssistant Web to achieve these streaks in 2024. View attachment 708120
Battle Tower Multi Open Level with Mackattack93
Me:
// Mack:
Back in September of last year, we decided to play BT Multi. Once Mack understood how the team worked and took into account the switch limitation of the format, he suggested we use Gengar instead of Articuno. In this context, it made perfect sense because Gengar is immune to Explosion, and Swampert can't go on my side of the field (refer to my experience with Gengar in regular Battle Tower Doubles above for more context).
SAVE STATES WERE USED. We used mGBA, which was quite unstable in Multi mode and sometimes crashed without warning. Our first run ended shortly after hitting 49 wins due to a crash. After that, we began save stating in the lobby after each round. That was the only way we could keep a run going. Every time a crash happened, we had no choice but to load the save states.
Hey! Not sure if you still play, but I noticed you hold the record with Articuno, one of my favorites. I was looking to mirror your team, but I saw that your Articuno has Haze. From what I can tell, that move isn’t obtainable on Articuno in Gen 3, it’s not in its level-up set, not tutorable, and you can’t transfer it back from later gens either. Am I missing something? Just curious how you were able to pull that off. Thanks!
Hey! Not sure if you still play, but I noticed you hold the record with Articuno, one of my favorites. I was looking to mirror your team, but I saw that your Articuno has Haze. From what I can tell, that move isn’t obtainable on Articuno in Gen 3, it’s not in its level-up set, not tutorable, and you can’t transfer it back from later gens either. Am I missing something? Just curious how you were able to pull that off. Thanks!
After many years I am happy to do a post with my gold symbol announcement! You can skip the fluff and get to the good stuff if you want, but I'd like to start with a little about me:
I got into pokemon many many years ago like I'm sure a lot of you did. I started with white version and eventually got into playing pokemon showdown and learning how to battle. I always wanted to play the older games that my cousins had, and were from the generations when I was most involved with the cards (didn't really play the TCG, but new the rules, and got the cards). I had a friend who had emerald so we started a new save file. After a while they lost interest and I played on my own. I learned many things the hard way about generational differences (physical/special split, aggron doesn't learn head smash, etc) and it took me 81 hours to beat the elite four the first time. From there I traded with a friend with fire red and another one with emerald, and started to take on the battle frontier. At first, it seemed impossible. The first few rounds were so easy then it seemed like the game would suddenly make it impossible. I wrote a 6 page manifesto about it in 2016, analyzing basic strategy but also chastising how "rigged" it was. Here's one of my favorite lines from that: "Have you ever wanted the computer to decide what moves your Pokemon should use for you? No? Well that’s why Scott created the Battle Palace, a royal red and gold battle ground for Trainers willing to let their Pokemon call the shots". Eventually I made a few improvements, using specifically EV trained pokemon, then breeding for good natures, then for perfect IVs in the two stats I would dump EVs into. I also noticed that a lot of the pokemon movesets of opposing mons were the same but never thought to look up a list of all of them, instead I tried to track it manually myself, but only ever figured a few of them out. Doing this, I gained 7 silver symbols.
Emerald is a game I pick up and put down every so often. During covid, I bought XD, which spiked my interest again. I learned how to properly RNG for perfect 6IV guys and found this thread. Using the Frontier Assistant (or just the trainer list in general), I was able to get gold in many of the facilities with about a week's worth of effort each. I'm proud I've finally finished this challenge and I think 14yo me would be proud. The dex was mostly completed long ago, and with 2 more entries I will be done (one of those entries is larvitar lol) and can do contests for the last part of my trainer card. I also have been gunning for the gold shield as well.
Going in order I completed them in, keeping in mind all streaks are on Retail, and currently Ongoing unless otherwise specified:
BATTLE PIKE, LV 50, 140 rooms
This one I found the absolute easiest and I did this back in like 2021 so I don't remember too much. I ended up doing mono psychic somewhat by accident but to great success. I remember reading advice here to simply avoid double battles like the plague, similar to the Pyramid, and that did me well. I also think I got lucky a few times, I remember some runs I would get an empty room, healing, or wild pokemon half the time so it didn't even feel like I had to do anything.
I think here your strategy as to what decisions you make can have as big an impact as your team. Mono psychic is fine because Metagross has a very different profile of strengths and weaknesses compared to the other two. Starmie as a lead was amazing- natural cure was important for shrugging off status easily, it's fast, SPIT coverages pretty much gets everything. I can't remember the actual item I used but it was one of those. Latios is just a second Starmie. Metagross covers the other matchups, and Choice Band does well into wild guys where you can have one turn battles. For double battles you can switch into Latios and EQ if needed, ideally you don't even face double battles. This is probably up there as one of my favorite facilities, and I haven't played it in years since I got my gold symbol since I have focused on getting all gold. The lucy battle probably went Psychic, Surf x2, Thunderbolt and was over fast.
BATTLE PALACE, LV 50, 42 wins
This facility I think I hated the most as a younger and don't feel any obligation to return to. It just feels like nature is so important, but you have to pick a nature that runs contrary to what a pokemon would actually want. This one also was from 2022-2023 so my recollection is a little spotty, although I do have the final battle saved (was my battle record for a year or two).
Zapdos was a total godsend here. An 88% chance to attack makes an absolute world of difference, especially when the odd occasion he uses a defensive or support move isn't wasted. Having protect is fantastic because even if you do the "bad option" the turn isn't a total waste, you protect yourself and get lefties. Thunder Wave makes a difference in the longer, drawn out battles but usually isn't used since Zapdos attacks so much. Metagross is nice with CB since after you attack the first time, you're at least certain it will use the same move. Also I didn't know this until just now when I looked it up, but the message where it says random stuff like "A glint appears in <Pokémon>'s eyes!" actually means something- the pokemon is below 50% HP and the message depends on their nature. I have a bad habit of writing things off as not helpful/useless immediately, and while this particular knowledge doesn't seem helpful (you can always see the HP, you know when it's under 50%) I guess you could use it to determine what set your opponent is when they get hit under half. Gentle nature means Latios would totally screw around until it was under 50%, not sure I really caught onto that, but Latios is so good anyway and I have no way of obtaining another one so I stuck with it.
BATTLE PYRAMID, OPEN LEVEL (75), 70 floors
As you can see, the first two symbols each took a long time, years of off and on playing. A lot of the time there was no thought of "I should do x or y differently, or train a new team member" but essentially just pulling the lever of the RNG slot machine until I got what I wanted, even if each run only had a 1% chance of working. At this point in my life I realized I can simply prep better and increase my odds rather than pull the lever endlessly like a chump. This translates practically into way better prep. I forgot to take advantage of the fact that when you beat a trainer, you can talk to them after to get a hint about something on the floor, and was doing that only like half the time, oops. Also the maps of the pyramid floor section was helpful I would recommend that. Each facility has tiny little mechanics I think should all be compiled. Another small detail: did you see each Brain is named to have the same first letter as their symbol? Tucker=Tactics, Greta=Guts, Brandon=Brave, Lucy=Luck, Anabel=Ability, Noland=(K)nowledge, Spenser=Spirits. In typical Pyramid fashion, I used many guys here (I love how much you can counterteam the wild pokemon or use niche team members) and I'll also start with the fact that I had a 2 year old streak that had done the first 4 rounds done. The glue of my team was the following two:
Depending on the floor, I employed the use of one of the following:
Levitate Floor
Houndoom @ (nothing) - DOOM
Ability: Flash Fire
Level: 75
Modest Nature
IVs: Perfect SpA, Spe
EVs: Max SpA, Spe
Stats: 215/144/96/264/134/217
- Overheat
- Flamethrower
- Taunt
- Crunch
Blissey is practically unkillable. Being able to dump healing items into it and softboiled for free to distribute the HP as needed is a godsend. Suicune can also Rest, switch out, and be woken with aromatherapy, and if Blissey gets status'd while doing so or using softboiled against a wild pokemon, it just switches to heal itself. It's beautiful. I had terrible items too other than 3 leftovers, didn't PP max my moves (except some 5pp moves) and was surviving on random leppa berries. Even then, I felt pretty safe. The one exception was at the absolute end of the explosion round, I saw the stairs and didn't do my due diligence to look around first, and ended up getting sniped by a trainer a tile or two before getting to the last warp tile. I had just sacrificed my last revive to bring back Suicune and I'm glad I did. It was Scizor SD Silver Wind set and caused a lot of trouble but I think Steelix ended up stopping it after it crit through Suicune. Super close call but barely made it out alive. Having Refresh on Salamence was totally redundant but I like having the XD move. Heracross was useless, Megahorn may as well be 0% accurate especially against Solrock/Lunatone who you need to use it against to kill and they can hit hard with Psychic. It couldn't even OHKO some of the rock types with Brick Break (granted I didn't have a CB at that point). This feels like a facility you could do with just Suicune and Blissey. Steelix did fine, saved me from the Scizor, and Houndoom was great except I should've used a PP Max on Crunch. Brandon battle was an extremely boring Calm Mind x6 -> kill all birds but hey that's life.
BATTLE ARENA, LV 50, 56 battles
Now I start using the Frontier Assistant when I play, prep more, and take better notes. Arena has some interesting mechanics with some big upsides and big downsides. First off, stall sets don't work for the most part. Usually you attack turn 1 before they do, do some damage, and if they just want to spam double team, you don't even need to attack and they will lose. Even if you keep attacking and miss, any chip damage + the fact you attacked more means you win. Battles are super fast paced. There's way less to think about since you can't switch, so you only ever have 4 options. This makes the facility "easier" to autopilot while you do something else. Unfortunately, if you do run into bad matchups, there's not much you can do. Three mons that counter your three, in order, is pretty unstoppable. Sometimes certain sets can hax through one of their counters (my snorlax lost to ninetails because it hit itself in confusion three times after confuse ray) and then they get a good matchup into your next guy. Three turn battles means hax can be life or death, but you can also beat things on pure chance. Did something SD twice then miss its attack? It's going to lose pretty much no matter what. It's also crazy you can win health sometimes just by having your guy be damaged while they send out a new guy, and getting leftovers back/using Rest. I like that the order of you team and not just your lead matters, I just wish it wasn't life and death. Here's my team, which I also posted a few weeks ago:
Gengar is sick because it will take losing matchups and at least trade rather than go down without a fight. It beats Fighting types, Reversal/Endure users (usually) and non Sheer Cold OHKO users for Snorlax. Good coverage for a lot of things, watch out for strong Shadow Ball users. QC Shadow Ball (like from Flareon) has no counterplay. There's other niche times to Destiny Bond, and I recommend using a PP Max since I almost ran out of PP once- you can use it to be safe against critical hits/Mirror Coat users. Either they 2HKO you and trade, or if they use Mirror Coat all 3 turns you win, since you tie on Body and Mind and win on Skill (Destiny Bond technically is successful, while Mirror Coat fails). Can also be used against Double Team users after you hit them on the first turn to not lose judgement due to a miss. Lum is anti-hax measure. Snorlax tries to Yawn, get a hit, then slowly Rest on turn 3 to abuse the Body mechanic, plus they will have one turn of not attacking due to Yawn. Use Frontier Assistant to scout for Lum/Chesto, and keep in mind this set gets destroyed by Murkrow. Snorlax takes the Ghost/Dark/Psychic attacks that hurt Gengar. It shields Latios from all special attacks it is weak to, plus Shadow Ball, but usually only if it comes from a Ghost type. Strong Normal types like other Snorlax can be a problem. Latios is Latios, 'nuff said. Greta fight is pretty funny.
BATTLE DOME, LV 50, 10 tournaments
Tucker, Tucker, Tucker. What a guy. Dome has got to be one of the more reasonable facilities when compared to some of the insane mechanics of Palace or checkmate situations in the Factory or Arena. With team preview there's a lot more of a skill ceiling too, but I don't think it's particularly difficult. This took me very few attempts.
Yeah, yeah, yeah, why am I running Lum with Refresh? I wanted one facility I actually used a mon with an XD exclusive move. For your information, I did in fact use Refresh one time- against a Forretress that hit 4/5 Zap Cannons while I was setting up on it. Blissey and Suicune just cover like 99% of guys and Salamance can sweep, although both Earthquake and Aerial Ace are somewhat weak. Aerial Ace makes more sense in other facilities/team comps, HP Flying may have been better, or another coverage move. Intimidate is great, especially paired with Suicune and PP stalling by swapping, either their attack drops or they lose extra PP to the Big Presh. I originally had Steelix over Blissey, but I kept losing to the same BoltBeam Gyarados set, which crit through Suicune once. I also thought I noticed that the trainer AI was terrible even in later rounds. I took advantage of the IV glitch but some of the decisions they made didn't make sense. I had an epic showdown with Tucker and was in such a panic I forgot to save it as my battle video! It went something like this:
Bring Suicune + Bliss, he leads Pert. Switch to Suicune, use Toxic, stall it out of Earthquake with Rest. Rest back to full, go to Blissey on Surf as Swampert dies. Latias would've been an auto win, but instead Metagross comes out. Blissey uses Aromatherapy while Metagross Protects. I should've just switched back, but I try to chip with Seismic Toss/heal with Softboiled before I die and instead give him 2 attack raises (out of 3 Meteor Mashes). Suicune comes in on Metagross which is at 50%. I hit Hydro Pump, they Earthquake, and with 24 hit points remaining I hit a second Hydro Pump to barely close it out.
BATTLE FACTORY, OPEN LEVEL, 42 battles
I don't like Factory. Never have. If you don't have access to other games, it lets you use Pokemon you otherwise couldn't use. Sometimes it feels like you get a draft that screws you. Also there may be something I'm missing with Level 50, I found even THE FIRST ROUND to be difficult to get past sometimes, and my silver symbol came from Level 50. Does the IV Glitch affect this place too? Anyways I ended up getting one of the luckiest rounds of my life and I'm glad I'll never be forced to do this place again. I did most of this run on a flight with my phone as the damage calc with an excel spreadsheet of all the sets, so I didn't take good notes until I got home and did the end of the run.
Round 5
I had done enough swapping to get 1 of the "boosted" sets, which ended up being the beautiful Dragon Dance Lum Tyranitar 10. Pair that with Tauros 2 as my lead and Tentacruel 3 and I was feeling pretty good. I think I took Tentacruel cause the first trainer had Fire types or Ground types or something. I swapped it for SPIT Lapras, then for one of the Swampert sets for the final battle of the round. Gengar 3 almost got me in game 7, since Swampert had no chance against Giga Drain and Tentacrual was on low health, but a crit from Tyranitar Rock Slide kept the dream alive.
Round 6
Terrible final draft. Dusclops 3, Gengar 3 (actually not bad), Golem 2, and an ok Pert set. Issue was, my two boosts were Dragonite 5 (yuck) and Raikou 3 (barf emoji). I took Gengar, Dragonite, Swampert, I believe in that order. I had one game I knocked out their first mon Xatu with Dragonite Outrage, then took 95% from Flygon Dragon Claw before knocking it out, only to face Sceptile. This low on HP it KO'd with Leaf Blade, and obviously Swampert has 0 chance against this thing. My last hope is Gengar. I took 95% from a Crunch, which was about a 50/50 roll to kill and end my run right there. I hit back with Psychic, doing less than half. Next turn, I get a miraculous QUICK CLAW CRITICAL HIT to knock out Sceptile and save the run. I thought it was over, I had even forgotten my item at that point so you can imagine how overjoyed I was when it saved my run and probably saved me many hours of factory grinding. My last battle, against Noland, was also very stressful and I had a hard time playing around P2 without knowing what set it was. There is some pretty insane luck on my side in that battle too, which you can watch for yourself. I made a serious misplay the last turn, I could've killed with Double-Edge as long as I didn't get an insanely poor roll, and Outrage never kills normally. It's interesting, it feels like when I slow down, do my best, and acknowledge the luck of the Battle Frontier, it seems to be on my side when I need it. I'm sure that's just a biased perspective though.
BATTLE TOWER, OPEN LEVEL (75), 71 battles [ENDED]
Super easy with the assistant, just sooooooo many battles jesus. I feel like this tests your luck more than the Pike does. Almost lost to a Regirock set with Thunder Wave/Curse/Rock Slide that flinched down Suicune (after some Hydro Pump misses, that move is clearly inferior to Surf but I wanted to give it some action regardless). Other than that, nothing crazy, another straightforward battle with the Brain here. Streak ended on battle 72.
Snorlax @ Leftovers - BIGMACFAN!
Ability: Thick Fat
Level: 50
Adamant Nature
IVs: 31/31/31/27/31/31
EVs: 44 HP / 212 Atk / 204 Def / 44 SpD / 4 Spe (ripped from some other team)
Stats: 355/256/164/109/201/74
- Curse
- Return
- Shadow Ball
- Rest
Anabel fight is boring and I forgot to save the battle video, but I used Calm Mind like 4 times, OHKO'd Raikou, won the speed tie and OHKO'd Latios, then 2HKO'd Snorlax as it tried to Curse. Loss came to Tyranitar 7 which Curse'd as I went Suicune. I hit one Hydro Pump and then Ice Beam to avoid missing, but it wasn't enough. At this point it was boosted up, Quick Claw Rock Slide flinched me and brought me to low enough health that sand polished me off. Latios died to Quick Claw and Snorlax got obliterated by Brick Break. In my later attempts, I run Swampert over Suicune, but if someone has better ideas of how to improve this one, I'm still looking for my gold shield. I tend to just react to whatever killed my last run and change something to fix that but it's done me well so far.
BRAIN FIGHTS (some of them):
All of these streaks except Tower are still active and once I get gold shield (or maybe before) I will push them all and see how far I can get. I'm gonna do the other things to "complete" my trainer card. I will include battle videos for some of the Brains where I remembered to record it when I get a chance. Excited to use Hoenn Bank- I have what I believe is a legit event Celebi that would be fun to share. I got it from someone who used a Game Shark for other legendaries, but this Celebi seems to be legit- it's level 70 and has the OT/encounter data as if it came from the event, which I don't think a ten year old would care or know how to hack into their game, even with an external tool. Also I ran into a shiny Kabuto recently! Pic included. I think this is my second or third frontier shiny.
Thanks to this forum for existing and being as excited about the BATTLE FRONTIER as me! I'll be around for questions and will still play every once and a while and appreciate the advice I got with my Arena team. I'm proud of myself for finally completing this challenge! It's been ten years since I started.


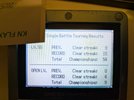


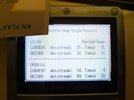
 Latios and Choice Band EQ Spammer Lead: Latios is probably the best Pokemon in the Gen III Battle Tower. It is fast, offers a lot of offensive pressure, and has good coverage moves. It secures many OHKOs and, when paired with a partner spamming Earthquake, the team can deal significant damage to backline Pokemon as they enter the field, which is a huge advantage.