• Follow our Instagram!
  • Curious about what we're currently doing about bots? Check out the latest updates from staff in this thread.

Gen III Battle Frontier Discussion and Records

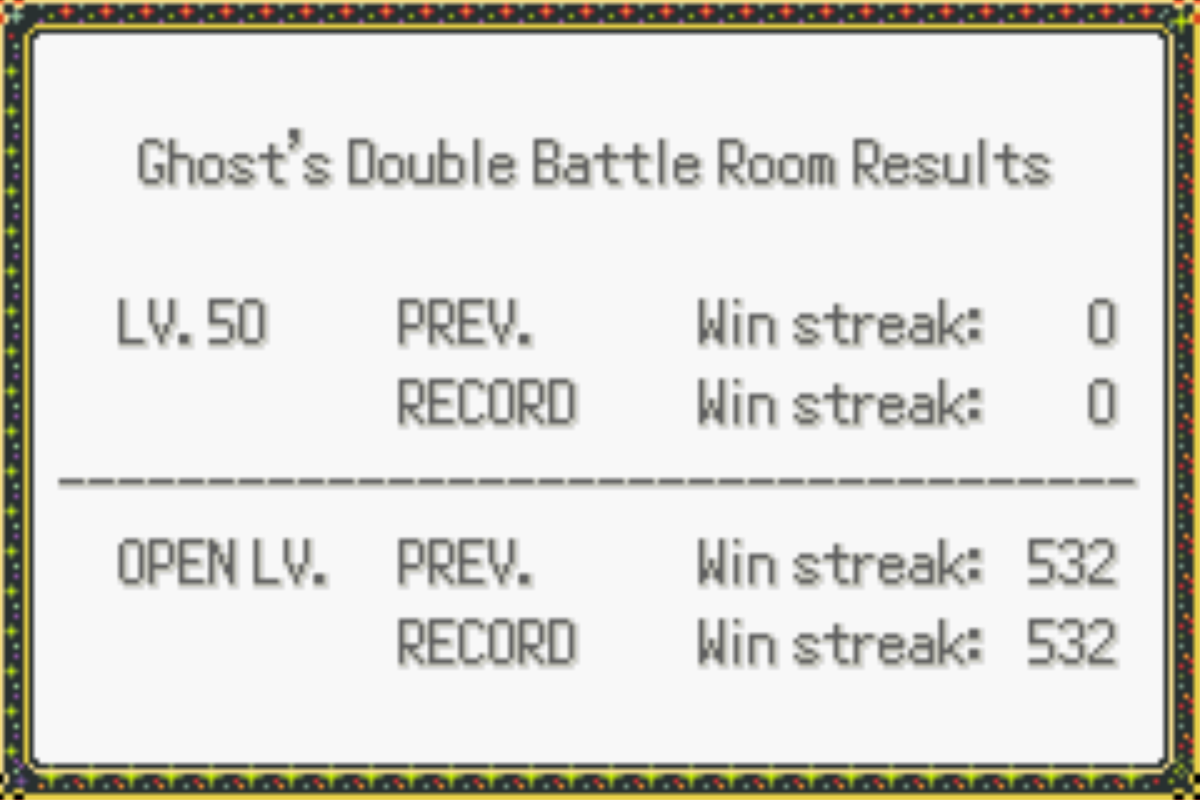
Hello everyone, reporting streak 532 in Battle Tower Double level 100 (on emulator). Out of all the possible ways I could have lost, the game has managed to surprise me.
I built this team based on the experience I have collected playing in Multi Battle Room with NPCs.
I started with Latios and Dugtrio, because they are an amazing combo, with great synergy. Few mons are safe from them, and most of the battles last less than 1 minute, making a streak of 7 last an average of 5/6 minutes. Picking an item for Dugtrio was easy: choice band. Latios is conveniently 2 points faster than him, which means if Latios gets a kill, the incoming mon is forced into an earthquake that, if not immune, will cause a lot of damage. As a 3rd member, I needed another mon immune to ground moves, and Latias sounds very solid. I wanted her also because I think a calm minder works well in the right times when I see a passive enemy, and since I can just use one lum berry, she took it, leaving Latios the cheri berry. For the last member I needed a physical mon that could help with the ice weakness. At first, I thought of Hitmontop, since he has intimidate and stab brick break, but after I almost lost around the 80th fight because of a Regice, it was clear to me I needed something more reliable, that could switch in saving Dugtrio when needed. So I chose Hariyama. Thick fat and a good bulk were what I needed, and since most of the time she is switching into ice beams, aspear berry as item.

Latios
Spr_3e_381.png

Hope (Latios) @ Cheri Berry
Ability: Levitate
EVs: 40 HP / 252 SpA / 216 Spe
Timid Nature
IVs: 7 Atk
- Ice Beam
- Thunderbolt
- Psychic
- Dragon Claw

Full offensive moves, to have as more coverage as possible. I prefer leaving lum berry to Latias since she has calm mind, while leaving Latios Cheri Berry since paralyze is the most common status that he gets inflicted, since all the offensive ice moves usually target Dugtrio first. He can still get hit by sleep/confusion status moves, but it’s rare, so far I’ve not regretted the choice.

Dugtrio
Spr_3e_051.png

Trinity (Dugtrio) (M) @ Choice Band
Ability: Sand Veil
EVs: 4 HP / 252 Atk / 252 Spe
Adamant Nature
IVs: 21 SpA
- Earthquake
- Sludge Bomb
- Ancient Power
- Aerial Ace

Classic moves for Dugtrio, I went for ancient power instead of hidden power rock because it costs me 1 speed iv, which means speed tie with Aerodactly(1,2). Ancient power still does what it needs to, except it does not have a guaranteed ohko vs Articuno. Sludge bomb helps vs grass types, or if I need to help Latios to defeat other latwins, while aerial ace, when possible, I use it vs Heracross so I’m sure to kill it, since set 2 can resist a psychic while set 3 has bright powder. Due to his low defense, I noticed it’s very rare that Ai uses fake out, which is a very good thing.

Latias
Spr_3e_380.png

Happiness (Latias) (F) @ Lum Berry
Ability: Levitate
EVs: 40 HP / 252 SpA / 216 Spe
Timid Nature
IVs: 7 Atk
- Thunderbolt
- Ice Beam
- Psychic
- Calm Mind

I like using calm mind Latias since she is bulkier than Latios and finds good opportunities to set up. In case of leads like Flygon and another flying/levitate mon, Latias can switch in, replacing Dugtrio, since Flying will always click earthquake due to AI behavior, saving him for later. This of course depends on who the other enemy mon is; otherwise Dugtrio will help Latios get a kill before getting sacrificed. Eventually the enemy team will be forced to switch one of its mons into his member earthquake.

Hariyama
Spr_3e_297.png

Mayariha (Hariyama) (F) @ Aspear Berry
Ability: Thick Fat
EVs: 252 Atk / 92 SpD / 164 Spe
Adamant Nature
IVs: 21 SpA
- Fake Out
- Brick Break
- Earthquake
- Helping Hand

Hariyama works very well to switch in replacing Dugtrio when facing Regice or other bulky ice + a flying/levitate mon. She helps deal with anything that Latwins have problems with, like Regice, Registeel, Umbreon, Blissey and other bulky mons. Maximum attack investment is a must to achieve this, the speed evs allow Hariyama to outspeed base 70 uninvested, rest in sdef to improve the bulk. I don’t think she needs hidden power ghost since Latwins deal with ghost types well; instead, earthquake can be more useful. Aspear berry is there to prevent an eventual freeze, but it has never happened; leftovers or rawst berry can be used too.

Quick claw/bright powder/focus band users, the activation of one of those items can cause a chain reaction of damages.

Explosion users: the most dangerous are Registeel(3) and Forretress(3,4), but in general the team suffers a lot from explosion due to the lack of a protect user or a ghost type. I always try to prioritize them because AI loves to click explosion. Usually it turns the battle into a 2v2, but if the other enemy mon was immune/protected leads to a dangerous 2v3.

Double bulky lead: there are few mons that can resist an earthquake + a Latios move, and most of them are ice and normal types. A lead made of 2 of them is a lot of work, and to make thing worse, usually one of them also carries quick claw/bright powder. No panic, usually I keep Dugtrio in, since using earthquake still deals good damage to both of them, leaving Hariyama and Latios to finish the job.

The whole run has been recorded, I post here just the last 2 videos, but the whole series is on the playlist:

A combination of bad luck and a misplay. Machamp(7) decided to go ninja mode and dodged both hits, landing a focus punch on Dugtrio, and Latias switched into a counter from the previous earthquake damage. Another miss on Machamp allowed her to land, again, focus punch and defeat Hariyama, leaving Latios 1v4. Using aerial ace on Machamp could have prevented all of this, but it’s something I couldn’t really consider to do, because leaving Dugtrio locked on it is not ideal, I rarely use it, and it’s for specific threats. Machamp is nowhere near as dangerous as Heracross. Switching in Latias immediately is probably the main mistake, I just saw the great opportunity to set up calm mind and come back from the bad beginning, not considering the possibility of Swampert using counter.

SCORE.png
 
Last edited:
Hi

Submitting an ongoing streak of 210 wins in the Open Lv. Battle Factory. Done on emulator. I streamed Rounds 1-12 in the Battle Facilities Discord with witnesses, then was recommended by LRXC to record the rest, so Rounds 13-30 are on YouTube. Here was my 119 Lv. 50 submission a few years ago for those who haven't read it as a warning for what is to come below. Need to save as much text as possible though it'll probably take multiple posts anyways.

1775084053561.png
There have been major developments in the Emerald Battle Factory over the years. While using resources such as the Battle Facilities Calculator and the Battle Frontier spreadsheet were commonplace in all facilities, I had a realization during a random No Man's Land (any Factory round where every Pokemon set can possibly be seen) round that the Battle Style table in Bulbapedia's Battle Factory article can be used to eliminate set possibilities. Since the Factory is a notoriously hated facility among Battle Frontier enthusiasts, I guess not many really cared much about such useful info. At the same time, it's definitely surprising that I was among the first to really take advantage of the table given that this was known information for who knows how long; all prior Factory streaks were done with such brute force. Such info was pivotal in achieving what was my prior personal best Open Lv. streak of 64 and later on, my 119 Lv. 50 streak.

Donly Phans (JoebertIII), after witnessing my streak, updated the Battle Frontier spreadsheet to conveniently show the battle styles in every Pokemon's moveset. A few months later, he was able to achieve 112 wins in Open Lv, the second triple digit Factory streak in a calendar year. This was the first major development.

The second major development occurred during LRXC 's grind to surpass my Lv. 50 streak. When you play the Battle Frontier enough, you'll get familiar with basic AI patterns that you can take advantage of to make more optimal plays. A simple example of abusing AI is bullying an EQ Thunder Nidoking4 by switching into Gyarados on EQ and switching into Jolteon on Thunder over and over again. A slightly more complex example is letting one of your Pokemon get Toxic'd on purpose vs. a Shuckle3, then switching back and forth between the Toxic'd and not Toxic'd mon to stall out the rest of Toxic PP before attempting to take it out. However, despite how much one played the Frontier, there was always uncertainty with how the AI truly operates.

Just happened to fact check this, but this is true. Gen III fanatic LRXC randomly found Emerald Kaizo AI documents (Move Choice AI Scoring, AI Move Choice Analysis) on a whim. These documents were intended for a romhack, but the romhack has the same AI as vanilla Emerald. Thus, such documents became critical info on how to anticipate what moves the AI can use. Along with Donly Phans's spreadsheet that I shared with LRXC (without permission? oopsie) and the sweaty ruler sometimes used in Nuzlockes, LRXC gained the consistency to reach high streaks and eventually surpass my 119 with his 155, seen here. Plays like baiting Skarmory3 to see a kill on Kangaskhan3 so it always Flies instead of Rest would be very hard to see without such AI knowledge.

The final major development is a natural extension of the first development. Not only can you use the scientist quotes to eliminate set possibilities of the Pokemon that's out, but they can also be used to infer on which Pokemon a Trainer has in reserve. Naturally, a program can be made to take advantage of such logic. Actaeon has worked on a Factory Assistant in the past, but now it has been fully realized by Dave Glorbus who created the Battle Factory Buddy winter 2024. Coincidentally, or perhaps not coincidentally, that was when my current Open Lv. streak began.
I was ready to move on from the Battle Factory until LRXC’s streaming explosion. I had to be a part of it as it was always a goal to promote Emerald’s Battle Factory as one of the best additions to any Pokemon game. It didn’t take long for other Factory formats to gain new records; both Lv. 50 and Open Lv. Doubles records both hit triple digits for the first time shortly afterwards. As a whole, I was actually expecting more competition than a small handful of players aiming for the Factory records, but the reality was that the majority just enjoyed watching the streams.

While I was busy working on other Pokemon-related things, I eventually wanted to find a window where I could grind Factory once more. With this newfound information and a realization that I needed to play a little slower than before, I was curious on how I can improve my previous records. There were 3 Factory goals that I eventually wanted to complete: the Double Go(l)d Run as I call it (reaching 42 wins alternating back and forth between Lv. 50 and Open Level), improving my Open Level record of 64 wins, and going full circle in surpassing LRXC’s 155 wins in Lv. 50.

This current Open Level run initially begun as a Double God run attempt, but I ended up losing in Round 5 Lv. 50 over-experimenting with an Alakazam3 elevation. I streamed rounds 1-4 in the Battle Facilities Discord, but I don’t have any logs that would’ve helped me recall what I used and faced. However, for Rounds 5 onwards, I wrote notes on what Pokemon I faced not only as a log but also as a general practice tool in order to slow down my decision making. I do have a screenshot of me trolling with Plusle2 and Minun2, almost losing in Round 3 Lv. 50 at least:

1775084534818.png

Rounds 5-12 will be more in depth given the lack of video footage but may not be 100% accurate as I attempt to recall events that happened well over 2 years ago at this point. Rounds 13-30 will be less in-depth since they were recorded.

:rs/skarmory:3 :rs/nidoqueen:1 :rs/snorlax:1 :rs/zapdos:6 :rs/snorlax:7 :rs/electabuzz:4

Actaeon joined during Round 4 Open Lv. and watched me lose Round 5 Lv. 50. He decided to stick around for one last round to see how his Factory Assistant would perform. As for the draft, there were interesting options with the ever-solid Curse Rest Skarmory and 2 Snorlaxes to choose from. I chose Snorlax7 because it had Thick Fat compared to Snorlax1’s Immunity, and I valued Snorlax7’s Earthquake coverage. I was honestly looking at Electabuzz last but I had others watching on stream who would naturally steer towards Zapdos. Slight peer pressure made me choose the Thunder Zapdos, but I was aiming for something more consistent as a swap that can cover Skarm’s and Lax’s weaknesses better.

:zapdos: :skarmory: :snorlax: vs. :ursaring: :misdreavus: :tentacruel:

Despite having Actaeon around with his Factory Assistant, it was all for naught as I accidentally told him that the phrase was unrestrained instead of HRHR (high risk high return), crashing his entire program. Thus, this round as a whole was played normally with me assuming unrestrained in this battle.

Zapdos lead vs. Ursaring lead. What could be an awkward situation given Zapdos’s inaccurate Thunder and Ursaring’s ability to OHKO if Choice Band isn’t the worst thanks to Skarmory. I go into Skarm and it is revealed Ursa5, CB. Interestingly, after playing around with calcs I realized it’s not safe to Curse up to +6 as CB Struggle does a ton, and I don’t want to risk multiple crits. I was content with a few Curses to take Ursa out through boosted Flys, but Skarm was still significantly chipped in the process.

2nd was Misdreavus. Scouting for Misdreavus4 Tbolt I go into Snorlax. It was revealed to be Misdreavus1 after some more switch scouting between Skarm and Lax. Missy1 can only generate damage through Shadow Ball and Confuse Ray confusion, so it was a simple PP stall swap between Skarm and Lax. When it only had Pain Split PP, it was safe to go for the max Curse Skarm setup. After fully setting up Skarm I was able to Toxic Missy, go for the slow Fly when it fainted to poison, and take out their last Pokemon Tentacruel through the slow +6 Fly. Surf reveal from Tenta meant that it was set 3 in order to meet the HRHR requirement.
:zapdos: :skarmory: :snorlax: vs. :forretress: :aerodactyl: :gardevoir:

Zapdos lead vs. Forretress lead. This could be easy Skarm setup, but there is fear of Zap Cannon from Forre3. We rip a Thunder and they reveal Light Screen, Forre1. This was free setup for Skarm3 which fully set up to take down Forre.

Next was Aerodactyl. There are some Fire Blast sets that could be problematic. I opted to scout by going into Zap, but they revealed to be Ancientpower. Went back into Skarm and Cursed up again. Based on the damage it was Choice Banded, Aero2. Last was Garde1 who couldn’t break Skarm.
:zapdos: :skarmory: :snorlax: vs. :starmie: :latias: :flareon:

I was hoping to find something better than Zap6 and I did run into CB Aero. I opted to keep still as I somewhat don’t trust 3 IV Aero2.

Zap vs. Starmie lead. Obvious Thunder rip. Starmie Cosmic Powered revealing 7 or 8. Zap was able to hit through Brightpowder and 1v1. Latias second. Given that the quote was HRHR, the last has to activate the phrase on its own. I went into Snorlax which 1v1ed. It was revealed to be Latias3. Their last was Flareon34 who Lax defeated as well.
:latias: :skarmory: :snorlax: vs. :fearow: :slowbro: :blissey:

Now a Lati is something I trusted more than Zapdos mostly because it has accurate moves. But typing-wise it was nice having an Electric and Fire resist paired with Skarm3.

Latias vs. Female Fearow lead. I have a Female Skarm. Go into it and set up to full. Fearow reveals to be Fearow3 but drops to Poison while Skarm has a slow Fly up in the air.

Their 2nd is Slowbro, so +6 Fly doesn’t kill. Since their last is a Normal that can’t hit Skarm super effectively, I opted to not risk hax on Skarm and switch into Lax to beat it.

Their last was Blissey. Thinking that I had it in the bag, I went for Curse on Lax attempting to Hyper Beam next turn. They revealed to be Blissey2 by Singing. Luckily for me, Skarm was Female so it couldn’t be Attracted. Thus, the way to 100% win is by getting Skarm in on a Seismic Toss and aggressively spamming Rest until they are out of Seismic Tosses. One could think that setting up with Skarm or going for Toxic asap are acceptable plays, but that risks going to sleep from Sing and staying asleep 4 turns while Blissey 4HKOs you with Toss. After stalling out the Tosses, the team can now safely take Blissey2 down.
:latias: :skarmory: :snorlax: vs. :regice: :jolteon: :dodrio:

Latias vs. Regice lead. I go into my Thick Fat Lax when Thunder Wave is revealed, meaning it’s either Regice3 or 4. I stay in a turn to scout when Double Team is shown, revealing 4. I go into Skarm to Toxic it asap. I get the Toxic off and Regice Thunder Waves Skarm. They Ice Beam Skarm and I opt to go for the slow Resto Chesto, then back into Lax while it drops to Toxic.

Their 2nd was Jolteon. Fortunately, Lax was healthy enough to tank Jolt’s hits while para’d and take it out with EQ. It was Jolt3. Their last was Dodrio which had to be set 4, activating HRHR by itself. Another mon walled by Skarm.
:latias: :skarmory: :snorlax: vs. :milotic: :feraligatr: :armaldo:

Latias3 vs. Milo lead. Pretty scary since there’s no amazing way to outplay its Mirror Coat. Went Lax first when Attract is revealed (Milo3). Annoying for me because my entire team is Female vs. this Male Milotic, so PP stalling this wasn’t safe. I opted to chance it with Skarm getting the Toxic which it was able to do. Snorlax was on the field when Milo fainted.

Snorlax was able to 1v1 the Feraligatr who had to be set 3 or 4. Last mon was Armaldo who went for Earthquake. Fortunately, it was Choice Banded so my Ground-immune Pokemon were able to handle it.
:latias: :skarmory: :snorlax: vs. :salamence: :claydol: :tyranitar:

Latias vs. Salamence lead. Scouting for this is a headache; we’re better off banking that it’s a slow one, and Latias can tank 1 hit anyways. Latias was faster and took it out with Ice Beam revealing Mence3456.

Claydol second mon. Latias was able to 1v1 with Ice Beam. Shadow Ball reveal from Claydol meant set 4.

Last was Tyranitar. Might as well get some Earthquake chip, but DD sets are scary; could be disaster with enough Rock Slide flinches. I EQ, they Double-Edge me seeing the kill which revealed Tyranitar10. Lax was able to fight past Tyranitar with Earthquake. This could’ve been way worse.
:rs/sceptile:3 :rs/forretress:1 :rs/exeggutor:3 :rs/snorlax:7 :rs/lanturn:1 :rs/kangaskhan:3

Snorlax7 shows up again which is a good sight since the rest of the draft wasn’t the best, but there’s just enough. I tend to like Exeggutor3 as it is like a more proactive version of the normally stronger Ludicolo34 and Meganium2, having ways of dealing immediate damage alongside Leech + Leftovers. Lanturn1 isn’t the most optimal of sets and lacks Volt Absorb here, but its invested Surfs hit hard. Thunder Wave and Confuse Ray can be useful utility too. I love to lead with the Leech Seeder in the case of a bad matchup I can just make a sacrificial Leech to put a partner Pokemon in a better position. Egg3 Lanturn1 Lax7 was chosen.

During this time, Dave created his earliest version of the Battle Factory Buddy. I tried it out for a test run starting this round.

:exeggutor: :lanturn: :snorlax: vs. :manectric: :fearow: :entei:

Egg vs. Manectric lead. Crunch 2HKOs Egg, but Egg 2HKOs Mane with Giga and gets enough recovery to avoid the Crunch 2HKO in the process. They Rain Dance revealing Mane2. Giga, Crunch, Giga KOs Mane.

Fearow is their 2nd. As it was slightly awkward to switch into, I opted to just Explode Egg and trust Lanturn Lax in a 1v2. They Attracted, revealing Fearow2. Egg brushed it off and got the Explosion. Entei was their last vs. Lanturn. They Double-Edged revealing set 3 or 5, but Lanturn 1v1ed.
:exeggutor: :lanturn: :snorlax: vs. :machamp: :rapidash: :dusclops:

Egg vs. Machamp lead. Egg matches up well vs all Machamp sets as it resists the usual Cross Chomp Earthquake combo. Double-Edge was used, revealing Machamp5, but Egg reamined healthy taking it out with a combination of Leech, Giga, and Leftovers. Rapidash was their 2nd. Dash3 could be annoying but Lanturn still was favored to handle them all. Flame was revealed so it was set 1. Lanturn took out Rapidash. Dusclops last could’ve been scary if it was set 2, but fortunately it was only set 1. Repeated Surfs did the job.
:machamp: :lanturn: :snorlax: vs. :fearow: :donphan: :aggron:

In a funny moment, while discussing my draft with EspeonScottie during the Discord stream, I accidentally swapped Exeggutor3 for Machamp5. At least Machamp5 is a more than usable Pokemon.

Machamp5 vs. Fearow lead. Machamp can live all Drill Pecks except for some Sharp Beak Fearow1 rolls. Felt better just letting Machamp tank it and preserve my better IV Pokemon. It tanks the Drill Peck while OHKOing Fearow in return with Rock Slide. Machamp goes down to Donphan4’s Iron Tail.

Lanturn1, being the ever essential Water Pokemon with the Water move, paid dividends not getting Quick Clawed and OHKOing their last 2 Donphan and Aggron.
:machamp: :lanturn: :snorlax: vs. :entei: :ninetales: :zapdos:

Since I accidentally swapped for a 3IV Machamp in a Noland round, I am hoping that I can find something better to make up for the mistake. The last 3 mons aren’t much of an improvement.

Machamp vs. Entei lead. Gotta just Earthquake it mostly to get intel on the set, but CM sets could get out of hand if left untouched. Given that the quote was Endurance, Entei5 was most likely; Buddy showing 53%. It was indeed the goofy max Defense Entei5; after getting the initial Earthquake, I went into Lanturn to take it out. Their 2nd was Ninetales.

After a swift Surf, Zapdos was revealed as their 3rd. Given that the quote was endurance, it was guaranteed Zapdos4. Lanturn went down, but Zapdos was revenged by Snorlax7’s Hyper Beam.
:zapdos: :lanturn: :snorlax: vs. :hariyama: :flareon: :hypno:

Trying to make up for my accidental swap, I swapped Machamp for Zapdos, giving me a Ground-immune and another Thunder Waver to support Snorlax.

Hariyama lead; Fake Out. I figured out that it must be set 4 based on the damage. Zapdos was able to win the 1v1 without getting haxed. Flareon 2nd. Since the quote wasn’t HRHR, it has to be 1 or 2. Went Lanturn on it going for Double-Edge, revealing Flareon2. After a Surf, Hypno was comfortably taken down afterwards. The Psychic damage revealed that it was Hypno2.
:zapdos: :lanturn: :snorlax: vs. :electrode: :flygon: :alakazam:

Electrode lead. We are still in the lookout for impossible to predict moves given that Electrode learns none; the odds of Clef1 or Zam3 are higher now. An awkward lead given that Zapdos can’t really touch it, and Lanturn is Illuminate instead of Volt Absorb. I opted to trade Thunder Waves with it. Fortunately, it did waste a turn to Mirror Coat, but I did have to Thunder Wave again given that Electrode4 carries Lum. Afterwards, I went into Snorlax to OHKO it with EQ.

2nd was Flygon. This confirms that the last is Clef1 or Zam3. Another awkward mon, but at least Lax practically OHKOs always with Hyper Beam. It Sunny Day’d, revealing Flygon2. Last was Zam3 who Tricked Lax while it recharged. I sac the paralyzed Zapdos so Lanturn can come in and T-Wave Zam for the safe Shadow Ball revenge from Lax.
:zapdos: :lanturn: :snorlax: vs. :gengar: :snorlax: :blaziken:

Very scary lead from Noland: Gengar. Zapdos was incredibly likely to lose the 1v1 thanks to the IV disadvantage. All moves from Ice Punch to Thunderbolt and even Sludge Bomb 2HKOed majority of the time. This could’ve resulted in me losing Zapdos and my second mon getting chunked or Destiny Bonded. Instead, I was able to OHKO Gengar with a crit Thunderbolt. It was interestingly Gengar1 or 2 as Noland went for Confuse Ray, so it was big that Zap didn’t hurt itself that turn too; granted it was an easy stall-out if it was Gengar1. Onto the next mon.

Snorlax was his 2nd. I had a Snorlax too! So all I know is that it can’t be Snorlax16 (same item as Gengar12) and Snorlax7 (I have Snorlax7). I’m willing to sac Zapdos to get damage and information. Zapdos breaks out of confusion to get 2 Tbolts on Snorlax as it Cursed and Double-Edged, revealing Snorlax4.

The 2 Tbolts + Double-Edge recoil was enough for Noland’s Lax4 to drop to my Lax7’s Hyper Beam. Noland’s last was Blaziken. Brick Break was revealed, so it was Blaziken2. While it took out my Snorlax, Lanturn guaranteed won as it could live any critical attack from Blaziken2, securing the win with Surf.
:rs/donphan:2 :rs/cradily:4 :rs/dewgong:4 :rs/blaziken:4 :rs/marowak:4 :rs/xatu:3

Now here is a fun draft, one that I feel many would dismiss as a bad draft and falter. A secret about the Factory is that you can create as many helpful external resources possible, but there’s arguably no stronger resource than raw experience. The big advantage of experience is by using or watching all of the Factory sets firsthand, you’ll get a proper opinion on how good or bad some sets actually are. Some may surprise you (in a good or bad way).

This is the case for Cradily4. A mon for the longest I completely dismissed, I turned around on it when I was forced to pick it in a draft. Mirror Coat is the saving grace for this Pokemon and is the best means of Lati counterplay in this draft.

Marowak is the best Pokemon here, outclassing Donphan. I’ve never used Dewgong4 before, but I’ll put trust into it as it is a Water Pokemon with a Water move and good item. Blaziken4 has no speed which makes it very hard to use. Xatu3 has purpose as a Heracross killer but nothing else. I’m very worried about the Metagross matchup with this draft given Cradily’s terrible weakness against it. I opted for Dewgong4 Cradily4 Marowak4, aiming to preserve Marowak’s HP as long as possible in case of Metagross, but of course it’s just my best mon in general.

:dewgong: :cradily: :marowak: vs. :ninetales: :granbull: :salamence:

Ninetales lead. Ideal matchup for the Water Pokemon with the Water move, or so I thought. Like I said earlier, I’ve never used Dewgong4 before, and now my opinion of this Pokemon was completely swayed by the following calc:

255 SpA Dewgong-4 Surf vs. 0 HP / 0 SpD Ninetales-4: 236-278 (91.1 - 107.3%) -- 43.8% chance to OHKO

1775084831745.png

Not a guaranteed OHKO on a Ninetales even with max SpA and IV advantage..how. Since it didn’t OHKO, Dewgong had to take Dedge chip and lose Lum from Ninetales4 before taking it down. Second mon was Granbull. After playing around with calcs, I was pleasantly surprised with how well Cradily4 tanks Granbull’s attacks, even Choice Banded, so I went into it. It was Granbull3 which Cradily 1v1ed through repeated Giga Drains.

Last was Salamence. A scary last for sure as Cradily risks getting setup on. After some time, I decided that the best play was switching into Marowak. If the Mence is Dragon Dance, Marowak can tank a +1 hit assuming no crit. If it is the fully special Mence78, then Wak gets 2HKOed, but then Dewgong revenges as it’s still healthy to tank a Claw. It turned about to be goofy Mence6; Wak was able to hit the Rock Slide.
:dewgong: :cradily: :marowak: vs. :electabuzz: :starmie: :clefable:

Decided that I’m not able to fit Mence onto the team and kept. Electabuzz lead. I went into Marowak naturally, but I was really hoping it was not Electabuzz3 as Wak would get severely chipped or can outright lose through hax. It Thunder Waved, revealing Buzz1. Wak takes it out.

Starmie 2nd mon. Given that the quote was impossible to predict, it’s guaranteed Clef1 last mon since neither Buzz or Starmie learn an impossible move, and it can’t be Zam3 as the quote would be Psychic specialist instead of no type.

Since we know the last is Clef1 who is very easy to beat, there is no necessity of preserving Marowak. Marowak tanks an Ice Beam to take out Starmie, meaning it must be Starmie4 or 7 given that Starmie3 would Surf. Clef1 gets blown up obviously.
:dewgong: :cradily: :marowak: vs. :quagsire: :altaria: :dugtrio:

This is a rather unique quote given that Grounds love activating HRHR instead. In fact, the only Grounds that learn a slow and steady move are Quagsire2, Claydol1, and Donphan1. Buddy shows this. I did not swap for Starmie because I prefer having a Water move.

Quagsire first Pokemon. 92% chance of it being Quag2 according to Buddy. It did turn out to be Quag2 as I Ice Beamed it down. Quag2 just spammed Curse.

Altaria and Dugtrio were swiftly taken down by Ice Beam. Dewgong4 sweep! (ignore the threat level of the mons)

Given that the quote was slow and steady, it was guaranteed Altaria3 as the only other Alt that learns a slow and steady move (Alt2) has Lefties just like Quag2. Interestingly through switch logic, it had to be Dug1 because a Rock Slide Dug would’ve come out before Altaria, and it can’t be Dug3 since it activates HRHR by itself. My notes didn’t show this because Dave’s Buddy did not have switch logic odds added at this time.
:dewgong: :cradily: :marowak: vs. :starmie: :flareon: :aerodactyl:

Starmie lead. Signal Beam gaming? At least for turn 1 as I would want some info on the set. It Light Screened, revealing Starmie5. Signal Beam 2HKO ez.

Flareon second. It can’t be Flareon34 as it activates HRHR by itself. I went into Wak as Light Screen was still up, and maybe Flareon2 can actually pose a threat if it gets free turns. Wak switches into Flamethrower and gets burnt immediately which is funny; Flareon1 did something. EQ still OHKOs.

Aero last. Aero took out Wak but Cradily revenged. Double-Edge and Earthquake revealed Aero4.
:dewgong: :cradily: :marowak: vs. :walrein: :latias: :muk:

Once again I turned down Starmie, preferring both Surf and Ice Beam that Dewgong has. Walrein 1st mon. A weirdish stalemate here; Sheer Cold is very tempting. Opted to Signal Beam with the intention of Signal Beaming twice to ensure the KO on Walrein3 with Wak EQ. Double Team reveals Walrein2. Kinda annoying, might as well fish with the OHKO move. Sheer Cold does connect.

Latias second. Time for Cradily to shine. Stayed in for information and Ice Beamed. Dewgong goes down, but now it’s known that Latias has Thunderbolt. Cradily tanks the Ice Beam and Mirror Coats. Muk last. Kinda awkward; was afraid of setup Muk getting out of hand so went hard Marowak. Muk1 Minimized, but Wak was able to hit.
:dewgong: :latias: :marowak: vs. :charizard: :medicham: :slowbro:

Here I made the swap for Latias1 over Cradily4 An interesting one tbh looking back; Cradily4’s Mirror Coat is very good into all Psychics bar Metagross. I guess my great fear of Metagross all round made me fear that Cradily was a liability here, but I did make myself weaker to Latios, banking on Latias speed tie. Maybe Dewgong swap was better; granted, Signal Beam is hilariously good here.

Charizard lead. Surf actually OHKOs here so congrats to Dewgong. Rock Slide reveals Zard4. Medicham second. It can’t be Medi2 given Psychic unrestrained. Thanks to a DynamicPunch dodge, Dewgong did get a hit in before going down from Medi3. Latias revenged but took an Ice Punch in the process. Slowbro last. It Calm Minded revealing 2 but couldn’t take repeated Tbolts.
:dewgong: :latias: :marowak: vs. :lapras: :rapidash: :glalie:

Now here was a swap decision that I took a lot of time on. Ice specialist, a matchup where Latias and Marowak dislikes on paper. Given that it’s the 7th battle, I could swap for a supposed anti-Ice mon Zard4 to maximize the matchup. Was considering either swapping Dewgong or even Latias for it. After a lot of thought, I did like my current team over Zard. Marowak’s EQ is a nuke vs the slowest Ices; the smallest amount of chip secures the KO against all Regices for example. Thunderbolt on Latias1 does more damage to the Water/Ices than Zard’s attacks. As for Dewgong, it matches up better against lead Lapras compared to Zard which I was worried about. I kept, but I remembered the decision being very interesting, looking at all the Ice sets with the spreadsheet.

Lapras lead. Akin to the situation against Walrein, I want to Signal Beam twice so Wak can KO with EQ if this turns out to be Lap78. Signal Beam into Thunderbolt Shell Bell proc reveals the anti-god, Lapras5. Simple pivot into Wak gives it entry to easily KO Lap with Earthquake.

Rapidash 2nd. Switch into Latias. Sunny Day into Hypnosis dodge makes taking Rapidash3 out easy. Glalie2 was their last.
:rs/skarmory:2 :rs/machamp:1 :rs/gardevoir:5 :rs/ampharos:1 :rs/quagsire:2 :rs/latias:3

This is a rather simplistic one. The 2 best mons here are Latias3 and Gardevoir5, and Machamp complements them by covering their weakness to Snorlax, Blissey, Regice, and Tyranitar. The only question worth a debate is whether to lead Gardevoir or Latias. Preserving a Destiny Bonder is always tempting to lock down practically any last mon situation, but attempting to stay ahead by 1v1ing their lead and trading vs a 2nd for a very favorable last mon situation is pretty good too, and overall safer. I tend to prefer keeping my best Pokemon in the back as well. Garde5 lead Latias3 Machamp1 was chosen.

Bonus: all 3 were perfect IVs, a big deal given that the elevations in Round 8 will be random.

:gardevoir: :machamp: :latias: vs. :jynx: :armaldo: :fearow:

Jynx lead. We Ball. Protect spam from Jynx reveals 2. Thanks to a Brightpowder dodge, Jynx2 got the cheese necessary to hilariously PerishTrap my Garde5. They switch into Armaldo on the final Perish turn to preserve their Jynx.

I go into Latias to handle Armaldo. A scary mon if I don’t deal with it quickly. Gotta Dragon Claw 2HKO. Iron Tail reveals Armaldo2. Armaldo goes down. Jynx returns but Latias takes it out thanks to the initial Shadow Ball damage from Garde; it Brightpowdered on the 2nd Ball.

Fearow was last, but Latias takes it out. Given that the quote was HRHR and Fearow was faster, it was guaranteed Fearow1. Was getting some de ja vu as 2 Open Lv. attempts ago, I got swept by Fearow2 in Round 8 with both Garde and Latias on the team (Attract Tri Attack hax op). Surely that’s not a warning sign for later…
:gardevoir: :machamp: :latias: vs. :shuckle: :ludicolo: :walrein:

Battle flow quote always gives you critical info; there’s very few weather sets. Shuckle lead means that it’s incredibly likely this is Shuckle2 with Sandstorm. Buddy says 80%. It was also big that my Garde was Synchronize so I could Synchro Poison back to Shuckle if it is Shuckle34. Surprisingly, it was Shuckle1 instead which was an easy KO. This means that the back mons are guaranteed Waters with a weather move.

Buddy shows a 42% chance of back mon Ludi. Lo and behold, Ludi second mon. Again, Synchro is good here in case it is Ludi4. I Psychic, they Rain Dance. No Lefties reveal that it’s Ludi1. They outspeed thanks to Swift Swim and Surfed Garde. Psychic doesn’t 2HKO. A cool sequence is that I can Endure to tank the next Surf, eat Salac Berry, and outspeed Ludi again to take it out with the 3rd Psychic. Last was Walrein; guaranteed Walrein1 with Hail. I spam Destiny Bond to KO it as Walrein sees the Blizzard kill.
:gardevoir: :machamp: :latias: vs. :tentacruel: :latios: :jolteon:

Tenta lead. Psychic doesn’t OHKO so I don’t want to risk Mirror Coat. Fortunately, Shadow Ball into Psychic KOs Tenta. This play works out nicely as Tenta Mirror Coated turn 1. They Surf me before going down to Psychic, revealing Tenta3.

Latios 2nd mon. Decided to play it super safe by spamming Dbond to trade vs it. Dragon Claw reveals Latios123.

Jolteon last vs. my Latias. Based on its moves, it was Jolt2 who can’t touch Lati.
:gardevoir: :machamp: :latias: vs. :milotic: :metagross: :steelix:

Steel unrestrained. Kinda scary given that I have 2 Psychics. Milotic lead. Used Psychic without caring about Mirror Coat damage as Garde can live. Plus I kinda need the damage anyways. Did practically no damage while Milo Attracted, revealing 3. Went into Latias who had to tank a Surf. Got lucky and crit Tbolted the Milotic to take it out.

Second was Metagross. Felt forced to Earthquake with Latias. EQ did half while Metagross Shadow Balled. Shell Bell revealed Metagross7. The Shell Bell made the second Earthquake a roll, but Latias was able to get it. Third was Steelix. Lix takes out Latias with Body Slam, revealing Steelix3. Destiny Bond cleans up. Will Machamp do something?
:gardevoir: :machamp: :latias: vs. :tyranitar: :registeel: :fearow:

Given how long this writeup will be and the fact that well over half of this run was recorded, I don’t have the motivation to write multiple “war story” esque battles, so this will likely be the only one.

Turn 1: A top enemy of Garde and Latias enters the fray: Tyranitar lead. Machamp, who has not come out of its Poke Ball yet, now has a purpose. Time to switch into Machamp so it can perform its only job.

GARDEVOIR, come back! Go, MACHAMP!
Foe TYRANITAR used CRUNCH! A critical hit! It’s not very effective…The sandstorm rages. MACHAMP is buffeted by the sandstorm!


Turn 2: Crit Crunch does 31%-37%. Time to hit a Cross Chop.

Foe TYRANITAR used ICE BEAM! A critical hit! MACHAMP fainted!

…

Turn 3: Machamp unfortunately failed at doing its one job, albeit very unlucky. Crit into Quick Claw crit. Quick Claw reveals Ttar4. VERY bad here as I now have to Destiny Bond this Tyranitar and bank on 31 IV Latias3 to 1v2. Guess there’s worse mons you can rely on to 1v2.

GARDEVOIR used DESTINY BOND! GARDEVOIR is trying to take the foe with it!
Foe TYRANITAR used CRUNCH! It’s super effective! The sandstorm rages. GARDEVOIR is buffeted by the sandstorm!


Turn 4: No Quick Claw crit secures the trade.

GARDEVOIR used DESTINY BOND! GARDEVOIR is trying to take the foe with it!
Foe TYRANITAR used CRUNCH! It’s super effective! GARDEVOIR fainted! GARDEVOIR took foe TYRANITAR with it! Foe TYRANITAR fainted!


Let’s see what Latias can do. Infinite Sandstorm is up too which can add up.

Go, LATIAS!
Foe sends out REGISTEEL! The sandstorm rages. LATIAS is buffeted by the sandstorm!


Turn 5: Not great…gotta do what I can I guess. I Earthquake.

LATIAS used EARTHQUAKE!
REGISTEEL used THUNDER WAVE! LATIAS is paralyzed! It may not move! The sandstorm rages. LATIAS is buffeted by the sandstorm!


Turn 6: So it’s Registeel4. Very annoying since Latias is paralyzed too, but this may have been a better sight than some other Registeels I guess.

REGISTEEL used DOUBLE TEAM! REGISTEEL’s evasiveness rose!
LATIAS used EARTHQUAKE! A critical hit! LATIAS is paralyzed! It may not move! The sandstorm rages. LATIAS is buffeted by the sandstorm!


Turn 7: Huge crit. Now the next EQ KOs Registeel. Sand chip is adding up though…

REGISTEEL used ANCIENTPOWER!
LATIAS used EARTHQUAKE! Foe REGISTEEL fainted!
Foe sends out FEAROW! The sandstorm rages. Foe FEAROW is buffeted by the sandstorm! LATIAS is buffeted by the Sandstorm!


Turn 8: Huge that Latias isn’t getting full para’d. But the de ja vu is kicking up again…Fearow last. Latias barely can still live every hit despite the chip, so the game will come down to if Latias gets crit or full para’d.

Foe FEAROW is glowing!
LATIAS used THUNDERBOLT! It’s super effective! Foe FEAROW fainted!


Fearow4 saw the Sky Attack kill which took out the crit chance. Luckily for me, Latias broke through. The streak totally could’ve ended here. Don’t know how I would’ve felt losing to Fearow again…
:gardevoir: :machamp: :latias: vs. :slaking: :kangaskhan: :marowak:

Slaking lead vs my Endure Gardevoir. Supposedly free given that I can Endure on Slaking’s attacking turn, but Yawn could be annoying. Machamp switch Turn 2 is a solution to that at least. It turned out to be Slaking3 as Shadow Ball brought Garde down to Salac. Was easily able to take it down thanks to Endure. Kangaskhan comes in second, but I’m fine with trading Garde with Dbond. Shadow Ball meant that it was either Kanga2 or 4. Wak last gets OHKOed by Latias.
:gardevoir: :marowak: :latias: vs. :golem: :aggron: :hypno:

Rock specialist; once again great fear of Tyranitar. Probably unwarranted, but I swapped Machamp out for Marowak due to its “useless” performance in this round. Was okay with even 3IV Marowak1 at this point, but Wak does hit harder and have more accurate STAB for these Rocks. It did turn out to be Wak1 haha.

Golem lead. Can’t be Golem4 as it activates HRHR. Go into Latias who doesn’t fear much. Double Team reveals the funny Golem2. Gets Ice Beamed. Aggron 2nd. Earthquake 2HKOs while it Iron Tailed, revealing Aggron1. Hypno2 last was comfortably taken out.
:rs/ninetales:2 :rs/steelix:3 :rs/xatu:4 :rs/vileplume:3 :rs/whiscash:1 :rs/latias:5

Fairly simplistic choice of 3. Steelix3 will have to be the star of sorts despite the Latias given that it’ll be the only perfect IV Pokemon in a Noland round. If Latias wasn’t in the draft, there was genuine appeal to Vileplume3 here, especially in a Water slow and steady matchup. Nice that I had screenshots of the random IVs for that extra context. Lead Whiscash to possibly Amnesia up on a Water lead with the ultimate aim of carefully PP stalling it for a Latias sweep.

:whiscash: :steelix: :latias: vs. :starmie: :suicune: :misdreavus:

Starmie lead. Very likely one of the 2 double slow and steady sets, Starmie16. They Surfed while I Amnesia’d to scout. Based on damage, it was indeed Starmie6. Kinda annoying as I’m at the mercy of crits and confusion from Confuse Ray. Will need multiple crits though since Surf now does nothing thanks to the Amnesias. Was too afraid of going for the full stallout as the chances of Starmie haxing Whiscash down is respectable. Was content with Earquaking it down after 2 Amnesias and using my Chesto. It was surprising to me that Starmie never recovered; now I know that the AI won’t Recover if their Pokemon is faster than the player.

The almighty Suicune was their next Pokemon. Interestingly, it can’t be the slow and steady Suicune2 as it has the same item as Starmie6. There’s fair means of handling the remainder of the sets. Suicune1 likely invites a CM war with Latias5, but it’s better than nothing and Latias is pretty favored to win. Suicune345 can be 1v1ed by my already Amnesia’d Whiscash. Suicune6 can be taken out by Steelix Explosion. I Earthquake on Suicune’s Surf. Based on damage, I was pretty convinced it was Suicune6. It Surfed again after Whiscash’s second EQ. I went into Latias on the turn it Rested, confirming the set. The play now is to get a Thunder Wave on it so Steelix can Explode, only risking a possible Ice Beam freeze on the switch through para. This sequence works out, and Lix is able to Explode on Suicune6.

Misdreavus was last. It Thunder Waved and Confuse Ray’d Latias which reveals Missy13, but Latias was able to fight through them to 2HKO Misdreavus.
:suicune: :steelix: :latias: vs. :slowking: :raichu: :machamp:

In my opinion, Suicune6 is the best set in the entire singles Factory with its ability to play either the short and long game better than any other set. I was ready to swap Whiscash for Starmie6 tbh, but clearly Suicune6 is an upgrade.

Slowking lead. LOL finally an easy writeup. Suicune6 set up in Slowking2’s face and swept. Raichu must’ve Double Teamed, revealing set 1. Machamp was OHKOed, but we know it can’t be sets 7 or 8 because Machamp7 has a slow and steady move when Slowking2 carries 2, not possible in unrestrained. Machamp8 activates HRHR on its own.
:suicune: :steelix: :latias: vs. :lapras: :articuno: :clefable:

Ice HRHR and Lapras lead. Scary…if I didn’t have STURDY Steelix3; didn’t mention it until now because in this battle the Sturdy was clutch. I went into Steelix Turn 1 to scout for the OHKO move and it indeed was one of the OHKO machines, Lapras8. It’s a simple stallout of switching Steelix3 in and out until it’s out of OHKO moves. It does have Sing; a minor inconvenience as I have to wake up both Steelix and Latias before going for the sweep.

After Lapras is out of moves, I was able to set up with Latias5 to sweep. Articuno and Clefable were their back 2 mons. It has to be a HRHR Articuno (345) since Clef learns no HRHR moves, and it can’t be Clef1 as it activates impossible to predict by itself.
:suicune: :steelix: :latias: vs. :raikou: :entei: :starmie:

RAIKOU lead. Cousin…ye I have a Steelix to easily take Raikou out. It was the unthreat Raikou2 who can’t touch Steelix but could troll by tanking, dodging and PP stalling EQ as it has Reflect, Double Team, Brightpowder and Pressure. Reflect went up but Lix was able to still hit and 2HKO.

ENTEI second…the whole family is here. We’re still looking for slow and steady actually, so odds of Entei3 has to be high. Buddy shows roughly 70%. Either way, Suicune odds of 1v1ing Entei were very high and it worked out. It was Entei3.

Starmie last. Guaranteed Starmie1 or 6. It was revealed to be 1. The Thunder Wave Confuse Ray cheese almost took out Suicune6…almost. Suicune misses its family…maybe I should swap it out so Suicune can go home!
:suicune: :steelix: :latias: vs. :venusaur: :marowak: :weezing:

Nah, I keep.

Venusaur lead. It is most likely Venu3, the only one with a HRHR move. Since Sleep Powder can actually be a little annoying, I opted to just CM once to get the Ice Beam 2HKO on Venu3, of course having one-time Sleep Powder insurance with the Chesto. It turned out to be Venu2 who Double Teamed twice but Suicune still was able to hit.

Here’s where the short game of Suicune excels. Even with one boost, it can still be a monster. Suicune took out their second and third of Marowak and Weezing. Since neither Venu2 or Marowak learns a HRHR move, it had to be Weezing2.
:suicune: :steelix: :latias: vs. :mr-mime: :regirock: :dusclops:

Mr. Mime lead. Steelix switch is a pretty safe scout: it’s the only one on the team that doesn’t mind a Choice Band, and it at worst is taking a lousy Psychic from Mr. Mime2. It did turn out to be Mime3. Big Banded Lix, BBL for short. PP stalling Mime3 was an option, but didn’t want Lix taking damage, Latias getting Tormented, or Lati getting Para’d. OHKOed Mime with CB EQ.

Regirock 2nd. Switched BBL out into Suicune to not unnecessarily risk Counter. It Exploded right off the bat OHKOing Suicune6.

Dusclops last. Can’t be Clops4 actually since the quote would be impossible to predict instead. BBL Earthquaked while Clops Earthquaked, revealing 3. Clops3 reveal meant that it had to be Regirock2 activating HRHR on its own. Easy win from there.
:suicune: :steelix: :latias: vs. :kingdra: :latias: :espeon:

The final obstacle of the random IV rounds, Noland3. While my team is very strong, the IV disadvantage may swing things into Noland’s favor.

Kingdra lead. This is pretty good for Suicune6 even with 3IVs. Can safely set up on 1 and 2, and if it’s 3 or 4, we can adjust the gameplan as Steelix can easily tank boosted Flails or Double-Edges. It turned out to be Kingdra1 which allowed Suicune to fully set up and…completely sweep Noland. His other 2 mons were solid actually, Latias6 and Espeon2 (2nd straight Noland where he had the same mon as me). Suicune6, even at 3IVs, is just completely different animal.
:rs/snorlax:7 :rs/lanturn:1 :rs/kangaskhan:3 :rs/manectric:2 :rs/fearow:2 :rs/feraligatr:3

What’s fascinating here is half of this draft was also in Round 6: Lax7, Lanturn1, and Kanga3 (same abilities too!). Past bias gravitates toward running it back with Lanturn1 Lax7. Psychic unrestrained is among the scariest quotes in the Factory. Gatr3 has the super-effective Crunch and matches up well against Metagross, but it’s probably the best 3rd in general. Led Gatr as it’s less vulnerable as a lead compared to Lanturn, plus I can attempt to preserve the T-Wave for Lax cleanup keeping Lanturn in the back similarly to Round 6.

:feraligatr: :lanturn: :snorlax: vs. :metagross: :claydol: :salamence:

Metagross lead! It’s time to play the Battle Factory. Gatr matches well here of course. Gatr had to tank an EQ, but Gatr 2HKOs Meta with EQs of its own. Based on damage rolls, it was guaranteed Metagross2, the only Meta without any Atk investment.

Claydol second. It’s better to Crunch first, Hydro second to account for Claydol wanting to Explode at low HP; Pump doesn’t OHKO. Claydol3 shows its face by raw Solarbeaming. Pump hits to KO Claydol.

Salamence last. A tricky one, for sure. Opted to go Lanturn, attempting to Thunder Wave. If it is the ever scary Mence4, it’ll see the kill on Lanturn after 1 Dragon Dance. The big calc here is that +1 Hyper Beam from Snorlax7 kills; the raw power of the move absolutely makes up its rather overrated downside.

It does turn out to be Mence4 as it Dragon Danced into OHKOing Lanturn. Time to go Lax, Curse, and Hyper Beam. +1 Dedge does 46%-54%, but the next would only do 36% max thanks to the Curse Def boost. The main fear is crits and Hyper Beam misses. Lax tanks a Dedge, Curse. Then QUICK CLAW HYPER BEAM GOOOOOOOOO
:feraligatr: :salamence: :snorlax: vs. :blastoise: :misdreavus: :suicune:

When I saw Metagross2, I was convinced that I was going to swap for it. Somehow, they had an even more swappable Pokemon in Mence4. Swapped Lanturn for it given that Lanturn can’t really hit Waters well anyways with mono-Surf.

Blastoise lead. Here I tried to make a fancy play going for Rock Slide in fear of taking too much damage from a possible Counter, plus flinch upside. I immediately regretted that play as it revealed to be Blastoise2. It Coated turn 1, but got a crit Mega Kick and hit a second. Thanks to Shell Bell, Blastoise lived Slide EQ EQ, so i needed a fourth attack to take it out. Feraligatr 1v1ed, but it’s in a lower amount of HP than needed.

Misdreavus second. Didn’t want to sac Gatr on possible Missy4 Tbolt so went into Lax. Thunder Wave used, so it’s most likely Missy3 who would complete the HRHR phrase. QC Ball connects before Confuse Ray which was big. Now I can pivot back into Gatr not fearing status, only fearing Missy3 Brightpowder. It Mean Looked, revealing 3. Crunch KOs.

Suicune last. Interesting endgame scenario. Gatr is guaranteed fainting to max SpA Surf. It cannot be Suicune4 since it has the same item as Missy3. Gatr is slower than Suicune13 but faster than 256. Fast Surf KO will confirm 13; slow Surf KO confirms 5, slow Surf survival or CM confirms 6. Suicune2 will obviously reveal itself with its unique moveset. I have reasonable answers to all sets. 1 and 2 can be beaten with DD Ace Salamence. Mence is faster than 5 and 6 so can get a hit off of them with Lax able to clean up. 3 is probably worst case since Lax is paralyzed and Mence will just get outsped and OHKOed, but Lax is still pretty favored to win.

Suicune outsped and KOed with Surf, so it’s 1 or 3. I go Mence first as it allows it to quickly pressure Suicune1 before it becoming a problem, and it’s pretty useless vs 3 anyways. Double Team reveals Suicune1 which Salamence 1v1s with DD and repeated Aerial Aces, never missing.
:suicune: :salamence: :snorlax: vs. :swampert: :weezing: :raichu:

Opted to swap Gatr for Suicune1, a mon very capable of getting out of control and winning on the spot. It’s not as broken as Suicune6 however as it’s no bulk, and no Ice Beam can bite you in the butt sometimes.

Swampert lead. This is a fairly comfortable stallout regardless of set with the only fear being Pert34 Ice Beam freeze. It did turn out to be the most likely Pert2, a mon that activates HRHR by itself. By switching into Mence on possible EQs and back to Suicune on possible Surf (they could Counter of Mirror Coat instead), the team was able to stall out Pert2 for the full Suicune setup. Weezing and Raichu were the 2nd and 3rd Pokemon. Raichu DT’ed, revealing set 1.

I knew that Weezing had to be set 3 because it was sent out before Raichu, so it must’ve had a super-effective move against Suicune. Reminder, this was before the Buddy had switch logic added. Switch logic wasn’t looked into from the LRXC Factory community until later, but Donly Phans and I had a hunch that there was some type of super-effective logic based on our time playing the Factory. Just couldn’t confirm it.
:suicune: :salamence: :snorlax: vs. :hariyama: :regirock: :misdreavus:

Yama lead, not what you expect for a slow and steady matchup. I go into Mence for the Intimidate. Fake Out. Inferred that it had to be Yama4 from damage. Now Mence4 does OHKO Yama4 with +1 DD Ace, but it would be bad if Yama crits me here especially with Yama being Scope Lens. The safer play is just Aerial Acing to account for a crit as Ace into Suicune Surf KOs. Mence doesn’t get crit and 1v1s Yama with Ace Ace.

Regirock 2nd. Still looking for slow and steady, so Rock46 are most likely. They will Slide, seeing the kill. I go into Suicune and Surf 2HKO it. Based on Surf damage, it had to be Regirock3 or 6. Leftovers weren’t revealed and the other sets would’ve taken more.

Misdreavus last, the slow and steady merchant. Leftovers were shown which revealed 2, but near impossible to lose from my position.
:suicune: :salamence: :snorlax: vs. :steelix: :tyranitar: :moltres:

Here’s a fun one, flexibly adaptable to the situation. Fun to figure out on your own, but I was curious what the Factory Buddy had to say. Moltres Clefable and Ursaring are the most likely Pokemon, the only 3 with a double digit percentage. As a whole, you’re looking for movesets that activate a bunch of different categories.

Steelix was the first Pokemon. I was thinking that it was going to be most likely 4 as it activates one phrase by itself, but to my surprise, Steelix2 was most likely at 64.5%. Makes sense as it has 2 moves covering 2 phrases compared to Lix4 covering only 1, and HRHR can be an easy phrase to activate. Another surprise was that Steelix1, a set that activates 0 phrases, wasn’t a 0% chance but rather 0.93%. This means that flexibly adaptable can actually be activated by 2 sets! LRXC was able to find a few. There’s only 4 2-mon flexible cores: Molt5 Ludi4, Molt5 Amp1, Dnite3 Ursa6, and Zam3 Ninetales4. That’s fun.

Back to Steelix. It was indeed Steelix2, revealing Sandstorm. Surf 2HKOs. Tyranitar second Pokemon. Interestingly, it can only be Tyranitar8 or 9 with guaranteed Moltres5 in the back. Between Lix2 TTar89 and Molt5, slow and steady, HRHR, and battle flow phrases are activated to complete the flexible phrase. TTar8 is revealed as it Thunder Waved Suicune, but Suicune Resto Chestoed up to get the 2nd Surf off. Molt5 is OHKOed.
:suicune: :salamence: :snorlax: vs. :jolteon: :rhydon: :weezing:

Jolteon lead. Not good for Suicune. I go into Snorlax who had to tank a T-Wave and Tbolt, but EQ OHKOed in return. Rhydon second. Interesting decision here as while I have a Suicune that OHKOs it, there’s massive fear of Horn Drill. The safest play is to sac Lax or Mence. I decided to pivot into Mence who has a slight chance of 1v1ing, but the main intention was sacrificing it to a likely Horn Drill for the Suicune switch while getting an Intimidate. Rhydon does KO Mence4 with Horn Drill, but at least Suicune didn’t get Quick Clawed on the revenge.

Weezing revealed Smokescreen so it was Weezing1. This essentially revealed Jolteon to be set 4 since Jolt1 would activate slow and steady, and Jolt3 has the same item as Weez1. Jolt2 lacks Thunder Wave.
:suicune: :salamence: :snorlax: vs. :jynx: :metagross: :tyranitar:

Jynx lead. Most likely Jynx3 as it has the impossible to predict move of Substitute. It was Jynx3 which is among the easiest Pokemon to use as setup fodder. To those unfamiliar, you can just switch back and forth between 2 Pokemon to stall out Jynx3 and Gengar1 so none of your mons take damage from Dream Eater. After the stallout, it was an easy Suicune setup. They had threats in the back in Metagross AND Tyranitar, but it was too late. It was guaranteed Tyranitar6 since Meta learns no impossible moves and Tyranitar7 has the same item as Jynx3. Meta wasn’t a Quick Claw set.

End of part 1…
 
Last edited:
:rs/altaria:2 :rs/heracross:3 :rs/ampharos:4 :rs/espeon:2 :rs/manectric:2 :rs/ursaring:7

Heracross3 is the clear star of the team. Espeon2 is a rather controversial Pokemon with many deeming it bad, but I tend to like it. Playing with Hera in a prior run, I gained a different perspective on how to build around Heracross, a one-of-a-kind Pokemon offensively and defensively. You actually have to think about stuff you usually ignore like Fearow when using Hera.

This is why Ampharos4 caught my eye. It has a more consistent moveset than Manectric2. Usually, I tend to lead with Electrics, but I actually wanted to keep Amp in the back so I have the easy Flying pivot if Hera needs it. Another serious issue is Espeon’s and Hera’s weakness to Fires, especially Houndoom. Ampharos can tank a hit and Thunder Wave a Fire so Heracross can safely revenge. The other workable 3rd could be Ursaring7, but it’s a mon I had no experience with. Plus, it is a rather questionable set with mixed EVs and your best STAB only having 70 BP. The Water matchup makes the Amp4 choice look even better.

A fun change of pace by me here with a back pure Electric. Espeon2 Amp4 Hera3 was chosen, keeping my best mon in the back.

:espeon: :ampharos: :heracross: vs. :swampert: :lapras: :moltres:

Swampert lead. Kinda awkward for Espeon here. I could attempt to outplay Mirror Coat, but Swampert’s Earthquake hits a bit too hard. Even if Espeon gets KOed by Mirror Coat, I at least get damage for Hera to revenge with Megahorn. This is exactly what happens. I lose Espeon turn 1 as it gets Mirror Coated on Psychic. Damage rolls and no Shell Bell confirms Pert2. Hera revenges with Megahorn.

Lapras second Pokemon. It is not Lapras2 or 8 due to Item Clause, but that’s all I know. Clear Brick Break. Psychic and Shell Bell reveals the anti-god, Lapras5. Hera 1v1s. Moltres last. Rock Slide misses into Flamethrower connect, so it’s Moltres1. Hera goes down. Fortunately, Amp4 doesn’t get crit and cleans up the battle.
:espeon: :swampert: :heracross: vs. :charizard: :gengar: :ursaring:

I’m not the biggest Swampert2 fan, but it greatly helps with the Fire matchup for my other 2 mons. I do swap Amp4 for it.

Zard lead. A pretty interesting situation here. I could Psychic, Calm Mind or switch into Swampert on this Charizard. Ignoring a crit, Calm Mind is pretty good vs every set except Charizard2 who would likely Dragon Dance and win the 1v1. Pert switch is the safest, but it will get chipped and lack the offensive upside of Calm Mind. Thought the risk of possible Zard2 was not worth the CM and went Zard. It turned out to be the most likely Zard4 where Swamp was able to get an unlikely OHKO roll with Surf.

Gengar second mon. Interesting second; most likely a Destiny Bond one given the quote, but the main fear is clearly Giga Drain. Espeon does easily revenge, but I don’t want to go hard Espeon on a possible Gengar2 Shadow Ball. It funnily turned out to be Gengar1, a Pokemon that you can 100% PP stall without taking damage. This allowed Espeon2 to fully set up, taking out the Gengar and unknown HRHR Ursaring.
:espeon: :swampert: :heracross: vs. :regirock: :golduck: :muk:

Regirock lead. It can’t be 2 or 5 as they activate HRHR on their own when the quote is total prep. There’s 2 Regirock sets with a prep move: 4 has Double Team while 6 has Psych Up. Safest play for sure is to go into Swampert here. It turned out to be Regirock6 as Pert 1v1ed.

Golduck shows up 2nd mon. Most likely Psych Up Golduck, set 2. If it’s not Psych Up Golduck, then the last mon will guaranteed have 2 prep moves in the back. There’s 7 sets in the Factory with 2 prep moves: Suicune1, Entei1, Gardevoir2, Claydol2, Clefable2, Scizor4, and Ursaring6. All but Suicune and Scizor would be on the table if it wasn’t Golduck2. It did turn out to be Golduck2 who took out my weakened Pert.

Decided to go Hera to revenge instead of Espeon as Espeon risked free setup vs some mons like Metagross3. Hera takes out Golduck and last mon Muk. Guaranteed Muk1, the only Muk with a prep move in Minimize. Interesting reading stream chat history for these battles; I’m reminded that the Factory Buddy at this time was not able to calculate specific set percentages yet.
:espeon: :swampert: :heracross: vs. :sceptile: :tyranitar: :quagsire:

Sceptile lead. Another interesting scenario for big brain(?) Espeon2. Options galore: do I Calm Mind, Psychic, Shadow Ball, or switch vs this Sceptile? Psychic 2HKOs, but Psychic puts it into Overgrow which would allow crit Leaf Blade to OHKO Espeon. Espeon doesn’t OHKO always at +1. I remember saying that CM has cute upside vs 4 as it can avoid getting 2HKOed by Scep4’s Crunch. Looking at it now, CM was pretty favored to work out vs 3 out the 4 sets as Scep1 likes Detecting and Scep2 likes DT’ing turn 1. Instead, I made the safer play of Shadow Ball into Psychic which practically always OHKOed Sceptile (Scep1 with bad rolls technically had a chance to live due to Lefties). It turned out to be Scep3. No crit resulted in Espeon defeating Sceptile with Shadow Ball Psychic.

Tyranitar second, a mon that Espeon can’t touch. The good news here is that TTar always sees a kill on Espeon, so it’s not gonna use it as setup fodder. Espeon goes down to Crunch, revealing set 249. Heracross is afraid of hax given that it’s Brightpowder or Quick Claw, but Hera’s HP is less valuable than Swampert’s. Hera doesn’t get unlucky and OHKOs with Brick Break.

Quag last. Turned out to be silly Quag2 who has Curse Attract Yawn Ancientpower. This eliminated TTar 9 possibility but yeah, not losing to this.
:espeon: :swampert: :heracross: vs. :wailord: :salamence: :tauros:

Wailord lead. Definitely need to Psychic so if Espeon gets OHKOed from Fissure, Heracross always can revenge. Double Team reveals 3. I played it safe and Psychic spammed to take it out, but Calm Mind was definitely an option.

Salamence 2nd. Most likely the HRHR ones of 2345. Psychic is the clear play here. It turned out to be Salamence7, a solid set. Espeon 2HKOed before Salamence could. Their last mon was Tauros who got crit from Psychic. It couldn’t have been Tauros2 as it has the same item as Wailord3.
:salamence: :swampert: :heracross: vs. :exeggutor: :typhlosion: :rapidash:

Fire battle flow is a scary quote for Espeon. As I like to say, “Houndoom lurks.” Salamence7 is a good Pokemon, and even though Espeon2 has been performing excellently, my best Pokemon is Heracross who won’t do well here on paper. I swap Espeon for Mence7 here, banking on Mence Pert to do well vs the Fires and Hera3 to continue being the ace of the team for, at minimum, the last battle.

Exeggutor lead. Genius strategy by the opp here utilizing 2 Fires and a Sunny Day Chlorophyll 3rd. It is incredibly likely for this to be Egg1. I could Flame here, but they could Quick Claw Sunny Day. The sun would then make Flamethrower an OHKO against Egg and allow the Fires in the back to come in at full power. At the same time, I do want to make sure the other Eggs don’t get out of control. So I Crunch instead. It did turn out to be Egg1, and it did QC Sunny Day.

Here, it’s very likely to Synthesis, and I would like to stall out sun turns if possible. Hera isn’t very useful here with 2 Fires in the back, so switching into it is inconsequential. They Light Screen up during the minor stall process, raising some question marks on what to do. Credit to Carthr in chat in recommending Brick Break to remove the screen, killing 2 birds in one stone. I spam Brick Break until sun ends and take out Egg1 with Megahorn.

Typhlosion second. An interesting decision here: I could sac Hera given its poor matchup vs Fires or risk luck by going into Swampert. Opted to go into Swamp. It takes a Fire Blast which reveals Typh1, completing battle flow. Sunny Day is used before it gets OHKOed from Earthquake.

Rapidash last. It’s best to just EQ again even though Dash3 could OHKO Pert with Solarbeam here. Mence with Lum was pretty good vs Dash3 anyways. It was however the best case, Charcoal boosted Dash1 who Swampert can 1v1.
:salamence: :swampert: :heracross: vs. :blissey: :porygon2: :gardevoir:

Big Blissey first Pokemon against my Salamence. Given that 2 Blissey sets have an Ice move, I naturally want to switch. I go into Heracross, but unfortunately Hera gets frozen from Ice Beam. It stayed frozen for 3-4 turns while Blissey4 spammed Calm Mind. Fortunately, Hera was able to thaw and 2HKO Blissey before it got another hit.

Porygon2 second mon. Hera is still healthy to live all of P2’s strongest attacks, but 2 of the 4 sets have Thunder Wave. It’s pretty interesting here; I could consider going into Pert to scout for Thunder Wave, but it will essentially lose the 1v1 vs set 4. That would get the damage necessary for a Mence or Hera revenge. Or I could stay in which has massive upside vs the non-Thunder Wave mons, but Hera will become useless afterwards if it is sets 2 or 3. A question of rather I’m fine with full health Mence Pert or Mence Hera vs a last. Decided to bite the bullet with Hera and risk T-Wave. It did turn out to be a Thunder Wave set. Went into Mence to preserve a sac and take P2 out with Dragon Claw. It did turn out to be set 3 who got a Psychic SpDef drop on Mence before going down. Porygon2 got a lot of mileage there.

Last was Gardevoir. Wished that Heracross wasn’t paralyzed now. Buddy shows this immediately, but let’s eliminate Garde sets here by hand. With a Normal unrestrained quote, Blissey4 Porygon2-3 reveals a LOT of information. It can’t be a Lum Garde set which eliminates 3 and 6. Blissey4 has a prep move which eliminates Garde2 as Garde2 Blissey4 would activate total prep. Blissey and Porygon both have endurance moves with Softboiled and Recover, meaning that the endurance sets of Garde1 (Reflect), 2 (Rest), and 5 (Endure) are eliminated. Finally, Blissey4’s Counter means that the Garde cannot have Destiny Bond, Garde’s only HRHR moves it learns (eliminating 567). It can only be Gardevoir4 or 8.

The only fears here are Brightpowder and Magical Leaf crit from 8. Hera, while paralyzed, still has a chance to cheese with Brightpowder of its own, so switching takes away that chance. Plus, Mence drops to Psychic always even without the SpDef drop. I Crunch and hit. It reveals to be Garde4. Pert hits the Earthquake through Brightpowder to revenge.
:rs/sceptile:4 :rs/regirock:4 :rs/flygon:3 :rs/nidoking:4 :rs/lapras:2 :rs/alakazam:1

Had a bit of an audience for this one I remember from the Discord, around 12-15 people. Wished this one was recorded as it had the most interesting Noland battle in this run.

My draft really want to just attack attack attack with minimal backbone. Lapras2 is the fastest Lapras in the West, or as LRXC calls it, Nascar Lapras. At perfect IVs, Nascar Lapras is faster than Lati which is huge. Sceptile4 is one of the most underrated megathreats in the Factory under the hands of the AI. There was appeal in just leading it to get a jump on everything and get an early lead with an easy Ice pivot with Lapras. Flygon3, known as CritGon, is also speedy with hard (enough) hitting Earthquakes. The main appeal of Flygon here is that paired with Lapras, you have a chance of stalling out BoltBeam mons like Regice by going into Lapras on Ice Beam and going into Flygon on Thunderbolt. Sceptile4 Flygon3 Lapras2 was chosen.

It was an interesting decision looking back as there’s a good argument that Regirock4 is the best mon in this draft. There were 2 reasons I didn’t pick it: I really valued the Earthquake coverage here over Brick Break to hit threats like Metagross harder, and I’ve never really used Regirock4 at all around that time. I base a good amount of my draft decision-making based on prior experiences. Now that I’ve used this Pokemon, I know how good it is. But…I’m not sure if I could fit Regirock on here well. Sceptile is very good vs Waters which Flygon Lapras could struggle against. Metagross will be a genuine issue if I chose Regirock over Flygon. And turning down a quality Water Pokemon with a Water move doesn’t sound right, especially with the Ice weakness. Weirdly, I’m still ok with this selection despite Regirock4’s strength.

3 Pokemon, 11 attacks. An unga bunga team; very scary since those builds are susceptible to losing via hax and running into the wrong mon at the wrong time.

:sceptile: :flygon: :lapras: vs. :exploud: :registeel: :gengar:

Exploud lead vs Sceptile. The clear fear is Overheat. 3 always OHKOs, but 4 is an unfavorable roll. No way of playing around this Pokemon; such is the law of the unga bunga team. Scep Leaf Blades. It turned out to be the best case of Exploud2, a Pokemon Scep 2HIKOs without taking damage.

Registeel next Pokemon. Guaranteed not Registeel3 or 5 as they both have a HRHR move. Flygon definitely wants to be in right now, but possible Ice Punch prevents safe entry. Decided to go into Lapras for the scout. In turned out to be Registeel6 which may or may not be a recurring theme in this streak. Flygon survives the silly Aerial Ace spam to defeat Registeel.

Last was Gengar. Plenty of sets are eliminated here: it cannot be 12 because slow and steady would be the quote, and it cannot be 478 because of HRHR. Guaranteed 356. Flygon drops to Psychic but Sceptile revenges. Gengar6 would’ve Ice Punched instead, so it wasn’t 6.
:sceptile: :flygon: :lapras: vs. :dugtrio: :skarmory: :steelix:

Dugtrio lead. Doesn’t get better than this with a Scep lead. Goodbye, Dugtrio.

Skarmory second. Thunderpunch on Scep becomes useful. Now Scep does get OHKOed by Skarm4, but Flygon would get severely chipped from 4 and invites crit and QC hax with the switch. Took the risk and stayed in as it works out vs the rest. Turned out to be Skarm2. Don’t remember what it did but it doesn’t matter, TPunch 2HKO.

Steelix1 was the last. Sceptile sweep! Given the other 2 sets, it was guaranteed Dugtrio34 for those curious, activating HRHR on its own.
:sceptile: :flygon: :lapras: vs. :jolteon: :hariyama: :ninetales:

Jolteon lead. Good day to have a Ground-type. Flygon easily takes out Jolteon, but not without revealing an advanced quirk: Jolteon Thunder Waved a Flygon. In Gen 3, the AI doesn’t see Flygon as immune to Ground. So it was a Thunder Wave Jolteon faster than Flygon (not Jolt3).

Hariyama next. Best to Earthquake first here since it 2HKOs 234, and set 1 will Fake Out anyways. Fake Out comes out; damage roll reveals set 1. Want to outplay Counter if possible, so I go for Claw first over Earthquake. This worked out nicely as they Countered both times I Clawed, quite fortunate there. Claw Claw EQ KOed.

Ninetales last. It is guaranteed 2 or 4 to complete the HRHR phrase. Flygon guaranteed wins, so I can afford to scout the set first on the insanely obscure chance of wanting to swap for Ninetales. It turned out to be set 2. Grudge Grudge Grudge!
:sceptile: :flygon: :lapras: vs. :espeon: :zapdos: :blastoise:

Espeon. A scary lead shows up. Sceptile is getting its money’s worth as it is outspeed some threatening mons in this round like Gengar, Dugtrio, and now this Espeon. The great fear is Espeon4. There’s no cute play here. I need to get maximum damage with Crunch to make sure a possible Espeon4 doesn’t get out of hand. Crunch hits, but Scep gets Attracted in return, revealing the great fear. Lapras doesn’t get 2HKOed by Psychic and was the same gender as Espeon but will take a lot of damage obviously. I could attempt to fight through the infatuation but that’s very risky. Decided that switching into Lapras was safer since Scep can revenge if Lapras gets crit or SpDef dropped. Lap doesn’t get lucked and takes out the weakened Espeon.

Zapdos is the 2nd mon. We’re still looking for HRHR. It’s most likely Zap56 under such logic, the only Zaps with a HRHR move. Can’t really switch around this, but there are Zapdos sets with no speed. Lapras2 is faster than those, and there’s also general Quick Claw upside. Lap drops to Drill Peck so Flygon pivot isn’t free. I stay in. Nascar Lapras does show its speed, outspeeding and OHKOing the Zapdos. Very likely Zapdos5 in that case. If it wasn’t, then Lapras got the clutch QC there.

Blastoise 3rd mon. This guarantees that Zap was 5 or 6, and Blastoise must be 234. I Ice Beam while Blastoise takes down Lapras with Earthquake which reveals 34. It’s better to go Flygon first because Sceptile could get OHKOed by Mirror Coat. If you Earthquake first, Scep can then live a Mirror Coat as Blastoise will be in a lower amount of HP. Flygon EQs and drops to Ice Beam. With last mon Scep4, it’s best to Thunderpunch to maximize odds against Focus Band luck No Focus Band luck so Blastoise goes down.
:espeon: :flygon: :lapras: vs. :shiftry: :crobat: :clefable:

Here I had an interesting swap decision. Personally, I was feeling that this unga bunga team was unsustainable en route to Noland. I was worried that Sceptile4 will be exposed heavily vs 31 IV threats. Espeon4 even at 3 IVs has the potential to snowball, giving the team an edge that it’s currently lacking. Synchronize can give me an out vs fat mon which the team is lacking as well. This was a tough call as there’s pros and cons for each. Ultimately, my greed for the Espeon swap is unmatched. I make the swap. Farewell, Sceptile.

Shiftry lead. LOL Espeon sucks here. The quote is impossible to predict though, and Shiftry learns no impossible moves. Decided to switch into Lapras here. 1 and 4 will Fake Out, and Lap2 can live a Solarbeam from 3. It turned out to be the funniest scenario of Shiftry2, also known as “better Meganium2.” Lap OHKOs.

Crobat 2nd. Another mon lacking an impossible set, so the last is guaranteed Clefable1 or Alakazam3. They Screeched; Lap OHKOs. Clefable1 was the last. In a funny moment, Clefable took itself out with METRONOME SELDFESTRUCT LOL
:espeon: :flygon: :lapras: vs. :machamp: :snorlax: :kangaskhan:

Hmm, Normal HRHR. This screams Snorlax. 25% chance of Snorlax according to Buddy. My Snorlax matchup isn’t the best, heavily relying on Flygon Earthquake with Scope Lens luck possibly needed. A hilarious swap option that surprisingly took more time than the Espeon swap was swapping Espeon for Screech Crobat. With Screech, Flygon would for sure have the firepower to beat all Snorlaxes. However, it’s Crobat13, not the greatest of mons, especially if it’s 1. After some time mapping out the Normal matchups, I felt that while ScreechBat would be helpful vs Snorlax, I would prefer Espeon vs pretty much every other Normal. Also, even with Espeon, I could potentially just throw the kitchen sink against Snorlax with my entire team if need be. Ultimately, I would feel worse losing here because I swapped for a questionable mon over being stubborn with Espeon. I keep.

Machamp lead. Perfect! Psychic OHKO.

Snorlax 2nd. Hehe. Time to throw the kitchen sink I guess. I get a Psychic off as Lax OHKOs Espeon with HYPER BEAM, revealing 7. Huge that it went for Hyper Beam instead of Shadow Ball as Flygon gets a free hit here. Scope Lens does come into play as Earthquake into crit EQ takes out Lax.

Kangaskhan last. It’s either Kanga1 or 3 for HRHR. Best to Dragon Claw here as it covers Kanga1 Counter and avoids Kanga3 from wanting to Endure. DClaw into Earthquake KOs Kanga3 majority of the time. Interestingly, Scope Lens kicks in again and I get a crit Dragon Claw that I didn’t want on Kanga3. Now it can Endure. Flygon can live a full power Reversal, but I can actually lose if it gets crit. I Flame for burn upside as it Endures. Flygon tanks the Reversal, phew.
:espeon: :flygon: :lapras: vs. :lapras: :dodrio: :jynx:

Now this was a Pokemon battle. Oh boy.

Lapras lead. This is the 3rd straight time Noland had a Pokemon that was also on my team. It cannot be Lap2 as I have it. This was interesting to map out. There’s plenty of tough scenarios here: I really don’t want to see GODLapras (set 4) or the OHKO machines (sets 78). What was cool here is that despite Espeon’s IV disadvantage, Calm Mind allowed it to always 2HKO Lapras4 AND avoid getting 2HKOed from Lap4’s attacks, doing 50% min with Psychic and taking 49% max from Surf/Ice Beam. Wow! Not strong enough to 2HKO Lap78 but that may be okay. The upside of 1v1ing an equally threatening set is too good to turn down. Worst case is Lap78 OHKOing me immediately turn 1 or hilariously it being the anti-god Lapras5, the only set that 100% 1v1s me if I CM. Actually better off using Psychic on Lap5, but that’s worse vs the other sets. I Calm Mind.

Lapras Surfs, but it only does 34%. It’s Lapras1: Surf Attract Confuse Ray Sing. What’s good here is that my Lapras is Water Absorb, so I do have means to not take any more damage from this mon. On the surface, this looks like an easy PP stall into Espeon setup. But there’s multiple problems. The main issue is that Lapras1 can Attract Espeon. If this wasn’t the case, this would be an easy PP stall. Fighting through Attract isn’t ideal because Struggle from Noland’s 31 IV Lapras does a whopping 21-25% to Espeon. Avoiding infatuation would be ideal. The second problem is Sing because I’ll need to wake up my asleep mons before it Struggles. Thirdly, even though my Lapras has Water Absorb, the AI won’t know that I’m Water Absorb until the text is revealed, meaning that it can still Surf in front of my Lapras. This presents the final problem here: Lapras2 is forced to use a lot of moves against this Lapras1. Surf and Ice Beam PP may be needed against Noland’s back mons. I don’t want to Roar as I’m aiming for Espeon setup. And Body Slam is kinda bad here due to its paralysis chance. I don’t want Lapras paralyzed initially because possible full para turns will make it harder to PP stall Surfs. After it runs out of Surfs however, paralysis is good.

This results in probably the craziest PP stall scenario I’ve ever been in. There was no perfect way of doing it, and I even miscounted PP from reading the stream chat. After switching into Lapras2 turn 2, I waited until they Surfed on Lapras to switch into Flygon. Flygon tanks Confuse Rays and eventually gets Sung, repeating the process of switching back and forth between Lapras and Flygon but only when Water Absorb is shown. They were able to hit majority of Sings, but I was lucky as well as I did use a good amount of Body Slams without getting a paralysis until close to the end. After it ran out of Surfs, I go into Flygon to wake it up.

Now it’s time to go into Espeon. Unfortunately, Lapras1 still has Sing PP. With only a few Sing PP left, I need to go into Espeon to Attract it and see how many CMs I can get before taking it out. Espeon switches into Sing and has to wake up before it runs out. In an instance of bad timing, Espeon woke up and got the Attract off, but immediately fell back asleep from Lapras1’s last Sing. Now it’s going to Struggle which 3HKOs Espeon, but it has to hit through paralysis, infatuation, and Brightpowder. The strong immobilization odds go my favor as Espeon wakes up without taking a hit. I Calm Mind once. From here. I liked the odds of +1 Biting it down until Psychic KOs. In an intense series of turns, Lapras did connect on 1 Struggle, but the Attract para flinch Brightpowder odds were too much for it. +1 Bite Bite Bite Psychic KOs Noland’s Lapras finally. Now I have the upside of a +1 Espeon4 vs. Noland’s back mons.

Or so I thought. His next mon was Dodrio. Due to the IVs, Espeon slower and gets OHKOed. I can’t switch into Dodrio, so I’m forced to sac Espeon. A valiant effort. My Nascar Lapras can’t afford to get crit here. Dodrio went for Drill Peck which only sets 1 and 4 would do. No crit, Lapras takes out Dodrio. Last mon is Jynx. The only way I can lose here is Jynx4 immediately Lovely Kissing and Lapras not waking up or Psychic critting; Surf + EQ doesn’t 2HKO perfect IV Jynx4. I win vs the rest. It turned out to be Jynx2 who cannot win/tie as I still have Flygon in the back. GG, Noland4.
Finally, after months of writing this, I get to the recorded parts of the streak. No longer need to remember everything! The footage is there. LRXC recommended to record the streak from here on out in the case that it passes Donly Phans’ record of 112 wins. Video quality starts off poor but gets better Round 18 onwards. Now I have a reason to write less for the rest of the streak. Maybe.

Round 13 video (poor mic quality)

:rs/kangaskhan:1 :rs/breloom:3 :rs/arcanine:4 :rs/rhydon:2 :rs/victreebel:3 :rs/ampharos:1

An inevitability of playing the Factory: you will eventually get a below average draft. Many like to immediately call a bad draft when they don’t see like a Lati or Metagross, but in reality, it’s pretty hard to get an actually bad draft. The IV advantage is a big deal, and there’s a surprising number of solid to good sets that can outright carry you with the IV advantage even when it’s your only “good” mon. It’s up to the player to figure out how to get usage out of the lesser mons.

So this draft is rather unimpressive. The best mon here is Arcanine4, but sadly it is Flash Fire instead of Intimidate. Arcanine answers the first question I usually ask in a draft: “What beats a Lati?” The quote for the next battle is slow and steady, so I definitely want my team prepared for that. Kangaskhan1 is a Pokemon I avoid even in Open Lv. Round 1, but it’s looking like the 2nd best mon here. The guaranteed chip with Fake Out could be big, and it can beat/trade vs Rocks which Arcanine dislikes. I dislike how Rhydon and Amp are weak to EQ just like Arcanine.

The slow and steady quote actually swayed me to pick Victreebel; if it wasn’t slow and steady I would’ve gone Breloom instead. The idea of Victreebel was that it is immune to Toxic, so I have a means to safely PP stall Double Team Toxic mons without taking damage. Plus it can Poison fish those mons with Sludge Bomb to win the 1v1. It technically could cover Arcanine’s weakness to Water as well. The logic is somewhat sound, but at the end of the day, Victreebel is a bad Pokemon. I think today I would’ve considered Ampharos1 more with its Rain Dance Thunder blowing through Double Teams. EQ weakness and Toxic vulnerability would’ve still been scary however. In the end, I went Victreebel gaming with Kanga lead and back Arcanine, trying to keep my best mon in the back.

:kangaskhan: :arcanine: :victreebel: vs. :dusclops: :slowbro: :venusaur:

Dusclops lead. Something that I did think about but remained stubborn was the fact that Kanga1 cannot touch a Ghost, a bad sign given that many Ghost sets carry multiple slow and steady moves. Really bad mon to see; if this is Dusclops2, I can possibly auto-lose to it if Victreebel is unable to get the Sludge Bomb poison. Getting the poison is not in my favor at all since Clops has Pressure and Protect. But I chose Victreebel for a reason; do something! I switch it in.

To my surprise, it turned out to be the slightly less likely Clops3 who Earthquaked. Victreebel got crit from Shadow Ball. Because of this, Victreebel loses the 1v1. Nice job.

Arcanine attempts to revenge with Overheat but misses. Clops Earthquakes. I was very tempted to go full tilt mode and Overheat again given how behind I was, but if I miss Overheat again, I just lose since Clops gains enough Lefties to survive next turn. I Crunched twice to safely 2HKO Clops3, tanking another EQ as a result.

Slowbro 2nd. Very likely Bro3 who has Attract. Kanga takes too much from Surf to preserve Arcanine. Need to bank on full health Kanga1 to beat the last. Crunch Fake Out Dizzy Punch KOs Slowbro. Fortunately, Arcanine gets the amazing crit Crunch to OHKO Slowbro!

Venusaur last. I Overheat to take it out.
:kangaskhan: :arcanine: :slowbro: vs. :dragonite: :regice: :entei:

Victreebel did practically nothing and will be swapped for its efforts. Not to excited to pick Slowbro given that it’s slower than the slow Rocks and Grounds, but as a Water Pokemon with a Water move, it’s still better than Victreebel. It did turn out to be Slowbro3.

Dragonite lead. Another lead where Fake Out isn’t safe because of Inner Focus. It is most likely the elusive Dragonite4 according to the algorithm. I stay in to Dizzy Punch as I need damage even though I’m risking Thunder Wave. Fast Brick Break reveals Dragonite8. Next turn I made a silly play Countering expecting another Brick Break, but Dnite Dragon Clawed instead. I was curious if they would go for a different attack given that the damage rolls overlapped, but wasn’t sure at the time. Now I know.

Tough situation here. I make another reckless play going into Slowbro hoping that they Brick Break instead of Dragon Claw, but they Dragon Clawed Slowbro. Slowbro was about to lose the 1v1, but it got a Quick Claw right before it was about to faint, bailing me out.

Regice 2nd. It has to be Regice16 with a double endurance mon in the back. Double Quick Claw alert! Bro gets chip on Regice before going down. Arcanine beats Regice. Amnesia reveals the excellent Regice1.

Entei last. Guaranteed Entei5, the only Entei set with 2 endurance moves. Want to Crunch to preserve HP compared to Double-Edge. Crunch SpDef Crunch vs Dedge Dedge crit. Arcanine goes down. The damage plus recoil fortunately puts it into Kanga Fake Out range. As a bonus, I don’t have to worry about Endure shenanigans since they saw the kill on Kanga. Fake Out cleans up.
:kangaskhan: :regice: :slowbro: vs. :crobat: :tyranitar: :shuckle:

Terrible matchup for my supposed best mon Arcanine. Decided to swap it out for a very good mon in Regice. While also weak to Rock, Regice at least can get a good hit on them compared to Arcanine while having the general upside of a Regice1. Dragonite8 was an option as well, but Kanga1 Slowbro3 is pretty good vs Rocks already. No need to overextend, so let’s just get the better overall mon.

Crobat lead. No free Fake Out again! Another Inner Focus mon. Decided to go into Regice hard to preserve Kanga and Slowbro vs the 2 Rocks in the back. Sadly, Regice1 goes down without getting a hit due to Crobat4 Confuse Ray hax. I go Slowbro to revenge as Psychic OHKOs. A big turn was Crobat wasting a turn to Confuse Ray, but my Slowbro was Own Tempo. Crobat drops.

Tyranitar next. Last is a Rock. Here’s a situation that I likely wouldn’t have made without the Factory Buddy. The biggest strength of the resource is the back mon info. If I was playing on my own, I would’ve likely been content on healthy Kanga attempting to 1v1 the last Rock. Upon the info I saw from the Buddy, there are a few Rocks that Kanga doesn’t want to see, mainly Shuckle. Because of this, I decided to switch into Kanga despite Slowbro’s solid matchup.

It Cursed, so it’s set 6 or 7. I make a bad play going for Fake Out without a good reason. I forgot to calc Ttar7 +1 Brick Break damage. I get the Brick Break on TTar, but the Brick Break from TTar7 takes Kanga out after the sandstorm damage. Slowbro gets bailed out for the 3rd time due to TTar using Curse instead of attacking. Last mon was Shuckle, a mon Kanga was indeed losing against. Factory Buddy op.
:kangaskhan: :regice: :slowbro: vs. :tauros: :magmar: :wailord:

Tauros lead. Kanga is Intimidated, but still fine-ish to Fake Out, only fearing Brightpowder from set 4. I Brick Break fearing Double Team from 2. Dedge damage reveals 4. Kanga is low after 2 Dedges from Tauros.

Magmar 2nd. Not Magmar3 as it would activate HRHR. I let it take out Kanga. Slowbro takes out Magmar4.

Wailord last. Guaranteed Wailord1. Trolled a bit too hard and got triple crit paralyzed in the process. Still won though.
:kangaskhan: :regice: :slowbro: vs. :entei: :scizor: :marowak:

Entei lead. Fake Out. It Flames and tanks Dizzy Punch. They switched turn 2 to Scizor. This means the Scizor must be 1 or 3 since they’re the only sets with a Fighting move. Slowbro takes out Scizor1.

Entei comes back to Rest, but Slowbro OHKOs with Surf. The Bone (Marowak) KOs Slowbro with Bonemerang, revealing 1. Regice revenges.
:kangaskhan: :regice: :slowbro: vs. :shiftry: :gardevoir: :latios:

Goofy Shiftry lead. Fake Out is free. IV advantage is real as sets 3 and 4 can take around 40% from Fake Out. Once again it was Better Meganium2. Opted to stay in as I don’t want Regice to send in a possible Metagross 2nd. Shiftry2 goes down.

Gardevoir 2nd. It’s not Garde2 since it has the same item. Regice is fairly safe here. Regice gets the free setup on Gardevoir1 to win. Last was a Latios wow
:kangaskhan: :regice: :slowbro: vs. :tyranitar: :donphan: :mr-mime:

Tyranitar lead. I Brick Break, they Thunder Wave. Very likely Ttar8. Big turn 2 with Kanga getting the Brick Break off through para on Ttar’s Rest. Kanga wins the 1v1.

Donphan 2nd. Most likely Donphan1. Kanga1, continuing its crazy run here, gets the OHKO on Donphan by Countering the Earthquake. Mime1 last isn’t beating Regice.
Round 14 video (low quality)

:rs/kangaskhan:1 :rs/kingdra:1 :rs/dodrio:1 :rs/kangaskhan:4 :rs/cradily:2 :rs/snorlax:3

After an inspiring performance, Kanga1 apparently wanted the runback in slot 1 again. A funnier reveal was that another Kangaskhan was in the draft Kangaskhan4. I prefer the extra speed and Earthquake coverage Kanga4 brings to the table over set 1. The best 2 remaining sets were rather obvious in Kingdra1 and Snorlax3. We roll with these 3 with the main fear being the accuracy of Mega Kick and Hydro Pump. Kanga4 Kingdra1 Snorlax3 was chosen.

:kangaskhan: :kingdra: :snorlax: vs. :quagsire: :latias: :suicune:

Quag lead. There’s genuine fear of Quag1 Counter, so I Shadow Ball first to scout and avoid getting Counter OHKOed. It turned out to be silly Quag2. Easy 1v1.

Latias second. Last is a Water. Kanga4 is faster and can Shadow Ball it. Kanga outtrades Latias2 or 8.

Suicune last. Pretty scary as we fear Calm Mind variants. Can’t be Suicune2 as it has the same item as Quag2. I want to Mega Kick because I really need that extra damage against Suicune6. Huge connect. Kanga drops to Surf, but Kingdra revenged. Rain Dance revealed 3.
:kangaskhan: :kingdra: :snorlax: vs. :muk: :nidoking: :jolteon:

Muk first. EQ 1v1. Sludge roll reveals set 3. Nidoking 2nd. Cannot be Nido14 as 1 activates HRHR on its own and 4 has Lum like Muk3. Obvious EQ into another Kanga4 1v1. Last is Jolteon. Funnily, Jolteon went for Bite as they saw a Bite kill, but Kanga ate and took it out with EQ.
:kangaskhan: :kingdra: :snorlax: vs. :gardevoir: :slaking: :salamence:

Gardevoir lead. Very likely Garde2 since it has 2 prep moves. We Ball. Damage roll reveals 2. Kanga hits the 2nd Ball through DT to take out Garde.

Slaking 2nd. Could be Slaking1 or 2 as both have a prep move. Gotta hit a Mega Kick as we need the damage for possible Slaking3. It turned out to be the joke set Slaking1. Swagger forced Kanga out, but Kingdra was able to pick it off.

Salamence last. It’s not Mence28 because the quote would otherwise be slow and steady. No reason to switch out; Kingdra Dragonbreaths. Dedge and rolls reveal Mence3.
:kangaskhan: :kingdra: :snorlax: vs. :jolteon: :ursaring: :manectric:

Jolt lead. Thunder Wave will be annoying, but forced to Quake. Kanga outsped so it was Jolt23. OHKO.

Ursaring second. Can’t be Ursa2 since that activates HRHR by itself. Here is a situation where I don’t want to risk Mega Kick. Worst case is Ursa5, Choice Banded. Earthquake into Kingdra Pump KOs Ursa5, and Kingdra1 is rather favored to survive a CB Kick, giving it 2 chances to hit. Meanwhile, Ursa5 OHKOs Kanga always. It turned out to be Ursa8 as it Brick Breaked. Kanga4 hits Mega Kick to take it out.

Last mon Manectric revenges Kanga, but Kingdra was able to 1v1. It Flashed so it was Mane1.
:kangaskhan: :kingdra: :snorlax: vs. :magmar: :salamence: :gardevoir:

Total prep again! Magmar lead. Buddy says that it’s an 80+% chance it’s Magmar1 as it has the prep move Barrier. Here was a situation where I placed too much faith in the Buddy. I immediately clicked Earthquake since it always OHKOs Magmar1, but it actually turned out to be the 6% likely Magmar4. Kanga is forced out by Confuse Ray, and Kingdra picked it off. I could’ve been punished heavily for this play. Magmar3, while the least likely set of only a 5% chance, would’ve eaten the EQ and possibly Counter OHKOed Kanga in return. I need to slow down and not take the high Buddy odds verbatim.

Mence 2nd. Now since Magmar wasn’t a prep set, it is guaranteed a double prep set in the back: Claydol2, Clef2, Garde2, Scizor4, or Suicune1. The Mence in front of Kingdra is also guaranteed a Dragon Dance one. This time I Icy Wind just in case Kingdra loses the 1v1 so Kanga can revenge without taking damage. Mence DDs but I do connect Icy. It Dragon Danced again, so it wasn’t set 4 as it saw the kill. Mence goes down.

Garde2 shows up again. While I have clear outs to it, I want to optimize the endgame. First I Attract to see if Kingdra can just outright win the 1v1. Then I Icy Wind twice on the chance Garde 1v1s Kingdra so my Snorlax gets a fast Psych Up and copies whatever boosts it has. Then Lax can spam Balls. Of course Kanga is still alive to Ball or Aerial Ace if needed too. Kingdra 1v1ed though. I still liked that idea.
:kangaskhan: :kingdra: :snorlax: vs. :raikou: :latios: :ninetales:

Raikou lead. Once again we hate para possibility, but we have to stay in and Quake. Brightpowder magic! Kanga dodges Thunderbolt and OHKOs Raikou with a crit. Crit means I don’t even eliminate Raikou6 possibility.

Latios 2nd. Latios lacks a HRHR move so the last is guaranteed to have at least 1. Kanga 1v1s with Ball. Latios was 2 or 8.

Ninetales last. Must be 2 or 4. Good IVs show up here as Kanga outspeeds. Goodbye, Ninetales.
:kangaskhan: :kingdra: :snorlax: vs. :charizard: :electabuzz: :hypno:

Charizard lead. Disliked the idea of risking Mega Kick accuracy and Kanga taking a big hit unnecessarily when Kingdra is pretty safe. Can tank Zard3 Flame into Dragon Claw in worst case. Kingdra 1v1s Zard4.

Electabuzz 2nd. Opted to Icy Wind so Kanga can outspeed if needed and allows Kingdra to outspeed as well. Crit Icy Wind on it using Rain Dance, revealing Buzz2. Helping Swift Swim Kingdra out with the rain The crit meant I didn’t need to risk Pump, dropping to DBreath.

Hypno last hahaha. It’s not winning. Shoutouts to Snorlax3; it never came out.
Round 15 video (low quality)

:rs/skarmory:4 :rs/salamence:2 :rs/tyranitar:5 :rs/blissey:3 :rs/slaking:4 :rs/machamp:1

Plush and Donly Phans were in call with me for this one. 6 quite menacing Pokemon here. The following battle was Fire unrestrained, a combination that brings 0 worry when you have Tyranitar5. Big Brain Salamence2 may not have the optimal set, but compliments TTar a fair amount with Intimidate,resisting Fighting, and being immune to EQ. Many would’ve gone Blissey3 last, but I was worried about the Metagross matchup. Blissey3 has Fire Blast but is pretty favored to lose the 1v1. Slaking4 fares better vs Metagross, still has Thunderbolt to hit Waters well, and can Yawn in its bad matchups. Yawn also can give TTar free setup opportunities. I go Slaking4 Mence2 TTar5.

:slaking: :salamence: :tyranitar: vs. :electrode: :charizard: :arcanine:

Electrode, my favorite Fire type. Not Trode4 who activates HRHR. I Yawned to get information. It Protected, revealing 1. I stay in to loaf while it crit Thunderbolts Slaking. Crit was kinda good as it sees the kill after a Yawn, giving TTar the safe setup. TTar proceeds to sweep after 2 Dragon Dances, taking out Trode and back mons Zard Arcanine.
:slaking: :salamence: :tyranitar: vs. :blissey: :umbreon: :gardevoir:

Big Blissey lead. Once again I Yawn for information. TTar switch would’ve been pretty good vs all but 2 because 2 can Attract cheese. I was also curious on Blissey possibly switching out after falling asleep; was pretty sure I’ve seen Altaria do this before. I Yawned and Blissey DT’s, revealing 1. I switch into TTar attempting to use it as fodder. My hunch was correct as Blissey switched out!

Umbreon comes in. Leftovers means it’s 2 or 4. Most likely 2 because HRHR. DD TTar brute forces through Umb2. Garde comes out before Blissey. Guaranteed a Destiny Bond Garde. Don’t know if I would’ve figured it out on my own, but it actually cannot be Garde7 because the quote would otherwise be flexibly adaptable to the situation. Could’ve scouted the set but didn’t. TTar sweep.
:slaking: :gardevoir: :tyranitar: vs. :slowbro: :golduck: :dewgong:

I really liked the idea of getting DBond Garde over Mence2. Garde still covers the Fighting weakness but can help DBond vs any general threat. Extra insurance against Waters is nice too. I make the swap.

Slowbro lead. Want to Thunderbolt for the chip. They Rain Dance so it’s set 1. Opted to let Slak tank the rain boosted Surf and take it out with the 2nd Tbolt.

Golduck 2nd. Stayed in again as I lack a rain boosted Pump switch (though it could’ve been Cloud Nine!). Surf survival confirms Golduck2. It barely survives TBolt to take out Slaking. Garde revenges. Dewgong3 was their last. No drawback in DBond, but I dodged every OHKO move to where I had to 2HKO with TBolt anyway.
:slaking: :gardevoir: :tyranitar: vs. :ninetales: :swampert: :snorlax:

Ninetales lead. Can’t be 4 because HRHR. The main nuisance is 3 since it can Attract TTar and hit it with Iron Tail. 1 and 2 are TTar setup. Here I make a play I regret. I got blinded by the idea that Gardevoir can Trace Flash Fire and has Lum, but my Slaking also has Lum and can get a Yawn, forgetting that Slaking has Lum. Garde switches in and wastes its Lum on Ninetales Confuse Ray. Garde is slower than Ninetales and can get Attracted too. It Attracts turn 2, but Garde still gets a Psychic off. Have to switch back into Slaking after that mistake. I then decided to go TTar first because if it Confuse Rays next turn, then I get the safe switch into Slaking without wasting Lum. This sequence works out, resulting in Slaking getting chipped from Fire Blast before Ninetales going down. Sand is now up.

Swampert 2nd. Can’t be Pert2 because HRHR. Really tempted to go hard Garde and DBond trade vs. it, but can’t afford getting crit. I stay in for info as Pert1 Curses. I Ice Beamed thinking that Yawning was pointless vs a Lum mon, but I get the freeze, forcing Pert to eat the Lum. The plan was actually to tactically let Garde take a turn of Sandstorm damage so it guaranteed dropped to Pert EQ. In unlucky fashion, Slaking survived an EQ from Pert with 1 HP and dropped to Sandstorm afterwards.

Because of this, Garde comes in still at 100%. EQ OHKOs Garde 5/8ths of the time. The freeze that supposedly didn’t matter turns ago now is huge; this gives Garde an alternative play to survive the attack: Will-O-Wisp. The odds of hitting the Wisp is better than the odds of dropping to EQ + crit chance. But…I missed Wisp and it got the EQ roll. Looks like I lose.

TTar last vs a 75% +1 Pert1. There’s still a mon in the back. The big calc here is that +1 doesn’t OHKO Ttar but practically will at +2. The aim clearly is to get enough DDs to where I can 2HKO or at least have a flinch out. I completely thought it was over, but slowly gained more hope as Pert continually went for Counter to my surprise. There was AI logic that I was unaware of at that time. Because Tyrantiar is 4 times weak to Fighting, the AI really wants to use Counter. I wanted to DD 4 times so +4 Rock Slide into EQ KOs Pert, and TTar can live a Counter on the Rock Slide. I get the 4 DDs on the 4 Counters. Only fear here is Rock Slide crit or miss. I did miss the +4 Rock Slide, but Pert actually Rested. Since Lum was used up from the freeze, Pert remains asleep. Bailout of the century, I get a 5th and EQ 2HKO.

SNORLAX was last, but it was too late. Was guaranteed Snorlax8 which was cool.
:slaking: :gardevoir: :tyranitar: vs. :breloom: :sceptile: :clefable:

Breloom lead. As per usual, Breloom goes down after tightening its focus. Sceptile 2nd. Stay in to loaf. Flame roll is favorable to OHKO. Leaf Blade roll shows set 3. Slaking does get the Flame roll to OHKO Scep. Clef3 takes out the weakened Slaking but Garde revenged.
:slaking: :gardevoir: :tyranitar: vs. :medicham: :moltres: :shuckle:

Medi lead. Chose to go into Garde because if it’s 3, Garde just 1v1s. Garde takes a lot from set 4 Mega Kick, but Medi4 is TTar setup fodder. Dynamicpunch connect confirms 3. I ideally want to dodge the next one, but would consider switching into Slaking if it connects again. Garde does dodge to get the 2HKO.

Moltres next. Since the quote is unrestrained, it can only be Molt123. TTar sets up on it. It did Roar me out revealing 1. Moltres did prevent outright disaster, only limiting TTar to one DD. Shuckle was last but could not survive Rock Slide.
:slaking: :gardevoir: :tyranitar: vs. :registeel: :rapidash: :regirock:

Perfect IV Registeel is an insanely bulky Pokemon to deal with. Do I Flame or Yawn? Due to it loafing every other turn, the Flamethrower damage isn’t much. Yawn can possibly get TTar the free turns need to set up.

This is exactly what happens. It Thunder Waved Slaking confirming set 4 with Slak eating its Lum. I go into Garde on a DT in the case that Noland T-Waved. Now it’s asleep. I don’t greed the DDs, content with keeping the entire team at full. Registeel4 goes down after 2 +1 Earthquakes.

Silly Rapidash 2nd. Not Rapdiash2 as it has Leftovers like Registeel. Might as well Dragon Dance again. Double crit Double Kick can OHKO, uh-oh! It Iron Tailed so it was 4. +2 EQ takes it out.

Regirock last. 2 of the 3 Regis, not bad. Also a mon I was worried about all round. At least TTar has some boosts under its belt. Can’t be Regirock14 due to item clause. It was the boss, Regirock3, but TTar’s initial boosts were too much for it. Tyranitar was the MVP, but Slaking4 was an instrumental partner.
Round 16 video (low quality)

After taking down Noland5, I can finally start thinking about being only 7 wins away from tying Donly Phans’ record of 112 wins. I planned to stream 2 rounds here as I really wanted to reach 119 to have equal personal best streaks in Lv. 50 and Open Level.

:rs/alakazam:4 :rs/tentacruel:1 :rs/quagsire:3 :rs/clefable:2 :rs/sceptile:1 :rs/medicham:4

Easy 3 here. Zam4 is a phenomenal mon at perfect IVs. The Defense EVs tend to be really nice as it’s actually able to live a physical hit. Quag3 is the best the draft gives me as a physical attacker, but works since it can handle Tyranitar for Zam. Scep1 is a mon I really wanted to try out in a high streak. Could it be among the top Leech Seeders? Let’s find out.

Other 3 options were too poor to consider. Scep1 Quag3 Zam4 was chosen.

:sceptile: :quagsire: :alakazam: vs. :wailord: :walrein: :xatu:

LEAF BLADE: Slashes with a sharp leaf. High critical-hit ratio.

Wailord and Walrein got crit LOL

Xatu2 was last. Made sure the team got the necessary EXP for the next battle.
:sceptile: :quagsire: :alakazam: vs. :espeon: :salamence: :armaldo:

Espeon shows up. Incredibly likely to be a Calm Mind variant. Need to get the jump with Leaf Blade it. Sceptile crits Espeon too LOLOLOLOLOL

Playtime is over however. Mence 2nd. It must be a Dragon Dance one right? I decided the play that covers all sets best, including non DD ones, was switching to Alakazam. Zam can tank all hits switching in and OHKOs with Ice Punch obviously. The big deal here is that Mence56 can DD, but the most threatening Mence4 will never DD as they see the Aerial Ace kill on Sceptile. Only fear is a crit, but the upside of the switch is too high, plus 56 could run away with it if it gets too many Dances. This sequence works out as ApologyMence (Mence6) DDs up and hits Zam with +1 Ace, but Zam tanked to OHKO it.

Armaldo last. Guaranteed Armaldo3, and it was Espeon24 in the back. NO QC so Zam gets the Psychic off. It did get the QC on Scep though, but Scep held on to finish the job.
:sceptile: :quagsire: :alakazam: vs. :venusaur: :heracross: :tyranitar:

Venu lead. Wish Zam was out right now. Thought of ideas such as risking Zam (could get crit or Sleep Powdered) or making a Quag midground. After some time, I ultimately decided that preserving Sceptile wasn’t worth. I let Scep go down to Venu Sludge Bomb. This may or may not be a recurring theme after Scep’s early overperformance. Zam gets the safe switch to revenge.

Heracross the boss. Don’t get Brightpowdered or Focus Banded! Zam OHKOs.

Tyranitar last. Quag’s time to shine. Preserving Quag’s health was big here. I let Zam go down so Quag can pick it off safely. Best case scenario occurred: Ursa1 Countered turn 1 as it didn’t see a kill. Scep gets good Leaf Blade rolls to 2HKO.
:sceptile: :quagsire: :alakazam: vs. :ursaring: :entei: :starmie:

The Bear. Ursa loves to trade vs opposing leads. Just gotta hope Scep doesn’t get Quick Clawed so it gets damage before going down.

Entei 2nd. This mon could get out of hand. I sac Scep to get a Leech off, but it dodged Entei’s Fire Blast! Since this happened, I entertained switching back and forth between Scep and Quag while Detecting in-between. Got punished for the cuteness as Quag got burnt in the process. Scep picks off Entei5 after the Leech Seed turns.

Starmie last. Nice that Scep is alive. More Scep1 propaganda. It did eat the Blade impressively without Lefties so it was Starmie1. Not bad, but it can’t win.
:sceptile: :quagsire: :alakazam: vs. :raikou: :rhydon: :nidoqueen:

Ground specialist; the Scep1 propaganda continues. Raikou lead means free Quag. Rhydon 2nd. Turned out to be the least threatening Rhydon of set 1 who Scary Faced. Quag stole Scep’s good matchup and took out Rhydon and Nidoqueen last.
:sceptile: :quagsire: :alakazam: vs. :lanturn: :arcanine: :forretress:

Lanturn lead. I want to Detect in the case that it’s Lanturn1 who would Thunder Wave. Ice Beam confirms set 4. Lanturn eats Leaf Blade to Confuse Ray Scep. I didn’t like confusion messing me up so I went into Zam, but Zam did get frozen. Really bad! That’s my best mon. I go back into Scep on Surf to take Lanturn out.

Arcanine 2nd. Can Detect safely to figure out set. Not set 2 as it has Lum like Lanturn4. It turned out to be the super best case of Arcanine1. Its Flamethrower is weak enough to where I can switch Zam in to thaw it out! The last interestingly has to be a mon activating HRHR by itself. This works out as Zam thawed. I go into Quag on the E-Speed, and Quag gets a lucky QC to OHKO Arc1.

Last was Forretress. Forre has 2 sets that activate HRHR on its own, but it must be set 4 since set 2 has Lum like Lanturn. Genuine fear of getting reverse swept if Forre QC’s Zam. Fortunately, Quag was able to 1v1 after good EQ rolls.
:sceptile: :quagsire: :alakazam: vs. :altaria: :aggron: :swampert:

Altaria lead. Only fear is the only competent set of Alt3 Dragon Dancing or Singing. Since Alt is slower, it really wants to Dragon Dance here. I like Detect still since switching into Zam turn 1 could be bad vs Alt2 DBreath. If it is Alt3, I can go into Zam turn 2 as it’ll see an Ace kill. Zam is still faster than +1 Alt. Hard Ace turn 1 all but confirms Alt1. I go Zam to OHKO Alt.

Aggron second. Rare situation where Aggron exerts pressure. Worst case is 4 using Double-Edge which does too much to Quag. Back mon logic swayed me again. Last mon Houndoom convinced me to preserve Quag HP. Like the situation with Venusaur, I opted to sac Sceptile, trusting a chipped Zam and healthy Quag3 more than Zam Scep. It was indeed Aggron4. I revenge with Quag as I couldn’t risk Zam getting Quick Clawed. Quag is slower than Aggron, but QC Quag shows up to not take damage.

Last is Swampert. Where’s Sceptile? Not Pert2 since it can’t have QC. I EQ first as it’ll work out vs 34. It turned out to be Pert1 who Cursed. Scary endgame here as I need to Curse with them. When Pert went for a 3rd Curse, Quag luckily got a crit +2 EQ on its second try. Pretty lucky round overall. Now my streak is tied with Donly Phans.

End of part 2…
 
Last edited:
Still in the same streaming session tied with Donly Phans. There were 2 goals for me: I wanted to reach 119 so my personal bests are equal in Lv. 50 and Open, and I wanted to purposely pause the streak until a certain someone inevitably matches it. Thinking ahead for maximum content.

Round 17 video (post-comm with loud background music)

:rs/sceptile:4 :rs/blaziken:2 :rs/dragonite:6 :rs/articuno:6 :rs/scizor:3 :rs/donphan:4

Another Sceptile sighting. First time seeing Dragonite in draft this streak, and it’s the best of the Shell Bellers imo. Donphan4 is a solid enough physical attacker. Articuno6 is a peculiar set that is on the cusp of being really good. Good moveset, but it’s not fast or bulky enough to be elite.

It’s a question of who I want between Scep4 Dnite6 Art6 and Donphan4. I decided that Dnite Art Donphan had just enough backbone to work. Scep Dnite Donphan was too Ice weak. Scep Art Donphan is too Fire weak. Scep Dnite Art lacks enough physical firepower. A Rest sponge that can hit Double Teamers had appeal as well. Bringing 2 Rock weaks in a Rock matchup looks incorrect, but Dragonite does have Surf. Dragonite6 Donphan4 Articuno6 was chosen.

:dragonite: :articuno: :donphan: vs. :regirock: :ninetales: :aerodactyl:

Regirock lead. Need to Surf in case it’s Regirock3 Cursing up. Dragonite wins the 1v1 without getting lucked.

Ninetales 2nd. This was a red flag for me. The last is a Rock, yet it sent out Ninetales first. I knew for sure that the last was a Rock lacking a Rock move. This was before people 100% knew about the switch logic, but I made that hunch based on my prior Factory experiences. It was fun using the spreadsheet for the first time in a while to filter out all Rock Pokemon without a Rock move. Buddy kinda renders the spreadsheet obsolete :(

In an embarrassing fashion, Ninetales4 failed to take out a Dnite with 25% HP remaining. Surf OHKOs.

Last was Aero1. From my filtering, it must be Aero4. Dnite goes down, but Articuno can handle Aero if it doesn’t get King’s Rock. This does happen, giving me the new record at 113.
:dragonite: :articuno: :donphan: vs. :zapdos: :exeggutor: :snorlax:

Zap lead. I have a Donphan, but it will get chipped from Drill Pecks/possible Dedges. Donphan wins the 1v1.

Egg 2nd. This works out nicely as Egg is practically guaranteed to Grass move instead of possible Explosion. It’s fine if it’s Egg2 as well since Articuno6 is Chesto. Articuno takes out Egg1.

Lax last. It must be a HRHR Lax without Quick Claw. Guaranteed set 1. What a great day to be an Articuno6. Reflect + Aerial Ace covers Lax DT spam well. Art wins the 1v1.
:dragonite: :articuno: :donphan: vs. :electabuzz: :lanturn: :regirock:

Electabuzz first. Scary mon to see if it’s Buzz3. Can’t outplay 3 so I’m best off fighting through the sets. It’s best to Surf since there’s no reason to risk Static, and Buzz2 could Rain Dance which would weaken the equal BP move in Flamethrower. It turned out to be Buzz4. Dnite outspeeds and 2HKOs.

Lanturn 2nd. Once again we fear the variant with an Ice move, Lanturn4. Technically it’s most likely Lanturn2 since we’re still looking for HRHR; it’s guaranteed a set that activates HRHR on its own otherwise. It does turn out to be Lanturn4 as it KOed Dnite.

I go into Articuno as 2 Ice Beams take out Lanturn at this range. It Confuse Ray’d me. This was pretty good for me because now I can pivot into Donphan to reset confusion and only take Surf damage instead of Thunderbolt.

Last mon Regirock. Guaranteed 2 or 5. Ice Beam into Donphan EQ KOs, so I really don’t want to get Quick Clawed. No QC proc locks up the endgame.
:dragonite: :articuno: :donphan: vs. :charizard: :exploud: :slaking:

Zard lead. Need to TBolt since Zard1 could Sunny Day to weaken Surf. Zard2 Dragon Danced while Dnite got the TBolt OHKO roll.

Exploud 2nd. Was legit worried about Ice Beam Exploud before this battle. Again, can’t switch around this. Dnite does drop to Ice Beam from Exploud3 after Dragon Clawing. Articuno tanks a TPunch and revenges.

Slaking last. Mega Kick KOs Articuno, revealing 2. Donphan, for the 2nd straight battle, wins as the last Pokemon.
:dragonite: :slaking: :great-tusk: vs. :metagross: :latias: :suicune:

Psychic unrestrained, among the scariest quotes in the Factory. The worst case scenario is Lati + Metagross. Dragonite6 matches up well vs Lati and Meta by getting a good hit on both, but will lose the 1v1 vs Lati. Articuno is terrible vs Metagross and pretty is favored to lose to the best of the best Lati sets. Donphan can fare well vs Meta but obviously loses to Lati. I would ideally want extra insurance against Lati so I can account for both lead Meta back Lati AND lead Lati back Meta. The current team prefers lead Meta back Lati but not vice versa. Slaking2 is a workable Pokemon that can hit a Lati hard with Shadow Ball, but likely worse as an overall mon than perfect IV Art6. The selling point to get Slaking2 was possible Starmie sighting. I swap Articuno out for Slaking.

Metagross lead. The 30 minutes of preparation comes into play. Outside of general hax, we like this position. Dragonite Flamethrowers. Ice Punch + Shell Bell confirms Meta7. Dnite survives to live the 1v1.

Latias 2nd. Again, the prep didn’t come to waste. Unluckily, Dnite was slower than Latias and dropped to Psychic. It’s either Latias8 or QC Latias2. Slaking 2HKOs with Shadow Ball but has to tank 3 Psychics. SpDef drop or Crit would’ve been devastating, but it didn’t happen.

…the last was SUICUNE. Um…this looks terrible. Slaking is in the red and my last is a Donphan. It looks like all but guaranteed defeat. I have no play but to throw Slaking away as it loafs around…or so I thought. Suicune went for DIVE! It’s Suicune2. Based on switch logic, it was guaranteed a Suicune set without Ice Beam, but it’s not like I had another play anyway. Suicune Dived because it saw a kill, but after Leftovers, Slaking tanks the Dive now. Slak2 is faster so might as well Amnesia. Even though Suicune2 is best case scenario, I’m not home free yet. This still requires Donphan to hit a Fissure. I thought Yawn hitting through DT was a factor in this battle too, but Yawn actually never misses. I want to Yawn to get Donphan in before it uses Toxic and Protect. Suicune falls asleep from Yawn as I switch into Donphan.

Donphan only had 3 chances to hit because of Pressure. It got a QUICK CLAW FISSURE connect on its second attempt! Amazing.
:dragonite: :suicune: :donphan: vs. :venusaur: :espeon: :swampert:

Slaking2 did a great job here, but a rather broken Pokemon showed up last battle. I swapped Slaking for Suicune2.

Venusaur lead. Um, Suicune dislikes this. Gotta Flame but definitely fear Venu3 Sleep Powder. It Sludge Bombed instead as Dnite 1v1ed.

Espeon 2nd. Um, Suicune dislikes this too. Must have a HRHR move in the back. Espeon CM’ed while Dnite Dragon Clawed. Psychic crit takes out Dnite. Forced to go Donphan because Suicune2 loses to Espeon2 near 100%, and Donphan is still favored to live +1 Psychic with QC upside. It did turn out to be 2 so Donphan got the revenge.

Pert last. Finally, a mon Suicune2 can beat. I let Donphan go down so Suicune2 can safely 1v1. It was Pert2.
:dragonite: :suicune: :donphan: vs. :raikou: :breloom: :typhlosion:

Raikou lead. Go! Ground type! Donphan 1v1s. It was Raikou2.

Breloom 2nd. Can’t be Loom2 from item clause. Awkward since the Focus Punch variants to not see a kill, so it can possibly Spore. Earthquake is fine vs even 1 as it live Counter. It was indeed Loom1 as it Countered Donphan. I switch into Dnite to take Loom out.

Typh last was outsped and crit by Surf. It had to be 4 since Typh3 was faster. My goal of hitting 119 is complete! Time to not touch the streak until someone gets close.
Round 18 Draft and Battle 120 video (finally watchable quality)

Rest of Round 18 stream (first YouTube stream!)

My round 16 and 17 stream happened on Jan 26, 2024. Around 6 months later, I made a silly mistake. I was in the middle of watching an NBA playoff game while grinding Lv. 50 Factory. I was intending to enter Round 4 of Lv. 50, but I instead accidentally entered Open Lv. Now I’m in Round 18 Open Lv. late at night unexpectedly. Have to do the right thing and stream it even though I’m not in the mood. Due to Discord streaming complications, I only played 1 battle that night and intended to play the rest another time.

:rs/salamence:2 :rs/exeggutor:4 :rs/dodrio:2 :rs/dragonite:8 :rs/granbull:3 :rs/machamp:1

The quote was Psychic HRHR, but at the time I thought it was Psychic unrestrained. Big Brain Mence2 and Dodrio2 are workable mons, but they are too similar in roles. Egg4 hit hard but has no bulk. Dragonite8 is a minor downgrade from last round’s Dragonite6. Granbull3 is an excellent 1v1 mon, but its low speed and Dedge recoil makes it unlikely to take out more than 1 mon. Machamp1 has been showing up a lot, but looks terrible here against a Psychic specialist. The draft as a whole lacks an answer to Ice Beam.

Like in battle 117, the great fear is Lati + Metagross and trying to account for either order. Dragonite lead can handle lead Meta back Lati but loses to vice versa. Dodrio lead would prefer Lati lead. It would chunk it heavily before going down, then Dragonite can revenge and handle a back Metagross. But lead Meta would be awful if I led Dodrio. While Dragonite has an above average matchup vs Lati Meta, it has a mediocre matchup vs the elemental Psychics like Garde34 Mime4 Hypno4 given their higher SpDef stats. Dodrio matches up nicely vs the elementals on the other hand, OHKOing the majority. Because of this, I want back Dodrio here.

Now let’s look at Granbull. Given Dnite and Dodrio’s similar weaknesses, I was considering back Granbull to potentially cover them. After more thought, I decided that lead Granbull is best. Bull3, while very likely to lose the 1v1 vs a lead Meta and Lati, can actually get a good hit vs both. Then I still have a healthy Dragonite and Dodrio to handle back Meta or back general Psychic respectively. After close to 30 minutes of thinking, I then recognized how weak I was to Starmie, using another 10 min. Any Ice Beam Starmie will sweep the team after Granbull is chipped. Since my Starmie counterplay in this draft was close to nonexistent, I decided to ignore attempting to cover it and pick Grabull3 Dragonite8 Dodrio2, the best 3 that can cover the other Psychics in my opinion.

:granbull: :dodrio: :dragonite: vs. :espeon: :claydol: :weezing:

Espeon lead. Wished Dodrio was the lead now as it would be an easy outspeed and OHKO. Granbull OHKOs Espeon, but it had to take a Psychic and recoil. It was uninvested Psychic from set 1 or 2.

Claydol next. Can’t switch into it safely so I sacrificed the Bull. Here I make a misplay by not maximizing my odds. Dragon Claw into Ice Beam KOed Claydol. Instead I just Ice Beamed. Unfortunately, Claydol4 got a Focus Band on the 2nd Ice Beam and Exploded on Dragonite. If I DClawed first, it was rather unlikely to Explode 2nd turn. A blind 1v1 awaits.

Last mon Dodrio2 vs. last mon Weezing, not ideal. Essentially, if Weezing gets the Sludge Bomb poison, I lose. I have to Double-Edge once, so Sludge Bomb + Dedge recoil + poison guarantees a Dodrio faint. Drill Peck into Dedge KOs nearly always. In a really lucky but clutch moment, Dodrio2 King’s Rocked Weezing, not giving it any chance to get the poison! Dedge got the roll to take it out.

After this battle, I rested and did not continue the streak for another 6 months.
:granbull: :claydol: :dragonite: vs. :blastoise: :slaking: :sceptile:

I wanted to attempt Lv. 50 streaks again, but in order to do so, I need to complete this round. Due to issues streaming on Discord, I streamed this and the rest of this streak on Youtube. Extra context: Since this was played almost a year from my previous round, I’ve gained some extra knowledge and resources. The Factory Buddy was essentially upgraded to what it is today. I finally took the time to understand most of the AI document which I was not using at all prior to this round because of confusion and a bit of stubbornness. I even felt forced to use the sweaty ruler to keep up with the competition.

Okay, onto battle 121. 6 months to think about a possible swap. Claydol4 was the mon I was eyeing, a Pokemon that could patch up the similar weakness of back Dragonite Dodrio. At first I remember thinking that Dragonite was going to be the swap, but I decided that Dodrio was less valuable. Claydol helps with especially Rocks but also Electrics and can possibly Explode vs emergency threats like Regice.

Blastoise lead. Decided to make a cute play in Sludge Bombing in order to give Granbull a chance to survive. Dedge wasn’t bad here as Dnite can revenge, but Dedge is essentially sac’ing Granbull. The worst case was Blastoise3 Countering the Sludge Bomb which I considered as unlikely. Was my logic correct? Questionable.

Blastoise Surfed so it was set 3 or 4. Lucky for me, it went for Counter or Mirror Coat turn 2 which allowed Bull to take it out with Dedge without taking more damage.

Slaking 2nd. Decided to go into Claydol here. Best case is switching into Slaking3 EQ. Worst case is trading with Claydol by Exploding. It did turn out to be Banded Slaking who used Brick Break. Claydol hilariously doesn’t do much damage with EQ. Plus, Explosion doesn’t even OHKO! Took 5 attacks to take Slaking out. Sceptile2 lost to Dragonite.
:granbull: :claydol: :dragonite: vs. :weezing: :arcanine: :slowking:

Weezing2 comes back for revenge. I attempt to 1v1 with Claydol, but thanks to poison and a crit, it essentially becomes a double-down.

Arcanine comes out as 2nd right before Claydol faints. I go into Dragonite to 1v1. DNite + Granbull work together to take out QC Slowking.
:granbull: :claydol: :dragonite: vs. :blaziken: :golem: :kangaskhan:

Blaziken lead It isn’t set 4 since White Herb didn’t activate from Intimidate. Most likely set 3. Dragonite 1v1ed Blaziken3.

Golem second. Switched into Claydol on likely Rock Tomb or Slide. It was set 1. Went for EQ expecting a 2nd Rock Tomb instead of Counter. It gets a Body Slam para on Claydol before going down.

I took a lot of timed deciding which mon was better to switch into after Claydol went down to Shadow Ball Kanga. Bull3 risks Attract nonsense from Kanga2 so I went DNite. Dragonite defeated Kanga2 with Brick Break.
:granbull: :claydol: :dragonite: vs. :ludicolo: :electabuzz: :donphan:

Ludi lead. My anti-stall countermeasures aren’t the best with this team. A good day to be a Sludge Bomb Granbull. Got double Quick Claw to 1v1 Ludi34.Electabuzz 2nd. Go into Claydol here. It 1v1s Electabuzz4. Donphan last. It gets the Explosion roll. The Claydol swap has been excellent thus far.
:granbull: :claydol: :dragonite: vs. :medicham: :metagross: :magmar:

Medi lead. Given that the quote is HRHR, it’s most likely Medi2 (60% chance). Medi13 Fighting move is annoying if I stay in, and the upside of switching into Claydol is huge if it isn’t set 4. It did turn out to be set 4, but Claydol dodged Mega Kick. Here’s the sequence I liked to take out Medi4 with the most efficiency:

  1. Medi will always Shadow Ball Claydol, so a Granbull switch is 100% free to get another Intimidate. Then it will Mega Kick again. I still need to get damage on this if I’m trying to preserve my DNite’s HP. So, I let Claydol tank a -1 Ball to get Earthquake damage. Then I can make the Granbull switch to Intimidate Medi again. Now it will Psychic Granbull instead of Mega Kick.
  2. I use that as an opportunity to switch into DNite on the much weaker Psychic so it can 1v1. It’ll even get a little Shell Bell out of it.
This sequence works out with no hax involved.

METAGROSS second. Now we’re playing the Factory. Most likely the Explosion sets. Dragonite can 1v1, but the Explosion sets have Quick Claw. Rock Slide reveals Meta5. Now I have an interesting decision. I could chance the QC here and have 1v3. Or…I could sacrifice my weaker Claydol on the Explosion as safe means to preserve my better Pokemon. I opted for the latter as Claydol is sacrificed to Explosion.

Last mon was Magmar. Guaranteed Magmar3. Magmar can actually win with realistic luck as its Scope Lens and can tank a Granbull Earthquake from full. I can Dragon Claw to not only 2HKO but to survive Mega Kick thanks to Shell Bell. However, DNite can get Flame Body’d from DClaw, so the burn will give Magmar the KO. I could switch into Granbull for the Intim, but it gives Magmar more chances to crit. Even though that was the case, it was better odds to still switch into Granbull than what I did. Switching into Granbull requires Magmar to crit twice (along with hitting moves) to win; staying in gives Magmar only 1 crit if DNite gets burnt. This indeed happens as Dragonite got burnt from Dragon Claw, so it dropped to Mega Kick. Granbull luckily avoided the Scope Lens crit to survive and win. Very scary one.
:granbull: :metagross: :dragonite: vs. :venusaur: :xatu: :slaking:

I ran into Metagross5 which looked like an upgrade from Claydol4. Thank you, Claydol4. First time using Metagross in this streak!

Noland was quite generous here as he led with Venusaur1. Majority of this battle was me trying to decide if it was worth taking Venu up with sun up or not. Waited until sun ended to take Venu out. My 3IV Metagross5 swept Noland6 who had Xatu 2nd, even getting to Explode on last mon Slaking2.

By winning Round 18, I can get back to attempting Lv. 50 streaks again while also continuing to wait for someone to get close.
When I was getting close to Donly Phans’ record, I had the idea of waiting until LRXC inevitably matched that number to possibly dual stream the record streaks in order to maximize visibility of the greatest thing Pokemon has ever given us. He was able to reach 126 6 months after I did and was nice enough to accept my request. We ended up streaming 2 complete rounds for 8 hours without losing.

Round 19 and 20 stream

:rs/dragonite:1 :rs/blissey:3 :rs/vaporeon:4 :rs/dragonite:3 :rs/aerodactyl:2 :rs/tyranitar:7

Pretty stacked draft to the point where one of Dragonite1 Blissey3 Vaporeon4 Aerodactyl2 is not coming. Vaporeon is 100% coming. I tend to dislike Blissey3, but I would be foolish to turn it down here. So it’s a choice between DD DNite or CB Aero. I opted to go for the immediate power of CB Aero instead of the more longterm but speedy wincon of DNite who isn’t guaranteed of getting the free setup. Hard to go wrong either way. Aero2 Vap4 Bliss3 was chosen.

:aerodactyl: :vaporeon: :blissey: vs. :claydol: :houndoom: :typhlosion:

Claydol shows up as the lead in a Fire battle flow matchup. Extremely likely to be Claydol3. Went into Blissey still as I have easy means of handling the other sets. It was Claydol3 which allowed Blissey3 to set up and sweep. The Fires in the back were Houndoom4 and Typhlosion2.
:aerodactyl: :vaporeon: :blissey: vs. :snorlax: :ampharos: :ninetales:

The biggest threat of the team shows up as a lead, Snorlax. This took a while to map out. Snorlax14567 all have a HRHR move. The only downside of attacking here is Counter from sets 5 and 6. Getting damage right now puts me in better position against the setup Laxes compared to switching. Aero gets an Earthquake on Lax. It responds with invested Mega Kick, revealing 5. While it’s pretty likely to Counter next turn, Vaporeon switch takes far too much from Lax5 Mega Kick for me to risk in my opinion. I stay in to EQ again, but Lax does KO Aero with Counter. Vap does revenge without taking damage. Not exactly ideal as I’m now really weak to something like an OHKO-move Water now.

Amp 2nd. Hilariously Blissey is not a safe switch here given that 2 sets have an invested Fighting move. What’s clutch here is that Amp really wants to Thunder Wave since it’s slower, and Vaporeon is Lum. Meanwhile, Surf 2HKOs 3 of the sets. Vap wins the 1v1, but Amp actually Thunderbolted instead of Waved. Turned out to be Amp3.

Ninetales2 last. It gets the last laugh by Grudging Vaporeon’s Surf! GRUDGE GRUDGE GRUGDE
:aerodactyl: :vaporeon: :blissey: vs. :golduck: :lapras: :marowak:

Here I wasted many minutes trying to figure out the optimal way to take down a Golduck of all mons. Decided to take it out with Aero to not risk Cross Chop crit on Vap. Ancientpower gets the omniboost! 2nd mon Lapras. Get ‘em out of here. 3rd mon Wak. Vap Surf OHKO.
:aerodactyl: :vaporeon: :blissey: vs. :dusclops: :medicham: :kingdra:

Dusclops lead that turned out to be Clops2 after scouting. This is an easy PP stall. I let Bliss take the Toxics and Aero take the Confuse Rays. Then I can take it out with repeated Aerial Aces, ignoring Double Team. Medi comes out 2nd and drops immediately. Kingdra2 last loses to Blissey.
:aerodactyl: :vaporeon: :blissey: vs. :electabuzz: :machamp: :milotic:

Electabuzz gets OHKOed by EQ. Machamp 2nd is kinda awkward. I decided to put my trust in Aero Vap than Bliss Vap, so I sacrificed Blissey to Machamp. Aero returns to revenge with CB Ace. Milotic was the last. Guaranteed Milo3 because Machamp revealed Counter prior. This is an easy PP stall fortunately: Vap comes in on Surf. From there, Milo will only spam Blizzard. When it’s out of Blizzards, I can swap stall since Milo will never Surf in front of Vap. By going back into Aero, I bait Milo to use the rest of its Surfs. Then I take it out with Aero.
:aerodactyl: :vaporeon: :blissey: vs. :magmar: :golduck: :registeel:

Oh no, it’s a Magmar! Gets OHKOed by Aero. Golduck returns, this time being set 1. Gets PP stalled by Vap. HRHR Registeel last. Turned out to be set 3 who’s a little lost. It won’t Explode since it’s last mon. Repeated Surfs take it out.
:aerodactyl: :vaporeon: :blissey: vs. :regice: :typhlosion: :jolteon:

Regice lead. Turned out to be set 4. It’s a PP stall almost as easy as Dusclops2. After it’s out of Ice Beams and Thunder Waves, I can take it out with Banded AA. Typh 2nd. Can’t be set 1 or 3 as it would activate battle flow or HRHR respectively. I go into Blissey who sets up on set 4. Blissey takes out silly last Jolteon2. More straightforward round than usual.
:rs/milotic:4 :rs/gyarados:2 :rs/shiftry:1 :rs/tauros:2 :rs/slowking:4 :rs/feraligatr:4

A draft with 4 Waters when my first battle this round is against Waters. Still a really strong draft overall when you get Milo4 Tauros2, so it’s all about the last. The biggest flaw of Milo is its inability to hit opposing Waters super well which is especially bad in this matchup. It’s a sitting duck against the OHKO-move Waters, so the best last would be something that can hit Waters well. Honestly, all of the remaining 4 can do this, even Shiftry who has Faint Attack as Double team counterplay!

I decided on Gyara2 last for 2 reasons. Of course, it has the super-effective Thunderbolt to hit opposing Waters for fairly good damage. The bigger reason was its Ground immunity, giving me fairly easy means of switch stalling the Waters that have Fissure like Wailord and Whiscash. Gyara2 is a pretty good mon despite its initial looks; the max speed is its biggest selling point. Just gotta hit a couple of moves, that’s all. I went Tauros2 Gyara2 Milo4.

:tauros: :gyarados: :milotic: vs. :tentacruel: :granbull: :slowbro:

Tentacruel lead. Tenta doesn’t get Intimidated as it was Clear Body. This was actually relevant as it was the least likely set of Tenta1. Invested Sludge Bomb + poison put Tauros at around half. I was very tempted to use this as fodder when I could’ve EQed again turn 2. I will end up paying the price. I Rest to heal Tauros and then switch it out as it got confused. Milo switches in and gets pressured heavily from a crit. After healing, I decided to go into my least valuable mon in Gyara as damage control, but it gets crit as well. Tenta1 got a lot of mileage on me; got too greedy.

Granbull second. Extremely likely it’s Granbull2 who activates HRHR on its own. I let Gyara go down. Was tempted to try to set up again but decided against it. Dedge OHKOs. Slowbro last. Only real fear is Attract Slowbro but still needs luck to beat even Tauros. Turned out the best case of Slowbro1 who gets 2HKOed by Dedge.
:tauros: :gyarados: :milotic: vs. :suicune: :vileplume: :ampharos:

SUICUNE! Got one play. Turned out to be Suicune5 who Icy Winded. Milo was able to pick it off after I switched Tauros out. Vileplume1 gets Ice Beamed down, but does get a poison on Milo. Lapras last. Could only be 23568. Turned out to be Nascar Lapras, set 2. Another Milo 1v1.
:tauros: :gyarados: :milotic: vs. :jolteon: :heracross: :shuckle:

Now here I was really thinking about greed swapping Gyara for Suicune5. Next match was a Bug specialist however, and Gyara2 has a great matchup vs the most dangerous Bug in Heracross. I keep as a result.

Jolteon, my favorite Bug. Unfortunate if it T-Waves, but I have to EQ. Jolteon1 makes it easy for me by double Protecting.

Hera comes out, the most likely back mon. Can’t be set 2 as it would activate slow and steady. Time for Gyara2 to perform its role. It did turn out to be set 3. I TBolted instead of risking Fire Blast accuracy as set 3 has Brightpowder, and TBolt + Dedge KOs. I missed TBolt thanks to Brightpowder. Now Dedge as a whole was already a good chance to OHKO from full, and Gyara has a great matchup vs any back Bug, so I wanted to keep Gyara. I go into Tauros on the 2nd Rock Slide and get the Dedge OHKO roll.

Shuckle last. Has to be 1 or 2 as the rest activates slow and steady. Milo beats Shuckle2.
:tauros: :heracross: :milotic: vs. :ursaring: :slowking: :golduck:

Heracross3 is a very good Pokemon. In a world where Megahorn never misses, it’s definitely up there as the one of the best physical attacker in Factory. Gyara2 did well, but Hera3 is on another level. I make the swap.

The Bear. 2 Waters in the back. I EQ because Counter Ursa will not OHKO in return, and EQ + Dedge KOs. It did turn out to be a Counter set so 1 or 2. Might as well Rest to live the next hit and take it out the following turn, but I risk Quick Claw. No hax occurs so Tauros gets the 1v1. It was Ursa2 so HRHR is already met.

Slowking 2nd. Must be Slowking12 because sets 3 and 4 have the same item as Ursa. Here I try to preserve Tauros and 1v1 Slowking with Milo. This was another greedy maneuver where I got punished. Thanks to Attract, Milo loses the 1v1 to Slowking1! Hera now has to hit Megahorn. It did at least.

Golduck last. This was actually scary because if it was Golduck4, it speed ties with Hera and has Scope Lens Aerial Ace. So speed tie AA crit could’ve resulted in a loss. Luckily it wasn’t so Hera gets the 1v1. My greed stally plays aren’t working out; this team is built for unga bunga play apparently.
:tauros: :heracross: :milotic: vs. :meganium: :golem: :exeggutor:

Meganium lead; first time seeing this mon actually. Tauros 1v1s Meganium1, hitting through Brightpowder. Golem 2nd, a HRHR merchant. Decide to go Milo as it is the least useful mon in with a Grass last. Only loses to crit + QC on 2nd turn. Milo defeats the Golem. Egg3 last loses to Milo too.
:tauros: :heracross: :milotic: vs. :breloom: :kangaskhan: :cradily:

Back-to-back Grass HRHR, wow. Loom lead. Only fear Brightpowder and Effect Spore poison/para. Dedge OHKOs.

Kanga 2nd. Now here’s some advanced switch logic that I doubt majority of players would figure out, but the Factory Buddy did, showing its strength and controversy. We are still looking for HRHR, and the last is guaranteed a Grass. Every remaining HRHR Grass actually has a Grass move (Shiftry34, Cradily4, Venu3, Victreebel4). So, it must be a Kanga with a super-effective Fighting move to come out 2nd. Otherwise, the Grass would come out 2nd since it shares a type with Breloom. This eliminates Kanga24.

Milo switch is good vs both sets 1 and 3. I PP stall Kanga3 and actually get Tauros fully Double Teamed up for once. Cradily3 as their last goes down to Tauros too.
:tauros: :heracross: :milotic: vs. :regirock: :rapidash: :typhlosion:

Regirock lead. Given that it’s a Fire specialist, Hera doesn’t look very good here. Hera could lose the 1v1, but it’ll at least get the damage for a Tauros or Milo revenge. Instead, I get the best case scenario: Hera 1v1s the Regirock6 and 1v1s the Rapidash by dodging Dedge thanks to Brightpowder! It does finally go down to Typhlosion2, but Milo revenges. Overall, I think the dual stream was a really cool moment for Battle Factory exposure.
I couldn’t continue dual streaming with LRXC due to other Pokemon-related obligations, so I had to let him pass me by. He was able to accumulate 48 more wins, losing to Noland9. That’s 7 more rounds away, so there’s no point in thinking about regaining the record. Gotta play my game one battle at a time.

In the background, Factory Buddy creator Dave Glorbus was also able to reach 140 wins in Open Lv. singles. One challenger leaves, another one enters. We coordinate our schedules to dual stream our rounds 2 months after the LRXC dual stream, aiming to reach and surpass his 188 wins.

Round 21 and 22 stream

:rs/latios:8 :rs/dragonite:7 :rs/shiftry:2 :rs/salamence:4 :rs/espeon:1 :rs/flareon:3

140 wins in and it’s the first time seeing a Latios in draft. A lot of Ice weaknesses here. The best mon here is Mence4 who is the best Dragon Dancer in the Factory. It’s funny seeing other’s reactions when Latios8 is seen, but I like the mon. Lati8 is the only Lati set with some speed, and every move, while not fully optimal, still has a purpose. Dragonite7 is solid too, but I cannot ignore this Ice weakness. Espeon1 is usable too but felt it was a little redundant with Latios.

The Ice resist was found as the last mon: Flareon3? Upon further analyzing this mon, this has to be the best Flareon simply because it has speed. With the IV advantage, Jolly Flareon3 is actually faster than the fast Suicunes and the 170 Speed EV base 100s! I decided that this mon is usable as my Regice/overall Ice answer paired with 2 Dragons. Chose Latios8 as the secondary Dragon mostly because it has a less vulnerable weakness to Ice than Dragonite7. Mence4 is the best mon, and I will try to keep it in the back until I see safe setup. LATIOS, SALAMENCE, AND flareon was chosen.

:latios: :salamence: :flareon: vs. :gardevoir: :dewgong: :snorlax:

Gardevoir lead. We Ball. It Balled in return, fun. Gardevoir5 reveal made me want to go Salamence next turn. The Shadow Ball damage from Turn 1 weakened Garde into “I wanna Endure” range. Want to take advantage of that to get some DDs up. Even if it Psychics, it doesn’t do much. Mence gets 3 DDs to sweep. It was worth getting those DDs as the back mons were Dewgong Snorlax.
:latios: :salamence: :gardevoir: vs. :registeel: :glalie: :mr-mime:

Now Garde5 is a mon that I felt was going to be more consistent than Flareon since it can just Destiny Bond any weak point to my team. Flareon3 does nothing and gets swapped out, never to be seen again…

Registeel 1st. Not the greatest, but have to Earthquake even though it’s most likely set 3 that has Counter. It was indeed Registeel3, but it didn’t Counter or Exploded, so Latios gets the 1v1. Glalie 2nd. Gotta just tank the Ice move and 1v1 with Psychic. It was Glalie4. Mime time last. Lati + Mence tag teams to take Mime4 out.
:latios: :salamence: :gardevoir: vs. :venusaur: :walrein: :umbreon:

A common theme in this round is Latios8 clicking buttons. Venusaur lead gets OHKOed by Psychic. Walrein 2nd is scary, but have to power through. It turned out to be Walrein2 going for Double Team and Curse. Turned out to be a waste of time for Walrein as it went down after repeated attacks without getting any damage, silly silly. Umbreon last. Stay in to scout; it’s the lousy Umbreon3 who will only Shadow Ball. I let Garde5 DBond trade.
:latios: :salamence: :gardevoir: vs. :dragonite: :glalie: :ursaring:

Dragonite lead. Where’s my super-effective move? Latios8 doesn’t care, powering through Dragonite678 to win the 1v1. Glalie is back as 2nd mon. I let Lati go down so Garde can revenge. Garde gets to DBond against last mon Ursa78.
:latios: :salamence: :gardevoir: vs. :moltres: :crobat: :articuno:

Latios8 is really making this the most unga bunga round of this streak. It continues to click buttons, first by taking out lead Moltres2 without taking damage. Crobat comes out next. Lati tanks the Ball to win vs it. Articuno last, so triple bird from the opp. Mence revenges Aritcuno45 after Lati8’s Psychic.
:latios: :salamence: :gardevoir: vs. :glalie: :milotic: :hariyama:

Glalie shows up for the 3rd time! Lati8 doesn’t care and crits it. Milo second could be a threat. Lati goes down to Milo4 but gets the damage needed for Mence4 to revenge. Yama last loses to Garde5 crit.
:latios: :salamence: :gardevoir: vs. :entei: :steelix: :charizard:

Milo4 is elite, but I opted against it. It possibly could be fraudulent vs Noland’s perfect IVs, so I thought DBond would be more useful.

Entei lead. Noland’s perfect IVs prove to be useful here as the fast Enteis are faster than Latios. This could potentially be Mence4 setup fodder, but Latios8 does match up pretty well vs majority of sets. It’s a choice of risking crits/burns right now or preserving Mence HP for a threatening back mon. Latios8 is pretty favored to 1v1 all Enteis except 3 who will outspeed and 2HKO with max Atk Double-Edge. I decided to stay in to preserve Mence4 HP. Even if Lati loses, I can attempt to set up with Mence4 afterwards.

It did turn out to be the worst case scenario for Latios8: Entei3. Latios8 is guaranteed to lose the 1v1 now after taking the Dedge. Such a play made me question my decision of not going into Mence. This is pretty awkward. I didn’t see much value in a Latios8 this low. 3IV Garde5 is far too weak to pose a threat vs any average Noland mon, and I obviously can’t DBond as the last mon. I could DBond the Entei, but I preferred attempting to set up with Mence instead. I’m all-in on Mence4 sweeping. I sacrifice Lati8 to Dedge and go into Mence.

The main question here is how many times I want to DD. This is Noland who has perfect IVs and gives essentially 0 information on back mons. I knew for sure that I needed 2 so I went for it. No crits from Entei yet. Entei will guaranteed drop to the next Dedge, so it’s a choice of being content of 2 Dragon Dances or greeding a 3rd. Obviously, the benefit of KOing Entei now is that I’m not risking another crit. Also, the extra damage I take from Dedge can put Mence into prio range from stuff like E-Speed Arcanine, something I admittedly did not think about. It was essentially a gut check, deciding on what key mons I wanted Mence to KO. The main calc that swayed me to get a 3rd DD was vs Regirock: +2 EQ never OHKOs Regirock, but +3 gives Mence a coinflip chance. I went for the 3rd DD and don’t get crit in return. Entei drops to recoil.

Steelix 2nd. No hesitation, Earthquake. Thanks to the 3rd DD, EQ always OHKOs, so Mence only fears QC. No QC; Steelix drops. Charizard last goes down to Aerial Ace. Nail-biter of a battle as it easily could’ve ended there.
:rs/golem:1 :rs/arcanine:2 :rs/clefable:2 :rs/ampharos:2 :rs/shiftry:2 :rs/typhlosion:3

Hmm…this draft is probably worse than the one from Round 13. The best mon is once again a Flash Fire Arcanine. Arcanine has a good matchup against most Psychics at least. Clefable2 is unusable. Golem1 technically is, but I don’t see it useful vs Psychics. Typhlosion3 could kinda work as a Blaziken3 at home, but I went against it due to its poor matchup against the Water/Psychics.

This leaves Ampharos2 and Better Meganium2 (Shiftry2). Amp will do well vs the Water/Psychics and can Thunder Wave stuff it’ll struggle against. It’s not the best mon given that it has 0 bulk despite being slow, and it’s running the purposely weaker Thunderpunch for some reason. Shiftry2 could kinda complement Arcanine’s weaknesses to EQ and Surf. I’m a big fan of Leech Seed as it is a consistent way of inflicting passive damage to foes while maintaining longevity. There’s better Leech Seeders out there but who knows; Shiftry is a Dark type, so it’ll likely be good enough in this first battle at least. Amp2 Shiftry2 Arc2 was chosen, aiming to take this round one battle at a time and find better mons.

:ampharos: :shiftry: :arcanine: vs. :metagross: :ludicolo: :espeon:

Metagross lead! It’s time to play the Battle Factory. A lot rides on Arcanine hitting the Fire move. Initial idea was switching into Shiftry on possible EQ and then going Arcanine on Mash to KO with Fire Blast. This of course risks QC and missing which likely would result in an auto-loss. A safer play would be sacrificing a mon to get Arcanine in. Arc is favored to live an EQ, so it would give it 2 chances to hit more often than not. At the same time, my team is a bit too underwhelming for me to throw mons away for free. I still pivoted into Shiftry turn 1 but with different intentions than initially: maybe Shiftry can win the 1v1 with some Double Team magic. If it can’t, we have Arcanine to revenge.

But there’s a reason why Shiftry2 is universally called “better Meganium2”: it’s just that good! It was able to 1v1 Metagross with Leech Seed + some Double Team luck. Hitting Mashes even through 1 DT isn’t easy.

A surprising second mon showed up…Ludicolo? Shiftry’s counterpart. Not exactly what I want to see given that Shiftry can’t do a thing to it. I actually prefer to see the stall Ludi’s over the all-out-attackers. It did turn out to be Ludicolo3. Shiftry2 is able to PP stall this, but it will lose almost all of its PP. When it’s fully out, I can go into Arcanine to Roar it out so it’s no longer maxed out in evasiveness. This works out.

Espeon gets dragged out as the last. A good day to be be a better Meganium2. Still, I want to stay in to make sure a possible Espeon4 doesn’t get out of hand. Arcanine 1v1s Espeon2.

In the Battle Factory, It’s incredibly important to flex when possible because there’s no reason to stay humble. The Factory will always out-humble you. I take out the Struggling Ludicolo by paralyzing it so I could hit a Focus Punch.
:ampharos: :ludicolo: :arcanine: vs. :heracross: :exploud: :dusclops:

Even though I ran into a Metagross and Espeon, the Pokemon that I swapped for was Ludicolo. A terrible matchup for this team that I ignored for the first battle was Rhydon since the quote was Psychic HRHR. Ludicolo3 has an actual attack to handle Rhydon while performing Shiftry2’s duties. I make the swap.

Heracross the boss. Similar situation as Meta lead: Arcanine beats Hera but can’t switch in directly. This time, I go for Thunder Wave with the intention of sacrificing Amp but giving it a chance to 1v1 with some fortune. Heracross1 went for Counter turn 1, then missed Megahorn turn 2. This allowed Amp to 1v1. Exploud1 was the 2nd mon but didn’t get any damage before fainting thanks to Amp2’s Brightpowder. You will see this as a recurring theme regarding Amp2. Dusclops1 last gets Leech Seeded, ensuring victory.
:ampharos-mega: :ludicolo: :arcanine: vs. :dugtrio: :lapras: :hypno:

I never really thought about it until it came out…my team is REALLY weak to Dugtrio. Ampharos gets OHKOed 50% of the time and can’t really fight back. Arcanine gets OHKOed 18% of the time, but will need to hit Fire Blast in response. I didn’t even realize this on stream, but 3IV Ludi3 does NOT OHKO Dug always, only 50% of the time. I’m some bad rolls + Fissure hits away from getting swept by Dug on lead.

So what happens? Well…uh…Amp2 dodges Fissure to get a Fire Punch burn on Dugtrio! Is Ampharos2 the greatest Pokemon in the Battle Factory? Amp can 1v1 Grounds too apparently.

Lapras 2nd could be a problem potentially. Turned out to be the unthreat of Lapras3. Hypno3 last gets revenged by Arcanine.
:ampharos: :ludicolo: :arcanine: vs. :dewgong: :ursaring: :latias:

Dewgong lead. If only we were Thunderbolt. Since it is silly Thunderpunch, Dewgong4 got a chance to hit Sheer Cold after turn 1 Ice Beam but missed. The Amp2 show continues. Amp drops to Ursa EQ after another TPunch. Rolls show Ursa78. I opt to take it out with Ludi3. Latias last could’ve done some damage, but it was Latias4 who lost the 1v1 to Ludi3 as well.
:ampharos: :ludicolo: :arcanine: vs. :exploud: :forretress: :dragonite:

Ampharos2 crit OHKOs Exploud and OHKOs Forretress. An overperfomance of a lifetime. A real Pokemon in Dragonite shows up as last. Amp trades with it, getting a T-Wave and TPunch before going down from DNite78. Arcanine revenges.
:ampharos: :ludicolo: :arcanine: vs. :kingdra: :ursaring: :golduck:

While DNite78 is a good mon, I do respect Amp’s and Ludi’s good matchup vs Waters next battle, so I keep.

Kingdra lead. Kingdra1 is worst case since it can possibly cheese through both Amp and Ludi with Attract. I TPunch to scout. It was indeed Kingdra1 who Attracted, but Amp got the hit in. Since it’s Pumping guaranteed, I go into Ludi and Leech asap. This works out. Because of Attract cheese fear, I went for Giga Drain spam instead of DT. Ludi does avoid getting paralyzed as a result and remained at full, but it did not get a Double Team up.

Ursa 2nd. The good Ursa sets will blow up Ludicolo. Here I make an interesting decision given that we know that the last is a Water. If I lose Ludicolo, and the last is a Water/Ground, there’s a good chance I lose with Amp Arcanine left. Arcanine can live all hits except the least likely set of Ursa5. So I switched into Arcanine. Ursa ended up being the very scary set 2, but luckily for me it Countered twice! Fire Blast Crunch KOed. Golduck last confirmed the Ursa set. Ride or Die Golduck (set 3) loses to Ludi.
:ampharos: :ludicolo: :arcanine: vs. :breloom: :tauros: :entei:

Amp vs. Loom. Best case is it seeing a Focus Punch kill so Amp has a good chance of OHKOing it here. Another Amp2 victim. Tauros shows up 2nd mon, but Amp2 is the most elusive Pokemon ever, Brightpowder dodging Earthquake to get the Thunder Wave. Ampharos2 is NOT a good Pokemon; don’t be fooled. Amp 1v1s Tauros3 thanks to the cheese. Entei shows up as the last. Flash Fire Arcanine has a use now! Arc wins the 1v1 against Entei2.

A bit nutty that I not only won this round, but did it without much trouble thanks to massive luck from Ampharos2. I kinda forgot that I gambled in the Game Corner for 30 minutes waiting for Dave to finish.

End of part 3...
 
This was another dual stream with Dave, both of us inching closer to LRXC’s record.

Round 23 stream

:rs/gengar:3 :rs/miltank:2 :rs/fearow:2 :rs/moltres:5 :rs/slaking:4 :rs/gyarados:4

I was rather disappointed with the draft until the Gyarados4 reveal. Gengar3 is a fine set but not outstanding given the strength of its other sets. TBolt + Giga can feel redundant most of the time, and Skill Swap is practically useless. Cow Fearow Molt all have technically usable qualities since they’re fast but nothing to get excited about. I am a fan in Slaking4 as shown back in Round 15, choosing it over Blissey3. The draft will be banking on a Gyara4 carry, one of the best sweepers in the Factory.

Just like in Round 15, I went lead Slaking4, aiming for free Gyara4 setup after using Yawn. Gengar3 was the 3rd only because it has to be the 3rd best mon by default, but it does form a Normal Ghost core which gives the team an easy out vs many Normals. Overall, this is still a rather flawed team especially defensively, really putting a lot of weight on Gyara’s Dragon Dances to win the games. Slaking4 Gengar3 Gyarados4 was chosen.

:slaking: :gengar: :gyarados: vs. :rapidash: :tyranitar: :dragonite:

Rapidash lead. This could be easy setup for Gyarados. Only fear is Rapidash3 Hypnosis nonsense. Decide to take the risk and go hard Gyara. It was indeed Rapidash3. Decided to greed and go for a 2nd DD. It was able to hit 2 Hypnoses (Gyara is Chesto), get a crit Solarbeam, AND get the full turns of sleep. Quite the scare. It forced my hand to just go for the KO at +2, but Gyara is now in the red. 2 menaces in Tyranitar and Dragonite were the back mons, but Gyara was able to OHKO both (TTar sand assistance with the DNite KO)
:slaking: :gengar: :gyarados: vs. :ursaring: :regirock: :blastoise:

The bear. Can’t be Ursa2 because it activates HRHR. Gengar pivot is good here vs many sets, but not perfect. Decided to just Yawn to scout; Slaking is bulky enough to live even CB Mega Kick. Dedge from Ursa reveals Ursa4. Not the best, but it’ll be asleep next turn. I go into Gengar as an 100% safe switch, not risking a Gyara crit. I go into Gyara on its first turn sleep. I decided that I didn’t want to go for setup until Ursa was at -2, so I wanted to go back into Slaking to Yawn it again expecting a wake up. Unfortunately, Ursa wakes up turn 2. I go into Slaking to get the 2nd Yawn, but now Slaking is in the red. Gar had to tank an Ace too before Ursa falling asleep. Now I go into Gyara for the setup, but Ursa AGAIN wakes up turn 2. Gyara takes it out after 2 DDs, but it’s now under half due to 2 Ursa Dedges.

Regirock 2nd. Not great! It’s guaranteed Regirock34 since it cannot be one with a HRHR move. I risk the crit by Resting in an attempt to maximize odds. Regirock3 may not see the kill. Based on damage, it was Regirock4. It’s a roll for them to KO Gyara after hitting the first one. I Earthquake while they Slide, but Gyara lived! Absolutely huge. Gyara takes out Regirock and gets a big hit on Blastoise for Gar to revenge. Had to be Blastoise1 given the rest has a HRHR move.
:slaking: :regirock: :gyarados: vs. :suicune: :raikou: :blaziken:

Here I make an interesting swap: Regirock4 over Gengar3. I saw Regirock4 as a sturdier backbone while being a pretty good mon on its own. It could potentially cheese with Double Team, and Thunder Wave could be huge for Gyarados.

SUICUNE lead. I have the super-effective move; let’s go for it. Rain Dance confirms set 3. I go into Gyarados to set up. I get 2 DDs up and Resto Chesto before taking Suicune out. RAIKOU shows up 2nd, an easy OHKO. Or so I thought. Raikou5 BRIGHTPOWDER dodges the EQ to take Gyara out hehe.

Annoying situation; now Regirock will have to beat this Raikou likely being chipped. I Thunder Waved while it Reflected. I was once again reminded that I could Brick Break the screens. I Brick Break, Slide in an attempt to paraflinch (Raikou just Reflected again), and Brick Breaked again to take it out.

Blaziken last. It has to be set 3 or 4 to fulfill HRHR. Regirock is in range to an EQ crit. I decide to go into Slaking here. By going into Slaking, I can TBolt 2HKO without fearing Salac or the AI wanting to Endure. Plus, it gives me a way to reset Slaking’s Truant if needed. Regirock ended up taking out the Blaziken3 anyways after I switched it back in.
:slaking: :regirock: :gyarados: vs. :ampharos: :umbreon: :magmar:

Amp lead. I Yawn while it T-Waved. Go into Regirock on the 2nd T-Wave. No Lum means that it’s 1 or 2. Regirock outsped going for a DT, so it’s guaranteed Amp2 who went for Focus Punch asleep. I Thunder Waved after it woke up which may have been incorrect. Attacking repeatedly may have been better, but I guess that’s easy to say when the apparent kingpin of the Battle Factory Ampharos2 crit Focus Punches you. Regirock4 loses the 1v1. I’m forced to risk Brightpowder again with Gyara and take Amp out unboosted.

Umbreon 2nd. Turned out to be set 4. A bit of an awkward 1v1, but Gyara was able to win after 1 DD. It is chipped and Toxiced now. Magmar last, phew. Must be Magmar3 for HRHR.
:slaking: :regirock: :gyarados: vs. :muk: :venusaur: :ninetales:

Poison HRHR is a weird matchup for Gyarados given that the most likely and threatening Pokemon is Gengar, a Pokemon it cannot touch. Because of this, I want to use Gyara early where I know it can generate value.

Muk lead. I go into Gyara immediately. It turns out to be Muk3 based on damage. Gyara could drop to crit TBolt or TBolt para. I still risk the DD because if Gyara gets crit, I can attempt to completely set up with Regirock as a solid backup plan. Funnily enough, Gyara gets para’d! Goodbye.

Regirock comes in to attempt possibly free setup. It sadly got paralyzed early from TBolt, so Muk3 is going crazy. Tough moment given that there’s still 2 healthy mons in the back. Feel like I have to go all the way now. Regirock was able to persevere in the end, taking the Muk out with +6 evasiveness around 60%.

Venu 2nd. The evasiveness adds up! Regirock 1v1ed without taking any damage. It was Venu3. Ninetales last is best case scenario. Another Regirock4 bailout; the swap is paying dividends.
:slaking: :regirock: :gyarados: vs. :claydol: :gardevoir: :dewgong:

Claydol lead. I was thinking to just Ice Beam since Yawn won’t work on Claydol1, but Claydol1 is easy setup given that Regirock can tank the Slides while Gyara can switch into EQ. I Yawned. Turned out to be Claydol3. Gyara got 3 Dragon Dances and swept. Garde set was unknown, but Dewgong1 used Fake Out.
:slaking: :regirock: :gyarados: vs. :kangaskhan: :rapidash: :crobat:

It was Kanga3. Finally, the super easy Gyara setup. After PP stalling, Gyara4 sweeps again. Dave won his round too, so we’ll have to do this again.
3 rounds done, 4 more to go. Big round here as it is a Noland round. Dave and I dual streamed once more.

Round 24 stream

:rs/houndoom:3 :rs/metagross:3 :rs/steelix:2 :rs/raichu:4 :rs/regirock:5 :rs/misdreavus:1

The big question here as more of the draft was revealed: Where’s my switch-in to Earthquake? The answer was found from the last mon…Misdreavus1? Who uses this?

A little nostalgic over Missy1 as younger me liked using that set in Open Lv. Round 1. It definitely has the tools to be a usable Pokemon, but nothing amazing. What is amazing is the Metagross3, arguably the best physical attacker in the Factory. A Mash EQ Meta is already elite, but one that could heal and cheese with Double Team too? Chef’s kiss. The rest of the draft isn’t the best. Houndoom is a Pokemon that I have a poor track record with, a kill or be killed Pokemon. It’s probably the 2nd best mon here still, but I will learn how underwhelming this set turns out to be throughout this round. Steelix2 isn’t optimal but totally usable. Can’t pick it here with Metagross. Raichu4’s moveset is good but is sadly no speed. Regirock5 has a goofy collection of moves. Can’t expect Focus Punch Hyper Beam to be reliable.

I was set on Houndoom Metagross Misdreavus quite early. Just needed to figure out the order. I definitely want Metagross3 in the back since it’s by best mon. If it’s in the front lines, it’s more likely that it’ll have to take unwanted hits and possibly going down in suboptimal conditions. If that happened, can I really rely on back Misdreavus1 Houndoom3? Nah. Houndoom3 lead could work, but I will be really really weak to Fire after it goes down. Misdreavus is really only here as a Ground immune, but it’s not like Meta Houndoom is completely useless vs Grounds, only really fearing the Water/Grounds. Lead Missy can Thunder Wave Confuse Ray scout vs their lead and potentially put Metagross in a better position to set up. Back Houndoom is a fine complement to Meta as it is Flash Fire. I go Missy1 lead with back Meta Doom.

:misdreavus: :metagross: :houndoom: vs. :alakazam: :zapdos: :victreebel:

Zam lead. Can’t be Zam3 as it activates impossible to predict. Houndoom matches up well vs Zam, but dislikes Thunder Wave. I Shadow Ball as I needed the damage for Doom to take it out (flaw of no Crunch). It Psychiced so it’s set 2 or 4. I go into Doom as it seems the Psychic KO on Missy. Doom takes it out.

Zapdos 2nd is real bad; probably the biggest threat to the team. Misdreavus can’t do anything here as it guarantee drops to any Electric attack. I’m forced to try to 1v1 with Houndoom with Metagross backup. I connected Overheat which was big. Zap6 Thundered Houndoom in return. Doom was able to survive and not get paralyzed which was huge. Doom takes out the weakened Zap and Victreebel last.
:misdreavus: :metagross: :houndoom: vs. :kangaskhan: :lanturn: :jolteon:

Electric endurance that isn’t Zapdos will reveal a lot of info.

Kanga lead. Most likely 2 or 3 since they have an endurance move. While I have good means of stalling sets 123, I do need to account for the unlikely but still possible set 4. I Thunder Wave specifically for set 4. It turned out to be set 2. Metagross is able to tank all of Kanga2’s attacks to PP stall it out. In a fun play, after it ran out of Balls, I was able to heal Misdreavus back to full with Pain Split since it had to tank a Ball turn 1. Metagross3 got 6 DTs to sweep. Lanturn2 and Jolteon1 were the back mons.
:misdreavus: :metagross: :houndoom: vs. :mr-mime: :vaporeon: :entei:

It’s Mime time. Go into Houndoom as it switches into all safely. This also is the case for Metagross, but I would rather have Houndoom Choice Banded instead of Meta in the case of Mime3. It did turn out to be Mime3, so now Houndoom is Tricked into a Choice Band. I’m forced to lock into Shadow Ball to take Mime out.

Vaporeon 2nd. Not a great mon to see. I go into Misdreavus banking on some Confuse Ray Thunder Wave cheese to weaken it a bit. It turned out to be Vap3 who was very close of beating Missy through the hax. Missy barely survived to get a Pain Split, so Vap is at half HP. However, it did get 2 Acid Armors up. If it Baton Passes to the right Pokemon, particularly a Rock like Tyranitar, I kinda auto-lose. Vaporeon3 Baton Passes into…

…Entei. Not good for Metagross but great for Houndoom, a mon that I could’ve sacrificed against Vap. It can’t be Entei1 because the quote would be prep. It can’t be Entei5 because the quote would be endurance. Set 6 is fully walled by Houndoom. Set 3 is fully walled by Houndoom + Missy switch stalling. Sets24 are guarded well by Doom, but the repeated Bites and Solarbeams can add up. I go into Houndoom on Entei2 Fire Blast. Flash Fire boosted Overheat does a lot. I switch back in forth between Meta and Houndoom to reset the stat drop and take Entei out. Metagross is able to pick off the weakened Vap.
:misdreavus: :metagross: :houndoom: vs. :salamence: :exeggutor: :ampharos:

Salamence lead, scary! Could’ve gotten Vaporeon3 over Missy, but wanted the Thunder Wave and IVs. It’s most likely sets 2 and 3 as they have the endurance moves Protect and Endure. Only play here is Thunder Wave to limit a Dragon Dance set. Salamence7 would be tough since it’s Lum and will Crunch 2HKO.

Salamence went for ATTRACT, and Missy didn’t get the Thunder Wave off. 2nd possible worst case: It’s Salamence8. I did recognize the best sequence to get out of this situation pretty quickly. It’s going to Crunch guaranteed next turn, so I want to go into Metagross first to bait Flamethrower. Then I can pivot into Houndoom so it gets a Flash Fire boost. Flash Fire Overheat into Dedge KOs Mence. I perform the sequence with everything working out. Except…Dragon Claw crits Houndoom. BUT Houndoom lived with 2 HP! Doom was not favored to live a crit DClaw. I opted to trade Doom to take out the Mence with Dedge instead of risking an Overheat miss.

Missy returns vs Egg 2nd. We’re still looking for endurance here, and Egg1 has 2 endurance moves. This is an easy stallout for Meta3. It did turn out to be the 98% likely Egg1. Mime gets fully set up to beat Egg1 and Amp4.
:misdreavus: :metagross: :salamence: vs. :rapidash: :hariyama: :steelix:

Salamence8 is a pretty good Pokemon that pairs nicely with Metagross. I decided that it was better than Houndoom in the longterm given that it’s a Noland round, still admittedly putting a lot of faith on Missy1’s T-Wave. Houndoom3 overperformed here but will not be forgotten.

Dash lead. Thought there would be some cute play that could open up Meta setup but just took it out with Mence8. Yama comes out 2nd which could possibly be PP stall material. It was Yama1; time to PP stall. Meta gets fully set up to take out Yama and Steelix last.
:misdreavus: :metagross: :salamence: vs. :electrode: :regirock: :suicune:

Prep is scary as I’m very worried about Entei1 and Suicune1. Have to keep given the mons I saw last battle.

Electrode lead. Not Electrode4 since it activates HRHR by itself. 93% chance it’s Electrode2. It instead turned out to be the 5.9% Electrode3 who T-Waved Missy. I go into Metagross to tank a TBolt and take it out with fast EQ.

Regirock 2nd. It’s guaranteed Regirock4. Also, the last is a double prep mon. Only 4 possible sets in the back: Scizor4, Gardevoir2, Clefable2, or SUICUNE1. I prefer to attack this asap to limit Rock4’s cheese potential. Want to Mash too because it’s less valuable vs possible Suicune last. I hit Mash on Thunder Wave, then get a slow Resto Chesto to take Regirock4 out with EQ.

The last is the worst case…SUICUNE1. I’m at the mercy of Double Team luck. If I hit, I’m in good shape as EQ is a 3HKO. Meta3 hits first EQ on their DT. If I EQ again, Suicune will likely Rest next turn, so might as well preserve EQ PP and attempt to get an Atk raise here. It Surfs, but I was able to hit the Mash. They will for sure Rest. Need to just spam EQ here. It Rests, EQ hit. Surf, another EQ hit. The last 2 EQ hits were huge. They will guarantee Surf again, so might as well go into Mence. Mence is faster and will KO Suicune in the red. This works out perfectly! Salamence hits and I’m on to Noland8!
:misdreavus: :metagross: :salamence: vs. :starmie: :registeel: :jolteon:

I ran into a Suicune1. Very good Pokemon, but 3 IVs. Another issue with Suicune1 is that it lacks bulk, so it’s not that easy to set up compared to Suicune6. I actually figured that swapping for Suicune1 is bait against Noland: too frail to set up, and too slow to outspeed certain threats with his 31 IV Pokemon. I’m all-in on Missy1’s T-Wave to support my best mon, Metagross3. I keep.

Noland sends out STARMIE lead. Uh-oh. With the perfect IVs, Starmie is now able to 2HKO Missy with ease. Plus, far too many Starmie sets have Lum. Figured my best play is to just get the Shadow Ball damage so Metagross can revenge. Would be down 1.5 mons, but it’s better than outright losing to this.

To my and everyone’s surprise, Thunder Wave was used from Starmie. No Lefties meant that it was Starmie1 LOL. Pretty good case as Meta3 can use it as setup fodder. Meta fully sets up and gets a Mash raise to sweep Noland. He had Registeel45 and Jolteon3 in the back.

Misdreavus1 masterclass! Noland8 taken down. Dave won as well, so we will continue at a later time.
The later time is now. 3 rounds away from Noland9, the battle where LRXC’s streak ended. The dual stream with Dave continues.

Round 25 and 26 stream

:rs/donphan:2 :rs/raikou:5 :rs/lanturn:4 :rs/weezing:4 :rs/marowak:2 :rs/espeon:2

Good draft with interesting options. On the surface, Lanturn4 Weezing4 Marowak2 makes a lot of sense as Weezing has a Ground immunity and Explosion upside. But, such a team is weak against the most powerful and common mon in Factory, Lati. Lanturn4 is faster than the slow 3 IV Latis which is good, but it could get chipped while the other 2 are definitely losing. My best Lati answer is actually Espeon2. So I instead opted for Espeon2 Lanturn4 Marowak2, a solid enough unga bunga-esque team that only really fears Sceptile. Love that Lanturn is Volt Absorb for once.

:espeon: :lanturn: :marowak: vs. :milotic: :starmie: :hypno:

Milo lead. Tricky as I fear Surf crits and Mirror Coats as a whole. What’s interesting is that I have an easy Wak revenge if Espeon gets unlucky. Espeon2 CMs through Milo2 to win the 1v1 and outright sweep. Back mons were Starmie and Hypno.

:espeon: Kill Counter: 3.
:espeon: :lanturn: :marowak: vs. :latias: :cradily: :raikou:

Latias! This is why Espeon is on the team. Espeon2 was able to 1v1 the very good Latias1 thanks to CM and Resto Chesto. Even with 1 CM, Espeon was able to brute force through Cradily1 and Raikou6 too!

:espeon: Kill Counter: 6.
:espeon: :lanturn: :marowak: vs. :machamp: :sceptile: :starmie:

Machamp lead. Good for Espeon, but Espeon doesn’t OHKO since has 0 SpA investment. I Psychic while it Countered. Another Espeon kill.

The monster threat of Sceptile shows up as 2nd mon. Espeon is faster thanks to IVs. Shadow Ball into Psychic is best as Shadow Ball doesn’t put Scep into Overgrow range. Scep2 goes for Double Team, but Espeon hits both attacks. Starmie shows up again to lose to Espeon.

:espeon: Kill counter: 9.
:espeon: :lanturn: :marowak: vs. :exploud: :manectric: :jolteon:

Talk about the perfect matchup. 2+ Electrics vs VA Lanturn and Marowak.

Exploud, an Electric type in training. No need to greed here. My back mons have a near perfect matchup vs any back Electric. Espeon just adds to its kill counter with the 2HKO on Exploud34. Manectric comes out 2nd. Espeon wins the 1v1 thanks to CM Resto Chesto. Jolteon last. Espeon outsped but fails to OHKO. It gets crit in return NOOOOOO

Who cares that Marowak revenged? The kill counter…

:espeon: Kill Counter: 11.
:espeon: :lanturn: :marowak: vs. :electrode: :latias: :golduck:

Electrode lead. It’s an Electric, but my Electric-immunes fear Explosion. I attempt to outplay Electrode34 by Calm Minding on Thunder Wave, getting a slow Resto Chesto whenever they Thunderbolt, and OHKOing with Psychic afterwards. It took a few tries because of Mirror Coat shenanigans, but this worked out. Espeon is at +1.

Latias is back but not set 1. Didn’t mention it earlier, but the worst case is the bulky Lefties sets of 47. It did turn out to be Latias4. I sacrifice Espeon for the Lanturn4 revenge. Golduck last is quite ideal for obvious reasons. SlowDuck makes things easier.

:espeon: Kill Counter: 12.
:espeon: :lanturn: :marowak:: vs. :skarmory: :nidoqueen: :jolteon:

Skarm lead. Hmm…Lanturn gets to play for once. It Countered so it is Skarm14. Nidoqueen 2nd. Surf doesn’t always OHKO so I went into Wak to take it out. It turned out to be set 1, so I had to risk Focus Band; slightly scary. Jolteon4 loses to Wak. No Espeon kills?
:espeon: :lanturn: :marowak: vs. :victreebel: :dragonite: :regice:

Victreebel lead. Add it to the kill counter! Dragonite 2nd. CM is fairly safe overall. With the CM, Espeon avoids getting 2HKOed from the Shell Bellers to 2HKO in return. Regice3 was the last. Repeated Psychic into Lanturn revenge takes it out. Shoutouts to Espeon2.

:espeon: Kill Counter: 14.
Dave won Round 25 as well. The stream continues.

:rs/snorlax:3 :rs/blastoise:4 :rs/claydol:2 :rs/salamence:6 :rs/ursaring:4 :rs/armaldo:1

Interesting 6 where the first 5 are more than usable. Blastoise4 is a very reliable Water but not elite enough to outright carry a round. Salamence6 is the worst out of the Dragon Dancers. It’s still a DD Mence at the end of the day though. Ursaring4’s Earthquake coverage makes it a more appealing option than Snorlax3. Claydol2 is a pretty big brain mon that can work with the right partners, but I tend to dislike its passivity. There’s a slight Lati fear if Snorlax doesn’t come, but Blastoise can Mirror Coat them if need be. Turning down DD Mence upside seemed incorrect, and Mence6 really appreciates the EQ coverage since it lacks the move. I chose Ursa4 Mence6 Blastoise4.

:ursaring: :salamence: :blastoise: vs. :shiftry: :kingdra: :nidoqueen:

Shifrty lead. This is freebie Mence setup more often than not. Raw Solarbeam reveals Shiftry3. Due to Explosion fear, I only got one DD on Mence before taking it out.

Kingdra 2nd is kinda scary. Guaranteed 1 or 2 as it can’t be a HRHR Kingdra. Mence can live a hit here. Opted to Ace for more damage. It was Kingdra2. With a good Ace roll, I can now attempt to get a Headbutt flinch which I got haha. Headbutt gaming. Nidoqueen last cannot be Focus Band as Shiftry3 has that item, so I guarantee win at this position.
:ursaring: :salamence: :blastoise: vs. :scizor: :flygon: :registeel:

An uncommon and scary quote combination. Salamence6 looks poor here since it can’t hit Steels well at all, so it’s tempting to swap. However, the most likely Steel by far is Scizor4, a mon that Mence6 handles the best between my 6 options. This is a very weird one; Mence6 could get many DDs up against Scizor4 but then be hard walled by the 2nd Steel. Feel forced to keep as a result.

Scizor lead. Obviously it’s most likely set 4, but sets 23 are not out of the question. Here I make a pretty nice sequence imo:

  1. Scizor4 really wants to Agility here because it’s slower than Ursa. If I go into Mence turn 1, it’ll really want to SD turn 2 after their turn 1 Agility. Even though Scizor4 doesn’t threaten Mence6 directly, it could potentially Baton Pass into something that can. By getting damage turn 1, it is less likely to SD turn 2. I could Aerial Ace to ensure I get damage through possible Brightpowder, but I do need to account for possible Zor2 who wants to SD. Going for EQ turn 1 is best. This works out nicely as it did Agility. Rolls show that it is indeed Scizor4.
  2. Now I can go into Mence turn 2 on a very likely Silver Wind. This works out as well.
  3. I can get 2 DDs with Mence now. Zor4 is very likely to Silver Wind again. After the 1st DD, Zor4 would really want to Agility again. The 2nd DD is thus free because +2 Mence6 will still be faster than +4 Zor4. Then I take it out.
This is a nice sequence, but it’s likely all for naught against their 2nd Steel.

Flygon 2nd. Red flag! Flygon lacks a prep move! So the last is guaranteed a Steel with a prep move. It’s only 5 possible sets: Metagross23 or Registeel156. Guaranteed Flygon34 since 12 has the same item as Scizor4. The main question here is am I okay with letting Mence 1v1 Flygon given that it’ll be fodder against the Steel. I do stay in as I prefer Ursa Blastoise to stay healthy for obvious reasons. I actually Dragon Danced because I wanted Mence to be low so something like Metagross sees a kill instead of setting up in its face. I had Blastoise backup if it got crit. Mence survives and takes Flygon out with +3 Ace.

Registeel last…what to do? I could stay in content with +3 Ace chip, but God Registeel (set 1) can set up in my face. Switching into Ursa to pressure it is best. Luckily for me, it was Registeel6, a totally not common theme. Easy 1v1.
:ursaring: :salamence: :blastoise: vs. :articuno: :latios: :victreebel:

Articuno lead. Kinda interesting here. I have Rock Slide, but can I risk missing? Have to go for it turn 1 to account for Articuno2. Protect reveals 3. Because Articuno3 loves using Protect, I decide to play the odds by going into Blastoise. Blastoise will get chipped, but the Blastoise switch prevents freeze risk which sounds worse. Preserving Ursa4 HP could be nice too. Blastoise wins the 1v1 only taking like 25% damage which was really good! Lost a lot of Surf PP as a downside. LATIOS 2nd…time to Mirror Coat. TBolt survival, so Mirror Coat OHKOs. The almighty Victreebel last graces the world with its presence. Thank you, Victreebel.
:ursaring: :latios: :blastoise: vs. :wailord: :dodrio: :tentacruel:

Ran into a Latios. Our team is very weak to Water HRHR. Latios’s TBolt coverage is likely needed. I part ways with Apology Mence.

Wailord lead is worrisome. Good to have Latios now. It turned out to be Latios4, nice! Latios was able to 1v1 Wailord4. Dodrio 2nd is kinda bad. I have no switch to Dedge. Tough decision here. If I sacrifice Tauros/Blastoise to Dodrio, I will have to go into the other one to revenge as Latios is slower and cannot live. So it’s a choice of if I want a half HP Latios + Ursa/Blastoise or a full + half HP Ursa + Blastoise. I decided to sacrifice Latios to revenge with Blastoise, mostly banking on full health Ursa to take down the last Water. Tentacruel last. It’s guaranteed 2 because of switch logic (Buddy op). I win the 1v1 with double EQ.
:ursaring: :latios: :blastoise: vs. :granbull: :golem: :suicune:

Granbull lead. Forced to stay in given the fear of Choice Band. It turned out to be set 3, but Ursa4 gets lucky with a Brightpowder dodge. EQ + Dedge takes out Bull3. Golem 2nd is a funny one. Granbull3 has Quick Claw, but 3 out of 4 Golems run QC too. So it’s guaranteed Golem2 who is spamming Focus Punch. Another easy Bear KO. An actual scare shows up last in SUICUNE. Can’t be Suicune16 because it wields Chesto like Golem2. -1 Dedge still does enough damage to 1v1 Suicune3.
:ursaring: :latios: :blastoise: vs. :fearow: :ludicolo: :walrein:

Fearow, kinda a similar situation as the Dodrio. 2 Waters in the back. Fearow was FEELING THE GLOW (Sky Attack), so easy OHKO without taking damage. HRHR quote already met. Ludi 2nd. Gets crit by AA; Bear going crazy. Walrein last. Can’t be set 1 as it would activate battle flow (Ludi went for Rain Dance before going down). Turned out to be the final boss, Walrein3. Ursa dodged Sheer Cold to get a Dedge. QC Attract, but Ursa broke through to KO.
:ursaring: :latios: :blastoise: vs. :tyranitar: :rapidash: :shiftry:

Dark specialist. There’s only 4 Darks: Houndoom, Shiftry, Umbreon, and Tyranitar. I did think about a Walrein3 swap for a little bit over Latios actually, but I kept.

TTar lead. Forced to EQ. It just Rock Slid. Ursa takes it out with a 2nd. Dash 2nd. It cannot be Houndoom in the back as the quote would not be Dark otherwise. No Lefties from sand so it’s not Dash2. Decide to go into Latios4, but it did turn out to be the worst case of Dash3. Dash3 means the last is either Shiftry or Umbreon. Latios is Lum, so it’s only bad if it decides to Hypnosis twice in a row AND hit both. Latios dodges 1 Hypnosis, securing the 1v1. Last was Shiftry who gets OHKOed by Ice Beam. Rewatching this, it had to be better Meganium2 there, and the Tyranitar set was one with a HRHR move. Interesting.

What’s more interesting is that I was able to catch up to LRXC’s streak, now only 6 wins away. Dave’s streak is still alive as well…
In the unlikeliest of scenarios, Dave and I were to reach the same round where LRXC’s streak ended. The likelihood of at least one of us surpassing 188 wins is high given the situation. Time for another dual stream with everything on the line.

Round 27 stream

:rs/slaking:2 :rs/porygon2:2 :rs/flareon:3 :rs/dodrio:4 :rs/gardevoir:8 :rs/medicham:1

Not the greatest of drafts which is concerning since this is a Noland round. The best mon here is Dodrio4, a true ride or die Pokemon. What makes this extra funny is that LRXC had this very set in this round too; possible redemption? Gardevoir8 is usable, but it only has one good move. Slaking2 is also usable, but feels redundant to bring with Dodrio as they both lose to the same stuff.

We start to get into really questionable territory with the other 3 Pokemon. Porygon2-2 is a heavily clowned set for good reason. Solarbeam only attack sounds really bad. There are positives at least. Thunder Wave is a good move, and the invested Solarbeam under sun makes this set very good against the common Waters. I actually picked Flareon3 in Round 21 as the draft’s only Ice resist. It didn’t do anything, but I can envision it actually contributing with its invested Speed. Medicham1 has an intriguing set with a workable EV spread. HJK base power in Gen 3 isn’t strong enough sadly.

So who to pick? If I’m building around Dodrio4, I would want partners that can handle Steels and Rocks. My best Steel answer is hilariously this Flareon. Who else can take on Metagross? Porygon2-2 and Gardevoir can combat against Rocks, but the most common Rock is Tyranitar! Not good for Garde8. Medi could be a midground vs both, but HJK damage is too low. After looking at calcs, I was convinced that it has to be Porygon2-2 Flareon3 Dodrio4. Only remaining question is who to lead. At first, I thought that I needed to lead P2 for the Thunder Wave support, but Dodrio doesn’t necessarily need that support. In fact, such support can backfire in situations where I’m looking to Endure but the opp’s mon gets paralyzed instead. Might as well lead Dodrio4 and see if it can get the sweep off early.

Dodrio4 Porygon2-2 Flareon3 go go go!

:dodrio: :porygon2: :flareon: vs. :shuckle: :metagross: :entei:

Shuckle gah! A benefit of bringing Garde8 would’ve been the Magical Leaf as an out vs Double Team. Since I didn’t bring it, I’m incredibly weak to certain Double Teamers like this Shuckle. Drill Peck is a 3HKO at least. It’s the only play…gotta hit enough before it’s too late. Fortunately, Dodrio takes out Shuckle with Drill Peck into crit Drill Peck! Phew.

METAGROSS 2nd HELP!!! Flareon3 has to do something. I’m totally a QC EQ or Overheat miss away from losing here. The question here is if I want to go directly into Flareon or stay stay in once for some information. Opted for the latter; Flareon actually needs some chip to OHKO Meta2 sadly. Dodrio dodges a Mash to get Drill Peck chip. I go into Flareon the next turn. Flareon takes almost half from Mash, but Flareon was able to connect on Metagross in return.

Entei last. Decided that keeping Flareon in is pretty safe. Porygon2 was able to 1v1 Entei5.
:dodrio: :porygon2: :flareon: vs. :registeel: :armaldo: :manectric:

The Metagross was set 4 or 6. I can’t risk it being the no EQ Meta6, and I can’t really fit the mon on my team in general. I keep.

Registeel lead no…Can’t be Registeel3, a double HRHR mon. I go into P2 as a scout. Once again in a totally uncommon scenario, it was the least threatening set of Registeel6. The reason that Registeel6 isn’t scary is because it loves spamming just Aerial Ace. I Thunder Wave, set sun up, and take it out with Flareon3 Overheat.

Armaldo 2nd. I have no switch-in to this, and sun ends this turn, meaning that Porygon2 doesn’t have an easy means of revenging after an Overheat. I sacrifice Flareon to get a -2 Overheat off under sun, doing about half. It Ancientpowered so it’s set 1 or 2. There’s great fear against 2 as it has Brick Break to possibly 2HKO P2. I go into Dodrio which risks omniboost and possible QC. It worked out. Dodrio takes out Mane last. It’s not Mane1 because it would’ve Quick Attacked Dodrio.
:dodrio: :porygon2: :flareon: vs. :zapdos: :dragonite: :dugtrio:

Here is where I found out that Dave lost at 186 wins to Lapras8…gotta keep going.

Zapdos lead. This is a better situation than it looks on paper. Zap sees the Electric move on Dodrio, so if Dodrio can avoid getting para’d, then Dodrio gets the full power Flail with Salac. It works out perfectly. Dodrio tanks TBolt with Endure, doesn’t gets para’d, and sweeps. Finally, an easy match.
:dodrio: :porygon2: :zapdos: vs. :walrein: :blastoise: :gengar:

I take a chance with the 3 IV Zapdos over Flareon. Makes sense to get Zapdos to better my matchup against Waters. Flareon is better vs Steels, but Zap isn’t that bad vs them either outside of Steelix.

Walrein lead. I found out that it was the most likely Zapdos of Zap5. Flail actually does not OHKO all Walrein sets. I go into P2 as it maximizes my odds vs all sets. It turned out to be set 2 who likes to spam Double Team and Curse a lot. P2 takes it out, only taking damage from turn 1 Ice Beam which did nothing as P2 Traced Thick Fat. Zapdos was able to take out Blastoise2 2nd. Gengar5 gets paralyzed and taken down by P2.
:dodrio: :porygon2: :zapdos: vs. :armaldo: :dewgong: :tentacruel:

Armaldo lead. Not great. The play with the best odds would be Drill Peck to put it into Zap TBolt range. Pretty scary no matter what I do because it puts so much weight on Zapdos not getting QCed. I went for Endure trying to account for the rarer chance of an AncientPower omniboost. In such a case, getting the stronger full power Flail would be better. I pay the price as Armaldo3 Quick Claws Dodrio after I Endured, so I can’t even go into Zap now.

I have to go into P2. Armaldo3 really wants to SD here. Of course, my only attack is Solarbeam, so I need the sun up. +2 Brick Break is a roll to OHKO P2, and there’s the QC element. A silver lining of getting no damage on Armaldo was shown from this sequence. Like I said, +2 Brick Break was a roll to kill 5/8ths of the time. If they don’t see the roll however, the AI likes Swords Dancing again as it’s still at full HP. P2 gets the first Solarbeam on the 2nd SD, doesn’t et Quick Clawed, and take Armaldo down without taking damage. HUGE. P2 cleans up against back mons Dewgong and Tentacruel. Scary one.
:dodrio: :porygon2: :zapdos: vs. :clefable: :rhydon: :kingdra:

Prep is scary. Considered getting Tentacruel2 for a bit to better my matchup against possible Suicune1 or Entei1. Decided to keep in the end.

LRXC joked that I was taking too long on this decision only to run into a Clefable2. This is exactly what happened. I take it out with Zap5. Rhydon 2nd is problematic. I am a Horn Drill hit on P2 away from losing. I sacrifice Zap to Rhydon, but it does reveal to be Rhydon1. No Horn Drill at least. P2 gets Scary Faced and Earthquaked but wins the 1v1.

Kingdra last with sun up. Guaranteed 3 or 4. Turned out to be Kingdra3 which P2-2 (MVP in this round) 1v1ed. Now tied with LRXC again! Time for Noland9.
:dodrio: :porygon2: :zapdos: vs. :miltank: :granbull: :altaria:

Dodrio4 attempts to get its revenge against Noland9. Last time, it got Brightpowdered by Noland’s Salamence5. What will happen this time?

Miltank lead. Tricky Pokemon given how differently all 4 are played. The main fear of staying in is Miltank2. It does not see a kill with Focus Punch, so it’s very likely to T-Wave Dodrio. Switching into P2 as a scout will work nice against Miltank1 and 3. Versus set 2, P2 will get paralyzed but at least I know the set. Set 4 is the one where staying in is perhaps better. Miltank4 will be an uphill battle no matter what I do, so I felt that playing the odds against the other 3 sets by switching into P2 is the better play. I make the switch. It does turn out to be Miltank2 who Thunder Waved. P2 get cured from Lum.

My best chances to win is by getting Dodrio fully set up in a safe manner. Miltank is either Focus Punching or Thunder Waving again. To maximize my odds of my best Pokemon winning, I should risk a crit by going into Dodrio on a Focus Punch. From there, they’ll spam Focus Punch, seeing a kill. This would allow Dodrio4 to Endure and take it out without fearing T-Wave. Porygon2 has to take a Focus Punch and gets paralyzed, but Dodrio doesn’t get crit from Focus Punch. It takes Miltank2 out in perfect position to sweep, Salac Berry used up and at 1 HP.

Granbull 2nd. Intimidate is a big deal; now Dodrio can’t OHKO this. There’s a simple play to fix this: switching out. I sacrifice my MVP Porygon2 to reset the Atk drop from Granbull2 to OHKO it. Dodrio loses its Speed boost which could matter.

Altaria last. Looks like the speed drop doesn’t matter. This is a guaranteed win. Altaria3 is the only competent Alt set but will never set up as it sees the kill. If Dodrio fails to OHKO Alt, Zap revenges. Alt did survive the Flail, so it was Alt13. Zapdos5 takes it out in style with Double-Edge. Dodrio redemption!

Noland9 is conquered! I regain the Open Lv. record at 189 wins, surpassing LRXC’s 188.

End of part 4...
 
Part 5: Road to 200 + Final Thoughts

Since I got the record again, I could wait until someone catches up like before for maximum content. At 189 wins, I recognized that I was close to 2 massive benchmarks: 200 wins (not seen in singles) and Noland10 (not seen at all). I decided that I wanted to do a superstream aiming for those benchmarks around the 2-year mark of when my streak began. Scheduling issues made me delay the event from December to February. The February date may have been more eventful. It was the same day where I lost my Lv. 50 119 streak 4 years ago. If I lose, I’m finally free from Open Lv. and can start some unga bunga attempts. If I reach 210 wins, I’ll wait once more until someone gets close (if that even happens).

Rounds 28, 29, and 30 stream

:rs/latios:5 :rs/arcanine:4 :rs/kangaskhan:3 :rs/swampert:2 :rs/exploud:1 :rs/vaporeon:1

After some tougher drafts prior, I was rather pleased to get a simpler draft to start things off. Intimidate Arcanine4 is a great complement to the obvious Latios5 and Swampert2 picks, covering for Heracross and Steels that CM Latios can’t beat. Slow and steady may be the team’s most questionable matchup, and that’s what I’m going against in the first battle. It may require smart play by letting Arc/Pert get Toxiced before going for the Latios setup. Arcanine4 Latios5 Swampert2 was chosen surprise surprise.

:arcanine: :latios: :swampert: vs. :porygon2: :ninetales: :skarmory:

Porygon2 lead. Most likely a Thunder Wave one. Now I have a Pert, but Pert2 doesn’t exactly follow up well vs set 3. Also, this P2 could just be set 4. The ideal scenario would it being the hero Porgyon2-2 as that would be easy setup fodder for Latios. Decided to let Arcanine get paralyzed in case that it’s set 4. It did turn out to be set 2. I PP stall the set without letting Latios get paralyzed. When it ran out of Solarbeams and Thunder Waves, Latios Calm Minds up to take P2 out and sweep.
:arcanine: :latios: :swampert: vs. :misdreavus: :shiftry: :quagsire:

Misdreavus lead. Another Pokemon likely to Thunder Wave. This time around, Swampert switch is favored to work out, only fearing Brightpowder miss and an early Mean Look from Missy3. I go into Pert2 on T-Wave Missy, so it’s not set 4. Pert fights through Confuse Ray to miss Surf due to Brightpowder, so it is indeed Misdreavus3. Miss was big because Surf into Arcanine Crunch KOed. Pert is very likely to get Perish trapped if it stays in, so I go back into Arcanine. Missy3 does Mean Look on the switch, so it’s very likely Arcanine gets paralyzed. BUT…Missy went for Confuse Ray the following turn instead. Arc4 was able to fight through Confusion to KO Missy3. Lucky sequence.

Shiftry 2nd. Turned out to be our good friend, better Meganium2. This became setup fodder for Latios. Latios maxed its stats from CM and hit through Double Team to take out Shiftry2 and Quag last.
:arcanine: :latios: :swampert: vs. :manectric: :venusaur: :metagross:

An Electric lead. I go into Pert to beat it. Pert takes Crunch chip from Mane4. Latios5 gets lucky hitting a boosted Dragon Claw through +6 evasiveness and Brightpowder from Venusaur2. Metagross last is fun but cannot win here.
:arcanine: :latios: :swampert: vs. :entei: :registeel: :latias:

Entei lead. Need some info here. I go for Overheat because it’s actually the highest damaging move here. I get a crit on Entei (lived on 1 HP) as it Double Teamed. Crunch picks it off.

Registeel 2nd. Most likely 3 who activates HRHR on its own. Obvious Overheat. It Amnesia’d. Dedge picks it off.

Latias last. Slight bummer that Arc is at -2 SpA now. I Dedge to limit possible Latias5 wanting to CM. Turned out to be set 6. My all male team is a bit annoyed by this set. Arcanine loses the 1v1 due to para and infatuation. Latios was able to fight through 1 para turn to get the 2HKO with DClaw.
:arcanine: :latios: :swampert: vs. :exeggutor: :flygon: :medicham:

Egg1 becomes setup fodder to Latios5. Latios5 sweeps.
:arcanine: :latios: :swampert: vs. :typhlosion: :kangaskhan: :skarmory:

Typhlosion1 becomes setup fodder to Latios5. Latios5 sweeps.
:arcanine: :latios: :swampert: vs. :articuno: :slowking: :dodrio:

Articuno lead. Obvious Overheat. It did turn out to be the “worst case” of Articuno3 who wasted 4 Overheat PP thanks to Protect. Slowking 2nd. I go into Pert. Pert loses to the 1v1 to Slowking3 but Arcanine picks it off with E-Speed. Dodrio last cannot win at this position. Can’t win without a Latios.
4 wins away from 200. Stream fatigue is real. I remember being tired after a 2 hours when I streamed Rounds 15-17 in Lv. 50 4 years ago. Round 28 here was a simpler round than most but still took 3 hours. Wonder who popularized the slower pace…

:rs/rhydon:1 :rs/moltres:4 :rs/cradily:4 :rs/clefable:3 :rs/raikou:2 :rs/glalie:2

Here we go. Weird collection of mons here. The only mon that I have trust in is Cradily4, a mon I used way back in Round 7. Cradily’s top enemies are Metagross and Immunity Snorlax. A Fire-type like Moltres looks like a workable complement. Unfortunately, this is the ever unusual Moltres4. Most Moltres sets lack speed investment which hurts them greatly, but this Moltres takes it to the next level by running QUIET. In return, it technically has the strongest special move in the Factory with its Overheat, sure. The rest of the team can’t really handle Metagross well; this one still loses to Metagross5 but I’ll have to play my odds I guess.

Last options? Glalie2 is a competent trade mon, but I need mons that can win more than trade given the draft. Rhydon’s shared weaknesses with Cradily makes it less desirable. I definitely want Cradily4 as it is my best Lati answer. Clefable3 attempts to generate damage with its great super-effective damage, but it is far too weak otherwise. Now there is Raikou2, a mon we all tend to avoid. It’s only attack is Thunder; that can’t be reliable. Given the other options, I think gambling here is a little warranted. There will be some situations where Rain Dance setup can be “free” as well. The bigger issue of the Raikou2 choice was the questionable synergy with Moltres if I Rain Dance as it’ll weaken Moltres Overheat. If that wasn’t the case, I would’ve made the decision sooner.

Still went with them anyways. The road to 200 is now reliant on Raikou2 Cradily4 Moltres4 of all Pokemon.

:raikou: :cradily: :moltres: vs. :jolteon: :metagross: :venusaur:

Jolteon lead lol. Raikou is walled. Cradily beats this but gets paralyzed in the process. METAGROSS 2nd oh no! While Moltres loses to Meta5, I’ll know immediately if it’s 5. 5 would Brick Break while the other sets use another move. Moltres switch is safe. Metagross used Double Team, so it’s the excellent set 3. Moltres4 HITS the Overheat to take out Meta3. Venusaur gets roasted too.
:metagross: :cradily: :moltres: vs. :gardevoir: :gyarados: :shiftry:

Metagross3 is too elite to turn down. Kinda works as a lead with Moltres pivot covering its weaknesses. Raikou2 didn’t do anything. Too bad.

Garde lead, one of the scariest leads to see. The main fear are the elemental attacking ones. There’s the unga bunga route of “just hit Mash”, but missing would put me in an awful spot. Decided to Rest scout over going Cradily just in case it was a Wisp set. Fire Punch reveals Garde34. Meta is back to full with Chesto used up. Forced to go into Cradily now. Cradily tanks Fire Punch + Ice Punch to Mirror Coat OHKO in return.

Gyara 2nd is just as scary. It’s most likely Gyara2 who’s in a phenomenal situation versus this weakened Cradily. There’s other sets that do completely different things, but Gyara2 is far too threatening; I have to Coat. It was Gyara2 who connects with Blizzard. Cradily gets the Coat off, but Gyara lives. Molt can live a Pump to revenge. Better case happens; Pump dodge into Dedge KO. Shiftry loses to Molt. Shiftry sure shows up a lot.
:metagross: :cradily: :moltres: vs. :gengar: :lanturn: :xatu:

Gengar lead. Similar situation with Garde. This time, I might as well go into Cradily immediately. Gengar TBolted so it’s not a set with Fire Punch. Cradily gets para’d from TBolt which was unfort. Gengar Psychic’d afterwards so it must be Gengar3. Think it’s too risky trying to set up on Gengar3 with Meta, so I have to trade with Cradily. It wins the 1v1 but now it’s low.

Lanturn4 revenges Cradily with Ice Beam. Another tough mon to see because it’s faster than Moltres. Meta can live an attack, but I would have to make a very tough play if it Confuse Ray haxes here. It Surfed which was best case; EQ OHKO. Xatu last is a sigh of relief. Xatu cannot beat a Metagross.
:metagross: :cradily: :moltres: vs. :forretress: :flareon: :espeon:

Here we go: battle 200. Forretress2 gets PP stalled by switching into Moltres on EQ and switching into Meta/Cradily on Dedges and Counters. With 6 DTs up, Meta takes out back Flareon and Espeon as well. 200 wins!
:metagross: :cradily: :moltres: vs. :aerodactyl: :donphan: :arcanine:

Aero lead. I can scout this by going into Cradily. Aero Fire Blasted, revealing set 3. Cradily gets immediately burned which was a bummer. I let Moltres stall out the rest of the Fire Blasts so Meta can sit and set up on the other moves.

Donphan 2nd. Even though Meta is at +6 evasiveness, I have a fairly easy means of PP stalling Donphan as well without risking Fissure by going into Moltres on EQ and back to Meta on Rock move. A play that I did not see during stream that could’ve happened was Donphan2 going for Rock Tomb as it likes to Rock Tomb when slower. That would’ve been bad if it was Donphan2 as I did make the Moltres switch. It was Donphan1, so this was another simple PP stall. Despite the simplicity, I decided to make things more complex by trying to find a line where I can take advantage of Donphan’s Swagger. Moltres does interestingly have Safeguard. In the end, mostly due to stream fatigue, I didn’t have Meta set up as well as possible. It takes out Donphan with a Swagger boost but no Double Teams up.

Arcanine last. Meta is at 77% HP. It has to be Arc34 for HRHR. It sees an Overheat kill so I pivot into Moltres. Damage shows that it’s Arc4. Molt is in low yellow HP but can live another hit. The goal here is to stall Arcanine out of Overheats. I can go back into Meta to bait another Overheat as Arc will not Overheat in front of a resist if it doesn’t kill. I go back into Moltres on another Overheat. Thanks to Pressure, 4 out of 5 Overheats are gone. Moltres faints. I go back into Meta to bait the last Overheat, sacrificing Cradily. Afterwards, Meta can safely EQ to take Arc out.

Long and frustrating battle there; had to deal with bots too. First battle since the Granbull Magmar face-off where it came down to my last Pokemon.
:metagross: :cradily: :moltres: vs. :golduck: :hypno: :medicham:

The Duck. Decided that, once again, I prefer Cradily to handle the lead as Pump can do a lot. Cradily handles Golduck with Mirror Coat. Hypno shows up 2nd. Forced to Coat again. Cradily takes out Hypno4 after 2 Coats. Medi is their last. Turned out to be Medi2. Cradily gets a Toxic to ensure Reversal shenanigans can’t win.
:metagross: :cradily: :moltres: vs. :electrode: :tyranitar: :snorlax:

Electrode lead. Can’t be Electrode4. I could just EQ, but it felt safer going into Cradily who won’t take much at all. Also handles set 2 better. So in 7/7 battles, I switched into Cradily to handle the 1st mon. Cradily 1v1s Electrode2 without getting paralyzed, but it was confused.

Tyranitar 2nd, a mon that I was afraid of from the beginning. Have to fight through confusion and Giga to get chip while figuring out the set. Turned out to be Ttar7 who just spammed Curse. Cradily4 amazingly 1v1s without taking damage. What a specimen.

Snorlax last! Big danger. Leftovers from sand reveals set 1 or 6. If it’s Thick Fat, immediate Toxic wins. Unfortunately, it was Immunity. Double Team reveals 1. A plus here is that any hit I generate is guaranteed thanks to the sand. I go into Metagross to try and take it down before it has too many DTs, but it was better to DT myself. I realized this almost too late, but I got just enough DTs up to Rest back up safely. Eventually, Meta hits enough moves to take Lax1 out. Can’t win without a Metagross.
I’m 8 hours into the stream. I eat an apple and continue. Noland 10 is approaching.

:rs/vaporeon:3 :rs/exploud:4 :rs/ampharos:2 :rs/altaria:1 :rs/entei:1 :rs/aerodactyl:3

Vaporeon3 is the most consistent Pokemon here. Entei1 is good, but it’s not as good as its counterparts Suicune1 and Raikou1. There’s definitely appeal of Acid Passing into Entei1 for the ultimate sweeper. Exploud4 is an okay Normal with good moves, but it lacks bulk and speed. Ampharos2 shows up again looking for more Dugtrios to take out. Altaria1 is bad. Aero3 is workable but lacks Earthquake.

Vaporeon3 and Entei1 are coming, so it’s all about the last. Aero3 was very tempting as a passable Ground-immune, but I’m not a fan of it. If it was Aero4 I would’ve been much more tempted to bring it. Amp2 is not a good mon in general and brings another EQ weak. Exploud4 can possibly work as a trade mon. I was also having trouble deciding the lead. I really wanted to lead Entei at first because I lacked faith in it closing a battle. Plus, I felt that if Entei’s best chances of sweeping is right off the bat rather than waiting later for a better matchup. But, the Vaporeon Acid Pass into Entei endgame sounds too good to (Baton) pass up. Got convinced of picking Exploud4 towards the end. As a lead, it’s rather favored to 1v1 a Pokemon and putting my better mons in a better position. As we know from the average PokeaimMD live, if you want the trashmon to do something, you lead with it.

Exploud4 Vaporeon3 Entei1 was chosen.

:exploud: :vaporeon: :entei: vs. :mr-mime: :registeel: :dugtrio:

Mime time. Most likely the Trick one which activates Impossible to predict. Gotta Shadow Ball then; CB Ball OHKOs. It does turn out to be set 3. Exploud gets a KO! Now locked into Shadow Ball.

Registeel 2nd. Very likely a Curse set. I go into Vaporeon to scout. If it is God Registeel, I get to Acid Pass into Entei for the super sweep. This works out perfectly. It was Registeel1, but there’s no way Registeel1 can beat Entei1. Funny Dug last gives a minor scare but drops.
:registeel: :vaporeon: :entei: vs. :aerodactyl: :latias: :hypno:

Registeel1 is a good Pokemon that matches up nicely against Psychics. I would have to swap Exploud for it. It’s honestly not that great as a lead and as a whole on the team, but it’ll likely perform better in this matchup than Exploud. I was also a bit biased because I haven’t used God Registeel in a very long time.

Aero lead is awkward. There’s actually nothing I can do vs. Aero2 outside of Metal Claw crit. CB EQ 2HKOs even if I Curse. I Claw only for the crit chance. Fire Blast dodge was very good for me. Registeel was able to set up in Aero3’s face and outright sweep. Interestingly, the back 2 mons all had moves that resist Steel. Factory Buddy shows this. Latias4 and Hypno3 were the back mons.
:latias: :vaporeon: :entei: vs. :salamence: :forretress: :nidoqueen:

Latias4, known as Laundrias, may have been the ideal Lati set to run into. It has Charm and Reflect to possibly ease setup for Entei. I swap Registeel out for it.

Mence lead. Most likely sets 2 through 5. I Reflect with the intention of going into Vaporeon next turn. Mence Dragon Danced. I go into Vaporeon to KO with Ice Beam. Mence gets a decent hit from Dedge, revealing set 4. Staying in to Charm spam was honestly better looking back. My excuse is that I was 10 hours into the stream at this point.

Forretress 2nd. Zap Cannon can happen. I go back into Latias. I’m okay with Latias getting Exploded. Forre4 Double-Edged and gets a crit Explosion to take out Latias. Vap comes back vs Nidoqueen last. Surf 2HKO.
:latias: :vaporeon: :entei: vs. :weezing: :rhydon: :typhlosion:

Weezing lead. We (Mist) Ball. OHKO! Rhydon 2nd. Megahorn kills, so I Reflect to live and go into Vaporeon the following turn if it is Megahorn. QC Megahorn dodge, oops! Mist Ball crit OHKOs, oops! Typh last can’t win. Laundrias sweep!
:latias: :vaporeon: :entei: vs. :clefable: :gengar: :zapdos:

Clef lead. Can’t be Clef1 since it activates impossible to predict by itself. I go into Entei hard who is heavily favored to win. Turned out to be Clef2. I go for the full Acid Pass into Entei1 super sweep. Sorry, Gengar and Zapdos.
:latias: :vaporeon: :entei: vs. :granbull: :glalie: :golduck:

Granbull lead. Most likely 2 who activates HRHR on its own. I Charmed for the permanent Atk drop, not even caring about White Herb. It did turn out to be set 2. Entei sets up on Granbull2 to sweep, yay! Noland10 time.
:latias: :vaporeon: :entei: vs. :regirock: :machamp: :weezing:

Regirock lead. Might as well Reflect before going into Vaporeon. Regirock does Rock Slide turn 1, and it was max Atk damage. I go into Vaporeon to 2HKO. Vap dodges a slide, so it takes Regirock12 out with 87% remaining HP.

Machamp 2nd. I do have a Latias that I deem less useful, but it’s a 3 IV Latias. Crit from perfect IV Machamp actually has a chance to KO Latias. Figured that I may have to sacrifice Vaporeon to ensure that Latias can safely revenge. My luck never ends; Vap dodges a Cross Chop and 1v1s Machamp34 with Surf Ice Beam crit Surf. Weezing shows up last and gets crit by Vap3 Surf. Latias4 cleans up.

And that’s Noland10. Yep. I can finally rest after 11 hours.

Honestly, I am kinda indifferent about this streak. It’s cool that it happened but I don’t know. Part of it is because I don’t play Factory solely to get massive streaks. I like trying to see or use uncommon sets and hoping that they can perform well. The other part is that this streak is no doubt an anomaly of anomalies given that my 2nd best Open Lv. record is only 64. Now that 64 was far before the era of these new resources but still. There’s 2 aspects to this record that I’m always thinking about: It’s better to be lucky than good, and these external resources are really strong.

You definitely need luck to go your way for a long time to get a streak this high. But it is interesting; if you play enough, you can definitely get a random run with really long stretches of great drafts/battle luck. I now believe that it’s incredibly hard to get a bad draft in Gen III Factory when you get to Round 10+. The IV advantage is massive to where the broken sets are strong enough to solo teams, the average sets become well above average, and the below average become more than passable. And there’s a high number of more-than-solid sets to where you’re bound to get at least 1 of them between the 6. I know there’s people out there that unga bunga’d triple digit streaks but can’t post them here because they lack proof, but I honestly believe them. If you play enough, you’ll get that lucky run.

Now, about these external resources when playing Factory. There is minor controversy involving them. Of course, the answer is “play the way that is most fun for you”, but I do want to talk how I feel about them. Before that, I do want to give a timeline of the origins of each resource as I was conveniently there from the beginning.

Battle Facilities Calculator and OG Spreadsheet were the only resources others like Donly Phans and I were using when playing Factory early on. Eisencalc was created a little bit later that included items that were missing from turskain like Lum Berry. Using the damage calc in Frontier is no different than using a damage calc in competitive. It can help you make the best decision as you see exact damage rolls. The OG spreadsheet displays every set in the Frontier for those who don’t have them memorized.

The Battle Style table from Bulbapedia’s Battle Factory article turned out to be very useful when I realized that you could use it to eliminate set possibilities. The Battle style table, OG spreadsheet, and my noggin were instrumental in improving my consistency in No Man’s Land.

A few weeks after I had my 119 Lv. 50 streak, Donly Phans updated the spreadsheet that everyone is familiar with today and gave it to me. It was just Donly Phans and I using the spreadsheet until I gave it to LRXC when I was helping him in a Factory run. The spreadsheet then became a public resource when he started streaming.

During LRXC’s grind to beat my Lv. 50 record, he randomly found an AI doc intended for Emerald Kaizo in his Discord, written by Xavion. The AI behavior apparently worked the same in vanilla Emerald, too. This was a big resource found as it made it easier to predict what the AI is going to do turn-per-turn, improving the player’s chances of making the correct play. Xavion also gave everyone the sweaty ruler that people use in Nuzlockes per Dave’s request (thanks Dave).

In the background, Actaeon created a program he called the Factory Assistant. This was capable of showing exact percentages of set possibilities and possible back Pokemon. It was never intended to be a completed project, but he’s used it a few times in tests. He was able to get a triple digit streak with it as well. LRXC and I knew this was going to be a strong resource. I told him that I wanted to surpass his 155 before Actaeon releases the Factory Assistant as I felt that anyone will be able to get 100+ wins with it.

The Assistant remained a private project, but it was inevitable that someone else would create one for the public based on the rising popularity of LRXC’s streams. This someone was Dave Glorbus and his Battle Factory Buddy. His earliest version was just as bare bones as Actaeon’s, just a little prettier and didn’t crash anytime you incorrectly entered an input.

Small optimizations of previous resources were made and found over the months after Buddy. An extension of the AI doc written later was Emerald’s Switch Logic. Donly Phans and I knew that there had to be some switch logic involving super-effective moves but lacked the proof. Switch logic gives the player another tool to possibly eliminate certain sets without scouting. Gym Leader Ellie created a sweatier ruler that measures the HP bar by pixels. Dave’s Buddy was upgraded to include features such as a Speed Calculator, improved percentages based on the switch logic, and a Teambuilder that attempts to suggest the best team from a given draft based on AI simulations built by Roger Whiteshoe (Phi Sigma). Will (thrillis) made a Emerald AI logic website that is easier to use and read than the AI doc.

As of this writing, I believe that’s all the known external resources. I can see this going further, but it won’t be from Dave. Someone could attempt to make a stronger Factory teambuilder that tries to spit out the perfect team composition for any situation. Someone could also try to make a program that spits out the exact percentage of each move the AI will go for every turn.

So there’s a very fair question regarding these resources. Are these resources so strong that they’re essentially playing the game for you? It is getting to the point where you need the following resources to get a really high streak; otherwise you’re handicapping yourself:

  1. Damage Calculator
  2. AI Document
  3. Battle Factory Buddy
  4. Sweaty Ruler
I didn’t use the ruler until Round 18 onward, but by pure coincidence, my trial run with Dave’s Buddy gave me a streak that hasn’t ended yet. My streak essentially forced LRXC to use Buddy when he was hesitant about it. And of course Dave was going to use his own creation. All 3 of us were able to get 180+ wins around the same time with those resources, completely blowing away Donly’s record.

So here’s my opinion of all the resources. I see the resources as useful and influential. I see the useful resources as fair despite some being quite strong (damage calculator). I see the most influential resources as ones that reach “playing the game for you” territory (Buddy teambuilder). I guess I’ll do a ranking system out of 5, but don’t put that much weight of the number. A 5/5 influence score would mean I see the resource as playing the game for you.

AI Doc - Usefulness 5/5, Influence 3/5

I’m now convinced that the AI doc is the strongest Battle Factory resource. I think having full knowledge on what the AI is doing every turn is more helpful than knowing the perfect damage rolls. I see newer players “misplay” winnable games in their grinds to Gold due to their unfamiliarity of AI behavior. But if they don’t know the AI logic like that, is it really a misplay? There’s so much logic that would’ve been huge to know 4 years ago. I didn’t even know that a Pokemon will always go for an attack that sees a kill back then. Deep down I despised this resource and really didn’t try to understand it until Round 18 onwards. Influence is higher than most because this is a “you’re not supposed to know this” type of resource. Too late now. Memorize the basics, and improve your consistency as a result.

Damage Calculator - Usefulness 5/5, Influence 2/5

If I had to choose a single resource, I and likely the majority would choose the damage calculator. You can memorize the basic AI logic anyways. This is an obviously strong and accepted resource used everywhere. Knowing the exact damage rolls you inflict on the opponent and inflict on you is beyond useful. There is fairness with this resources as the play will not always be as simple as going for the highest damaging move or switching into something that tanks the hit better. Can’t be a 1 in influence as knowing the exact damage roll is huge in anticipating whether the AI is going for a certain attack or not. I feel the pressure of unknown rolls all the time in unga bunga.

Spreadsheet - Usefulness 3/5, Influence 1/5

This is EASILY the fairest resource of the bunch. Any complaints about Donly’s spreadsheet is silly. It’s just a memorization tool. It greatly helps newer players in learning the sets and understanding which moves belong in each battle style. For an experienced Factory player like me, I don’t get much value from the spreadsheet as I know the sets. Also, the most controversial resource is essentially the upgrade.

BATTLE FACTORY BUDDY - Separated into 4 parts

Buddy Lead Set Odds - Usefulness 4/5 , Influence 2/5

Lead set odds is what the Buddy gives you after the first Pokemon comes out. It won’t be that much info on a more generalized phrase like free-spirited and unrestrained, but something like Dark battle flow will give you massive info. This was super fun to use early on and is pretty helpful for newer players. As you get more experienced, you’ll start to realize that you can kinda estimate the highest set possibilities without the Buddy. You don’t need to know the exact set percentages, but you can no doubt anticipate the most likely set from each lead mon with enough experience. Also, it is a foolish endeavor to make your turn 1 play based on whatever the Buddy says is the most likely Pokemon; it can easily be the single digit % set. So the influence of Buddy lead set odds isn’t high. I’ll give it a 2.

Buddy Back Mon Odds - Usefulness 4/5 , Influence 3/5

Buddy back mon odds is what Buddy gives you as possible 2nd/3rd Pokemon in the back + 2nd and 3rd mon odds with the added switch logic. Here is the real strength of the Buddy, a power that may be too strong for a human to figure out. It can spit out literally every possible Pokemon AND set it could be in the back which would be pretty cumbersome to do by hand even with the spreadsheet. Also, the switch logic implementation makes it tougher to estimate the exact percentages in your head. So now we’re getting closer to a resource having more control of a current situation than the player. For Buddy, you’re getting all that info with just a click of a button. Battle 125 is a good example of Buddy’s back mon odds’ influence. I made the decision to sac Claydol instead of risking QC from Meta5 because DNite had a really good chance to get a hit on the last Pokemon. It would’ve been a gut check play otherwise. Among the most influential of resources.

Buddy Speed Calculator - Usefulness 3/5, Influence 1/5

Don’t really see anyone else use this, but I use this resource all the time. It’s just a more efficient and visually appealing way of filtering the speed tiers from the spreadsheet. I like seeing the speed tiers of Pokemon that I’m less confident in using to get a better gauge on what it can or cannot beat. Same score as the spreadsheet.

Buddy Teambuilder - Usefulness 2/5, Influence 4/5

Here is my least favorite resource and the closest thing we have to someone playing the game. Buddy Teambuilder attempts to suggest the strongest possible team you can pick from your draft, perhaps the biggest decision you make every time you play a Factory round. While it’s not perfect, it’s bound to make better team selections than a novice Factory player. A new player could blindly follow the teambuilder’s suggestions and perform better than figuring it out on their own. An experienced player wouldn’t blindly take the suggestions but could use them to see what threats they may have missed in their head for each team composition. I despise this resource and avoid it. I fear that someone may make a stronger one in the future.

Sweaty Ruler - Usefulness 4/5, Influence 3/5

Just like the damage calc, the sweaty ruler is helpful in figuring out exact damage rolls. Unlike the calc however, the ruler attempts to measure a stat that was meant to be hidden. It feels wrong using the ruler, and it’s among my least favorite resource. I enjoyed estimating the damage rolls and basing my decision from my estimations. I can’t envision myself using a ruler to measure the opp’s HP bar on my GBA. An emulator advantage that is heavily abused, holding a lot of influence on which damaging move to click.

Chat - Usefulness 3.5/5, Influence 3/5

I’m happy I remembered this: the secret BROKEN final resource that we all abuse. Interacting with the chat is the fun part of streaming these attempts. The chat understandably will throw out suggestions on the best play, showing their investment. The chat dynamic is fascinating in my opinion. One could argue that the average chatter isn’t going to give you a helpful suggestion. A good amount of viewers tend to be experienced Factory players on the other hand, so their suggestions are more likely to be helpful. There’s also the dynamic of the chatter suggesting a “fun” play for their entertainment. As the streamer, you have to think of all the scenarios. The obvious play tends to be correct most of the time, but sometimes, the fun play is actually optimal and a play you did not see. Good players can end up suggesting plays that you missed, but the influence from the chat is strong no matter the skill level.

All in all, I don’t think it’s gotten to the point where the resources are playing the game for us. It could definitely reach there if someone wants to push such a direction; hopefully that won’t be the case. I have been enjoying playing Factory with zero resources as of late. If I had to choose the resources, I would have only the damage calc, spreadsheet, and I guess the AI doc since you can’t unlearn it. Either way, I'm behind whatever the community thinks is most fun.

Ok, finally done. Thanks to everyone who read it all. Nice to post this today with how unreal this streak is. Like before, I love this facility too much, so I'm not stopping here. I’ve been doing Lv. 50 attempts on Youtube as of late. Battle Factory is awesome! Everyone should play it. If you need help getting Gold symbol, you can message me. There may be a part 6 in the future, who knows. Until next time.
 
The leaderboard has been updated! Please reach out as usual if I have missed your streak or incorrectly added something.

A few things to note...

1) As brought up by ZliNK, Jeez Louise used an illegal Skarmory for one of their streaks. Consequently, all of their streaks have been removed for now. My apologies for not catching this earlier. Despite our best efforts, sometimes even relatively obvious things slip by. Legal egg moves combinations can be tricky and are certainly something I should brush up on. Thank you for bringing this up regardless.

2) As suggested by Croconaw Guy, I have added the web version of Dome Assistant, created by Actaeon and Mow. It should now be on the first post.

Have a great day.
Hi sorry I've been inactive for some time. I did not realize that drill peck and curse on Skarm was illegal I'll be more mindful of egg move combos going forward. This Skarm and all my teams were generated in PkHex. I wanted to clarify, the rules state genned pokemon are legal so long as their movesets and stats are. This means PkHex generated pokemon are legal right? Or do I need to rng manip my teams? I working towards beating the Palace record for open level at the moment and want to make sure submissions I make will be legit. Planning to record my streak on OBS this time around. Thanks!
 
I was wondering why pokemon stolen from the Ruby/Sapphire tower aren't allowed. Is this an old rule from before genning was allowed? Can this rule be changed?
 
Reporting a completed win streak of 137 in level 50 battle tower singles on cartridge with dusclops, umbreon and aerodactyl. The entire streak was streamed. This is the first tower streak I've done on my new cartridge save file and I wanted to use a team that was relatively easy to get. It's also a team I used when I first started playing the Emerald frontier last year. At the time I knew basically nothing about what was good and was just building fun teams. It helped me discover dusclops as one of my favourite pokemon for the frontier and I began to figure out how powerful pressure can be. I also really love ghost type curse, but it is rarely used on this team. At the time I just thought it would be funny to have a team with both versions of curse and looking back at the team I thought it had potential to get 100+ wins relatively consistently. It not having legendaries or requiring hidden power also made me want to use it more. I also wanted to get dusclops another mention on the leaderboard. This was my first attempt with the team and after reaching my goal of 100+ I knew I wouldn't be using this team again or at least not for quite some time. A better result is certainly possible, but the team has some major flaws and is too weak to hax to consistently get multi hundred streaks, but getting 100+ wins is very achievable, especially if you improve some of the EV spreads.

The EV spreads on this team can be improved. I figured I would improve them if needed once I had a better understanding of the team's weaknesses, but I only made some very minor changes during the streak. I went with the first really good IVs I got because I didn't know how serious this team was going to be and didn't want to spend a month of breeding to get slightly better stats for a team I only use to get 100 wins once.

The idea for the team was to have both versions of curse. Dusclops is the bulkiest ghost curse user and can benefit from receiving curse boosts to stall. Umbreon is a great curse passer and has good defensive synergy with dusclops. Aerodactyl is extremely fast, has good attack and gets stab aerial ace so it was my choice as sweeper.

The team is very slow and I highly recommend using damage calcs to figure out the best way to stall out the lead pokemon.

Dusclops.png

Dusclops @ Leftovers
Ability: Pressure
Level: 50
Calm Nature
EVs: 252 HP / 244 SpD / 12 Spe
IVs: 2 Atk / 22 Def / 5 SpA
- Protect
- Substitute
- Rest
- Curse

Outspeeds -1 curse regirock.

Dusclops is the team's PP staller and the secondary win condition for the team. It can also use curse to get rid of problematic leads, but this is like to result in losing dusclops so it's risky.
Umbreon.png

Umbreon @ Lum Berry
Ability: Synchronize
Level: 50
Calm Nature
EVs: 252 HP / 144 Def / 60 SpD / 52 Spe
IVs: 17 HP / 1 Atk / 30 Def / 9 SpA
- Curse
- Substitute
- Rest
- Baton Pass

Outspeeds dewgong and many other ohko mons.
Outspeeds rhydon at -1 unless we get quick clawed. 255+ Atk Rhydon-4 Megahorn vs. +1 252 HP / 144 Def Umbreon: 83-98 (42.6 - 50.3%) -- 1.2% chance to 2HKO (0.8% chance to 2HKO after accuracy). You can guarantee your survival with a better hp IV, but I would probably go with a different EV spread.

Umbreon's job is to baton pass curse boosts, mainly to aerodactyl. It's also a secondary PP staller and can use substitute baton pass to help heal up dusclops.

Aerodactyl.png

Aerodactyl @ White Herb
Ability: Pressure
Level: 50
Adamant Nature
EVs: 248 Atk / 8 Def / 252 Spe
IVs: 30 HP / 30 Atk / 16 Def / 26 SpA
- Aerial Ace
- Ancient Power
- Earthquake
- Substitute

White herb removes all curse pass speed drops on switch in.
Outspeeds sceptile, dugtrio. Speedties Crobat 3,4 and jolteon 1.
Hidden power rock would be better for higher damage and pp.
Protect over ancient power is an option to pp stall against certain dangerous pokemon (earthquake users).
Jolly improves the matchup against jolteon, but the added damage from adamant improves our kill chances against a bunch of bulky pokemon. I'm not entirely sure what's better, but currently I'm leaning towards adamant.

The team's sweeper. At +6 we one shot most other pokemon and with aerial ace we rarely have to worry about brightpowder or double team.
For rounds 1-3 I lead aerodactyl with choice band to speed things up.
The team's goal is to baton pass +6 to aerodactyl. I started with umbreon lead, but I very quickly came to the conclusion that this was too risky. I could almost never set up fully without risking losing umbreon to double or even a single crit and there are many pokemon against which I just can't set up at all. I also found that baton passing curse boosts to dusclops against the really threatening physical attackers was very risky, so I switched to dusclops lead. Switching into dusclops when I needed to pp stall also wasted valuable hp on either umbreon or dusclops. With protect, substitute and rest dusclops can stall out most pokemon on its own. Aerodactyl can sometimes help stall out ground moves and umbreon can help dusclops PP stall or use baton pass to give dusclops some extra leftovers turns to heal up if needed. While setting up with umbreon I tried to stay out of double crit range whenever possible and often used substitute or rest early to stay out of double crit range. If you substitute at an amount of hp where once your substitute goes down you won't die to crit you are very safe. Keep in mind that due to the curse speed drop you can go from being faster one turn to being slower the next and need to keep this in mind for surviving crits.

against very dangerous leads dusclops can go for curse. Dusclops will likely die, but with substitute on both aerodactyl and umbreon we can stall the curse damage. Having to set up against the second pokemon is very risky, especially if dusclops is down. Curse is also the secondary win condition in case aerodactyl can't sweep and doesn't lose to infinite focus band activations.
Whenever possible I would start aerodactyl's sweep with ancient power to potentially get an omni boost. This would allow me to outspeed jolteon and can also protect you from getting ohkoed by certain special attacks if something quick claws or focus bands.

Dusclops can 1v1 most pokemon with curse, but going for it against a lead that you can stall isn't worth it because +6 aerodactyl is almost a guaranteed win.
I love dusclops, but it has some major flaws. Due to its low hp we are very vulnerable to crits from powerful pokemon despite our high defenses. It also has very low speed which allows most pokemon to have a chance to crit it before it can use substitute. This also means we can be hit by OHKO moves before we substitute. Dusclops is also vulnerable to attract which many other pressure stallers are immune to due to them being genderless legendaries. I was very aware of these flaws and the entire streak I was basically waiting for something like a big crit to end the streak. There were definitely a bunch of close calls along the way before I finally lost the streak.

The main threat to the team is being unable to set up aerodactyl. A powerful attacker like metagross can ohko dusclops with crit meteor mash. It can also get attack raises and deal too much damage for me to stall even without crits. Weaker attackers like zapdos won't ohko with a crit, but they can deal enough damage to prevent dusclops from being able to substitute. Secondary effects like paralysis and freeze are also loss conditions.

The other way to lose is when we fully set up aerodactyl and then fail to sweep. There are a few pokemon that take 2 hits to kill, jolteon can also outspeed us. The most common loss condition was quick claw into a focus band activation or brightpowder from a pokemon like zapdos, metagross or regirock. We almost always start the sweep with a substitute so we are protected from some amount of hax, but we're not entirely safe.
The loss was against a pokemon that I hadn't thought about before this battle. Battle 138 was the first time I ran into marowak lead and it was against expert Alexas. Earthquake does around 80-90% to this dusclops so I had to go for curse on turn 1. Marowak went for earthquake turn 1 and dusclops died to curse. Earthquake means it was one of the fast marowaks. My umbreon is slightly slower so I couldn't get a safe substitute stall. One of them has brick break so I also didn't want to risk going into umbreon and then switching to aerodactyl on an expected earthquake or swords dance for a free curse damage turn and getting hit by brick break instead. I went aerodactyl and substituted until I could kill marowak and I just hoped I would be able to set up against the next pokemon although I knew it would be unlikely. In comes ursaring and it crit ohkos umbreon with mega kick as I switch to it. I get an omni boost with aerodactyl, but I lost too much hp stalling out marowak and still die to the next mega kick.
Dusclops is focused on special defense because of the potential for it to receive curse boosts from umbreon. I didn't change this when I changed to dusclops lead over umbreon lead despite that meaning there was a very low chance of dusclops receiving curse boosts. Some of the most threatening pokemon are physical attackers so changing the EV spread to improve the matchup into physical attackers like metagross and marowak could be really useful. This does come at the cost of being able to stall special attackers less well, but I think umbreon's EVs could be changed to tank those more consistently. Another thing you could consider is replacing curse with a move like calm mind, double team or pain split to improve your stalling potential, but I don't like the idea of losing the curse win condition/lead panic button.

For umbreon I would highly consider giving it more speed to outspeed fast marowak given that it's what I lost to. I EVed it to survive against rhydon because it was one of the scariest pokemon I could think of when I planned to use it as a lead. Given that I stopped using it as a lead very quickly the EVs should be changed to help dusclops stall. Higher spdef could be very useful if dusclops goes for higher def, but having good defense on umbreon is nice because it protects you from things like double struggle crit from choice banded pokemon, but that has a lower priority than surviving regular hits from a big group of pokemon. Wish healing would be amazing to help dusclops stall, but I don't think any of the moves on umbreon can be replaced.

For aerodactyl there are a few changes you can make. Hidden power rock over ancient power to increase your damage output. Jolly over adamant means you can only really get outsped by jolteon 4, but the loss of damage output probably isn't worth it. Lastly, protect could be used over a rock move to increase aerodactyl's stalling potential, but you lose a lot of sweeping potential.
Ancient curses 137 streak.png
Playlist: https://www.youtube.com/playlist?list=PL_0uaPXxMXAxaoNPwSt5FXgwazr3dN0Fo
Rounds 1-7:
Rounds 8-10:
Rounds 11-12:
Rounds 13-15:
Rounds 16-18:
Round 19:
Round 20 (loss):

There may be more dusclops propaganda in the future.
 
Last edited:
Hello! New to this forum, I was searching for a leaderboard of streaks and this seems to be the main hub so I figured I should post here ~

While testing my rng manip for Gold Symbol in the Battle Pike I went for streaks to see how far it could go, so far I reached 1414 rooms and it's still ongoing. Dunno how far I'll push it but I'll report here when it ends! Done on an actual cartridge.

Edit 1: 1624 ~

Didn't put much thought into the team as battles are not supposed to happen that often, I still wanted to use something better than my speedrun team so I went for a team made by Magpie with Latios, Tauros and Blissey. Only modification I made is giving Hardy to Tauros, as somehow giving it another nature breaks my manip, still trying to figure that one out *shrug*
https://pokepast.es/dab62a7951a21349

Basic Strategy if the manip ever fails (quite often after you lose focus), always take the hint room except if it could lead to a single trainer without healing, and it's basically impossible to lose except with exceptionally bad luck. I will always preserve my Latios if fighting a single trainer that could have a way to deal with both Blissey and Tauros, as they're both really weak to fighting.
Rest of the streak here: https://www.youtube.com/playlist?list=PL50KQ_8ZpFRl_XogR6y4_T9PKfYJlivtg
And the first screen:
1777405675686.png
 
Last edited:
Posting an ongoing 203 win streak for Emerald Battle Tower Doubles (Level 60). I previously only played Singles, because I was reluctant to train up a new team with the same Pokémon in it. I made this Doubles team and got this far on my second run. The naming theme is Vocaloids other than Hatsune Miku, out of spite because my brother hates Vocaloid for no reason. This post is just a team introduction.
Spr_3r_376_s.png

K. Rin/Len (Metagross) @ Salac Berry
Ability: Clear Body
Shiny: Yes
EVs: 252 HP / 252 Atk / 4 Spe
Adamant Nature
- Meteor Mash
- Earthquake
- Aerial Ace
- Explosion

A shiny Metagross that I've had for a long time, with the same moveset I've used in Singles. I'm using Meteor Mash instead of HP Steel because the IVs would have to be lowered, and HP Steel's reliability isn't worth the significant loss in power (and Attack boost chance, which came in clutch at times). Aerial Ace is useful against evasion-boosting opponents. I often use Explosion immediately when I see a Snorlax, because it is one of the biggest threats to my team, and none of them have Bright Powder or Quick Claw + Double Team on the same set. Salac Berry helps Metagross more reliably use Explosion at low HP against other threats. Named after both Kagamine Rin and Len, because a Metagross is two fused Metang, just like how Rin and Len are two characters in one voicebank. Also, Metagross' Explosion represents the trope where Len always dies in songs.

Spr_3r_381.png

KAITO (Latios) (M) @ Lum Berry
Ability: Levitate
EVs: 4 HP / 252 SpA / 252 Spe
Modest Nature
- Psychic
- Ice Beam
- Thunderbolt
- Protect

A 3 Attacks set. Protect is most often used for Metagross' Explosion, but it of course has its standard uses in Doubles. This Latios is from a Japanese cartridge of Pokémon Sapphire (I had to hack in the Eon Ticket of course), which already had a save file with 7 badges. The player character was named KAITO in katakana (which is one of the default male trainer names in Sapphire), which is where the idea of naming my team members after Vocaloids came from.

Spr_3r_260_s.png

M. Luka (Swampert) (F) @ Leftovers
Ability: Torrent
Shiny: Yes
EVs: 216 HP / 84 Atk / 112 Def / 96 SpA
Quiet Nature
- Waterfall
- Earthquake
- Ice Beam
- Protect

This Swampert is a bulky mixed attacker. I RNG'd it to be shiny and female to go with the naming theme. 216 HP EVs give Swampert a Leftovers number at level 60 (241). Protect + Leftovers came in clutch sometimes. The M stands for Megurine. I don't have much else to say about it.

Spr_3r_380.png

MEIKO (Latias) (F) @ Pecha Berry
Ability: Levitate
IVs: 6 Atk / 30 SpA / 30 Spe
EVs: 252 HP / 76 Def / 180 Spe
Timid Nature
- Dragon Claw
- Hidden Power [Fire]
- Toxic
- Recover

This Latias was originally going to be a secondary Latios, but I scrapped that idea and went with a speedy support set. The two attacks hit everything at least neutrally, with HP Fire specifically hitting Steel-types immune to Toxic. Speaking of Toxic, Latias holds a Pecha Berry to comply with Item Clause and to poison Synchronize users (especially Umbreon) safely. I used Recover over Protect because Latias is likely to be my last Pokémon. The Nature and EV spread will outspeed all Starmie sets, because Starmie can be kind of annoying, and I already gave Latias a Timid nature. Because I named Latios after KAITO, it would only be right to name Latias after MEIKO.
 
More of a meta question here - anybody know what happened to the Bank of Hoenn Discord server? Was that shut down recently?
I joined the server a little while ago and the server disappeared for me before I got around to sharing one of my streaks to get access. I thought they banned me because I didn't see any announcements about the server being shutdown.

---

Nice to see a bunch of doubles action lately!
 
Posting an ongoing 203 win streak for Emerald Battle Tower Doubles (Level 60). I previously only played Singles, because I was reluctant to train up a new team with the same Pokémon in it. I made this Doubles team and got this far on my second run. The naming theme is Vocaloids other than Hatsune Miku, out of spite because my brother hates Vocaloid for no reason. This post is just a team introduction.
View attachment 828611
K. Rin/Len (Metagross) @ Salac Berry
Ability: Clear Body
Shiny: Yes
EVs: 252 HP / 252 Atk / 4 Spe
Adamant Nature
- Meteor Mash
- Earthquake
- Aerial Ace
- Explosion

A shiny Metagross that I've had for a long time, with the same moveset I've used in Singles. I'm using Meteor Mash instead of HP Steel because the IVs would have to be lowered, and HP Steel's reliability isn't worth the significant loss in power (and Attack boost chance, which came in clutch at times). Aerial Ace is useful against evasion-boosting opponents. I often use Explosion immediately when I see a Snorlax, because it is one of the biggest threats to my team, and none of them have Bright Powder or Quick Claw + Double Team on the same set. Salac Berry helps Metagross more reliably use Explosion at low HP against other threats. Named after both Kagamine Rin and Len, because a Metagross is two fused Metang, just like how Rin and Len are two characters in one voicebank. Also, Metagross' Explosion represents the trope where Len always dies in songs.

View attachment 828620
KAITO (Latios) (M) @ Lum Berry
Ability: Levitate
EVs: 4 HP / 252 SpA / 252 Spe
Modest Nature
- Psychic
- Ice Beam
- Thunderbolt
- Protect

A 3 Attacks set. Protect is most often used for Metagross' Explosion, but it of course has its standard uses in Doubles. This Latios is from a Japanese cartridge of Pokémon Sapphire (I had to hack in the Eon Ticket of course), which already had a save file with 7 badges. The player character was named KAITO in katakana (which is one of the default male trainer names in Sapphire), which is where the idea of naming my team members after Vocaloids came from.

View attachment 828615
M. Luka (Swampert) (F) @ Leftovers
Ability: Torrent
Shiny: Yes
EVs: 216 HP / 84 Atk / 112 Def / 96 SpA
Quiet Nature
- Waterfall
- Earthquake
- Ice Beam
- Protect

This Swampert is a bulky mixed attacker. I RNG'd it to be shiny and female to go with the naming theme. 216 HP EVs give Swampert a Leftovers number at level 60 (241). Protect + Leftovers came in clutch sometimes. The M stands for Megurine. I don't have much else to say about it.

View attachment 828621
MEIKO (Latias) (F) @ Pecha Berry
Ability: Levitate
IVs: 6 Atk / 30 SpA / 30 Spe
EVs: 252 HP / 76 Def / 180 Spe
Timid Nature
- Dragon Claw
- Hidden Power [Fire]
- Toxic
- Recover

This Latias was originally going to be a secondary Latios, but I scrapped that idea and went with a speedy support set. The two attacks hit everything at least neutrally, with HP Fire specifically hitting Steel-types immune to Toxic. Speaking of Toxic, Latias holds a Pecha Berry to comply with Item Clause and to poison Synchronize users (especially Umbreon) safely. I used Recover over Protect because Latias is likely to be my last Pokémon. The Nature and EV spread will outspeed all Starmie sets, because Starmie can be kind of annoying, and I already gave Latias a Timid nature. Because I named Latios after KAITO, it would only be right to name Latias after MEIKO.
It turns out I forgot to upload an image of my records. My streak is now 266, still ongoing, and I have made no changes to my team.
 

Attachments

  • IMG_0072.jpeg
    IMG_0072.jpeg
    2.2 MB · Views: 76
After the nerdiest month of my life, I accomplished a streak of 305 in the Battle Palace! This was always my least favorite facility growing up because of the randomness involved and the frustration of your pokemon picking the wrong move. When I revisited the battle frontier in recent years to get all the gold symbols, I started to really enjoy the unique mechanics of the battle palace and the challenge of building a consistent team.

I tested out some different teams a year or two ago and posted some decent streaks, but I recently started playing it again in hopes of getting a world record. My initial team I had the most success with had a core of Latios and Tyranitar who together can take down just about any pokemon in the game, and hasty nature with sub and 3 attacks on Latios and Ttar works well with sand stream, which still makes progress even if you click sub. In the process of testing a bunch of teams, I got a really good (and lucky) streak of 225 using a choice band Machamp lead with only 1 move, low kick. The battle palace has weird AI decision making with some moves that vary in power, including low kick, return/frustration, and hidden power, where your pokemon will randomly choose that move when it's not the best attack, or will not choose that move when it is the best choice. For this reason, you can’t reliably use hidden power as a coverage option in the palace. Low kick is almost always as powerful or more powerful than brick break, and having it as the only move allows Machamp to avoid the randomness. In hindsight, that Machamp set was probably better off having brick break and some other coverage options. Regardless, while this streak was promising, I wanted to get a recorded one. After more trial and error with different teams, I soon had a new goal: to make an optimal battle palace team with the highest possible odds of winning and achieving record level streaks.To make a team with the highest possible odds of winning, I needed a way to test teams on a larger scale to gather more data so that I could actually measure the success rate of a given team. To do this, I’d either need to do a lot more streaks on my own with different teams in the palace, which would take forever, or, I could make a simulator for the palace and test different teams running 1000s of streaks at a time. This actually seemed pretty doable with the palace, as the enemy pokemon and your pokemon choose their moves entirely based on their nature (and gen 3 AI). The only issue was, I don’t know how to code at all, so making a running simulator didn’t seem like a realistic option.

My friend was using Claude AI at the time to code and was having a lot of fun with it, and he recommended I try it. So I got Claude Code set up (yes I paid real money for this) and started writing prompts for it to make me a battle palace simulator. This immediately started to be much more difficult than I thought. I gave the AI all the resources I thought it would need, but it would get a lot of things wrong and I had to troubleshoot and correct a lot of mistakes it made. There’s also a lot of little pokemon mechanics that it needed to correctly implement that I didn’t originally consider. Things like item effects, pokemon abilities, all the moves and their unique added effects. I had to give it Gen 3 AI move choice analysis so it understood the unique scoring system for each move, which really matters. I realized this when the team I was testing kept dying to explosion users because the enemy was exploding turn 1. I prompted the AI to give me a report of streak losses when it simulated a few hundred of them, so I could see the errors happening within those battles. A big challenge to making this simulator was ensuring the simulated player was playing optimally. The player only has the choice to battle or switch on any given turn, but it took a lot of trial and error to come up with an algorithm that was optimal, or at least close. I’ll attach the player switching algorithm below. I also had it make a custom strategy just for Spencer Gold fights, which it was struggling with. I’m sure there are still a couple game mechanics that might not be implemented properly, and I’m very sure the player switching algorithm could be improved upon, but I got the simulator to a point where it was accurate enough for my purposes of testing different teams.

Testing teams included a lot of trial and error. I started by testing different lead pokemon in a 1v1 against all possible frontier matchups. Based on previous experience and the results of this, the best leads were almost all sassy nature choice band mons that can immediately attack and remove an enemy threat when needed. Sassy pokemon are also better as a lead rather than in the back of the team because they would rather not switch into an attack and risk dropping below 50% hp. For each tested lead, the AI gave me their mean win percentage (WP) as well their number of solid matchups (WP above 65%), free matchups (WP above 95%), and nightmare matchups (WP below 35%). Among the tested leads (which I’ll attach below) choice band Snorlax had the highest mean WP of 89.6%, with Swampert in second with 89.2%. So Snorlax is the best lead, right? Not necessarily, since it all depends on how the lead pokemon pairs with the rest of the team.

To determine this, I ran the top 10 tested choice band leads with a set I knew to be one of the best, Latios with a hasty nature, substitute, and 3 attacks. I tested each of them with Latios in a 2v3 against full teams, including high tier enemies. This revealed, not surprisingly, that Metagross, who was ranked third in leads with a WP of 87.9%, paired the best with Latios. I then ran a test to see which third pokemon would pair best with Metagross and Latios over 1500 streaks. The Ai gave me each team’s mean wins per streak, the P99 (top 1% of streaks reach this), percent chance of reaching a streak of 100, and the teams WP against Spencer Gold. The results (which I’ll attach below) showed that Suicune with a hasty nature (sub+calm mind+surf+ice beam) was the best third slot with a mean of 66.6 wins and 13.5% of streaks making it past 100. I tested replacements for each of the 3 pokemon of the team, and couldn’t find any better team combinations. I also tested different set variations for each of the 3, finding it was best to run max hp on Metagross rather than investing in speed, and best to run an interesting Suicune set with max hp, 96 sp atk, and 160 sp def evs. I did more testing beyond this, including a matchup matrix that aimed to assemble the best team based on each pokemons’ free matchups, but there was no combination of pokemon I found with free matchups against every possible enemy set, and I couldn’t find a team that performed better than this one. The results aren’t all that surprising either, as this team simply consists of 3 of the best known pokemon in the emerald battle frontier.


Metagross @ Choice Band
Ability: Clear Body
EVs: 252 HP / 252 Atk / 4 Spe
Sassy Nature
- Meteor Mash
- Earthquake
- Brick Break
- Aerial Ace


As mentioned before, this set runs max hp rather than investing in speed, which my testing found to be optimal. More hp allows Metagross to have really solid bulk and stay above 50% hp more often. The best tested movesets for Meta had MM, EQ, BB, and aerial ace and rock slide had similar results for the 4th move. Aerial ace gives better matchups into Ludicolo who can be annoying, as well as Heracross. Rock slide mainly helps against Zapdos. I opted for aerial ace after losing to double team Ludicolo.

Latios (M) @ Lum Berry
Ability: Levitate
EVs: 76 HP / 252 SpA / 4 SpD / 176 Spe
Hasty Nature
IVs: 0 Atk
- Psychic
- Dragon Claw
- Thunderbolt
- Substitute


Nothing crazy with this Latios set, only 2 notable things to mention. The sim found 176 speed evs was best (hits 330 to outspeed Starmie and Raikou), and puts the rest into hp to get 320 (divisible by 4 for substitute). Also, the sim found better results with dragon claw rather than ice beam, which mainly helps Latios hold his own against other psychic types and dark types, and notably other Latis.

Suicune @ Leftovers
Ability: Pressure
EVs: 252 HP / 96 SpA / 160 SpD
Hasty Nature
IVs: 0 Atk
- Surf
- Ice Beam
- Calm Mind
- Substitute


The first thing to mention with this Suicune is that the sim had far better results running a hasty Suicune rather than a modest one with rest. Rest is too inconsistent and can leave Suicune vulnerable as he spams it. I also tested running just CM or just sub as defensive move options, but better results were found with Suicune running both. Lastly is the weird ev investment, which the sim found had better results than running max sp atk, max sp def, or def investment, among a few other tested spreads. The special bulk is nice for Suicune setting up against other special attackers, especially other CM boosters.

I made a post about asking about this earlier, and hopefully this isn’t an issue for the legitimacy of this run, but this team was generated using PkHex as I didn’t want to spend a bunch of time rng manipulating to get perfect ivs, especially when testing a bunch of different pokemon and sets. The rules say that “genned” pokemon are legal so long as their stats and movesets are legally obtainable, which these sets are.


Threat type​
% of losses​
Top mons​
Special walls when Meta is dead15.3%Snorlax, Blissey, Registeel, Umbreon, Slowbro
Spencer Gold (almost all Suicune)14.6%Spencer's Suicune (288/293)
Setup sweepers in regular pool12.7%Pool Suicune, Blissey, Raikou, Gardevoir
Status crippling11.1%Various — Confuse Ray, Toxic, sleep moves
OHKO moves (with or without Quick Claw)4.7%Lapras, Walrein, Dewgong, Rhydon, Donphan, Wailord
Spencer Silver Lapras1.8%Sheer Cold/Horn Drill + Quick Claw

Based on thousands of streaks tested with this team, as well as my own smaller sample battling with it, I have a good grasp of the team’s weaknesses. Most of them are special walls like Blissey, Snorlax, and CM boosters like Suicune or Slowbro. My run ended against Cool Trainer Gillian, who led with a Zapdos 3. My team doesn’t struggle with Zapdos, but doesn’t have a great switch in either, and the best play based on WP is to stay in with Meta against just about every Zapdos set, including Zapdos 3. Metagross handles it 1v1, tanking a tbolt and living with about 60% hp. Latias 3 comes in next, who I choose to stay in against after getting an attack boost. Its focus band activates though and it leaves Meta with 21 hp. Regice 1 comes in last, and Meta is incapable of using its power 2 turns in a row while Regice sets up Amnesia and then KOs with ice beam. Suicune has roughly a 66% chance to win this matchup, but Regice already has +2 sp def and Suicune refuses to CM. Once Suicune drops below 50% hp to tbolt it’s essentially over, as Latios has almost no chance of winning. Latios doesn’t get the crits I needed and the run ends. I feel I played well, but also too fast, and should value Metagross’ life more as he’s the only physical attacker on this team, and the only one who can reliably beat special walls like Regice, Blissey, or Snorlax. I could have switched Latios in on the Zapdos or Latias, but the better play based on WP was to stay in with Meta in both of these cases. I think this team is capable of streaking even higher, with more attempts and more careful play. I only attempted about 15 to 20 streaks with this team. I’m sure that with more careful play, using resources like frontier assistant to determine sets, making slight optimizations to the team, and attempting more streaks, this team could reasonably reach over 400 wins. The sim was only able to reach a best streak of 354, which may suggest that this run was close to the team’s ceiling, but I think the simulator’s decision making was suboptimal at times, potentially worse than mine, despite all of the troubleshooting I did. Overall, this project and streak was a lot of fun, and I may end up trying to optimize the team further or attempt for a higher streak.


Attachments

Nice record!

If AI really is that useful in helping us determine the best paths forward for the Frontier, I think it will be useful for the whole community to know how to use it properly. Are you able to provide access to the simulator or at least the logs between you and Claude that were part of this process?
 
Hello everyone, I am amidst updating the leaderboard and have just a couple more streaks to go. I will aim to finish by Tuesday, if not then next weekend. Apologies for the delays, but in the meantime I will be making some statements and clarifications here.

1) I am looking to revamp the leaderboard format into a grid / table style presentation. BBCode has been increasingly annoying to work with, while a table (ideally) looks much nicer. This is why some streaks I have added right now do not have placement #s on them. BBCode has also consistently made the factory leaderboard double up for absolutely no reason, despite me constantly removing the (seemingly) troublesome lines. Hopefully a table style revamp will fix this. Here is a brief proof of concept.

Name​
Streak​
Team​
Valentino​
123​
Latios / Salamence / Suicune​


2) There have been questions if genned Pokemon are allowed. The answer is yes, but they *must* have legal moves and IV combinations, etc. It is your responsibility to ensure you do not have any illegal IV spreads for a given Pokemon. I always recommend rnging your pokemon, but I understand not everyone is able to do so.

3) Regarding the "steal from battle tower glitch", I personally am not aware of how it works. If it could result in a Pokemon with an illegal move / IV combination, I'd recommend not doing it. But if that's not the case, it is fine to me.

4) I am planning to retire as leaderboard manager by the end of this year. I do not play Pokemon as much these days and feel it would be more appropriate to pass the thread to someone who is more engaged in the community. If you would like to step up, please message me either on discord or via private message here. By the end of the year if everything is sorted, I'll announce who is taking over.

As always, excellent work from everyone involved. Great streaks and explanations.
 
3) Regarding the "steal from battle tower glitch", I personally am not aware of how it works. If it could result in a Pokemon with an illegal move / IV combination, I'd recommend not doing it. But if that's not the case, it is fine to me.

The glitch allows you to catch pokemon used by the Ruby/Sapphire tower trainers. They have a random nature, and IVs depending on the round they're in. Some of them have egg moves, but unless the developers messed up there shouldn't be any illegal movesets. My understanding of possible IVs is limited, but I believe anything that can be bred should be able to get 6 31 IVs. I don't know what would be possible for the legendaries, but according to current rules latios is the only pokemon from the tower that's allowed to be used and that is a legendary. If the latios is fine then the other legendaries should also be fine, I think. If the latios isn't fine then maybe it should be banned instead of being the only pokemon allowed.

Thanks for the effort you put in. Let me know if you have any other questions.
 
Hello everyone, I am amidst updating the leaderboard and have just a couple more streaks to go. I will aim to finish by Tuesday, if not then next weekend. Apologies for the delays, but in the meantime I will be making some statements and clarifications here.

1) I am looking to revamp the leaderboard format into a grid / table style presentation. BBCode has been increasingly annoying to work with, while a table (ideally) looks much nicer. This is why some streaks I have added right now do not have placement #s on them. BBCode has also consistently made the factory leaderboard double up for absolutely no reason, despite me constantly removing the (seemingly) troublesome lines. Hopefully a table style revamp will fix this. Here is a brief proof of concept.

Name​
Streak​
Team​
Valentino​
123​
Latios / Salamence / Suicune​


2) There have been questions if genned Pokemon are allowed. The answer is yes, but they *must* have legal moves and IV combinations, etc. It is your responsibility to ensure you do not have any illegal IV spreads for a given Pokemon. I always recommend rnging your pokemon, but I understand not everyone is able to do so.

3) Regarding the "steal from battle tower glitch", I personally am not aware of how it works. If it could result in a Pokemon with an illegal move / IV combination, I'd recommend not doing it. But if that's not the case, it is fine to me.

4) I am planning to retire as leaderboard manager by the end of this year. I do not play Pokemon as much these days and feel it would be more appropriate to pass the thread to someone who is more engaged in the community. If you would like to step up, please message me either on discord or via private message here. By the end of the year if everything is sorted, I'll announce who is taking over.

As always, excellent work from everyone involved. Great streaks and explanations.
Ahhh thanks for the clarification on the genned Pokemon rules. This means that my team for my recent streak is actually illegal since perfect 31iv hasty natures on Latios and Suicune aren't legal iv spreads obtainable in the game. I used PokeFinder to find some iv spreads that are close to perfect and that are legal, and I'll be attempting a new streak with these.
 
In order to make teambuilding easier for myself I've started putting together boxes with optimal spreads for all 'viable' Pokémon within each role for BF Doubles, thought I might as well share them in case other people find this useful (all spreads are for lvl 100). I feel like you can split up the field into four roles:

-'quakers'
-'special attackers'
-'hax control'
-'fake out support'

First one I finished are the 'quakers':

https://pokepast.es/7f4576d30aa21604

Swampert spread is copied from Jheisinho's current number one team (albeit in a CB variant, which could easily be switched for sub-protect if running another CB user), as it the Tauros spread.

Metagross and Gyarados are both built to outspeed anything but Jolteon and Crobat at +1 speed (post Salac/DD).

Marowak matches Swampert's speed to outspeed all OHKO users bar Dugtrio and is opting for max attack in this build. Can also be run with Careful nature and 137 Spe for a more defensive version that's built to outspeed the Regii.

Dugtrio I added due to Ghost14196's recent success with it. 339 hits the same speed benchmarks as Tauros, apart from speed ties instead of outspeeding against Sceptile and opposing Dugtrio. I swapped Sludge Bomb for HP Bug due to its overall better offensive typing, but can be switched back depending on personal preference.

Dugtrio's success at 500+ also got me thinking about other CB users that haven't been used a lot due to frailty/crippling 4x weaknesses. In come Aerodactyl and Flygon.

Flygon brings the strongest EQ available with 320 speed, combined with overall strong defensive typing and levitate. HP Rock is there as the standard coverage combination, Gust lands OHKOs on Heracross and Breloom, while Double Edge is there just to fill out the roster. Correct me if I'm wrong, but the 4x ice weakness should draw the AI towards targeting it with Ice Beams whenever present, which combined with an Ice resist to switch in can leave its partner (likely Latios) with a relatively free turn.

Aerodactyl meanwhile has the speed to go Adamant, still hit 340 and also invest a fair bit into bulk (the logic here being 'if it works for Dugtrio, it should also work for Aero, but that requires testing). Moveset seems pretty self explanatory, though I'd have to check if HP Rock lands certain important KOs that Ancient Power doesn't.

Notable exceptions here are Snorlax and Salamence. The former is missing because I haven't figured out the optimized spread yet, the latter because I'm unsure whether to go CB, DD or mixed.

Anyways, mainly made these for my own convenience but if anyone else finds them useful I've been happy to help. Planning to do the same for the other roles soon.
 
Reporting a battle tower level 50 doubles streak of 155 wins on cartridge. This streak used a flygon stolen from the Ruby Battle tower, so if it's decided that those remain illegal then ignore this streak for the leaderboard. I caught this flygon to use as a parent, but it happened to have a jolly nature so I decided to use it.

I've been working on recreating my swampert doubles team on cartridge so I can get a streak with it that I want to submit, but I don't have a hidden power ghost swampert at the moment. I felt like playing some doubles and I got my hands on a good flygon so I decided to use it to see how good or bad it is on this team. When I originally built the swampert team to get 100+ wins flygon was one of the pokemon I briefly considered as the choice band earthquaker, but the quad weakness to ice seemed like too big of an issue to me at the time. I only did 1 streak with this flygon version of the team. It only took a few rounds to come to the conclusion that on this team flygon is just a massive downgrade compared to swampert. The worst matchups for the team are even worse with flygon and there are a bunch of other matchups that are now also bad.

Zapdos.png

Zapdos @ Lum Berry
Ability: Pressure
Level: 50
Timid Nature
EVs: 4 HP / 252 SpA / 252 Spe
IVs: 22 Atk / 30 Def
- Thunderbolt
- Light Screen
- Hidden Power Ice
- Protect

Originally I started with latios+swampert, but trace levitate was really annoying. Latios also missed quite a few one shots on flying types that zapdos does get. Now that flygon's levitate can be traced latios' levitate doesn't really matter so it could go back to being the lead.

Stab thunderbolt takes out a lot of ground immune pokemon and can also one shot a lot of water types which is nice with how common they are. Hidden power ice hits most of the other ground immunes like flygon, claydol, lati@s.

Light screen I put on here to help swampert survive some grass moves. Flygon is too weak to survive ice moves even with light screen. It's still nice to help the team tank some extra hits. It's also nice to have a potentially useful move to click when earthquake is going to kill both of the opponents currently on the field and tbolt or hp ice aren't going to make a difference.

Flygon.png

Flygon @ Choice Band
Ability: Levitate
Jolly Nature
EVs: 16 HP / 252 Atk / 242 Spe
- Earthquake
- Rock Slide
- Fly
- Protect

Originally the EVs were 252 speed, but that speedties zapdos on this team so I used a berry to lower its speed and then gave flygon an hp up so that's why the EVs look a little odd.

Flygon has 1 good move and it's earthquake. Luckily, that's one of the best moves to have for doubles.

Choice band protect is here to scout, buy a turn for perish song or to give flygon's partner a free turn while the opponent tries to ice beam flygon.

Fly is similar to protect but with a chance to deal damage. I clicked it twice. The first time the last pokemon died to a crit and the second time I missed so 0 damage dealt. You could also consider putting dig on here, but I didn't want another ground move.

Rock slide is just something that can hit flying types. Spread damage getting reduced by 50% makes it deal almost no damage, but at least you have the flinch chance. I also only clicked this a few times, but one of those times it finished off an articuno so that's something. Rock tomb could be used for single target damage, and the speed drop could be nice, but the accuracy on that move is a little bit worse. Rock tomb could help against aerodactyl lead. You'd probably just want something like hidden power ghost or rock here instead if you have access to it.

Articuno.png

Articuno @ NeverMeltIce
Ability: Pressure
Modest Nature
EVs: 4 Def / 248 SpA / 4 SpD / 252 Spe
IVs: 26 HP / 10 Atk / 30 SpA
- Protect
- Toxic
- Ice Beam
- Hidden Power Grass

Ice beam switch in that's immune to freeze while being immune to EQ and being good against pokemon that are immune to EQ.
Toxic is a way to beat stally pokemon when I can't use perish song. Originally I had haze, but that is an XD exclusive move. I thought I would miss it, but I mostly used it against double team and perish song deals with that so it's fine. I don't think I clicked it during this streak. Maybe some other move could take its place. For open level mind reader+sheer cold is something I'm considering trying instead of hp+toxic. Substitute over hp is also possible, you'd need to switch to leftovers and I like the damage boost from nevermeltice.

Gengar.png

Gengar @ Cheri Berry
Ability: Levitate
Timid Nature
EVs: 24 HP / 4 Def / 252 SpA / 228 Spe
IVs: 10 HP / 9 Atk / 25 Def / 31 SpA / 22 SpD / 29 Spe
- Thunderbolt
- Ice Punch
- Perish Song
- Protect

Same electric+ice coverage as zapdos.

Perish song is a great win condition against pokemon that are difficult to kill. Being immune to explosion is also nice, but didn't come into play during this streak.

Swampert.png


Here's the swampert that would be on the team in Flygon's spot if I had it.
Swampert @ Choice Band
Ability: Torrent
Hasty Nature
EVs: 252 Atk / 4 SpA / 252 Spe
IVs: 30 Def / 30 SpD
- Earthquake
- Hidden Power Ghost
- Ice Beam
- Protect

Hidden power ghost over rock to outspeed all metagross sets. It's also really nice into lati@s lead. Ice beam is decent into things like dragon trainers and helps the lead matchup against aerodactyl.
The strategy for this team is very simple. EQ is very powerful so I try to deal as much damage with it as possible. The rest of the team are all immune to EQ so I don't have to worry about switching into my own EQs. The rest of the team also hits ground immune pokemon very hard. Against most trainers zapdos+EQ spammer gets 2 kills very quickly which opens up the perish song win condition. Most trainers are defeated very quickly by just my lead in 2-4 turns, but some trainers can be very challenging. Into bad lead matchups articuno can often be a defensive switch in.
The 2 main weaknesses of the team are that there's only 1 physical attacker and the physical attacker only really deals good damage with earthquake. If your physical attacker goes down early and there is a bulky pokemon like snorlax or regice in the back it can be really difficult to beat them.

Threats:
- Regice
Regice tanks special hits and half of them can one shot zapdos. With flygon its a way worse matchup. Depending on the set it can kill both of my leads so I don't know who will be targeted.
- Aerodactyl 2
Outspeeds zapdos and ohkos both zapdos and articuno. Aerodactyl 1 can also ohko articuno so it can also be an issue.
- Gardevoir
Tanks special hits well and is also very threatening to my earthquaker. With swampert the issue was that some gardevoirs can outspeed swampert and kill with magical leaf, but light screen could solve this. With flygon gardevoir can just trace levitate and now I can't touch it at all while also potentially getting ohkoed by ice punch regardless of light screen.
- Gengar
Immune to earthquake and there are multiple ice punch sets. For swampert the issue was the quick claw giga drain set. Hidden power ghost flygon could outspeed and kill gengar.
- Snorlax
Very difficult to kill if my choice bander is down. Even with my CBer it can be difficult in the case of QC curse.
Regirock/steel
Difficult to kill without EQ. Counter and explosion are also threats from them.
- Legendary trainers
Legendary trainers have a lot of ground immunities. They can also have the regis so it's a difficult matchup for the team which isn't great given that they are some of the strongest trainers you'll encounter.

Flygon threats
- Starmie
Fast starmie is a speedtie with zapdos. With swampert the main threat is speedtie loss into a crit, or a freeze on swampert. Now it can just ohko flygon if it has ice beam.
- Quick claw/brightpowder/focus band Ice move
There are a lot of pokemon with an ice move that can ohko flygon. Letting flygon go down in exchange for dealing a lot of damage is usually fine, but there are a lot of pokemon that can ohko flygon and have a hax item and that makes a lot of battles scary.
- Lati@s
They're immune to ground and a lot of them can ohko flygon.

There are no doubt more threats, but these are the main ones specific to this team. As you can see flygon makes many of the existing threats worse and then adds a bunch more.
I was facing dragon tamer Maddox. He sent out nidoqueen and latios.
Turn 1: Dragon tamers usually have a lot of ground immunities so I decided to trade flygon for nidoqueen and get a safe switch into articuno while also getting some chip damage on latios with hp ice from zapdos. If it was focus band on nidoqueen I could've gone into gengar to protect against counter. Nidoqueen goes down and aerodactyl gets sent out. Flygon goes down to ice beam.
Turn 2: I sent out articuno and decided to scout for aero 2 with a protect on both zapdos and articuno. It goes for ancient power into articuno. I don't know if it's aero 1 or 2. Latios reveals thunderbolt into articuno.
Turn 3: I decide to go for tbolt into aero and ice beam into latios, because I was afraid of switching articuno into gengar and it then being aero 2 who decides to one shot zapdos. In hindsight this probably wouldn't have been as bad as I feared because I would've been able to stall it out of ancient power pp and articuno has a lot of value against dragons. Aerodactyl kills articuno and I kill aero while latios ice beams zapdos. Last mon is rhydon.
Turn 4: Zapdos is at really low hp so I decide to protect and hope that latios targets it over gengar. Luster purge goes into protect and rhydon goes for rock slide while I bring latios to 1 hp with ice punch.
Turn 5: I double target latios with ice moves and I kill it and hit rhydon while it kills zapdos with brick break.
Turn 6: quick claw rock slide kills gengar.
Swampert>flygon
The flygon version of the teams feels a lot worse to use. I constantly had to play around things that could potentially kill flygon turn 1 while swampert has way fewer pokemon that can one shot it and those are often much easier to play around. Even good matchups like metagross were scary because I could just die to brightpowder ice punch. Flygon might be a better fit on a different team, but a 4x ice weakness, limited movepool and somewhat lacking stats will always be an issue.

The best way to improve the team would probably be adding another physical attacker in the back, but if you want a streak that has a good chance to make it past 300 I would just build a different team. My goal for this team is to get a 200-300 streak once I get a good swampert on cartridge as that is something I've hit multiple times on my 2DS save file.
Flygon doubles 155.png
Rounds 1-12:
Rounds 13-20:
Rounds 21-loss:
It will probably be quite a while before I get a hp ghost swampert for this team or hp ghost tauros that I want to use for some of my other doubles teams. My next doubles team will probably be a rain team. I already have a good zapdos and I recently got a very good horsea. I've used a rain team once before and wasn't impressed, but I want to use a different team composition and see if it will be any better. I don't expect amazing results, but hopefully it will be fun to use.
 
Last edited:
The leaderboard should now be updated again. Thank you to everyone for their patience and again, pardon the mess that it is currently in while I work on transitioning to a table style format. As always, please reach out or message if I have missed your streak or made an error. A few replies in the mean time...

The glitch allows you to catch pokemon used by the Ruby/Sapphire tower trainers. They have a random nature, and IVs depending on the round they're in. Some of them have egg moves, but unless the developers messed up there shouldn't be any illegal movesets. My understanding of possible IVs is limited, but I believe anything that can be bred should be able to get 6 31 IVs. I don't know what would be possible for the legendaries, but according to current rules latios is the only pokemon from the tower that's allowed to be used and that is a legendary. If the latios is fine then the other legendaries should also be fine, I think. If the latios isn't fine then maybe it should be banned instead of being the only pokemon allowed.

Thanks for the effort you put in. Let me know if you have any other questions.

In that case, it is not any different to me than using a genned Pokemon with legal IVs / moves. Players should be careful if they use any legendary / method 1 pokemon from there, as not all natures are possible to obtain with 6IVs. As you mentioned, Pokemon that can be bred do not really have this concern, so it is of no concern to me. I will update the rules accordingly.

Leupho I am sorry, but I cannot accept your streak. In similar vein to the Factory, you cannot use RNG manipulation for a reported streak to manipulate the facility layout itself, regardless if it is Factory, Pike, Pyramid, etc. While it is certainly impressive in its own right, it goes against the nature of what has been agreed upon in previous streaks.
 
Hello, I wanted to post a Python package I've been working on called frontierbrain3 that I think could be helpful for people here. The basic idea is that it has a database of all Frontier sets, all trainer data, a damage calculator, and facility-specific data (wild encounters in Pyramid/Pike, nature probabilities in Palace, etc.) along with a bunch of useful functions for doing data analysis/teambuilding. So you can do basic stuff like filtering sets by moves/types/stats and so on, but you can also do stuff like filtering by whether or not a set can OHKO your pokemon, or filter to see how many sets your pokemon can OHKO. There's a README that goes over a lot of the different things you can do.

I made it open source on GitHub here: https://github.com/NJKMath/frontierbrain3 and you can also just pip install it with "pip install frontierbrain3". I haven't made a Python package before, so let me know if there are any issues getting it to work. Also let me know if there are any issues in terms of the actual functionality and how it's calculating things, all the code is in the GitHub so it should be easy to double check it if you see something that feels off when you're using it. If there are other things people want me to add just let me know, I wanted to get a first version out just to see what people think but there's definitely room to add more features if people want them.
 
Hello? I'm new to this website and was directed here for team help for the frontier, is there a place to make a post here or do i just use this thread?
 
Back
Top