| DPP / HGSS RNG Manipulation Guide Part 1 - Common Information for Breeding, Capturing, and Receiving Perfect Pokemon
IntroductionSo you've encountered all these people with shiny Pokemon with perfect IVs, and now you want to know how to get some for yourself? Look no further, for this guide will show you every step of getting your dream Pokemon. This guide's purpose is to walk you through the basics of RNG manipulation in the 4th Generation Pokemon games. It is written with the layman in mind and is intended to be simple and easy to follow, without overwhelming the user with complex computer lingo. At every opportunity given there will be a picture or two that spells out exactly what to do. If you're reading this, it's assumed that you are already familiar with the concept of natures and IVs and have at least unlocked a majority of the content in the Pokemon game you wish to do this in. You must also be using an actual DS and game carts if you wish to follow along. Here are a few terms you must be familiar with before beginning: Seed: A value determined based on the current date, time, and delay. If you don't really understand what these terms are, don't worry about it. It's enough to know that frame, delay, and seed are three things that we are trying to control for our purpose and that manipulating your seed is almost the same thing as manipulating your delay, so there are really only two things to keep track of. While this guide is written for Pokemon Diamond, Pearl, and Platinum as well as HeartGold and SoulSilver, you can alternate between DPP and HGSS specific information by using the buttons at the top of the page. PrerequisitesBelow are the things you'd want to get in order to prepare for this endeavor:
DPP
HGSS
Recommended for All Games
Getting StartedStart off by downloading RNG Reporter and EonTimer. Pretty much all RNG manipulation processes can be summarized by a few steps, so if you focus on perfecting each step, you should have no trouble cranking out perfect Pokemon. The steps are:
But first there is some setup that need to be done, starting with our timer. Setting up EonTimerOnce you finish this section, you won't have to do this again. First select the button that's circled in green below. 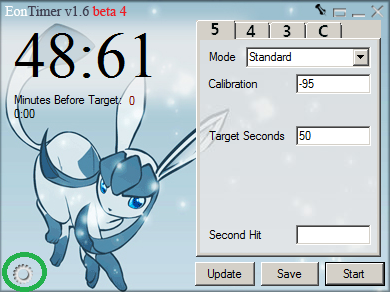
Let's take a look at the window below. 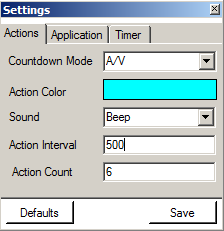
You'll want to change Countdown Mode to A/V. The only other thing you'll need to change is Action Count, which is basically how many beeps you want EonTimer to make as the timer counts down to 00:00. Next, go to the Application tab. 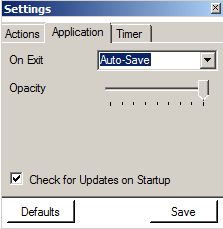
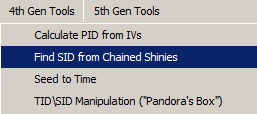
Select Auto-Save for "On Exit", and it's up to you whether you want the program to check for updates on startup. Once you've done that, you're done and no longer have to do this again. At this point, you'll want to determine your desired method of RNG manipulation so skip to the appropriate section. It's recommended to go to section III first because it's the easiest one to start with. Using EonTimerNow we'll show you how to set up EonTimer for a 4th Generation Game. 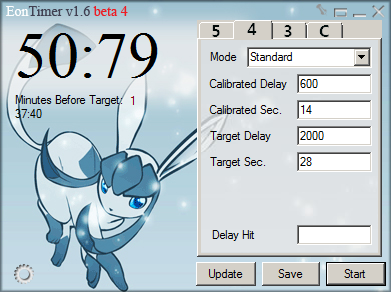
If using Diamond or Pearl, set Calibrated Delay to 600 and Calibrated Sec. to 14. If using Platinum, set Calibrated Delay to 575 and Calibrated Sec. to 14. If using HGSS, set Calibrated Delay to 490 and Calibrated Sec. to 14. Once set, do not touch either value unless you're switching to a game that requires the change. The only thing left to worry about is Target Delay and Target Sec., which can be found in the Seed to Time window, as shown below. 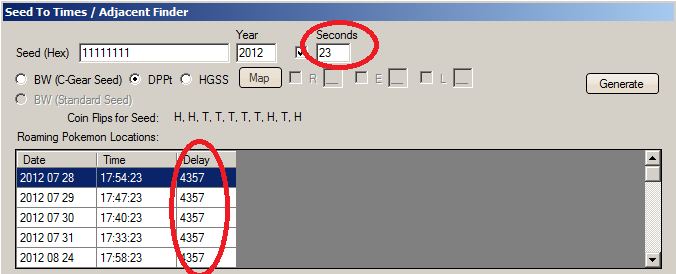
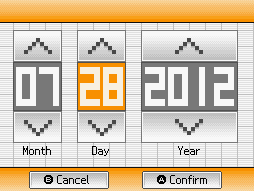
Here the Seconds value is 23 and the delay value is 4357, so in EonTimer Target Delay would be 4357 and Target Sec. would be 23. We'll be showing how to set up the Seed to Time window in later sections so don't worry about it for now. Just don't forget to change Target Delay and Target Sec. whenever you're attempting a different seed. Setting up your DS Clock and Hitting your SeedFor this section we will be trying to hit seed 0x11111111 using the date 7/28/12 and time 17:54:23 (See the highlighted option in the above picture. If you are attempting to hit another seed, know that you will only need the DATE and TIME for this part. 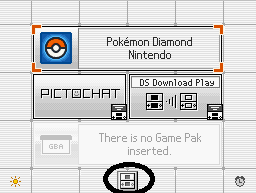
On your DS, click the icon circled above and go to the blue option shown below, and select the calendar. 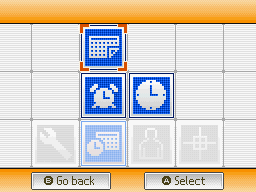
Now we look at EonTimer again; if you're using DPP, it should be set up as follows: 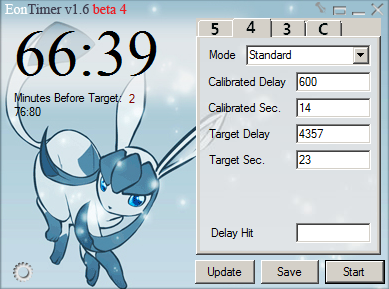
Take note of the Minutes Before Target option; see how it's 2? We'll have to take that into account when we change our time. Our target time is 17:54:23, so simply subtract 2 MINUTES from the time (remember, the format is hours:minutes:seconds) to give us a time of 17:52 and change the DS clock as follows. Do not exit from this screen at this time. Keep in mind that the subtraction of 2 minutes does not apply all the time. If Minutes Before Target said 0 instead of 2, you should input 17:54 as the time in your DS clock. 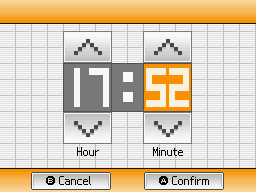
Now the moment you've been waiting for. With your DS still at the screen above, hover your mouse cursor on the Start button in EonTimer and prepare to press A on your DS at the above screen. Then simultaneously press Start on EonTimer and press A on your DS. Restart your DS and wait at the screen below. 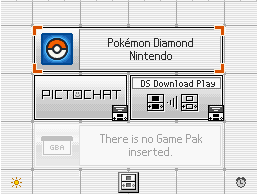
When EonTimer reaches 00:00 (And you'll know it's about to if you have it set to Audio or A/V mode since you can hear beeps), press A. The timer should be counting down to 00:00 again. Head to the screen shown below and wait there. Once the second timer reaches 00:00, press A and hope for the best. This approach applies to all 4th generation games. 
Once you're in-game, head to the appropriate Seed Verification section in DPP / HGSS RNG Manipulation Guide Part 2 - How to Capture / Receive Perfect Pokemon to see what to do next. |