looks pretty good. just some things are kind of off? Custom shiny looks cool but I believe we are only going by original shinies and such. also, I think the hoverboard is backwards and would just use it how it originally comes as in battles.This one exists(couldn't find the normal one on my pc so i just sent my custom shiny)
https://media.discordapp.net/attach...9df732bf5d9ce132243f7d09ff1cd63af47060beb32&= (Upload Image isn't working)

-
Follow our Instagram!
-
Welcome to Smeargle's Studio! Please be sure to review the studio rules. Feel also free to check out our hub to learn more about this place!Welcome to Smogon! Take a moment to read the Introduction to Smogon for a run-down on everything Smogon, and make sure you take some time to read the global rules.You are using an out of date browser. It may not display this or other websites correctly.
You should upgrade or use an alternative browser.Custom 3D Animated Renders
- Thread starter DJTHED
- Start date
Very fortunate to have a speedier turnaround this time for the priority poll (shoutouts to smokeyinferno), but Glimmora is now live on Showdown! A certain matcha-flavored fellow I mentioned last update is also live along with it. Will hopefully be getting in more updates soon so I can make the next formal update post, thank you all once again for your patience.

love itVery fortunate to have a speedier turnaround this time for the priority poll (shoutouts to smokeyinferno), but Glimmora is now live on Showdown! A certain matcha-flavored fellow I mentioned last update is also live along with it. Will hopefully be getting in more updates soon so I can make the next formal update post, thank you all once again for your patience.
 hi all
 pretty excited about the work I've been doing for this project over the past week, so I figured I'd share in this thread
as promised, I am also working on the other two pokemon that were featured in the priority poll. progress has been a bit slower both because I'm not really rushing to get these out the door & their models are notably harder to work with than glimmora's, but by now they are close-ish to a Showdown-ready state.
I started work on garganacl months ago (& in fact it was the first pokemon I formally worked on for Showdown) but I just could not get nice-looking output with the knowledge I had then. the oddly-shaped salt blocks produced ugly, inconsistent outlines & cast shadows all over the main body:
working on other renders in the meantime has taught me some tricks which I've used to finally clean up garg (and start work on archaludon, who incidentally has a lot of the same problems). in particular, Sinistcha's whisk-hair produced some very busy outlines which forced me to think outside the box with how I handled our 3DS-lookalike compositing setup & mesh normals in general (mostly re: how to use data transfer custom normals for nefarious Hacky Bullshit purposes)

as an aside: these sorts of issues are (part of) why less competitively viable pokemon often come first in the pipeline. higher BSTs & more broken gimmicks correspond roughly to more complicated visual designs, and more complicated visual designs mean more work for us
that's all. it's been fun working on this project for the past few months & I'm looking forward to what comes next once we finish the reg H-legal pool at Some Point™August 4th, 2025 Update
(To skip to poll information on Gholdengo, click here.)
-- Render Progress --
Completed
With these recent updates, I'm happy to say that all basic Pokémon from Scarlet and Violet are now rendered! This was a very hefty ordeal that I could not have done without the fantastic work of the render team, so I want to spend a bit of time highlighting their work.


Previous Update


New!
Priority Winner #2: Glimmora
The last poll winner was Glimmora by a narrow margin, and this render was handled by smokeyinferno! The eyes that Glimmet and Glimmora have are encased in a sort of crystal at the center of the "flower," but rendering out the emissive eyes thankfully wasn't that much of a hurdle compared to a lot of other Pokémon in Paldea.
New Renders
Phew, this was a big wave of renders, a fair amount which had a plethora of things to fix or adjust. I'll start with my solo renders first, since I've been sitting on these for a while.
This line was a lot tricker than I would have liked, mostly just for Bax. Frigibax had a unique case of me adjusting its eye expression, since its battle idle specifically has it scowling! But the real problem Pokémon was Baxcalibur, this thing had several issues ranging from weight paint issues, to adjust geometry for cleaner lines, to fixing the eyes... it was honestly something that haunted me for ages. Even now I'm not fully sure if I like the final product, but I do think it still came out very solid. I hope Baxcalibur fans are happy with this look!
smokeyinferno
Smokeyinferno once again has been on an insane pace in getting renders done, I honestly can't be thankful enough for their contributions. They would likely explain in better detail the full process of bringing these more complicated renders to life, but from doing QA I can list a few examples of things that needed adjustments so they'd look good in 3DS form:
Sinistcha: It's head whisk was an outline mess, so needed quite a bit of touch up so it could look as clean as it does now.
Nacli line: Eyes for all of them are emissive, outlines needed clean up for weird geometry on both Naclstack and Garganacl, Garganacl itself needed color balancing for its outlines to blend nicer with the white salt.
Archaludon: This one was particularly a nightmare, so many outlines to adjust, texture edits for it's chest frame, color adjustments to make the metallic look visible but not washed out...but I love how the final product looks.
Denial
One of our two new volunteers, Denial! She covered the Maschiff line for her first assignment, and these guys were honestly trickier than I expected to be! They're deceptively wrinkly dogs, so a fair amount of outlines needed to be touched up to clarify their expression and colors. I helped a bit here with some model edits, but for the first submitted work I am very happy with her final renders!
WaytooHaz3d
Our other new volunteer, Hazed! They covered both Bombirdier and the Charcadet line, both had some extra work needed to make their renders come together as solidly as possible. Bombirdier for one was a bit of scaling predicament, since we typically use a mix of the Pokémon's official "height" in game plus in game comparisons to determine how big or small we should render each Pokémon. It's hard sometimes to understand what this "height" is supposed to be, is it head to tail? Head to foot? Wingspan? It can usually be a reliable metric, but sometimes it comes down to reasonable judgement + some subjectivity. But it is important, we don't want to render Pokémon to be too big on Showdown. I also aided Hazed with some mesh adjustments and some texture editing for the eyes, to make sure the eyes are still visible at this scale.
The Charcadet line was also really complicated! A lot is going on here with the eyes, the fire, and just honestly just the sheer density of shapes in these designs. I've been very short on spare time this summer, so I was struggling to find time to help Hazed polish these guys off. Smokeyinferno came in clutch and helped wrapped this whole line up, so huge props to both of them for contributing!
-- Pokémon Animation Poll #1 --
So truthfully, part of the reason I wanted to start doing polls like Priority Polls was because I wanted to test the waters on how users would like having more community involvement with the 3D render process. I think the couple we've run so far have gone fairly well, so I want to introduce something I really would love to get all of your input on, animation votes!
For those that might not know, Pokémon Scarlet and Violet actually feature a good handful of Pokémon with multiple battle idles, typically a standard battle idle and an alternate battle idle used for swimming/floating. If you ever threw out a Pokémon on water for battle and noticed it wasn't restricted to the random pool floatie, or noticed sometimes your Scream Tail floats and sometimes stands on the ground, those are basically what I'm referring to.
Now in most cases, a lot of these animations I wouldn't really need to "decide" between for renders. Default idles are almost always disregarded in favor of battle idles, and most swimming idles wouldn't make sense for Showdown (it wouldn't really make sense to have Leafeon doggy paddling mid air, as funny of a mental image that is). However, there are some alternate idles that are really iconic or fun, and I feel especially for these cases it doesn't feel right for me to make the call on what to use for something that thousands of users will be seeing. And given the next Pokémon we need to render, I think this is a special moment I want to celebrate by bringing it to the community! So here's what you all will be voting for.


(Sample renders provided by smokeyinferno)
Gholdengo has two battle idle variants, one standard with its fists up, and another on its iconic surfboard. For me, both of these idle animations are very charming, but since we cannot have both I'd like to bring the decision to popular vote. Which Gholdengo animation do you want for Gholdengo's Showdown render?
Note that these render previews here won't be exactly one-to-one with the final output, there still might be some adjustments done to color balancing or outlines or just the slight changes that come from optimization, but these are a very close indication of what the final look would be like. Please vote on what animation you prefer!
Also, for those that have trouble voting directly on the poll in this thread, or want to share this with non-forum using friends, I also have the poll copied onto Strawpoll. Please feel free to share this, and also feel free to vote both here and on the Strawpoll if you wish.
https://strawpoll.com/e2naXxoxzyB
As for what's next, we're going to be putting full steam ahead in rendering all Paradox Pokémon. I'm very excited for this next update, it's going to likely take quite a bit of time getting all the renders ready, but I hope everyone will be looking forward to it!
the gen VIII screenrips were/are meant as placeholders for custom 3DS-lookalike renders, so you can't revert to them on showdown itself. they still exist in older versions of theIs it possible to go back to the old Dragapult 3D model?smogon/spritesrepository (and on pkparaiso.com without the outlines), though, so if you'd like you can look into writing like a tampermonkey script or browser extension that replaces the new sprites with the old:


 I recognize that perhaps it is beyond the scope of feasibility, but because SCVI made brand new models for past generation Pokemon, is it possible to make renders down the line for them? I feel as though it would help give Gen 9 more visual identity, at least on Showdown. Obviously it is and should be low priority but I'm just curious.Last edited:
Should be noted that some of the older SV renders such as Corviknight, Mewtwo and Some Eeveelutions? did this already but it was switched to Home models for future renders because they were significantly easier to work with and very few mons had significant updates to their animations.I recognize that perhaps it is beyond the scope of feasibility, but because SCVI made brand new models for past generation Pokemon, is it possible to make renders down the line for them? I feel as though it would help give Gen 9 more visual identity, at least on Showdown. Obviously it is and should be low priority but I'm just curious.
this seems like an inordinate amount of work to make renders to match a single generation's art style for 840 pokemon only to be discarded the next gen. the whole point of sticking with 3ds renders is they are futureproof, It's the same reason we have 3ds style sprite icons rather than matching gen 8's upscaled ones or illustrating SV style ones. making new animations for every single mon every single gen would be a huge load on your browser cache and showdown's storage, whereas oldgen static sprites are comparatively small.I recognize that perhaps it is beyond the scope of feasibility, but because SCVI made brand new models for past generation Pokemon, is it possible to make renders down the line for them? I feel as though it would help give Gen 9 more visual identity, at least on Showdown. Obviously it is and should be low priority but I'm just curious.
I might be wrong but I assumed they meant new models specifically for the few Pokémon that recieved a very notable overhaul in SV - the biggest case being Charizard who looks really differentthis seems like an inordinate amount of work to make renders to match a single generation's art style for 840 pokemon only to be discarded the next gen.
Less so trying to match the gen's artstyle but devamping this to a 3DS style similar to new mons. Still tho it'd be understandable if this is considered unnecessary work since Charizard already has a Showdown model, just fiigured i'd point out that the suggestion likely isn't to update every showdown model to gen 9 but rather take the few new models for old mons and devamp them (again tho, understandeable if that's not a reasonable ask)
ye it could be fun to redo some of the past-gen animations with SV's models if/when we finish the current-gen workload. a problem which sticks out to me though is that the current-gen models & textures aren't made to look good at tiny resolutions the same way X/Y's were
like, just look at the eyes on these. SV's charizard is definitely more expressive at full gameplay scale, but even at this resolution you're kind of losing the irises -- I suspect we'd have to retool the eye textures pretty significantly to get anything besides the sclerae to show up in our render outputs. meanwhile, XY zard's big blocky eye textures show up just fine:

definitely an interesting idea to keep in mind for the future, I think. but I also kind of worry that some of the newer models will look worse than what we have nowLast edited:
Quick note frome on this topic when it comes to making renders for models that were officially reworked.I recognize that perhaps it is beyond the scope of feasibility, but because SCVI made brand new models for past generation Pokemon, is it possible to make renders down the line for them? I feel as though it would help give Gen 9 more visual identity, at least on Showdown. Obviously it is and should be low priority but I'm just curious.
I would personally not bother doing this unless the changes are notable enough to change the silhouette substantially. There are a lot of Pokemon in ScVi that did get model adjustments, but remain mostly the same in overall shape. These kinds of changes are often just additional geometric detail, along with more detailed textures to go along with that. However, the main reason I would avoid doing renders for these reworks is because these changes do not translate well into the 3DS style. Typically the original models will fare better and have a more clear appearance, since they were designed with this type of rendering and small 3DS screen and resolution in mind.
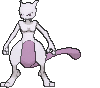
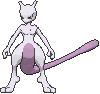
I made a couple exceptions to this, since these exceptions did significantly change the design enough to warrant tackling these. Persian, and Mewtwo.
->

->
It might be revisiting Persian again in particular because their textures were still using the highly detailed fur texture from ScVi in the render, and is a bit more noisy as a result than I'd like. I do have ideas on how to clean that texture up, but we'll see if I ever get the time to get to it. But either way, for both these cases, these reworks were very significant.
Persian received a massive overhaul in proportions. Head shape, neck, body and limb thickness, were all changed, which I think now fits the original 2D design of Persian a lot more as well, while before Persian felt a bit off with its design and proportions.
Mewtwo, while not as noticeable, did receive an update as well that addressed issues with its headshape most importantly. Before, its headshape felt very squashed down and didn't quite match Mewtwo's original 2D design very well, which was finally addressed with his new model in ScVi. Mewtwo did receive overall proportion updates as well, if a bit more subtle.
Anyways, my point is that while it is possible to re-render the more highly detailed ScVi models in 3DS style, it requires a ton of work. Especially because we usually have no choice but to use the ScVi models. For all the actual ScVi Pokemon, we're been using the Pokemon Home models, which are more suitable for the 3DS shading style. But these model revisions often (if ever) get updated into Home, they are stuck in the mainline game itself. So a lot of manual work is required to touch up the model to make sure outlines aren't overdrawn or underdrawn in places, and there will of course need to be a lot of manual touch up with the textures to make sure they don't get super noisy, and this gets harder the more complex the Pokemon's color palette is.
However, if I perhaps missed another Pokemon that got a more significant update than I may have realized, then I might be open to allowing other re-renders, as long as these reworks do more than just add detail with minimal changes to silhouette and proportions.
EDIT:
Also yes, I also have done updates to past pokemon, but only for animation. Here's one example of me doing this:
->

Leafeon, among other eeveelutions (not all of them), received new battle idle animations in ScVi. This was a significant change, but not to their models. Their ScVi models are very similar to before, but with some extra facial geometry to replace 2D animated textures. But I didn't see any reason to get these ScVi models to match 3DS style when they have identical proportions and silhouette anyway, and their 3DS models look perfectly fine in this style as is. But their animation and stance was a noticeable and noteworthy enough change for me to go in and make new renders for them to match the new game. I am aware there are a lot more than just the Eeveelutions that got new battle idles while still retaining most of the old model that I could've done, so maybe if anyone has any ideas in mind for that, I'm open to that as well that we can tackle as a team later once we get the more important stuff out of the way first.Last edited:Not sure if the artists here still take requests, but for after gen 9 is all finished up, I just wanted to point out that it seems Galarian Slowpoke, Slowbro, Slowking seem to have been skipped, potentially by mistake. The gen 8 legends as well, but I believe earlier in the thread it was mentioned that those wouldn't be returned to until after gen 9.
Edit: also Duraludon as wellLast edited:
Is that Mewtwo's SV model? Because he floats in the game.->
Mewtwo, while not as noticeable, did receive an update as well that addressed issues with its headshape most importantly. Before, its headshape felt very squashed down and didn't quite match Mewtwo's original 2D design very well, which was finally addressed with his new model in ScVi. Mewtwo did receive overall proportion updates as well, if a bit more subtle.
No, he does not float during normal battles. He floats during the overworld when he moves around. But in battle, he stands just like what is shown in that render. We always rip their "Battle Idle" animations from the game when doing these renders.Is that Mewtwo's SV model? Because he floats in the game.i cant see the animations of new mons that got animation like ghold and chien pao while my oppo can what to do?
You're probably talking about the 2D animated sprites, not the 3D models.i cant see the animations of new mons that got animation like ghold and chien pao while my oppo can what to do?
- Gholdengo and Chien-Pao only have front animated sprites, not back animated sprites.
- For some reason I don't understand, the animated sprites sometimes don't load in live battles, but they always load in replays.
New content to render(insert eye emoji)


fell through the cracks as a kind of complicated set of designs at the end of the hisui dex & returning to gen8 stuff hasn't been a priority since. I brought this up a while ago when I was picking up where work on hisuian qwilfish left off, I wasn't given the go-ahead to work on them then but now that we have actually made it back to the legendaries I suppose it's a possibilityHey, not sure if this has been asked before, but is there a reason that neither of Dialga or Palkia Origin form animated sprites are available/added to Showdown?
How long does it take to make these & did u do the animations back for these 2?New content to render(insert eye emoji)
Hello everyone! I've recently been spearheading the rendering of all of the new Megas from Legends Z-A while I have a bit of free time and motivation from the new game coming out. Given the list is small, I figured I'd handle going through the new Mega list on my own while the rest of the team we have can just keep going with the tasks they have for ScVi Pokemon.
I'll first open up this post with just dropping all of the renders I have done, and then go into detail about new rendering techniques that should benefit the entire team, as the rendering process is magnitudes faster to go through, and is using a method that is even more accurate to how the actual 3DS games handled drawing their outlines.
Mega-Clefable:


Mega-Victreebel:


Mega-Starmie:


Mega-Dragonite:


Mega-Meganium:


Mega-Feraligatr:


Mega-Skarmory:


Mega-Froslass:


Mega-Emboar:


Okay! So, rendering technique. Before, we rendered the base resolution of these renders at an 8:1 ratio. Or in other words, 8 times the target resolution on each axis, which would be 64 times the total amount of pixels. The reason I had set this up this way before was because of the need to improve accuracy of Blender's built in edge detection filters I was using at the time. The lower the base resolution, the less accurate the outlines would be drawn and more unintended areas would receive outlines with no way to filter them out. Blender's built in edge detection (the variant I used was referred to as "Laplace") would draw outlines around around high areas of contrast around whatever we fed into the filter. The most important pass to put through the filter is what is called the "Normals" pass. The high areas of contrast often represent parts of the model that have creases, intersections, or is otherwise not a continuous flow of the object's mesh, and would more than likely be an intuitive place to draw the outline.


The result of this Laplace edge detection filter would then be put through more filtering nodes I set up to remove color, and filter out any faint detections that would otherwise not make sense (like an edge of a face on a continuous mesh would still get highlighted, just very faintly).
As I mentioned before, though, this method is not very easy to tune to work at small resolutions. We had to have quite a large base resolution to get a clean output from Laplace. But, with this large resolution, the result is fairly clean as you can see in the above images in the spoiler window. It would output what would on average be a 2px thick outline in all the important areas. However, if we kept this as is when shrinking the render back down to its intended resolution, it would be an 8x shrink and the outlines would barely be visible as they wouldn't be able to maintain the needed 1px thickness we need.
The solution I came up with for this issue would be to first use a Blur effect on the entire filtered outline, and then use Color Ramp nodes in Blender to tune at what point the outline thickness should be within the gradient of the blurred outline.


Then this could be shrunk down to a 1/8th scale image, and outline thickness could be tuned precisely with this color ramp to maintain the intended thickness, so that it's not too thick, or too think as to leave gaps around the drawn outlines.
Now that I have gone over this, let me go over why this method ended up being a huge bottleneck, especially for a lot of people we've brought onto the team to help render out ScVi Pokemon, as a lot of them don't have super high end PC hardware like I do.
First issue is obvious, the base render resolution is very, very high compared to the target resolution. Rendering at a higher resolution will pretty clearly force renders to take longer and be more resource intensive.
Secondly, in the compositor, the main bottleneck here is the blur functionality. Blurring images in realtime is very slow, especially if the blur is given a fairly large radius, and is using a fairly large base image on top of that. This also, in turn, resulted in long render times.
And thirdly, something I didn't touch on yet, was high lighting was handled. This is a bit too complicated for me to want to dive too deeply into in this thread, but in a nutshell, lighting was originally handled by using sun light with a very large radius to give the base shading render pass a very, very, VERY soft shadow. Given how large the radius was for the light, Blender EEVEE was required to be set up to have a very high sample count. To put it simply, essentially every frame (a frame that is 8x the intended scale already) needed to be rendered a couple hundred times for that one frame with different lighting samples in order to produce the soft shadow. This was the biggest bottleneck of them all, but was hard to get around not doing this at the time, so it stuck.
The reason we needed soft shadows was to allow a fine amount of control and tuning for how shadows were drawn from parts of the model that are expected to cast shadows. Similar to how we filtered the blurred outline, we just used color ramps to tune where shadows would start and end, and this tuning needed base shading that had nice soft gradients, hence the large light size.
Anyway, this method is irrelevant now. There are still upcoming renders for ScVi that may still be using the old method, but I'm fairly certain everyone on the team will want to be using this new method from here one out. So, let's go into why the new way is so much better.
Outlines. Outlines, outlines, outlines. The outlines are now using the same exact method the 3DS uses. Blender Laplace is not an accurate representation of how the 3DS did things for outlines and edge detection in general. If it was, we wouldn't have needed to render at such a MASSIVE base render in order for it to behave in a way we'd like. The method the 3DS uses is a lot more simple, and more appropriate to use for smaller resolution renders. It's essentially a 2 sample difference pass, one pass with two copies of an input image with one copy shifted 1px to the left with the two images then being put through a difference mix filter, and the second pass doing the same thing, but with the one copy shifted 1px up instead of left. Then these passes would get combined, and out comes a very clean 1px outline.
This image here was intentionally rendered at a high base resolution with high outline thickness to show more clearly how this works:

This method is really simple and easy honestly, and I'm surprised I didn't really look to investigate this sooner. This method idea came up mainly from observing how the 3DS games rendered these outlines while playing them by... using a device that allowed rendering the games at a higher internal resolution than the original 3DS would be able to display. Seeing the enlarged image made it a lot more obvious what they were doing to me. So, that, combined with the more game development experience I've accumulated for the past few years, made if quite easy to find a way to essentially indirectly reverse engineer how the outlines are drawn, and now I have a method that produces nearly the same kind of outlines you'd see on real hardware, even the same visual artifacts (Look at the top of Leafeon's ears for example in the above image and how they have a gap on the outline tip, this is how it looks on real 3DS hardware too that you can observe yourself if you look closely).
Now, I was hoping to develop this method without needing to increase the base resolution size, and I was CLOSE to managing this, but it was hard to filter out edge detection artifacts sufficiently enough, so I opted to just role with a 2x base resolution with 4x more pixels. This is still a significant improvement over 8x scaling though, and in the end this decision didn't result in significant render time penalties. And since this method is custom and built using Blender's compositing nodes, I am able to very easily increase the thickness of these outlines by 2x as well to maintain consistent outline thickness.
The next improvement is something that kind of just comes with the previous, which is no more need of very large blur effects. There is still a blur node in the compositing tree for very specific situations, but is a very small blue on a very small image and does not bottleneck renders when its used, so that's a very, very nice victory there as well.
And lastly, the method of lighting has changed. Lighting for most elements of the render are no longer using Blender EEVEE's real time lighting. Instead I'm calculating lighting using math in the compositor using dot products of the model's normals and the normal direction of an emulated light source. This is very basic lighting but it works for our needs. However, there are still situations where we absolutely NEED proper shadows, so here comes the last main change to this process, baked shadowmaps:

The shadow texture here on Leafeon is what it came with from the 3DS officially. And this was used to allow the lighting engine to render shadowed areas of the model that the basic dot product lighting method would not cover. These official shadowmap textures I sort of figure are probably not baked, but rather hand-drawn to some extent at the very least. However, I didn't like the idea of requiring anyone who needs to make a shadowmap texture for a Pokemon, so I resorted to using baked lighting, which is put into a texture, then is porcessed to appear similar to how the 3DS show maps appear. Take Mega-Meganium for example:

Mega-Meganium has very large flowers around its neck, which would be a very, very obvious source of casted shadow that wouldn't be able to render without having some what to bake down casted shadow detail into a texture for the pokemon to carry into the lighting pass. Not every Pokemon will need something like this, but if the Pokemon has a lot of large parts that hover over other parts of its body, there's a good chance it may need it to not feel super flat. This is why I chose to give Mega-Meganium this custom shadow treatment.
Alright! That's it for now! Expect more renders at some point in the future soon for Legends Z-A Megas! I'll continue to work through the list in my freetime until the list is finished.
There isn't actually an official animation where it's like this as an idle, only briefly in some animations such as an attack animation, so if this were to be done it would have to be via a custom animation which might be more effort than they'd want for this project.Wow DJTHED, those are beautiful. I'm curious if you have plans to make an alternate render for Feraligatr that has the helmet down?


