SwSh Battle Facilities Discussion & Records

Right on the eve of the Tundra release, I just wanted to have a quick snapshot of how all the types are doing before Tundra shakes everything up:

1. Grass - 168 (Jumpman16)
2. Fire - 143 (sb879)
3. Bug - 124 (Dobbly)
4. Steel - 117 (Eisenherz)
5. Ghost - 99 (Eisenherz)
6. Dark - 96 (sb879)
7. Flying - 89 (sb879)
8. Normal - 75 (sb879)
9. Water - 74 (doctordoak), Dragon - 74 (Eisenherz)
10. Ground - 68 (Eisenherz)
11. Electric - 65 (doctordoak)
12. Fighting - 62 (Eisenherz)
13. Psychic - 61 (Eisenherz)
14. Fairy - 60 (derangedyoshi15)
15. Poison - 58 (Eisenherz)
16. Ice - 54 (Dialganet2)
17. Rock - 50 (Eisenherz)
 
EeveeTrainer asked earlier today in the discord about foreign RS communities, so I looked into that. While there didn't appear to be anything as centralized as ours, I stumbled onto this Japanese blog:

https://tokitamaroku.blog.fc2.com/blog-entry-324.html

Basically, this was one person's ("RYO", it would seem) journey to get 30 in every type, which they ended up doing over 2 months. Several of their streaks actually did beat ours at the time, namely Water (45, 6/27, Gyarados/Seismitoad/Toxapex), Ice (48, 7/29 [this was the same date I posted my 53, but assuming the blog uses Japan's timezone their's should've been earlier], Lapras/Mamoswine/Avalugg), Poison (56, 7/25, Gengar/Drapion/Gloom [yes gloom]), Flying (68, 8/17, Gyarados/Coviknight/Emolga), Steel (69, 8/16, Durant/Duraludon/Corviknight), and Fairy (46, 8/22, Mimikyu/Togekiss/Weezing-G). While the blog is in Japanese, it's not too hard to at least read through the data (look for tables) with Google Translate, though sadly this leaves the actual write-ups ignored (well, they can be Google Translated too, but that's probably doing them a disservice...). Feel free to look through all of them, they have some interesting ideas. There's also general RS theory and a threatlist on the main page.

Their highest streak was actually one that was never a record, but another high entry for Grass - 76. In fact...

Rillaboom/Ferrothorn/Appletun
(I think all image links from this blog are temporary so go to the blog's main page if you want to see the nice image)

Look familiar? Don't get the wrong idea though, this actually was not copied from Jumpman's team; it was posted weeks before his initial 139 run, on 8/5. Amusingly, the beginning of the write-up notes that there's lots of room for improvement with this team (it already postulates running Leech Seed over Iron Defense on Appletun) - yeah, you could say that!

Don't think this blog was blind to what we were doing, though. It even references Eisenherz's old 83 Grass run in this very write-up. In fact, it is remarkably attuned to what we're up to - they compare their own runs to the top score in each type they could find, and it's even been updated with Eisenherz's 117 Steel run posted just a few days ago! Sadly, looking over this defacto leaderboard didn't reveal any RS behemoths lurking in the shadows; with all but one exception they were scores from our leaderboard. The one exception was Fairy, which was 61 with Mimikyu/Togekiss/Clefable, which I just interpreted as typo, given that our current record is 60 with the same Pokemon.

I had found this blog in the first place by just image searching a random RS proof picture since they look generally similar, and since this was the only notable result I found on that search I was about ready to wrap up, but I figured I'd read the comments before I did, hoping to get a chuckle out of some random claiming 200 with Rock or something equally stupid. Instead, I found a promising lead. Someone said they found a 102 Bug run on twitter, and while that initially sounded really vague and fishy, the blog author not only confirmed they had seen it too, but that they also found a 104 Steel run rom that person. Without any links, I hopped to twitter myself, searching for the Japanese term for RS ("しばり組手") with a slight date buffer to get rid of the litany of Week 1 5-win posts. Most were still very low, with a slight exception of someone who goes by haiK2tettou who's been taking RS up recently and getting decent streaks with Flying and Fire with some cute choices of Emolga and Flareon.

But after a bit of searching, I found the runs that been talked about a bit earlier, from a user named pokemonsirasu:


While twitter isn't the greatest place to share detailed team info, they did post infographics detailing the teams. First, Bug:

Durant @ Shell Bell
Hustle
Iron Head/X-Scissor/Thunder Fang/Stomping Tantrum

Shuckle @ Leftovers
Contrary
Rest/Shell Smash/Infestation/Toxic

Shedinja @ Heavy-Duty Boots
Wonder Gard
Baton Pass/Will-O-Wisp/Toxic/Gust

No nature/EV information sadly. As you can see this is a very defensive team (well, when Durant isn't murdering everything), with Shedinja only weakening and pivoting, never boosting. In fact they even posted a picture of their team's status right at the end of the run, and Shedinja had used all of its PP, except 8 Baton Pass. This means it used 58 Baton Passes. Definitely seems like a lot of that was just stalling out passive damage, hah. There's also the seemingly-bizarre option of Gust, but this is one I'm no stranger to! It was something I genuinely considered and suggested to others running Ghost. The idea is simple enough, it's a damaging move with a ton of PP that, unlike Shadow Sneak, fails to make contact, which is helpful versus Toxapex, Gyarados, and Druddigon with their Rocky Helmets. No one else seriously took it on, so I'm glad to see it got used sometime :) Now for the Steel team:

Durant @ Shell Bell
Hustle
Iron Head/X-Scissor/Thunder Fang/Stomping Tantrum

Bronzong @ Lax Incense
Heatproof
Rest/Extrasensory/Calm Mind/Toxic

Ferrothorn @ Leftovers
Iron Barbs
Iron Defense/Rest/Leech Seed/Toxic

Durant makes a return with a defensive core, though this one seems a bit quicker to use. CM/Heatproof Bronzong was something Eisenherz considered for his 117 run, and clearly there was something behind it even if it's not what he went for. The tweet mentioned that Lax Incense was used a way to mitigate damage in lieu of Leftovers, and as something I considered on Mimikyu I get where they're coming from. The Ferrothorn is even more defensive than usual, forgoing any sort of attacking move. The logic is sound, though - Leech Seed, Toxic, and Iron Barbs are three sources of passive damage, and since they continue even when Ferrothorn is sleeping and not using PP this set isn't as PP-inefficient as it first appears (not to say it's super-efficient, either, though).

Anyways, I haven't mentioned when these were posted, so let's get to that: 8/10 for the Bug team, and 8/14 for the Steel team. AlphaClement posted their 100 Grass run on 8/6, which was later beaten by Dobbly's 124 Bug run on 8/18. This means that both of these runs were #1 streaks when they were posted! Oh, and that weird discrepancy with the Fairy record I mentioned earlier? Not a discrepancy at all, the 61 run was also something this user posted back in August. In fact, that means they're actually still the Fairy record-holder!

So that's what I found. While it doesn't seem like we're being dominated in Japan, there's still some people putting great efforts in outside of this forum, and it was cool to see their results.
 
Last edited:

Eisenherz

επέκεινα της ουσίας
is a Forum Moderatoris a Community Contributoris a Tiering Contributoris a Top Social Media Contributor Alumnus
Moderator
As some may already have noticed, I have taken ownership of this thread from turskain a few days ago, so first off I'd like to thank him for taking care of it until now and keeping it running for the last year or so!

I revamped the OPs pretty much entirely; in addition to aesthetic changes, here are some notable changes:
  • The addition of a leaderboard for the new multiplayer roguelike mode added in Crown Tundra, Endless Dynamax Adventures. Streak submissions for this mode are now open!
  • Both RS and Tower leaderboards have been updated, and the RS leaderboard has been slightly expanded.
  • Since RS has proven to be the more competitive and popular facility, I have moved its leaderboard to the top of our list.
  • I removed resources that were outdated, and added new ones.
  • Change to the rules: the Battle Tower streaks that are added as ongoing streaks now need to receive an update from the players within 6 months. After this time period, I will mark them as done, and updating them won't be allowed; this is to prevent streaks from staying ongoing forever, which seems to be a tendency (I assume some of them have simply been forgotten by their users who have now moved on). People who wish to keep their streaks listed as ongoing simply need to post every once in a while to let us know the streak is still going.
    With that in mind, several streaks are currently ongoing without updates for 6 or more months. The following users now have one month to update us of their progress before those get marked as completed:​
  • We don't have a banner, so if you're an artist or know one who would be interested in designing one, it would be appreciated!
  • If you have feedback or ideas of things you'd like added or changed, let me know, either here, by DM or on Discord!

Cheers!
 
Do you think there's possibility to increase the current top streaks even further now with the influx of legendaryes?

Judging by the pre-tundra functionality, I'm assuming the "banlist" is same as regular facilities, allowing Legendaryes but not Restricted.
 

Eisenherz

επέκεινα της ουσίας
is a Forum Moderatoris a Community Contributoris a Tiering Contributoris a Top Social Media Contributor Alumnus
Moderator
Do you think there's possibility to increase the current top streaks even further now with the influx of legendaryes?

Judging by the pre-tundra functionality, I'm assuming the "banlist" is same as regular facilities, allowing Legendaryes but not Restricted.
Hmmmm sorry I'm not sure I fully understand your first question. In what facility do you mean, Tower or RS? Are you asking about my/other people's opinions on the potential on the new stuff for higher streaks or are you asking about adding something to the way the leaderboard is done?

The official Tower banlist for entering the facility itself has not changed, so technically everything is still allowed, including all the new stuff. The banlist for our Classic and Dynamax modes is custom since the modes themselves are custom self-imposed rules, so something like Mew is allowed, but the broken things like Zacian aren't.
 
Hmmmm sorry I'm not sure I fully understand your first question. In what facility do you mean, Tower or RS? Are you asking about my/other people's opinions on the potential on the new stuff for higher streaks or are you asking about adding something to the way the leaderboard is done?

The official Tower banlist for entering the facility itself has not changed, so technically everything is still allowed, including all the new stuff. The banlist for our Classic and Dynamax modes is custom since the modes themselves are custom self-imposed rules, so something like Mew is allowed.
I was specifically talking of RS.

Tower would offer some fun shenenigans with the new "regular" legendaries, but my question was mainly regarding RS.
 

Eisenherz

επέκεινα της ουσίας
is a Forum Moderatoris a Community Contributoris a Tiering Contributoris a Top Social Media Contributor Alumnus
Moderator
I was specifically talking of RS.

Tower would offer some fun shenenigans with the new "regular" legendaries, but my question was mainly regarding RS.
Ahhhhh I see!

I think RS definitely benefits a ton from all the new legendaries, and yeah, the ruleset is the classic one, regular legends are allowed but not restricted/mythicals.
I've seen a lot of people excited about the UBs in particular, they definitely have lots of potential in RS, some of the Tapus probably too. Lando seems incredible for Flying (rip Emolga), Flying in general has a ton of interesting options now, G-Zapdos seems very good too! I've been working on Mono Fairy so I've only looked into those options in depth for now, but I'm sure many people are working on using the new stuff in many types :eyes:
 

drcossack

I'm everywhere, you ain't never there
Ahhhhh I see!

I think RS definitely benefits a ton from all the new legendaries, and yeah, the ruleset is the classic one, regular legends are allowed but not restricted/mythicals.
I've seen a lot of people excited about the UBs in particular, they definitely have lots of potential in RS, some of the Tapus probably too. Lando seems incredible for Flying (rip Emolga), Flying in general has a ton of interesting options now, G-Zapdos seems very good too! I've been working on Mono Fairy so I've only looked into those options in depth for now, but I'm sure many people are working on using the new stuff in many types :eyes:
In my limited experience with the old legendaries so far (using an old Suicune set, which Jumpman used in a previous Battle Tower. In fact, the Suicune was from him, so he likely remembers what it had. Nicknamed Holy Water), he was pretty much untouchable. Granted, a defensive powerhouse like Suicune is going to be hard to break through.

I'm going to take a look at G-Zapdos for the Flying-type RS. I've wanted to see how the Galarian Birds did in a battle setting, since I haven't used them yet. Some other Pokemon (UBs, in particular) I'd like to take a look at are Kartana & Pheromosa.
 
Water
I know I'm pretty far away from the record, but I would like to post this, as it was done a long time ago, and with hard work. And hard work always deserves to be rewarded :)

IMG_8467.jpg


Lapras-Gmax @ Light Clay
Ability: Shell Armor
EVs: 252 Def / 252 SpA / 4 SpD
Modest Nature
IVs: 0 Atk
- Sparkling Aria
- Freeze-Dry
- Ice Beam
- Rest

Lapras is the key of the run. Without it, you have to rely on Dracovish, which is pretty limited (as a Choiced mon). BUT, with an insane bulk when Gigamaxed, especially behind the screens, access to Rest to restore its HPs + the Wish/Heal Bell support from Vaporeon, this mon is an insane thing to chain victories. Plus the fact it can Freeze-Dry to beat annoying Water mons like Milotic or Gyarados which are nuisances. Lapras can Gigantamax and win against almost any Pokémon, so that's extremely broken.


Dracovish @ Choice Band / Choice Scarf
Ability: Strong Jaw
EVs: 252 Atk / 4 Def / 252 Spe
Adamant Nature
- Fishious Rend
- Outrage
- Psychic Fangs
- Crunch

When something bad is happening, Dracovish is always here to clean. You can hard switch into that (especially behind screens) when Lapras is facing annoying Electric or Grass-type mons like Magnezone, Boltund or Abomasnow. It can then spam Fishous Rend, or eventually Dynamax (if it has not been done by Lapras), Max Wyrmwind does insane damages. The Wish support from Vaporeon is also incredible, because this mon is pretty bulky behind screens, so we can easily Wish-Pass to it and spam Fishious Rend to clean games.
Choice Scarf is pretty useful to outspeed things and could eventually be more useful that Band but I never could test it (I did my run with the Band).


Vaporeon @ Leftovers
Ability: Water Absorb
EVs: 252 HP / 252 Def / 4 SpD
Impish Nature
- Wish
- Protect
- Heal Bell
- Toxic / Flip Turn

The god themselves. Without Vaporeon, the streak would be like... 15 wins? Vaporeon is extremly useful in the team, cause its Wish + Heal Bell support helps Lapras keeping healthy/cures it from Rest, and Dracovish preventing para and spamming Fishious Rend as long as possible. Toxic helps beating 1v1 annoying and passive mons, but I think you can also run Flip Turn on it (never tested it before), it could be more viable. Especially because it doesn't waste screen turns.

--------------------------------------------------

This team is pretty "no brain": you just Gmax and spam screens with Lapras turn one, eventually hard switch into Vish and spam Fishious Rend, and support (Wish/Heal Bell) with Vaporeon when you're facing a passive mon like Pyukumuku, this is the right time to heal your team. I think this team has the potential to easily reach 50+ because it has really few threats, but you have to be a bit lucky (not facing SO MANY Boltunds/Magnezone, and eventually facing passive mons to heal your team with Vaporeon).
 
I was specifically talking of RS.

Tower would offer some fun shenenigans with the new "regular" legendaries, but my question was mainly regarding RS.
I am incredibly behind schedule with the DLC (I started the DLC, got to the village, started the quests, saw a Tyrunt and... *WILD T-REX - immediate mind check about best Apricorn ball to have Tyrunt in - catch it - transfer HA female - back to breeding until I have a perfect T-Rex to bodybuard me*) but I have done some early testing.

To add on what Eisenherz said, other than the obvious snowballing UBs, some type records are bound to be more or less shattered.

1) The Tapus may not have as expanded movepools as we thought, but they're miles better than 99% of the available options. Electric (Koko), Fairy and Psychic (Lele is a much better secondary option to Alakazam than anything else, and it works very well with the Galar-Slow dudes) are bound to be broken;
2) Incredibly, Fire got another ungodly option: Blaziken. High PPs, high powered moves, attack boosting STAB, a broken ability, baton pass, and Thunder Punch for Water. I still have to think about how to implement it with Cinderace and Fire has one of the most impressive streaks around, but I think it's worth a shot (and I will surely use it on Fighting).
3) I am less sure about it, but I think that the fossils may help with Rock (especially the Swift Swimmers) and preserve Terrakion, which I think remains the best option regardless and should be used 100% of the time. Since I currently hold Ice streak, I may go for Rock next to see if it is doable.

Now, back to breeding Tyrunt.
 
With that in mind, several streaks are currently ongoing without updates for 6 or more months. The following users now have one month to update us of their progress before those get marked as completed:​
Cheers!
You can go ahead and call mine done; I don't see myself going back to singles. Thanks for all the hard work on the update to the front page!
 
Hi everyone!

With the release of the Crown Tundra, we now have access to a ton of new Legendaries. I wanted to bring attention and ask everyone’s opinion on one that may slip under the radar despite receiving some cool new moves- Raikou!

While Raikou did lose Hidden Power Ice, it gained Scald which helps separate it from other Electrics as a way to combat Ground types. Additionally, it is now able to use Aura Sphere without being locked into a Rash nature. Finally there’s Rising Voltage for Raikou to hit very hard in combination with his excellent speed tier under Electric Terrain. These, in addition to Shadow Ball and ol’ reliable Thunderbolt offer a nice wide range of coverage. My question is how viable do you believe Raikou is in both the Battle Tower and Restricted Sparring?

What Raikou does have going for him:

-An excellent speed tier & pretty good Special Attack
-Good bulk especially on the special side
-Set versatility: can run Assault Vest, Air Ballon + 4 attacks, Calm Mind + Lefties, a Choice Specs set etc.
-Great coverage moves, specifically Scald, Aura Sphere, Shadow Ball and to a lesser extant Extrasensory.

With only three pics in RS, Raikou may still be hard to justify with no secondary typing. Does the amazing speed tier, decent bulk, versatile coverage and multiple set possibilities make up for that? For the Battle Tower, running Raikou with something like Gyarados/rain overall seems decently viable. Gyarados offers Intimidate to cover up Raikou’s lower Defensive stat and rain to power up Scalds and Thunder. While Zapdos did receive Hurricane to abuse the rain as well, perhaps you don’t want to double up on the Rock weakness.

Let me know what you guys think! Also, thanks for reading and hope you have a nice day :)
 

Eisenherz

επέκεινα της ουσίας
is a Forum Moderatoris a Community Contributoris a Tiering Contributoris a Top Social Media Contributor Alumnus
Moderator
Let's get things started! A few hours ago, doctordoak, JustinTR, Ullar and I spontaneously decided to have a shot at an endless dmax adventure, and we ended up getting a decent run (and got rewarded 92 ore for it)!

ElcR6xCU8AAPJ64.jpg


Unfortunately, Justin had to leave after the 16th battle, so an AI took his place and he doesn't show on the records screen.

The bosses we encountered were Thundurus (which was pretty brutal), Groudon, Uxie and Xerneas.

We had several MVPs through the run, but Ullar's Vikavolt deserves a prize for sticking around this long; he picked it up on our very first battle, and it stuck with us through the entire run! All of its moves came in clutch at a point or another. Other notable helpful Pokémon we had along the way:
- Cinccino, which I picked early on and stuck around for more than 2 floors I think. A fast Light Screen was really helpful at times, and Triple Axel / Hailstorm kind of carried the Groudon fight (well, a couple Precipice Blades misses also helped........).
- Comfey, which doctordoak picked up shortly before the Xerneas fight and is the only reason we got through it with no deaths(!).
- Galvantula, which Justin picked up early and got us a bunch of clutch Thunder paras. Justin also had a Vaporeon for a long time which was helpful, and finished with a nice Rising Voltage Luxray.

We *may* have been able to finish this 5th floor, which had a Psychic boss, if Justin had been able to stick around, but it's doubtful since we were only 1 KO away from the end.

Overall, this was a ton of fun! There's a lot of RNG involved obviously, between the possible paths and rental Pokémon, the inaccurate moves, and the AI sometimes picking the best possible move on the best target and sometimes picking moves that do absolutely nothing, but there's also quite a lot of room for strategy and optimization during runs, a lot of choices have to be made under strict time pressure. I'm looking forward to more attempts in the near future!
 
Last edited:

Eisenherz

επέκεινα της ουσίας
is a Forum Moderatoris a Community Contributoris a Tiering Contributoris a Top Social Media Contributor Alumnus
Moderator
Has anyone compiled a speed tier list for the regular battle tower?
I have a spreadsheet informant that has a Speed Tiers tab: https://docs.google.com/spreadsheets/d/1U5Ag4ibaJJrdy9ZzIgK3uTuqkLN6CDbA6knP_YZEuD4/edit?usp=sharing
(sets ABCD are the ones Leon uses)

A proper list posted on here would be useful though, I'll edit this post later with that!

EDIT: Here it is!

256 – Cinderace-1 (Leon)
253 – Cinderace-5
244 – Cinderace-1

226 – Ninjask-2
219 – Flygon-2
217 – Xatu-4
213 – Dragapult-2 (Leon)
211 – Dragapult-2
210 – Accelgor-2, Chandelure-3, Ninjask-4
208 – Ninjask-3
204 – Ninjask-1
202 – Sawk-4, Malamar-4
200 – Barraskewda-2
199 – Dracovish-2
195 – Jolteon-3, Accelgor-4, Passimian-4
193 – Butterfree-3, Accelgor-3, Stonjourner-3
192 – Weavile-7
191 – Ribombee-67
190 – Weavile-3, Noivern-4
189 – Inteleon-2 (Leon), Ribombee-3, Espeon-3
188 – Cinderace-3 (Leon), Boltund-57
187 – Ribombee-2, Inteleon-6
186 – Gothitelle-3, Barraskewda-4
185 – Noivern-2, Boltund-3, Cinderace-7
184 – Kingler-3, Dugtrio-3, Barraskewda-3
183 – Salazzle-4
182 – Inteleon-2
181 – Boltund-1, Cinccino-4, Maractus-4
180 – Dugtrio-1, Swoobat-4, Jolteon-4
179 – Salazzle-2
178 – Hawlucha-1
177 – Cinccino-2
176 – Swoobat-2, Jolteon-2
175 – Weavile-48
174 – Cinccino-1, Jolteon-1, Ribombee-48
173 – Swoobat-1, Gengar-3
172 – Inteleon-134 (Leon), Durant-3, Golurk-4, Crawdaunt-4,
171 – Cinderace-24 (Leon), Froslass-2, Gengar-2, Raichu-2, Espeon-2, Noivern-3, Boltund-48
170 – Inteleon-4578, Manectric-4, Dugtrio-4, Rapidash-G-57
169 – Froslass-1, Galvantula-2, Liepard-3, Machamp-3, Cinderace-468
168 – Durant-1, Heliolisk-1, Inteleon-3, Rapidash-G-3, Hawlucha-4
167Charizard (Leon), Galvantula-1, Noivern-1, Liepard-2, Meowstic-2
166 – Manectric-2, Dugtrio-2, Hawlucha-3, Whimsicott-4
165 – Cinderace-2, Salazzle-3, Flygon-4
164 – Inteleon-1, Hawlucha-2
163 – Haxorus-234 (Leon), Manectric-1, Rapidash-G-1
162 – Dragapult-1 (Leon), Swoobat-3, Flygon-3, Charizard-1, Hydreigon-3
161 – Salazzle-1, Morpeko-4
160 – Whimsicott-1, Ninetales-2, Basculin-3, Hydreigon-1, Froslass-4, Gengar-4, Raichu-4, Espeon-4, Togedemaru-4, Ditto-4
159 – Sigilyph-3, Haxorus-3, Durant-4, Heliolisk-4, Drapion-6
158 – Accelgor-1, Basculin-2, Froslass-3, Raichu-3, Togedemaru-3, Dragapult-1, Galvantula-4
157 – Haxorus-2, Morpeko-2, Obstagoon-3, Arcanine-3, Heliolisk-3, Darmanitan-G-3, Unfezant-4
156 – Mimikyu-2, Galvantula-3, Liepard-4
155 – Sigilyph-1, Haxorus-1, Morpeko-1, Arcanine-2, Xatu-2, Drapion-2, Heliolisk-2, Unfezant-3, Rapidash-G-468
154 – Gengar-1, Raichu-1, Mimikyu-1, Meowstic-4, Lucario-6, Thievul-56
153 – Manectric-3
152 – Arcanine-1, Xatu-1, Darmanitan-G-1, Meowstic-1
151 – Rapidash-G-2, Roserade-3
150 – Unfezant-1, Rotom-2, Ninetales-4, Charizard-2
149 – Haxorus-4 (Leon), Barraskewda-1, Orbeetle-2, Thievul-2, Lucario-2, Dubwool-3, Rotom-Fan-2
148 – Rotom-1, Ninetales-3, Basculin-4, Hydreigon-24
147 – Thievul-1, Rotom-Fan-1, Rotom-Wash-1, Rotom-Frost-1, Sigilyph-4, Haxorus-4
146 – Hitmonlee-2, Indeedee-2
145 – Morpeko-3, Drapion-4, Indeedee-3, Darmanitan-G-4, Silvally-2, Drapion-78
144 – Hitmonlee-1, Flygon-1, Sawk-2, Cramorant-2, Duraludon-2
143 – Skuntank-2, Xatu-3, Drapion-3, Indeedee-1, Silvally-1, Shiftry-4, Braviary-4, Gardevoir-7, Togekiss-6, Weavile-5
142 – Basculin-1, Togedemaru-2, Ribombee-5
141 – Cherrim-1, Sawk-1, Qwilfish-1, Cramorant-1, Darmanitan-G-2
140 – Gardevoir-3, Gallade-3, Roserade-4, Lucario-478, Thievul-7
139 – Obstagoon-1, Leafeon-1, Gyarados-2, Milotic-2, Boltund-6
138 – Weavile-1, Glalie-2, Gallade-2, Togekiss-2, Braviary-2, Passimian-2, Orbeetle-3, Thievul-3, Lucario-3, Excadrill-4, Meowstic-3
137 – Rillaboom-34 (Leon), Gyarados-1, Ribombee-1, Kingler-4, Delibird-4
136 – Klinklang-2, Excadrill-3, Rotom-Heat-2, Rotom-Mow-2
135 – Vanilluxe-1, Boltund-2, Hitmonlee-3, Falinks-3, Dracovish-3, Rillaboom-478, Cherirm-4, Toxicroak-4, Qwilfish-4, Cramorant-4, Kommo-o-3
134 – Tsareena-4, Skuntank-4, Gourgeist-4
133 – Falinks-2, Rillaboom-3, Toxicroak-3, Sawk-3, Malamar-3, Qwilfish-3, Kommo-o-1
132 – Tsareena-3, Skuntank-3, Whimsicott-3, Cloyster-4, Polteageist-4
131 – Cinccino-3, Gyarados-4, Milotic-4
130 – Claydol-1, Kingler-1, Delibird-1, Gourgeist-2, Whimsicott-2, Glalie-4, Gardevoir-48, Gallade-4, Togekiss-48, Chandelure-4
129 – Drednaw-1, Tsareena-2, Ludicolo-3, Hitmontop-3, Gyarados-3, Seaking-4
128 – Shiftry-3, Glalie-3, Drifblim-3, Braviary-3, Passimian-3, Corviknight-4, Weavile-6
127 – Noctowl-2, Ludicolo-2, Barbaracle-3
126 – Shiftry-2, Mandibuzz-2, Diggersby-3, Hitmonchan-4, Frosmoth-4678, Centiskorch-6
125 – Butterfree-1, Hitmontop-1, Bisharp-1, Mantine-1, Stonjourner-1, Weavile-2, Toxtricity-3
124 – Gallade-1, Braviary-1, Frosmoth-3, Drednaw-4
123 – Seaking-1, Espeon-1, Durant-2, Delibird-3, Toxtricity-1, Alcremie-4
122 – Mr. Rime-4 (Leon), Diggersby-1, Centiskorch-2, Frosmoth-2, Slurpuff-4
121 – Claydol-2, Kingler-2, Garbodor-2, Delibird-2
120 – Butterfree-4, Noctowl-4, Hitmontop-4, Flapple-2, Lunatone-4, Solrock-4, Mr. Rime-4
119 – Liepard-1, Pelipper-1, Gothitelle-1, Malamar-2
118 – Noctowl-3, Flapple-1, Bisharp-3, Wailord-3
116 – Tsareena-1, Bewear-2, Hitmontop-2, Cloyster-2, Polteageist-2, Seaking-3
115 – Pelipper-4
114 – Lapras-1
113 – Ninetales-1, Pelipper-3, Arctovish-3, Obstagoon-4, Arcanine-4, Leafeon-4, Drapion-5
111 – Sigilyph-2, Leafeon-3
110 – Bellossom-4, Bewear-4, Clefable-4, Eiscue-4
109 – Togedemaru-1, Obstagoon-2, Leafeon-2
108 – Drapion-1, Orbeetle-4, Thievul-4, Pangoro-4, Klinklang-4, Thievul-8
107 – Unfezant-2, Beartic-3, Eiscue-3
106 – Dubwool-4
105 – Rillaboom-12 (Leon), Bellossom-2, Ditto-3, Hitmonlee-4
104 – Whiscash-1, Maractus-1, Roserade-2, Crustle-4, Rotom-Wash-2, Rotom-Frost-2
103 – Orbeetle-1, Roserade-1, Klinklang-1, Milotic-1, Ditto-2, Indeedee-4, Kommo-o-24, Rillaboom-56
102 – Shiftry-1, Dubwool-2, Excadrill-2, Rotom-Heat-1, Rotom-Mow-1
101 – Rhyperior-1 (Leon), Dubwool-1, Excadrill-1, Ditto-1, Cherrim-3, Cramorant-3, Duraludon-3
100 – Gourgeist-3, Mimikyu-3
99 – Rillaboom-2, Cherrim-2, Toxicroak-2, Qwilfish-2, Vespiquen-48, Ditto-5
98 – Toxicroak-1, Rillaboom-1, Bellossom-3, Mamoswine-4, Drifblim-4, Mandibuzz-4, Goodra-2, Gardevoir-56, Togekiss-5
97 – Crustle-1, Skuntank-1, Milotic-3, Vanilluxe-4, Lucario-5
96 – Beartic-2, Eiscue-2, Mandibuzz-3
95 – Klinklang-3
94 – Seismitoad-1234 (Leon), Araquanid-1, Mamoswine-2, Shedinja-2, Gardevoir-2, Drifblim-2
93 – Mamoswine-1, Glalie-1, Gardevoir-1, Drifblim-1, Togekiss-1, Mandibuzz-1, Chandelure-1, Passimian-1, Crustle-3, Garbodor-4, Toxtricity-4, Falinks-4
92 – Shedinja-2, Rhyperior-1, Lucario-1, Diggersby-2, Hitmonchan-3, Seismitoad-4, Duraludon-4
91 – Toxtricity-2, Dracozolt-3
90 – Mr. Rime-23 (Leon), Hitmonchan-2, Drampa-2, Turtonator-2, Drednaw-3, Seismitoad-3, Shedinja-4
89 – Hitmonchan-1, Dracozolt-2, Sandaconda-4
88 – Falinks-1, Duraludon-1, Dracozolt-1, Dracovish-1, Drednaw-2, Seismitoad-2, Shedinja-3, Slurpuff-3, Togekiss-7
87 – Seismitoad-1, Gourgeist-1, Sandaconda-3
86 – Slurpuff-2, Mamoswine-3, Togekiss-3, Polteageist-3, Mantine-3, Mr. Rime-3, Goodra-1, Diggersby-4, Barbaracle-4
85 – Slurpuff-1, Vanilluxe-3
84 – Sandaconda-1, Butterfree-2, Bisharp-2, Chandelure-2, Lunatone-2, Solrock-2, Mantine-2, Mr. Rime-2, Stonjourner-2
83 – Noctowl-1, Ludicolo-1, Cloyster-1, Polteageist-1, Lunatone-1, Solrock-1, Vanilluxe-2, Corviknight-3, Lanturn-3, Claydol-4, Centiskorch-4578, Vaporeon-4, Flareon-4, Glaceon-4, Sirfetch'd-45678, Gothitelle-4, Dracozolt-4, Dracovish-4, Frosmoth-5
82 – Barbaracle-2
81 – Mr. Rime-1 (Leon), Barbaracle-1, Corviknight-2, Lanturn-2, Claydol-3, Garbodor-3, Centiskorch-3, Vaporeon-3, Flareon-3, Umbreon-3, Glaceon-3, Sirfetch'd-3
80 – Aegislash-34 (Leon), Corviknight-1, Lanturn-1, Alcremie-3
79 – Garbodor-1, Pelipper-2, Vaporeon-2, Flareon-2, Glaceon-2, Sirfetch'd-2, Gothitelle-2, Ludicolo-4, Bisharp-4, Mantine-4
78 – Centiskorch-1, Vaporeon-1, Flareon-1, Umbreon-1, Glaceon-1, Sirfetch'd-1, Heatmor-1, Forsmoth-1, Alcremie-2, Abomasnow-4, Eldegoss-4, Sylveon-4, Whiscash-4, Grimmsnarl-4, Weezing-G-4, Jellicent-4, Aegislash-4, Oranguru-4, Wailord-4
77 – Malamar-1, Cloyster-3, Lunatone-3, Solrock-3, Tyranitar-1
76 – Sandaconda-2, Abomasnow-3, Eldegoss-3, Sylveon-3, Whiscash-3, Weezing-G-3, Clefable-3, Aegislash-3, Lanturn-4
74 – Mr. Rime-1, Abomasnow-2, Eldegoss-2, Sylveon-2, Whiscash-2, Grimmsnarl-2, Weezing-G-2, Maractus-2, Jellicent-2, Oranguru-2, Wailord-2, Pangoro-3, Scrafty-3, Umbreon-4, Heatmor-4, Trevenant-4
73 – Bewear-3, Sylveon-1, Grimmsnarl-1, Clefable-1, Jellicent-1, Oranguru-1, Wailord-1, Machamp-4
72 – Aegislash-12 (Leon), Pangoro-2, Scrafty-2, Heatmor-3, Trevenant-3
71 – Scrafty-1, Umbreon-2, Heatmor-2, Golurk-3, Crawdaunt-3, Arctozolt-3, Tyranitar-2
70 – Trevenant-2, Lapras-4
69 – Alcremie-1, Trevenant-1, Golurk-2, Machamp-2, Arctozolt-2, Arctovish-2
68 – Golurk-1, Crawdaunt-1, Arctozolt-1, Arctovish-1, Bewear-3, Grimmsnarl-3, Maractus-3, Jellicent-3, Oranguru-3, Lapras-3, Vileplume-4, Scrafty-4, Sableye-4, Mawile-4
66 – Clefable-2, Aegislash-2, Lapras-2, Vileplume-3, Perrserker-3, Sableye-3, Mawile-3
65 – Abomasnow-1, Eldegoss-1, Weezing-G-1, Aegislash-1, Hippowdon-4, Arctozolt-4, Arctovish-4
64 – Vileplume-2, Perrserker-2, Mawile-2
63 – Vileplume-1, Pangoro-1, Perrserker-1, Beartic-1, Sableye-1, Mawile-1, Eiscue-1, Hippowdon-3, Dusknoir-4568, Octillery-4, Conkeldurr-4, Throh-4
62 – Crawdaunt-2
61 – Machamp-1, Hippowdon-2, Octillery-3, Conkeldurr-3, Throh-3, Vikavolt-4, Perrserker-4, Beartic-4, Vikavolt-578
60 – Araquanid-4, Grapploct-4
59 – Crustle-2, Dusknoir-2, Conkeldurr-2, Throh-2, Vikavolt-3
58 – Dusknoir-1, Octillery-1, Conkeldurr-1, Throh-1, Araquanid-3, Grapploct-3, Golisopod-4, Vespiquen-567
57 – Sableye-2, Gastrodon-4
56 – Vikavolt-1, Bellossom-1, Grapploct-2, Vespiquen-3, Golisopod-3, Dhelmise-3, Dusknoir-7
55 – Grapploct-1, Gastrodon-3
54 – Rhyperior-234 (Leon), Hippowdon-1, Vespiquen-2, Golisopod-2, Dusknoir-3, Turtonator-4, Vikavolt-6
53 – Vespiquen-1, Golisopod-1, Dhelmise-1, Octillery-2, Gastrodon-2, Quagsire-4, Toxapex-4
52 – Gastrodon-1, Drampa-3, Turtonator-3, Rhyperior-4, Beheeyem-4, Dhelmise-4
51 – Vikavolt-2, Toxapex-3, Wobbuffet-4
50 – Araquanid-2, Rhyperior-3, Beheeyem-3, Stunfisk-G-4
49 – Drampa-1, Turtonator-1, Mudsdale-2, Toxapex-2, Bronzong-3, Wobbuffet-3
48 – Mudsdale-1, Quagsire-1, Toxapex-1, Rhyperior-2, Beheeyem-2, Dhelmise-2, Stunfisk-G-3, Wishiwashi-4, Coalossal-4, Steelix-4, Appletun-2, Cursola-4, Reuniclus-4, Copperajah-4, Shiinotic-4, Drampa-4
47 – Beheeyem-1, Bronzong-2, Wobbuffet-2, Mudsdale-4, Aromatisse-4
46 – Bronzong-1, Wobbuffet-1, Stunfisk-G-2, Wishiwashi-3, Coalossal-3, Cursola-3, Sudowoodo-3, Snorlax-3, Copperajah-3, Shiinotic-3
45 – Stunfisk-G-1, Mudsdale-3, Musharna-3, Quagsire-3, Hatterene-3, Bronzong-4
44 – Quagsire-2, Wishiwashi-2, Coalossal-2, Cursola-2, Sudowoodo-2, Snorlax-2, Copperajah-2, Shiinotic-2, Avalugg-3
43 – Wishiwashi-1, Coalossal-1, Steelix-1, Cursola-1, Sudowoodo-14, Snorlax-14, Reuniclus-1, Copperajah-1, Runerigus-14, Shiinotic-1, Hatterene-2, Gigalith-4
42 – Musharna-14, Aromatisse-1, Hatterene-14, Avalugg-2
41 – Avalugg-14, Gigalith-3, Steelix-3, Appletun-1, Reuniclus-3, Runerigus-3
40 – Aromatisse-3
39 – Gigalith-2, Steelix-2, Reuniclus-2, Runerigus-2
38 – Gigalith-1, Musharna-2, Aromatisse-2, Escavalier-4678, Torkoal-4,
36 – Escavalier-3, Torkoal-3
34 – Escavalier-25, Torkoal-2, Greedent-4, Ferrothorn-4
33 – Greedent-1, Ferrothorn-1, Torkoal-1, Pincurchin-4
32 – Greedent-3, Ferrothorn-3
31 – Pincurchin-3
30 – Greedent-2, Ferrothorn-2
29 – Escavalier-1
28 – Pincurchin-1
26 – Pincurchin-2
23 – Shuckle-4
21 – Shuckle-3
20 – Pyukumuku-4
18 – Pyukumuku-3
17 – Pyukumuku-2, Shuckle-2
16 – Pyukumuku-1, Shuckle-1
 
Last edited:
I got 11 wins in Dynamax Adventure playing solo. I had gotten a higher score with other humans, so I can't post the scoreboard. But here's a pic from after I finished anyway. I don't think you'll be able to prove anything in the solo category. I fortunately happened to be taking notes at the time.

Elh35pSU8AAVtEC.jpg


- Picked Diggersby as a starter.
Floor 1 - Steel Boss
1) Diggersby vs Cofagrigus (Ghost)
- Took Expert Belt between battles
2) Diggersby vs Charjabug (Bug)
3) Diggersby vs Drapion (Dark)
- Picked Dark because I recognized the silhouette and saw it was weak to ground.
- Slowbro dies to Max Darkness.
4) Diggersby vs Kartana (Steel)
- Crap. I wanted something weak to Ground, and I only had physical moves. If Slowbro didn't get a Flamethrower off (~75% damage) I would have lost.
- Diggersby dies to Leaf Blade.
- Slowbro dies to Leaf Blade.

Floor 2 - Water Boss
5) Diggersby vs Liepard (Dark)
6) Diggersby vs Durant (Steel, ugh another steel not weak to Ground)
- Wanted Durant with Thunder Fang but all the AI had low HP so I let one have it. Luckily one took it.
7) Diggersby vs Duraludon (Dragon)
- I picked Dragon because there were berries afterward. I just happened to get lucky with its second typing.
- Took Duraludon because I was very low on PP, and it had Thunderbolt.
8) Duraludon vs Suicune (Water)
- Battle started with 2 lives left and decent HP.
- AI missed a Screech AND a Metal Sound. But after that, one connected and it was extremely helpful.
- Won with no deaths because of Durant with Thunder Fang, Charjabug with Spark, Duraludon with Thunderbolt.

Floor 3 - Dragon Boss
9) Duraludon vs Sceptile (Grass)
- 1 turn KO, however Chargabug died to Max Overgrowth from low HP.
10) Duraludon vs Bellossom (Grass)
- Picked grass again because my team heavily resists it.
11) Duraludon vs Wailmer (Water)
- Picked Water because team is very strong against water from the Suicune battle.
- Max Lightning OHKO after Metal Sound from Durant.
- Ate berries after, but team wasn't looking so good against Dragon despite being at full HP.
12) Duraludon vs Dialga (Dragon)
- Terrible matchup. All I could do is Thunder Wave and then spam Breaking Swipe until Dynamax. And it was Gigantamax, which was a big hindrance.
- Rest of team's moves were all resisted - Bounce and X-Scissor mainly.
- Wailmer dies to Max Wyrmwind.
- Durant dies to Ancient Power.
Ended at 11 wins.

Some takeaways:

- A big part of why this went well (compared to earlier runs) is that I had partners with both Screech and Metal Sound. Having that is useful. Of course, you also have to have the right moves to go along with them. And you never know when they'll swap out. Not being able to control anything the AI does is frustrating.

- I lost because Dialga completely walled me. Even if it didn't attack me at all, it may have taken more than 10 turns to beat. I'm not sure whether 10 turns is a loss like it is in a normal raid, but I would guess that it is.

- You need to balance your path choices between 3 things. It's tough to weigh the pros and cons of each of these in such a short time.
1) Your team's strength against the typing/Pokemon on that path
2) The boss's typing, to try to pick paths with Pokemon that are strong against the boss
3) The location of Berries and female Backpackers (who have the hold items). Scientists are less useful, but they could be helpful if most of your teammates are low on HP.

- Consider all the possibilities for what the boss is based on the type it gives you and plan accordingly. I didn't prepare for Dialga. And really I didn't prepare for Dragon either, but at the very least I thought I would be able to use a Super Effective Breaking Swipe, but it ended up being only neutral. Unfortunately, there are a lot of Dragon, Flying, and Psychic types, so seeing those aren't all that helpful. I don't remember what choices I had for battles 10 and 11, but I may have had more luck against Dialga if I had chosen my battles based on the boss and not on what my team was strong against at the time.

- Always look at the entire map (you can scroll up and down using the right joystick) before you pick each and every turn. Sometimes something right before the boss will influence my choice of even the first battle. It's a lot to process in such a short time, but I think that makes it fun.

- And a general observation: being able to tell what the silhouettes are is incredibly useful, but I can only do it myself about one-third of the time. I'm not really sure how I can go about improving that. Maybe just repetition will help. I noticed that if you move the camera on the path screen a bit, sometimes they can become easier to see.

- I was all the way down to one life during the first boss battle and figured the run wasn't going anywhere. But a deathless second floor left me with three lives (each time you finish a floor, you get 1 life back). So it's possible to bounce back from a bad start.

I don't see myself doing this solo very much at all. It's much more fun in a group.
 
Last edited:
I wrote a guide to Restricted Sparring recently, and what better time to deploy it than when people are sure to have hordes of legendaries just wasting away in boxes? Give them a whirl in Restricted Sparring, a Battle Facility included with the first Sword and Shield expansion, The Isle of Armor. Restricted Sparring is an endurance mode where heals are not provided for free after every battle; instead you must carefully select when to use two of them throughout your streak. This means even the mightiest Pokemon will fall as their PP dwindles to nothing. Furthermore, teams are forced to be mono-typed, so your defensive cores will never be ironclad. Accordingly, the ingame achievement is merely to get 5 consecutive wins in any given type. Most people are proud to even reach 20. And that's fine – Restricted Sparring can feel very alien compared to how you're used to playing Pokemon. But so much more than that is possible once you understand how to play Restricted Sparring, and that's what this guide is going to teach you.
Your lead will always be the most important Pokemon on your team. Switching often necessitates damage being taken, and the more defensive Pokemon that can tolerate switching will rarely dispatch opposing Pokemon with the PP efficiency of a good offensive lead. Thus, it's ideal that your lead disposes of everything. While “everything” is of course impossible, you can get a lot closer to that than you might expect; with Dynamax available and RS Pokemon having lowered IVs (15), OHKOs are bountiful to a strong lead.

So, what makes a strong lead, then? A good (Special) Attack stat is an obvious start. In fact, you can never have enough offense. Even if you're able to KO a Pokemon with your strongest move, Pokemon with seemingly overkill offenses can have the flexibility to also use potentially weaker Max Moves like Knuckle, Airstream, or Overgrowth to get those KOs and really press an advantage. The need for Speed, on the other hand, is more relaxed than you might be used to in a competitive environment. Unless your Pokemon is very fast (base 110+) and can outspeed the similarly fast RS threats, you can go as low as 85 while feeling little practical difference. Generally speaking, it's the Pokemon with extreme offense/moderate Speed that excel in RS, not the other way around.

While overkill offense can manifest in the form of a huge stat, don't forget about abilities, which are what really separate the great from the good. When looking for a lead, abilities like Moxie, Adaptability, and Hustle should stick out, as these are easy and substantial power boosts to get while in Dynamax. Note “in Dynamax”; while abilities like Sheer Force and Strong Jaw may conventionally be thought of as good abilities, they make no contributions during Dynamax which is what your lead will typically be doing.

Another thing to keep in mind is the secondary type. Let's take a look at the use of Roserade as a lead for a Poison team. Its Grass-typing lets it defeat any Ground-type before they get a chance to move, so there is little reason to be concerned about switching into Ground-type moves, a weakness of Poison. Grass does add its own set of weaknesses, though, namely Flying, Ice, and Fire. However, this shows another strength of complementary secondary typings. Normally when you try to cover a lead's weaknesses, your best switch-ins are often forced to only have a neutrality to those weaknesses, a natural pitfall of a monotype team. But when it comes to weaknesses from the secondary typing, you can often find outright resistances! Here, Ice and Fire are both resisted by the notorious Toxapex. Flying may not be resisted by a good defensive switch-in, but even then most options you will consider will not be weak to it, either.

Once you've selected a Pokemon, you're going to need to select moves. STAB is the clear way to start, but after that you need coverage. While you do need to focus on types that resist your STAB moves, don't forget that you're going to be in Dynamax. As such, some types should have increased priority when deciding what coverage to run. Fighting moves grant you Max Knuckle which boosts your Attack, Flying moves grant you Max Airstream which boosts your Speed, Grass moves grant you Max Overgrowth which provides Grassy Terrain for healing, and Fairy moves grant you Max Starfall which provides Misty Terrain for status protection (though Fairy moves tend to have subpar PP). While not quite as useful, also keep in mind Steel- and Ground-type moves, which boost your Defense and Special Defense, respectively. Note the lack of mention of Max Ooze. While it's hard to say for sure just because special attacking leads are far less common than physical ones in RS, Max Ooze seems hard to justify as a coverage option. It hits far less types super effective than its analogue, Max Knuckle, and stronger special Poison moves have mediocre PP.

Another concern for moves is PP, the most important one if you're really trying to aim high but somewhat less so if you're just getting started. Moves with 8 PP should be nowhere near your lead, but leads that really stand out are able to utilize multiple moves with 32 or more PP with little to no loss in effectiveness (you can get amazing PP with a set of Tackle/Pound/Scratch/Quick Attack, but that's not going to beat anything). Some good moves (or at least good in Dynamax, like Bullet Seed) will just happen to have high PP, but you can also make concessions with weaker moves to get more. Moves with 65-70 BP will turn into a 120 BP Max Move, which is only slightly behind the conventional 130. And even 55-60 BP still turns into 110 Max BP, which is passable (any lower can be quite hard to justify, and is likely not your concern if you're reading this guide). Such power loss can definitely be worth the PP boost, though it will likely require testing (or extensive damage calculations).

When making that decision, note what Pokemon you actually need that type of move for. Unlike traditional Battle Facilities which have 800+ sets to watch out for, RS only has 151 with a single set each, so you can see most of them without a crazy amount of playtesting or even compile a manual list from the set data if you really want to lab it up. From there, note which KOs you might miss, and then what the impact of missing that KO is. Versus some Pokemon, you simply cannot afford to miss a KO, especially depending on your type. But versus others, you may only take a relatively small amount of damage, and if that doesn't happen with too many Pokemon the PP boost can absolutely be worth it. Also keep in mind that despite the dominance of your lead, you do have a full team. So if there is a problem with your lead that is untenable but you have a good way to switch into it, then it's not actually an untenable problem at all.

Another thing to watch out for with weaker moves is the prospect of being outside of Dynamax. Three Pokemon, three Dynamax turns – it often runs like clockwork, but obviously you will fail to OHKO some Pokemon, meaning you will at least be out of Dynamax for the third Pokemon. Thus, you should not make a moveset completely under the assumption of Dynamax. This can be particularly troublesome for low BP moves: with Psychic vs Psybeam for example, the 130 vs 120 Max power comparison is favorable, but the 90 vs 65 post-Dynamax comparison is far less so. That doesn't mean it's a bad option, but you absolutely need to keep this in mind. Other moves that can be problematic are inconsistent ones, whether that be from variable hits or imperfect accuracy. Again, this doesn't mean you should avoid these kinds of moves, but you should make sure your set is not completely full of them.

For all this discussion about moves, only damaging ones have been mentioned. Yet, leads are functionally sweepers in RS, and set-up moves are common on those in other formats. Well, as you might imagine, having only 3 damaging moves does put a lower ceiling on how far your lead can go. Nonetheless, some Pokemon may only get marginal coverage from a 4th move, or really need the set-up to excel. While these leads don't have the potential 4 attack ones do, they have some proven success and are still an option to consider.

Alright, let's build a moveset. Say you've decided on Alakazam for your lead, a Pokemon with amazing Special Attack and Speed. Psychic is an obvious start for STAB, and then you should look for coverage. Shadow Ball hits opposing Psychic-types, Dazzling Gleam hits Dark-types, and Focus Blast hits Steel-types. Solid start, but let's really optimize this for RS. It doesn't take a lot of thought to see why Focus Blast is terrible. It has 8PP, the Max Knuckle it turns into pointlessly boosts Attack and has weak BP, and it only has 70 accuracy for post-Dynamax situations. What to replace it with, then? Alakazam does learn Nasty Plot, but can it use it well? Alakazam is already exceptionally strong, and since it's so frail it's very reliant on getting OHKOs to stay alive. Let's go for a fourth damaging move instead. We've exhausted our type-coverage options, so let's recall the types with Max move utility: Fighting, Flying, Fairy, Grass, Steel, and Ground. Fighting is not applicable here and Fairy is already being used, so the only option from here in Alakazam's special movepool is Grass, where it learns Energy Ball and Grass Knot. While Energy Ball can be a more consistent option post-Dynamax, Grass Knot's 16 extra PP is very hard to ignore, so let's go with that. That brings us to Psychic/Shadow Ball/Dazzling Gleam/Grass Knot, which is a good set. There's another potential PP optimization to be made here, though. It was just being discussed, in fact: Psybeam versus Psychic. Alakazam can run Psybeam for an additional 16 PP for a Max Mindstorm with only 10 less BP. The power drop post-Dynamax is more notable, but let's see where we are with that. All four moves have 100 accuracy, and only Grass Knot has some light inconsistency with its BP. While we may run into some issues with Psybeam, we're looking pretty good post-Dynamax otherwise, so it's definitely worth testing. This makes our final set Psybeam/Shadow Ball/Dazzling Gleam/Grass Knot. From our initial draft, we've added 40 total PP and the healing utility from Max Overgrowth. While we've lost some coverage versus Steel-types, those are not even a weakness of Psychic-types, so we can find switch-ins that resist Steel.

Now that you've got a Pokemon and a moveset, you just need an item. This will be brief – 9 times out of 10, you use the Shell Bell. That might seem like a surprising pick, but in RS it's the dominant item for a lead. The recovery it provides for one is unmatched, far better than Leftovers. 1/8th of the opposing Pokemon's health is almost always more than 1/16th of yours, and Shell Bell also gets recovery off of KOing the last Pokemon which Leftovers does not. While it may seem tempting to use a boosting option to get more KOs, nothing is going to make your lead perfect, and the ability to bounce back from heavy hits is incredible.

Even though the lead will do most of the work, crafting a good backline for it is incredibly important and can be one of the most difficult aspects of teambuilding for RS. Generally, your lead will run into three types of problems: offensive, defensive, and status. Offensive ones are most common and what we typically think of as threats: Pokemon that, whether it be by speed or bulk are able to get off a heavy (or possibly even fatal) hit on your lead. Defensive ones are less common, but more subtly problematic.They are very sturdy, and may take several hits from your lead to take down. Even if they're not directly that dangerous, they can stall out your Dynamax turns and deplete your PP which is both resource-intensive and can leave you in a terrible position versus more offensive threats afterwards. Status threats are self-explanatory, they're Pokemon that can inflict status on you, which has far-less common methods to recover. For many teams, it is not even an option.

Offensive threats tend to do heavy damage because of super effective moves, which can be a huge problem to switch into due to the monotype restriction. Naturally, Pokemon with secondary typings and/or abilities that neutralize or outright negate these weaknesses can be a huge help. A good switch-in needs more than that, though. Switching in usually involves taking damage, and that means you need some way to heal it off. Leftovers are a great option for some passive healing on switch-ins, but are rarely completely sufficient. 50% healing moves, draining damaging moves, Leech Seed, and Regenerator are the usual options for more pronounced healing. Without these, any Pokemon designed to be a switch-in will not last long. Another aspect of switch-ins is that sometimes switches need to be done after your lead has committed to Dynamax, which means that the switch-in's set should be fully usable without that option available. That is to say, full of accurate, reliable moves. What can be relaxed, though, is PP optimization. Since switch-ins are used far less than leads, they use far less PP as a result. While you still want to avoid 8 PP moves, a switch-in's attacking PP can be pretty low even for longer streaks. 32 total can often be sufficient, whereas that’s nothing for a lead.

In finding Pokemon that can fulfill the above criteria for your lead's weaknesses, you will naturally be attracted to more defensive options. While ideal in many respects, be careful with the passive sets that are usually run with these Pokemon. Momentum is an important concept in Pokemon and RS is no exception. Basically, having momentum means that you are dictating the pace of the battle. If you have a stally set slowly dominating some poor Pokemon, you have the upper hand for now. But if you carelessly knock out that Pokemon and a bad match-up comes out that you've done nothing to protect against, then there's nothing slow about the game you're playing – the momentum is on your opponent's side now, and you're going to pay for it.

Let's look at two conventionally passive Pokemon, Mandibuzz and Umbreon. Both of these Pokemon have very high defenses with recovery, and are tempting to run as switch-ins. But their typical sets – filled with moves like Toxic, Foul Play, Heal Bell, Defog – are very stally and thus likely to leave you in a bad position as described above. So let's rethink our approach to how we use them. Mandibuzz is capable of boosting its stats in several different ways. It can raise its Defense with Iron Defense, Special Attack with Nasty Plot, and Speed with Max Airstream. While the last one requires Dynamax, it's still a good option to keep in mind, you just shouldn't rely on it. Iron Defense and Nasty Plot can work separately, but you also don't have to limit yourself to one boosting move! Iron Defense can make Mandibuzz take a pittance from physical attackers, at which point it easily sets up Nasty Plot. Attacking PP will be limited, but as mentioned earlier that is tolerable for a switch-in. So now, Mandibuzz can leave any winning match-up with +6 Defense, +6 Special Attack, and potentially +1 Speed. No position is ever flawless, but your opponent will have a very difficult time overcoming Mandibuzz now. Now for Umbreon. It can set-up with Curse or Work Up, but Curse has very limited PP while Work Up is very slow while not boosting a defense to compensate. So let's look at a pivoting move instead. Umbreon learns Baton Pass, which as long as it's slower can give a free switch to something else on your team – something that can keep momentum better than Umbreon. Of course, you aren't switching in Umbreon for no reason. While Umbreon is in, you can use it to weaken the opposing Pokemon, do clerical work with Wish and Heal Bell, and maybe even Baton Pass the aforementioned Work Up. What exactly you want to accomplish depends on your team, but the point is that once Umbreon has completed its job versus a good match-up, it leaves so you can keep momentum with a less passive Pokemon.

The last option is not to focus on gaining momentum, but rather on not losing momentum. This is done by running a second wall, complementary not just to your lead but to your other wall. Since you're aiming to create a two-Pokemon core that stops most threats, the monotype restriction is extremely damaging here. Very few types really have a pair of good, defensive Pokemon whose types complement each other well. It's kind of hard when so many Pokemon in a given type share weaknesses, for obvious reasons! If you look at the Mandibuzz/Umbreon pair talked about previously, while they can beat a good variety of threats, any good Fairy-type will be their undoing. Nonetheless, some types, usually those with few weaknesses and/or good Steel-type partners, can pull it off. The aim is that while you may very well run into a bad match-up as originally described, your core pairs together well enough that you are able to switch between them to cover most match-ups, and you are free to run movesets as stally as you please. There may still be some terror that rips through both, but you still minimize risk. Instead of say 10 match-ups that are terrible for an individual wall to run into, there may now be only 3 or 4 that threaten a good pair.

On that note, let's talk about team archetypes. The previously mentioned double wall set-up is as defensive as any successful RS team has gotten, and it still utilizes an offensive lead. Another archetype is to run two switch-ins that maintain momentum but don't necessarily synergize with each other. If you switch, the goal is to always end up on a sweeper, whether that be the switch-in itself or using a pivoting move to end up back to one. And despite all this talk of switch-ins, the last team archetype with some success is to only run one dedicated switch-in, and to run what is colloquially called a “secondary sweeper”, though more accurately it's a secondary lead. This is a Pokemon that has little to no switch-in utility, and is instead designed to lead after your primary lead faints. Generally, you should avoid this if you feel like you have two good options for switch-ins, but not every type has that luxury. A secondary lead is often precarious; it cannot have the Shell Bell due to Item Clause, and naturally it's both a worse lead than your primary (or else you would make it your primary lead!) with a worse support net. Still, it's a perfectly fine way to build a team if your switch-in options don't seem up to par, or if you have a good way to use a secondary lead without Shell Bell (Magic Guard+Life Orb is a combo with some results). These are what have shown good results thus far in RS, but it is worth noting that some work has been done with entirely defensive teams, but they are as yet unproven. Since you're just getting started, I would highly recommend against reinventing the wheel for now and stick to proven team archetypes.

Lastly, when you're finishing up your team, do not get attached to the idea of it being perfect. It does not take particularly outlandish luck to put grievous wounds into even the mightiest teams. The aim of teambuilding in RS is to mitigate as many threats as possible, not everything. While RS has removed almost all of what are conventionally thought of as unfair factors from traditional Battle Facilities (Bright Powder, Double Team, OHKO moves, Focus Band), the flipside is that you have much less flexibility to play around more mundane bad luck sources like bad match-ups and/or low% secondary effects. But don't get discouraged. RS runs, especially when you're just getting started, are relatively short, so you can always just try again.

Now that you've built your team, you've got to actually use it. You will more than likely run into some threats you hadn't anticipated, and it's important that you keep track of these. While you may find there's nothing to be done about some of them, some can be fixed or at least alleviated with either move, Pokemon, or play changes. Not everything is in your control in RS, but do not use that as an excuse to be lazy: always analyze when something goes wrong. And do it quickly since there's no Battle Videos anymore!

Not everything in RS is a simple binary of winning or losing, though – you have to win efficiently, and that's where PP management comes in. When it comes to your lead, your moves will usually not start with the same amount of PP, so you will want to avoid using those with lower PP, and prioritize those with higher PP. That's just starting PP, though. As your PP dwindles down, what moves have high and low PP will vary. Regardless, the name of the game is balance: you never want to run out of PP for a move while you still have plenty of PP in your other moves. Presumably that option was put there for a reason, and potentially being deprived of it for several battles could be disastrous. One way to help with this is to have a damage calculator handy. The RS sets are fixed, so you can always know whether or not you have a guaranteed OHKO. Especially if you have some boosts, you may be surprised at what moves can OHKO!

You will also more than likely have moves that advance your momentum, and you need to use those to minimize bad match-ups. A move like Low Kick's Max Knuckle will have 32 PP, but you will basically never go out of your way to use it since it has so much utility. Moves like this have the most impact at the start of the battle since there's two Pokemon left to feel their effects on, so definitely prioritize choosing KOs with them there. After the first KO, though, they lose some of their luster. In addition to the mathematical diminishing returns with boosts like this (going from x1 to x1.5 is a larger boost than x1.5 to x2), any sort of boost after a +1 is probably going to net you minimal additional KOs. While it will let you be more flexible with which PP you can use after, you're not really achieving PP balance if you're overfocusing on, say, Max Knuckle to get there. As such, don't feel obligated to stack more damage boosts if you already have a boost and you're not going to run out of Dynamax. You should usually focus on your other moves at that point, especially the more niche coverage options. Just note that this only applies to stacking more damage boosts; you should almost always go for Max Airstream's Speed boost if you haven't gotten one yet.

You may very well be in a position where you're going to run out of Dynamax, though. Any situation in which you fail to OHKO the first or second Pokemon will result in this. Here, provided you don't have a good switch-in for whatever the problem is, stack as many boosts as you can before your Dynamax runs out. Post-Dynamax can be a scary situation to be in, and you'll want to be prepared as possible. One upside of these situations is that the AI prioritizes sending out Pokemon based on their strongest move versus whatever you have out (keep in mind they don't factor in STAB). As such, the last Pokemon is likely to not be too scary. This won't always hold, of course – your opponent could have simply have two dangerous Pokemon in reserve – but if you feel like you're getting lucky with post-Dynamax scenarios, well, it's not all luck. Speaking of last Pokemon, a small optimization for your lead's PP is to let your reserves take care of it if they have a dominating match-up, even if your lead can get a simple OHKO. This won't happen too often, but it can save a few PP over the course of a run.

Let's run through a battle. Say you're using a Gigantamax Cinderace, with PP as such:

Flame Charge 20/32 → G-Max Fireball
Low Kick 15/32 → Max Knuckle
U-turn 23/32 → Max Flutterby
Zen Headbutt 17/24 → Max Mindstorm

You run into an Exploud lead. It can be OHKOed by G-Max Fireball or Max Knuckle. While Max Knuckle has noticeably less PP than G-Max Fireball right now, Max Knuckle's Attack boost is incredibly valuable on the first turn of a battle and should take precedence over G-Max Fireball. After you OHKO Exploud with Max Knuckle, Politoed comes in. This is a damage range without an Attack boost, so good thing you went for one! Having said Attack boost actually lets every move besides G-Max Fireball OHKO, so what to use? Max Knuckle for an extra Attack boost or even Max Mindstorm for Psychic Terrain are tempting, but recall that any offensive boost after an initial +1 boost is of marginal use. So instead, let’s focus on PP balance, and give that OHKO to Max Flutterby. The last Pokemon is the notoriously fragile Mienshao. Anything but the resisted move will be fine, so let's go with G-Max Fireball since it has the least PP...ah, but wait, let's check the damage calculator:

+1 252 Atk Libero Cinderace Max Flutterby (120 BP) vs. 0 HP / 0- Def Mienshao: 132-156 (100 - 118.1%) -- guaranteed OHKO

...oh! How surprising! Since Max Flutterby has the most PP right now, let's OHKO Mienshao using that instead.

And now let's go to an alternate dimension where nothing seems to go right. Same Pokemon, same lead you've decided to use a Max Knuckle on, but instead of Politoed, Rhyperior is sent in. You have no switch-in for its Rock Wrecker, so Cinderace is forced to fight it. While +1 Cinderace could 2HKO with Max Mindstorm and/or Max Flutterby, you still absolutely want to use Max Knuckle here since you will be entering a post-Dynamax situation, and a perilous one at that. Rhyperior's Rock Wrecker will do around 65% even with Dynamax up, leaving Cinderace with no Dynamax and low health for the final Pokemon. Here, you should go for all the boosts you can get, even going for a third Max Knuckle on the final Dynamax turn. This leaves you are +3 for the last Pokemon, which is hopefully good enough. In comes...Kingler! Another horrible match-up for a Fire team. In fact, even at +3, Low Kick only has an 81.3% chance to OHKO it. You have no other option though, so you go for it and...Kingler survives and finishes off Cinderace with Crabhammer. Tragic, but the only reason you even stood a chance here was because you went for all those Attack boosts. The odds may not always go your way, but when you know you're going to be put in a bad situation you can try to get them as much in your favor as possible.

I mentioned earlier that switch-ins have far less PP concerns than your lead, and that's true, but you should still not go crazy with their PP. While ordinary damaging moves can usually be used without too much thought, healing and set-up moves do need to be closely monitored. Don't waste healing moves – if you're only going to heal 30% with a 50% healing move, you should really avoid making that move. Because switch-ins are usually switching in on good match-ups anyways, ending a fight at only 70% is usually fine. There are exceptions, of course. If you've identified a huge threat to your lead that a switch-in can deal with but it needs to have 80+% when it switches in, you might want to be a little more frivolous with your healing to keep it at that point. But you will naturally burn more healing PP, so especially if you're getting low you may need to risk a bit more. Sure, ending at 70% could be bad if you run into said threat immediately, but if you run into any number of Pokemon you typically switch into before that, you can use a more efficiently timed healing move and end that battle above 80%, not wasting a PP in the earlier battle. Like a lot of RS, you have to play it by ear. Also, if you're using a move like Drain Punch to heal, try to avoid using it for anything but healing unless you really need the coverage.

Then there's set-up moves. In almost any other context, the 32 PP these moves usually have is superfluous. In RS, this is absolutely not the case. There will be many cases where you could set up to +6, but you will rarely want to, especially if the move only boosts by one stage at a time. Anywhere from +2 to +4 is where you will want to stay in so you don't run out of PP too early. Of course, like anything else it can depend on the situation. If for whatever reason you haven't used much of your set-up PP and your lead is almost finished, then maybe you will want to be a bit more carefree with setting up. It also depends on whether you have Dynamax available. If you do, you will rarely need more than +1 or +2 to win without issue.

Sometimes, you will be put in a bad situation. You may feel like you have to sacrifice a Pokemon or take a status condition. In situations like these, always remember: your lead is your most important Pokemon. While there are some occasional situations where your lead is expendable (mainly when it has perilously low HP or PP), it is almost always better to let your reserves take the fall. What can be less clear-cut is dealing with low% risks. Unlike a Thunder Wave which you should assume will always hit, a Thunderbolt paralysis is a more acceptable risk to take. While it is certainly worse for your lead to be afflicted with that than your reserves, keep in mind that because they're switching in (and possibly KOing the enemy over more turns) your reserve is more likely overall to get afflicted by paralysis here due to risking more chances. Depending on where you are in your leg, that can change what the best play is. Near the start of a leg, you should go for the play less likely to result in something bad happening to my team. Sure, a reserve being paralyzed is nowhere near as bad as my lead, but it is still likely to kneecap this leg, and that's not something you want to see period in a good run. But near the end of a leg, a reserve being paralyzed will have much less effect on your leg's length, and it makes you less likely to outright lose (a paralyzed lead is very, very bad). Honestly, these situations aren't easy to deal with, and you will probably second-guess yourself on whether you made the right call. Don't doubt yourself too hard – while it is very bad to get in the mindset of thinking you did nothing wrong every time a bad thing happens, it can be similarly foolish to always think your play was wrong. Sometimes you made a good call but the odds didn't go your way. It happens. The important part is to always rethink the situation afterwards, regardless of what your conclusion ends up being.

Now for another difficult part of RS play: healing. Choosing when to take your heals can be nerve-wracking. Too early, and you risk getting a streak under your standards. Too late, and you risk not having a streak at all. It's hard to say when a team's situation becomes untenable. Your lead being alive often means you're fine to not lose, but sometimes you may be out of PP of an important move (you will often not have perfect PP balance), and maybe both the health of it and your reserves is low. It's hard to not see that as a situation where you need to heal. It also largely depends on the speed of your reserves. If they're slow, you are definitely at more risk of getting outright swept than you are with fast ones. Of course, they won't be faster than everything, so even then something like a badly timed Barraskewda can be fatal. Here's a little exercise that can help: after some time with your team you will have an idea of what threatens it, so think it through: if I run into x threat now, will I lose? If the answer is yes, then you should probably heal. If the answer is no, but can become yes in conjunction with some other threat (or class of threats, say any Fire-type), then that may still be cause for a heal, but is definitely a more acceptable risk. It also depends on what your goal with your streak is. If you are aiming for a streak of 30 and you've just finished Battle 10, then you may be pretty willing to take a heal even if you're only in a lightly precarious situation with your team, since if you keep that pace you will meet your goal. But if you're at Battle 7 and your team is feeling pretty weak, you will definitely need to push on for a few more battles if you want to have a good chance at achieving your goal. Furthermore, it also depends on which heal you're talking about. Your first heal is the one you can tolerate more risk on, since there's less of a time-loss if it all falls apart here. But it's hard to justify taking big risks with the second heal, since you could potentially lose hours of time on a good run.

While monotyped teams can diverge wildly in what's threatening, there are a number of prominent threats that you will frequently have trouble with. These are loosely sorted into Offensive, Defensive, and Status threats, though the lines can blur. Ultimately, the point is that they're all threats you need to consider when teambuilding.

Offensive

:starmie:
There are so many gimmicky sets in RS, and then there's this double STAB, BoltBeam, Life Orb Starmie straight out of 2006. You are almost certainly going to at least take unresisted STAB damage from this, or even worse super effective damage. Very few Pokemon period make a good switch-in to this, and if your lead isn't faster it's going to take a heavy hit. One of the biggest perks of getting a Speed boost from Max Airstream for most Pokemon is being able to outspeed this.

:cinccino:
Just as fast as Starmie, and with similarly wide coverage. Since it's reliant on abilities to be optimal you can get lucky and see Cute Charm or 2-hit Technician, but usually you are going to take a lot of damage from this. It's a bit easier to switch in to than Starmie, but don't sleep on that Metronome – spend too much time versus this and you will regret it.

:zoroark:
I put Zoroark here as though it's something you can plan for, but honestly...you really can't. RS does not give you the flexibility to play around this; its inclusion at all is kind of insulting. Types that are weak to Dark or Fire will be miserable versus this awful thing, any switch-in can just get annihilated. The only upside is that leads are generally fine versus this. It has a Rash nature, so even base 85 Pokemon can outspeed it, and it's so frail that basically any unresisted hit will KO it. And even if it's fortunate enough to survive, it has an Eject Button that will prevent it from attacking. Psychic attacks are the exception, so watch out with those.

:sirfetch
Always fear Sirfetch'd's smug visage; it's smug because it knows what's about to happen. It's quite difficult to OHKO with unboosted physical attacks, and then you're taking a 150 BP Meteor Assault with a 50% chance to crit. Brave Bird hits some Pokemon that resist Meteor Assault, too. This is also one of the biggest barriers in trying to accomplish any sort of defensive stat-boosting in RS.

:rhyperior:
Rhyperior is almost impossible to KO with anything physical but 4x effective attacks, and its Rock Wrecker is very similar to a Sirfetch'd Meteor Assault, though it mercifully lacks a Stick. The Weakness Policy it has instead is still terrible, though. A lot of Pokemon can have trouble 2HKOing this without triggering it, which can be fatal. Do keep in mind that Rock Wrecker has a recharge turn, though, so if you can't OHKO this you basically have three turns to deal with it.

:boltund:
Boltund is likely to outspeed you and can be somewhat threatening if it gets Strong Jaw, but that's not why it's bad to deal with. It has Electrify which makes your moves Electric type (also note that it makes your Max moves Max Lightning, so no Speed boost from Max Airstream or anything of the sort) that it's likely to survive. This triggers its Cell Battery, which makes it quite a bit more threatening, especially if it wastes your final turn of Dynamax.

:mienshao:
Mienshao is a bit slower than Starmie and Cinccino and also has much narrower coverage, but it makes up for that with how incredibly strong High Jump Kick is, striking fear into the hearts of all Fighting-weak Pokemon. If it has Reckless as its ability, it can flat out OHKO many leads even in Dynamax. It can also use Fake Out if it doesn't have an OHKO, but don't count on it.

:ribombee:
This is one of the absolute fastest RS Pokemon, and its Pixie Plate Moonblast in tandem with Pollen Puff and Psychic can make life miserable for a lot of leads. It's quite a bit easier to switch in to that a lot of offensive threats, though, since its coverage has trouble with Steel- and Fire-types.

Defensive

:porygon2:
Trick Room appears on a couple of RS Pokemon, and it completely stymies any sort of offensive lead should it be used. For many of these Pokemon, you can simply make sure your lead OHKOes them, but to be frank: you are not going to OHKO Porygon2. It's only weak to a type whose Max Move has weakened BP, and it has an Eviolite. As a result, any RS team needs some kind of good, stally way to deal with Trick Room. One potentially funny option is that if you switch in a Pokemon slower than this, it will actually reset the Trick Room so it can be faster again. But usually, you just need some kind of decently bulky Pokemon with recovery and a way to finish off Porygon2 as Trick Room finishes. Going into a second Trick Room is also a possibility if you must, but stalling out a second will be quite PP-intensive. Also, Tri Attack can be a frustrating status roulette, though fortunately once Porygon2 uses Conversion2 it will prefer Psychic as long as it's not resisted. One last note: don't forget to put 4 Special Defense EVs on offensive Pokemon with equal defenses to trigger an Attack boost from Download, as you don't want to give Porygon2 a free Special Attack boost.

:musharna:
Musharna is somewhat realistic to OHKO if you have physical, super effective STAB, but more than likely this is another Trick Room threat you have to deal with. With Yawn, Expanding Force, and Psychic Terrain, it can be a good deal harder to wall than Porygon2. Yawn also makes it quite frustrating to KO right as Trick Room ends, so you may have to accept knocking it out while TR remains. If it has 1 turn left when the next Pokemon comes in, that can actually be beneficial if you have Dynamax still – you can Max Guard to stall out that last turn if you need to, or just utilize TR for yourself depending on what comes in.

:greedent:
“Look at this silly Route 1 rodent trying to be a threat”, you muse. You attack it, but only deal around half. “Oh well, I'll just KO it next turn”. It uses Stuff Cheeks. You laugh as you see the Petaya Berry trigger. “What could it possibly do with that?”. But you start to be somewhat concerned as Cheek Pouch triggers, and it's now back up to 80% with +2 Defense. You do the math; it will survive three more hits now. “But what could it possibly do? It's a special Greedent”. It Belches twice, and the damage seems pathetic. How can you lose? But you realize your Dynamax has finished. Still, it should be fine. But just as you've almost escaped Greedent's Horrible Buffet, just as you can see the light at the end of the tunnel, it uses Hyper Beam, and your lead has fainted.

Greedent smiles on.

Do not ever underestimate how badly this will stop your physical leads. It is humiliating, it is infuriating, but it will win. The only mercy is that it is set-up fodder for almost anything.

:magnezone:
Magnezone with its Air Balloon can be difficult to OHKO for a lot of Pokemon, and even if you're able to OHKO it you can still see Sturdy (unless you're privileged like Cinderace). Magnezone actually has incredible offensive prowess, but in practice it ends up being a defensive threat because it almost always sets up Reflect or Light Screen on the first turn. Sometimes it sets up the wrong one which is fantastic, but if it sets up the right screen you can have a rough battle ahead. If possible, try to switch into a more defensive Pokemon when the opportunity arises.

:corviknight:
Flying/Steel is an obnoxious type for a lot of Pokemon to deal with, and this can waste incredible amounts of PP with Pressure and Spite versus them. While this will basically never KO anything, it can absolutely wreck you long-term in PP.

:steelix: :skarmory:
These tend to be similar. While Skarmory's type is more problematic, Steelix's raw durability is much better. They can also both have Sturdy even if you are able to OHKO them. Steelix can be particularly annoying if Dig is the strongest option, since that wastes another turn. But it is also a great set-up opportunity if you anticipate it.

:talonflame:
Talonflame's Sticky Barb seems rather peculiar at first, but don't be fooled – it is nefarious. With Gale Wings, Fly has priority and will cause your Pokemon to miss with whatever move it's using. Then, due to the Sticky Barb recoil, Gale Wings will no longer be active, and since Talonflame has no Speed investment it will likely be slower than your lead, causing another attack to whiff at it in the air. And the worst part is, with max HP and Defense EVs you still might not KO it even after all that. If it's going to use Fly, don't ever commit to Dynamax versus this. Even if you're going to stay in and potentially whiff an attack (but do realize it can also have Flame Body, so don't use a contact move), you really don't want this to waste two Dynamax turns for nothing. But more likely, you should switch. The upside is that it also has Overheat, which it prefers versus many targets due to its high power. In that case, this is much less dangerous.

:tangrowth:
Tangrowth is very bulky on the physical side, and its combination of Grassy Terrain healing with its Grassy Seed can make it hard to even 2HKO. And the worst part is, since Grassy Terrain is so common for your own use in RS, you may end up triggering its Grassy Seed immediately!

:coalossal: :druddigon: :octillery:
The Endure brigade, capable of wasting a turn of Dynamax no matter what. Octillery is OHKOed by almost any lead anyways, but Coalossal and Druddigon can survive most hits and Endure the next turn, totally wasting your Dynamax by the time you've disposed of them. If they really want to be obnoxious, then they can even get lucky and get a second Endure, wasting another PP! Neither are great to switch in on either – Coalossal can have Flame Body which contact attackers need to watch out for, and Druddigon's Dragon Tail and Taunt are obnoxious for defensive Pokemon to do anything about.

Status

:magneton:
This is one of the absolute dumbest Pokemon for a lot of types. Its typing and Eviolite alone can be hard for some Pokemon to deal with, but no matter what you have the risk of Sturdy into Thunder Wave, a surefire way to ruin your lead. While hoping this doesn't get Sturdy isn't the worst strategy for even moderate length streaks, any streak aiming to go high needs a way to deal with this.

:froslass:
Fast Pokemon destroy this without a second thought, but anything in the more common moderate Speed range forces something on the team to take a Will-O-Wisp. Even special attackers hate the constant damage tick, and it's ruinous for physical attackers. Like Magneton, you need a way to deal with this for a high streak.

:fukyu:
Every aspect of this Pokemon is bullshit. It has both Counter and Mirror Coat in tandem with good bulk, which makes it difficult to avoid taking lots of damage. And if you're able to circumvent that with an OHKO, you may be treated to Innards Out anyways. Well, this sounds like a wash. Let's switch something in. Oh...it used Toxic and your Pokemon is now crippled. Well, let's put a Toxic immunity on the team. Counter and Mirror Coat do damage depending on what's taken, so let's use weak attacks to wear it down. Oh...it's a Red Card, and now the Counter/Mirror Coat has been transferred to something without quick recovery. Well, that's not fatal, so let's just keep at this...back to the Toxic immunity. A nice 4HKO to whittle it down, healing Counter/Mirror Coat damage as needed. But wait! Spite! Spite! Spite! Congrats, you've wasted nearly 20 PP trying to deal with this. Oh, but what if you at least tried to set-up on it, both to gain momentum and waste less PP? Nope, Unaware! (You can still gain momentum, but you'll lose even more PP.)

Pyukumuku is a uniquely awful experience for newer players. It does have some huge flaws, though. Most notably, if you have any sort of Toxic immunity, you can repeatedly switch between said immunity and anything else on your team, both for the purposes of gaining Leftovers recovery and stalling out Counter/Spite PP (it will not use Mirror Coat until you use a special move again, or if it has no other option). That is generally the best option if you have an immunity, tedious as it may be (if you're not aiming for a good streak, you may just want to save yourself 10 minutes and eat the Spites). Without an immunity, you will either need to have some sort of way to heal the status, or simply roll the dice with Toxic. Do keep in mind that if your way of healing the status is Rest, you should either heal up later versus some other Pokemon, or switch out right when you use Rest then switch back in, so Spite doesn't destroy your PP as you sleep. Also, if you have your own Toxic user, you can totally bypass Counter/Mirror Coat/Red Card.

:passimian:
Passimian may have no defensive investment, but its base 100 HP/90 Defense can still make it annoyingly hard to OHKO, at which point it Flings its Light Ball at you for paralysis. Since this requires an item you can be tricky with Knock Off, but otherwise you will need to OHKO this or have some way to deal with the status.

:amoonguss:
This has Spore, which is the first instance of sleep as a status. While not permanent, it can waste your lead's Dynamax and leave them open to several attacks, though Amoonguss in particular isn't that threatening, damage-wise. It may be weak to a lot of types, but with max HP and Defense EVs even those are not a surefire way to OHKO. And while it's not too hard to wall with a lot of different Pokemon with Leftovers, the combination of Giga Drain, Clear Smog, and Ingrain can make it difficult to make any progress. Steel-types are usually your best bet since they can still set up without fear of Clear Smog. Oh, and don't forget that this can have Effect Spore if you're considering contact moves.

:quagsire:
Quagsire can be super obnoxious if you don't have a Grass move, due to Yawn, Leftovers, and Unaware. Toxic is super nice if you have it, but otherwise you're bound for an awkward time. The main advice is to never let Yawn sleep you, because with Power-Up Punch you will eventually take heavy damage from this – there's no safe way to sleep.

:accelgor:
Accelgor zooms in at the speed of light and poisons you with Sludge Bomb 30% of the time to ruin your day. Any good Poison or Steel type puts a stop to this, but if you want to play it safe this can be annoyingly disruptive to your lead.

:meowstic:
Never stay in versus this as a lead unless you're a Dark-type, because it can stifle your lead with Prankster Yawn. But since the rest of its set is one of the dumbest ever conceived (Disarming Voice? What is this, the first gym?), almost anything with Leftovers will win.

:gyarados:
Gyarados can be awful for physical attackers if it has Intimidate, and even if it doesn't you're probably not going to OHKO it. It starts with Icy Wind to lower Speed, then goes for Scald which can burn, or Taunt which is bad for most things you might switch in. One nice thing is that a lot of Pokemon remain faster than this after a Speed drop, but unless you 2HKO you're still going to risk Scald burns.

:drifblim:
Drifblim tends to be one of those Pokemon you just barely miss an OHKO on, and what a miserable OHKO to miss. It will use Trick and give you its Flame Orb, burning you. Also note that this will use up any consumable item you have until your next heal, so this is extra dangerous in that case.

:milotic: :torkoal: :sandaconda: :rotom: :miltank: :lickilicky: :garbodor: :dusknoir:
These are all Pokemon with low-moderate% chances to inflict status with secondary effects and some type of bulk. Miltank's Thunderbolt is particularly maddening; there aren't words to describe the feeling of being paralyzed by a move that does as much damage as its paralysis chance.

While this guide has talked at length about how to build an RS team, there's no shame in using someone else's team. You can even employ the teambuilding concepts discussed and try to improve them. The teams listed here are not particularly beginner teams or anything of the sort, the purpose of this is to show some successful teams and how they applied concepts talked about earlier. Feel free to use anything you see on the leaderboards.

Team #1 – Normal, :braviary::bewear::blissey: by sb879, Record: 75 wins

Braviary is a good example of using a secondary type on your lead to deal with your type's weaknesses. By leading with a Flying-type, this team is much less impacted by Fighting-types that are difficult to deal with. From there, two switch-ins of Bewear and Blissey are employed, which broadly give this team a good way to switch into many physical and special threats. They are not really a core, though, since most Fighting-types will tear through them. Both Bewear and Blissey keep up momentum in their own ways. Bewear uses a very offensive set with Swords Dance (healing with Drain Punch) to go for sweeps on its own, while Blissey uses Teleport to relinquish control to one of the sweepers after it has weakened special attackers.

Team #2 – Water, :gyarados::gastrodon::toxapex: by doctordoak, Record: 74 wins

Gyarados makes for a powerful lead with great Attack, sufficient Speed, and Moxie. This team then employs a strong defensive core of Gastrodon and Toxapex to deal with various threats. Unlike above, this team's defensive core does not aim to press momentum, but will not be easily broken. One big reason for this is that Gastrodon and Toxapex do not share weaknesses, and since both are good defensive Pokemon they can win games by themselves if need be.

Team #3 – Grass, :rillaboom::appletun::ferrothorn: 
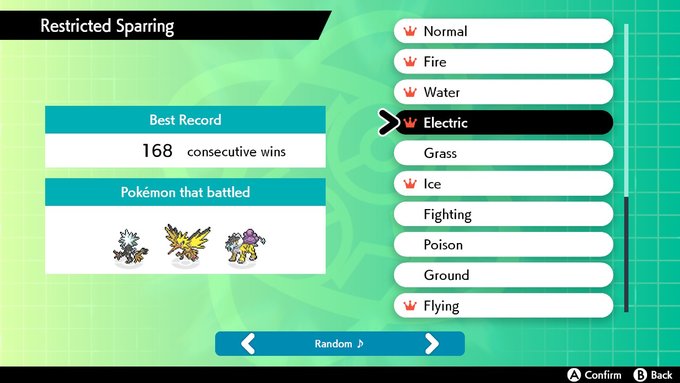
by Jumpman16, Record: 168 wins

This is another defensive team. Rillaboom is able to amass incredible PP by taking advantage of the fact that its G-Max Drum Solo has the same power no matter what, letting it use Branch Poke with no loss in effectiveness. Its Grassy Surge ability both bolsters its offense and also lets it support its defensive teammates with supplemental healing. On the backline, Appletun and Ferrothorn are able to neutralize all of Grass’s weaknesses, including an outright Poison-immunity on Ferrothorn and a Fire-resistance on Appletun. They also do not share weaknesses, and can use Leech Seed both as a way to heal and do lots of damage over time. Appletun's Gigantamax form lets it heal its own status, and it also utilizes the as-of-yet mostly unutilized strategy of Recycle+Leppa Berry to keep its PP up. While Appletun and Ferrothorn can mow through teams by themselves, they can still keep momentum even without a dedicated pivoting move – Leech Seed+Grassy Terrain can make raw switches back to Rillaboom relatively painless versus a number of Pokemon.

Team #4 – Psychic, :alakazam::gallade::slowbro: by Eisenherz, Record: 61 wins

A rare look at a lead that does not use a Shell Bell. With Magic Guard, Alakazam is able to utilize the Life Orb without recoil and get tons of extra OHKOs from that, which in tandem with its great speed offsets its incredible frailty. Gallade is then an interesting combination of a switch-in and a secondary lead. Its Fighting-type neutralizes the Dark weakness, and it can use a Choice Band Drain Punch to heal up, then Dynamax to use other moves. It also leads for a while after Alakazam faints, where it instead uses its Fighting move to amass Max Knuckle boosts. Slowbro rounds out the team to switch into various threats with its good defenses, and is able to use Teleport to maintain momentum while gaining health with Regenerator.

Team #5 – Bug, :heracross::volcarona::shedinja: by Dobbly, Record: 124 wins

Heracross is similar to Gyarados, but better due to having great PP and a STAB Max Knuckle. It's also another good use of a secondary type. Its Fighting-type allows it to easily beat any Rock-type, which this team is incredibly bad at switching into. This shared Rock weakness of Volcarona and Shedinja, as well as the shared Flying-weakness, should make it clear that they don't act as a core, but rather separate switch-ins where maintaining momentum is key. Volcarona switches into many threats – notably Fire types and burn users, but also various physical walls – and sets up Quiver Dance to sweep, maintaining health with Roost. Shedinja on the other hand is a peculiar case, having many flawless match-ups but destined for failure if it KOs anything by itself. As such, Shedinja never knocks anything out. It only weakens Pokemon and Baton Passes Hone Claws to Heracross, which give it a ton of momentum to massacre virtually anything.

The community has made various resources to help out with RS, so you should check them out and use them as you see fit.

SwSh Battle Facilities Damage Calculator (courtesy of Eisenherz)
SwSh Battle Facilities Mass Damage Calculator (courtesy of turskain)
Trainer + Pokémon lookup spreadsheet (File → Make a copy) (enter "Student" as Trainer for Restricted Sparring) (courtesy of of SadisticMystic)
Full list of Restricted Sparring sets (courtesy of Eisenherz)
Restricted Sparring speed tiers

I just copied these from the OP

Off You Go!

Well, that's the basics of RS. Now it's your turn to go and try it for yourself! Hopefully you enjoy it as much as the RS community has. It's certainly an interesting mode to learn, with many opportunities to be creative and innovate. And at only 4 months old, the book is nowhere near closed, so perhaps you will write the next chapter.
 

a loser

I'm a loser, baby, so why don't you kill me?
is a Tiering Contributoris a Contributor to Smogonis a Community Contributor Alumnus
I'm super glad to see effect Restricted Sparring and now Dynamax Adventures have had on this thread! I poked my head in at the beginning of Gen 8 to see everyone being sad about the disappointing Battle Tower and I quickly lost interest in the facility. I was pumped to see RS come out but didn't even think to check back in Orange Islands to see what kind of resources could have been added since I last checked. I casually played RS just to "master" every type and it was fun but now I have even more incentive to go for better streaks.

That being said, I'll share two streaks I've gotten so far. One is pre-Tundra and the other I got the other night but had to cut it short manually since I had to go to sleep.
grass.jpg
dragon.jpg

Neither team is really optimized for a super long run, especially after browsing some posts here and finding Branch Poke Rillaboom and other mega PP strats lol. Pretty awesome to see what people have come up with though in order to be in it for the long haul. I'll share the teams anyway but won't get too specific on the runs I had.

1604078241259.png

This is the run I had to cut short because of sleep. By the time I called it a night, I had already used my two heals but my team was in good enough shape to surely break 30 if things had gone well so I'll be going at it again soon.

:rillaboom-gmax: @ Terrain Extender
Ability: Grassy Surge
EVs: 252 HP / 252 Atk / 4 Spe
Adamant Nature
- Swords Dance
- Grassy Glide
- High Horsepower
- Drain Punch

I EV'd this Rillaboom before realizing that its speed tier really wasn't that bad and will probably change it to 252 Spe since the extra bulk really hasn't come in handy so far. The coverage also could probably be optimized since I ran into a Butterfree and had no choice but to brute force my way through it with a Swords Dance and a Hurricane miss, which is nothing I should be relying on in the future. Terrain Extender is a feeble attempt to get recovery for longer but I need to change this after realizing how much AI loves to set terrains.

:kartana: @ Miracle Seed
Ability: Beast Boost
EVs: 252 Atk / 4 SpD / 252 Spe
Jolly Nature
- Leaf Blade
- Smart Strike
- Psycho Cut
- Sacred Sword

Before Tundra came out, I got 16 wins with Decidueye in this slot but changed to Kartana to get the nice snowballing from Beast Boost. I chose STABs but am not sold on Smart Strike, although Kartana's movepool isn't super extensive. I'm wondering if Aerial Ace would be worth it over Psycho Cut so I'm not removing my terrain , but they are equal in PP so I'm not exactly sure. Miracle Seed is a filler item but I'm open to suggestions to optimize this.

:appletun: @ Leftovers
Ability: Thick Fat
EVs: 252 HP / 48 Def / 20 SpA / 188 SpD
Calm Nature
- Apple Acid
- Dragon Pulse
- Leech Seed
- Recover

This EV spread is not specific for anything (that I know of) since I just winged it going with what looked useful. I need to browse the thread some more and find an optimal spread as well as give this guy some Max Mushrooms as the Gmax move does sound useful. Dragon Pulse has been nice to have some coverage but it also seems like something better could go here. Protect seems useful to help heal up in a pinch though.


1604079313543.png

This was my longest pre-Tundra run and also before I knew this thread had been updated so I didn't care too much about getting a super long streak at the time. For most of the other types I kinda mailed it in after 8 or 9 wins but this team just kept winning so I went with it for a bit longer.

:Dragapult: @ Choice Band
Ability: Clear Body
EVs: 4 HP / 252 Atk / 252 Spe
Jolly Nature
- U-turn
- Phantom Force
- Sucker Punch
- Dragon Darts

In my Battle Facility experience, which is mainly just Maison and Tree, I never liked using choiced attackers. Dynamax changes this a bit so I'm trying it out and loving it so far. Mainly Pult clicks Dragon Darts but I really wish it had better PP. This set was made to use in Battle Stadium so I doubt that Sucker Punch is really optimal in RS so I'll probably need to find a breedject to optimize for a longer run.

:Hydreigon: @ Choice Scarf
Ability: Levitate
EVs: 4 HP / 252 SpA / 252 Spe
Timid Nature
- Dark Pulse
- U-turn
- Flamethrower
- Dragon Pulse

Here's another Battle Stadium set that I borrowed to use in RS but it has more than pulled its weight so far. I'm going out of my comfort zone with TWO choiced users in this team. Not sure how useful Scarf Drei is in RS since I don't know the main threats that well but it did ok.

:Kommo-o: @ Roseli Berry
Ability: Bulletproof
EVs: 252 Atk / 4 SpD / 252 Spe
Jolly Nature
- Clangorous Soul
- Close Combat
- Dragon Claw
- Iron Head

I'm not a fan of this set and honestly it didn't get much use during this run. It is mainly here because it was the most battle-ready Dragon-type at my disposal. I never clicked Clangorous Soul so I should probably change that to Dragon Dance. Based on what I've seen I also need to swap Close Combat for Drain Punch but again, I was running CC before really thinking about longevity in these runs.

:garchomp:
Since Tundra came out I'm considering replacing Kommo-o with Scarf Chomp and giving Hydreigon something else, maybe even trying Specs to make it a triple choice team but I'm not sure at this point.

That's all I have for now, so I'm going to go back through the thread and resources to learn more about this and probably look through the recently posted guide again as it looks nice. I'd love some feedback if anyone has thoughts they'd like to share as well.
 
Normal-type

For those who don't know me, I'm the founder of a brand new recent Pokémon project, the first competitive Pokemon AI Horux.
I would never expect it, but Horux made me beat the Restricted Sparring Normal-type world record... on its first try :v4:

Horux presentation video is available here.

Currently, Horux is able to build insane 6v6 teams and we can reach the top of Showdown OU/Ubers ladder with them if we play well-enough. So I decided to put the AI further and test Horux on the Restricted Sparring challenge. I chose the first type presented to me: the Normal-type.

Currently, 1690 Pokémon movesets are in the Horux database. As Horux only builds 6v6 teams for the moment, all those movesets are 6v6 ones (with like Stealth Rock, stuff like that...). And I randomly asked Horux to pick me the best possible "pick of 3" Normal-type Pokémon (among those 1690 6v6 movesets) to beat the Normal-type Restricted Sparring challenge.

Firstly, Horux chooses one Dynamax lead. It takes all the different Pokémon of their database, replacing the set's current item with the Shell Bell, and sort them by the % of victories against all the possible Restricted Sparring Pokémon, in a battle where it dynamaxes and not the opponent.
After that, Horux calculated that the 6v6 set "Porygon-Z, Choice Specs, Adaptability, Timid, 252SpA/4SpD/252Spe, Trick / Tri-Attack / Thunderbolt / Ice Beam" had the highest score, and was the one with the most victories against those bots (replacing the Choice Specs by the Shell Bell, as said previously). This PZ has 0 check, and can beat more than 86% of those Pokémon without losing more than 25% of its HPs.
Seeing that "Trick" was a free move, I decided to optimize it a bit and tried more Porygon-Z, and got this following one with a score of 89.6%.
Porygon-Z, Shell Bell, Adaptability, Modest, 252SpA/4SpD/252Spe, Swift / Shadow Ball / Thunderbolt / Solar Beam
I could have better scores, but it was with low PPs moves like Hyper Beam, so not viable for the RS challenge (contrary to that, I removed Tri Attack for Swift to keep more PPs).

Then, I asked Horux to gave the 2 best possible partners for this Porygon-Z lead, as the best combination that "mon that can switch into the mon making Porygon-Z loses more than 25% of its HPs". Horux answered me this (in their Java Eclipse Console, after a couple minutes of calculation):

Screenshot 2020-10-30 at 19.03.16.png


The 6v6 sets of their partners were the following:
Chansey, Eviolite, Natural Cure, Bold, 252HP/252Def/4SpD, Stealth Rock / Toxic / Soft-Boiled / Seismic Toss
Dubwool, Leftovers, Fluffy, Impish, 252HP/252Def/4SpD, Rest / Sleep Talk / Cotton Guard / Body Press


Horux told me that the only threat of this team of 3 was Politoed on Perish Song. That's a right answer. Firstly, Politoed is a threat, cause Focus Blast does a ton of damages to PZ, and Chansey and Dubwool cannot beat Politoed if it does Perish Song on the switch. But I just have to switch permanently and it's okay.

So I really liked this team, and again, I decided to improve it a bit: we don't need Stealth Rock in RS, and Sleep Talk is a waste of PPs.
That's here that the following and record-breaker team was born.


Porygon-Z @ Shell Bell
Ability: Adaptability
EVs: 252 SpA / 4 SpD / 252 Spe
Modest Nature
IVs: 0 Atk
- Swift
- Shadow Ball
- Thunderbolt
- Solar Beam


Chansey (F) @ Eviolite
Ability: Natural Cure
EVs: 252 HP / 252 Def / 4 SpD
Bold Nature
- Toxic
- Heal Bell
- Soft-Boiled
- Seismic Toss


Dubwool @ Leftovers
Ability: Fluffy
EVs: 252 HP / 252 Def / 4 SpD
Impish Nature
IVs: 0 Atk
- Rest
- Thunder Wave
- Cotton Guard
- Body Press


So I tried it, and on my first try, I did 84 streak wins.

Screenshot 2020-10-30 at 19.27.00.png


Can you realize what did just happen to me??? I absolutely don't care of this record and I know it will be be beaten tomorrow (because I only did one try, I just copied a team from my AI, and I didn't think about improve the team). The thing is that:
- I created an AI
- The AI gave me three 6v6 Pokémon that I just had to change a bit
- And on my first try I beat the record
=> So THAT'S INSANE!!! I knew that the thing I created could help players, but... never thought it could be something so insane O__O So I'm really hasty to continue to improve Horux and try to make it build more insane teams to defeat some other RS records :)


--------------------------------------------------

The run


Horux calculated that my Porygon-Z had a 89.6% chance of victories against a random Restricted Sparring Pokémon, with at least 75% HPs remaining. This scenario exactly happened: Porygon-Z is insanely broken and made me win more than 80% of the time, without losing much HPs (and even sometimes recovering thanks to the Shell Bell and the Grassy Terrain of Max Solar Beam). But I noted some "threats".

Not threatening mons, but annoying, because they make PZ lose like 30-50% of its HPs before dying (or force me to switch)

(This one has a Quick Claw Superpower...)

Not threatening mons, but annoying, because they waste my Dynamax turns (or force me to switch)


Not threatening mons, but threatening if I lose my Dynamax


Coalossal and Steelix are the only hugely problematic mons if I lose my Dynamax.
If Coalossal beats PZ, it can Tar Shot + Heat Crash the rest of my team. Chansey will not like it, and Dubwool has Fluffy so it fears that...
Steelix has Iron Defense + Body Press, and cannot be Toxic. So it's a 50/50: the first between Steelix and Dubwool to have a crit...

First heal: 25, after a 25th nightmare team Politoed (fortunately missed Focus Blast lol) + Steelix (I could beat it as I still was Dynamax on T3) + Dedenne which spammed Super Fang on Chansey/Dubwool was pretty annoying
Second heal: 53, after all my Pokémon were 80%+, but running like... 3 PPs per move lol
Lost at my 85th battle. After a dramatic 84 with a non Dmax versus against Klinklang which left me only 1 HP lol On 85 I faced a Boltund, switched into Dubwool which PP wasted the Boltund, Kingdra KOed me with Draco (couldn't go Chansey cuz few HPs and no Soft-Boiled remaining), RKd with 1HP remaining Dmax PZ lol And Trevenant beat the rest of my team with Horn Leech, cuz it's AV so Max Phantasm doesn't KO it and Chansey cannot touch it.

I think we still can improve the team. I will improve Horux firstly and try to make Horux beat other records, and then maybe I'll be back on this one ;)
 
Last edited:
Hello!

I am here to report a new high score for Dynamax Adventures. My team and I were able to get to the boss on BF7.

Our team (please name the leaderboard entry RIT Pokémon Club) was:

AWood (Postal Dude)

Banded Bonks (Bran Flakes)

ATcheron (Kelli)

Pseudophysics (Hans) (also DC'd mid challenge)
round.jpg


So our sequence of bosses was the following:

Zapdos->Latios->Entei->Uxie->Raikou->Thundurus->Yveltal

We lost on Yveltal even though it Taunted three times. What ended up KOing us was just an error on my side as I didn't swap my Armaldo out for a Pincurchin with Electric Surge. I was on 44 HP and I think that we would have gone even longer if we didn't have a disconnect. We were actually cruising with a a Rain Dance team for a few floors after Zapdos.
 
Last edited:
Endless dynamax with me and three AIs.

Getting this deep with big brain AIs that hydro pump a water absorb Araquanid repeatedly made me want to share this.
Haunter with Wide Lens Hypnosis carried this so hard, eg. sleeping Xerneas for three turns avoiding 6+ attacks is ridiculous.

Bosses were: Cresselia -> Xurkitree -> Mesprit -> Xerneas -> Necrozma

Hypnosis PP ran out but could have def gone farther if AIs didn't pick up Boldore/Ninjask who unsurprisingly did absolutely nothing.

1.jpg
2.jpg
 

Eisenherz

επέκεινα της ουσίας
is a Forum Moderatoris a Community Contributoris a Tiering Contributoris a Top Social Media Contributor Alumnus
Moderator
I joined with the same group as last time (doctordoak, JustinTR, Ullar) yesterday night for our second run, and this one brought us a whopping 157 Dynite Ore!

Pokémon Sword-Shield Screen Shot 2020-11-02, 1.53 AM.png

(and everyone stayed until the end this time!)

I'm not sure how we ended up getting this far, because our team felt very iffy for most of it (the team we had by the end was pretty solid, though).

The bosses we faced, in order: Heatran, Necrozma, Raikou, Lunala, Pheromosa, Landorus, Articuno, Dialga (the losing battle)

We started off with a cool Steely Spirit team; Perrserker + 3 Pokémon with Steel moves, and with our first battle being Alcremie, it came through big time. But the first boss was Steel, so we had to quickly dismantle that, and Alcremie was a great pick for the long run thanks to G-Max Finale; I took it and used it until it basically was out of PP, at which point I switched to Hitmonchan until the very end. I'm pretty sure everyone else swapped a lot more than me.

We picked up Palpitoad early on; it carried us through Heatran pretty easily, and then stuck around for a pretty long time. Justin, until then, had an excellent Bouffalant, which got eventually replaced by its better brother, Tauros. For the time it was healthy, Tauros was doing amazing, and the Necrozma fight took a while but was overall very easy. We picked up Dugtrio for the Electric boss afterward, and with Palpitoad also still on deck, we powered through Raikou in no time, and I'm pretty sure we were at 4 lives after that.

Then disaster struck... Tauros got paralyzed by an Emolga's Static (we picked up the Emolga, though!). Since it had Facade, and a (now slow) Assurance, we decided it was worth keeping Tauros around even with the para. And so we headed into the Lunala fight and got our asses kicked, because Tauros got paralyzed almost every single turn (the rest of the team's damage output for Lunala was quite pathetic). After getting paralyzed, Tauros got fully paralyzed 8 out of 10 turns, including 2 Dynamax turns of the Lunala fight. Meanwhile, Lunala scored a bunch of KOs on us and I believe we left that fight with 1 life left (replenished to 2 afterwards). Levels of frustration were high.

However, we slowly built ourselves back up, though our team was far from solid; Altaria, Hitmonchan, Emolga and Passimian (the latter 2 with Acrobatics and an equipped item lol). We 1-turned Pheromosa with no death, and that really helped. We picked up Bisharp over Altaria seeing a Flying boss incoming, and just before the boss, Passimian was switched to Lanturn (which made it to the end). The Metal Sound combo from Bisharp into Lanturn's attacks proved useful for the next 2 floors.

Landorus, however, proved extremely brutal for us, the 2 Pokémon we picked to deal with Flying (Bisharp and Lanturn) were weak to Ground, and Lando was relentless, Bulldozing and EQing away. We were able to take it down pretty quickly thanks to Metal Sound + Max Geyser and Hitmonchan's Ice Punch, but it scored 3 KOs on us; DMax Lanturn ended up living the final EQ on probably 2-3% HP, and that absolutely saved us.

Once more, we were able to slowly build ourselves back up. Ullar's Emolga was switched to Doublade, and we mowed through Articuno, scoring a paralysis on it (justice!!) in the process, and setting sun with DMax Hitmonchan to prevent freezes / nerf Hurricane accuracy.

Doublade was switched to Flygon since it was low on HP, and Flygon seemed like a good pick for a Steel boss. doctordoak's Bisharp was running low on PP and was switched to Basculin right before the Dialga fight. Sadly, Dialga walled both Lanturn and Basculin; both could still contribute (Lanturn's Confuse Ray scored a self-hit, Liquidation scored a Def drop...), but a lot of this fight relied on Hitmonchan. For a while, it seemed like we were doing really great. Hitmonchan got 2 Max Knuckles in, so even Flygon's Dragon Claw was doing nice damage, and the Liquidation defense drop meant the next Max Knuckle was going to almost KO, most likely. And then Dialga reset all stat changes, and boosted itself with Max Steelspike on Hitmonchan, Hitmonchan went down before getting that final Knuckle, and it was all downhill from there. We were extremely close, it had very little HP left, but we fell...

Overall, this run felt shakier than the previous one the entire way through, we were hanging on by a thread a few times, but somehow made it though to 31! It was a ton of fun... except the Lunala fight.
 
Last edited:
Xurkitree's weird, insanely-lopsided stat spread often makes it hard to find a niche in competitive play, but in the slow world of Restricted Sparring it's in heaven. A Timid Xurkitree outspeeds 130/150 Pokemon, letting its absurd special attack and Beast Boost work their magic. Xurkitree's coverage is somewhat lacking - in fact, unless you want to use Normal moves it literally does not learn 4 types of special moves - but when you see stupid bullshit like this:

+1 252+ SpA Xurkitree Max Lightning (140 BP) vs. 0 HP / 0 SpD Flapple in Electric Terrain: 131-154 (95.6 - 112.4%) -- 75% chance to OHKO

...you have to wonder, does it even matter? While Xurkitree does learn Dazzling Gleam for this particular example, I wanted to avoid it due to its 16 PP. In fact my initial Xurkitree draft was just 3 Electric moves and Grass Knot, lol. I also went for Modest as the calc above implies, and truthfully that was probably the biggest mistake. Going Modest boosts the number of Pokemon that outspeeds Xurkitree from 20 to 30, with some nasty ones like Heracross and Kingdra tucked in there. And since Xurkitree has no way to boost its speed, these are unavoidable hits unless I have a good switch (I don't). As a result, my first (real) run was as inconsistent as Xurkitree's stats; an amazing 57-win middle leg, but the first and last were 27 and 15, leading to an overall streak of 99. The last leg had a particularly embarassing scenario where +2 Xurkitree was walled by a Pikachu post-dynamax since it can have Lightning Rod and weighs almost nothing. While the impacts of not using Dazzling Gleam and running Modest weren't necessarily dealbreakers by themselves, using both just made Xurkitree too volatile. So I went with Timid and Dazzling Gleam over Volt Switch, a sad 16 PP loss but one that would hopefully increase reliability.


Hm, this number seems familiar...


Xurkitree @ Shell Bell
Timid/Beast Boost
252 SpA/4 SpD/252 Spd
Rising Voltage/Thunder Shock/Dazzling Gleam/Grass Knot

I've spent the introduction talking about Xurkitree's perks, and to continue on that train of thought: it may be the absolute-best RS lead. It's not bulky, but it also takes super-effective hits very rarely, and the only STAB one it ever has a reason to take is Quick Claw Scorching Sands from Sandaconda (and that certainly isn't a damage concern). It also has insane PP efficiency; I would estimate that 95+% of its PP go straight to OHKOs. The raw PP count of this set is also pretty high at 128. The triple STAB variant I mentioned earlier had 144, and truthfully that might be still be viable with Timid instead of Modest. Getting walled by Pikachu scars a man, though...

Rising Voltage is the best STAB you can have for RS: 32 PP, 140 BP max move, and great post-dmax, usually being just as strong (and still okay even without terrain). Only Bullet Seed/Icicle Spear with their 48 PP/130 Max BP come close, but they're inconsistent outside of dmax. Thunder Shock is used for extra STAB PP, adding a whopping 48. It gets 90 BP as a max move which is sometimes sufficient for leads, but once Xurkitree gets a boost and Electric Terrain it's sufficient for the vast majority of what it runs into. While calcs like the earlier Flapple one are insane, lead Dragons are 2HKOs at best without Dazzling Gleam, so it helps a lot with those (and, I suppose, post-dmax Pikachu). And others like Appletun and Goodra are always complete showstoppers without it, the latter of which is pretty awkward to deal with. None of them are absolutely terrible to deal with without it though, so I remain undecided on whether Dazzling Gleam is worth the PP loss. But it's what I ran with here. What is not up for debate is Grass Knot; there's no muscling past Ground-types with Electric moves, and it has a great 32 PP regardless.

Like a lot of special attackers, Xurkitree has an awkward overabundance of terrain. In fact, this whole set places different terrains up. Electric is the preferred terrain generally speaking, though it is of marginal use for the last mon if dynamax is active still, so Grassy Terrain is preferred then if I need the health. If dynamax is not going to be active then Electric Terrain all the way. Misty Terrain exists I guess but the odds it'll be up for the slim few things it matters versus is barely anything.

Lastly, I just want to mention a very sad casualty of Gen 8's move purge: Signal Beam. This was a very weird removal (it's neither redundant or even arguably broken), and one that is absolutely tragic for Xurkitree. It has more PP than Dazzling Gleam, and, well...just keep it in mind when looking at the Threats section.

Zapdos @ Wise Glasses
Modest/Pressure
4 HP/252 SpA/252 Spd
Rising Voltage/Hurricane/Heat Wave/Roost

Zapdos's Ground-immunity, and even more importantly its Grass-resistance, are crucial for an Electric team. Emolga ( ._.) and Thundurus share this typing, but Zapdos's tankier build makes it the obvious choice. The set was difficult to choose, though. Initially, I wanted a more defensive set to really capitalize on Roost. I didn't like the lack of momentum, though, since Electric really doesn't have the defensive options to make more passive cores like this work. Nothing else is even close to Zapdos's level. So I decided to use an offensive set instead. But since Zapdos's coverage after its STABs and Heat Wave is marginal, I stuck Roost on it anyways. I don't try this sort of thing on offensive mons usually - most can't afford the coverage slot nor find opportunities to heal - but it worked quite well here. Zapdos isn't leading, so it can pick out opportunities to Roost fairly well when it takes damage switching in or when its sweeps don't go smoothly. They usually do, though. With Modest and Wise Glasses, this set OHKOs nearly 3/4th of the RS roster in dynamax. Moral of the story: don't underestimate Zapdos.


Raikou @ Leftovers
Timid/Pressure
252 HP/4 SpA/252 Spd
Thunderbolt/Shadow Ball/Calm Mind/Rest

Calm Mind with Raikou's stats is way too good to ignore. Admittedly things falter a bit from there. While Rest's status healing is occasionally useful (Froslass, Accelgor), by and large it is a vastly inferior way to heal and that does dampen Raikou a bit. It does at least have nice synergy with Pressure; Raikou can often waste away 10 PP moves as it sleeps to leave a battle with more health. The choice of a coverage move to go with Thunderbolt is also awkward. Scald is great for Ground-types that threaten Raikou, but it leaves Raikou completely walled by Water Absorb Seismitoad, and struggling to break through Dragon and Grass-types. Aura Sphere is nice in several respects, but it leaves Raikou completely walled by Runerigus and Golurk, the latter of which is awful to switch into. Shadow Ball is the best compromise, but it does indeed feel like a compromise: while it has some perks, by and large it's just extra attacking PP.

Anyways, while Raikou doesn't always have the cleanest sweeps without Special Attack investment, it's hard to break through with a couple Calm Minds especially if dynamax is still available, so it's generally fine. The HP EVs are definitely necessary to provide insurance against crits; Raikou takes a ton of hits due to Rest and is often against some scary foes in its quest to shield Xurkitree from Light Screen and Trick Room. I originally had Defense EVs to help with Froslass, though I quickly realized this was stupid when Raikou can outspeed Froslass instead and get way more utility from being fast.

Threats

:orbeetle::exeggutor:
These are Trick Room threats a lot of teams just OHKO, but Xurkitree KOs neither as leads. Zapdos is suicidal to bring out into Trick Room, so the work falls to Raikou. Orbeetle is very dicey if it starts CMing though, and Exeggutor is crazy strong and can stack damage with Future Sight. Though on the bright side, Exeggutor often uses Solar Beam even after the Power Herb is used. Crits are very bad, possibly fatal coming from these.

:abomasnow:
It's hard to imagine this being a threat, but it is as a lead. Xurkitree doesn't KO and takes a ton from Wood Hammer, and while Zapdos can switch in it still takes around 40%. Furthermore, with hail and Ice Shard, Abomasnow can potentially snipe Zapdos if it's not at good health.

:trevenant::eldegoss:
These both stop Xurkitree even after it gets a KO, and they're pretty likely to come out second due to their strong moves, leaving an anonymous Pokemon waiting in the mists. While they're fine as leads since Zapdos still has Dynamax available to go off with Airstream, the fact they can stop Xurkitree after comitting to that can be dangerous. Eldegoss can be set up on with Raikou, but Eject Pack can bring in something dangerous before Raikou amasses multiple Calm Minds. And Trevenant requires Zapdos to hit Hurricane, which, uh, yeah... If it misses, Pressure lets it feasibly stall out Poltergeist PP as long as it doesn't high roll every time, but even then Roost giving up the Flying-type makes it very hard to gain health from the Horn Leech it will use after. Honestly I've never had to do this, it sounds pretty bad as I type it out! Probably better to just hope the second Hurricane hits lol

:alakazam:
Very dangerous as a lead (amusingly +1 Electric Terrain Lightning KOs this through Light Screen so I just let Xurkitree do that if I have a boost). Raikou is the best bet, and thankfully it's faster. Alakazam is likely to use Safeguard which helps, and Pressure is also very handy for stalling out Psychic PP. But Psychic crits before they run out can be very bad.

:froslass:
Forces a burn on Xurkitree outside of the unlikely event of Misty Terrain being up, which is bad even on a special attacker. Raikou is the best solution, and thankfully it quickly stalls out Poltergeist with Pressure. While Triple Axel hits even harder, it seems to be weighted equally with Draining Kiss due to only being a "20" BP Ice move that theoretically deals around the same damage. It also likes to reapply the burn when Raikou wakes up, which is honestly a good thing - it can be healed off later in a safer environment. That being said if Froslass feels like spamming Triple Axel it's a nightmare so I KO it ASAP with +1 Shadow Bal, or even a raw Phantasm if it comes to that and it's an option.

:coalossal:
Annoying lead. I don't like going for the dynamax 2HKO since it can use Tar Shot and also totally waste dynamax with Endure after. My preferred play is to start with Thunder Shock, which can transition into an RV!Lightning KO. If it uses Tar Shot I go to Raikou on the Heat Crash (only does around 20% since Raikou is heavy), then have Raikou CM until Coalossal uses Tar Shot (always been ASAP for me), then back to Xurkitree on the Heat Crash which does around 40% before KOing with Lightning. Clunky, but it works okay.

The Run

In standard RS fashion, I remember almost nothing about the first leg. I know Xurkitree burned through all of its PP, and that Zapdos's Hurricane PP got really overworked so I didn't feel safe leading with it at all when Xurkitree went down. This leg lasted 56 battles.

The second leg was going pretty smoothly, until I made a mistake that could only be described as, "fucking stupid". Accelgor and its poison chance forced Xurkitree out, and I went to Raikou. And there I fell asleep at the wheel and forgot to fall asleep with Raikou, leaving it at 39 HP and poisoned. Leech Life was a likely KO so I went to Zapdos who thankfully avoided a Sludge Bomb poison and finished the battle. But Raikou was still in a perilous position. I thought I had my opportunity to heal it when I ran into last Pokemon Meowstic, which did such little damage that Raikou could switch in and Rest. But before I did that, I realized...I had Electric Terrain up. You know, that prevents sleep? Still, Meowstic is so passive that I had to try something. I went to Zapdos instead, who stalled out the terrain with Roost (which let it block Yawn as well). But rather than Roost on the last turn, I used Rising Voltage instead. This let Yawn go through, but could also prompt Meowstic to Rest. Plus I've seen Meowstic use Yawn even when the drowsy effect is active. I switched to Raikou with as much faith as I could muster, but alas: Disarming Voice, now Throat Spray boosted. If you're wondering whether that was the first time RS Meowstic ever KOed something: nope, Raikou survived, but the poison did it in. Thankfully, Raikou was pretty spent PP-wise so this wasn't as impactful as it could've been. Xurkitree again depleted its entire PP stock, but without Raikou I didn't feel safe at all doing battles with just Zapdos. So this leg only went for 51 battles.

The last leg got off to a pretty bad start, partly due to bad play and partly due to luck. I ran into a Dunsparce lead, which I usually let Xurkitree attack outside of dmax first before KOing, so as not to waste a turn of dmax since Dragon Rush only does a quarter (it's Dunsparce). Here I felt a little iffy about that due to only being at 70% HP though, so I tried to set-up with Raikou instead. But I realized Pressure was actually detrimental here, since I would run out its 10 Dragon Rush PP and then it would Skitter Smack instead. And while it's Dunsparce, trying to Rest versus physical attacks is very iffy, even ignoring the eventual Special Attack depletion. So since I got to +3 at good health, I decided to dynamax to finish it before that happened. I usually don't dynamax with Raikou unless necessary, so I have much more flexibility with Zapdos if needed. And it was needed, since I ran into Krookodile as the last Pokemon. Resisted Ghost-moves are the best Raikou can muster, and even +3 Phantasm only did 50% before Raikou got trapped by Sand Tomb. Since dynamax ran out, the next Shadow Ball didn't KO and Raikou got Sand Tombed again, leaving it with 3 HP after the residual effect. Raikou still won, but in an awful position. Mercifully, though, I ran into last Pokemon Pelipper soon after who I have never seen start with anything but Stockpile, and it did just that as I went to Raikou and healed up.

After that things went quite smoothly. Raikou got perilously low on attacking PP about halfway through the leg, but the number of things I needed it for dropped dramatically after that. Xurkitree yet again burned through all its PP, falling at battle 158 after muscling through a Blissey with Light Screen up in the previous battle (just Xurkitree things). Now, I hadn't honestly set my sights on Jumpman's record, but goddamn did Zapdos think otherwise. It zoomed through battle after battle without a scratch. I hit two snags: a Lickilicky lead that I didn't KO and took a Body Slam from (I healed up on a Bisharp within the next 2 fights though), and more importantly a Cursola that both Spited my Rising Voltage and Endured afterwards to waste another PP. Still, Zapdos trucked along to battle 167. There I ran into a second Pokemon Dragalge, which truthfully I didn't initally calc vs and didn't realize Airstream was a 75% KO. I assumed I didn't have a KO, so I cashed in my Raikou lifeline, who got off its last Shadow Ball and a Thunderbolt on Dragalge before fainting. While it was in Hurricane range now, I only had 2 left so I decided to use 3 Heat Waves instead since they're much less useful and I had 5 left. After Draco Meteor drops (and Meteor itself being out of PP due to Pressure) it wasn't dangerous. It eventually Flip Turned out into Pressure Vespiquen. I really couldn't afford to deplete my Hurricanes on this, nevermind the miss chance, so I went for Rising Voltage, hoping for the 1/4 range (otherwise, I would need to use "2" more Heat Waves). And I got it! This left Zapdos in a good position for 168 (1 RV, 2 Hurricane, 2 Heat Wave), where it swept effortlessly, but only left it with 2 attacking PP for 169, an easy loss at the beak of a Porygon2. So the final leg ended up being 61 battles.

Anyways, Xurkitree is one of my favorites, so I'm glad to see it kicked as much ass as it does on paper. I can't wait to see what the other new legends can do >:)
 
Last edited:

Users Who Are Viewing This Thread (Users: 1, Guests: 2)

Top