


Solum's Core
Written by Kevin Garrett. Art by Yilx and Nastyjungle.


Introduction
I figured it would be good to make my Black and White RMT debut with a balanced team. It's odd how the only teams I have posted up until this point have been offensive or stall teams since I credit balanced teams for helping me learn competitive Pokémon. I created this team in Battling 101's Apprentice Program for the same purpose. Timeneon asked me to tutor him for Round 49, so I wanted to come up with a team that would do well in the current metagame. You might remember I posted a formula for team building in my last RMT that I use in Battling 101. I break the team down into different segments and form cores of synergy that are interchangeable. This works especially well for a balanced team since they rely on synergy more than other styles. Since this team was going to be focused on sandstorm, Tyranitar was obviously the starting point since it is the most effective Sand Streamer. Garchomp was an easy addition to the team since it is the most dominant threat in the current metagame. That forms the beginning of the team since Tyranitar offers functional synergy with Garchomp because of their abilities.
The core was going to need to have synergy with each other as well as support the rest of the team. Rotom-W, Jirachi, and Gliscor cover each other's weaknesses well and handle a plethora of threats in the metagame. The theme here is that they spread status in order to allow the rest of the team to have an easier time sweeping. I felt like the team needed a strong Fighting-type resistance, so I decided to add Sigilyph as the last piece. It added another defensive presence that was capable of sweeping and spreading additional status. It obviously can't cover every threat in BW, but this strategy has been really successful in the current metagame. Timeneon marked a lot of improvement by eclipsing a previous ladder best by over 300 points, which I am really proud of. I managed to reach a peak rating of 1589 en route to attaining the #1 rank on Smogon University's leaderboard. As for the team's name, it is a reference to Tales of Symphonia; Solum is the Centurion of Earth, which I thought was an appropriate name for a sandstorm team. Now that the introduction is out of the way, let's take a closer look at the team.
Closer Look
Tyranitar is the ideal lead for this team as it activates sandstorm and can set up Stealth Rock. Its ultimate function is to ensure that sandstorm will outlast any opposing forms of weather. Since it is usually the slowest automatic weather starter, it guarantees that I have the first few turns to put pressure on the opponent in order to gain an early advantage. This usually involves switching to Rotom-W or Jirachi to get burn or paralysis on the opponent in order to allow Garchomp to safely get behind a Substitute. That will force the hand of the opponent to bring in their source of weather, allowing me to get some healthy damage on it or another one of their Pokémon. Since the weather starter on a team is one of the bulkiest members, the damage output to other things is generally high. Pursuit is also a nice tool to use against opposing weather starters because it greatly reduces the amount of times they can switch back in. Sometimes I won't lead with Tyranitar if I see one of a few things in team preview. If the opponent has a Pokémon on the team that is likely to lead against Tyranitar, I will opportunistically choose a different lead. Look for alternate lead match-ups in the other Pokémon summaries.
When you have a battle against a different form of weather, it is a showdown between the five other Pokémon on each team with the weather starters taking a backseat role in order to enable their teammates to do their thing. Although Tyranitar will normally come out on top of a weather battle, it really gets to shine in a different way when it doesn't have to worry about keeping its health until the very end. It can put its respectable Special Defense stat to good use as a secondary check to various special threats. It is also effective from an offensive perspective. Tyranitar will take only about half of its health from a physically defensive Gliscor's Earthquake and OHKO it in return with Ice Beam. Fire Blast puts pressure on opposing Spikers such as Ferrothorn, Forretress, and Skarmory. While this team does not like Toxic Spikes, it can still function close to capacity with only one layer down. Not to mention when a player looks at this team, they won't just come right out using Toxic Spikes unless they are very weak to Garchomp. If they are that weak to Garchomp, you can exploit their weakness before they can even set a layer of Toxic Spikes. As for Skarmory, it is the best counter to the Garchomp set used by this team, so to be able to have multiple places on this team to damage it with is immensely useful.
Garchomp is the focal point of the team's support because it is capable of doing the most damage. With Sand Veil activated, the accuracy of all the opponent's attacks are reduced by 20%. It supports Tyranitar in return because it can set up on Politoed and Ninetales and do a number on the other members of rain and sun teams. All Garchomp needs is one free turn to shred through the opponent's team, as long as the proper support has been carried out. Once you are familiar with this team you'll realize it is tempting to just use Substitute right away until the opponent misses, but that isn't how this team functions best. It isn't meant to rely on luck because on a fundamental level, that would mean you don't have much of a chance of winning otherwise. With paralysis support, Garchomp increases its odds of having a free turn by 25% every turn. Paralysis is usually the most effective way to get a free turn since it works against every Pokémon. Burn is a nice alternative this team offers against Pokémon with physical attacks. For instance, a Ferrothorn afflicted with burn will definitely yield Garchomp a free turn to Swords Dance since you don't need to bank on a miss or a skipped turn from paralysis. The bonus chance of a miss allows the match to snowball in your favor.
Every game is sort of like God's fingerprint when it comes to using Garchomp. What I mean by that is that sometimes you will need to use it early to put pressure on the opponent and other times you can let it hang back until it is ready for the final act. If your opponent has more than one good answer to Garchomp, it is better to wait on a sweep attempt until the coast is clear. You can also use its offensive prowess as a means to getting set up. It has great typing and modest bulk that can be used to its advantage. When you switch into something it won't take much damage from and the opponent needs in order to have a chance of winning, that is a free opportunity to use Substitute. If you break it down, they have two options: Stay in to play a risky game of prediction, or switch out and allow you to get powered up. If they happen to stay in and break your Substitute, they have to constantly ponder what you will do. On top of that, if the opponent's attack misses you will completely win out. Since Garchomp will get 4 turns to Substitute from full health the odds are in your favor. Substitute's value goes beyond giving you the chance to get boosted up without taking much damage. It is also great for dealing with faster Pokémon and protecting against status conditions.
This Pokémon is easy to overlook, but it offers incredible team support that would be hard to find in anything else. Sigilyph offers invaluable type coverage with its Ground-type immunity and double Fighting-type resistance, and it is one of the greatest status absorbers in the game with its ability, Magic Guard. It can switch into all of the moves you never want to have used against your other Pokémon that include, but are not limited to, Leech Seed, Toxic, Will-O-Wisp, Lava Plume, Scald, and Body Slam. With Psycho Shift, you can send any form of status you happen to be inflicted with during the game right back to the opponent. Ideally, you will want to have Sigilyph inflicted by a burn because it allows Sigilyph to beat Tyranitar and other Dark-type Pokémon, as well as give Garchomp the best possible support. Sigilyph acts as the team's failsafe because it can cause a game to turn on a dime. All it needs is one turn to pull off a Cosmic Power late game and that can be the difference. That isn't hard to do when you have planted the necessary support beforehand I might add. Hold on to Sigilyph because it can pull you out of a mess if you play your hand right.
Sigilyph can take on almost everything with a few Cosmic Powers under its belt. The only way it will usually lose in that scenario is from a critical hit. There are things you can do to reduce the chances of those critical hits being able to KO you. If you set up on a slower Pokémon with an Electric-, Ice-, or Rock-type move, you can Roost in between turns to remove the super effective nature of the hit. That will almost guarantee you will survive a critical hit unless it is from a really heavy hitter. The biggest things you will want to avoid taking on are Terrakion and Thundurus since they are extremely powerful and faster than Sigilyph. Once you have gotten enough boosts, you can unleash an enhanced Stored Power. It begins as a base 20 attack, but increases by 20 for every boost you receive. Once you have hit +6 Defense and Special Defense, the base power of Stored Power jumps to 260. STAB is later applied to it in the damage calculation. It is easy to get greedy with Sigilyph, but I only go for as many boosts as I need to get through whatever I am facing, because the omnipresent risk of a critical hit is always lurking.
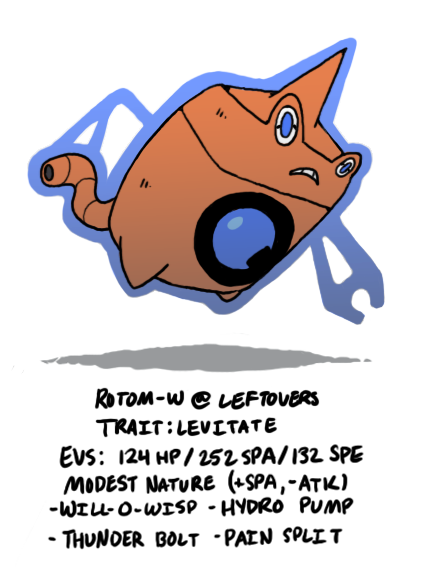
Rotom-W is a vital member of the core because it is the only Pokémon with a Water-type resistance and one of two Pokémon with an Ice-type resistance. Those valuable resistances make it very useful against rain teams since Choice Specs Politoed can be hard to switch into. It will live a Hydro Pump boosted by Drizzle comfortably enough to be able to fire off Pain Split against whatever the opponent decides to throw at it. Rotom-W benefits from having a low HP stat and high defenses, which means it can get the most bank for its buck with Pain Split. No matter what switches into Pain Split will take a lot of damage and will have to face an almost fully healed Rotom-W. It has all of the tools necessary for harassing utility Pokémon on rain teams. Ferrothorn will end up switching into Will-o-Wisp, which makes Garchomp a major force to threaten the rest of their team. Will-O-Wisp will also cripple Toxicroak and Azumarill, two of the most common physical sweepers seen on rain teams. You can take advantage of Drizzle to boost the strength of Hydro Pump. That can come in handy if the opponent doesn't have something to absorb Water-type attacks. It has so many options for the opponent to fear that I often times pivot with it to get sandstorm back up once the proper support has been set up. Most of the time, it is either Rotom-W or Garchomp that checkmates opposing rain teams.
Rotom-W has other important roles besides giving rain users a headache. The most popular counters to the Garchomp set used on this team are Skarmory, Gliscor, and Slowbro. All of them can be taken out by Rotom-W. I prefer to use Rotom-W as my switch into Gliscor more than my own Gliscor because most of them carry Ice Fang. You are better off avoiding a speed tie situation because it can flinch or carry Taunt and Swords Dance. As might be expected, Rotom-W is the team's main answer against bulky Water-types like the aforementioned Slowbro, Suicune, and Vaporeon. It can also check opposing Rotom-W. I don't like to leave that responsibility to Jirachi alone because Will-O-Wisp is common, and the burn status would cripple it for the entire game. Rotom-W is also the team's best check to mixed Landorus. I surprisingly didn't run into it often, but when you do, you better be careful. If Landorus usage jumps, the first thing I would do is make Rotom-W bulky enough to take multiple attacks from it. Infernape is another one of those Pokémon that isn't widely used and can be checked by Rotom-W. It is much less capable of doing any significant damage to this team because it has to take residual damage from sandstorm. Additionally, Rotom-W helps defend against Fire-type Pokémon and by extension, sun teams.
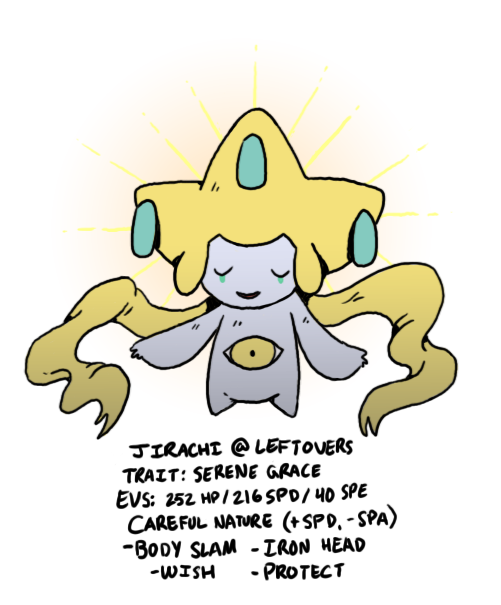
This Pokémon frustrates a lot of players out there and with good reason. It is the defensive anchor of the team because it handles a good portion of the team's special sponging. Jirachi has two purposes on this team; they are to deal with heavy special threats such as Thundurus, and spread paralysis around the opponent's team in order to make Garchomp's life easier. Jirachi makes its biggest splash for this team against rain teams, because they commonly run two high powered special threats focused on exploiting Thunder's and Hurricane's 100% accuracy in rain. The only thing that will stop Jirachi from completely shutting down all of a rain team's special options is if they get paralysis and/or confusion on it and benefit from consecutive turns without Jirachi being able to move. As you would imagine, this is quite rare since it takes multiple hits for them to KO Jirachi. When sandstorm is active their odds of attacking are reduced, which puts additional pressure on their Politoed to make sure it is raining. This can be used to your advantage to gain the upper hand in the match, because you can continue to execute your strategy while they are preoccupied getting rain back up.
When the opponent shows a Deoxys-S lead, I will commonly make Jirachi the lead in order to limit the amount of support it can muster up. Jirachi is also a reliable counter to Reuniclus because it can switch into any of its attacks and use Body Slam to get paralysis on it. The odds of it moving after Iron Head are 30%. Jirachi will wear it down over time until it is in range to be killed. Trick Room and other offensive variants fall easily to Jirachi. However, Calm Mind variants can take some time since they run some bulk, but they too have a very slim chance of coming out on top. Latios and Latias are the other things that are easily taken care of by Jirachi. The only thing it doesn't like is being Tricked, but that is avoidable because Tyranitar is an alternate counter to both. Sigilyph and Gliscor are also adequate alternatives to receiving Trick if either one of them no longer has use in the match. I use Body Slam over Thunder Wave for two reasons: one reason being that it is effective against Ground-type Pokémon like Excadrill and Gliscor that commonly switch into Jirachi, and the other being that it is an attack, meaning that it will do damage and evade Taunt. Another place where Jirachi offers the team a lot of support is with Wish. In games where Garchomp couldn't get the opponent to stop breaking the Substitute, it's great to be able to replenish its health for another round. It is also beneficial for Rotom-W in games where the opponent has Gliscor and I repeatedly have to switch it in from Jirachi.
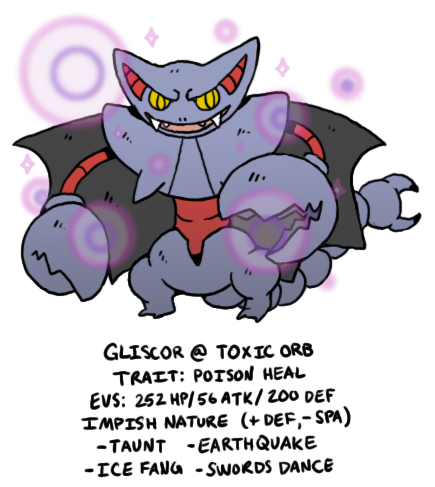
Gliscor is the physically defensive juggernaut on the team. It is needed to lockdown game breaking threats like Garchomp, Terrakion, and Excadrill. With Poison Heal, Gliscor will recover 1/8 of its maximum HP at the end of every turn after Toxic Orb is activated. That is twice as much as Leftovers and also ensures Gliscor won't be inflicted with any other form of status. The key is making sure it is activated because if you wait too long and switch it at the moment you desperately need it, you will have to wait until the following turn for recovery. The same can be said for switching into a threat like Jirachi, where Body Slam can paralyze you before it activates, essentially making it useless for the rest of the game. When the team preview window is up prior to the start of the game, I will figure out when I can get a free turn to activate its Toxic Orb and what threats I need to save Gliscor for. You have to play in a disciplined manner with Gliscor to stick to the game plan. Only plan to use Gliscor for the most problematic parts of your opponent's team and let the rest of the team handle threats by committee.
Gliscor works best against stat boosting sweepers; for example, when it is switched into Choice Band Garchomp's Outrage, it will take a good portion of damage. In instances like that, you will have to fall back on Jirachi to take a resisted hit to keep everything alive. It is easy to get your health back between Toxic Orb, smart switching, and Wish support if necessary. Gliscor isn't limited to just walling as you can guess by the move set. It is also used to shut down opposing Spikers and setting up on them. The combination of Gliscor's bulk and power make it a different kind of monster than Garchomp. It is easily capable of setting up on Skarmory or Ferrothorn and annihilating the opponent's team. You can use this strategy to wear down the opponent over time, because after you use Taunt, they know what is coming. It is an easy way to spread damage to things like Latios that are trying to stop the bleeding before it starts. Gliscor is also a secondary check to a lot of Fighting-type threats, but most of the time I will leave them to either Sigilyph or Jirachi, as they are more reliable answers. For more information on what to do against almost anything you might come across, take a look at the threat list.
Threat List
 Abomasnow: Jirachi is my first option to go to against Abomasnow. The most annoying thing they can do is Leech Seed, but Jirachi is usually just a pivot to go back to Tyranitar in order to change the weather back to sandstorm. Between Jirachi and Tyranitar, Abomasnow can never get much going before it's forced out. Stealth Rock limits the amount of times it can switch in so it is not an issue.
 Azelf: Azelf is hardly seen in the BW metagame, but it can still cause some damage. Tyranitar deals with most variants of Azelf, such as the lead Stealth Rock set and Nasty Plot set. The latter can carry Hidden Power Fighting, which is something to keep in the back of your mind, but I have never seen it in BW. Any physical variant can be handled by Gliscor and Jirachi, but I don't recall having seen any.
 Azumarill: Azumarill can pack a big punch on a Drizzle team so make sure you are on top of controlling the weather. If you let rain control the game Azumarill can pick this team apart. Luckily, Rotom-W makes an excellent pivot for managing rain since it threatens threats commonly seen on rain teams and allows Tyranitar to change the weather. Since Choice Band is the only set commonly used, just use smart switching against it. Rotom-W is your first option for Azumarill and since you don't need Rotom-W for many other things commonly seen on rain teams it is never really a problem.
 Bisharp: This thing isn't commonly seen, but if you ever run into it, just go to Gliscor. The only set I have ever seen it use is Swords Dance. Since Bisharp is so slow they have to use Sucker Punch, which you can sometimes use to your advantage if you need a boost to KO anything else remaining on their team. Garchomp can also take Bisharp out, but it is better off to save the walling duties for Gliscor.
 Breloom: Breloom can't do anything as long as you have Sigilyph. The worst thing Breloom can do is Spore, which is something you can be prepared for after viewing team preview. If you can slip Sigilyph or Gliscor in early to activate their item, then it has literally nothing to hurt you with. If they lead with Breloom just let it use Spore on something you can either give a couple of free turns to wake up later or something that isn't vital towards winning the game.
 Blissey: Blissey is set up bait for Sigilyph and Garchomp, depending upon the set for the latter. It isn't something you need to worry about since just about everything on this team doesn't care about it. The only thing you have to be careful of is making sure you have a way to beat it down the stretch since the opponent might keep switching it out until they have removed everything that can harm it. They will either do that or just let it die early, seeing that it will be taken out by almost anything.
 Bronzong: Bronzong is a Pokémon that just sits there and does nothing. At worst it will force you to switch out since it can be tricky to dent. Rotom-W and Sigilyph can burn it and the former can take it out in a few hits with either of its STAB moves. Since Tyranitar is slow it won't take much damage from any of Broznong's moves. In exchange you can take it out in a few hits with Fire Blast. Just make sure you find a way to deal with this so Garchomp and Gliscor can do their thing.
 Celebi: Celebi can be an annoying Pokémon with Nasty Plot, but Sigilyph will beat it as long as it doesn't get a critical hit. The combination of burn and Cosmic Power will stall Celebi out and eventually allow you to beat it handily with Stored Power. The only attack you really don't want to see on a Nasty Plot Celebi is Hidden Power Ice since that has a much easier time against Sigilyph. Jirachi can handle variants without Hidden Power Fire with the combination of Body Slam and Iron head. Other variants of Celebi are not common and easy to deal with.
 Chansey: Chansey is basically a clone of Blissey, but only with more physical bulk and less special attack. That means you won't be seeing Ice Beam, which guarantees Garchomp will have a relatively easy time against it. Gliscor is another Pokémon that completely shuts it down with Taunt and Swords Dance. Sigilyph can set up on it easily and Jirachi Iron Head can do a number on it since it takes damage from sandstorm without recovery.
 Cloyster: Cloyster is a powerful threat with Shell Smash, but Jirachi handles it well. The two Skill Link attacks are resisted and Body Slam can make it useless with paralysis. There aren't many places Cloyster can switch in and get a free turn without taking a significant amount of damage. Between Stealth Rock, sandstorm, and Life Orb, Cloyster has to take a lot of residual damage. Just don't think your Garchomp is safe behind a Substitute against this thing because the additional hits attack it directly once it breaks through.
 Conkeldurr: Conkeldurr does absolutely nothing to this team. Sigilyph can set up alongside it to take it out with Stored Power and Gliscor can Taunt and Swords Dance while taking a resisted Drain Punch of Payback without STAB. Not to mention that Garchomp will take it out if you are in before Conkeldurr. The best way to deal with it is to go to the one you need to rely on less for other threats in that game.
 Darmanitan: These things are usually only seen on sun teams. The first thing you'll want to do is make sure you have sandstorm going, otherwise it will hit like a nuke. Between Stealth rock and sandstorm, it doesn't last very long. Tyranitar, Garchomp, Rotom-W, and Gliscor are viable candidates to have switch into it. Choose the one you need to rely on the least for the rest of the game.
 Deoxys-D: Deoxys-D is a Pokémon with a lot of support potential, but is rarely seen. The only versions I have run into were Spikes and that is the worst thing it can do to you. As long as you get status on it you can beat it in the end with Garchomp, Sigilyph, or Gliscor, depending upon Deoxys-D's move set. Sigilyph is probably your safest bet in case they have Ice Beam, which it can Roost away its Flying-type in between using Cosmic Power.
 Deoxys-S: Jirachi is the best option for all Spikes, mixed, and dual screen variants. It can get paralysis on it to slow it down and let Iron Head do the rest. Since Deoxys-S can do a lot in a short amount of time, I will tend to lead with Jirachi if the opponent shows they are leading with Deoxys-S in team preview. It isn't in your best interest to give it a free turn for setting up.
 Dragonite: Dragonite has quite a few popular sets in BW. Dragon Dance variants are handled best by Gliscor, but they don't have many free places to set up on you. Choice Band variants can be tricky because it will 2HKO Gliscor with Outrage. The best thing you can do here is be smart about your decision. If you need Gliscor for something else, don't risk it right away. Special versions are limited to rain teams and very predictable. Jirachi is your best option against such version. Finally, the bulky Dragon Tail version can be handled by the whole team. It can't hurt Gliscor and Sigilyph can burn it without having to worry about Thunder Wave.
 Dugtrio: Dugtrio has the potential to be very good in this metagame since it can trap and remove automatic weather starters, but it is not commonly seen. Since you can't counter Dugtrio, the best thing you can do is beware that it is on your opponent's team and don't leave yourself wide open to let it take something that you need to win the game. Luckily, this team has 3 floating Pokémon.
 Electivire: The only way Electivire can be a problem is if you activate Motor Drive with Rotom-W's Thunderbolt. On the off chance your opponent has an Electivire, take note of it and don't be overzealous with Rotom-W. Garchomp outspeeds it as long as it doesn't have a Choice Scarf, in which case it is very easy to wall. Just be careful you don't switch into Ice Punch. Jirachi can take either Flamethrower or Fire Punch and paralyze it with Body Slam. Rotom-W can take a hit from it to get burn on it or finish it off with Hydro Pump.
 Excadrill: Excadrill is covered really well by this team. It can't do anything against Gliscor. Rotom-W doesn't take much from it either unless it is a Choice Band set. Garchomp will take less than half from unboosted Earthquake on the standard Air Balloon set. If Sigilyph has one or more Cosmic Powers under its belt, it can safely use Psycho Shift to burn Excadrill as long as it isn't a Choice Band set.
 Ferrothorn: Ferrothorn doesn't like to switch into any Pokémon on this team whether the player knows it or not. Everything is capable of messing it up. Tyranitar will 2HKO at most with Fire Blast, Garchomp can get set up with Substitute and Swords Dance, Sigilyph can burn it and Cosmic Power, Rotom-W can burn it with Will-o-Wisp, Jirachi can paralyze it with Body Slam and Wish heal a teammate, and Gliscor Taunt and Swords Dance. The most Ferrothorn will do is get a couple layers of entry hazards up, but it hurts the opponent more than they know because it gives you free turns to set up.
 Forretress: Forretress is just like Ferrothorn, but only it has a potentially more dangerous move in Toxic Spikes. With that in mind, I will tend to force Tyranitar, Garchomp, or Gliscor on it so it can't get anything set up. If it does, at least I will put myself in good position for some time. Since Sturdy now activates on moves that KO in one shot, I will get Stealth Rock up as soon as possible to negate that effect. Unlike Ferrothorn, I am more aggressive when handling Forretress so I won't beat around the bush with Jirachi or Sigilyph unless the latter will win the game.
 Garchomp: Garchomp is one of the biggest threats in BW. Gliscor is my first option to go to against it. I like it to be poisoned before I need to go to it so I can get recovery every turn. If it is Choice Band, I will switch out to Jirachi on the second Outrage. If it gets a third turn I will either use Protect or Body Slam depending upon Jirachi's health. For Swords Dance variants, I have to rely on Gliscor even more. If Garchomp manages to take out Gliscor, I will go to my own Garchomp to either revenge kill it or force a speed tie. The best thing you can do against a Swords Dance variant is preventing it from setting up. If Tyranitar can no more use I will keep it in to Ice Beam. Choice Scarf variants are not a problem at all.
 Gengar: Gengar is easily handled by Jirachi. It can take any attack Gengar can throw at it. I will usually Protect first to scout for Will-o-Wisp. It is not common, but I'd rather be safe than sorry. Tyranitar can check Gengar if it needs to, but that is not necessary if you play your cards right. Choice variants are even less of an issue because Tyranitar can use Pursuit. I can't recall having seen any of those, though.
 Gliscor: Rotom-W is a great counter for Gliscor. The worst thing it can do is use Toxic, which is not on the most common move sets. Facade versions hurt more than Ice Fang, but once again, that is very rare now that Garchomp has proven to be one of the most dangerous threats. Tyranitar can OHKO physically defensive Gliscor with Ice Beam without worrying about being knocked out unless you had a bunch of prior damage. Sigilyph will outspeed physically defensive Gliscor and can therefore boost on it before it can Taunt, if it has Taunt.
 Gorebyss: Gorebyss can be a huge pain if they have the right recipient and support. Luckily, they don't have that most of the time. I use Jirachi to check it with Body Slam paralysis. I realize that is not a reliable check, but I would add more protection against it if the need became greater. Other things you can do is get Garchomp behind a Substitute if possible or play aggressively with Rotom-W. It's one of those things where if it's not broken don't fix it. If it breaks you, you can make adjustments.
 Gyarados: The version of Gyarados this team least likes facing is Choice Band in rain. The best way to neutralize it is to keep sandstorm in play. Rotom-W is a good check for all variants of Gyarados. If Gyarados is in a rain team, you will notice the natural flow of the game will cover Gyarados well enough as long as you play the team right. Since Garchomp outspeeds it, if you spread status around and get sandstorm up for Garchomp, you won't even think about it. As for defensive variants, they are also handled between Garchomp and Rotom-W. Since a lot of them run Dragon Tail, a Substitute up beforehand comes in handy.
 Haxorus: It's a good thing Haxorus has a bad Speed tier because it hits like a truck. It can 2HKO everything on the team, but it still doesn't ever accomplish much because it is not easy to switch it in. When you see this in team preview, the best thing you can do is stick to your game plan and get Garchomp in position. Choice Scarf variants are the easiest to face. The one thing you won't want to do is give it a free turn to do whatever it wants because letting it Dragon Dance really hurts. The good thing is everything on this team can hurt it.
 Heatran: Tyranitar is the best switch in for Heatran. The worst thing it can do is Earth Power and that does a poor amount of damage. Tyranitar can't do much to it in return, but it can be a pivot to go to Garchomp. Garchomp is your best answer for Heatran as long as it doesn't have an Air Balloon. Not that Air Balloon is threatening to Heatran, it just means you have to use Dragon Claw first. Sigilyph can also get set up on Heatran as long as it isn't an offensive variant.
 Hippowdon: Gliscor and Sigilyph are the best answers for Hippowdon. Gliscor can Taunt on Hippowdon's Stealth Rock and proceed to use Swords Dance without having to worry about Roar. Sigilyph can burn it with Psycho Shift and use Cosmic Power and Stored Power. Rotom-W doesn't take anything from Hippowdon and can OHKO it with Hydro Pump. Tyranitar can finish it off with Ice Beam if it has some prior damage on it.
 Hydreigon: Jirachi is the best answer for Hydreigon because it resists its strongest attack, Draco Meteor. Fire Blast can do a decent bit of damage, but since they are usually Choice Scarf or Specs you can switch out without receiving life threatening damage. Garchomp will beat any Hydreigon without Choice Scarf. It never really does much damage to this team.
 Infernape: Infernape is handled by committee. It can't OHKO Rotom-W and it will be taken out in one shot from Hydro Pump. They always have to deal with residual damage from Stealth Rock, sandstorm, and usually Life Orb. You can switch between Tyranitar and Gliscor on Fire Blast and Close Combat if you are really desperate. These things are not common and never break open the game on their own.
 Jellicent: The first thing I will normally go to against Jellicent is Sigilyph. The only move that can hurt it is Shadow Ball and the opponent will never come out of the gate using that considering what the rest of the team is. I like to scout to see if they are using Will-o-Wisp or Scald and then form a plan on attack after that. Rotom-W is a great counter for Jellicent, but I'd rather not let it get unnecessary status unless Rotom-W has nothing else better to do.
 Jirachi: There are two kinds of Jirachi I see in the current BW metagame. The most common is the same version used in this team. Since it is capable of paralyzing anything, I will just go to whatever I don't mind picking up paralysis in that particular game. There isn't a lot Jirachi can do to this team besides paralyze. If you can get Gliscor's Toxic Orb activated before Jirachi comes in, you'll have the whole game free of worry from that kind of Jirachi. The other form of Jirachi I see from time to time is Calm Mind. These versions can be dealt with by Garchomp and to a lesser extent, Gliscor.
 Jolteon: Jirachi is the first thing I will switch to against Jolteon. The worst attack it can have is Thunderbolt or Thunder in rain. Jirachi can get paralysis on it with Body Slam and Wish to stay healthy should it take a few turns. If you notice your opponent has Jolteon and you have Rotom-W active in the game, you might want to fire off a Hydro Pump if it will do a similar amount of damage to whatever is out in case Jolteon comes in to try to sponge the attack with Volt Absorb.
 Kingdra: Kingdra is rarely seen nowadays because of the Drizzle + Swift Swim ban. With that being said, you might come across one of these because it isn't a terrible Pokémon on its own. It just has a bad Speed tier for a Dragon-type in this generation. Jirachi does a good job of dealing with it since it resists one of its STAB types. Rotom-W and Sigilyph also do an adequate job checking some of its sets. Garchomp can revenge kill any set that doesn't have its Speed boosted.
 Kyurem: Jirachi is a great switch in for Kyurem. It is very strong, but Jirachi will resist both of its STAB types so there is nothing that will put a major dent in it. Since this thing is really only seen on Hail teams, you'll probably he in a two man game with Tyranitar and Jirachi for a good portion of the battle. Garchomp can revenge kill any set except Choice Scarf, which I have never come across.
 Landorus: Landorus is one threat that stands out against this team. The mixed variant can be hard to deal with since it has super effective attacks against the whole team except Rotom-W. If your opponent has a Landorus you should make sure you keep Rotom-W healthy so you can deal with it in the end. Garchomp will outspeed mixed variants so it can help if you are in need of a revenge kill. All other versions besides the mixed set are much easier to deal with. If you have difficulty with Landorus and start seeing more of it all of a sudden, you might want to give Rotom-W more bulk. The need never arose for me to make that change, though.
 Latias: Latias is dealt with easily by either Jirachi or Tyranitar. If the opponent has more powerful special threats that require Jirachi's attention, I will have Tyranitar deal with Latias. The only thing Jirachi doesn't like about it is Trick. If it isn't a Choice set, you don't have to worry about it. Most people who use Latias tend to use it more for its bulk rather than its power. Chances are that it will be a Life Orb attacker or Calm Mind set. It doesn't scratch this team at all.
 Latios: You have to take Latios more seriously than Latias because it is so much more powerful. The most common set you will see is Choice Specs. Jirachi is always your first option for Latios. Rarely will they use Trick the first time it comes in, but if they do it isn't the end of the world because it is likely early in the match and Jirachi has plenty of health. If that happens, Latios will not take damage from sandstorm every turn and you will want to use Ice Fang with Gliscor when you know your opponent will switch out to Latios. As soon as Latios uses Trick it will lose its ferocity. You will either beat it with Jirachi or they will beat themselves.
 Lucario: Lucario doesn't see nearly as much usage as it did in DPP, but you'll still come across is occasionally. The only sets I have seen are Swords Dance and Nasty Plot. The first thing I will normally go to is Gliscor because it can handle it right away if it is a Swords Dance set. If it has Nasty Plot, I can switch Jirachi into a Hidden Power Ice for a small amount of damage. Garchomp outspeeds all variants of Lucario and is bulky enough to take a boosted Extremespeed or Vacuum Wave.
 Machamp: Machamp is another Pokémon that has seen a drop in usage this generation. The only version you will come across is the standard physical set from DPP. Gliscor can switch into any one of its attacks except Ice Punch. Once Gliscor is in you can switch to Jirachi and proceed to use Iron Head. I will use Protect in between turns to allow sandstorm to suck its health away.
 Magnezone: Magnezone will usually switch into Jirachi only to find out it loses. This is an interesting threat because the opponent will usually do your work for you. Get paralysis on it with Body Slam and use Wish and Protect to keep yourself healthy. Some variants of Magnezone will eventually beat Jirachi like Substitute + Charge Beam, but Jirachi will do so much damage in the process that it opens up a huge door for Garchomp to sweep. Choice Scarf variants of Magnezone are even more of a joke because they can't scratch Jirachi.
 Metagross: Rotom-W is probably your best bet for tackling Metagross. It is capable or burning it with Will-o-Wisp and both of its STAB attacks do considerable damage. Gliscor is a less reliable options because it has to be wary of Ice Punch. Garchomp can come in for a revenge kill and Sigilyph can burn it with Psycho Shift. You won't come across too many Metagross, though.
 Mew: Mew is a scary Pokémon as it has limitless possibilities. Thankfully, barely anyone uses Mew to its potential. The most common variant you will see now is bulky with Taunt and Will-o-Wisp. The way I deal with this it is with Rotom-W and Gliscor. Rotom-W is slower than Mew, but it will do a sizable amount of damage with Hydro Pump or Thunderbolt. If you can inflict it with burn, Gliscor can stall it out Recover with Earthquake. Mew will not be able to do anything to Sigilyph besides PP stall. It is slower than Garchomp so you can resort to that if all else fails.
 Mienshao: Mienshao usually appears as a lead with Fake Out and all that jazz. I normally use Gliscor against those variants because I don't recall ever having run into one with Hidden Power Ice. If you are worried about that, you can use Sigilyph as a counter instead. They never do anything meaningful; it normally just keeps switching out to heal its health until it realizes it has nothing to do.
 Ninetales: Ninetales is dealt with by Tyranitar. The only move it has to beware of is Will-o-Wisp and then it usually doesn't care enough because it doesn't have many useful moves against a sun team. Stealth Rock alone does 25% to Ninetales so what's 12%? If you are concerned about getting burn on your Tyranitar you can use Sigilyph or Gliscor as a pivot. As soon as you have sandstorm back up the only smart move Ninetales has is to switch out.
 Politoed: The only Politoed set that could give you grief is Choice Specs. As long as you keep Rotom-W in good health it won't be a problem for you, though. Virtually no one keeps their Politoed in againt Politoed because that would practically lose the game for them. With that in mind, you'll want to use Pain Split to recover the HP you lost. Other variants of Politoed are much easier to switch into for Rotom-W. You don't have to play as strictly if they don't have Choice Specs. Choice Specs downfall is its lack of bulk, which can be exploited by Garchomp once you've had the chance to keep sandstorm up for a few turns.
 Porygon2: Porygon2 is a threat that never does anything to the team. It just sits there until it realizes it has nothing to do to the team. Sigilyph can set up on Porygon2 very easily because the burn from Psycho Shift will give you some free turns when they use Recover to boost your defenses with Cosmic Power. Both of Porygon2's attacks, Ice Beam and Thunderbolt, are not strong and can have their super effective nullified when you use Roost. Since everyone uses an Eviolite on Porygon2, it will not like sandstorm very much.
 Raikou: Raikou is not a very common threat, but you may run into it on rain teams. Just like with other special sweepers in rain, Jirachi is your first line of defense. You can use Body Slam to paralyze it. Tyranitar can switch into some of its attacks to activate Sand Stream if you want to lower the accuracy of Thunder and cause Raikou to residual damage. Don't keep Tyranitar in against it because they will carry Aura Sphere.
 Reuniclus: When you see your opponent has Reuniclus in team preview make a mental note not to spam Will-o-Wisp and Psycho Shift. They are just crying for Reuniclus to absorb it and prevent any other form of status. The easiest way to take down Reuniclus is with Jirachi through Body Slam paralysis and Iron Head flinches. If you are unable to get paralysis on Reuniclus, you will need to make it a two man game with Jirachi and Garchomp.
 Rotom-W: Rotom-W could be a potentially damaging threat if you aren't careful. It won't cause any problems if you play smart. This is another instance where team preview supports the way you play greatly. Make sure you use something that won't need to be attentive to the rest of your opponent's team. Sometimes I will use my own Rotom-W if they have Will-o-Wisp since it doesn't mind a burn. Jirachi can easily take on variants without Will-o-Wisp. You can use Protect to scout for it. Last but not least, none of the moves that will touch Garchomp are accurate in sandstorm. That doesn't mean it is the first thing you should go to, though.
 Salamence: Salamence is a powerful threat, but it is not used widespread because of its Speed tier. Gliscor and Jirachi are the two best covers for it. Salamence will normally run a Dragon Dance or mix set. If you are wary it might be a mix set, go to Jirachi first to scout for Draco Meteor. You can make the necessary pivot to Gliscor if it is a physical set. Sigilyph can burn it and set up with Cosmic Power as long as has burn or their Special Attack dropped from Draco Meteor.
 Sawsbuck: The only time you may come across Sawsbuck is on a sun team. Swords Dance is its best set so you will want to do one of a few things. If you have sandstorm up, Sawsbuck won't have its Speed increased by Chlorophyll. That means you can use Garchomp to take it out. You can also inflict it with a status condition. Burn will make Sawsbuck dead weight. Since it will likely be taking damage from Life Orb already, it won't last for long. Finally, smart switching can prevent it from recovering its health with Horn Leech.
 Scizor: Scizor will either be a Choice Band or Swords Dance set. Gliscor covers both variants with ease. I will usually try to get Rotom-W in against Swords Dance variants because it is a lot easier for Gliscor to take out after Scizor has a burn. If you try out this team, you will see that Scizor can never really get anything going over the course of a match. The only thing it can come in against without being obvious is Tyranitar and then it has to be wary of Fire Blast.
 Scrafty: Scrafty can be annoying with Shed Skin, but they still only have a slim chance of actually beating you. Jirachi is my best option to go to against Dragon Dance variants because Gliscor doesn't like taking a boosted Ice Punch. Body Slam paralysis and Iron Head flinches will normally do the job. The Bulk Up set is completely destroyed by Gliscor because it can use Taunt after one boost, take relatively no damage, and boost up at twice the pace.
 Sharpedo: Sharpedo will typically be a late game sweeper on some rain teams. Rotom-W can take it out easily with Thunderbolt. It has enough bulk to live Crunch. Jirachi can also be used to finish off Sharpedo. If it isn't raining you can stall it out with Wish and Body Slam. Like many other sweepers in rain, it can be have its potency reduced as long as you manage the weather.
 Shaymin: Jirachi and Sigilyph do an excellent job of sponging Shaymin's attacks. Jirachi can take Seed Flare and Hidden Power Ice with ease. Sigilyph can be used to scout for Earth Power. If it doesn't have Hidden Power Ice, you can set up with Cosmic Power after Psycho Shift. You can recover from any drop when they use Rest. If they have Hidden Power Ice, you are better off just sticking to a two man game and inflicting the switch out with either burn or paralysis.
 Sigilyph: Opposing Sigilyph are handled by Gliscor, Rotom-W, and to a lesser extent, Garchomp. Gliscor is the safest option because it doesn't have to think about receiving a burn and can Taunt after the first Cosmic Power. You can then boost up while they either use a fairly weak Stored Power or switch out. Rotom-W can also come in right away to threaten it with Thunderbolt. Garchomp will crush Sigilyph as long as it doesn't get inflicted with burn.
 Skarmory: Skarmory is dealt with by the whole team. There are a lot of tools at your disposal to whittle its health down with. Your best bet is with Gliscor as it can use Taunt and Swords Dance against it, while preventing it from setting up any Spikes. Rotom-W will OHKO Skarmory with Thunderbolt. Tyranitar will 2HKO Skarmory with Fire Blast. Sigilyph will burn it with Psycho Shift and then boost once followed by an attack with Stored Power.
 Slowbro: Slowbro is managed between Rotom-W and Sigilyph. Rotom-W will keep scaring Slowbro away because it will OHKO it with Thunderbolt. Sigilyph can come in without fear of being inflicted with a burn and be able to get off a free Psycho Shift against Slowbro or whatever switches in from it. Slowbro is another one of those things that Sigilyph can set up on relatively well because it can Roost off Ice Beam to cut the damage in half.
 Snorlax: To beat Snorlax, all you need to do is use Gliscor. Taunt and Swords Dance will prove to be too much for Snorlax. You can also use Garchomp as long as you don't switch it into a Body Slam. The odds for a paralysis aren't quite as bad as Jirachi's, but it would still greatly reduce the team's ability to win without a clear Garchomp. Snorlax isn't common in the BW metagame anyway.
 Starmie: Jirachi is your best bet against Starmie. The most damage it can do outside of rain with Hydro Pump is less than half of Jirachi's health. Even in rain you can stall Starmie out with Wish and Protect. Just wait until they are in range for Body Slam to knock it out. Rotom-W can also take one Starmie because the most poweful thing Starmie can hit Rotom-W with is Thunder or Thunderbolt. Outside of rain, that is nothing to fear.
 Suicune: Suicune is much less common than in previous generations, but that could change. It is best handled by Rotom-W. You have just enough bulk not to care about an offensive Calm Mind Suicune and more than enough power to send a defensive Calm Mind Suicune into oblivion. If you notice Suicune doesn't have Leftovers, you should use Jirach instead of Rotom-W. Then you can save Rotom-W for better things and not worry about Jirachi's health because it will recover it.
 Swampert: Swampert is another Pokémon that just sits there waiting for something to happen to it. The only thing it will do is set up Stealth Rock. Rotom-W will burn it with Will-o-Wisp or take it down with Hydro Pump. Sigilyph can burn it with Psycho Shift and set up Cosmic Power against it. Swampert is slower so you can Roost off its Ice Beam to avoid having a critical hit matter.
 Tentacruel: There are two things you can do against Tentacruel. If you think they will use Toxic Spikes, you can go directly to Garchomp. You can either get a free Substitute if they switch out, OHKO it with Earthquake, or keep using Substitute until they miss. If you know they need to use Rapid Spin or attack, you can go to either Rotom-W or Sigilyph.
 Terrakion: Gliscor is your main counter to Terrakion. It can switch into pretty much anything and force it out. When you see Terrakion in team builder make a mental note to keep Gliscor is good standing so it can properly deal with Terrakion. Garchomp can go heads up with Terrakion to OHKO it with Earthquake, but you don't really want to subject Garchomp to that kind of damage if you can avoid it. Of course, if you are behind a Substitute, you are golden.
 Thundurus: Thundurus is probably the most threatening special threat in the game. You'll want to save Jirachi for Thundurus because it will wreck just about everything else. Jirachi will beat Thundurus almost every time and it is basically a guarantee if they don't have Nasty Plot. It is also as good as a guarantee if you have sandstorm going and they are using Thunder. The likelihood of a miss coupled with all the residual damage Thundurus faces would waste it pretty fast.
 Tornadus: Tornadus is a calmer version of Thundurus as far as Jirachi is concerned. It resists its only STAB attack, Hurricane. Focus Blast and Hammer Arm both fall short of a 2HKO by a good margin. The only thing Tornadus can do is waste itself attempting to dent Jirachi in the process, but with Wish and Protect, that is normally an unsuccessful maneuver. When you have sandstorm going it is suicide for this thing to come in.
 Toxicroak: Toxicroak is only seen on rain teams because of its ability, Dry Skin. It will recover some of its health in rain and lose some of it in sun. You'll just have to settle for no additional recovery when using this team since there is only sandstorm. Gliscor won't even blink against Toxicroak unless they have Ice Punch. It never comes to that because a lot of people misplay Their Toxicroak. A lot of people underestimate Sigilyph's Speed and take a free burn from Psycho Shift. If they have Sucker Punch, Sigilyph is also in great shape to set up against it.
 Tyranitar: I will usually lead with Garchomp against opposing Tyranitar leads. Garchomp can set up against it unless they have Ice Beam, but even then a lot of people running sandstorm teams will probably switch out to Gliscor or Slowbro if they have it. Sigilyph will burn Tyranitar, which will lead to a slow death. If it is healthy when you first burn it, don't stay in to set up against it because a critical hit is always looming. Rotom-W can 2HKO it with Hydro Pump, Jirachi can Iron Head flinch it for a 2HKO, and Gliscor can finish it off with Earthquake. I won't risk the latter unless it is a certain KO since Gliscor is way too important opposing sandstorm teams.
 Vaporeon: Rotom-W can bully Vaporeon around since its Thunderbolt attack deals it super effective damage. The only thing Rotom-W doesn't like is Toxic. If you want to use Sigilyph against Vaporeon you can. If your Flame Orb hasn't activated yet and it uses Toxic you can use Psycho Shift to transfer it back to Vaporeon. Vaporeon is also in that category of Pokémon Sigilyph sets up on well because it can Roost on Ice Beam to reduce its damage output.
 Venusaur: Venusaur is only seen on sun teams. The best way to handle it, like other weather sweepers, is to keep sandstorm up throughout the game. Without Chlorophyll activated, Venusaur can't really harm much on this team because Garchomp can stop it without being tossed around in the process. Sigilyph can take on mix variants if they don't have Growth.
 Victini: I don't come across very many Victini in the current metagame. The ones I have seen use Death Gambit so make sure you don't leave Tyranitar in against it. That would allow your opponent to have sun up for the entire game. You are probably better off sticking to Gliscor or Rotom-W to see what set it is running. Like many other things that are not entirely covered in BW, just make sure you know your opponent's team and don't throw away anything you need to win.
 Virizion: Special variants of Virizion are easily covered by Jirachi. You can use Body Slam on their Focus Blast to try to inflict it with paralysis. If it doesn't happen the first time just use Wish to get your health back. Calm Mind is the most common set you will see on Virizion. Sometimes you will run into a Swords Dance Virizion. Don't leave Jirachi in against those. Switch to Sigilyph or Gliscor to handle it.
 Volcarona: Besides Landorus, this is probably the other legitimate weakness this team has. You will be able to outplay most of your opponents and it won't show up, but there are scenarios that can be troublesome. If they have a Rapid Spinner and can get Volcarona a free turn to set up, you are in some trouble. The key is not letting that happen. As long as you have Stealth Rock and/or sandstorm up, you can play aggressively with Garchomp throughout the game.
 Whimsicott: Whimsicott doesn't do anything but prolong the game. It can't touch Sigilyph or Gliscor with Stun Spore and the former doesn't take an damage from Leech Seed. The best thing Whimsicott can do is Encore whatever move you use and switch out. In the end, that kind of a game plan won't hold up. If you want to rush things along you can keep using Body Slam with Jirachi until you get paralysis. Be warned that you might be paralyzed in the process so don't do it if you need it for something else.
 Wobbuffet: I never see Wobbuffet and I have no idea why. It is an incredible teammate to have if you are interested in removing opposing forms of weather besides sandstorm. Wobbuffet doesn't really touch this team at all, though. Just make sure whatever move you make against it won't cause you to receive damage from Counter or Mirror Coat because every Pokémon on this team is fully capable of stalling Wobbuffet out.
 Xatu: The best thing Xatu does is prevent you from getting Stealth Rock on their side of the field. Quite frankly, it doesn't really work against this team because Xatu doesn't really want to switch into Tyranitar and this team doesn't care if they deflect Stealth Rock back anyway. Rotom-W will deal with Xatu whenever the opponent is ready to let it die. The screen support it gives is not a big deal because this team isn't about hitting hard and fast. You can afford to sit back for a few turns.
 Zapdos: If you don't need Tyranitar to deal with other forms of weather it is a perfect counter for Zapdos. If they have Toxic you can go to Jirachi because that probably means they don't have Heat Wave. Zapdos is rarely seen this generation. The only variants I have run into so far have been offensive. Zapdos isn't something you have to worry about.
 Zoroark: Zoroak is a tricky Pokémon because you never know if it is out until you attack your opponent. The only time you will find Zoroak to be a problem is if the other Pokémon on the team heavily require the attention of your defensive unit. There are some things that give Zoroak away before you attack it, including item and move. It's just something you have to play around and isn't a big problem unless you make a mistake or overlook something.
Export to Text
Conclusion
I hope you took the time to read through everything to develop an understanding of the team. Feel free to give it a try yourself and change it however you like. This team is definitely geared towards my style of play, so don't assume you will get the same result. It isn't completely past its peak, but the BW metagame changes rather quickly and I don't expect it to maintain its level of dominance for very long. I wanted to showcase this team while I thought it was still relevant. As time goes on I might tweak some of the pieces to allow it to continue its success. If you want to post your ideas on something you think can improve it moving forward, that would be cool. It can be food for thought as the metagame continues to develop. I would like to thank Nastyjungle for making this amazing format and Aerrow for proofreading this thread before I posted. It took a lot of effort to type it all up to the standard I wanted it so I was bound to overlook a bunch of tiny errors. I should also thank Limitless, WhiteQueen, and reachzero for giving me ideas. Whether they knew it or not, it inspired me to make this team. Well that's it, and I hope you enjoyed it!
Written by Kevin Garrett. Art by Yilx and Nastyjungle.
Introduction
I figured it would be good to make my Black and White RMT debut with a balanced team. It's odd how the only teams I have posted up until this point have been offensive or stall teams since I credit balanced teams for helping me learn competitive Pokémon. I created this team in Battling 101's Apprentice Program for the same purpose. Timeneon asked me to tutor him for Round 49, so I wanted to come up with a team that would do well in the current metagame. You might remember I posted a formula for team building in my last RMT that I use in Battling 101. I break the team down into different segments and form cores of synergy that are interchangeable. This works especially well for a balanced team since they rely on synergy more than other styles. Since this team was going to be focused on sandstorm, Tyranitar was obviously the starting point since it is the most effective Sand Streamer. Garchomp was an easy addition to the team since it is the most dominant threat in the current metagame. That forms the beginning of the team since Tyranitar offers functional synergy with Garchomp because of their abilities.
The core was going to need to have synergy with each other as well as support the rest of the team. Rotom-W, Jirachi, and Gliscor cover each other's weaknesses well and handle a plethora of threats in the metagame. The theme here is that they spread status in order to allow the rest of the team to have an easier time sweeping. I felt like the team needed a strong Fighting-type resistance, so I decided to add Sigilyph as the last piece. It added another defensive presence that was capable of sweeping and spreading additional status. It obviously can't cover every threat in BW, but this strategy has been really successful in the current metagame. Timeneon marked a lot of improvement by eclipsing a previous ladder best by over 300 points, which I am really proud of. I managed to reach a peak rating of 1589 en route to attaining the #1 rank on Smogon University's leaderboard. As for the team's name, it is a reference to Tales of Symphonia; Solum is the Centurion of Earth, which I thought was an appropriate name for a sandstorm team. Now that the introduction is out of the way, let's take a closer look at the team.
Closer Look
Tyranitar is the ideal lead for this team as it activates sandstorm and can set up Stealth Rock. Its ultimate function is to ensure that sandstorm will outlast any opposing forms of weather. Since it is usually the slowest automatic weather starter, it guarantees that I have the first few turns to put pressure on the opponent in order to gain an early advantage. This usually involves switching to Rotom-W or Jirachi to get burn or paralysis on the opponent in order to allow Garchomp to safely get behind a Substitute. That will force the hand of the opponent to bring in their source of weather, allowing me to get some healthy damage on it or another one of their Pokémon. Since the weather starter on a team is one of the bulkiest members, the damage output to other things is generally high. Pursuit is also a nice tool to use against opposing weather starters because it greatly reduces the amount of times they can switch back in. Sometimes I won't lead with Tyranitar if I see one of a few things in team preview. If the opponent has a Pokémon on the team that is likely to lead against Tyranitar, I will opportunistically choose a different lead. Look for alternate lead match-ups in the other Pokémon summaries.
When you have a battle against a different form of weather, it is a showdown between the five other Pokémon on each team with the weather starters taking a backseat role in order to enable their teammates to do their thing. Although Tyranitar will normally come out on top of a weather battle, it really gets to shine in a different way when it doesn't have to worry about keeping its health until the very end. It can put its respectable Special Defense stat to good use as a secondary check to various special threats. It is also effective from an offensive perspective. Tyranitar will take only about half of its health from a physically defensive Gliscor's Earthquake and OHKO it in return with Ice Beam. Fire Blast puts pressure on opposing Spikers such as Ferrothorn, Forretress, and Skarmory. While this team does not like Toxic Spikes, it can still function close to capacity with only one layer down. Not to mention when a player looks at this team, they won't just come right out using Toxic Spikes unless they are very weak to Garchomp. If they are that weak to Garchomp, you can exploit their weakness before they can even set a layer of Toxic Spikes. As for Skarmory, it is the best counter to the Garchomp set used by this team, so to be able to have multiple places on this team to damage it with is immensely useful.
Garchomp is the focal point of the team's support because it is capable of doing the most damage. With Sand Veil activated, the accuracy of all the opponent's attacks are reduced by 20%. It supports Tyranitar in return because it can set up on Politoed and Ninetales and do a number on the other members of rain and sun teams. All Garchomp needs is one free turn to shred through the opponent's team, as long as the proper support has been carried out. Once you are familiar with this team you'll realize it is tempting to just use Substitute right away until the opponent misses, but that isn't how this team functions best. It isn't meant to rely on luck because on a fundamental level, that would mean you don't have much of a chance of winning otherwise. With paralysis support, Garchomp increases its odds of having a free turn by 25% every turn. Paralysis is usually the most effective way to get a free turn since it works against every Pokémon. Burn is a nice alternative this team offers against Pokémon with physical attacks. For instance, a Ferrothorn afflicted with burn will definitely yield Garchomp a free turn to Swords Dance since you don't need to bank on a miss or a skipped turn from paralysis. The bonus chance of a miss allows the match to snowball in your favor.
Every game is sort of like God's fingerprint when it comes to using Garchomp. What I mean by that is that sometimes you will need to use it early to put pressure on the opponent and other times you can let it hang back until it is ready for the final act. If your opponent has more than one good answer to Garchomp, it is better to wait on a sweep attempt until the coast is clear. You can also use its offensive prowess as a means to getting set up. It has great typing and modest bulk that can be used to its advantage. When you switch into something it won't take much damage from and the opponent needs in order to have a chance of winning, that is a free opportunity to use Substitute. If you break it down, they have two options: Stay in to play a risky game of prediction, or switch out and allow you to get powered up. If they happen to stay in and break your Substitute, they have to constantly ponder what you will do. On top of that, if the opponent's attack misses you will completely win out. Since Garchomp will get 4 turns to Substitute from full health the odds are in your favor. Substitute's value goes beyond giving you the chance to get boosted up without taking much damage. It is also great for dealing with faster Pokémon and protecting against status conditions.
This Pokémon is easy to overlook, but it offers incredible team support that would be hard to find in anything else. Sigilyph offers invaluable type coverage with its Ground-type immunity and double Fighting-type resistance, and it is one of the greatest status absorbers in the game with its ability, Magic Guard. It can switch into all of the moves you never want to have used against your other Pokémon that include, but are not limited to, Leech Seed, Toxic, Will-O-Wisp, Lava Plume, Scald, and Body Slam. With Psycho Shift, you can send any form of status you happen to be inflicted with during the game right back to the opponent. Ideally, you will want to have Sigilyph inflicted by a burn because it allows Sigilyph to beat Tyranitar and other Dark-type Pokémon, as well as give Garchomp the best possible support. Sigilyph acts as the team's failsafe because it can cause a game to turn on a dime. All it needs is one turn to pull off a Cosmic Power late game and that can be the difference. That isn't hard to do when you have planted the necessary support beforehand I might add. Hold on to Sigilyph because it can pull you out of a mess if you play your hand right.
Sigilyph can take on almost everything with a few Cosmic Powers under its belt. The only way it will usually lose in that scenario is from a critical hit. There are things you can do to reduce the chances of those critical hits being able to KO you. If you set up on a slower Pokémon with an Electric-, Ice-, or Rock-type move, you can Roost in between turns to remove the super effective nature of the hit. That will almost guarantee you will survive a critical hit unless it is from a really heavy hitter. The biggest things you will want to avoid taking on are Terrakion and Thundurus since they are extremely powerful and faster than Sigilyph. Once you have gotten enough boosts, you can unleash an enhanced Stored Power. It begins as a base 20 attack, but increases by 20 for every boost you receive. Once you have hit +6 Defense and Special Defense, the base power of Stored Power jumps to 260. STAB is later applied to it in the damage calculation. It is easy to get greedy with Sigilyph, but I only go for as many boosts as I need to get through whatever I am facing, because the omnipresent risk of a critical hit is always lurking.
Rotom-W is a vital member of the core because it is the only Pokémon with a Water-type resistance and one of two Pokémon with an Ice-type resistance. Those valuable resistances make it very useful against rain teams since Choice Specs Politoed can be hard to switch into. It will live a Hydro Pump boosted by Drizzle comfortably enough to be able to fire off Pain Split against whatever the opponent decides to throw at it. Rotom-W benefits from having a low HP stat and high defenses, which means it can get the most bank for its buck with Pain Split. No matter what switches into Pain Split will take a lot of damage and will have to face an almost fully healed Rotom-W. It has all of the tools necessary for harassing utility Pokémon on rain teams. Ferrothorn will end up switching into Will-o-Wisp, which makes Garchomp a major force to threaten the rest of their team. Will-O-Wisp will also cripple Toxicroak and Azumarill, two of the most common physical sweepers seen on rain teams. You can take advantage of Drizzle to boost the strength of Hydro Pump. That can come in handy if the opponent doesn't have something to absorb Water-type attacks. It has so many options for the opponent to fear that I often times pivot with it to get sandstorm back up once the proper support has been set up. Most of the time, it is either Rotom-W or Garchomp that checkmates opposing rain teams.
Rotom-W has other important roles besides giving rain users a headache. The most popular counters to the Garchomp set used on this team are Skarmory, Gliscor, and Slowbro. All of them can be taken out by Rotom-W. I prefer to use Rotom-W as my switch into Gliscor more than my own Gliscor because most of them carry Ice Fang. You are better off avoiding a speed tie situation because it can flinch or carry Taunt and Swords Dance. As might be expected, Rotom-W is the team's main answer against bulky Water-types like the aforementioned Slowbro, Suicune, and Vaporeon. It can also check opposing Rotom-W. I don't like to leave that responsibility to Jirachi alone because Will-O-Wisp is common, and the burn status would cripple it for the entire game. Rotom-W is also the team's best check to mixed Landorus. I surprisingly didn't run into it often, but when you do, you better be careful. If Landorus usage jumps, the first thing I would do is make Rotom-W bulky enough to take multiple attacks from it. Infernape is another one of those Pokémon that isn't widely used and can be checked by Rotom-W. It is much less capable of doing any significant damage to this team because it has to take residual damage from sandstorm. Additionally, Rotom-W helps defend against Fire-type Pokémon and by extension, sun teams.
This Pokémon frustrates a lot of players out there and with good reason. It is the defensive anchor of the team because it handles a good portion of the team's special sponging. Jirachi has two purposes on this team; they are to deal with heavy special threats such as Thundurus, and spread paralysis around the opponent's team in order to make Garchomp's life easier. Jirachi makes its biggest splash for this team against rain teams, because they commonly run two high powered special threats focused on exploiting Thunder's and Hurricane's 100% accuracy in rain. The only thing that will stop Jirachi from completely shutting down all of a rain team's special options is if they get paralysis and/or confusion on it and benefit from consecutive turns without Jirachi being able to move. As you would imagine, this is quite rare since it takes multiple hits for them to KO Jirachi. When sandstorm is active their odds of attacking are reduced, which puts additional pressure on their Politoed to make sure it is raining. This can be used to your advantage to gain the upper hand in the match, because you can continue to execute your strategy while they are preoccupied getting rain back up.
When the opponent shows a Deoxys-S lead, I will commonly make Jirachi the lead in order to limit the amount of support it can muster up. Jirachi is also a reliable counter to Reuniclus because it can switch into any of its attacks and use Body Slam to get paralysis on it. The odds of it moving after Iron Head are 30%. Jirachi will wear it down over time until it is in range to be killed. Trick Room and other offensive variants fall easily to Jirachi. However, Calm Mind variants can take some time since they run some bulk, but they too have a very slim chance of coming out on top. Latios and Latias are the other things that are easily taken care of by Jirachi. The only thing it doesn't like is being Tricked, but that is avoidable because Tyranitar is an alternate counter to both. Sigilyph and Gliscor are also adequate alternatives to receiving Trick if either one of them no longer has use in the match. I use Body Slam over Thunder Wave for two reasons: one reason being that it is effective against Ground-type Pokémon like Excadrill and Gliscor that commonly switch into Jirachi, and the other being that it is an attack, meaning that it will do damage and evade Taunt. Another place where Jirachi offers the team a lot of support is with Wish. In games where Garchomp couldn't get the opponent to stop breaking the Substitute, it's great to be able to replenish its health for another round. It is also beneficial for Rotom-W in games where the opponent has Gliscor and I repeatedly have to switch it in from Jirachi.
Gliscor is the physically defensive juggernaut on the team. It is needed to lockdown game breaking threats like Garchomp, Terrakion, and Excadrill. With Poison Heal, Gliscor will recover 1/8 of its maximum HP at the end of every turn after Toxic Orb is activated. That is twice as much as Leftovers and also ensures Gliscor won't be inflicted with any other form of status. The key is making sure it is activated because if you wait too long and switch it at the moment you desperately need it, you will have to wait until the following turn for recovery. The same can be said for switching into a threat like Jirachi, where Body Slam can paralyze you before it activates, essentially making it useless for the rest of the game. When the team preview window is up prior to the start of the game, I will figure out when I can get a free turn to activate its Toxic Orb and what threats I need to save Gliscor for. You have to play in a disciplined manner with Gliscor to stick to the game plan. Only plan to use Gliscor for the most problematic parts of your opponent's team and let the rest of the team handle threats by committee.
Gliscor works best against stat boosting sweepers; for example, when it is switched into Choice Band Garchomp's Outrage, it will take a good portion of damage. In instances like that, you will have to fall back on Jirachi to take a resisted hit to keep everything alive. It is easy to get your health back between Toxic Orb, smart switching, and Wish support if necessary. Gliscor isn't limited to just walling as you can guess by the move set. It is also used to shut down opposing Spikers and setting up on them. The combination of Gliscor's bulk and power make it a different kind of monster than Garchomp. It is easily capable of setting up on Skarmory or Ferrothorn and annihilating the opponent's team. You can use this strategy to wear down the opponent over time, because after you use Taunt, they know what is coming. It is an easy way to spread damage to things like Latios that are trying to stop the bleeding before it starts. Gliscor is also a secondary check to a lot of Fighting-type threats, but most of the time I will leave them to either Sigilyph or Jirachi, as they are more reliable answers. For more information on what to do against almost anything you might come across, take a look at the threat list.
Threat List
Export to Text
Code:
Tyranitar (M) @ Leftovers
Trait: Sand Stream
EVs: 252 HP / 176 SAtk / 80 SDef
Quiet Nature (+SAtk, -Spd)
- Stealth Rock
- Pursuit
- Fire Blast
- Ice Beam

Garchomp (M) @ Leftovers
Trait: Sand Veil
EVs: 252 Atk / 4 Def / 252 Spd
Jolly Nature (+Spd, -SAtk)
- Substitute
- Swords Dance
- Dragon Claw
- Earthquake

Sigilyph (M) @ Flame Orb
Trait: Magic Guard
EVs: 252 HP / 60 Def / 140 SDef / 56 Spd
Bold Nature (+Def, -Atk)
- Psycho Shift
- Cosmic Power
- Roost
- Stored Power

Rotom-W @ Leftovers
Trait: Levitate
EVs: 124 HP / 252 SAtk / 132 Spd
Modest Nature (+SAtk, -Atk)
- Will-O-Wisp
- Hydro Pump
- Thunderbolt
- Pain Split

Jirachi @ Leftovers
Trait: Serene Grace
EVs: 252 HP / 216 SDef / 40 Spd
Careful Nature (+SDef, -SAtk)
- Body Slam
- Iron Head
- Wish
- Protect

Gliscor (M) @ Toxic Orb
Trait: Poison Heal
EVs: 252 HP / 56 Atk / 200 Def
Impish Nature (+Def, -SAtk)
- Taunt
- Earthquake
- Ice Fang
- Swords Dance
Conclusion
I hope you took the time to read through everything to develop an understanding of the team. Feel free to give it a try yourself and change it however you like. This team is definitely geared towards my style of play, so don't assume you will get the same result. It isn't completely past its peak, but the BW metagame changes rather quickly and I don't expect it to maintain its level of dominance for very long. I wanted to showcase this team while I thought it was still relevant. As time goes on I might tweak some of the pieces to allow it to continue its success. If you want to post your ideas on something you think can improve it moving forward, that would be cool. It can be food for thought as the metagame continues to develop. I would like to thank Nastyjungle for making this amazing format and Aerrow for proofreading this thread before I posted. It took a lot of effort to type it all up to the standard I wanted it so I was bound to overlook a bunch of tiny errors. I should also thank Limitless, WhiteQueen, and reachzero for giving me ideas. Whether they knew it or not, it inspired me to make this team. Well that's it, and I hope you enjoyed it!


