
Hello everyone, welcome to my fourth RMT already. It's been a long time since I posted here. Basically since Pokémon home dropped, I have been trying to assess the post home metagame before trying to build something. Instead, I decided to take a team I already built and fixed its flaws to make it more suitable for the new metagame, then I laddered with it on my alt that was in the 1500s ELO, and brought it all the way up to 1904 ELO. For those who don't know, I am talking about this team SV OU - Tera Iron Moth HO (PEAKED 1905 #51 on the ladder) | Smogon Forums. So let's jump into the team composition right away.
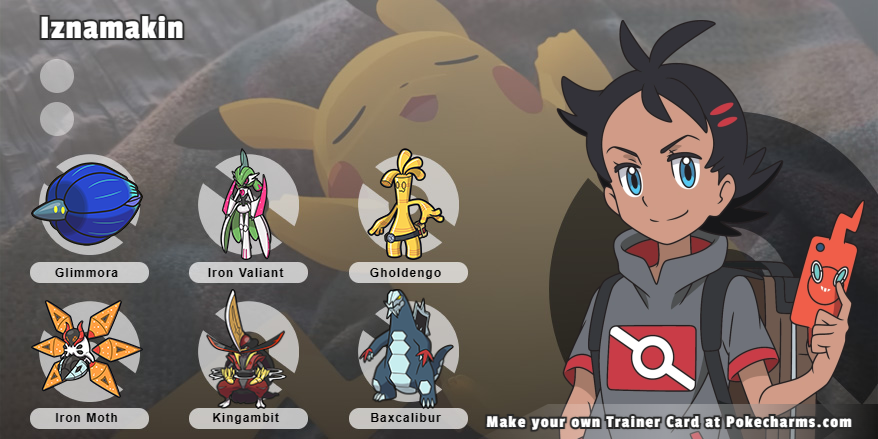
TABLE OF CONTENTS
1- Proof of the peak
2- Teambuilding Process
3- The Pokémon
4- Tips and Tricks
5- Threat List
6- Replays
7- Importable
8- Other teams
9- Outro
1. Proof of peak
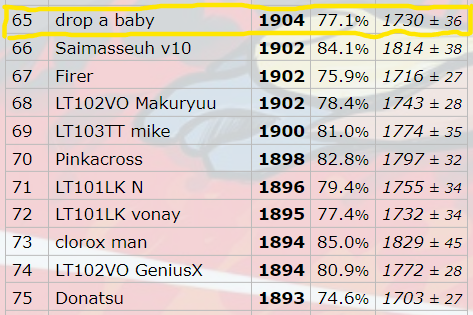
Game that got us in the 1900s : [Gen 9] OU replay: lt103tt Yulala vs. drop a baby - Pokémon Showdown (pokemonshowdown.com)
2. Teambuilding Process


The main idea was to build a HO team. Naturally, Glimmora came to mind, being able to setup rocks, spikes and even toxic spikes and also remove hazards from our side if necessary. Gholdengo is the perfect partner for Glimmora, being able to block hazard removal and offering ground immunity with Air Balloon.

What would this team without Iron Moth ? I went again for Iron Moth for special firepower, being able to lure the likes of Toxapex, Slowking-Galar and Clodsire and removing them with Ground Tera Blast, and also beat most of Baxcalibur and Kingambit checks.

Next, Baxcalibur. This time I opted for a Life Orb SD set which I ultimately find better than the DD set, being able to blast through the entire metagame, even his best check Dondozo, which greatly benefits Kingambit in late game.

I needed a Ghost resist. Kingambit was perfect for that role also being a powerful breaker/cleaner in late game.

Finally, I wanted to have a speed control that could also act as late game cleaner in late game. I went for Iron Valiant.
3. The Pokémon


Glimmora @ Focus Sash
Ability: Toxic Debris
Tera Type : Fairy
EVs : 252 SpA / 4 SpD / 252 Spe
Timid Nature
- Spikes
- Mortal Spin
- Earth Power
- Sludge Wave
Role : Glimmora functions as a lead/hazard setter.
Item : Focus Sash allows Glimmora to live a hit, making it able to set up a layer or more of Spikes or do damage.
Tera Type : Tera Fairy can help against those who lead Banded Dragapult to OHKO Glimmora, but honestly it'll be useless most of the time.
Moves : Spikes is particularly helpful to break sashes chip opposing Pokémon on switch-in. Mortal Spin allows hazard removal and can be used to cripple opposing Pokémon with a Toxic. Earth Power allows Glimmora to hit opposing Glimmoras and steel types, such as Gholdengo and Kingambit. Sludge Wave is its strongest Poison STAB that allows Glimmora to OHKO Hatterene and hit hard those who do not resist Poison type.
EVs & Nature : Timid nature with max Speed and 252 SpA investment for maximum damage on Sludge Wave.


Gholdengo @ Air Balloon
Ability : Good as Gold
Tera Type : Flying
EVs : 252 SpA / 4 SpD / 252 Spe
Timid Nature
IVs : 0 Atk
- Shadow Ball
- Make It Rain
- Nasty Plot
- Psyshock
Role : Gholdengo functions as the Rapid Spin/Defog Blocker and as a wallbreaker.
Item : Air Balloon allows Gholdengo to be a Ground Immunity for the team.
Tera Type : Tera Flying allows Gholdengo to be a Ground Immunity even after losing the Air Balloon and can help to beat the likes of Ting-Lu and Clodsire. Use it when necessary.
Moves : Shadow Ball is its main Ghost STAB, it does very good damage to neutral targets making it very spammable when there is no Ghost Immunity/Resist. Make it Rain, its main Steel STAB, allows Gholdengo to deal a ton of damage and threaten the likes for Garganacl and Enamorus with an OHKO. Nasty Plot allows Gholdengo to boost its SpA and threaten bulkier teams. Finally, Psyshock allows it to beat the likes of Clodsire and Blissey with more ease.
EVs & Nature : Timid Nature with 252 Spe investement for maximum Speed and 252 SpA to hit as hard as possible while keeping that 293 Speed Tier.
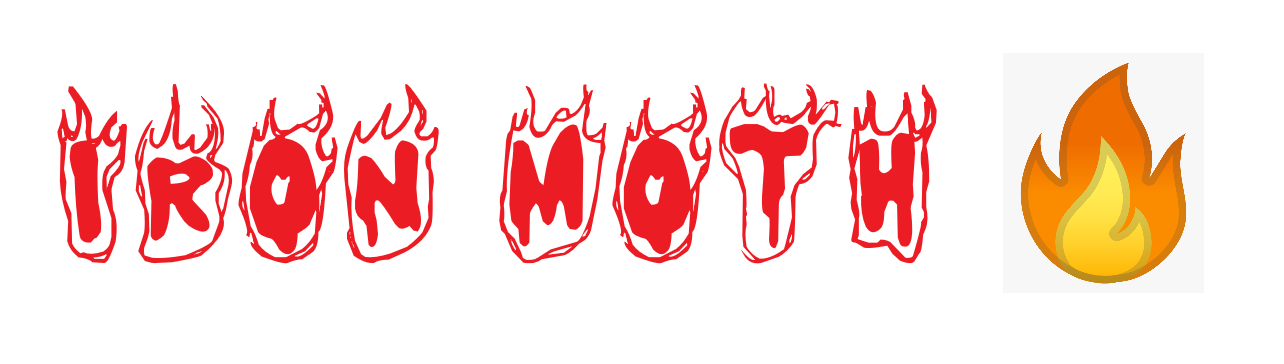


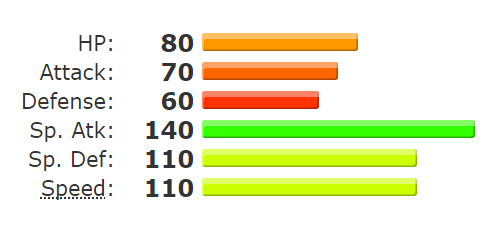
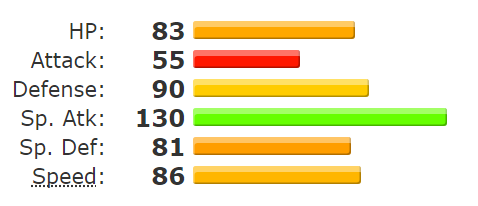
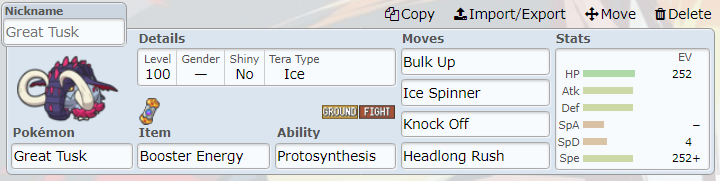
Iron Moth @ Booster Energy
Ability : Quark Drive
Tera Type : Ground
EVs : 252 SpA / 4 SpD / 252 Spe
Timid Nature
IVs : 0 Atk
- Fiery Dance
- Sludge Wave
- Tera Blast
- Energy Ball
Role : Iron Moth primarily functions as wallbreaker, but can be a sweeper depending on the situation.
Item : Booster Energy allows Iron Moth to get a SpA when coming on the field.
Tera Type : Tera Ground allows Moth to break through its checks with Tera Blast and lose the Ground double weakness when necessary.
Moves : Fiery Dance allows Iron Moth to boost its SpA 1/2 times while dealing great damage. Sludge Wave is its main Poison STAB which allows it to deal massive damage, even OHKOing some neutral targets with only +1 boost from Fiery Dance. Tera Blast allows Iron Moth to have Ground type coverage when using Terastallization which helps it break through most of its checks. Finally, Energy Ball is useful especially against the bulkier Water types and Ground types such as Dondozo and Ting-Lu.
EVs & Nature : Timid Nature with 252 SpA and 252 Spe investment to hit the hardest while still outspeeding Enamorus.
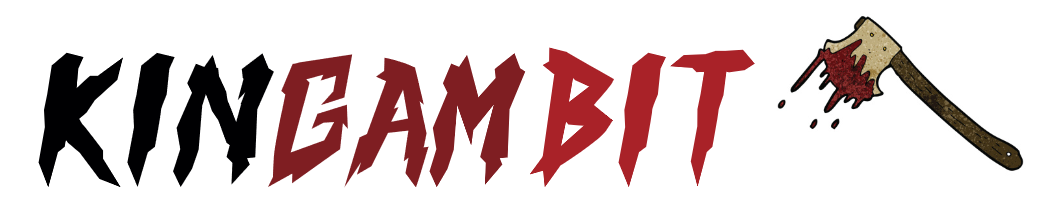


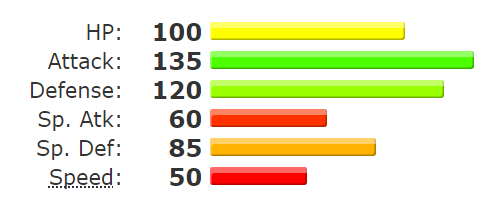
Kingambit @ Lum Berry
Ability : Supreme Overlord
Tera Type : Dark
EVs : 252 Atk / 4 SpD / 252 Spe
Adamant Nature
- Kowtow Cleave
- Iron Head
- Sucker Punch
- Swords Dance
Role : Kingambit primarily functions as a late a game sweeper, because of its reverse sweeping capabilities thanks to Supreme Overlord ability, but also acts as the Ghost resist of the team.
Item : Lum Berry allows Kingambit to cancel a status one time only, whether it be burn or paralysis.
Tera Type : Dark Tera Type to boost Dark type damage and to lose Steel type weaknesses (mostly Fire and Ground) when necessary.
Moves : Kowtow Cleave is its main Dark type STAB, Iron Head is its main Steel STAB, Sucker Punch allows Kingambit to hit first, making it kind of a speed control and combined with Swords Dance, makes it very threatening in the late game.
EVs & Nature : Adamant Nature with 252 Atk and 252 Spe investment allows Kingambit to hit as hard as possible while outspeeding slow defensive Pokémon.
Other Options : In terms of Terastallization for Kingambit, there's a lot you can do, but I found Tera Dark to be the most effective, at least for me.

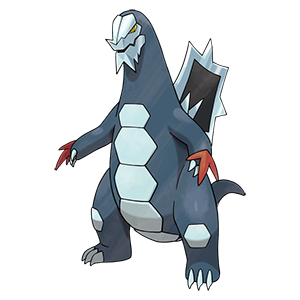

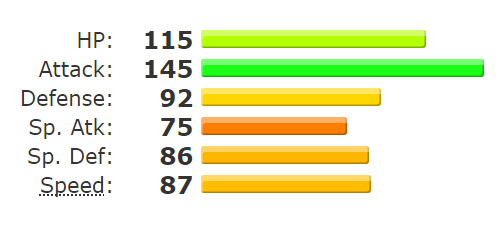
Baxcalibur @ Life Orb
Ability : Thermal Exchange
Tera Type : Dragon
EVs : 252 Atk / 4 SpD / 252 Spe
Adamant Nature
- Swords Dance
- Glaive Rush
- Earthquake
- Ice Shard
Role : Baxcalibur essentially functions as a wallbreaker.
Item : Life Orb gives Baxcalibur a 30 % increase in damage for all of its moves, allowing it to break more effectively.
Tera Type : Tera Dragon boosts Baxcalibur's Glaive Rush, allowing it to 2HKO even the bulkiest physical wall, Dondozo. Use it when necessary.
Moves : Swords Dance allows Baxcalibur to boost its Atk stat by 2 stages, making it extremely threatening right away thanks to its base 145 Atk stat. Glaive Rush is its best Dragon STAB, it allows Baxcalibur to deal massive damage to neutral targets combined with Life Orb. Earthquake is its main coverage move, allowing Baxcalibur to hit everything that isn't immune to it, which synergises well with Ice type moves. Finally, Ice Shard is the main Ice STAB of this set and also a priority move which allows Baxcalibur to hit faster Pokémon.
EVs & Nature : Adamant Nature with 252 Atk and 252 Spe investment to hit as hard as possible which is optimal for a wallbreaker like Baxcalibur.
Notable Calcs :
252+ Atk Life Orb Baxcalibur Glaive Rush vs. 252 HP / 252+ Def Dondozo: 199-235 (39.4 - 46.6%) -- guaranteed 3HKO
252+ Atk Life Orb Tera Dragon Baxcalibur Glaive Rush vs. 252 HP / 252+ Def Dondozo: 265-315 (52.5 - 62.5%) -- guaranteed 2HKO
+2 252+ Atk Life Orb Tera Dragon Baxcalibur Glaive Rush vs. 252 HP / 252+ Def Great Tusk: 481-567 (110.8 - 130.6%) -- guaranteed OHKO
+2 252+ Atk Life Orb Baxcalibur Glaive Rush vs. 248 HP / 252+ Def Corviknight: 211-248 (52.8 - 62.1%) -- 99.6% chance to 2HKO after Leftovers recovery
+2 252+ Atk Life Orb Tera Dragon Baxcalibur Glaive Rush vs. 248 HP / 252+ Def Corviknight: 281-331 (70.4 - 82.9%) -- guaranteed 2HKO after Leftovers recovery
252+ Atk Life Orb Tera Dragon Baxcalibur Ice Shard vs. 0 HP / 0 Def Enamorus: 273-322 (94.4 - 111.4%) -- 68.8% chance to OHKO
+2 252+ Atk Life Orb Tera Dragon Baxcalibur Ice Shard vs. 0 HP / 4 Def Iron Valiant: 220-261 (76.1 - 90.3%) -- guaranteed 2HKO
+2 252+ Atk Life Orb Baxcalibur Glaive Rush vs. 252 HP / 252+ Def Alomomola: 504-594 (94.3 - 111.2%) -- 68.8% chance to OHKO

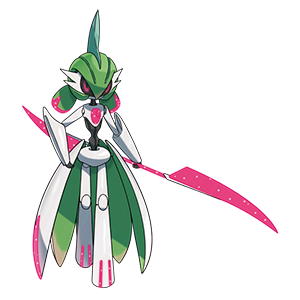


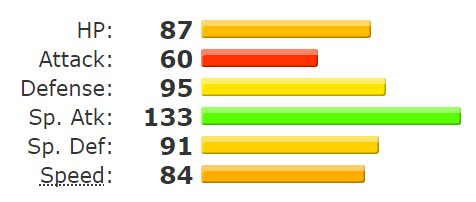
Iron Valiant @ Booster Energy
Ability : Quark Drive
Tera Type : Fairy
EVs : 4 Atk / 252 SpA / 252 Spe
Naive Nature
- Thunderbolt
- Moonblast
- Knock Off
- Close Combat
Role : Iron Valiant essentially serves as a speed control/cleaner or can be used as a breaker thanks to this set being mixed.
Item : Booster Energy allows Iron Valiant to get a Speed boost when coming on the field.
Tera Type : Tera Fairy allows Iron Valiant to hit harder with Moonblast. Use it when necessary.
Moves : Thunderbolt allows Iron Valiant to hit Corvikinght and Toxapex. Moonblast is its main special Fairy STAB, does great damage to neutral target and very spammable when there is no Steel/Poison type in the opposing team. Knock Off allows Valiant to hit Gholdengo and Psychic types like Slowking-Galar for super effective damage while also removing items, which is particularly helpful against fat teams running full boots. Finally, Close Combat is its main physical Fighting STAB which allows Valiant to surprise opponents that do not expect it to be mixed.
EVs & Nature : 252 SpA and 252 Spe, and 4 Atk with Naive Nature to avoid having to lower attack while hitting as hard as possible on the special side.
4. Tips and Tricks
5. Threat List

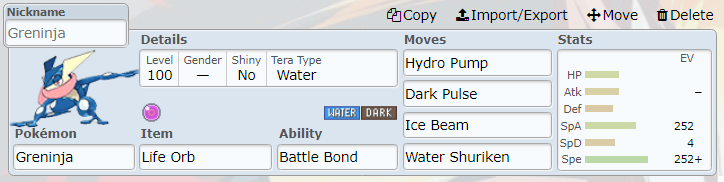
Greninja is easily the most threatening Pokémon for this team. After the activation of Battle Bond, it can sweep the whole team, so you need to be careful. If you expect it to use a Water type move, go on Baxcalibur and pray you don't get flinched. If it does, then you're most likely screwed. If Greninja somehow kills one of your Pokémon and gets the boost, your only chance would be to go Baxcalibur and pray to not get flinched. Baxcalibur is the only way out in that situation, so don't get it chipped unnecessarily.
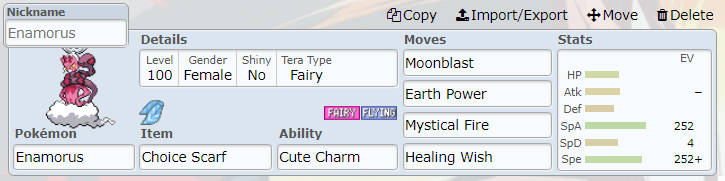
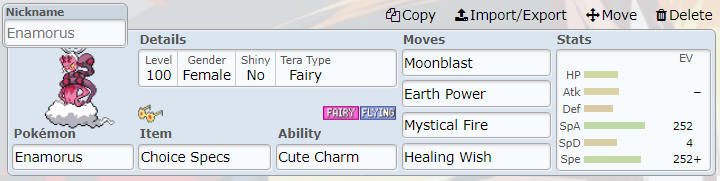
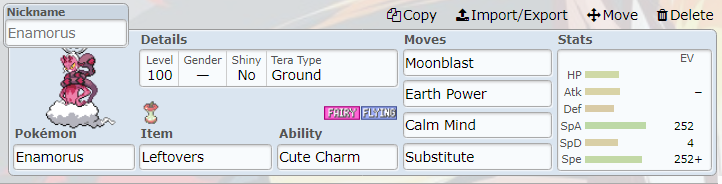
Enamorus is a big threat as well. Keeping the health on Gholdengo is crucial against. You can go Iron Moth if you expect it to Moonblast. But you should be fine because it shouldn't get too many opportunities to come in or setup.
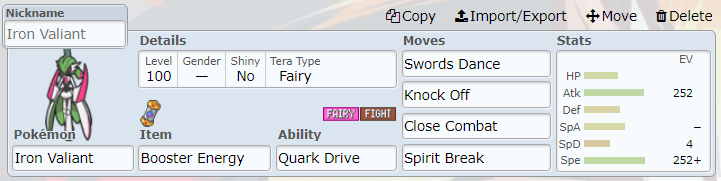
Iron Valiant itself is manageable, but SD Iron Valiant is deadly for this team if it successfully sets up. Never let it SD for free, always get some kind of chip that will allow you to kill it with priority. The other ways to revenge kill it would be use Tera on Gholdengo to avoid OHKO, go Iron Moth if not heavily chipped or attempting to win the speed tie with Iron Valiant.
Last but not least, Speed boosting Bulk Up Great Tusk. With the Booster Energy, Great Tusk becomes faster than the whole team except Iron Valiant. Which is usually the way to eliminate it or force it out. If it gets going and you don't have Valiant anymore (or you already used Booster Energy), you're most likely done for unless you Tera Flying with Gholdengo.
6. Replays
Feel free to check out some of the replays below.
1. [Gen 9] OU replay: LT103TT Light vs. 2(H2O) -


2. [Gen 9] OU replay: LT103TT R vs. 2(H2O) -


3. [Gen 9] OU replay: LT103TT big neck vs. 2(H2O) -

4. [Gen 9] OU replay: DanielRiodani vs. 2(H2O) -

5. [Gen 9] OU replay: 2(H2O) vs. In what way -
6. [Gen 9] OU replay: OUDJButterBuilding vs. 2(H2O) -

7. [Gen 9] OU replay: 2(H2O) vs. lt103tt Yulala -


8. [Gen 9] OU replay: 2(H2O) vs. LT103TTGalatasaray -
9. [Gen 9] OU replay: 2(H2O) vs. zannty -
10. [Gen 9] OU replay: elpets vs. 2(H2O) -


11. [Gen 9] OU replay: drop a baby vs. lt103tt drifter -
12. [Gen 9] OU replay: drop a baby vs. selah -
13. [Gen 9] OU replay: drop a baby vs. nfyhsueryfgius -
14. [Gen 9] OU replay: drop a baby vs. clear nights -


15. [Gen 9] OU replay: ftiofnaw vs. drop a baby -

16. [Gen 9] OU replay: LT103TT EclipseY vs. drop a baby -
17. [Gen 9] OU replay: friedfreak vs. drop a baby -
18. [Gen 9] OU replay: Jackeyhate vs. drop a baby -

19. [Gen 9] OU replay: lt103ttnana vs. drop a baby -
20. [Gen 9] OU replay: lt103tt Yulala vs. drop a baby -
7. Importable
With nicknames : Tera Iron Moth HO 2.0
Without nicknames : Tera Iron Moth HO 2.0
8. Other teams
SV OU - Chi-Yu at home : Specs Moth + Band Baxcalibur Balance (PEAKED 1851 #70) ::amoongus:
SV OU - Tera Iron Moth HO (PEAKED 1905 #51 on the ladder) :
SV OU - Kingambit always has the last say Hyper Offense (PEAKED 1891 - #73) :
9. Outro
I found this team to be very effective in the current metagame, having great matchup not only against hyper offense, but also against bulkier archetypes. I am not done laddering with it yet, usually I just stop laddering when I reach the 1900s because I normally hover around 1700-1800, so when I reach 1900s with a team I conclude that it works well, so I might update the peak later on. Thank you for making it this far in the post ! Let me know if you have any suggestion or thoughts on this teams, some sets you'd like to improve, just let me know. See ya next time !
TABLE OF CONTENTS
1- Proof of the peak
2- Teambuilding Process
3- The Pokémon
4- Tips and Tricks
5- Threat List
6- Replays
7- Importable
8- Other teams
9- Outro
1. Proof of peak
Game that got us in the 1900s : [Gen 9] OU replay: lt103tt Yulala vs. drop a baby - Pokémon Showdown (pokemonshowdown.com)
2. Teambuilding Process
The main idea was to build a HO team. Naturally, Glimmora came to mind, being able to setup rocks, spikes and even toxic spikes and also remove hazards from our side if necessary. Gholdengo is the perfect partner for Glimmora, being able to block hazard removal and offering ground immunity with Air Balloon.
What would this team without Iron Moth ? I went again for Iron Moth for special firepower, being able to lure the likes of Toxapex, Slowking-Galar and Clodsire and removing them with Ground Tera Blast, and also beat most of Baxcalibur and Kingambit checks.
Next, Baxcalibur. This time I opted for a Life Orb SD set which I ultimately find better than the DD set, being able to blast through the entire metagame, even his best check Dondozo, which greatly benefits Kingambit in late game.
I needed a Ghost resist. Kingambit was perfect for that role also being a powerful breaker/cleaner in late game.
Finally, I wanted to have a speed control that could also act as late game cleaner in late game. I went for Iron Valiant.
3. The Pokémon
Glimmora @ Focus Sash
Ability: Toxic Debris
Tera Type : Fairy
EVs : 252 SpA / 4 SpD / 252 Spe
Timid Nature
- Spikes
- Mortal Spin
- Earth Power
- Sludge Wave
Role : Glimmora functions as a lead/hazard setter.
Item : Focus Sash allows Glimmora to live a hit, making it able to set up a layer or more of Spikes or do damage.
Tera Type : Tera Fairy can help against those who lead Banded Dragapult to OHKO Glimmora, but honestly it'll be useless most of the time.
Moves : Spikes is particularly helpful to break sashes chip opposing Pokémon on switch-in. Mortal Spin allows hazard removal and can be used to cripple opposing Pokémon with a Toxic. Earth Power allows Glimmora to hit opposing Glimmoras and steel types, such as Gholdengo and Kingambit. Sludge Wave is its strongest Poison STAB that allows Glimmora to OHKO Hatterene and hit hard those who do not resist Poison type.
EVs & Nature : Timid nature with max Speed and 252 SpA investment for maximum damage on Sludge Wave.
Gholdengo @ Air Balloon
Ability : Good as Gold
Tera Type : Flying
EVs : 252 SpA / 4 SpD / 252 Spe
Timid Nature
IVs : 0 Atk
- Shadow Ball
- Make It Rain
- Nasty Plot
- Psyshock
Role : Gholdengo functions as the Rapid Spin/Defog Blocker and as a wallbreaker.
Item : Air Balloon allows Gholdengo to be a Ground Immunity for the team.
Tera Type : Tera Flying allows Gholdengo to be a Ground Immunity even after losing the Air Balloon and can help to beat the likes of Ting-Lu and Clodsire. Use it when necessary.
Moves : Shadow Ball is its main Ghost STAB, it does very good damage to neutral targets making it very spammable when there is no Ghost Immunity/Resist. Make it Rain, its main Steel STAB, allows Gholdengo to deal a ton of damage and threaten the likes for Garganacl and Enamorus with an OHKO. Nasty Plot allows Gholdengo to boost its SpA and threaten bulkier teams. Finally, Psyshock allows it to beat the likes of Clodsire and Blissey with more ease.
EVs & Nature : Timid Nature with 252 Spe investement for maximum Speed and 252 SpA to hit as hard as possible while keeping that 293 Speed Tier.
Iron Moth @ Booster Energy
Ability : Quark Drive
Tera Type : Ground
EVs : 252 SpA / 4 SpD / 252 Spe
Timid Nature
IVs : 0 Atk
- Fiery Dance
- Sludge Wave
- Tera Blast
- Energy Ball
Role : Iron Moth primarily functions as wallbreaker, but can be a sweeper depending on the situation.
Item : Booster Energy allows Iron Moth to get a SpA when coming on the field.
Tera Type : Tera Ground allows Moth to break through its checks with Tera Blast and lose the Ground double weakness when necessary.
Moves : Fiery Dance allows Iron Moth to boost its SpA 1/2 times while dealing great damage. Sludge Wave is its main Poison STAB which allows it to deal massive damage, even OHKOing some neutral targets with only +1 boost from Fiery Dance. Tera Blast allows Iron Moth to have Ground type coverage when using Terastallization which helps it break through most of its checks. Finally, Energy Ball is useful especially against the bulkier Water types and Ground types such as Dondozo and Ting-Lu.
EVs & Nature : Timid Nature with 252 SpA and 252 Spe investment to hit the hardest while still outspeeding Enamorus.
Kingambit @ Lum Berry
Ability : Supreme Overlord
Tera Type : Dark
EVs : 252 Atk / 4 SpD / 252 Spe
Adamant Nature
- Kowtow Cleave
- Iron Head
- Sucker Punch
- Swords Dance
Role : Kingambit primarily functions as a late a game sweeper, because of its reverse sweeping capabilities thanks to Supreme Overlord ability, but also acts as the Ghost resist of the team.
Item : Lum Berry allows Kingambit to cancel a status one time only, whether it be burn or paralysis.
Tera Type : Dark Tera Type to boost Dark type damage and to lose Steel type weaknesses (mostly Fire and Ground) when necessary.
Moves : Kowtow Cleave is its main Dark type STAB, Iron Head is its main Steel STAB, Sucker Punch allows Kingambit to hit first, making it kind of a speed control and combined with Swords Dance, makes it very threatening in the late game.
EVs & Nature : Adamant Nature with 252 Atk and 252 Spe investment allows Kingambit to hit as hard as possible while outspeeding slow defensive Pokémon.
Other Options : In terms of Terastallization for Kingambit, there's a lot you can do, but I found Tera Dark to be the most effective, at least for me.
Baxcalibur @ Life Orb
Ability : Thermal Exchange
Tera Type : Dragon
EVs : 252 Atk / 4 SpD / 252 Spe
Adamant Nature
- Swords Dance
- Glaive Rush
- Earthquake
- Ice Shard
Role : Baxcalibur essentially functions as a wallbreaker.
Item : Life Orb gives Baxcalibur a 30 % increase in damage for all of its moves, allowing it to break more effectively.
Tera Type : Tera Dragon boosts Baxcalibur's Glaive Rush, allowing it to 2HKO even the bulkiest physical wall, Dondozo. Use it when necessary.
Moves : Swords Dance allows Baxcalibur to boost its Atk stat by 2 stages, making it extremely threatening right away thanks to its base 145 Atk stat. Glaive Rush is its best Dragon STAB, it allows Baxcalibur to deal massive damage to neutral targets combined with Life Orb. Earthquake is its main coverage move, allowing Baxcalibur to hit everything that isn't immune to it, which synergises well with Ice type moves. Finally, Ice Shard is the main Ice STAB of this set and also a priority move which allows Baxcalibur to hit faster Pokémon.
EVs & Nature : Adamant Nature with 252 Atk and 252 Spe investment to hit as hard as possible which is optimal for a wallbreaker like Baxcalibur.
Notable Calcs :
252+ Atk Life Orb Baxcalibur Glaive Rush vs. 252 HP / 252+ Def Dondozo: 199-235 (39.4 - 46.6%) -- guaranteed 3HKO
252+ Atk Life Orb Tera Dragon Baxcalibur Glaive Rush vs. 252 HP / 252+ Def Dondozo: 265-315 (52.5 - 62.5%) -- guaranteed 2HKO
+2 252+ Atk Life Orb Tera Dragon Baxcalibur Glaive Rush vs. 252 HP / 252+ Def Great Tusk: 481-567 (110.8 - 130.6%) -- guaranteed OHKO
+2 252+ Atk Life Orb Baxcalibur Glaive Rush vs. 248 HP / 252+ Def Corviknight: 211-248 (52.8 - 62.1%) -- 99.6% chance to 2HKO after Leftovers recovery
+2 252+ Atk Life Orb Tera Dragon Baxcalibur Glaive Rush vs. 248 HP / 252+ Def Corviknight: 281-331 (70.4 - 82.9%) -- guaranteed 2HKO after Leftovers recovery
252+ Atk Life Orb Tera Dragon Baxcalibur Ice Shard vs. 0 HP / 0 Def Enamorus: 273-322 (94.4 - 111.4%) -- 68.8% chance to OHKO
+2 252+ Atk Life Orb Tera Dragon Baxcalibur Ice Shard vs. 0 HP / 4 Def Iron Valiant: 220-261 (76.1 - 90.3%) -- guaranteed 2HKO
+2 252+ Atk Life Orb Baxcalibur Glaive Rush vs. 252 HP / 252+ Def Alomomola: 504-594 (94.3 - 111.2%) -- 68.8% chance to OHKO
Iron Valiant @ Booster Energy
Ability : Quark Drive
Tera Type : Fairy
EVs : 4 Atk / 252 SpA / 252 Spe
Naive Nature
- Thunderbolt
- Moonblast
- Knock Off
- Close Combat
Role : Iron Valiant essentially serves as a speed control/cleaner or can be used as a breaker thanks to this set being mixed.
Item : Booster Energy allows Iron Valiant to get a Speed boost when coming on the field.
Tera Type : Tera Fairy allows Iron Valiant to hit harder with Moonblast. Use it when necessary.
Moves : Thunderbolt allows Iron Valiant to hit Corvikinght and Toxapex. Moonblast is its main special Fairy STAB, does great damage to neutral target and very spammable when there is no Steel/Poison type in the opposing team. Knock Off allows Valiant to hit Gholdengo and Psychic types like Slowking-Galar for super effective damage while also removing items, which is particularly helpful against fat teams running full boots. Finally, Close Combat is its main physical Fighting STAB which allows Valiant to surprise opponents that do not expect it to be mixed.
EVs & Nature : 252 SpA and 252 Spe, and 4 Atk with Naive Nature to avoid having to lower attack while hitting as hard as possible on the special side.
4. Tips and Tricks
- Don't take unecessary damage on Baxcalibur and Kingambit, you'll understand why in the threat list section.
- When you see a Cinderace in the opposing team, usually one layer of spikes will do the job. Putting too much can hurt you as Cinderace will just Court Change all of your hazards. You could also not lead Glimmora and keep it for later.
- Make aggressive plays. When you expect a Pokémon to come, make a double switch. For example, if you expect Great Tusk to come in on your Kingambit, bring your Iron Valiant or your Iron Moth in.
- Don't be afraid to use Tera. If you think it is necessary to make progress, then use it.
- If they lead Great Tusk on your Glimmora, go Gholdengo to avoid getting earthquaked or spinned on. Then damage it with Make it Rain. Great Tusk being heavily chipped greatly benefits Kingambit.
- Against Psyspam, try to keep Focus Sash on Glimmora as it can be useful for revenge killing.
- Against Rain, also try to keep Focus Sash on Glimmora as it can help revenge killing.
- If you see Enamorus or Iron Valiant in the opposing team, avoid getting Gholdengo chipped unnecessarily as it needs to be at full HP most of the time to deal with them.
- Don't systematically go Kingambit on Gholdengo. Some Gholdengos run Focus Blast these days so you need to be careful. Instead you can use Iron Moth as a switch-in if it's not too heavily chipped.
- When you see a Zamazenta in the opposing team, keep hazards at all costs, especially toxic spikes if possible.
5. Threat List
Greninja is easily the most threatening Pokémon for this team. After the activation of Battle Bond, it can sweep the whole team, so you need to be careful. If you expect it to use a Water type move, go on Baxcalibur and pray you don't get flinched. If it does, then you're most likely screwed. If Greninja somehow kills one of your Pokémon and gets the boost, your only chance would be to go Baxcalibur and pray to not get flinched. Baxcalibur is the only way out in that situation, so don't get it chipped unnecessarily.
Enamorus is a big threat as well. Keeping the health on Gholdengo is crucial against. You can go Iron Moth if you expect it to Moonblast. But you should be fine because it shouldn't get too many opportunities to come in or setup.
Iron Valiant itself is manageable, but SD Iron Valiant is deadly for this team if it successfully sets up. Never let it SD for free, always get some kind of chip that will allow you to kill it with priority. The other ways to revenge kill it would be use Tera on Gholdengo to avoid OHKO, go Iron Moth if not heavily chipped or attempting to win the speed tie with Iron Valiant.
Last but not least, Speed boosting Bulk Up Great Tusk. With the Booster Energy, Great Tusk becomes faster than the whole team except Iron Valiant. Which is usually the way to eliminate it or force it out. If it gets going and you don't have Valiant anymore (or you already used Booster Energy), you're most likely done for unless you Tera Flying with Gholdengo.
6. Replays
Feel free to check out some of the replays below.
1. [Gen 9] OU replay: LT103TT Light vs. 2(H2O) -
2. [Gen 9] OU replay: LT103TT R vs. 2(H2O) -
3. [Gen 9] OU replay: LT103TT big neck vs. 2(H2O) -
4. [Gen 9] OU replay: DanielRiodani vs. 2(H2O) -
5. [Gen 9] OU replay: 2(H2O) vs. In what way -
6. [Gen 9] OU replay: OUDJButterBuilding vs. 2(H2O) -
7. [Gen 9] OU replay: 2(H2O) vs. lt103tt Yulala -
8. [Gen 9] OU replay: 2(H2O) vs. LT103TTGalatasaray -
9. [Gen 9] OU replay: 2(H2O) vs. zannty -
10. [Gen 9] OU replay: elpets vs. 2(H2O) -
11. [Gen 9] OU replay: drop a baby vs. lt103tt drifter -
12. [Gen 9] OU replay: drop a baby vs. selah -
13. [Gen 9] OU replay: drop a baby vs. nfyhsueryfgius -
14. [Gen 9] OU replay: drop a baby vs. clear nights -
15. [Gen 9] OU replay: ftiofnaw vs. drop a baby -
16. [Gen 9] OU replay: LT103TT EclipseY vs. drop a baby -
17. [Gen 9] OU replay: friedfreak vs. drop a baby -
18. [Gen 9] OU replay: Jackeyhate vs. drop a baby -
19. [Gen 9] OU replay: lt103ttnana vs. drop a baby -
20. [Gen 9] OU replay: lt103tt Yulala vs. drop a baby -
7. Importable
With nicknames : Tera Iron Moth HO 2.0
Without nicknames : Tera Iron Moth HO 2.0
8. Other teams
SV OU - Chi-Yu at home : Specs Moth + Band Baxcalibur Balance (PEAKED 1851 #70) :
:amoongus:SV OU - Tera Iron Moth HO (PEAKED 1905 #51 on the ladder) :
SV OU - Kingambit always has the last say Hyper Offense (PEAKED 1891 - #73) :
9. Outro
I found this team to be very effective in the current metagame, having great matchup not only against hyper offense, but also against bulkier archetypes. I am not done laddering with it yet, usually I just stop laddering when I reach the 1900s because I normally hover around 1700-1800, so when I reach 1900s with a team I conclude that it works well, so I might update the peak later on. Thank you for making it this far in the post ! Let me know if you have any suggestion or thoughts on this teams, some sets you'd like to improve, just let me know. See ya next time !
Attachments
-
 33.5 KB Views: 28
 -
 120.1 KB Views: 40
 -
 3.7 KB Views: 36
 -
 51.6 KB Views: 17
 -
 58.4 KB Views: 37
 -
 15.3 KB Views: 38
 -
 12.9 KB Views: 104
 -
 50.9 KB Views: 31
 -
 54.5 KB Views: 24
 -
 52.7 KB Views: 19