
-
Follow our Instagram!
-
Curious about what we're currently doing about bots? Check out the latest updates from staff in this thread.
-
Welcome to Smogon! Take a moment to read the Introduction to Smogon for a run-down on everything Smogon, and make sure you take some time to read the global rules.
You are using an out of date browser. It may not display this or other websites correctly.
You should upgrade or use an alternative browser.
You should upgrade or use an alternative browser.
Challenge 4th Generation Battle Facilities Discussion and Records
- Thread starter Tsitso
- Start date


If you're asking me then yes what did you want to knowCan you give any information at all?
Like what move sets did you use? What order did you do types? Literally anything at allIf you're asking me then yes what did you want to know
I have a set for every type, mostly made by fade. I don't have a set order ironed out but I try to do Fire and Electric first because those have the highest chance to go wrongLike what move sets did you use? What order did you do types? Literally anything at all

Submitting for Platinum Battle Hall, can submit video if needed
Video is not required, but it's better to have footage than not. Details of your "team" are needed though, a pokepaste or showdown exports of the p-zs you used and which types they faced will do


McMeghan kinda roped me into this. I also never had the gold print in this and decided to try my hand at it as well and played a bit with him and Mana. Amounted up to records of 57 wins in L50 singles (owned McMeghan) and 49 wins in L100 singles.
Recently i started making a playlist for various interesting battles in replay-form which can be found here, though so far it's only the loss in battle L50 #58, the L100 fight against Thorton and one other game that was funny; I'll keep updating it as I play more
https://www.youtube.com/playlist?list=PLDmxCANvcqWU
Recently i started making a playlist for various interesting battles in replay-form which can be found here, though so far it's only the loss in battle L50 #58, the L100 fight against Thorton and one other game that was funny; I'll keep updating it as I play more
https://www.youtube.com/playlist?list=PLDmxCANvcqWU
Directly copypasted from our channel;
i lost Open #50 to
T1: Jolteon vs Crobat
Tbolt, crobat dies. Dugtrio comes out.
T2:
Baton Pass to mence on ground move
T3:
I click DD but stone edge crits and I die. Tenta next bc 37.5% to live
T4:
EQ Crits. Jolteon is walled. I lose.
okay man
i probs had to go back to jolt a few times honestly
for intimidates
bc i knew 3rd was also gonna be ground
but i still brought jolteon because
i had the bumfuck no moves ludicolo, heatproof zong and manectric as other options.
and a sash twave in the lead is broken
and i have mence to pivot vs ground
i lost Open #50 to
T1: Jolteon vs Crobat
Tbolt, crobat dies. Dugtrio comes out.
T2:
Baton Pass to mence on ground move
T3:
I click DD but stone edge crits and I die. Tenta next bc 37.5% to live
T4:
EQ Crits. Jolteon is walled. I lose.
okay man
i probs had to go back to jolt a few times honestly
for intimidates
bc i knew 3rd was also gonna be ground
but i still brought jolteon because
i had the bumfuck no moves ludicolo, heatproof zong and manectric as other options.
and a sash twave in the lead is broken
and i have mence to pivot vs ground

Hello,
looking for the last two Pokemon to complete my double Team for the Battle Tower for the Ribbon
My goal is to use my Shiny Regigigas for all 50 battles.
Right now, I'd use it along with a Jumpluff with Worry Seed to suppress Regigigas's Ability.
https://pokepast.es/94ae808a3496f6cd
Regigigas' IVs are pretty bad, but I want to at least give it a try. I might still change its moves and item.
If possible, no Legendary Pokémon, since I've already caught most of them.
Thanks :)
looking for the last two Pokemon to complete my double Team for the Battle Tower for the Ribbon
My goal is to use my Shiny Regigigas for all 50 battles.
Right now, I'd use it along with a Jumpluff with Worry Seed to suppress Regigigas's Ability.
https://pokepast.es/94ae808a3496f6cd
Regigigas' IVs are pretty bad, but I want to at least give it a try. I might still change its moves and item.
If possible, no Legendary Pokémon, since I've already caught most of them.
Thanks :)

Alright, it is done.
After a bit of trial and error, I've managed to acquire all gold prints in the HGSS battle frontier and it only took 931 hrs... WAIT 931 HOURS??!?
Yeah, based off of the accounts of others on this thread my experience might've overshot the usual grind(I'm trash). The first 200 involved beating and clearing most optional content in the game alongside training/breeding pokes and acquiring 4/5 gold prints; the rest?? Battle Factory.
As a result this post will mostly focus on battle factory as I've not really done anything particularly note worthy in the other facilites that hasn't been done a million times with even less suboptimal teams.
Originally I was never going to post about my experience but reading/watching more and more people's experiences returning to seemingly one of the most difficult piece of pve content you can engage with in an official pokemon game; not only was I motivated to play more but also wanted to share this if anyone else needed vindication for their troubles with this facility.
I didn't record any information so this is pretty much all from memory.
Of course the winning round 7 team ended up being something as ridiculous as Metagross4/Suicune4/Latias4 (Lv50) because as most have alluded to before; success in the battle factory is almost entirely about building/acquiring a self-sufficient team without any major weaknesses and then just minimizing risks in the subsequent battles. If you don't get good pokes, you're just playing with fire until you get good pokes.
This isn't the most cracked team I've gotten in this facility; because believe it or not I've gotten teams in earlier rounds on failed runs that I could only describe as near-autopilot in terms of the decision making. Things like download Porygon-Z seem to just sweep smart AI consistently. I once recall having Lickilicky4/Slaking3/Garchomp4, so pretty much if a problem couldn't be easily solved by Lickilicky > explode lead > into Slaking or Garchomp who both move fast and always hit so hard I basically always outsped and OHKO the last 2 mons. (No Garchomps were featured in this successful run ironically.)
Also unsurprisingly was Thorton's gold team wasn't anything special; I ALREADY FORGOT HIS LEAD but I recall finishing it with earthquake and his last 2 mons were Dugtrio4/Kingdra4. Suicune was brought in after Metagross > Surf dealt with Dugtrio > and admittely Kingdra was kinda scary. I didn't wanna be put in a dilemma where I lost the gold print match because *lmao draco meteor missed tee hee* from Latias but not from the returning Kingdra; but I knew setting up Suicune with calm mind was a tempting bad decision as Kingdra (especially if it had sniper) could just *plap* me with a crit. Knowing this I opted to just keep attacking with ice beams because there is a chance I could crit and/or freeze; and I lucked out as after the Sp.atk drop from Draco Meteor(I kinda forgot about this tbh so I was likely to win either way) the AI went for and missed a hydro pump meaning I could get in another ice beam(I think 2 actually) for extra damage and finish Kingdra off with a safe 100% accuracy thunderbolt from Latias.
Addendum - team from the starting draft was Staraptor4/Suicune4/Latias4, Staraptor was swapped for Metagross mid round to give you perspective on how much influence the draft options have on a round.
General Strategy/Personal Playstyle:
IDK dude, this facility just feels like it has so many "checks" you need to pass; and that's after you get reliable pokemon sets to utilize. If nuzlockes/competitive battling don't do it then battle factory will certainly show you why critical hits were nerfed in subsequent gens. Accuracy is also a huge issue you have to routinely play around. You truly realize how much Pokemon forces you to think and adapt every turn because every turn presents a possible lose condi... you know what, whatever...
Round 1 - 2:
I swapped every battle no matter what to get the 2 elevation picks next round.
The AI being entirely random meant I usually opt to always attack every turn as you'd almost always have an advantage over the AI via damage per turn.
Round 3:
I usually ended up with the 2 elevations in the back row and only swapped the lead position as it seems fit; the main idea being to build the trade count and once I get to silver Thorton I would have a pretty good "mid tier set-2" poke as a lead and 3 other options from the previous battle to counter his lead.
HOWEVER, the winning run I just YOLO swapped after every battle I believe which is also a commonly accepted strategy within battle factory.
(Did I mention this successful run was the first run I did after a long break from playing this game? I also fell asleep halfway in and woke up to a flashing red 3DS.)
Round 4:
Work in a few more swaps to get a 3rd elevation for *gulp* round 5, which usually happens naturally.
Random and Semi-Random AI I feel generally are countered by pure offense. A reoccuring issue I began to notice was I had a tendency to try and incorporate deeper battle strategies and was switching out too much. In general, staying in and hitting the big fat damage button usually results in a dub until you get to Smart AI.
Round 5:
It's over...
No seriously, all the swapping was just to make sure half the draft is at least usable against opponents who actually go for the throat and will half the time have the actual good set 1 variants of each pokemon.
I know most of the strat portion of this post has just been regurgitating what has already been said in actual guides about this facility; but understanding the swapping mechanics, how smart AI functions, the differences between random/semi-random/smart AI and which level you'll encounter in which round was a huge boon in my performance with this facility (it was really the only way I was actually given a change to win).
This is the filter, and there is too much to write about what I learned to do and how to do it come this far.
Once again the irony is I usually was using a damage calculator with all the sets filled in for Silver Thorton and round 5-7; but I had completely given up on the idea of ever getting this gold print and was playing raw all the way until round 7. This definitely was more than likely a fluke, as having perfect information on everything in a game state is still not enough to win if you have to bet on the enemy not getting a crit slightly less than a couple of times a run.
My Order of operation accessing info(presuming you built a decent team(persuming you read the opponent preview(you didn't, did you?))):
Round 6-7:
Assuming I survive, nothing changes about my approach. The draft is just more fun and reliable as opposed to being primarily composed of gimmicky low accuracy movesets... also LEGENDARIES!!! *I point with my mouth agape*
Play Lv50 mode or you get trolled... or don't you might get lucky.
The battle factory has it's own meta that is better intuited via experience and playtime; you might even remember all that junk you keep referencing on an excel sheet. Though in general, I find the best way to persevere is to just view it as gambling but if it was fun; you know... because it has funny little pocket monster guys and SOME skill (if you're a statistician)...
Failed Attempts and Loss Experience:
To put into perspective my usual batting average for each round I started recording which rounds I lost in and how many times around 10/21/2025. I had been working on this save file on and off since about 2016 and was definitely putting in time into the factory before the aforementiond recording date; so these numbers aren't even half accurate... but I had to offset the purgatory of salt somehow so here:
Round 1: 54 Ls
Round 2: 37 Ls
Round 3: 42 Ls
Round 4: 14 Ls
Round 5: 29 Ls
Round 6: 8 Ls
Round 7: 2 Ls
You can tell I liked to play earlier rounds with youtube on in the background. I don't even care about the streak after gold.
TL;DR just learn gen 4 rng manipulation.
After a bit of trial and error, I've managed to acquire all gold prints in the HGSS battle frontier and it only took 931 hrs... WAIT 931 HOURS??!?
Yeah, based off of the accounts of others on this thread my experience might've overshot the usual grind(I'm trash). The first 200 involved beating and clearing most optional content in the game alongside training/breeding pokes and acquiring 4/5 gold prints; the rest?? Battle Factory.
As a result this post will mostly focus on battle factory as I've not really done anything particularly note worthy in the other facilites that hasn't been done a million times with even less suboptimal teams.
Originally I was never going to post about my experience but reading/watching more and more people's experiences returning to seemingly one of the most difficult piece of pve content you can engage with in an official pokemon game; not only was I motivated to play more but also wanted to share this if anyone else needed vindication for their troubles with this facility.
I didn't record any information so this is pretty much all from memory.
Of course the winning round 7 team ended up being something as ridiculous as Metagross4/Suicune4/Latias4 (Lv50) because as most have alluded to before; success in the battle factory is almost entirely about building/acquiring a self-sufficient team without any major weaknesses and then just minimizing risks in the subsequent battles. If you don't get good pokes, you're just playing with fire until you get good pokes.
This isn't the most cracked team I've gotten in this facility; because believe it or not I've gotten teams in earlier rounds on failed runs that I could only describe as near-autopilot in terms of the decision making. Things like download Porygon-Z seem to just sweep smart AI consistently. I once recall having Lickilicky4/Slaking3/Garchomp4, so pretty much if a problem couldn't be easily solved by Lickilicky > explode lead > into Slaking or Garchomp who both move fast and always hit so hard I basically always outsped and OHKO the last 2 mons. (No Garchomps were featured in this successful run ironically.)
Also unsurprisingly was Thorton's gold team wasn't anything special; I ALREADY FORGOT HIS LEAD but I recall finishing it with earthquake and his last 2 mons were Dugtrio4/Kingdra4. Suicune was brought in after Metagross > Surf dealt with Dugtrio > and admittely Kingdra was kinda scary. I didn't wanna be put in a dilemma where I lost the gold print match because *lmao draco meteor missed tee hee* from Latias but not from the returning Kingdra; but I knew setting up Suicune with calm mind was a tempting bad decision as Kingdra (especially if it had sniper) could just *plap* me with a crit. Knowing this I opted to just keep attacking with ice beams because there is a chance I could crit and/or freeze; and I lucked out as after the Sp.atk drop from Draco Meteor(I kinda forgot about this tbh so I was likely to win either way) the AI went for and missed a hydro pump meaning I could get in another ice beam(I think 2 actually) for extra damage and finish Kingdra off with a safe 100% accuracy thunderbolt from Latias.
Addendum - team from the starting draft was Staraptor4/Suicune4/Latias4, Staraptor was swapped for Metagross mid round to give you perspective on how much influence the draft options have on a round.
General Strategy/Personal Playstyle:
IDK dude, this facility just feels like it has so many "checks" you need to pass; and that's after you get reliable pokemon sets to utilize. If nuzlockes/competitive battling don't do it then battle factory will certainly show you why critical hits were nerfed in subsequent gens. Accuracy is also a huge issue you have to routinely play around. You truly realize how much Pokemon forces you to think and adapt every turn because every turn presents a possible lose condi... you know what, whatever...
Round 1 - 2:
I swapped every battle no matter what to get the 2 elevation picks next round.
The AI being entirely random meant I usually opt to always attack every turn as you'd almost always have an advantage over the AI via damage per turn.
Round 3:
I usually ended up with the 2 elevations in the back row and only swapped the lead position as it seems fit; the main idea being to build the trade count and once I get to silver Thorton I would have a pretty good "mid tier set-2" poke as a lead and 3 other options from the previous battle to counter his lead.
HOWEVER, the winning run I just YOLO swapped after every battle I believe which is also a commonly accepted strategy within battle factory.
(Did I mention this successful run was the first run I did after a long break from playing this game? I also fell asleep halfway in and woke up to a flashing red 3DS.)
Round 4:
Work in a few more swaps to get a 3rd elevation for *gulp* round 5, which usually happens naturally.
Random and Semi-Random AI I feel generally are countered by pure offense. A reoccuring issue I began to notice was I had a tendency to try and incorporate deeper battle strategies and was switching out too much. In general, staying in and hitting the big fat damage button usually results in a dub until you get to Smart AI.
Round 5:
It's over...
No seriously, all the swapping was just to make sure half the draft is at least usable against opponents who actually go for the throat and will half the time have the actual good set 1 variants of each pokemon.
I know most of the strat portion of this post has just been regurgitating what has already been said in actual guides about this facility; but understanding the swapping mechanics, how smart AI functions, the differences between random/semi-random/smart AI and which level you'll encounter in which round was a huge boon in my performance with this facility (it was really the only way I was actually given a change to win).
This is the filter, and there is too much to write about what I learned to do and how to do it come this far.
Once again the irony is I usually was using a damage calculator with all the sets filled in for Silver Thorton and round 5-7; but I had completely given up on the idea of ever getting this gold print and was playing raw all the way until round 7. This definitely was more than likely a fluke, as having perfect information on everything in a game state is still not enough to win if you have to bet on the enemy not getting a crit slightly less than a couple of times a run.
My Order of operation accessing info(presuming you built a decent team(persuming you read the opponent preview(you didn't, did you?))):
- Search trainer class/name to be sure what sets they use (hence why I play Lv50)
- Take into account IVs for damage calculator (we want to know their actual speed stat)
- Take note of how much damage all your moves do and theirs do.
- Take note of abilities and items.
- Given smart AI is quite complicated for specific moves, in general if they can OHKO with a move you know they're going to use it.
- Get confused why the AI didn't use sucker punch > Lose somehow.
Round 6-7:
Assuming I survive, nothing changes about my approach. The draft is just more fun and reliable as opposed to being primarily composed of gimmicky low accuracy movesets... also LEGENDARIES!!! *I point with my mouth agape*
Play Lv50 mode or you get trolled... or don't you might get lucky.
The battle factory has it's own meta that is better intuited via experience and playtime; you might even remember all that junk you keep referencing on an excel sheet. Though in general, I find the best way to persevere is to just view it as gambling but if it was fun; you know... because it has funny little pocket monster guys and SOME skill (if you're a statistician)...
Failed Attempts and Loss Experience:
To put into perspective my usual batting average for each round I started recording which rounds I lost in and how many times around 10/21/2025. I had been working on this save file on and off since about 2016 and was definitely putting in time into the factory before the aforementiond recording date; so these numbers aren't even half accurate... but I had to offset the purgatory of salt somehow so here:
Round 1: 54 Ls
Round 2: 37 Ls
Round 3: 42 Ls
Round 4: 14 Ls
Round 5: 29 Ls
Round 6: 8 Ls
Round 7: 2 Ls
You can tell I liked to play earlier rounds with youtube on in the background. I don't even care about the streak after gold.
TL;DR just learn gen 4 rng manipulation.
Attachments


sorry this took so long to reply to; I was catching a flight as I made the post.Video is not required, but it's better to have footage than not. Details of your "team" are needed though, a pokepaste or showdown exports of the p-zs you used and which types they faced will do
https://pokepast.es/ca3795e22305d9bb
these are the Porygon-Z sets used for each type, with a Choice Specs Porygon-Z named Miku Beam once I get past the 10er rounds.

I’m reporting a PtHGSS Battle Tower Doubles streak of 296 on retail HeartGold.
Here’s the team:

BitchAlarm (Bronzong) @ Lum Berry
Ability: Heatproof
Level: 50
EVs: 252 HP / 252 Atk / 4 SpD
Brave Nature
IVs: 27-28 HP / 28-29 Def / 24-25 SpD / 0 Spe
- Iron Head
- Earthquake
- Trick Room
- Explosion

Martyr (Togetic) (M) @ Focus Sash
Ability: Serene Grace
Level: 2
IVs: x HP / x Atk / x Def / x SpA / x SpD / 0-19 Spe
- Protect
- Endeavor
- Follow Me
- Encore

HurrDurr (Slowbro) (F) @ Life Orb
Ability: Own Tempo
Level: 50
EVs: 252 HP / 252 SpA / 4 SpD
Quiet Nature
IVs: 25-26 HP / 28-29 Atk / 29-30 SpA / 23-24 SpD / 2-3 Spe
- Psychic
- Flamethrower
- Grass Knot
- Trick Room

Hecaton (Machamp) (M) @ Iron Ball
Ability: No Guard
Level: 50
EVs: 252 HP / 252 Atk / 4 SpD
Brave Nature
IVs: 25-26 HP / 28-29 Def / x SpA / 4-5 Spe
- Dynamic Punch
- Stone Edge
- Fling
- Protect
My team is heavily derived from Jheisinho’s 1001-streak team of Bronzong, Togekiss, Machamp, Slowbro. The main differences are that I used Togetic over Togekiss because of its lower base HP, and none of my Pokemon have perfect IVs. I took the best candidates I could find from a couple hours of breeding for each team member, and went with those. Except for Machamp, which was caught. I don’t actually know the exact IVs for all my team members, so I’ve shown the possible ranges their stats can have where they are unknown. Irrelevant stats/IVs are represented with an x, and omitted stats are 31.
My strategy for each battle revolved around setting up Trick Room turn 1 with Togetic Protecting, then keeping Togetic alive for most of the battle as I use its Endeavor in combination with Bronzong’s Earthquake and Iron Head to KO at least one opposing Pokemon each turn. The main goal was to finish the battle within a single Trick Room duration, if not sooner. Most battles would last exactly five turns, but some would last more if the opponent had a bulky but mostly non-threatening mon on their team, such as Cradily 2 or most Slaking sets. Earthquake especially was useful, as most of the time Togetic could Endeavor something while Bronzong KOs it and simultaneously chips the other mon.
If a fairly frail, Ground-weak pokemon like Raichu, Toxicroak, or Blaziken was on the field next to a non-Ghost, non-floating mon, and I didn’t Protect Togetic the previous turn, I would Protect while Bronzong Earthquakes to knock the Ground-weak mon below half HP, then Endeavor the other mon and Earthquake again next turn. This would give me a two-for-one KO while keeping Togetic alive. I would also use this Endeavor-Protect-Endeavor line on Togetic if the opponent had a mon in lead that could be 3HKO’d by Earthquake, and their partner wasn’t immune to EQ.
It was close to a 50/50 on who I would value staying alive more between Bronzong and Togetic, but I found myself preserving Togetic slightly more often, as Endeavor and the AI hard-focusing it was the team’s biggest asset. I didn’t really mention it above enough, but Togetic almost constantly funneling the AI into attacking it singlehandedly made most battles a sweep in the team’s favour. Bronzong’s relatively weak attack power also didn’t mean a whole lot with Togetic setting it up for clean KOs constantly.
Bronzong’s Explosion was probably the team’s second biggest asset. I wouldn’t use it needlessly, but if I was at least one Pokemon up on the opponent, both active mons were in KO range for Explosion, and especially, if one of them was a floater, I’d go for it more often than not. Explosion was perhaps most useful for preserving Trick Room turns. If I went a turn without being able to KO anything for any reason, and there were no Ghosts, going boom was a fairly easy decision to make. I’d most often do it with Togetic still alive, and while I’d normally Protect with Togetic on these turns, sometimes I’d elect to Endeavor instead if there was something I *really* needed dead that may not have died on its own.
Slowbro and Machamp formed an excellent backline for the team. Both are bulky and strong attackers that can clean up what Bronzong and Togetic left behind, each with little support from my remaining lead. Most often, I found myself sending Slowbro out to replace Bronzong, and Machamp to replace Togetic, as they both plug holes that might be left by the leads fainting. Slowbro being a second Trick Room setter didn’t come up all too often, but there were absolutely a handful of battles where Bronzong would go down on turn 1 to a crit or stray OHKO that would have been lost without Slowbro to set up next turn. Slowbro’s damage was good enough to clean up some stragglers, but I found it wasn’t strong enough to do so entirely on its own much of the time, and it benefitted from Togetic’s help more than Machamp general did. Machamp, on the other hand, was a revenge-killing machine, able to pick up KOs with little or no support from Bronzong, should Togetic fall first. DynamicPunch with No Guard, combined with Bronzong’s Iron Head, were excellent for disrupting bulky opponents that wouldn’t go down in just one turn of doubling into them.
The biggest threat to this team was definitely Rock Slide flinches, which Togetic’s Flying type definitely encouraged the AI to use a lot more. If Bronzong flinched turn 1, I’d weigh the future value of Togetic’s Endeavor versus a backliner’s ability tank whatever the current opposing leads could throw at me. If the position was too awkward for Machamp or Slowbro to break out of with just Bronzong’s help, I would then swap Togetic out for a backliner (usually Machamp) as a sacrifice while Bronzong tries to get up Trick Room again. If, however, the backliners were likely able to OHKO the opposing leads after a safe switch-in, I’d then go for the double-Protect on Togetic as, if it fails, I know my backline can handle things. If Bronzong flinched again turn 2, either Machamp would Protect if it was in, or I’d switch Togetic out instead of risking the triple-Protect.
Marowak 3 and 4, but especially 4, were also huge threats when they would appear. The best strategy I had against them was simply to hope they didn’t click Earthquake, as that was a guaranteed OHKO on Bronzong. Switching Slowbro in wasn’t really an option, as it would just die the following turn if it survived an EQ meant for Bronzong.
In the end, the streak didn’t end to any real threats, or to bad RNG. It ended to me misclicking Explosion instead of Earthquake on Bronzong. Once I misclicked, the battle was basically unwinnable from any position I could see, especially since I exploded on two Rock/Steel types, which barely did anything. Protecting with Togetic the turn Scizor came out would have preserved it for another turn while Slowbro KO’d Scizor with Flamethrower, but between Aggron chipping away at Slowbro with Rock Slide, Life Orb recoil, and Sandstorm chip, there was no way I could have reasonably come back with just Togetic alive.
Video of the loss:
Here’s the team:
BitchAlarm (Bronzong) @ Lum Berry
Ability: Heatproof
Level: 50
EVs: 252 HP / 252 Atk / 4 SpD
Brave Nature
IVs: 27-28 HP / 28-29 Def / 24-25 SpD / 0 Spe
- Iron Head
- Earthquake
- Trick Room
- Explosion
Martyr (Togetic) (M) @ Focus Sash
Ability: Serene Grace
Level: 2
IVs: x HP / x Atk / x Def / x SpA / x SpD / 0-19 Spe
- Protect
- Endeavor
- Follow Me
- Encore
HurrDurr (Slowbro) (F) @ Life Orb
Ability: Own Tempo
Level: 50
EVs: 252 HP / 252 SpA / 4 SpD
Quiet Nature
IVs: 25-26 HP / 28-29 Atk / 29-30 SpA / 23-24 SpD / 2-3 Spe
- Psychic
- Flamethrower
- Grass Knot
- Trick Room
Hecaton (Machamp) (M) @ Iron Ball
Ability: No Guard
Level: 50
EVs: 252 HP / 252 Atk / 4 SpD
Brave Nature
IVs: 25-26 HP / 28-29 Def / x SpA / 4-5 Spe
- Dynamic Punch
- Stone Edge
- Fling
- Protect
My team is heavily derived from Jheisinho’s 1001-streak team of Bronzong, Togekiss, Machamp, Slowbro. The main differences are that I used Togetic over Togekiss because of its lower base HP, and none of my Pokemon have perfect IVs. I took the best candidates I could find from a couple hours of breeding for each team member, and went with those. Except for Machamp, which was caught. I don’t actually know the exact IVs for all my team members, so I’ve shown the possible ranges their stats can have where they are unknown. Irrelevant stats/IVs are represented with an x, and omitted stats are 31.
My strategy for each battle revolved around setting up Trick Room turn 1 with Togetic Protecting, then keeping Togetic alive for most of the battle as I use its Endeavor in combination with Bronzong’s Earthquake and Iron Head to KO at least one opposing Pokemon each turn. The main goal was to finish the battle within a single Trick Room duration, if not sooner. Most battles would last exactly five turns, but some would last more if the opponent had a bulky but mostly non-threatening mon on their team, such as Cradily 2 or most Slaking sets. Earthquake especially was useful, as most of the time Togetic could Endeavor something while Bronzong KOs it and simultaneously chips the other mon.
If a fairly frail, Ground-weak pokemon like Raichu, Toxicroak, or Blaziken was on the field next to a non-Ghost, non-floating mon, and I didn’t Protect Togetic the previous turn, I would Protect while Bronzong Earthquakes to knock the Ground-weak mon below half HP, then Endeavor the other mon and Earthquake again next turn. This would give me a two-for-one KO while keeping Togetic alive. I would also use this Endeavor-Protect-Endeavor line on Togetic if the opponent had a mon in lead that could be 3HKO’d by Earthquake, and their partner wasn’t immune to EQ.
It was close to a 50/50 on who I would value staying alive more between Bronzong and Togetic, but I found myself preserving Togetic slightly more often, as Endeavor and the AI hard-focusing it was the team’s biggest asset. I didn’t really mention it above enough, but Togetic almost constantly funneling the AI into attacking it singlehandedly made most battles a sweep in the team’s favour. Bronzong’s relatively weak attack power also didn’t mean a whole lot with Togetic setting it up for clean KOs constantly.
Bronzong’s Explosion was probably the team’s second biggest asset. I wouldn’t use it needlessly, but if I was at least one Pokemon up on the opponent, both active mons were in KO range for Explosion, and especially, if one of them was a floater, I’d go for it more often than not. Explosion was perhaps most useful for preserving Trick Room turns. If I went a turn without being able to KO anything for any reason, and there were no Ghosts, going boom was a fairly easy decision to make. I’d most often do it with Togetic still alive, and while I’d normally Protect with Togetic on these turns, sometimes I’d elect to Endeavor instead if there was something I *really* needed dead that may not have died on its own.
Slowbro and Machamp formed an excellent backline for the team. Both are bulky and strong attackers that can clean up what Bronzong and Togetic left behind, each with little support from my remaining lead. Most often, I found myself sending Slowbro out to replace Bronzong, and Machamp to replace Togetic, as they both plug holes that might be left by the leads fainting. Slowbro being a second Trick Room setter didn’t come up all too often, but there were absolutely a handful of battles where Bronzong would go down on turn 1 to a crit or stray OHKO that would have been lost without Slowbro to set up next turn. Slowbro’s damage was good enough to clean up some stragglers, but I found it wasn’t strong enough to do so entirely on its own much of the time, and it benefitted from Togetic’s help more than Machamp general did. Machamp, on the other hand, was a revenge-killing machine, able to pick up KOs with little or no support from Bronzong, should Togetic fall first. DynamicPunch with No Guard, combined with Bronzong’s Iron Head, were excellent for disrupting bulky opponents that wouldn’t go down in just one turn of doubling into them.
The biggest threat to this team was definitely Rock Slide flinches, which Togetic’s Flying type definitely encouraged the AI to use a lot more. If Bronzong flinched turn 1, I’d weigh the future value of Togetic’s Endeavor versus a backliner’s ability tank whatever the current opposing leads could throw at me. If the position was too awkward for Machamp or Slowbro to break out of with just Bronzong’s help, I would then swap Togetic out for a backliner (usually Machamp) as a sacrifice while Bronzong tries to get up Trick Room again. If, however, the backliners were likely able to OHKO the opposing leads after a safe switch-in, I’d then go for the double-Protect on Togetic as, if it fails, I know my backline can handle things. If Bronzong flinched again turn 2, either Machamp would Protect if it was in, or I’d switch Togetic out instead of risking the triple-Protect.
Marowak 3 and 4, but especially 4, were also huge threats when they would appear. The best strategy I had against them was simply to hope they didn’t click Earthquake, as that was a guaranteed OHKO on Bronzong. Switching Slowbro in wasn’t really an option, as it would just die the following turn if it survived an EQ meant for Bronzong.
In the end, the streak didn’t end to any real threats, or to bad RNG. It ended to me misclicking Explosion instead of Earthquake on Bronzong. Once I misclicked, the battle was basically unwinnable from any position I could see, especially since I exploded on two Rock/Steel types, which barely did anything. Protecting with Togetic the turn Scizor came out would have preserved it for another turn while Slowbro KO’d Scizor with Flamethrower, but between Aggron chipping away at Slowbro with Rock Slide, Life Orb recoil, and Sandstorm chip, there was no way I could have reasonably come back with just Togetic alive.
Video of the loss:
Attachments

Last edited:
Not the best record but it's my first run; I used Latios, Suicune, and Lucario. I will show the sets below

Judging by your Lucario's and Suicune's sprites, that's because you're playing on Platinum. The DP Battle Tower has different sets than the ones used for the PtHGSS Battle Tower/rest of the Frontier.I lost to a damn Swords Dance Vileplume, but the set wasn't anything like the sets shown on the Smogon Battle Tower article (it had Frustration and Drain Punch)
insane I missed something so obvious in hindsight lol, thanks a bunchJudging by your Lucario's and Suicune's sprites, that's because you're playing on Platinum. The DP Battle Tower has different sets than the ones used for the PtHGSS Battle Tower/rest of the Frontier.

1:06:19 Battle #1329: Probably the closest battle of this streak so far. Collector Newman has set 1 Pokemon. I decided to set up my Garchomp on Politoed locked into Swagger. Garchomp KO'd Politoed when he was at +6 Atk behind a sub. His second Pokemon turned out to be a Jolly Garchomp with BrightPowder. It's a speed tie. He wins the first speed tie while I miss because of BrightPowder. I lose the second speed tie as well and he kills me with Dragon Claw. At that point, as you can hear from my commentary, I had already thrown the towel, because I knew the chances here were very slim. Registeel managed to pull the win because the AI Garchomp opened with Double Team and I was able to set up Curse 3 times. Iron Head at +2 Attack does between 45-55% damage so it would be a range to 2HKO Garchomp here. Because it kept Double Teaming I used a 3rd Curse. This had me sweating, since Garchomp managed to use Double Team three times with Sandstorm up and BrightPowder boosting its evasion. Earthquake was also still doing significant damage to Registeel, but Registeel managed to land two Iron Heads and take it down. I was so shook that I forgot the AI still had a 3rd Pokemon Lmao, which turned out to be Umbreon1. Lucky for me, because Registeel shouldn't have too many issues with that although I was at low health and Umbreon has Swagger.
Next time I probably won't go for the Garchomp set up when I face Collector Newman (only trainer with set 1 Pokemon and set 1 Garchomp in the roster) and set up Registeel instead.
1:20:27 Battle #1330: vs Yanmega4 lead. A benefit of having Memento over Charm: Tinted Lens Yanmega4’s Bug Buzz breaks Registeel’s, and when it crits it can bring Registeel to low health. That's why my strat vs Yanmega4 is to lead with Memento so Registeel can set up behind a Sub.

Hey can I get confirmation on whether Battle Tower Pokémon in DP have random natures? The first post says they do, but Bulbapedia has natures listed for them (and yes, I am looking at the DP lists and not the PtHGSS lists). I'm building a facility Pokémon lookup tool and I want to make sure the stat calculations are accurate. So is the master post on this thread correct, or is Bulbapedia?
They have natures assigned in the data but when you encounter them they get overwritten with random ones. Bulbapedia is copying the game data and this thread states the actual practical effect.Hey can I get confirmation on whether Battle Tower Pokémon in DP have random natures? The first post says they do, but Bulbapedia has natures listed for them (and yes, I am looking at the DP lists and not the PtHGSS lists). I'm building a facility Pokémon lookup tool and I want to make sure the stat calculations are accurate. So is the master post on this thread correct, or is Bulbapedia?

But you are aware that there are already tools such as this?: https://lookup.eisencalc.com/Hey can I get confirmation on whether Battle Tower Pokémon in DP have random natures? The first post says they do, but Bulbapedia has natures listed for them (and yes, I am looking at the DP lists and not the PtHGSS lists). I'm building a facility Pokémon lookup tool and I want to make sure the stat calculations are accurate. So is the master post on this thread correct, or is Bulbapedia?


Updating my Battle Factory records: 63 wins in Lv50 and 53 wins in Open Level.


Yeah.
This one happened after I got quite possibly the worst draft I've ever seen especially considering I knew I was against a Steel specialist.

4 Poison Types, 1 Bug and Blissey vs a Steel specialist is already pretty egregious, but the sets were close to the worst possible for the matchup: Crobat1, Vileplume1, Muk3, Skuntank1, Yanmega4 with SpeedBoost and Blissey2 with SereneGrace. A simple Heatran would have to be PPStalled by Blissey for example.
As for how the game went, it was a frustrating loss, see for yourself:

4 Poison Types, 1 Bug and Blissey vs a Steel specialist is already pretty egregious, but the sets were close to the worst possible for the matchup: Crobat1, Vileplume1, Muk3, Skuntank1, Yanmega4 with SpeedBoost and Blissey2 with SereneGrace. A simple Heatran would have to be PPStalled by Blissey for example.
As for how the game went, it was a frustrating loss, see for yourself:
Yeah.
Last edited:

Hello there,After a fairly lackluster loss at battle 441 using the team from my previous post (don't exactly remember the battle itself, all I remember is that I underestimated an Ampharos, which ultimately led to my loss), I used the opportunity to start from scratch with a new Battle Tower Doubles team that I've been testing.
Currently at 161 wins (ongoing).
Cepha (Garchomp) @ Focus Sash
Ability: Sand Veil
Level: 50
EVs: 4 HP / 252 Atk / 252 Spe
Jolly Nature
- Earthquake
- Dragon Claw
- Swords Dance
- Protect
Tethys (Cresselia) @ Leftovers
Ability: Levitate
Level: 50
Shiny: Yes
EVs: 252 HP / 60 Def / 112 SpD / 84 Spe
Bold Nature
IVs: 0 Atk
- Psychic
- Icy Wind
- Grass Knot
- Helping Hand
Zapdos @ Life Orb
Ability: Pressure
Level: 50
EVs: 4 HP / 252 SpA / 252 Spe
Timid Nature
IVs: 2 Atk / 30 Def
- Thunderbolt
- Heat Wave
- Hidden Power [Ice]
- Protect
Scizor @ Lum Berry
Ability: Technician
Level: 50
EVs: 92 HP / 248 Atk / 4 Def / 164 Spe
Adamant Nature
IVs: 11 SpA
- Bug Bite
- Bullet Punch
- Swords Dance
- Protect
To be honest, this team has exceeded my expectations so far. I was never really sold on Garchomp in this format, especially in the lead position. But with the aid of Cresselia, it can accomplish things it cannot otherwise. Cresselia's role is to support Garchomp in anything it struggles with. Icy Wind drops the speed of threats that outspeed Garchomp, such as Weavile, Froslass or Starmie, which can then get dealt with by Garchomp. Grass Knot is mainly used to inflict decent damage on bulky Water types, which can put them into KO range for Garchomp. Helping Hand boosted Earthquakes can put some serious dents into the opposing teams, and helps Garchomp achieve KO's that it wouldn't get without the boost. Zapdos is the team's special attacker, and is needed to deal with the occasional Skarmory and Bronzong (which can both wall Garchomp and Cresselia), as well as having a way to effectively deal with Water types. Since the team has a big problem with Ice types, Scizor makes for a decent partner in the last slot. It's upsides compared to Metagross is that thanks to the ability Technician, it has a stronger Bullet Punch by default, which allows it to safely OHKO both Froslass and Weavile. Scizor gets often switched in for Garchomp due to potential incoming Ice type attacks, which is why a Lum Berry is required to avoid a freeze, which could end up being fatal.
The EV spreads are mostly pretty standard. Cresselia has enough investment in HP and physical defense to survive a critical hit from Weavile's Night Slash, the rest went into SpD to balance it's defensive stats out. 84 Speed EVs makes it outspeed the Jynx sets that carry status moves, so that it can at least act before it gets put to sleep. 164 Speed EVs makes Scizor faster than Cresselia, as well as most Gardevoir sets, which eases the match-ups against those. The rest went into bulk to increase it's longevity (it actually lives a Fire Punch from Hypno and a Fire Fang from Steelix).
If anyone has any suggestions to improve this team, I'd be glad to hear them.


short update: the streak came to an end at 270 wins.
I did a few other attempts after the loss to see if I could crack the 300 win streak, but wasn't able to get anywhere near that point again.
Nonetheless, I'm pretty satisfied with this result and I think that the team has the potential to go over 300 wins one day.
At battle 271, I faced a team of Abomasnow, Hippowdon, Pinsir and Metagross.
Opponent sent out Abomasnow and Hippowdon. Luckily, Sand Stream triggered after Snow Warning, so I didn't have to worry about Garchomp's Focus Sash breaking turn 1.
Opponent sent out Abomasnow and Hippowdon. Luckily, Sand Stream triggered after Snow Warning, so I didn't have to worry about Garchomp's Focus Sash breaking turn 1.
- Turn 1 Garchomp protects and Cresselia attacks Hippowdon with Grass Knot, dealing about 50% damage. Both opponents go for Garchomp with Sheer Cold and Ice Fang.
- Turn 2 Garchomp attacks Abomasnow with Dragon Claw, and then faints due to Sheer Cold and Ice Fang hitting it. Cresselia goes for Hippowdon with Grass Knot, but it survived with a sliver of HP left.
- Turn 3 Scizor finishes Abomasnow off with Bullet Punch, and Cresselia finishes Hippowdon off with Psychic.
- Turn 4 Metagross' Quick Claw activated and used Meteor Mash against Scizor and gets an Atk boost. Scizor weakens Metagross with Bug Bite. Pinsir deals huge damage to Cresselia with X-Scissor and Cresselia attacks Pinsir with Psychic.
- Turn 5 Scizor hits Pinsir with Bullet Punch, but it survived. Metagross finishes off Cresselia with another Meteor Mash and Scizor tanks X-Scissor.
- Turn 6 Scizor finishes off Pinsir with Bullet Punch. Zapdos attacks Metagross with Thunder Bolt, but it barely survived it. Metagross defeats Scizor with Zen Headbutt.
- Turn 7 Metagross' Quick Claw activated and hits Zapdos with Zen Headbutt. Zapdos barely survived it and KOs Metagross with Thunder Bolt. But then Zapdos faints due to Life Orb damage.
It is over. My team reached a streak of 1583 in Platinum Battle Tower Singles.
Lost at Battle #1584 against Ice trainer with Abomasnow2 lead. gg
Abomasnow is one of the toughest opponents my team can face due to Hail (really for any team Abomasnow is an annoying lead), and this time it hit 4 Sheer Colds in a row against me. I had a slight chance to win still, but he had Ice Shard Lapras in the back and Garchomp was without a Sub.
Looking back at this match, I think I rather have switched in Garchomp instead of Registeel after Latios died to Sheer Cold. If Abomasnow hits all Sheer Colds against Garchomp then I could set up Registeel against Struggle, which is not ideal at all, but against Ice Pokemon that would still give me a decent chance. This is rough considering the amount of time it takes on console to reach such a streak.
Overall I'm content that this team reached a streak of 1583, even though I secretly wanted more.
Memento Latios definitely proved it's worth to me. In a lot of situations it's nice to have Memento Latios over Charm Latias since it's easier to get Garchomp in on stuff like Swagger, Leech Seed, Hypnosis, "strong" Struggles etc. An option to cripple powerful special attackers is also an additional bonus.
Tinted Lens Yanmega proved to be an annoying opponent for Lati/Registeel teams, so Memento is a nice tool to have against it. Gastrodon4 is another example where it is useful to have Memento in the back after I have outstalled its Earth Power and Ice Beam.
Another thing I like about Latios compared to Uxie, for example, is that Latios has no issues against strong Fire-type leads such as Blaziken4 and Heatran. I used Choice Scarf Uxie leads in the past, and Blaziken4 was always scary to face.
Here is the playlist of all the battles I recorded and livestreamed:
https://www.youtube.com/playlist?list=PLRQoOpPs8wK4
Initially, I recorded a set of 7 battles every time I passed a new 100 mark.
Later in the streak I recorded more frequently and at Battle #1163 I livestreamed everything.
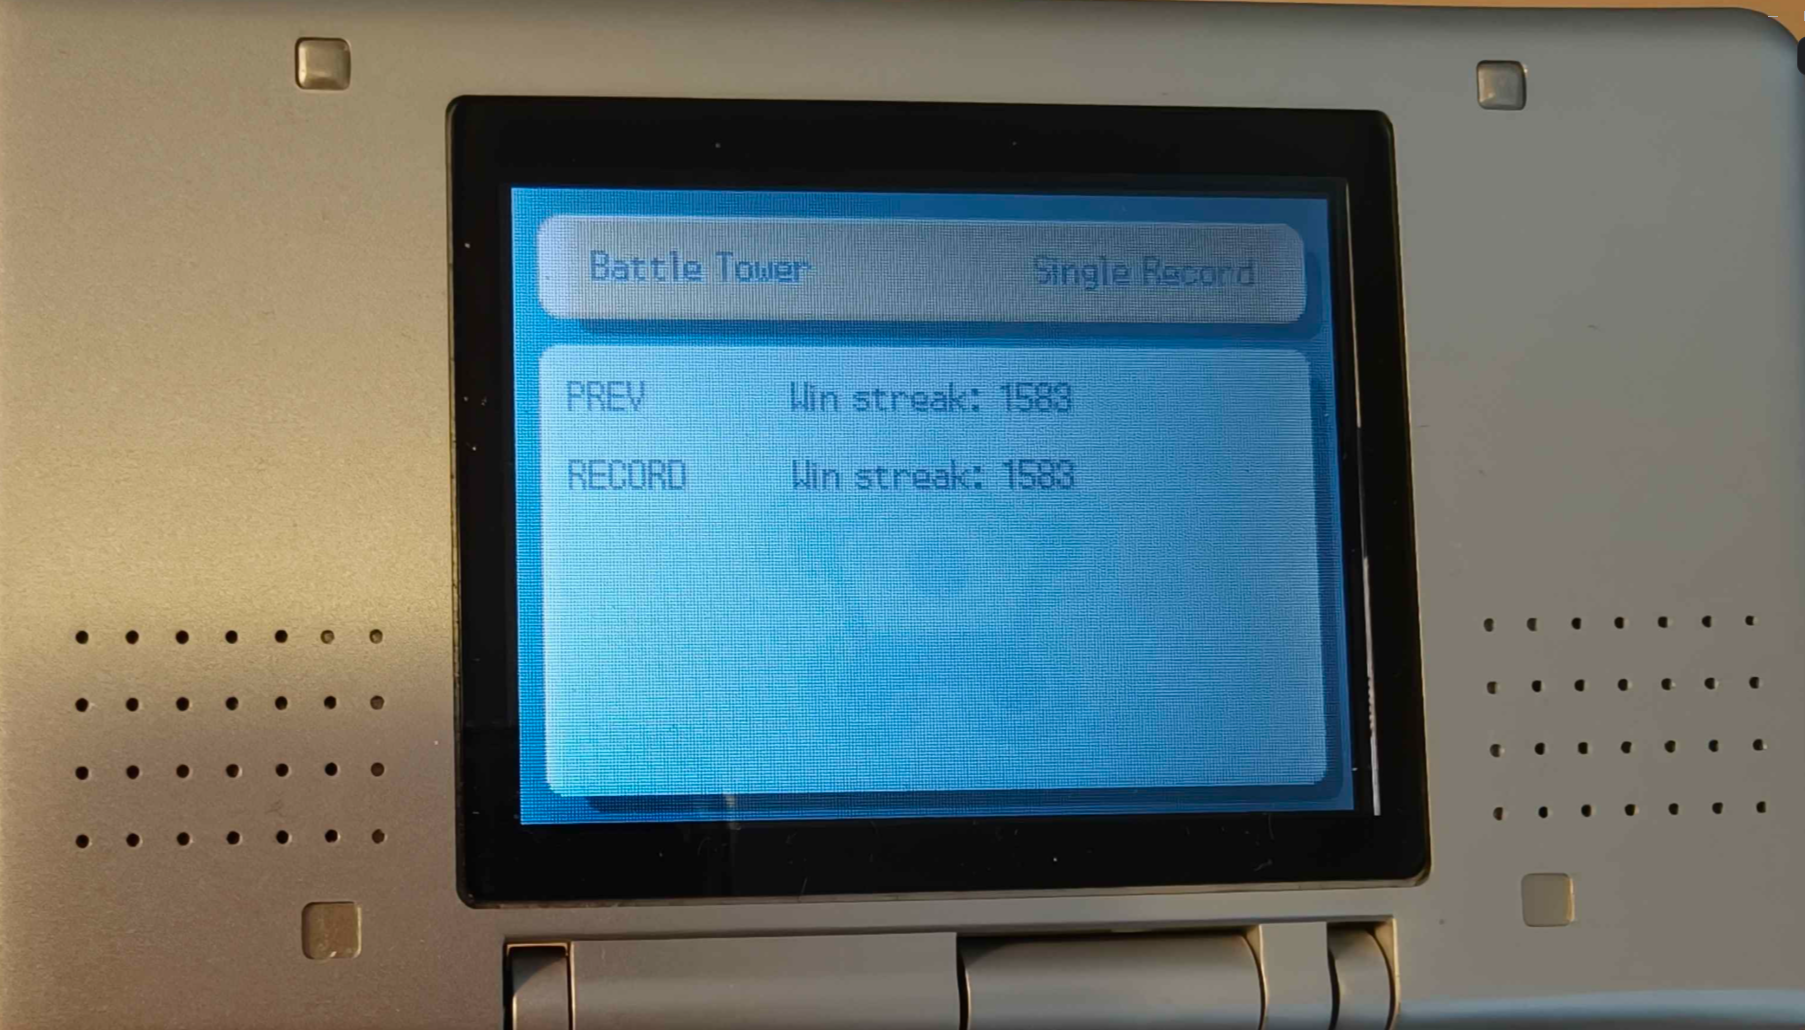
Lost at Battle #1584 against Ice trainer with Abomasnow2 lead. gg
Abomasnow is one of the toughest opponents my team can face due to Hail (really for any team Abomasnow is an annoying lead), and this time it hit 4 Sheer Colds in a row against me. I had a slight chance to win still, but he had Ice Shard Lapras in the back and Garchomp was without a Sub.
Looking back at this match, I think I rather have switched in Garchomp instead of Registeel after Latios died to Sheer Cold. If Abomasnow hits all Sheer Colds against Garchomp then I could set up Registeel against Struggle, which is not ideal at all, but against Ice Pokemon that would still give me a decent chance. This is rough considering the amount of time it takes on console to reach such a streak.
Overall I'm content that this team reached a streak of 1583, even though I secretly wanted more.
Memento Latios definitely proved it's worth to me. In a lot of situations it's nice to have Memento Latios over Charm Latias since it's easier to get Garchomp in on stuff like Swagger, Leech Seed, Hypnosis, "strong" Struggles etc. An option to cripple powerful special attackers is also an additional bonus.
Tinted Lens Yanmega proved to be an annoying opponent for Lati/Registeel teams, so Memento is a nice tool to have against it. Gastrodon4 is another example where it is useful to have Memento in the back after I have outstalled its Earth Power and Ice Beam.
Another thing I like about Latios compared to Uxie, for example, is that Latios has no issues against strong Fire-type leads such as Blaziken4 and Heatran. I used Choice Scarf Uxie leads in the past, and Blaziken4 was always scary to face.
Here is the playlist of all the battles I recorded and livestreamed:
https://www.youtube.com/playlist?list=PLRQoOpPs8wK4
Initially, I recorded a set of 7 battles every time I passed a new 100 mark.
Later in the streak I recorded more frequently and at Battle #1163 I livestreamed everything.
Last edited:

Hey y'all. Decided to run some Battle Hall this weekend. Got a streak of 176 with Scizor on my old HeartGold. Decent run with a favorite of mine. It ain't much, but it's honest work.
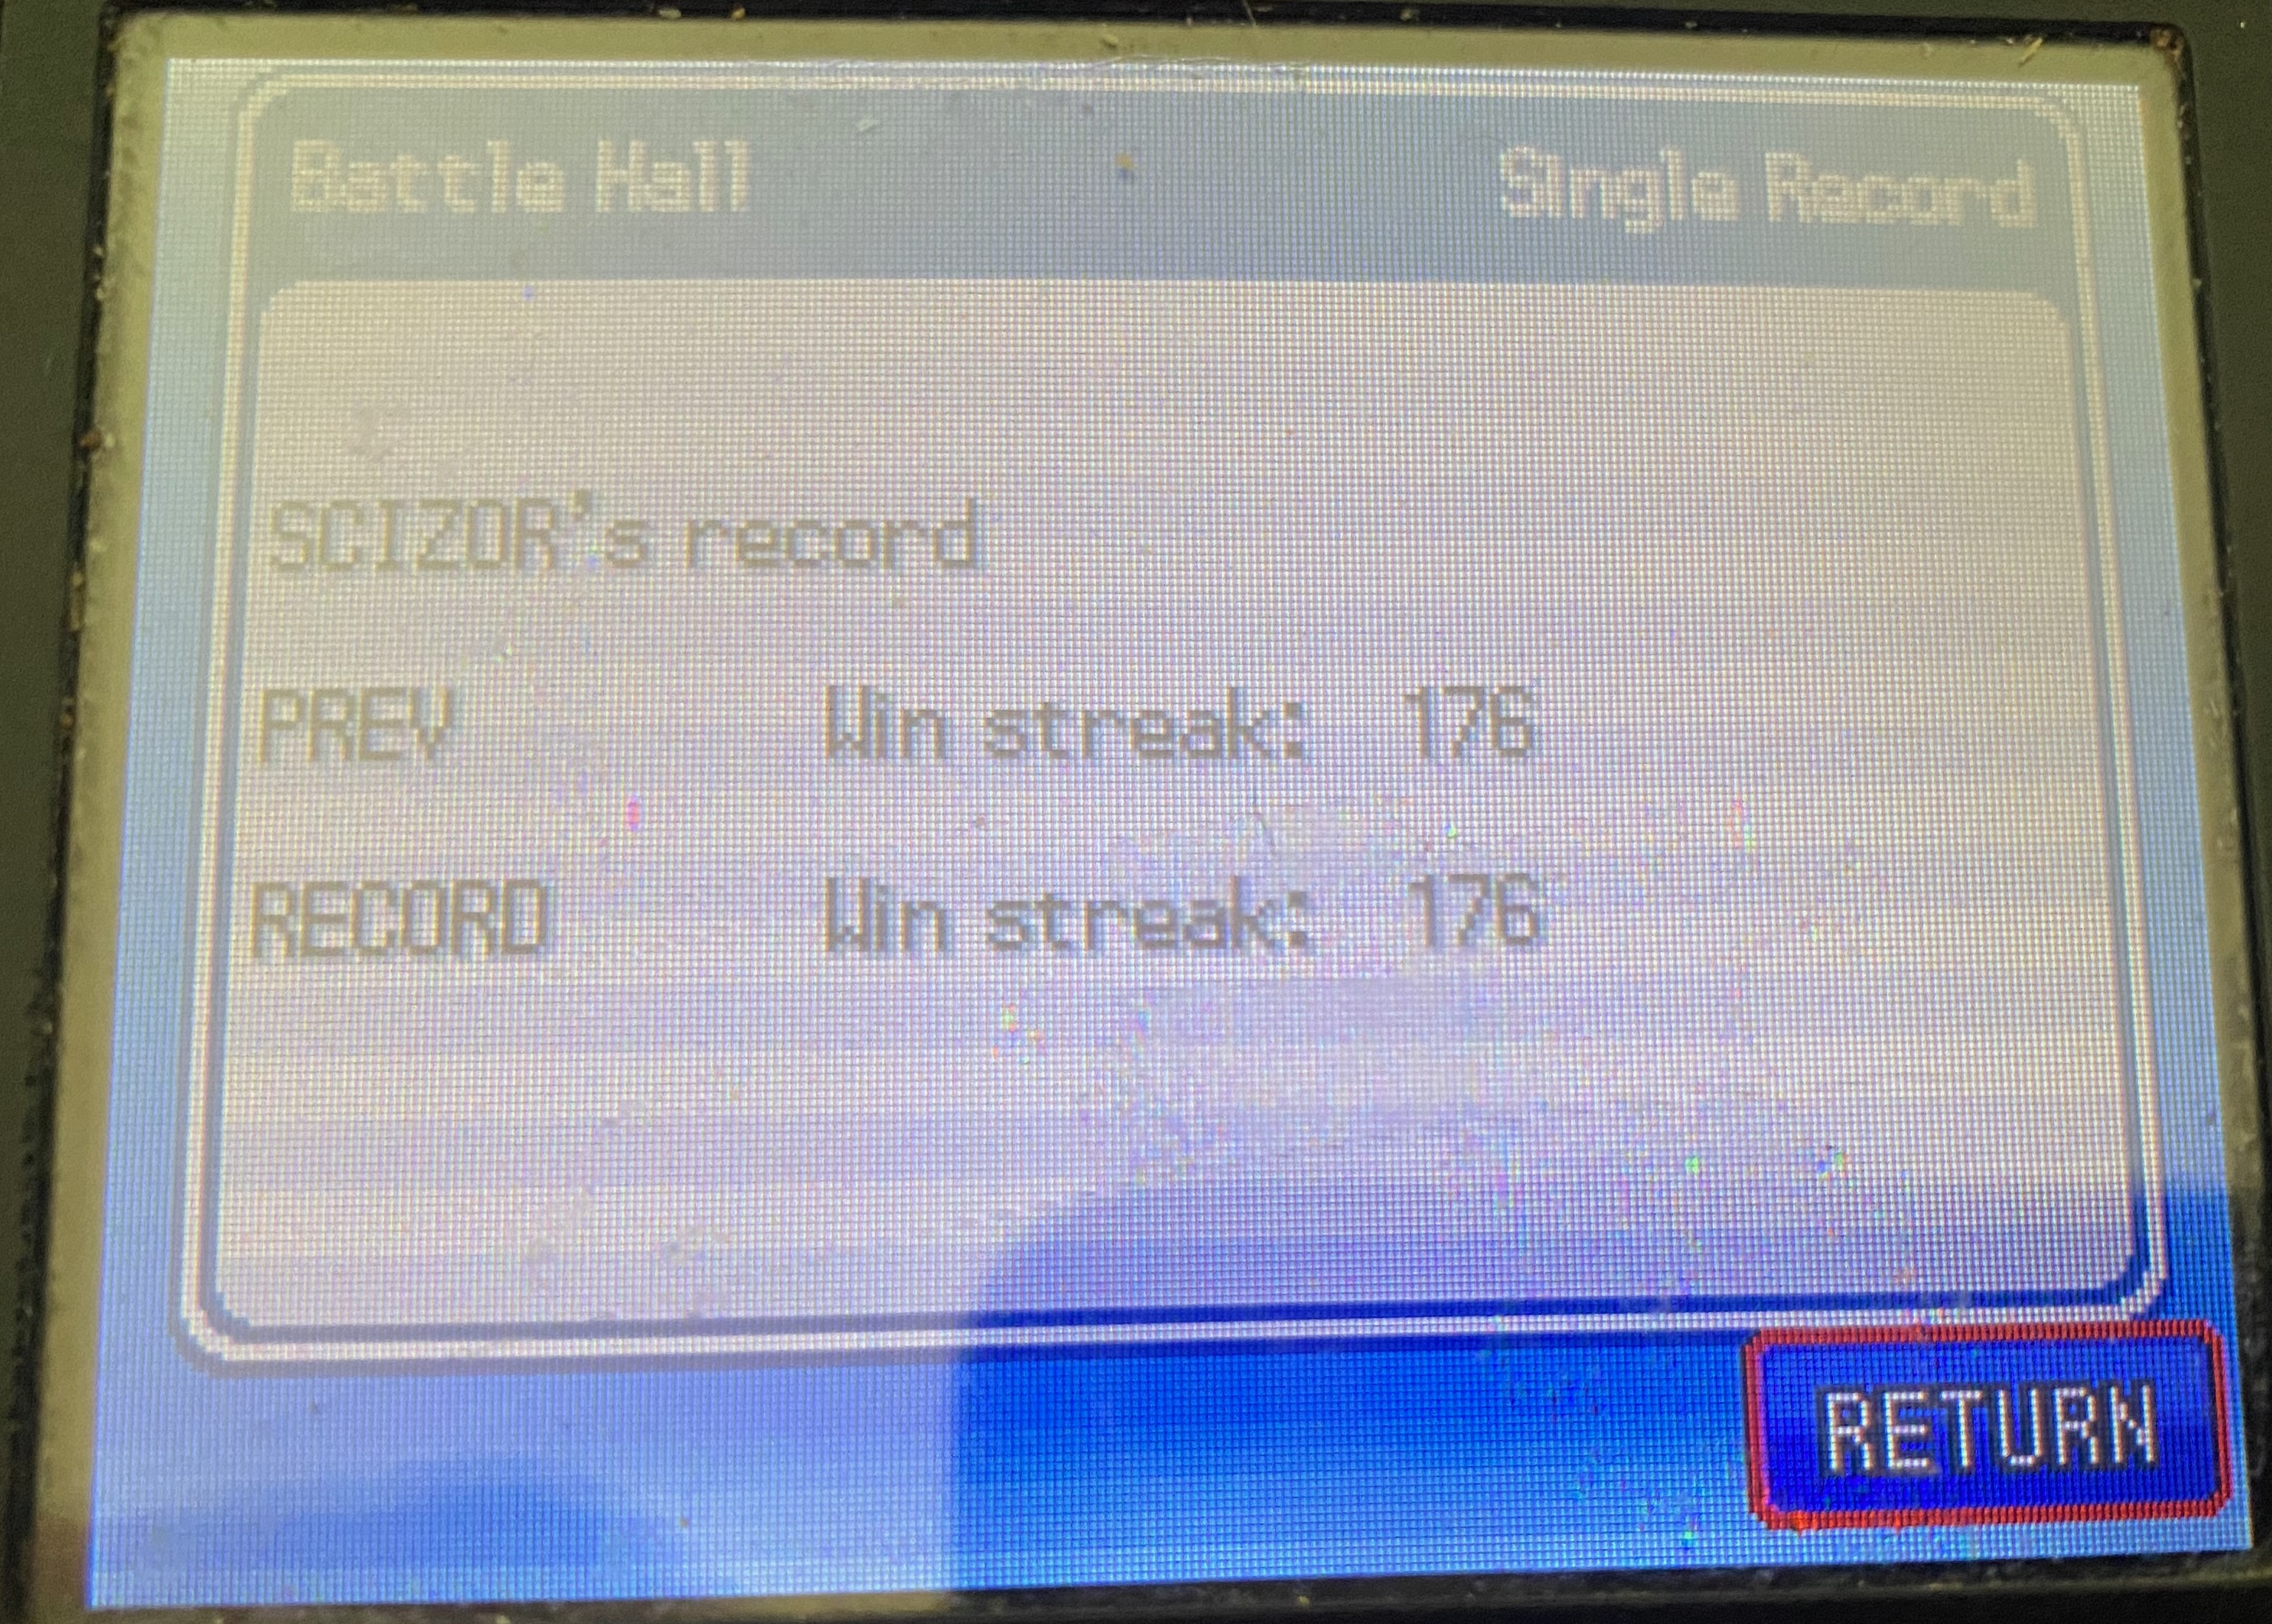
I used the same Scizor from my Battle Tower a few years ago. This was the set for the majority of the run. I made some swaps as I went along, which I will explain later. Screenshots are from right after the streak ended, hence the different moveset. Also, part of my DS's top screen is broken. I was able to borrow a DS for my Battle Factory runs, but had to go back to my old one for this. If you think it's hard to read in these photos, imagine not seeing what level and HP your opponent is at.

Clamps (Scizor) (M) @ Focus Sash
Ability: Technician
EVs: 248 HP / 252 Atk / 8 SpD
Adamant Nature
IVs: 27 Def / 21 SpA / 25 Spe
- Bug Bite
- Bullet Punch
- Superpower
- Aerial Ace
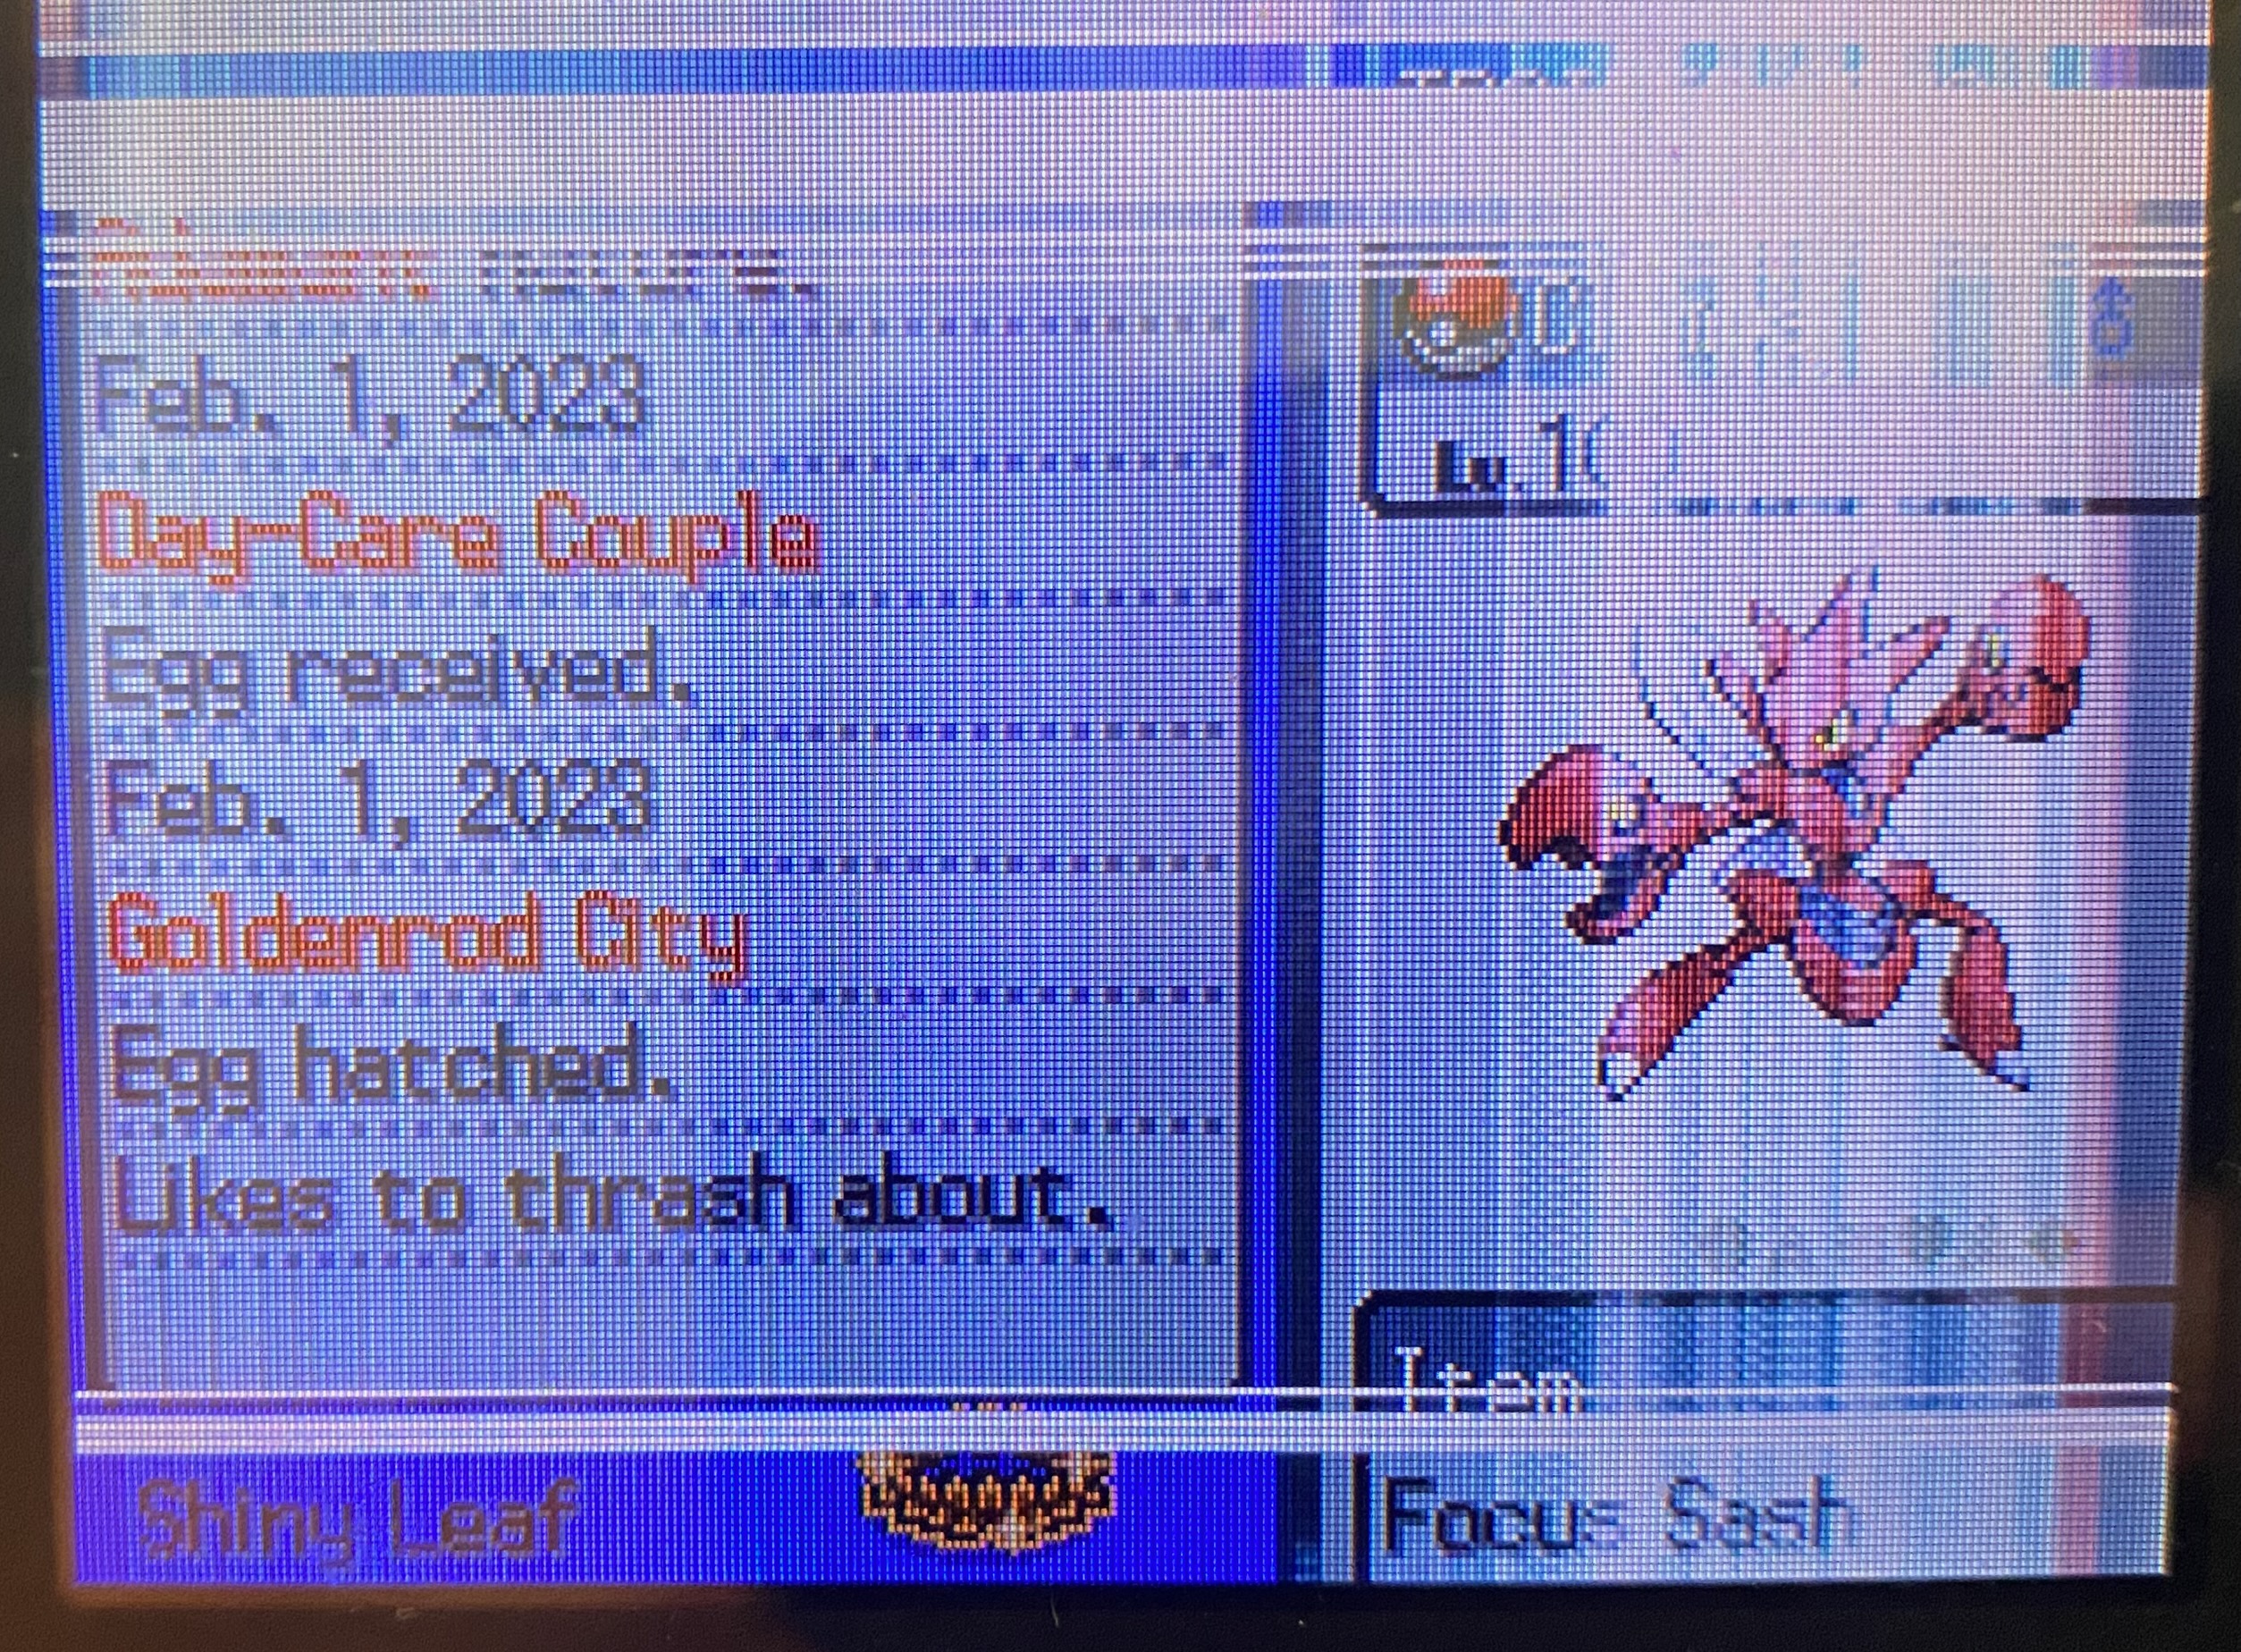
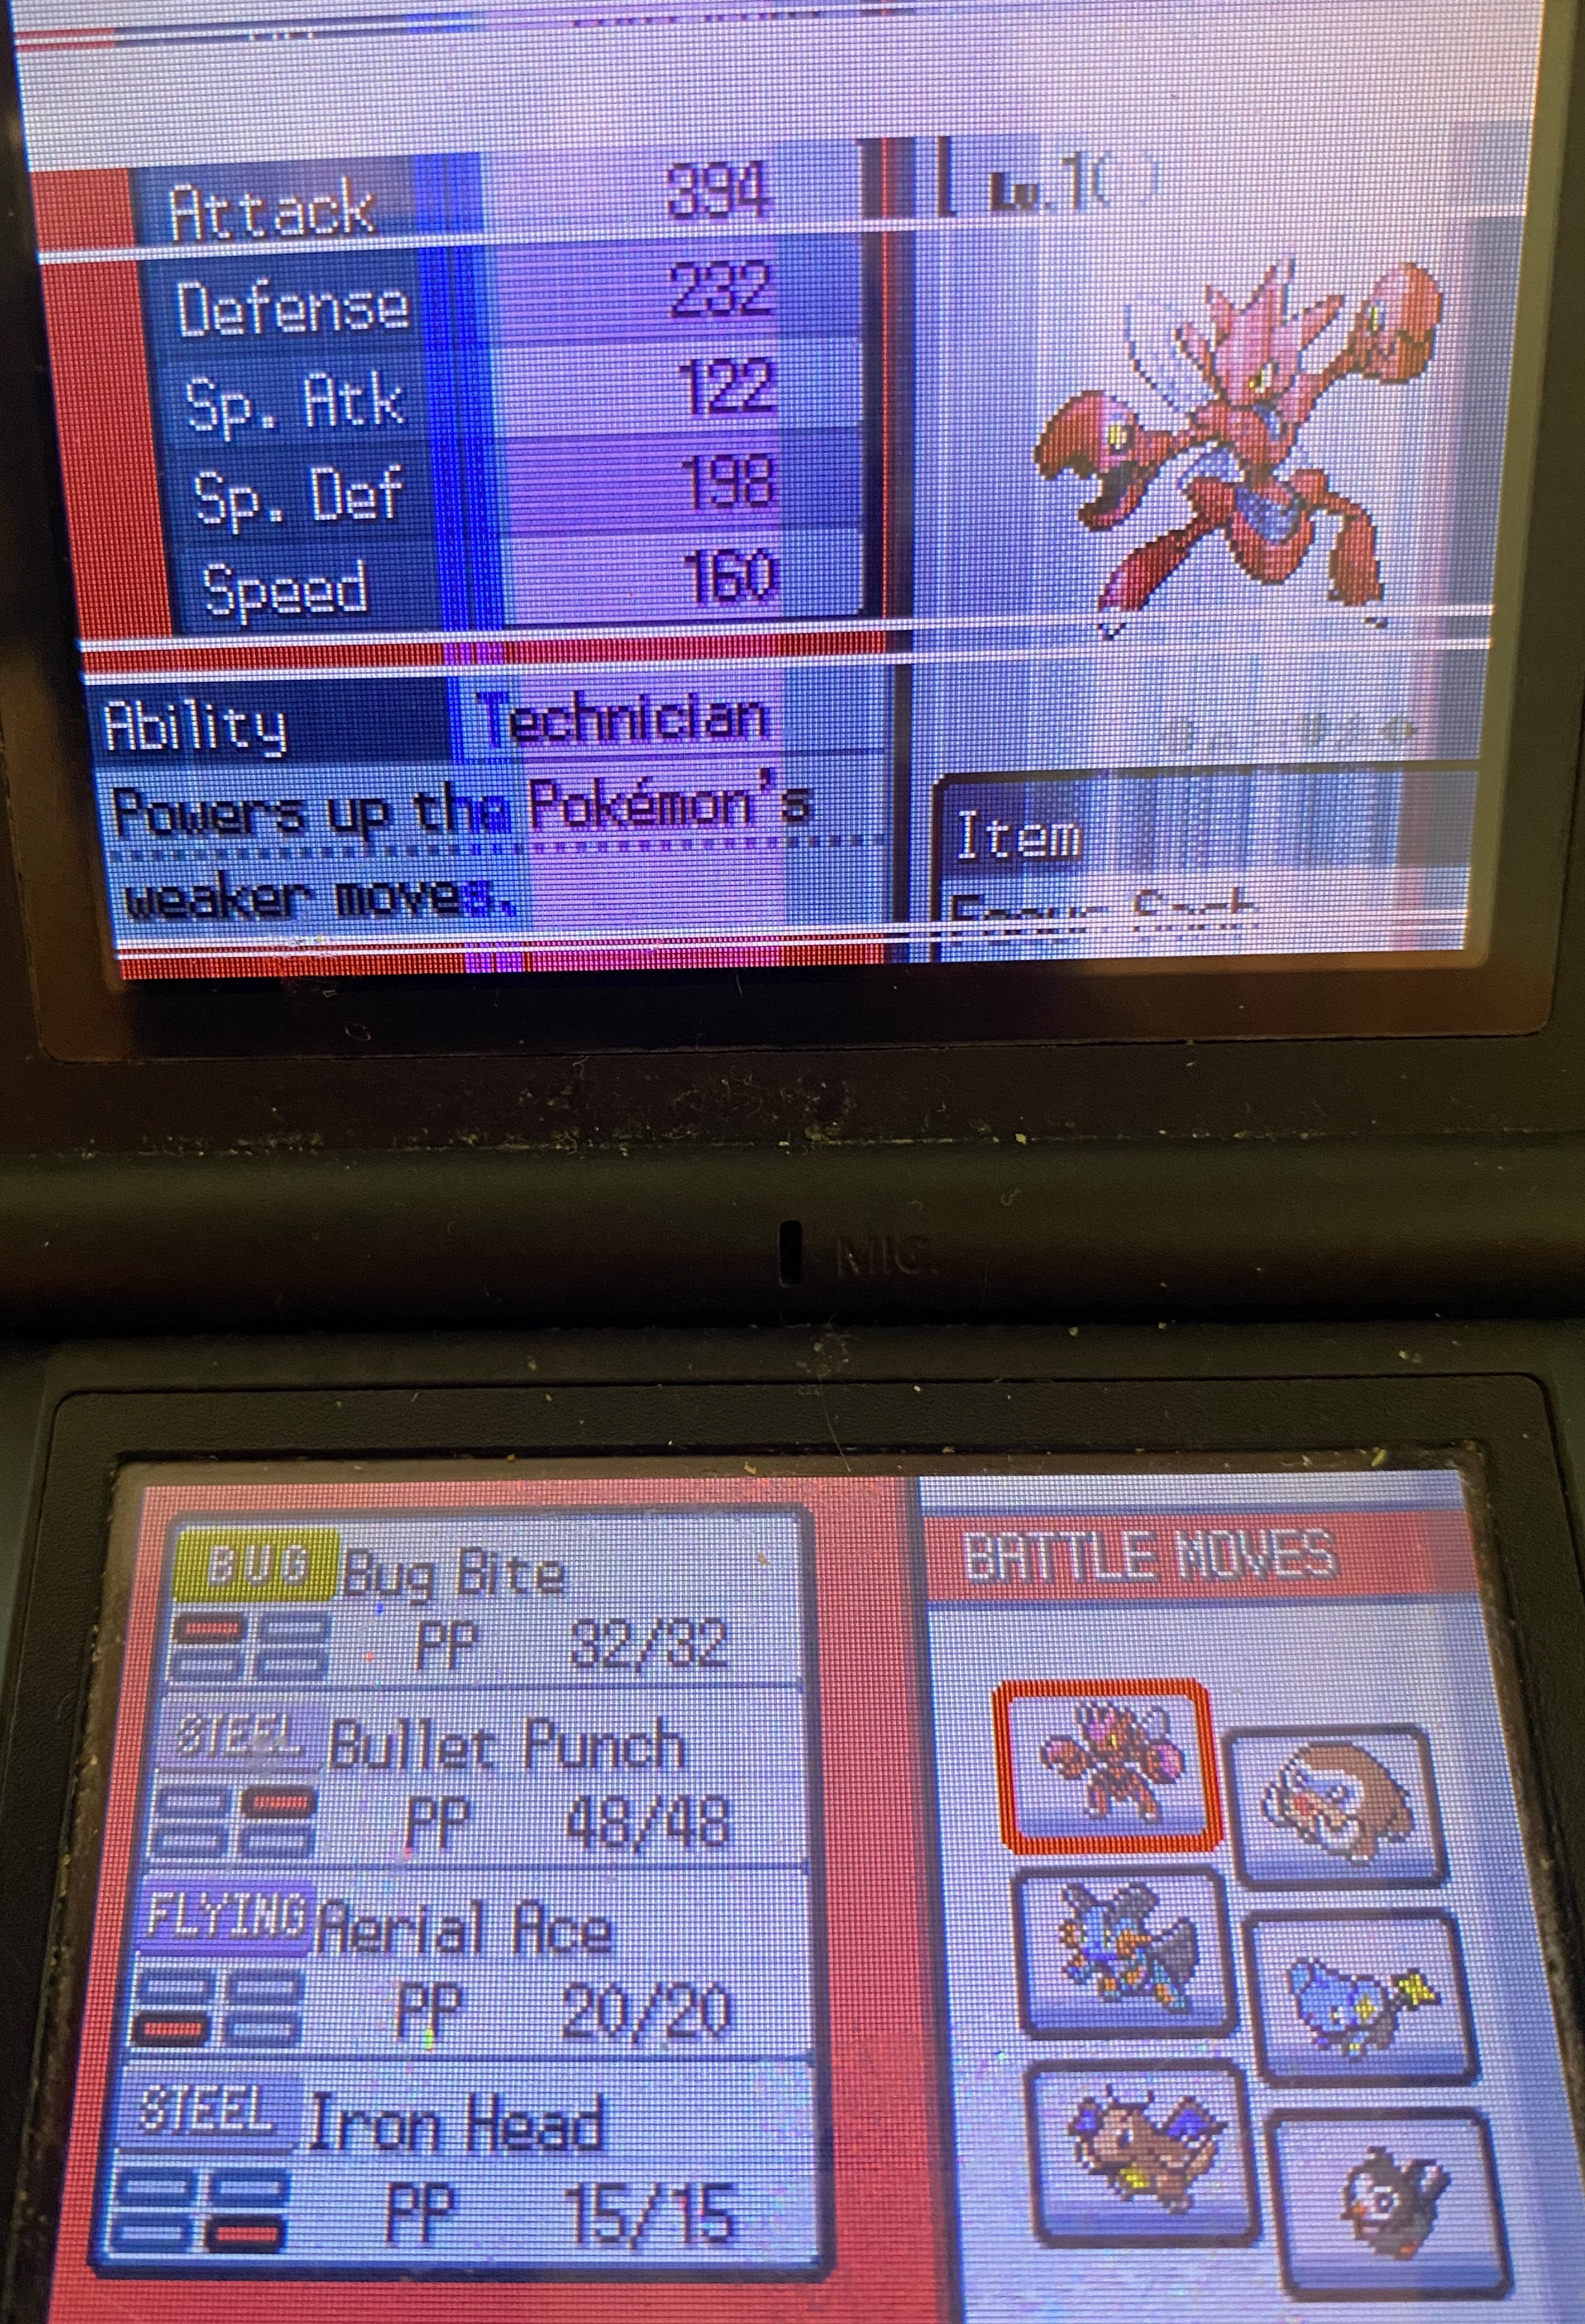
Overall strategy pre-170 was pretty much to hope and pray until Argenta 1, especially the first two types. Anything could KO me from fire, while poison also had a number of threats, namely Weezing, Skuntank, and Swalot. I lost a number of runs quickly to these two types. This time, I ran into Weezing in Battle 17, but it went for Dark Pulse first for some reason, letting me KO with 2 Aerial Aces. Swalot in Battle 18 also went down to 2 Aerial Aces.
From there, flying had a few threats. Pidgeot and Altaria have fire type moves, while Moltres, Zapdos, Gyarados, Skarmory, and Charizard are just about automatic losses. Next was fighting, where Infernape is an automatic loss with correct AI, and a number of mons have fire type moves. I made it through these fairly easily though. Similarly, dark has a few threats. Mightyena was taken care of with Bug Bite after a scare from Swagger in Battle 48, while Choice Scarf Houndoom didn't burn me in Battle 49. Argenta's Heracross was easily dealt with in Battle 50 with Aerial Ace.
From there, I swapped in Swords Dance for Aerial Ace, then Superpower to better deal with Scizor and Forretress in steel and bug. I faced Forretress in Battle 58 and Battle 68, each time winning with Bullet Punch, setting up 3 Swords Dances, and Superpower (58 vs. steel) or Aerial Ace (68 vs. bug). I kept the same set for dragon, which allowed me to beat Altaria with a Swords Dance and Bullet Punch in Battle 78 and Kingdra in Battle 80 with Bug Bite and Bullet Punch. I brought in Night Slash for Swords Dance to handle ghost and psychic types. The only threat there was a Slowbro that survived Bug Bite, but luckily didn't burn me with Flamethrower in Battle 99.
For the final stretch, I taught Superpower to Clamps again, bringing me back to the original moveset. Ground has a lot of hax focused sets, but Camerupt was OHKOed by Superpower in Battle 106, while Whiscash was dealt with in Battle 109 by Bug Bite and Aerial Ace. I avoided paralysis against electric types and hax against water types. Normal type Pidgeot was defeated by 2 Bullet Punches in Battle 129, while Battle 130 was the most interesting match of the day, as a Bug Bite and a Bullet Punch critical hit took out Staraptor. Rock, ice, and grass types went down easily, avoiding hax. Finally, Argenta's second battle ended up being a cake walk against Drapion as shown here.
After Argenta, I did some planning and came up with a rotation for the next group of battles. I planned out the following moveset rotation, with Bug Bite and Bullet Punch set in stone:
Iron Head + Aerial Ace: Psychic (Ace for Espeon + Jynx), Ghost (Head for Dusclops), Dragon (Iron Head for Altaria), Poison (Head for Weezing + Swalot), Ground (Ace for hax + Iron Head for Rhyperior + Nidoqueen), Water (Ace for Poliwrath + hax), Flying (Ace for Crobat + Jumpluff + Head for Staraptor + Skarmory), Fighting (Ace for everything)
Swords Dance + Superpower: Bug (Swords Dance for Forretress + Scizor), Steel (Swords Dance for Forretress + Scizor + Skarmory + Steelix), Electric (Superpower for Magneton + Magnezone), Normal (Superpower for everything), Fire (Superpower is my best hope)
Can use either set and fill in gaps: Grass, Dark, Rock, Ice
I wanted to use a rotation where I could keep the right set for the right types, while also facing the easiest types as early as possible. Therefore, I beat the following Pokemon with the first moveset:
Grass (Venusaur: Ace 2HKO), Dark (Sharpedo: Bug Bite + Bullet Punch KO), Psychic (Espeon: Aerial Ace 2HKO), Ghost (Dusknoir: Iron Head + Curse KO), Dragon (Altaria: Iron Head + BP KO), Poison (Weezing: Iron Head 3HKO after flinch)
After getting lucky in Battle 176, I knew it was only a matter of time before I ran into a loss. It ended up coming in the very next battle against a ground type Steelix, which set up with a few Curses and promptly dispatched of me with Dig and Gyro Ball. I knew that this was a risk with choosing to take it on there instead of with the other set, but Swampert, Whiscash, Sandslash, Gastrodon, and Piloswine all had various evasion tactics to be wary of. Unfortunately, it ended right there. Still though, it was a great run!
I used the same Scizor from my Battle Tower a few years ago. This was the set for the majority of the run. I made some swaps as I went along, which I will explain later. Screenshots are from right after the streak ended, hence the different moveset. Also, part of my DS's top screen is broken. I was able to borrow a DS for my Battle Factory runs, but had to go back to my old one for this. If you think it's hard to read in these photos, imagine not seeing what level and HP your opponent is at.
Clamps (Scizor) (M) @ Focus Sash
Ability: Technician
EVs: 248 HP / 252 Atk / 8 SpD
Adamant Nature
IVs: 27 Def / 21 SpA / 25 Spe
- Bug Bite
- Bullet Punch
- Superpower
- Aerial Ace
Overall strategy pre-170 was pretty much to hope and pray until Argenta 1, especially the first two types. Anything could KO me from fire, while poison also had a number of threats, namely Weezing, Skuntank, and Swalot. I lost a number of runs quickly to these two types. This time, I ran into Weezing in Battle 17, but it went for Dark Pulse first for some reason, letting me KO with 2 Aerial Aces. Swalot in Battle 18 also went down to 2 Aerial Aces.
From there, flying had a few threats. Pidgeot and Altaria have fire type moves, while Moltres, Zapdos, Gyarados, Skarmory, and Charizard are just about automatic losses. Next was fighting, where Infernape is an automatic loss with correct AI, and a number of mons have fire type moves. I made it through these fairly easily though. Similarly, dark has a few threats. Mightyena was taken care of with Bug Bite after a scare from Swagger in Battle 48, while Choice Scarf Houndoom didn't burn me in Battle 49. Argenta's Heracross was easily dealt with in Battle 50 with Aerial Ace.
From there, I swapped in Swords Dance for Aerial Ace, then Superpower to better deal with Scizor and Forretress in steel and bug. I faced Forretress in Battle 58 and Battle 68, each time winning with Bullet Punch, setting up 3 Swords Dances, and Superpower (58 vs. steel) or Aerial Ace (68 vs. bug). I kept the same set for dragon, which allowed me to beat Altaria with a Swords Dance and Bullet Punch in Battle 78 and Kingdra in Battle 80 with Bug Bite and Bullet Punch. I brought in Night Slash for Swords Dance to handle ghost and psychic types. The only threat there was a Slowbro that survived Bug Bite, but luckily didn't burn me with Flamethrower in Battle 99.
For the final stretch, I taught Superpower to Clamps again, bringing me back to the original moveset. Ground has a lot of hax focused sets, but Camerupt was OHKOed by Superpower in Battle 106, while Whiscash was dealt with in Battle 109 by Bug Bite and Aerial Ace. I avoided paralysis against electric types and hax against water types. Normal type Pidgeot was defeated by 2 Bullet Punches in Battle 129, while Battle 130 was the most interesting match of the day, as a Bug Bite and a Bullet Punch critical hit took out Staraptor. Rock, ice, and grass types went down easily, avoiding hax. Finally, Argenta's second battle ended up being a cake walk against Drapion as shown here.
After Argenta, I did some planning and came up with a rotation for the next group of battles. I planned out the following moveset rotation, with Bug Bite and Bullet Punch set in stone:
Iron Head + Aerial Ace: Psychic (Ace for Espeon + Jynx), Ghost (Head for Dusclops), Dragon (Iron Head for Altaria), Poison (Head for Weezing + Swalot), Ground (Ace for hax + Iron Head for Rhyperior + Nidoqueen), Water (Ace for Poliwrath + hax), Flying (Ace for Crobat + Jumpluff + Head for Staraptor + Skarmory), Fighting (Ace for everything)
Swords Dance + Superpower: Bug (Swords Dance for Forretress + Scizor), Steel (Swords Dance for Forretress + Scizor + Skarmory + Steelix), Electric (Superpower for Magneton + Magnezone), Normal (Superpower for everything), Fire (Superpower is my best hope)
Can use either set and fill in gaps: Grass, Dark, Rock, Ice
I wanted to use a rotation where I could keep the right set for the right types, while also facing the easiest types as early as possible. Therefore, I beat the following Pokemon with the first moveset:
Grass (Venusaur: Ace 2HKO), Dark (Sharpedo: Bug Bite + Bullet Punch KO), Psychic (Espeon: Aerial Ace 2HKO), Ghost (Dusknoir: Iron Head + Curse KO), Dragon (Altaria: Iron Head + BP KO), Poison (Weezing: Iron Head 3HKO after flinch)
After getting lucky in Battle 176, I knew it was only a matter of time before I ran into a loss. It ended up coming in the very next battle against a ground type Steelix, which set up with a few Curses and promptly dispatched of me with Dig and Gyro Ball. I knew that this was a risk with choosing to take it on there instead of with the other set, but Swampert, Whiscash, Sandslash, Gastrodon, and Piloswine all had various evasion tactics to be wary of. Unfortunately, it ended right there. Still though, it was a great run!

Hello, I'm a long-time watcher here on Smogon Forums. Pretty sure this is my first time posting here, too. ^_^
I created this team as an experiment for the Gen. 4 AI Multis format, specifically to counter all the various setup and stall strats we've all faced and often lost to in the Battle Tower. The strategy for this team is pretty straightforward: the lead Pokémon runs Taunt and shuts down foes before they can use any status or support moves. Once that happens, they're far less of a threat. Best of all, there are certain Pokémon in the Battle Tower that ONLY run status and support moves. So when they're shut down by Taunt, they're forced to only use Struggle, which takes away 1/4 of their health each and every time they use it.
I should go ahead and mention this first. I made this team while doing what's called the Ribbon Quest, where you collect Ribbons on a particular Pokémon. The Gen. 4 Battle Tower has a Ribbon for every one of its formats that you get for winning 50 battles (or in the case of Singles, after beating Palmer during Battles 21 and 49). So this team I've created was meant to only get people as far as Battle 49 in the AI Multis format; I'm in no way trying to get a world record and win hundreds of battles using it. Afterward, I just switch the team out and use a Pokemon like Garchomp along with whatever Pokemon is my Ribbon Master to earn the AI Multis Ribbon. So forgive me if it seems like I'm not aiming high enough with this team I made.
Now with that in mind, here is my experimental team for Gen. 4 AI Multis,
Gliscor (F) @ Focus Sash
Ability: Hyper Cutter
Level: 50
EVs: 252 HP / 4 SpD / 252 Spe
Careful Nature
- Taunt
- Earthquake
- Fire Fang
- Roost
This Gliscor set is made specifically to deal with setup and stall Pokémon. Taunt prevents your opponent's Pokémon from using all setup and status moves for a few turns. That means no Double Team, no Toxic or Thunder Wave, no Confuse Ray or Swagger, no Curse or Calm Mind, no Recover or Rest, and no Trick Room. Pokemon that revolve around these sort of strategies become much less of an influence in battle. There's even a significant chunk of Pokemon in the Battle Tower who ONLY run setup and status moves. So by Taunting them, they're reduced to only using Struggle, which makes them lose 1/4 of their health every time they attack. By the time their Taunt wears off, the opponent's Pokemon have likely lost most of their HP and can easily be taken out by you and/or your partner (since they're programmed to have their Pokemon attack the weakest target on the field). Now, of course, you're not always gonna face opponents who run setup or stall strategies. So I needed my Taunt user to be a Pokemon that maintains an offensive presence in battle. After a long search, I realized that Gliscor was the ideal candidate for this experimental strategy. It's fast, relatively bulky, and has a great typing that gives it immunity to Thunder Wave and other Electric-type moves. Earthquake gets STAB and can hit both of your foes' Pokemon (make sure to pair with an ally that's either a Flying-type or a Pokemon with Levitate so they aren't hit by Earthquake as well). Fire Fang is a single-target move that gives Gliscor great coverage overall. There's also a chance it can cause foes to flinch or, better yet, burn them. Lastly, Roost helps give Gliscor longevity. Best of all, it temporarily removes its Flying typing, which gives it only a 2x weakness to Ice-types rather than a 4x weakness. Maximizing HP and Speed with a Careful nature is very effective when combined with Gliscor's natural bulk. The Speed investment is necessary to maximize Taunt's effectiveness, enabling Gliscor to shut down a majority of Pokémon that run setup and stall moves before they can even use them. Focus Sash enables Gliscor to survive at least one super-effective Ice-type attack. While you normally want Gliscor to avoid battling Ice-types as best you can, there are a few that run some stall or setup strategies that you'll want to shut down with Taunt before switching out. Thankfully, the Focus Sash makes that possible. Plus, you can use Roost to restore Gliscor's HP if you find a chance to recover. Lastly, you'll want Gliscor to run the ability Hyper Cutter. Since Gliscor doesn't have any Attack EV investment, Hyper Cutter will prevent its damage output from being dampened by any Intimidate user you may come up against.
Empoleon (M) @ Shuca Berry
Ability: Torrent
Level: 50
EVs: 252 HP / 252 SpA / 4 SpD
Modest Nature
IVs: 0 Atk
- Hydro Pump
- Flash Cannon
- Ice Beam
- Grass Knot
Now the biggest threat to Gliscor is Ice-types. So to deal with them, I needed a Pokemon that not only could handle them, but also any Water-types that often run Ice Beam or any other kind of Ice-type move. After much searching, the only Pokemon I could find that best synergizes with Gliscor is Empoleon. Its Water/Steel typing gives it x4 resistance to Ice-type moves, and its movepool allows it to handle both them and opposing Water-types. Should you ever go up against an Ice-type Pokemon or something with Ice Beam, switch Gliscor out immediately and have Empoleon deal with them. Hydro Pump is Empoleon's strongest STAB move; the move isn't very accurate, but it's Empoleon's only special Water STAB option in this Gen. since Surf now hits your ally in Double battles. Flash Cannon is Empoleon's secondary STAB option. While the move may feel unnecessary, it is vital for dealing with the Ice-type Pokemon that threaten Gliscor. Ice Beam gives Empoleon solid neutral coverage as well as a means of dealing with Dragon-types that Gliscor really can't handle with its moveset. Lastly, Grass Knot is meant to deal with Ground-types as well as opposing Water-types. Most notably, the move handles Water/Ground-types that can threaten both Gliscor and Empoleon, like Quagsire, Swampert, Whiscash, and Gastrodon, as a single Grass Knot is often enough to OHKO them. Max HP and Special Attack investment with a Modest nature enables Empoleon to tank hits and dish out hits the best it can. Having it hold a Shuca Berry enables Empoleon to tank at least one super-effective Ground-type move that would otherwise OHKO it. Best of all, you can preserve it by switching Gliscor back in, which is immune to Ground-type moves. Lastly, Torrent is Empoleon's only available ability in Gen. 4. Something to note about Empoleon is that it is not very fast and will more often than not be moving after the opponent. So keep that in mind in case you need to pivot Gliscor back in.
Now that my team lineup has been explained. There are some important points I should bring up about it. Because this team primarily revolves around utilizing Taunt, knowing exactly what Pokémon sets your opponents are using is an absolute necessity. So with this in mind, you're gonna want to look up trainers and what Pokémon sets they specifically run in either of the Gen. 4 Battle Towers on either Bulbapedia or this other site I use called Psypokes. Things will get much more difficult if you try a blind run with this team. Of course, this team I created isn't perfect, as I have yet to reach 49 wins with it in the AI Multis format of either Tower (which is something I'd love for it to be capable of doing). Some losses were due to not choosing the right partner or them not having the right Pokemon. Other losses were due to RNG or unluckiness, like facing an opponent that just completely countered our team. Like this one loss, I paired with Mira, who was running Zapdos and Heatran, and the opponents led with Gyarados and Marowak. The opponent's Marowak had Lightningrod so Mira's Zapdos couldn't touch Gyarados. Then both opponents' Pokemon proceeded to take out Mira's team before ganging up on me. Aside from that unlucky lead, I've noticed my team struggles against bulky Steel-types like Metagross and Bronzong. Both can tank Gliscor's moves relatively well, and Empoleon's Hydro Pump is the only move it has that can hurt them. So I found myself needing my AI Partner to run a Fire-type or something with a Fire-type move to help better deal with those Pokémon that can end up being problematic. Lastly, I've also noticed that my team performs better in the DP Tower, due to the AI opponents not having access to tutor moves introduced in PTHGSS. As a result, they're forced to use more unusual movesets, many of which involve status or support moves. Whereas in the PTHGSS Tower, the AI's Pokemon have access to tutor moves and thus have more diverse and dangerous movesets. Status and support moves still pop up there, but just not as often. So if I had to say which Tower my team performs better in, it'd probably have to be the DP Tower.
So what do you think of my team? If there are any recommendations you have for improving it (such as moveset changes, held items, AI partner, or a better Taunt user or backup option), I'd love to know. I'm open to changing the Pokemon I use for this team; my one condition is that, so long as whatever Pokemon you recommend I use still runs Taunt. My goal is to reach 49 battles with this experimental Taunt strategy, and I believe it to be possible with a little fine tuning.
I created this team as an experiment for the Gen. 4 AI Multis format, specifically to counter all the various setup and stall strats we've all faced and often lost to in the Battle Tower. The strategy for this team is pretty straightforward: the lead Pokémon runs Taunt and shuts down foes before they can use any status or support moves. Once that happens, they're far less of a threat. Best of all, there are certain Pokémon in the Battle Tower that ONLY run status and support moves. So when they're shut down by Taunt, they're forced to only use Struggle, which takes away 1/4 of their health each and every time they use it.
I should go ahead and mention this first. I made this team while doing what's called the Ribbon Quest, where you collect Ribbons on a particular Pokémon. The Gen. 4 Battle Tower has a Ribbon for every one of its formats that you get for winning 50 battles (or in the case of Singles, after beating Palmer during Battles 21 and 49). So this team I've created was meant to only get people as far as Battle 49 in the AI Multis format; I'm in no way trying to get a world record and win hundreds of battles using it. Afterward, I just switch the team out and use a Pokemon like Garchomp along with whatever Pokemon is my Ribbon Master to earn the AI Multis Ribbon. So forgive me if it seems like I'm not aiming high enough with this team I made.
Now with that in mind, here is my experimental team for Gen. 4 AI Multis,
Gliscor (F) @ Focus Sash
Ability: Hyper Cutter
Level: 50
EVs: 252 HP / 4 SpD / 252 Spe
Careful Nature
- Taunt
- Earthquake
- Fire Fang
- Roost
This Gliscor set is made specifically to deal with setup and stall Pokémon. Taunt prevents your opponent's Pokémon from using all setup and status moves for a few turns. That means no Double Team, no Toxic or Thunder Wave, no Confuse Ray or Swagger, no Curse or Calm Mind, no Recover or Rest, and no Trick Room. Pokemon that revolve around these sort of strategies become much less of an influence in battle. There's even a significant chunk of Pokemon in the Battle Tower who ONLY run setup and status moves. So by Taunting them, they're reduced to only using Struggle, which makes them lose 1/4 of their health every time they attack. By the time their Taunt wears off, the opponent's Pokemon have likely lost most of their HP and can easily be taken out by you and/or your partner (since they're programmed to have their Pokemon attack the weakest target on the field). Now, of course, you're not always gonna face opponents who run setup or stall strategies. So I needed my Taunt user to be a Pokemon that maintains an offensive presence in battle. After a long search, I realized that Gliscor was the ideal candidate for this experimental strategy. It's fast, relatively bulky, and has a great typing that gives it immunity to Thunder Wave and other Electric-type moves. Earthquake gets STAB and can hit both of your foes' Pokemon (make sure to pair with an ally that's either a Flying-type or a Pokemon with Levitate so they aren't hit by Earthquake as well). Fire Fang is a single-target move that gives Gliscor great coverage overall. There's also a chance it can cause foes to flinch or, better yet, burn them. Lastly, Roost helps give Gliscor longevity. Best of all, it temporarily removes its Flying typing, which gives it only a 2x weakness to Ice-types rather than a 4x weakness. Maximizing HP and Speed with a Careful nature is very effective when combined with Gliscor's natural bulk. The Speed investment is necessary to maximize Taunt's effectiveness, enabling Gliscor to shut down a majority of Pokémon that run setup and stall moves before they can even use them. Focus Sash enables Gliscor to survive at least one super-effective Ice-type attack. While you normally want Gliscor to avoid battling Ice-types as best you can, there are a few that run some stall or setup strategies that you'll want to shut down with Taunt before switching out. Thankfully, the Focus Sash makes that possible. Plus, you can use Roost to restore Gliscor's HP if you find a chance to recover. Lastly, you'll want Gliscor to run the ability Hyper Cutter. Since Gliscor doesn't have any Attack EV investment, Hyper Cutter will prevent its damage output from being dampened by any Intimidate user you may come up against.
Empoleon (M) @ Shuca Berry
Ability: Torrent
Level: 50
EVs: 252 HP / 252 SpA / 4 SpD
Modest Nature
IVs: 0 Atk
- Hydro Pump
- Flash Cannon
- Ice Beam
- Grass Knot
Now the biggest threat to Gliscor is Ice-types. So to deal with them, I needed a Pokemon that not only could handle them, but also any Water-types that often run Ice Beam or any other kind of Ice-type move. After much searching, the only Pokemon I could find that best synergizes with Gliscor is Empoleon. Its Water/Steel typing gives it x4 resistance to Ice-type moves, and its movepool allows it to handle both them and opposing Water-types. Should you ever go up against an Ice-type Pokemon or something with Ice Beam, switch Gliscor out immediately and have Empoleon deal with them. Hydro Pump is Empoleon's strongest STAB move; the move isn't very accurate, but it's Empoleon's only special Water STAB option in this Gen. since Surf now hits your ally in Double battles. Flash Cannon is Empoleon's secondary STAB option. While the move may feel unnecessary, it is vital for dealing with the Ice-type Pokemon that threaten Gliscor. Ice Beam gives Empoleon solid neutral coverage as well as a means of dealing with Dragon-types that Gliscor really can't handle with its moveset. Lastly, Grass Knot is meant to deal with Ground-types as well as opposing Water-types. Most notably, the move handles Water/Ground-types that can threaten both Gliscor and Empoleon, like Quagsire, Swampert, Whiscash, and Gastrodon, as a single Grass Knot is often enough to OHKO them. Max HP and Special Attack investment with a Modest nature enables Empoleon to tank hits and dish out hits the best it can. Having it hold a Shuca Berry enables Empoleon to tank at least one super-effective Ground-type move that would otherwise OHKO it. Best of all, you can preserve it by switching Gliscor back in, which is immune to Ground-type moves. Lastly, Torrent is Empoleon's only available ability in Gen. 4. Something to note about Empoleon is that it is not very fast and will more often than not be moving after the opponent. So keep that in mind in case you need to pivot Gliscor back in.
Now that my team lineup has been explained. There are some important points I should bring up about it. Because this team primarily revolves around utilizing Taunt, knowing exactly what Pokémon sets your opponents are using is an absolute necessity. So with this in mind, you're gonna want to look up trainers and what Pokémon sets they specifically run in either of the Gen. 4 Battle Towers on either Bulbapedia or this other site I use called Psypokes. Things will get much more difficult if you try a blind run with this team. Of course, this team I created isn't perfect, as I have yet to reach 49 wins with it in the AI Multis format of either Tower (which is something I'd love for it to be capable of doing). Some losses were due to not choosing the right partner or them not having the right Pokemon. Other losses were due to RNG or unluckiness, like facing an opponent that just completely countered our team. Like this one loss, I paired with Mira, who was running Zapdos and Heatran, and the opponents led with Gyarados and Marowak. The opponent's Marowak had Lightningrod so Mira's Zapdos couldn't touch Gyarados. Then both opponents' Pokemon proceeded to take out Mira's team before ganging up on me. Aside from that unlucky lead, I've noticed my team struggles against bulky Steel-types like Metagross and Bronzong. Both can tank Gliscor's moves relatively well, and Empoleon's Hydro Pump is the only move it has that can hurt them. So I found myself needing my AI Partner to run a Fire-type or something with a Fire-type move to help better deal with those Pokémon that can end up being problematic. Lastly, I've also noticed that my team performs better in the DP Tower, due to the AI opponents not having access to tutor moves introduced in PTHGSS. As a result, they're forced to use more unusual movesets, many of which involve status or support moves. Whereas in the PTHGSS Tower, the AI's Pokemon have access to tutor moves and thus have more diverse and dangerous movesets. Status and support moves still pop up there, but just not as often. So if I had to say which Tower my team performs better in, it'd probably have to be the DP Tower.
So what do you think of my team? If there are any recommendations you have for improving it (such as moveset changes, held items, AI partner, or a better Taunt user or backup option), I'd love to know. I'm open to changing the Pokemon I use for this team; my one condition is that, so long as whatever Pokemon you recommend I use still runs Taunt. My goal is to reach 49 battles with this experimental Taunt strategy, and I believe it to be possible with a little fine tuning.


Are there any resources out there in regard to teambuilding and strategy for AI multis? I've been working on a ribbon master and had no issue with singles/doubles/link but I haven't been able to break out of the 40s for the last ribbon I need. It's so different to any other format because you not only have to worry about yourself but also babysitting a very stupid AI, so I feel like I have a knowledge gap that's preventing me from winning
There's QuentinQuonce's guide on AI Multis linked in the 1st post. There's also Magpie's VOD of AI multis for an example of high-level play. From what I've read, you want to partner with someone using as few status moves as possible, because the idiot AI can and will use them at every opportunity. I guess it thinks it's "helping".Are there any resources out there in regard to teambuilding and strategy for AI multis? I've been working on a ribbon master and had no issue with singles/doubles/link but I haven't been able to break out of the 40s for the last ribbon I need. It's so different to any other format because you not only have to worry about yourself but also babysitting a very stupid AI, so I feel like I have a knowledge gap that's preventing me from winning
New record of 63 wins in Open Level.

If you're wondering why my Level 50 record is 48 and not 63 like I posted here, it's because I play on two different save files.
My loss:
 Draft was Rivalry Luxray3 - Gallade4 - Slowbro4
The options I left at home were Aggron3/Poliwrath3/Magmortar2.
Regarding the battle itself, I think most moves are self-explanatory. I went with Psychic over TrickRoom vs Weezing because my Slowbro was Oblivious and didn't wanna attack through a potential Swagger.
Had a really fun run for battle 56-63 carried by Sub/Double Team Regigigas ft ScaryFace Salamence to outspeed Pokemons and getting better odds with Sub/DTeam.
If you're wondering why my Level 50 record is 48 and not 63 like I posted here, it's because I play on two different save files.
My loss:
The options I left at home were Aggron3/Poliwrath3/Magmortar2.
Regarding the battle itself, I think most moves are self-explanatory. I went with Psychic over TrickRoom vs Weezing because my Slowbro was Oblivious and didn't wanna attack through a potential Swagger.
Had a really fun run for battle 56-63 carried by Sub/Double Team Regigigas ft ScaryFace Salamence to outspeed Pokemons and getting better odds with Sub/DTeam.