Gen III Battle Frontier Discussion and Records

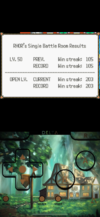
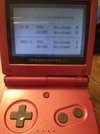
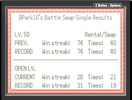
Reporting a 239 win streak for Level 50 Battle Tower with the following team. This is the level 50 version of Adedede's Dans Macabre team.

Slaking (F) @ Choice Band
Ability: Truant
EVs: 4 HP / 252 Atk / 252 Spe
IVs: 19-20 HP / 31 Atk / 22-23 Def/ 22-23 SpD / 31 Spe
Stats: 220 HP/ 233 Atk / 116 Def / 81 SpD / 152 Spe
Adamant Nature
- Double-Edge
- Earthquake
- Shadow Ball
- Hyper Beam

Gengar (F) @ Lum Berry
Ability: Levitate
EVs: 252 HP / 36 Def / 220 Spe
IVs: 27-28 HP / 6-7 Atk / 31 Def/ 30-31 SpD / 31 Spe
Stats: 165 HP/ 65 Atk / 85 Def / 95 SpD / 173 Spe
Timid Nature
- Destiny Bond
- Perish Song
- Protect
- Mean Look

Wobbuffet (M) @ Leftovers
Ability: Shadow Tag
EVs: 248 HP / 146 Def / 116 SpD
IVs: 30 HP / 20-21 Atk / 28-29 Def/ 31 SpD / 23 Spe
Stats: 296 HP/ 43 Atk / 104 Def / 93 SpD / 49 Spe
Bold Nature
- Destiny Bond
- Counter
- Encore
- Mirror Coat

My goals were humble with this team. I wanted the 100-win decoration and my offensive teams using my IV bred, EV trained Latias/Metagross/Milotic/Salamence were having a hard time getting past 80-90.

This is my first time posting, but I've lurked on these leaderboards before. I wanted to find a team that I could breed by conventional methods without RNG manipulation. So I looked for teams without pseudo-legendaries. This led me to the Dans Macabre team. It took me probably a month to get Pokemon with the correct natures and good enough stats to accept.

Notes on the team: As Adedede suggested to me (in a Youtube comment), Shadow Ball is the obvious choice for Slaking's 4th move in level 50 (as opposed to Brick Break needed for TTar in Open). I've seen that others have used this team for good reason. I strongly recommend breeding until you get perfect Attack/Speed on Slaking and good enough Gengar speed to get to the tier at 173 Spe. Those stats number are very important as there are many pokemon you just barely outspeed/KO. My other stats are pretty good. Having average speed on Wobbuffet meant that I didn't out speed Snorlax, but that never severely cost me since it is dealt with by Slaking/Gengar so well.

Check out Adedede's post for a lot of great information. However, I must say that the best way to learn this team is to try it out. I love how this team easily quashes trolling Double Teamers and Quick Claw Horn Drill/Fissure users. With this team you spend almost all your time predicting what the AI will use. You get very comfortable switching into hits. Damage calculators are essential since they help you play around critical hits. Generally, I tried to keep Slaking away from unnecessary damage or potential satuses. If I must sacrifice a Pokemon, it is almost always Wobbuffet since Gengar's Destiny Bond is an almost certainty, whereas Wobbuffet can more easily faulter due to no Lum Berry/ no Protect/lower speed.

A few differences from my own perspective:
  • There were a lot of things I feared would happen that really never did. Examples:
    • Trying to Destiny Bond with Gengar but getting double statused
    • Getting quick claw rock slide into flinch on Gengar (happened once I think)
    • Sheer Cold trolling by Lapras or Walrein. Actually, what sometimes nearly happened was Wobbuffet running out of Destiny Bond PP before the Sheer Colds ran out!
  • Unlike what Adedede mentioned, I used Gengar's Mean Look pretty often. Since Encore may last until 1, 2, or all 3 perish song turns complete, it can sometimes be useful for Gengar to 1. Perish Song, 2. Mean Look, 3. Protect, 4. Switch to Wobbuffet (or Slaking!). This way you can limit the damage on Wobbuffet in certain situations.
  • I almost never clicked Hyper Beam, though it certainly saved me on a near loss around win 135 (where Slaking 1 v 1'd Armaldo due to Hyper Beam damage + Double-Edge recoil damage!!)
  • I agree that playing aggressive with this team pays off. You start to learn that you just always switch into Gengar when certain Pokemon appear for example.
  • Something I couldn't figure out, but I would love to know is how to predict when the opponent will just spam Counter even if it has reasonable moves. This would happen even with Gengar and Wobbuffet out.

In addition to the Pokemon Adedede mentioned, here are some ones that I didn't like seeing (this particularly as a first Pokemon against Slaking)
  • Raichu. It's a speed tie with Slaking. I've tried switching into Wobbuffet, but thunderbolt into paralysis made it hard to guarantee Mirror Coat or Destiny Bond. I've also kept in Slaking and KO'd it after getting paralyzed.
  • Latios/Latias. There are so many different possibilities, but I almost always would go for Slaking - Shadow Ball and hope for no brightpowder/focus band hax. If Latios/Latias comes out second, it is also difficult to deal with. Sometimes I end up Encoring something like Calm Mind which usually means Wobbuffet will need to die.
  • Heracross. Gengar deals well with Hera. But the problem is that you need to switch out to Wobbuffet for 1 turn. With my Def/HP stats, there was a ~10% chance that Megahorn OHKO's my Wobbuffet! This actually happened, and I then found out that the opponent can then switch out removing the Perish Song! Luckily I saved that battle with Slaking and Gengar, but I'm not sure how to avoid this issue.

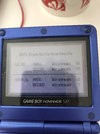
Here is a video of the loss, which I saved in-game.

The loss may have been avoidable, but I had been getting away with aggressive play with this team for awhile.
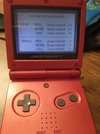
Ranger Nelson
Regirock - I almost always switch to Gengar since there are 2 with Quick Claw and 1 with Brightpowder
Turn 1a - Switch to Gengar
Turn 1b - Rock Slide - It does <50% damage, so it is the Brightpowder Regirock with Explosion. Only a critical hit kills so I go for setting up Perish Song
Turn 2a - Perish Song
Turn 2b - Rock Slide Critical Hit - Gengar faints. Now I am in a bit of trouble. I am afraid of Slaking getting Brightpowder, which is a likely loss. I am also not certain if this will explode on Wobbuffet, but if it does I will survive.
Turn 3a - Switch to Wobbuffet - Perish Song Count 3
Turn 3b - Explosion - Wobbuffet is down to low health.
Regice - All the Regice will see a KO on Wobbuffet. I have two options, switch in to Slaking now and tank Ice Beam/Thunderbolt (hope against status/critical), or tank the hit on loafing turn for the next Pokemon. I decide to sacrifice Wobbuffet.
Turn 4a - Thunder bolt - Wobbuffet faints. I will switch in to Slaking and use Hyper Beam since I can't afford to accept the recoil damage from Double-Edge.
Turn 4b - Hyper Beam - Regice faints
Latios - I am actually happy. I am faster than all of them. I am thinking if Hyper Beam hits I will win and this fortunate streak will continue!
Turn 5a - Loafing around
Turn 5b - Psychic Critical Hit - Slaking faints - Game over.

Looking back at the possible Pokemon, tanking the hit on Regice was probably the play. I also think I could have switched to Wobbuffet after the first Rock Slide and then switched back to Gengar on Explosion. However, when the AI chooses Explosion was something I am still a little uncertain on. I believe a Metagross Explosion on Wobbuffet also helped end Adedede's streak. Maybe someone who knows a bit more can let me know.

I would love to know if someone knows what a better what to play out that fight would be.


Final thoughts: The team is really fun to play with. I think the streak could have ended much earlier (~135), but I was also starting to play a little careless (see loss) and so even with these lower IV's this particular team could probably reach ~400 if played more diligently.

Oh well, it has definitely been a pleasant walk down memory lane.

I’m always glad my previous work is still helping so many people, and I’m also honestly surprised it still finds success through multiple players given how far from that g3 gaming has recently gone.

Today, I would definitely not recomend this team, but nonetheless I still get why its intricate and yet fast and effective gameplan and its in-game breedable accessibility has made it so fascinating.


I’d like to add 2 considerations to your post.

Firstly, the Emerald decomp has made us aware of how AI “selects moves”, or better, how AI gives scores to every move based on the current status of the game.

Factory players have brought that to an art; AI score system is crucial in such an harsh facility, where top competitors must always squeeze every drop of water from the hardest rocks, but of course its understanding benefits every Frontier player to some extents.

I’ll link there Emerald AI choice analysis file, hope it helps:
https://docs.google.com/document/d/1CzTIoDbwdOX2cvQN9yldL7zLXfKQtBy_UWuxccpJnAM/edit?usp=sharing


In your loss, the analysis of whom will be my 2nd point, you where stuck in a point where you could have stayed in with low health Wobbuffet, or you could have switched into Slaking.
A Thunder Wave on the switch could have been atrocious, so you stayed in.

The reality is that due to decomp, you already know that a potential Regice3 f.e. would have never picked TWave.

Let’s see why, from the decomp file:

“Paralyzing Moves
Moves: Glare, Stun Spore, Thunder Wave


If the target is faster than the user, there is a 92% chance of +3 score. If the user is faster than the target, the move gets -1 score if 70% HP or less.

As a result, this is extremely likely to occur as a form of speed control. However, when not speed controlling it should only be used while at high HP, and with only +0 score.”


Then, due to Wobbuffet being at red health, look at the score of KOing moves:

+6Priority moves that can kill (not Fake Out)
+4Moves other than Explosion or Self Destruct, and power 1 moves that can kill
+2Status moves, power 1 moves, discouraged moves, and the highest damage move if they are doubly super effective, ~69% of the time
+0The highest damage move if the target lacks an absorbing ability; all other moves, including any status move, power 1 move, or discouraged move that is not doubly super effective the other ~31% of the time
-1Damaging moves that are not the highest damage move. Explosion or Self Destruct if both the player and AI are on their last pokemon.
BadAny move that would fail or the target would be immune to. Explosion or Self Destruct if the AI is on their last pokemon but the player is not. These will be in the range of -5 to -12 score.
-100Moves that cannot be used at all (normally out of PP)


So, Regice would have always picked an attack, and your best odds are to risk the secondary effect in a spot like that.
Don’t worry though, because I think the match was decided a couple turns earlier, but we’ll come to that soon.


My 2nd and last point revolves around the gameplan you chose in the losing match.

Nelson is a 31IVs trainer with all of Regis sets, so we have no info on Regirock leading set.
From this spot, it would have been better to go Wobb. Even in the worst situation (losing Wobb to an Explosion, that also practically happened), you are 2v2 with Gengar and Slaking. Every other haxy spot (like Thunder Wave full paras / consecutive flinches) needed a lot of misfortune to turn bad, while an opening Curse could have then been Encored, and even Encoring an incoming +1 RS due to QC would not have been the end of the world.

That said, let’s say you still want to switch into Gengar vs. a potential QC Regirock.
After recognizing Regirock6 from the damage calcs (nice scout!), there are no doubts left: the play would have definitely been to switch into Wobbuffet vs. that set, after a Protect to drain another RS PP.
I really see no reason why you should risk a CH with Gengar at this point, given Regirock6 doesn’t have TWave / QC Curse to potentially hax Wobb.

0+ Atk Regirock Rock Slide vs. 244 HP / 136+ Def Wobbuffet: 54-64 (18.2 - 21.6%) -- possible 7HKO after Leftovers recovery (47.8% chance to 7HKO after accuracy)
(54, 55, 55, 56, 56, 57, 58, 58, 59, 60, 60, 61, 62, 62, 63, 64)

It deals litterally nothing, while you just need 2 Counters to connect to KO.
It might not even have enough Rock Slide PPs to actually kill Wobb without exploding!
And if immediately / after one Counter it booms, the match is still in a good spot.

Brightpowder on opponent team is gone, Nelson at Lv.50 only has legendary birds, dogs, regis and latis.
There still could be a dangerous QC somewhere, but without BP around Slaking is very strong in 1v1 vs. this roster, with Gengar at full health (if switching on T1 into Wobb) / at ~56% HP (if switching on T3 into Wobb after Protect) as a layer of insurance vs. Registeel.


Now, the ending.
The precedent notes were just my thoughts and with a gun pointed at my head I’d have played that way, but, as everyone could easily read through lines, a lot of things could go very wrong in a colorful variety of ways with this team.

It is surprisingly effective in getting hundreds of wins (as multiple players have also confirmed in the past), but the magnitude of the safety difference between this and my latest Tower stall one is not accurately described by the Ws (3101 and counting vs. 1090); IRIDESCENCE is just exponentially better, the gap is incalculable.

Dans Macabre has been used with great success, also at first try / very few attempts, but it overperformed in my record streak and I won’t suggest this team to ones who want to competitively approach to Tower Singles nowadays.
Nonetheless, it always makes me feel very proud when players like you dedicate their time and effort to put into test, to rework and to master my creations at this level, so thank you!

…and for a fast, easy route to Gold Shield, DM still seems to be the best, funniest team tho!
 
Last edited:
I’ve beaten emerald frontier on emulator a long time ago, but I wanted to do it on console, and without any of werster’s team of latios, metagross or swampert. I borrowed my roommates sp and emerald version a few years ago, and got 6 gold symbols then got held up on the pike for my last symbol and forgot about until about a week ago, when he said he wanted it back so that he could try it. I ended up finishing it today, and finally fulfilled my dream of doing it on retail. I rnged all my pokemon as wild catches so they are not perfect. I kept track of the frame and method I caught each pokemon. I did rng breed a gardevoir but I only used it for 1 facility and it was a huge pain in the ass so I didnt do it for anything else. I have played a lot of frontier on emulator in college but I really dont have the patience to do some of the more lengthy strats you need to do when not using super high bst mons, so I was lucky to beat most of the facilities quickly.

Battle Tower - 85 Wins - Walrein / Lanturn / Smeargle
Battle Dome - 10 Sets - Salamence / Gardevoir / Registeel
Battle Factory - 42 Wins (Open Level)
Battle Palace - 44 Wins - Salamence / Regice / Dusclops
Battle Arena - 56 Wins - Registeel / Walrein / Salamence
Battle Pike - 157 Rooms - Salamence / Starmie / Regice
Battle Pyramid - 77 Floors - mostly Salamence / Regice / Skarmory or Walrein

Battle Tower Team - 85 Wins

1848:37.45-methh2-timid synchro (Walrein) @ Lum Berry
Ability: Thick Fat
Level: 50
EVs: 252 HP / 28 Def / 12 SpA / 20 SpD / 196 Spe
Timid Nature
IVs: 29 Def
- Surf
- Icy Wind
- Mud-Slap
- Encore

4:16.90-methh2 (Lanturn) @ Leftovers
Ability: Volt Absorb
Level: 50
EVs: 252 HP / 116 Def / 136 SpD / 4 Spe
Relaxed Nature
IVs: 30 Atk / 25 Def / 28 SpA / 30 SpD / 11 Spe
- Thunderbolt
- Ice Beam
- Thunder Wave
- Flash

463:23.55-methh2 timid synchro (Smeargle) @ Sitrus Berry
Ability: Own Tempo
Level: 50
EVs: 116 Def / 148 SpD / 244 Spe
Timid Nature
IVs: 30 HP / 5 Atk / 15 SpA
- Seismic Toss
- Leech Seed
- Spore
- Substitute

I intended for that Lanturn to be used for the palace but I ended up not using it there so its just got inferior ivs and nature for no reason lol. You can win sets with some really trash pokemon in the lead slot if they’ve got accuracy lowering moves paired with a good setup pokemon in the back. Really though Walrein isn’t bad at all. Theres very few things that can ohko it and it can pretty reliably get off at least a few mudslaps and an icy wind. I originally had my dusclops in the smeargle slot which I think is a better team, but was too slow for me on console. Lost to donphan qc earthquake killing smeargle after it woke up and broke sub, then its eq ohkoed my full health lanturn in the back.

Battle Arena Team - 56 Wins

2377:54.80-meth1-8560488 (Registeel) @ White Herb
Ability: Clear Body
Level: 50
EVs: 252 HP / 92 Atk / 80 Def / 84 SpA
Relaxed Nature
IVs: 27 Atk / 30 Def / 27 SpA
- Superpower
- Ice Punch
- Thunderbolt
- Explosion


1848:37.45-methh2-timid synchro (Walrein) @ Lum Berry
Ability: Thick Fat
Level: 50
EVs: 252 HP / 28 Def / 12 SpA / 20 SpD / 196 Spe
Timid Nature
IVs: 29 Def
- Icy Wind
- Mud-Slap
- Dive
- Rest

1900:28.40-methh2-jolly synchro (Salamence) @ Choice Band
Ability: Intimidate
Level: 50
EVs: 20 HP / 252 Atk / 4 Def / 232 Spe
Jolly Nature
IVs: 27 HP / 14 SpA / 30 SpD / 30 Spe
- Hidden Power [Flying]
- Earthquake
- Rock Slide
- Brick Break

This facility is not fun at all and 56 wins feels like too much tbh. You have no room to outplay them if they have a bad lineup for you and I think the absence of latios hurts here more than anywhere else. You can get some ties against stuff you should lose against by making them miss with dive or resting to beat them in the hp category which is kind of cool. I lost immediately after getting the symbol and am definitely never going to play this again.

Battle Palace Team - 44 Wins

1900:28.40-methh2-jolly synchro (Salamence) @ Choice Band
Ability: Intimidate
Level: 50
EVs: 20 HP / 252 Atk / 4 Def / 232 Spe
Jolly Nature
IVs: 27 HP / 14 SpA / 30 SpD / 30 Spe
- Hidden Power [Flying]
- Earthquake
- Rock Slide
- Brick Break

89:27.01-meth1 (Regice) @ Lum Berry
Ability: Clear Body
Level: 50
EVs: 236 HP / 248 SpA / 24 Spe
Modest Nature
IVs: 2 Atk / 30 SpA / 30 Spe
- Ice Beam
- Thunderbolt
- Hidden Power [Fire]
- Thunder Wave

870:57.61-methh2-calm synchro (Dusclops) @ Leftovers
Ability: Pressure
Level: 50
EVs: 252 HP / 180 Def / 76 SpD
Calm Nature
IVs: 0 Atk / 8 SpA
- Curse
- Substitute
- Double Team
- Rest

I’m pretty sure those Regice ivs are wrong and are much worse than that to get HP Fire, which ended up being mostly useless on it lol. The frame I caught it on is accurate though so its whatever the ivs are for that frame but I’m not going to go back and look up exactly what they are. I’m sure it must seem pretty bad to use a set like this on Dusclops because I’m gonna kill myself with curse but its actually more consistent than you'd think. It has very low odds to use curse so its likely to have a lot of double teams and sub up by then, and has a great chance to sweep with some possible intimidate + twave support. Its still pretty inconsistent though, it is the palace after all. I lost because I let my roommate play a battle and I thought he couldn’t fuck it up but he made a terrible switch in a situation where I was still likely to win and lost it lol.

Battle Pyramid Team - 77 Floors

Used a lot of different pokes depending on the floor, but mostly Salamence, Regice, Walrein, Skarmory and Shedinja. I waited around on earlier sets until I got a choice band from my pickup zigzagoon. Not too difficult but such a grind. My streak was still ongoing but I’m not going to play it out, the floors take too long and it could take a while to lose.

Battle Dome Team - 10 Sets

1900:28.40-methh2-jolly synchro (Salamence) @ Choice Band
Ability: Intimidate
Level: 50
EVs: 20 HP / 252 Atk / 4 Def / 232 Spe
Jolly Nature
IVs: 27 HP / 14 SpA / 30 SpD / 30 Spe
- Hidden Power [Flying]
- Earthquake
- Rock Slide
- Brick Break

62:54.90-Breeding (no splits) (Gardevoir) @ Lum Berry
Ability: Synchronize
Level: 50
EVs: 4 HP / 252 SpA / 252 Spe
Modest Nature
IVs: 1 Atk / 30 SpD
- Psychic
- Thunderbolt
- Ice Punch
- Destiny Bond

2377:54.80-meth1-8560488 (Registeel) @ White Herb
Ability: Clear Body
Level: 50
EVs: 252 HP / 92 Atk / 80 Def / 84 SpA
Relaxed Nature
IVs: 27 Atk / 30 Def / 27 SpA
- Superpower
- Ice Punch
- Thunderbolt
- Explosion

I also used shedinja for tucker’s gold team. The reduced ivs for enemies make it pretty easy, kind of a boring facility. I bred the Gardevoir after I had already beaten a bunch of stuff so I didn’t get to use it that much but its pretty good as a generic attacker. My win streak was also still intact here but I’m not interested in playing it out.

Battle Factory Team - 42 Wins

I dont remember anything about my winning streak at this point it was so long ago, but I do know in my gold noland fight he had a complete dogshit team lol. I think his lead was a Wailord with double edge as its only attacking move, I don’t remember his second, and a Golduck as his third. I ended up sweeping his whole team with curse Skarmory. I lost immediately after from a horrible draft, and the first trainer I fought had a latios + some other legendary.

Battle Pike Team - 157 Rooms

1900:28.40-methh2-jolly synchro (Salamence) @ Choice Band
Ability: Intimidate
Level: 50
EVs: 20 HP / 252 Atk / 4 Def / 232 Spe
Jolly Nature
IVs: 27 HP / 14 SpA / 30 SpD / 30 Spe
- Hidden Power [Flying]
- Earthquake
- Rock Slide
- Brick Break

337:36.08-methh2 timid synchro (Starmie) @ Smoke Ball
Ability: Natural Cure
Level: 50
EVs: 108 HP / 252 SpA / 4 SpD / 144 Spe
Timid Nature
IVs: 12 Atk / 29 SpD / 30 Spe
- Surf
- Ice Beam
- Thunderbolt
- Recover

89:27.01-meth1 (Regice) @ Leftovers
Ability: Clear Body
Level: 50
EVs: 236 HP / 248 SpA / 24 Spe
Modest Nature
IVs: 2 Atk / 30 SpA / 30 Spe
- Ice Beam
- Thunderbolt
- Thunder Wave
- Rest

I ended up doing this one last, and I didn’t think it would be that hard but somehow I couldn’t get it done. Lost like 3 times on set 8 or 9 and quit for over a year. I beat it on my first try after adding recover over Psychic on Starmie and rest over hidden power on regice, but honestly still not a great team. The absence of latios is really felt here as well. Salamence needs Choice Band and cant get bailed out of status by a Lum Berry like Latios can. I also switched Salamence to the lead because Starmie is not sweeping shit by itself. Timid Starmie with no boosting item is super weak and misses the ko on basically everything. Its tbolt even failed to kill a crawdaunt even in set 2, which then killed me with a guillotine lmao. I lost because I got: single battle with no heals > nostalgia room paralyzes mence > double battle and just didn't have enough left.

I'm fairly certain I've had streaks longer than 100 in the tower while playing on emulator testing random shit but I never started from 0 while doing that or kept track. I don't actually own emerald and this file is getting overwritten. I've done everything there is to do, so I think that's it for me, hopefully nintendo makes a frontier or at least a tower in new games or I think I'm just totally done.
 

Attachments

  • 1000000079.jpg
    1000000079.jpg
    1.3 MB · Views: 21
  • 1000000080.jpg
    1000000080.jpg
    1.5 MB · Views: 19
  • 1000000081.jpg
    1000000081.jpg
    1.4 MB · Views: 19
  • 1000000082.jpg
    1000000082.jpg
    1.4 MB · Views: 19
  • 1000000083.jpg
    1000000083.jpg
    1.4 MB · Views: 19
  • 1000000084.jpg
    1000000084.jpg
    1.5 MB · Views: 21
  • 1000000085.jpg
    1000000085.jpg
    1.4 MB · Views: 23
  • 1000000078.jpg
    1000000078.jpg
    1.7 MB · Views: 23
Last edited:
Reporting a streak of 74 for Factory Singles: Level 50.
This was done on retail, using the GB Player for Gamecube.
I did R1-4 without recording, since it's dumb AI, and is very tedious.

I've been streaming Factory for about a year, along with being involved in discord. Finally a streak I'm proud of. Also, first lvl 50 streak past dumb AI on retail. Any questions, feel free to ask. If you want more info, ask as well.

I hate doing write ups...

Links
Twitch:
Rounds 5-7:
Rounds 8-9:
Rounds 10-11:
 

Attachments

  • 50s pb.png
    50s pb.png
    306.6 KB · Views: 17
Heya everyone. Reporting a streak of 96 in L50 Factory Singles on emulator.

After Noland 4 crushing my dreams with Lapras on my previous PB at 83 I was determined that I'd at least beat my OL PB and maybe snag my second triple figures. Sadly, that wasn't to be this time - with a Lapras / Ampharos / Machamp team beating my Heracross-4 (31 IV), Snorlax-8 (3 IV), Claydol-2 (31-IV) squad. On paper, that really shouldn't be losing but I got greedy and tried to setup my claydol which got hit a bunch, burnt, bright powdered and machamp pulled out a focus band proc to kill hera and lax.

While it's easy to be a bit salty about the luck involved, I could have played better here and there were multiple occassions earlier in the run where misplays could have cost me.

Noteable moments from the run:
- Kingdra-1 attract scamming the hell out of my all-female mence / blissey / dusclops team.
- Latias-6 pulling a 1v3 after lapras sheer colded its way through the rest of my team.
- Lapras turning up 3 times in my last round...
Lots of lapras nonsense basically.

Playlist of all the battles from round 5 onwards here: https://youtube.com/playlist?list=PLGqwWPRvANuqce3AUDt1mnWR6wU1UEbS9&si=AHEu1ilEl2QAw927

As always, my play is very fast and loose for round 5, getting gradually more careful up until round 10 when I consider myself to be on a solid run. I also streamed from there so the vods of those bits have more commentary / calcs.

My lowest PB is now OL singles, so guess that's what I'm off to next! Thanks for reading!
 
Hello, ive recently gotten an interest in the battle frontier after playing emerald and getting all achievements from retroachievements. Prepping a team to tackle all the diferent facilities which promote and discourage intricate aspects of the game was very cool to come up with and a very fun challenge, one i wouldnt expect from the mainline games.

Once i was done with that, i wanted to see how far i could take these facilities and put myself to the test, with the knowledge ive gathered from playing this game and from learning what others have posted here or experienced otherwise.

I started small and tackled pyramid first, a facility regarded as a joke when it comes to getting high streaks and i can vouch for that, its not really a matter of how high you can go, but rather how much time youre willing to put before your pacience runs out/lose interest. Its probably the only facility that becomes statistically more likely you get better odds of getting further (i guess it plateaus once you get 99 items of everything), even in castle youre still limited to the items you give to your pokemon, here you can dump dozens of potions and revives in a single battle if needed (ive done it myself).

Its a very experimental facility so i can imagine the devs wanted to play a bit more on the safer side and not make it too brutal, there probably wasnt much thought put out with things like soft-boiled and the like. Having it first beaten with only emerald native pokemon i can say that its a bit more challenging for sure, its still one of the easiest facilities, tho id argue dome is easiest with this restriction.


The coolest aspect of the pyramid for me is the thematic rounds you go through each pyramid you beat. Establishing its own "meta" between whats good to use each round given a lot more variety and oportunity for pokemon to be used. Outside of pyramid, has anyone unironically ever tried houndoom in a non challenge related scenario? The facility acts like a white canvas and allows you to approach it in many diferent ways. Given how forgivable it is, id say many options are the right one, its a matter of the player to choose which one they want to partake.

I chose the most straightforward path. I consider myself a very impatient person, to a crippling fault, i dont know what it is but i hate taking time on things i know can be done quickly. So to conform to that as best as i can, i decided to really focus on the wild pokemon and to kill them as fast and easy as possible, keeping things simple also leaves less margin for mistakes, which im bound to do plenty. So the general gist was have one pokemon do all the trash killing, another to cover for the trash killer if needed, particularly in trainer battles, and blissey. Its a lineup most who played pyramid are familiar, tho i wanted to make extra sure that the wild pokemon were next to no issue ever. They are the meat and potatoes of this facility and anything i could to make it better to beat them id do it with only a few exceptions, particularly threatning/awkward pokemon from trainer fights. While beating lvl 45 shitters as fast as possible is great, i couldnt ignore the potential threat of a trainer/double trainer fight.

I chose to play at level 50, which might make wild battles a bit more dificult, its not that big of a deal. Hyper potions have much more value at this level and are pretty much max potions to anything that isnt blissey, not having to deal with ttars and dnites is a nice concern to not have and not having to grind extra levels is a nice bonus. All pokemon were obtained with rng manip, ace, cloning and one in particular with some egregious save state scumming.

With this in mind i then went to work and built what i thought was the best "team" for the job, given the number of pokemon used its more of an army than a team.


blissey.gif

B (Blissey) @ Leftovers
Ability: Natural Cure
Level: 50
31/0/31/24/31/31
EVs: 180 HP / 252 Def / 76 SpD
Bold Nature
- Soft-Boiled
- Seismic Toss
- Toxic
- Minimize

gengar.gif

G (Gengar) (F) @ Leftovers
Ability: Levitate
Level: 50
31/11/31/11/31/31
EVs: 204 HP / 84 Def / 220 Spe
Timid Nature
- Perish Song
- Protect
- Substitute
- Destiny Bond

These two are the constant of this entire streak, from beginning to end, they were here to aid my lead pokemon.

Blissey is the backbone of many pyramid runs for its unmatched support in providing healing with its massive "soft-boils", whilst putting a stop at just about any spatker coming my way. I didnt opt to go for heal bell support as i figured lums were gonna be plentyful for any status healing, plus the specific status berries when my bag wasnt full yet. So i decided to go for minimize on 4th move, its a nice move that can get blissey out of a sticky situation without needing to take much damage like counter would for example. In restrospect, It didnt play out much and i barely click it outside of brandon. Counter, with the near unlimitled supply of hyper potions, is most definitely a superior choice, would finish off brandon quicker too. Something like protect would be better too, in conjunction with perish song from gengar, it goes really well to stall out turns and give extra lefties recovery. Its spread is probably better off just being max hp max def, bigger "soft-boils" means bigger heals but yeah, once you plateau on potions it doesnt really matter as youre better just using those.

Perish song, a genius idea from the doctor (Doctor_Rob), pins the battle down to 3 turns after using it, taking advantage of pyramid's single pokemon trainer fights. I chose gengar because i was looking for consistency in this role, which doesnt necessarily mean only the bulkiest mons can do it. Gengar being the fastest user means it gets to move first more often, its less prone to OHKO moves, being immune to 2/3 and provides the best defensive synergy alongside blissey, which was something i was expecting before starting this run, but never imagine being this effective. So many times i could just switch between these two and take 0 damage while perish song turns go down, or heal from lefties, or just remove status from blissey, pokemon like snorlax, miltank, hariyama, machamp, clef are some examples. Dbond is nice if there isnt a way out without having to sack something, and substitute just adds to the stalling turn factor, its great in double trainer battles, tho its definitely replaceable and a there's a lot of good options. Toxic, wow, ice punch/fire punch/tbolt, rest, torment, confuse ray, skill swap etc. Anything that either gets a kill quickly enough or that optimizes stalling extra perish song turns is justifiable. Ev spread gives mod16+1 hp, 173 speed stat and the rest is dumped in defense to even out the bulk. Brightpowder was an option i considered once i maxed out my bag as a means to increase the odds of being able to pull off a perish song in battle, but i just ended up going lefties through the whole run.


tauros.gif

1,3,4,6 (Tauros) @ Choice Band
Ability: Intimidate
Level: 50
31/31/30/15/30/31
EVs: 4 HP / 252 Atk / 252 Spe
Adamant Nature
- Return
- Hyper Beam
- Earthquake
- Hidden Power [Ghost]

Slaking is known for turning pyramid into a pretty trivial facility, the 1v1 playstyle was practically made for it to succeed, but wild encounters can still be pretty annoying with the amount of protects being thrown around. It doesnt take away from slaking's viability but it does make you wish you just had something else that was just mildly strong to ko some lvl 38 trash that just happens to have the move to stop slaking. Tauros essentially acts like a slaking lite, tho i think it should get more credit in this facility. While not as strong as slaking it still packs a punch, more than enough for the earlier rounds, intimidate support, inside battles and outside (less encounters) and packing the same coverage as slaking. Id argue its the most viable pokemon i use for trainer battles outside of slaking and a godsend for double trainers.

latios.gif

2 (Latios) @ Shell Bell
Ability: Levitate
Level: 50
31/7/31/31/31/31
EVs: 36 Def / 252 SpA / 220 Spe
Timid Nature
- Psychic
- Thunderbolt
- Ice Beam
- Surf

18 (Latios) @ Shell Bell
Ability: Levitate
Level: 50
31/7/31/31/31/31
EVs: 36 Def / 252 SpA / 220 Spe
Timid Nature
- Dragon Claw
- Ice Beam
- Thunderbolt
- Psychic

Latios is the premier special attacker and thanks to its coverage, it can take on rooms with varied amounts of typing. Amazing in trainer fights. Its latios, what else needs to be said. I went for timid nature as mons like aero, cm raikou and duggy couldve been problematic for blissey and gengar to deal with.

houndoom.gif

5,16 (Houndoom) @ Shell Bell
Ability: Early Bird
Level: 50
31/10/30/31/31/31
EVs: 252 SpA / 4 SpD / 252 Spe
Modest Nature
- Crunch
- Flamethrower
- Hidden Power [Ice]
- Overheat

Houndoom crushes the ghost and psychic types present in the levitating and ghost rooms, couple that with fire coverage to hit neutral targets like weezing, sableye and hidden power ice for flygon, its great for the psychic room as well but i avoid using it whenever possible as it does poorly in trainer fights, very often i have to rely on blissey/gengar to do the work for it.

medicham.gif

7,14,20 (Medicham) @ Choice Band
Ability: Pure Power
Level: 50
31/30/30/7/30/31
EVs: 4 HP / 252 Atk / 252 Spe
Jolly Nature
- Brick Break
- Shadow Ball
- Hyper Beam
- Hidden Power [Bug]

The pyramid has 3 floors weak to fighting, so having one is very beneficial. I think medicham is the best option and the only other potential candidate is heracross, i prefer medi for its substantial power compared to it, even with a jolly nature, which is much appreciated to outspeed the likes of slaking, tauros and swellow most of the time. Its coverage hits just about everything hard, but it can be a hit or miss in battling trainers, if it doesnt get the ohko its likely to die.

slaking.gif

8 (Slaking) @ Choice Band
Ability: Truant
Level: 50
Shiny: Yes
31/31/31/11/31/31
EVs: 252 Atk / 4 SpA / 252 Spe
Adamant Nature
- Return
- Flamethrower
- Shadow Ball
- Earthquake

9, 19 (Slaking) @ Choice Band
Ability: Truant
Level: 50
Shiny: Yes
31/31/31/11/31/31
EVs: 252 Atk / 4 Def / 252 Spe
Adamant Nature
- Return
- Hyper Beam
- Shadow Ball
- Earthquake

The goat himself, pretty much reserved for room where there is little to no wild encounters who have protect. Room 8 has forry which explains the flamethrower, shiftry and golem are the two mons with protect and they are both walled by gengar. Room 9 is the only room with no protect pokemon so slaking gets to rampage without any regard and the same can be said in room 19 where only ninetales can protect. Goated mon for trainer battles, you couldnt ask for better unless you fighting a skarm or something.

starmie.gif

10,12 (Starmie) @ Shell Bell
Ability: Natural Cure
Level: 50
31/3/31/31/31/31
EVs: 252 SpA / 4 SpD / 252 Spe
Modest Nature
IVs: 3 Atk
- Surf
- Thunderbolt
- Ice Beam
- Psychic

13 (Starmie) @ Shell Bell
Ability: Natural Cure
Level: 50
31/6/31/30/31/30
EVs: 4 HP / 4 Def / 248 SpA / 4 SpD / 248 Spe
Modest Nature
- Surf
- Psychic
- Hidden Power [Fire]
- Ice Beam

Starmie is latios-lite but thanks to its stab surf it does get some kills that latios would struggle like high level armaldo, aerodactyl and shuckle. Room 12 can be done by latios, damage wise its obviously better but i wanted to go with starmie so i wouldnt take ice beams from lapras and walrein (after getting shell bell latios is arguably better but i stuck with starmie). Room 13 is dealt by hp fire starmie, latios gets better rolls on heracross but honestly its not worth having to take a toxic a lot of times you have to face a shuckle, plus starmie is way easier to get. Its decent in trainer fights, just have to play a bit more carefully compared to latios given its bulk.

salamence.gif

11 (Salamence) @ Choice Band
Ability: Intimidate
Level: 50
31/31/31/22/30/30
EVs: 252 Atk / 4 SpA / 252 Spe
Jolly Nature
- Hidden Power [Flying]
- Earthquake
- Rock Slide
- Flamethrower

Mence is great in a lot of rooms, but i feel like its too reliant in its inconsistent coverage or else id rather use tauros instead. It still a beast against the fighting room and another room with intimidate is a nice bonus to have. Great mon for trainer battles and top tier for doubles, adamant is probably better for trainers but i already had this jolly one when i was first trying out aceing high iv wild pokemon so i stuck with this guy.

zapdos.gif

15 (Zapdos) @ Choice Band
Ability: Pressure
Level: 50
31/26/31/30/31/31
EVs: 48 Atk / 208 SpA / 252 Spe
Rash Nature
- Drill Peck
- Thunderbolt
- Hidden Power [Grass]
- Extrasensory

Fuck this thing... Had i known the trouble this guy wouldve given me i wouldnt have bothered. Room 15 is the water room, quag is the anti electric spam, ludi/peli are the anti grass spam i guess so i thought zap can cover all options with tbolt/hp grass/band drill peck. I invested enough atk to kill a perfect non benefitting nature lvl 53 ludi. Its a hit or miss in trainers, just depends on how weak they are to zapdos coverage. All of this is perfectly fine, then i had the brilliant idea of trying to get extrasensory last, its the only real coverage it gets outside of hidden power. If youre a gen 3 enthusiast you probably know where this is going, extrasensory is exclusive to gale of darkness, a game i never played before, luckily i didnt need to and just got a save file with the game ready to fight greevil. While that helps, it still took me the better part of a weekend just to get this thing, all of that for one move, which i mustve clicked a total of less than 5 times throughout this whole streak. Had i known better i wouldve just gotten a frlg one and put shock wave last, saving myself some ethers even if i dont need to.

blaziken.gif

17 (Blaziken) @ Choice Band
Ability: Blaze
Level: 50
31/30/30/31/31/31
EVs: 4 HP / 56 Atk / 196 SpA / 252 Spe
Rash Nature
- Flamethrower
- Brick Break
- Earthquake
- Hidden Power [Ice]

I know i said there's only 2 fighting type candidates for pyramid but blaziken is just about the best you can get to deal with anything steel related, enough atk to garantee kill wild aggron with brick break. Blaziken feels better than houndoom in trainer battles but its vulnerable to a lot of common coverage so it relies on bilssey/gengar a good amount.

Below are the notes ive taken for the wild encounters, i dont follow them to a T, they moreso give me an estimation of whats reasonable to click, they are calced with the worst case scenario in mind, so its ok to give myself some leeway.

THIS ASSUMES WORST CASE SCENARIO (31 IVS FOR BULK WITH FAVORABLE NATURE OR ATK FOR ROLLS AGAINST YOU OR SPEED IF OUTSPEED/SPEEDTIE IS MENTIONED)


floor 1

plusle: hp ghost
minun: hp ghost
pikachu: hp ghost
electabuzz:hp ghost at lvl 37 or lower, eq after that
vileplume: eq at lvl 36 or lower, return after that
manectric: hp ghost at lvl 35 or lower, eq after that
breloom: return
jolteon: hp ghost at lvl 36 or lower, return after that


floor 2

gulpin: surf at lvl 36 or lower, psychic after that
roselia: ice beam
butterfree: tbolt
seviper: surf at lvl 35 or lower, psychic after that
skarmory: tbolt
ludicolo: psychic (surf if they dive after)
crobat: psychic/ice beam/ tbolt
gengar: psychic


floor 3

growlithe: return (hp ghost if not intimidate)
vulpix: hp ghost
magcargo: eq
ninetales: return
medicham: hp ghost
weezing: return at lvl 41 or lower, hyper beam after that
dusclops: hp ghost (garanteed ohko up until lvl 41)
houndoom: return/eq


floor 4

dunsparce: return
banette: hp ghost (eq kills at lvl 42 if needed pp)
misdreavus: hp ghost
ninetales: return/eq
absol: return
dusclops: hp ghost (eq can 2hko if needed)
shedinja: hp ghost
gengar: hp ghost


floor 5

haunter: crunch/flame
chimecho: crunch
solrock: crunch
misdreavus: crunch
claydol: crunch (only garanteed ohko at lvl 44)
weezing: flame at lvl 42 or lower, overheat after that
flygon: hp ice
gengar: crunch (flame garanteed ohko at lvl 41 or lower if pp needed)


floor 6

diglett: hp ghost
trapinch: hp ghost at lvl 44 or lower, return after that
wynaut: hp ghost
wobbuffet: return at lvl 41 or lower, hyper beam after that
dugtrio: hp ghost at lvl 44 or lower, return after that


floor 7

glalie: brick break
sneasel: hp bug
dewgong: brick break
piloswine: brick break
jynx: hp bug/sball
cloyster: brick break
walrein: brick break
lapras: brick break


floor 8

weezing: return
electrode: shadow ball at lvl 44 or lower, eq after that
gengar: shadow ball
golem: eq, if tect switch to gengar
pineco: return
solrock: shadow ball
forretress: flamethrower
shiftry: return, if tect switch to gengar


floor 9

wobbuffet: return/shadow ball
metang: eq
exeggutor: return/shadow ball
slowking: return/shadow ball
xatu: return/shadow ball
alakazam: return/shadow ball/eq
starmie: return/shadow ball
espeon: return/shadow ball/eq


floor 10

golem: surf/ice beam
steelix: surf
omastar: tbolt (garanteed ohko at lvl 43 or lower) (still faster with ancient power boost)
lunatone: surf
shuckle: surf (garanteed ohko at lvl 42 or lower)
armaldo: surf
cradily: ice beam x2 (giga drain max roll is 86, go gengar if low hp)
aerodactyl: surf/tbolt/ice beam from lvl 42 or lower, surf after that


floor 11

poliwrath: hp flying
hariyama: hp flying
breloom: flamethrower from lvl 43 or lower, hp flying after that
medicham: eq from lvl 43 or lower, hp flying after that
hitmonchan: eq from lvl 44 or lower, hp flying after that
hitmonlee: eq
heracross: hp flying
machamp: hp flying


floor 12

quagsire: psychic 2x
tropius: ice beam
pupitar: surf/ice beam
lapras: tbolt 2x
cacturne: ice beam
flareon: surf (garanteed ohko at lvl 47 or lower)
walrein: tbolt 2x
gyarados: tbolt (garanteed ohko at level 52 or lower)


floor 13

pineco: surf/psychic/hp fire
shuckle: surf (garanteed ohko at lvl 42 or lower)
venomoth: psychic
scizor: hp fire
heracross: psychic (garanteed ohko at lvl 50 or lower)
forretress: hp fire
armaldo: surf (garanteed ohko at level 52)
shedinja: hp fire


floor 14

sableye: shadow ball (garanteed ohko on level 43)
sneasel: brick break/hp bug, can start outspeeding at lvl 40
crawdaunt: brick break/hp bug
shiftry: brick break/hp bug
cacturne: brick break/hp bug
absol: brick break/hp bug
houndoom: brick break
umbreon: brick break (lvl 55 has 3/16 to live)


floor 15

octillery: tbolt
dewgong: tbolt
pelipper: tbolt
quagsire: hp grass
ludicolo: drill peck (garanteed ohko at level 50)
slowking: tbolt (garanteed ohko at level 45, max psychic roll is 90)
starmie: tbolt (can start outspeeding at level 52)
blastoise: tbolt (garanteed ohko at level 49, max roll hydro pump is 112)


floor 16

duskull: flame from lvl 45 or lower, crunch after that
haunter: crunch/flame
banette: crunch
misdreavus: crunch
sableye: flame from lvl 45 or lower, overheat after that
duslops: crunch into hp ice
shedinja: crunch/flame
gengar: crunch (garantted ohko at level 53)


floor 17

mawile: flame/eq/brick break
magneton: flame/eq/brick break
steelix: flame
scizor: flame
forretress: flame
skarmory: flame
aggron: brick break
metagross: flame (garanteed ohko at level 50)


floor 18

dragonair: dclaw/ice beam
vibrava: dclaw/ice beam/psychic
altaria: dclaw from lvl 44 or lower, ice beam after that
flygon: dclaw from lvl 49 or lower, ice beam after that
aerodactyl: ice beam/tbolt/psychic (rock slide max roll = 78)
gyarados: tbolt
kingdra: dclaw (garanteed ohko at level 47, ice beam max roll = 100)
charizard: tbolt 2x (iron tail max roll = 62)


floor 19

arcanine: return/eq from lvl 42 or lower, eq after that
poliwrath: return
raichu: return/shadow ball from lvl 48 or lower, return after that
vaporeon: return
jolteon: return/eq/shadow ball from level 46 or lower, return/eq after that (can outspeed at lvl 47)
flareon: return/eq/shadow ball from level 46 or lower, return/eq after that
ninetales: return/eq
starmie: return/shadow ball (can outspeed at level 52)


floor 20

kangaskhan: brick break
swellow: brick break (can outspeed at level 46)
ursaring: brick break
porygon2: brick break
tauros: brick break (garanteed ohko at level 50, can outspeed at level 51)
fearow: brick break (3/16 to live at level 53)
snorlax: brick break
slaking: brick break (garanteed ohko at level 51 with no def nature, level 49 with def nature, speed tie at 55 with speed nature)


Streak.jpg

bag1.jpg

bag2.jpg


Bag should have one extra shell bell and 2 leftovers from the party, revives are in shorter stock than usual as these last rounds the game looked like it was trying its absolute hardest to end the run and turn the bullshit meter to 100. Fluffy tail and sacred ash are fraud items, one extra stock of hypers and revives are optimal imo.


How should I go about dealing with Snorlax in the Battle Tower?

My team consists of:
Latios (Modest Nature, Lum Berry, 252 Attack EVs, 252 Speed EVs, 4 HP EVs)
-Psychic
-Calm Mind
-Dragon Claw
-Thunderbolt

Suicune (Bold Nature, Chesto Berry, 252 Defense, 252 HP, 4 Special Defense)
-Surf
-Calm Mind
-Rest
-Substitute

Blissey (Bold Nature, Leftovers, 252 Defense, 252 HP, 4 Special Defense)
-Toxic
-Seismic Toss
-Softboiled
-Heal Bell


It feels like Snorlax is the ultimate counter against my team. None of my Pokemon do well against it.

Counter on Blissey would work against some Snorlax but not all of them, any boosting ones will destroy you.

Dive/Double Team on Suicune might be an option if you're sticking with these three, you'll drain the PP of sets which use moves like Mega Kick and get them to Struggle before you run out of moves. But in general a physical attacker would probably be a safer bet.
 
Hello everyone, I'm here one last time. Back in 2022, I discovered this thread and became very interested in the Battle Tower Doubles facility since I had played PvP doubles formats in the past. Over time, for various reasons, I completely lost interest in posting in this thread. However, in September of last year, Adedede reached out to me and encouraged me to reconsider posting the streaks I had achieved up until that point, which I had shared on the Discord server. To be 100% honest, I seriously do not care about the leaderboards at this point. The only reason I'm posting again is to share my long journey in the Gen III Battle Tower and Battle Dome, as it might be helpful or interesting for other users.

I'm not bringing anything new. I'm just going to go over the streaks I previously posted here and those shared on the Discord server. I'll expand on them and express myself in more detail this time.

Unlike in other generations, Gen III BT Doubles provides the player with a variety of mechanics to exploit: Using the right Pokemon with the right Speed investment allows the player to outspeed almost everything in the facility (a pseudo Turn 1 Tailwind), Earthquake deals full damage in this generation because it is a move that hits all Pokemon on the field, and the player can take advantage of the insta-switch mechanic (when a Pokemon faints, one of the backline Pokemon enters the field in the same turn). My goal, just like in other generations, was to achieve a 1K streak in Tower. However, I played many more runs after reaching 1K for the first time, just for fun and to explore what modifications the core could benefit from to improve consistency and achieve 1K in fewer attempts.

Battle Tower Doubles​

⚫ Latios and Choice Band EQ Spammer Lead: Latios is probably the best Pokemon in the Gen III Battle Tower. It is fast, offers a lot of offensive pressure, and has good coverage moves. It secures many OHKOs and, when paired with a partner spamming Earthquake, the team can deal significant damage to backline Pokemon as they enter the field, which is a huge advantage.

⚫ Choice Band Swampert vs. Choice Band Tauros: I used both with great success in different teams, but I prefer Tauros. Both are perfectly viable, but each one offers something the other does not:
  • Intimidate is one of the best abilities in doubles, whereas Torrent, in this context, is useless for Swampert and doesn't support the team in any way.
  • Tauros is much faster than Swampert, reducing the AI's opportunities to attack and minimizing the chances of crits, freezes, etc.
  • Swampert often needs to switch out against a wide range of opponents because it is either threatened by a faster Pokemon or unable to deal meaningful damage. Tauros does not face this issue.
  • Swampert’s Water/Ground typing makes it immune to Thunder Wave, which is very valuable.
  • Swampert has a stronger Earthquake.
  • Tauros, using Return and Double-Edge, can deal significant damage to Pokemon like Latios, Latias, Gardevoir, or Porygon2 (when they trace Levitate from Latios), unlike Swampert.
⚫ Haze: In this generation, there is a large number of Double Team and setup Pokemon, which, if not handled carefully, can easily lead to a loss. I used teams without Haze but relied on Toxic in the backline to deal with such sets late-game (except the ones immune to Toxic). However, some battles were extremely sketchy. Needless to say, I'm not a fan of teams without Haze.

⚫ Articuno vs. Gengar: These are the two best Haze users immune to Ground-type attacks, which is important since most hyper-offensive archetypes rely on spamming EQ:
  • Gengar, on paper, is the better option because it's a Ghost type, and being immune to Explosion in this generation is extremely valuable. However, it's very fragile, and there are many QC sets with STAB Psychic that won't even let it get a single attack off.
  • Since Gengar is so fragile, the player is more likely to be punished by the insta-switch mechanic.
  • Pressure on Articuno does not help in any way. Battles are simply too short to benefit from it, and it even causes allies using EQ to lose more PP.
⚫ Thoughts About Streak Lengths: I want to be extremely careful with my words here, as my intention is not to be disrespectful in any way towards the players who have played this facility in the past. If we average the lengths of the submitted streaks, I believe the result would not reflect the facility's true difficulty level. Someone without prior knowledge of Gen III BT might look at the streaks and assume it's a very tough challenge, but that simply wouldn’t be accurate. It is evident that some archetypes are significantly stronger than others in this format. That said, every player should have the right to enjoy their BT experience however they want—using the Pokemon they prefer and aiming for the goals they consider reasonable.

⚫ Would I consider, for example, a 300-win streak in BT Doubles a good streak?: It depends. If we’re talking about a player who picks up a team (even a very optimal one) and wants to get a streak going for fun or to try the facility, then it is certainly a decent streak. However, if we’re talking about a player willing to make 8–10 attempts to achieve the highest streak possible with a very optimal team, then 300 is extremely low for this facility—comparable to getting the first 49 wins in the Tower.

⚫ Level 50 vs. Open Level: I don’t think I did more than 5 runs in Level 50. I simply dislike the idea of not facing Tyranitar and Dragonite.

Teams​

381MS3.png
260MS3.png
376MS3.png
380MS3.png

Latios (M) @ Lum Berry
Ability: Levitate
EVs: 28 HP / 12 Def / 244 SpA / 6 SpD / 220 Spe
Timid Nature
IVs: 7 Atk
- Protect
- Psychic
- Ice Beam
- Thunderbolt

Swampert (F) @ Choice Band
Ability: Torrent
EVs: 6 HP / 252 Atk / 252 Spe
Adamant Nature
- Earthquake
- Hidden Power [Rock]
- Brick Break
- Double-Edge

Metagross @ Salac Berry
Ability: Clear Body
EVs: 6 HP / 252 Atk / 252 Spe
Jolly Nature
- Endure
- Explosion
- Earthquake
- Hidden Power [Steel]

Latias (F) @ Cheri Berry
Ability: Levitate
EVs: 32 HP / 252 SpA / 226 Spe
Timid Nature
IVs: 9 Atk
- Psychic
- Protect
- Toxic
- Dragon Claw
This was my first serious team. As you can tell from the members, it’s Haze-less. It’s inspired by waffles101's Lv. 50 team.

I wasn’t the biggest fan of this team; however, that doesn’t change the fact that it is capable of achieving a good number of wins. Any team with this archetype has a high chance of success. Personally, I prefer Tauros as a lead over Swampert and having a Haze user. Toxic as the answer for Double Team sets is far from ideal—many battles were very sketchy and too close for comfort. Additionally, some Double Team sets can’t be countered with Toxic because of Rest or the ability Immunity, so those must be KOed.

Metagross is a Pokemon that covers Swampert's weaknesses and bad matchups fairly well, and Explosion is always a move that can get the player out of trouble in bad scenarios. Metagross, generally speaking, is not particularly outstanding in this facility, but in this context, it’s viable.

Finally, Latias. This Pokemon is one of my favorite backline options, but eventually, I felt the need to replace it with a ground-immune Haze user. I have no doubt that I would’ve used Latias in all of my teams if Double Team sets weren’t so abundant.

381MS3.png
128MS3.png
260MS3.png
144MS3.png

Latios @ Lum Berry
Ability: Levitate
EVs: 28 HP / 12 Def / 244 SpA / 226 Spe
Timid Nature
IVs: 6 Atk / 30 SpA / 30 Spe
- Psychic
- Ice Beam
- Thunderbolt
- Hidden Power [Fire]

Tauros @ Choice Band
Ability: Intimidate
EVs: 40 HP / 252 Atk / 218 Spe
Jolly Nature
IVs: 30 Def / 3 SpA / 30 SpD
- Double-Edge
- Earthquake
- Return
- Hidden Power [Ghost]

Swampert (F) @ Leftovers
Ability: Torrent
EVs: 168 HP / 252 Atk / 90 Spe
Adamant Nature
IVs: 30 Def / 11 SpA / 30 SpD / 30 Spe
- Protect
- Substitute
- Earthquake
- Hidden Power [Rock]

Articuno @ Cheri Berry
Ability: Pressure
EVs: 6 HP / 252 SpA / 252 Spe
Timid Nature
IVs: 6 Atk / 30 SpA
- Protect
- Haze
- Ice Beam
- Hidden Power [Grass]
Modified version of Actaeon's Haymaker team

He used Latios, Tauros, Gengar, and Metagross. It's a fast and hyper-offensive lead with Haze in the backline. Initially, I kept using Gengar and replaced Metagross with Swampert. I gave Gengar multiple tries, but I simply felt it wasn’t good enough for the reasons I previously described. I lost 2 or 3 times in the following way while using Gengar: Latios would get KOed, then Gengar would come into the field in the same turn, only to get KOed as well by a crit. All of a sudden, Tauros is locked into EQ next to Swampert — the worst-case scenario. Gengar’s fragility makes the team more vulnerable to being punished by the insta-switch mechanic.

This is the first version of the team: HP Fire on Latios, no Protect. This hyper-offensive lead guarantees KOs on all Explosion sets, except for the Regis. It’s worth mentioning that HP Fire + EQ KOs all Metagross and Steelix sets.

The biggest threats to this team are:
  • OHKO sets with QC, Bright Powder: Lapras, Rhydon, Wailord, Whiscash, Donphan, Walrein, Nidoking, etc.
  • Problematic QC / Faster sets that can OHKO Latios or Tauros with a crit: Whiscash (Ice Beam), Slowking (Psychic, Ice Beam), Slowbro (Psychic, Ice Beam), Flareon (Overheat, Shadow Ball), Crobat (Shadow Ball), Jolteon (Thunderbolt), Tyranitar (Crunch), Rhydon (Megahorn), Metagross (Meteor Mash, Shadow Ball), Latios (Psychic, Ice Beam), Aggron (Iron Tail), Gardevoir (Psychic), Granbull (Double Edge), Hariyama (Cross Chop), Lapras (Ice Beam), Latias (Psychic, Ice Beam), Machamp (Cross Chop), Snorlax (Mega Kick, Shadow Ball, Brick Break, Double Edge, Hyper Beam), Steelix (Iron Tail), Ursaring (Mega Kick, Double Edge, Brick Break), etc.
  • Problematic Bright Powder sets: Crobat, Exeggutor, Gardevoir, Heracross (!), Jynx, Latias, Latios, Metagross, Porygon2, Regice, Salamence, Scizor, Walrein (!), Regirock, Articuno, etc.
  • Regice: The team does not have an actual counter for this Pokemon, and only Tauros and Swampert can do significant damage to it. It’s important for Tauros to get at least one Return or a couple of EQs off to guarantee that Swampert can finish it off late game. Regice should be prioritized when it’s the lead.
  • EXPLOSION, EXPLOSION, EXPLOSION: This move is the biggest threat to this team by far. There are a lot of QC Explosion mons and some bulky ones that Latios and Tauros can’t KO. T1 QC Explosion is the worst situation to be in, especially if the Explosion Pokemon’s partner is immune to it or resists the attack, as it turns the battle into a 2 vs. 3. Some of the most problematic Explosion mons are: Metagross, Forretress, Registeel, Regirock, Golem, Steelix, Muk, Exeggutor (Brightpowder), etc.
  • Icy Wind: Articuno and Glalie are the worst. Articuno will use Icy Wind first and then start spamming STAB Modest Ice Beams. Glalie often uses Explosion after Icy Wind.
  • Thunder Wave: Getting two or three members paralyzed means the team is slower than almost everything in the facility. Combined with the possibility of being unable to move, it’s not something to play around with, as it can very easily lead to a loss.
  • Counter: Losing Tauros and Swampert to Counter is terrible. Regirock-2 and Registeel-3 are the worst Counter sets, as both hold QC and run Explosion. Blissey-4 is a set I usually try to ignore and deal with late-game using Substitute Swampert. In these kinds of matchups, Substitute on Swampert shines.

381MS3.png
128MS3.png
260MS3.png
144MS3.png

Latios @ Lum Berry
Ability: Levitate
EVs: 28 HP / 12 Def / 244 SpA / 6 SpD / 220 Spe
Timid Nature
IVs: 7 Atk
- Psychic
- Ice Beam
- Thunderbolt
- Protect

Tauros @ Choice Band
Ability: Intimidate
EVs: 40 HP / 252 Atk / 218 Spe
Jolly Nature
IVs: 30 Def / 3 SpA / 30 SpD
- Double-Edge
- Earthquake
- Return
- Hidden Power [Ghost]

Swampert (F) @ Leftovers
Ability: Torrent
EVs: 168 HP / 252 Atk / 90 Spe
Adamant Nature
IVs: 30 Def / 11 SpA / 30 SpD / 30 Spe
- Protect
- Substitute
- Earthquake
- Hidden Power [Rock]

Articuno @ Cheri Berry
Ability: Pressure
EVs: 6 HP / 252 SpA / 252 Spe
Timid Nature
IVs: 6 Atk / 30 SpA
- Protect
- Haze
- Ice Beam
- Hidden Power [Grass]
Latios (M) @ Lum Berry
Ability: Levitate
Level: 50
EVs: 28 HP / 6 Def / 244 SpA / 4 SpD / 228 Spe
Timid Nature
IVs: 9 Atk
- Psychic
- Ice Beam
- Thunderbolt
- Protect

Tauros @ Choice Band
Ability: Intimidate
Level: 50
EVs: 38 HP / 252 Atk / 220 Spe
Jolly Nature
- Double-Edge
- Earthquake
- Return
- Hidden Power [Ghost]

Swampert (F) @ Leftovers
Ability: Torrent
Level: 50
EVs: 168 HP / 252 Atk / 90 Spe
Adamant Nature
IVs: 30 Def / 3 SpA / 30 SpD / 30 Spe
- Protect
- Substitute
- Earthquake
- Hidden Power [Rock]

Articuno @ Cheri Berry
Ability: Pressure
Level: 50
EVs: 6 HP / 248 SpA / 4 SpD / 252 Spe
Timid Nature
IVs: 26 Atk / 30 SpA
- Protect
- Haze
- Ice Beam
- Hidden Power [Grass]
The team remains largely the same, except for Latios' fourth move: Protect instead of HP Fire. I considered Protect as an interesting option to play around Explosion and potentially use Latios as bait when it’s at low HP. The value of buying a free turn with Latios, allowing Tauros to get an attack off, should not be underestimated. In my search for consistency with this core, the only change that improved the team's performance was adding Protect to Latios.

381MS3.png
128MS3.png
260MS3.png
144MS3.png

Latios @ Lum Berry
Ability: Levitate
EVs: 28 HP / 12 Def / 244 SpA / 226 Spe
Timid Nature
IVs: 6 Atk / 30 SpA / 30 Spe
- Psychic
- Ice Beam
- Thunderbolt
- Hidden Power [Fire]

Tauros @ Choice Band
Ability: Intimidate
EVs: 40 HP / 252 Atk / 218 Spe
Jolly Nature
IVs: 30 Def / 3 SpA / 30 SpD
- Double-Edge
- Earthquake
- Return
- Hidden Power [Ghost]

Swampert (F) @ Quick Claw
Ability: Torrent
EVs: 168 HP / 252 Atk / 90 Spe
Adamant Nature
IVs: 30 Def / 11 SpA / 30 SpD / 30 Spe
- Protect
- Substitute
- Earthquake
- Hidden Power [Rock]

Articuno @ Cheri Berry
Ability: Pressure
EVs: 6 HP / 252 SpA / 252 Spe
Timid Nature
IVs: 6 Atk / 30 SpA
- Protect
- Haze
- Ice Beam
- Hidden Power [Grass]
Hidden Power Fire vs. Protect on Latios: It's a tough call. As I mentioned before, in my first runs, I used HP Fire, and this move was extremely useful. However, months later, after doing more runs, it became clear that Protect is also a very solid choice since it helps a lot against Explosion and allows Latios, when at low HP, to act as "bait," buying a free turn for the team. In 2023, I said multiple times that I was convinced Protect was better for Latios.

Fast forward to January 2025: I grinded for 1K one last time, but using HP Fire Latios, and achieved the goal after only 3 attempts. I’d probably say both moves are equally viable, but I think I prefer Protect on Latios.

Without HP Fire, Latios and Tauros can't guarantee KOs on all Metagross sets, Forretress, Steelix, Scizor, etc. However, it's undeniable that Protect is one of the best moves Latios can have for the reasons mentioned above.

⚫ Emerald File #1: "Team #3 - Open Level" and "Team #3 - Lv. 50" were used. The teams were built in 2023, but these streaks were achieved in 2024. My first streaks in 2022 were done in this file, but were eventually improved by the ones I mentioned from 2024.
Emerald Battle Tower File #1.png

⚫ Emerald File #2: The Lv. 50 streak was achieved in 2023 using "Team #3 - Lv. 50," but with Substitute on Articuno instead of HP Grass. It was not continued. The Open Level streak was achieved using "Team #4" this year, 2025.
Emerald Battle Tower File #2.png

⚫ Emerald Retail Cardtrige:
Once I finally found a way to transfer "Team #3 - Open Level" and "Team #3 - Lv. 50" to retail, I did some runs. Initially, I planned to redo both the Tower and Dome streaks on retail, but I only ended up playing Tower. I managed to achieve 1K in Open Level after a few attempts, but in Lv. 50, I didn’t reach the goal on my first try. Sometime later, I started a new run but eventually abandoned it—I’m just not the biggest fan of Lv. 50. The Open Level streak was achieved in 2023 and the Lv. 50 one in early 2024.
Emerald Retail Battle Tower Streaks.jpg


Some recordings of the streaks and failed attempts can be found on my YouTube channel. While they aren’t meant to serve as proof of the streaks, there are more than enough games to give a clear understanding of how the team works.
In Tower Doubles, no team can currently get into a guaranteed winning position in every game, unlike the top singles team. This means that for a good doubles team to achieve a long streak, it usually requires several attempts. When it comes to reaching 1K wins, I've achieved the goal in as few as one attempt and as many as seven on different occasions using the same team. I've experienced losses as early as just before reaching 100 wins and as late as beyond 1K.

This is a very simple team to use, but it's not hard to misplay, which can lead to a loss. That said, this facility can be very forgiving of misplays, unlike in later generations. A key aspect of success is understanding the threats to the team and identifying other particularly annoying sets. It's important to prioritize KOs on those Pokemon while knowing which other sets can be safely ignored and dealt with in the late game.

The way I enjoy this facility is by playing with a lot of speedup while doing something else, like watching a movie or TV show. While this isn’t exactly ideal, the format is simple and forgiving enough to play this way and still perform decently well—as long as the player understands how to properly use the team.

Taking this kind of archetype to the next level, such as achieving 2K wins (which I believe is likely its ceiling), would require scouting, a precise understanding of AI behavior in every scenario (including on-the-spot research), and carefully analyzing each tough matchup and situation. Essentially, it would require adopting a Factory-like playstyle.

Rambling about items and moves for Tauros, Swampert and Articuno​

⚫ Leftovers vs. Quick Claw vs. Aspear Berry on Swampert: I used Leftovers in all my runs from 2022 to 2024, since it makes sense on a SubTect set. However, given how short battles tend to be, Swampert is rarely able to take full advantage of the item, making it useless in most battles. For that reason, it doesn’t seem like the best option. Having lost to freezes on Swampert multiple times in the past, I now believe there's no reason not to use Aspear Berry over Leftovers.

However, in 2024, it was discovered that in Gen III, Quick Claw is turn-activated for the Pokemon holding the item on the field, resulting in a "speed tie" that ignores the actual speed of the mons. This means that, for example, if my Swampert is holding a Quick Claw and is facing a Registeel-3, and Quick Claw activates on that turn, it will be a 50-50 chance as to which Pokemon moves first, even though my Swampert is faster. This mechanic could technically save a run against Explosion sets.

So in my opinion, Quick Claw and Aspear Berry are the best items for Swampert.

⚫ Substitute vs. HP Grass on Articuno: In my first Level 50 run, I used Substitute on Articuno, intending it as another way to play around Explosion. While that seemed promising on paper, in practice, Substitute was not impactful at all, and I missed Hidden Power Grass significantly. That was the first and only time I used Substitute on Articuno.

⚫ Return vs. Double Edge vs. Hyper Beam on Tauros: From the very beginning, I used Return and Double Edge on Tauros, and I’m 100% convinced this is the best STAB combo for it. Return allows Tauros to stay on the field longer, which is crucial.

After hearing about the apparent success of another user with the Double-Edge + Hyper Beam STAB combo, I decided to give it a try. Using Double-Edge as the main STAB move for Tauros is something I did not like at all. The recoil puts Tauros in KO range for many Pokemon, limiting its time on the field. As for Hyper Beam, I absolutely hate it. The move's 90% accuracy makes it unreliable, and the forced recharge turn after use is a major drawback. In my opinion, it is not a good option at all.

Battle Dome

2v2 is not the best format for good stuff teams. There is very little room for a comeback if something goes wrong (misses, QC activations, EXPLOSION, etc.), unlike in the standard Battle Tower Doubles format. However, considering the IV bug on the AI's mons, good stuff can get a very good amount of free wins, but I couldn't find the consistency I was looking for with this kind of archetype.

As long as the player gets the #1 seed in the tournament bracket, a tie is always a win for the player. This opened the possibility for a Perish Song team.
131MS3.png
115MS3.png
381MS3.png

Lapras (F) @ Lum Berry
Ability: Shell Armor
EVs: 108 HP / 244 Def / 64 SpD / 92 Spe
Calm Nature
- Protect
- Rest
- Substitute
- Perish Song

Kangaskhan @ Leftovers
Ability: Early Bird
EVs: 252 HP / 4 Atk / 4 Def / 120 SpD / 128 Spe
Jolly Nature
- Fake Out
- Protect
- Substitute
- Double-Edge

Latios (M) @ Cheri Berry
Ability: Levitate
EVs: 28 HP / 32 Def / 248 SpA / 12 SpD / 188 Spe
Timid Nature
IVs: 30 Def / 30 SpA / 30 Spe
- Psychic
- Ice Beam
- Thunderbolt
- Hidden Power [Fire]
131MS3.png
115MS3.png
381MS3.png

Lapras (F) @ Lum Berry
Ability: Shell Armor
Level: 50
EVs: 108 HP / 244 Def / 60 SpD / 96 Spe
Calm Nature
- Protect
- Rest
- Substitute
- Perish Song

Kangaskhan @ Leftovers
Ability: Early Bird
Level: 50
EVs: 252 HP / 4 Atk / 4 Def / 116 SpD / 132 Spe
Jolly Nature
- Fake Out
- Protect
- Substitute
- Double-Edge

Latios @ Cheri Berry
Ability: Levitate
Level: 50
EVs: 28 HP / 32 Def / 248 SpA / 4 SpD / 196 Spe
Timid Nature
IVs: 30 Def / 30 SpA / 30 Spe
- Psychic
- Ice Beam
- Thunderbolt
- Hidden Power [Fire]

A Perish Song team is only viable thanks to Lapras' Shell Armor ability; otherwise, the run would end at some point due to a crit. Lapras needs Fake Out support, so I chose Kangaskhan because it's decently fast, can offer good offensive pressure with Double-Edge, and is bulky.

The last member is Latios, who is probably the best Pokemon in the Battle Frontier. This way, the team has two modes: Perish Song mode with Lapras + Kangaskhan and full offensive mode with Latios + Kangaskhan.

Back in 2023, when I built this team and did my first couple of runs, I was not scouting at all (because it takes too much time without a tool, and I was not aware of the existence of DomeAssistant at the time), so I decided to assume it could be any set, although I was aware that was not the case. The team works fine without scouting for the most part, but the decision-making might not be optimal in many battles. In 2024, DomeAssistant Web was released, so I felt like running it back in this facility using the tool, but this time with an optimized version of the team (EVs and IVs, thanks Adedede!). Using DomeAssistant Web helps minimize errors and make better decisions against problematic matchups.

The biggest threats to this team are:
  • Soundproof Pokemon: Electrode, Exploud and Mr. Mime. Perish Song does not work against them, so using the offensive mode is required.
  • Machamp-7, Breloom-2: Bright Powder and Focus Punch. Offensive mode is used against them.
  • Teams with multiple Fighting-types: Offensive mode is used.
  • Attract: This move can be easily overlooked even while scouting. Attract on Lapras can lead to a loss.
  • EXPLOSION: Explosion from a lead that resists the attack (e.g., Metagross, Steelix) must be handled carefully. Sometimes both Pokemon may run Explosion, so the only solution is to alternate Protects and play around with Substitute after setting up Perish Song.
  • OHKO moves: Substitute is very useful against them.
  • Flinches: Rock Slide and King's Rock attacks from fast Pokemon like Aerodactyl, Dugtrio, Salamence, etc. Offensive mode is recommended.
  • Double Earthquake Spam: Double Flying-types/Levitate Pokemon with EQ. Offensive mode is recommended.
⚫ Emerald File #1: I used the Perish Song team core to achieve the Open Level and Lv. 50 streaks in 2023, but the EVs and IVs were not fully optimized, and I didn’t scout. As shown in the picture, I played a lot of tournaments in Open Level with good stuff and bad Perish Song teams before ultimately building the Lapras - Kangaskhan - Latios team, which provided the consistency I was looking for.
Emerald Battle Dome File #1.png

⚫ Emerald File #2: I used the optimized version of the team and DomeAssistant Web to achieve these streaks in 2024.
Emerald Battle Dome File #2.png

Battle Tower Multi Open Level with Mackattack93

Me:
381MS3.png
094MS3.png
// Mack:
128MS3.png
260MS3.png

Back in September of last year, we decided to play BT Multi. Once Mack understood how the team worked and took into account the switch limitation of the format, he suggested we use Gengar instead of Articuno. In this context, it made perfect sense because Gengar is immune to Explosion, and Swampert can't go on my side of the field (refer to my experience with Gengar in regular Battle Tower Doubles above for more context).

SAVE STATES WERE USED. We used mGBA, which was quite unstable in Multi mode and sometimes crashed without warning. Our first run ended shortly after hitting 49 wins due to a crash. After that, we began save stating in the lobby after each round. That was the only way we could keep a run going. Every time a crash happened, we had no choice but to load the save states.
381MS3.png
128MS3.png
260MS3.png
094MS3.png

Latios @ Lum Berry
Ability: Levitate
EVs: 28 HP / 12 Def / 244 SpA / 6 SpD / 220 Spe
Timid Nature
IVs: 7 Atk
- Psychic
- Ice Beam
- Thunderbolt
- Protect

Tauros @ Choice Band
Ability: Intimidate
EVs: 40 HP / 252 Atk / 218 Spe
Jolly Nature
IVs: 30 Def / 3 SpA / 30 SpD
- Double-Edge
- Earthquake
- Return
- Hidden Power [Ghost]

Swampert (F) @ Lum Berry
Ability: Torrent
EVs: 168 HP / 252 Atk / 90 Spe
Adamant Nature
IVs: 30 Def / 11 SpA / 30 SpD / 30 Spe
- Protect
- Substitute
- Earthquake
- Hidden Power [Rock]

Gengar (F) @ Cheri Berry
Ability: Levitate
EVs: 28 Def / 252 SpA / 6 SpD / 224 Spe
Timid Nature
IVs: 2 Atk
- Protect
- Haze
- Ice Punch
- Thunderbolt
Emerald Battle Tower Multi Streak.png
 
I'm going to train up a Linoone for the early part of the Battle Pyramid, to be used as an item collector (Pickup + Covet). Does anyone know which Nature and EVs I should put on it?

As for moves, I was thinking of giving Linoone:

-Covet
-Return
-Shadow Ball
-(a 4th move I haven't decided on yet. Possibly Surf)

I thought it would be neat to have an RPG thief deployed for the early parts of the Battle Pyramid, then switch to something tougher in the later parts.

IIRC the one I used was Naive, worked quite well.

However I can tell you that it's a far more efficient strategy to lead with something else - for the paralysis round, Flygon is an ideal lead and can OHKO nearly all of the wild Pokemon as well as most NPC's Pokemon. On my most successful Pyramid run I rushed through the first six floors then spent ages walking around the seventh floor in sight of the exit grinding items using a team of Flygon, Phanpy, and Linoone for the first two rounds as both Flygon and Phanpy have a type advantage over most of the Electric and Poison wild spawns (I taught the former Fly and the latter HP Flying for the Grass-types). If you see a trainer you can switch Linoone to the lead spot to make use of Covet though it's such a gamble whether you'll get a decent item or not. For the third round I swapped Linoone for a Fighting-type for the Brandon battle - by then you should have a Choice Band and if you're using Heracross or Hariyama it's relatively easy to get them burned to make use of Guts as well. But if you make it to the seventh floor with an intact team and lots of PP left in the first three rounds, you'll have a lot of opportunity to find items and should be starting the fourth round with a ton of Revives, Hyper Potions, Lum Berries etc.
I'm probably going to use Flygon at some point, simply because it makes so much sense thematically. Using the desert dragon in the Egypt-themed battle facility. I was thinking my team early on would consist of Linoone, Blissey, and Latios. While my team later on would consist of Flygon, Blissey, and Swampert.
 
Reporting a 203$* Streak in Battle Tower Singles - Open Level on Delta emulator.
Open Level (90) - No specific reason, just didn't want to train to 100 and leaves room to change EVs if I want

The Team
Latias (F) @ Lum Berry
Nature: Calm
IVs: 28 HP / 8 Atk / 28 Def / 7 SpA / 30 SpD / 29 Spe
Evs: 252 HP / 204 Def / 40 SpD

  • Thunder Wave
  • Charm (32/32 pp important! - beats enemy swords dance (30/30 pp) by 2)
  • Mud-Slap
  • Recover

*Note - I used to use Flash and think I will go back to flash. Not hitting flying/levitate is a little annoying. I don't believe I have encountered a scenario where I absolutely need the 100% accuracy of the move, it is always a nice-to-have. Also it has happened where once they see you use mud-slap twice, there is a very small probability they swap into a flying type (they have swapped from Typhlosion into Articuno), which usually isn't a huge problem but has the potential to be. High streaks are all about probabilities.

Suicune @ Chesto Berry
Nature: Calm
IVs: 25 HP / 16 Atk / 20 Def / 29 SpA / 28 SpD / 7 Spe
EVs: 252 HP / 252 Def / 6 SpD

  • Surf
  • Calm Mind
  • Rest
  • Substitute

*Note - I am planning to use RNG to get one with better hp/def IVs and especially speed IVs. It has not been a common problem as the Pkmn is usually Paralyzed and ground ones are usually slower or not a threat (charmed to oblivion).

*Note 2 - I rarely (and by rarely I mean 1 fight in the 203 streak, ever used surf. It's nice to know it has the potential to sweep but if water absorb, ludicolo, or bulky pokemon come out it can fail and ruin the run. So I always opt to PP stall and setup with Dragonite. Possibly 31 Spe IV could change this a little, but this set revolves around Dragonite sweeping).

*Note 3 - Due to Note 2 above will likely swap Surf for Protect and test. This would allow it to handle it's biggest threats (thunderbolt + icebeam/ice punch users, ex. Starmie, Latios, Gengar) efficiently by PP stalling through all 15 thunderbolt before resting and using Chesto berry with no chance of Crits (only quick claw procs which are rare for those pkmn and even protect stops those still).


Dragonite (F) @ Leftovers
Nature: Adamant
IVs: 31 HP / 31 Atk / 29 Def / 2 SpA / 27 SpD / 29 Spe
EVs: 238 HP / 252 Atk / 20 Spe

  • Aerial Ace
  • Dragon Dance
  • Earthquake
  • Substitute

*Note: I think I would prefer M since anything that can attract Latias can attract Dragonite, but it hasn't been a real problem as usually attract users don't run threatening sets anyway and I can always PP stall with Suicune

*Note 2: I have gotten similar streaks with Salamence as well. I prefer the bulk that Dragonite offers in the rare case the other 2 go down with no setup, as Dragonite has better chance to get a few dragon dances and sweep if things go terribly wrong (has happened 1 time - multi crits / quick claws on previous pkmn).

*Note 3: Never switch to dragonite when chance of status moves can happen (poisened/burned/par). Sleep is ok if they don't have a move that can crit kill you after. Switch to Suicune to PP stall it out first.


Overall very happy with the team, I will continue the streak and report back when I lose!
Proof:
 

Attachments

  • IMG_2664.PNG
    IMG_2664.PNG
    1.8 MB · Views: 11
Reporting a 203$* Streak in Battle Tower Singles - Open Level on Delta emulator.
Open Level (90) - No specific reason, just didn't want to train to 100 and leaves room to change EVs if I want


The Team
Latias (F) @ Lum Berry
Nature: Calm
IVs: 28 HP / 8 Atk / 28 Def / 7 SpA / 30 SpD / 29 Spe
Evs: 252 HP / 204 Def / 40 SpD

  • Thunder Wave
  • Charm (32/32 pp important! - beats enemy swords dance (30/30 pp) by 2)
  • Mud-Slap
  • Recover

*Note - I used to use Flash and think I will go back to flash. Not hitting flying/levitate is a little annoying. I don't believe I have encountered a scenario where I absolutely need the 100% accuracy of the move, it is always a nice-to-have. Also it has happened where once they see you use mud-slap twice, there is a very small probability they swap into a flying type (they have swapped from Typhlosion into Articuno), which usually isn't a huge problem but has the potential to be. High streaks are all about probabilities.


Suicune @ Chesto Berry
Nature: Calm
IVs: 25 HP / 16 Atk / 20 Def / 29 SpA / 28 SpD / 7 Spe
EVs: 252 HP / 252 Def / 6 SpD

  • Surf
  • Calm Mind
  • Rest
  • Substitute

*Note - I am planning to use RNG to get one with better hp/def IVs and especially speed IVs. It has not been a common problem as the Pkmn is usually Paralyzed and ground ones are usually slower or not a threat (charmed to oblivion).


*Note 2 - I rarely (and by rarely I mean 1 fight in the 203 streak, ever used surf. It's nice to know it has the potential to sweep but if water absorb, ludicolo, or bulky pokemon come out it can fail and ruin the run. So I always opt to PP stall and setup with Dragonite. Possibly 31 Spe IV could change this a little, but this set revolves around Dragonite sweeping).

*Note 3 - Due to Note 2 above will likely swap Surf for Protect and test. This would allow it to handle it's biggest threats (thunderbolt + icebeam/ice punch users, ex. Starmie, Latios, Gengar) efficiently by PP stalling through all 15 thunderbolt before resting and using Chesto berry with no chance of Crits (only quick claw procs which are rare for those pkmn and even protect stops those still).

Dragonite (F) @ Leftovers
Nature: Adamant
IVs: 31 HP / 31 Atk / 29 Def / 2 SpA / 27 SpD / 29 Spe
EVs: 238 HP / 252 Atk / 20 Spe

  • Aerial Ace
  • Dragon Dance
  • Earthquake
  • Substitute

*Note: I think I would prefer M since anything that can attract Latias can attract Dragonite, but it hasn't been a real problem as usually attract users don't run threatening sets anyway and I can always PP stall with Suicune


*Note 2: I have gotten similar streaks with Salamence as well. I prefer the bulk that Dragonite offers in the rare case the other 2 go down with no setup, as Dragonite has better chance to get a few dragon dances and sweep if things go terribly wrong (has happened 1 time - multi crits / quick claws on previous pkmn).

*Note 3: Never switch to dragonite when chance of status moves can happen (poisened/burned/par). Sleep is ok if they don't have a move that can crit kill you after. Switch to Suicune to PP stall it out first.

Overall very happy with the team, I will continue the streak and report back when I lose!
Proof:
Streak did not go much longer. Lost on the 211 battle to a Metagross who got 3 boosts from meteor mash to finish the streak at 210. I’ll add some notes, mistakes, what I could’ve changed.

Threats to the team: Clear body physical users (Metagross, Regirock) especially if they can raise Atk. Metagross with meteor mash RNG, regirock with curse. For regirock, it is typically too slow as I will have a sub up on suicune and enough calm minds to surf kill it.
Usually the same for metagross, and +1 atk is very manageable. +2 would need some crits to kill me but +3 is very tough which is what happened

These points about the clear body physical threat list makes me rethink removing surf for protect on suicune.

While it would essentially stop metagross (thunder wave w latias, insta switch to suicune) he has used 2 meteor mashes so about 24% chance to have raised 1atk, with 7 PP remaining or 4 more hits. Protect stops 2. So another 24% chance to get atk boost. Low chances but a +2 struggle metagross does too much damage to dragonite to setup (maybe get 3 dragon dances plus sub due to leftovers). I will check on some math.

Curse regirock against protect suicune will just get to +6 and struggle which I can’t deal with, so I think I have to keep surf for these 2 mons.

On the battle:

Upon rewatching, I did have a chance when the light screen went down and/or when he was at 1/4 hp that I had a turn I think I could’ve killed the metagross. There was 1 more chance too I could’ve killed but would’ve been left <20% hp. With no sub up this is not ideal but has a much better chance at winning as it would be 2v2 with a +3CM suicune with half hp and a strong dragonite waiting behind.

Might go 1 more attempt with this team after I RNG a better suicune but otherwise gonna start breeding some dif mons, and finishing the gold trainer card by getting all the master rank contests! Cheers everyone!
 
Hey everyone, I need guidance and advice from the pros that understand the Emerald Battle Frontier.

Been watching the Gen 3 BF scene from afar and in awe of all the work that has been done by the community. I'm on a mission to play through every generation of games and have a crazy goal in mind: 100% each game while Nuzlocking. And that includes post-game facilities.
To explain though, I'm not counting deaths in a Battle Frontier facility or anything like that as permanent (because that would be actually insane). Fainted Pokemon stay fainted for the rest of that streak. I have already accomplished my goal in generations 1 and 2 with Stadium and Stadium 2. There were some challenges but I managed to beat every battle challenge while "Nuzlocking" that facility. A lot of what I've seen recommended for Battle Frontier applied to the Stadiums, like expecting hax items to proc and Substitute being the most broken move in existence. Still, I expect the Frontier challenge is on a whole different level.

So, my question is, how feasible is it to Gold Print every facility with EV trained but essentially random IVs? I have seen some successful teams posted without any IV breeding. I do plan on making use of my full roster of Pokemon from Emerald, LeafGreen, Colosseum, and XD, and breeding my Nuzlocke encounters. However, I want to maintain the spirit of the Nuzlocke and limit it to as many eggs as I can hatch in new met locations. I have also RNG'd in the past, but I'm not sure how helpful that'll be if I want to earnestly keep it at one attempt per Pokemon. I've been taking note of what species often show up on successful Frontier teams so I can target them as captures. Plus there's a few guaranteed species like Metagross and Gyarados that I plan around. Haven't decided yet, but I'm also leaning toward allowing legendaries in the Nuzlocke to give me more options.

I want to get a sense from you all if this sounds like a pipe dream or something that could feasibly be done. There are some gold prints that seem fairly trivial and others that require very specific strategies. Do you think this is too much of a handicap to overcome? And do you have any advice? Thank youuuuuuuuuuuuu!
 
Back
Top