Pokemon XD Orre Colosseum Guide
(Approved by Oglemi)
(Approved by Oglemi)
Abstract
This guide is limited in scope to the Orre Colosseum challenges present in the story mode of Pokemon XD. This guide covers the background of the colosseum, its rules, effective strategies and teams for its challenges, data on each round, and analysis of the AI teams. This is not a challenge to be taken lightly, as it requires much in-game time investment and contends for the most challenging battling ever presented in a Pokemon game. Your opponents have nearly perfectly IVed Pokemon that have been EV trained and have been given a variety of exotic movesets and held items. The potential for level advantage is impossible, meaning that the traditional in-game mindset of simply muscling through your opponents is not an option; you must outplay them. If you have a copy of Pokemon XD but never attempted this challenge, now would seem a good time to go back and test your prowess. For those without a copy and who are interested in the toughest battling Pokemon has ever produced, you will unfortunately have to invest in a copy of the game and possibly in a GBA link cable as well.
Introduction
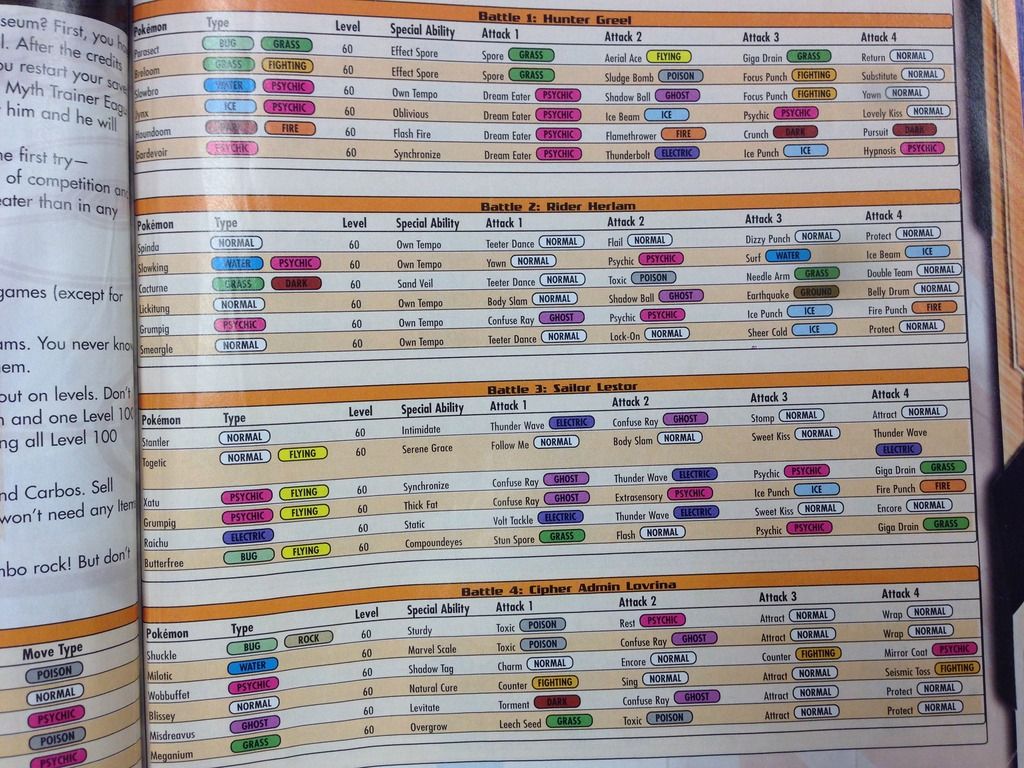
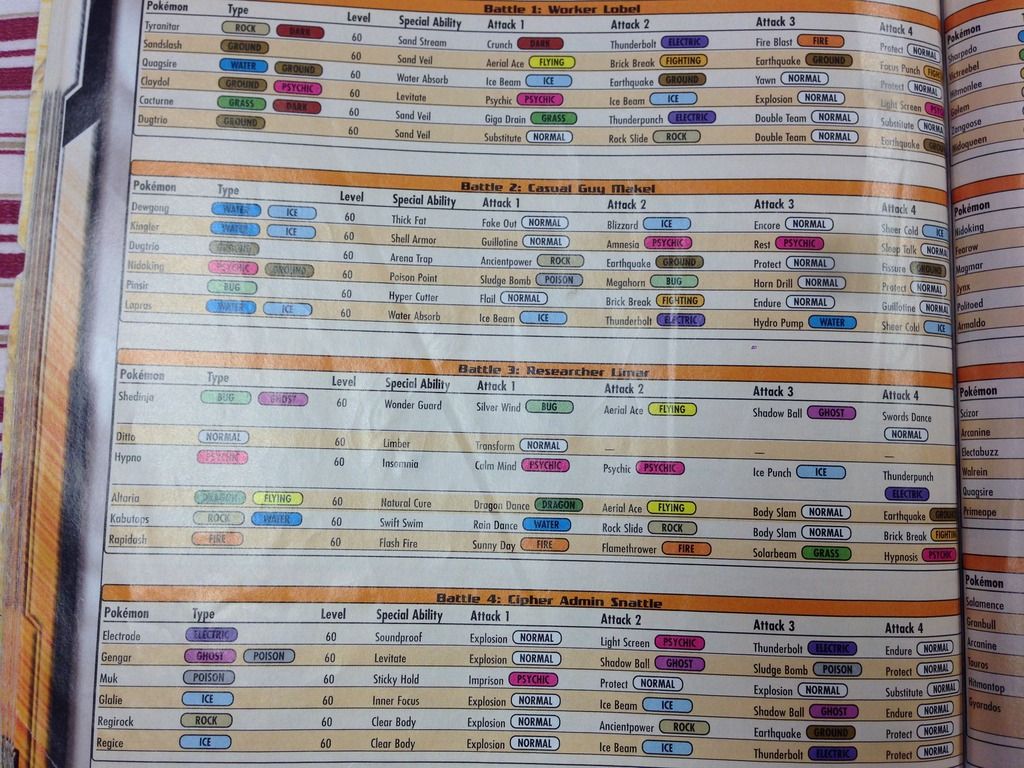
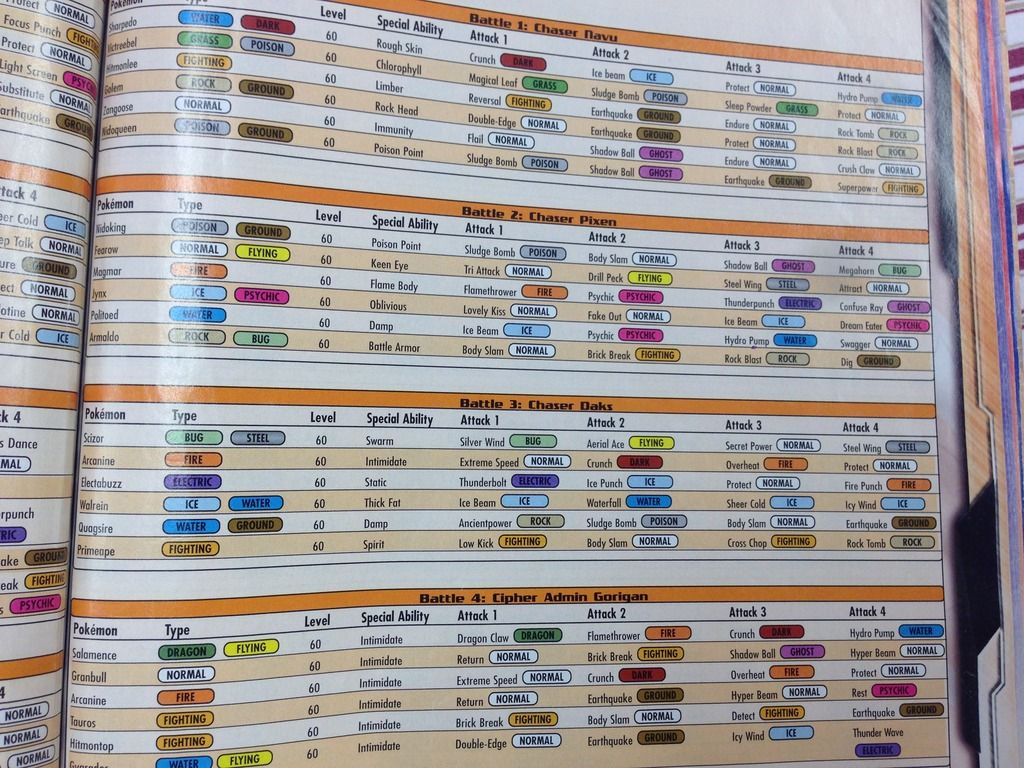
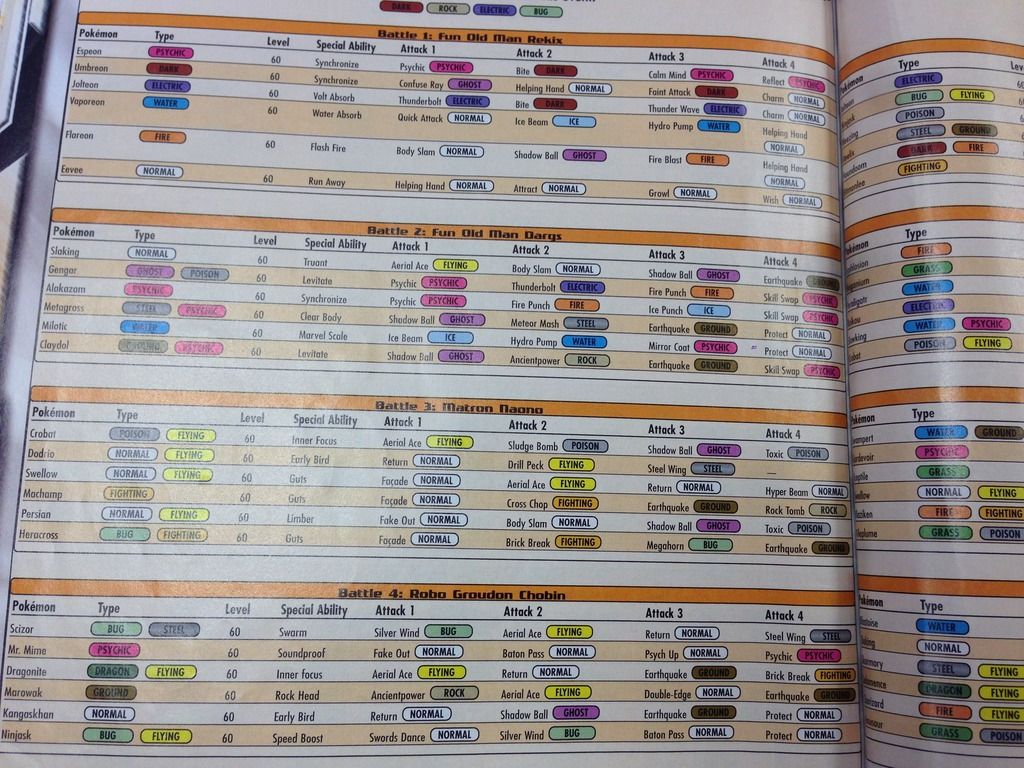
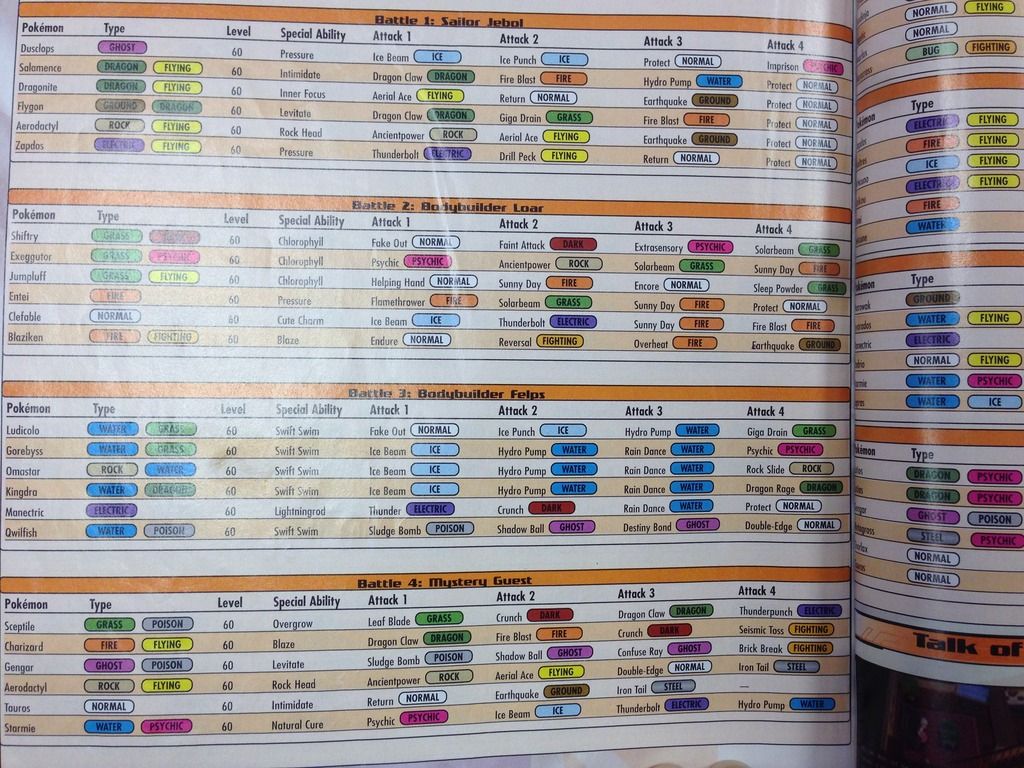
The opportunity to challenge the Orre Colosseum is available only after the main storyline of Pokemon XD has been completed. The Colosseum consists of seven rounds of double battles, each with four battles. To advance to the next round you must win each battle consecutively; a loss against the AI during a challenge means that you must restart that round from the beginning again. At the start of each round you will challenge with a team, and you will use this team for all four battles of that round. Only four of your six Pokemon will be used in each battle, and these are to be chosen at the start of each battle. This provides more flexibility when preparing for the AI teams, which helps to offset the disadvantage of having to use the same team four battles in a row. In general, each round has some sort of a theme, meaning that it is expected for a challenger to bring a specially-selected team for each round. It is possible to complete all seven rounds with the same team; however, it is easier to complete the challenge by preparing for each round on its own.
Naturally there will be hax during the challenge, especially when considering that almost every round has a Pokemon that caries BrightPowder or Lax Incense. The AI also makes use of Thunder Wave, confusion, and OHKO moves, furthering the potential for disaster. While this is mostly limited to the first two rounds, it becomes quite apparent because the challenge requires that you win four battles in a row, quadrupling the AI's opportunity to screw you over. While this is a negative, it is nowhere near as bad as in the Battle Frontier, where almost every challenge is ended by hax due to how the player is forced to win a large number of battles in a row. The first round is the only one that really focuses on the use of confusion, paralysis, and infatuation. In the second round, the AI makes use of Sand Veil and Double Team, and in another battle it wields OHKO moves, although these things are not seen in the five subsequent rounds. While sometimes it is impossible to prevent hax from mangling your team, following several strategies can drastically reduce the opportunity for the AI to screw you over.
The AI in the Orre Colosseum is generally effective, albeit somewhat predictable. It tends to make the "smartest" play and has the Pokemon to execute such plays. "Smartest" is in quotations, because it refers to how the AI seeks to maximize the yield of its turn. The simplest case is that if you have a Water-type in battle against the AI’s Raikou, it is almost assured that Raikou will attack the Water-type with Thunderbolt. On occasion the AI does make some strange plays that serve to keep things interesting, but most of the time it will choose the obvious play. This is especially exploitable with users of Protect, which serves to further solidify the move's incredible utility. Situations of double battle events such as Explosion, Earthquake, and Skill Swap serve to further highlight this and are responsible for some of the more interesting moments of play.
There are a few moves in particular that prove extremely effective for this challenge. The previously mentioned Protect is great on a Pokemon that has room for it, and a majority of Pokemon should be running it. Protect can allow the manufacture of free turns when the AI focuses both their attacks on a single target, allowing your second Pokemon to take an advantage. Protect can also be used to alter how a trade occurs, allowing a slower Pokemon to knock out a faster Pokemon because the faster Pokemon was focused on the protected Pokemon. Protect also provides a single-turn immunity to Earthquake, Selfdestruct, and Explosion, which are some of the most effective and deadly moves in the Orre Colosseum. These moves allow the disposal of multiple foes at a time and, when used effectively, force trades in your favor. Strong special attacks are also valuable assets, and they can plow through foes quickly when coming off certain Pokemon. Similarly, fast Pokemon with good coverage can be used to double team one of the AI’s Pokemon and knock it out before it has a chance to move. The pace of the game is very fast and battles are usually over quickly, with the exception of the Lovrina final. This makes it very easy to lose from a single poorly played turn and means that the player needs to make calculated safe plays.
Rules
~ The following Pokemon are banned: Mew, Mewtwo, Lugia, Ho-Oh, Celebi, Groudon, Kyogre, Rayquaza, Jirachi, Deoxys;
~ Soul Dew is banned;
~ A team is not allowed to have multiple of the same species of Pokemon (Species Clause);
~ A team is not allowed to have multiple use of the same item (Item Clause);
~ You are permitted from calling your Pokemon or using healing items on them;
~ All AI Pokemon are at level 60, or they are at the same level as your highest Pokemon;
~ All battles are double battles;
~ Four of six Pokemon are to be selected and used at the start of every battle;
~ The challenge must be completed by winning four consecutive battles, losing a battle restarts the challenge for that round;
~ Use of recoil or self-destructing moves that knock out the last Pokemon of both the AI and the player always results in a victory for the AI; the AI always wins if the player has run out of usable Pokemon.
Building Teams
To attempt this challenge it will be necessary to train an elite group of Pokemon. The best Pokemon are often bred for optimal IVs and nature and then EVed, given the best moveset, and leveled up. This is a very time-consuming process that also wants all the resources available across the Gen III Pokemon games (Ruby / Sapphire EV training spots, Emerald move tutors, Fire Red / Leaf Green move tutors and Pokemon, Pokemon from Colosseum, and Mt. Battle items). Unless you already have boxes of perfect level 100 Pokemon that were acquired long ago, it will be necessary to raise Pokemon from scratch and train them to level 60. This process itself would make a massive guide, but in the interest of restoring confidence it is possible to complete the Colosseum with your in-game Pokemon XD team by making the greatest uses of the resources available in XD alone. Clearing the first round of Orre Colosseum does give the player access to the Lucky Egg, which can slightly reduce the amount of time such a process takes. It is also possible to use hacked Pokemon, which is great in the way it saves time, although it makes the Colosseum slightly easier because you have access to perfectly IVed Pokemon. Note that the Orre Colosseum invests far more Speed EVs compared to Emerald's Battle Frontier, meaning that Pokemon specifically EVed for the Battle Frontier will not necessarily be effective here.
If building with resources only available in Pokemon XD, the best Pokemon available in-game are Snorlax, Starmie, Salamence, Zapdos, Tauros, Gardevoir, Flygon, Electabuzz, and Houndoom. There are many other usable Pokemon, so don't allow these specific mentions to limit your imagination; even Pokemon such as Primeape and Flareon can put in some work during earlier rounds. Because it's not feasible to EV train Pokemon in the confines of the Orre region, simply focus on obtaining these Pokemon with good IVs and a useful nature; this can mean having to soft reset until you get an acceptable Pokemon, which is especially difficult when reseting for a Pokemon obtained in a boss battle. For some Pokemon such as Zapdos and Tauros it is impossible to soft reset for them because the game forces a save before you can check their stats. When intending to use an in-game team to clear the colosseum, try to keep all Pokemon around the same level, and ideally, never over level 60 as to minimize the amount of work required if you intend to train new Pokemon. The natural route of the game offers almost enough experience to get six Pokemon to level 60, so round off remaining Pokemon at Mt. Battle after completing the game.
Item Clause being in effect means you have to decide on which Pokemon to give Leftovers to; usually it will be the most bulky. Not many other items have significant utility. The only items that boost offensive power are the 1.2x boosting items for each type of move, and Choice Band, which can be effective but not always an easy fit. The Shell Bell is another item that can restore HP, but it is usually only worth using on Pokemon such as Tyranitar when it wields moves that hit multiple targets, such as Rock Slide and Earthquake. A Lum Berry can free a Pokemon from status once, but it is of not much use in battles where the AI doesn't make use of status conditions. BrightPowder, Scope Lens, Focus Band, etc. are all usable items but are luck-dependent and limited to clutch use. It is actually surprising how annoying the Item Clause can be, especially when trying to build around a theme.
Overall, the following strategies are highly effective:
- Explosion and Selfdestruct
These two moves are absolutely devastating in the Orre Colosseum. While the AI does have several teams that make use of Protect and Ghost-types, the amount of damage these moves can do in exchange for one Pokemon often yields an advantage. There are several battles where a three-against-two advantage can be attained on the first turn when a bulky and powerful Pokemon goes boom. The Regis, Snorlax, Metagross, and a few other Pokemon can make effective use of Explosion and Selfdestruct, and they can be combined with some other strategies such as Helping Hand Dusclops and Endure + Salac / Liechi Berry Pokemon to quickly attain an offensive advantage.
- Fast and Powerful Pokemon
Pokemon with a high base Speed, a strong offensive stat, and a good movepool are highly effective due to how they can ensure quick and easy KOs before the AI can make a move. This type of matchup does become troublesome against similar Pokemon employed by the AI because their stats are perfect and thus the Speed advantage often becomes too much to outplay. Pokemon such as Gengar, Latios, Latias, Zapdos, Starmie, Alakazam, Aerodactyl, and Sceptile are examples of such Pokemon.
- Endure + Salac or Liechi Berry
Use of Endure along with the held item Salac Berry or Liechi Berry can be an effective offensive strategy against the AI; however, it does fail sometimes, such as against Tyranitar and users of priority. Heracross is the most effective user, being able to spam Reversal after the Speed boost from the Salac Berry. Some other Pokemon such as Hitmonlee, Blaziken, and Electrode can also put in work with a combination of Endure and one of these Berries. Combining this with use of Explosion or Earthquake will ensure that your Pokemon is lowered to 1 HP on the turn it uses Endure in the event that the AI chooses not to attack it.
- Lightningrod Abuse
A few Pokemon such as Gyarados are very difficult for the AI to KO when Electric-type moves are taken out of play. Although Manectric is not immune to the Electric-type attacks it draws, it is the best user of Lightningrod. Other Pokemon such as Rhydon and Marowak are usable but easier for the AI to capitalize on due to their low Speed and highly exploitable weaknesses.
- Heavy Intimidation
For battles where the AI’s team is mostly physical attackers, using a team with several Pokemon that have the ability Intimidate can greatly reduce the AI’s ability to blow holes in a build. The AI is also reluctant to switch out, meaning that switching Intimidate users in and out can repeatedly lower their Attack.
- Bulky Setup Sweepers
Setup sweepers capable of taking a hit or two can be quite effective depending on the battle. Most of these are users of Dragon Dance, although there are some effective users of Calm Mind and Swords Dance as well. Pokemon such as Salamence, Tyranitar, Dragonite, Raikou, and Scizor can really pack a punch after a turn dedicated to setup; however, note that the fast pace of the battle means that they usually aren’t alive very long to attack.
- Rain Dance
While it is possible to clear every round with a sand team, rain usually works out much better. Effective Swift Swim users and rain abusers can cleanly KO many of the AI’s Pokemon with neutral Hydro Pumps, and pairing this with Thunder leaves few Pokemon able to withstand an onslaught. Full rain teams are not required either; even just one Swift Swim user that has effective synergy with the rest of the team can be a valuable asset.
These of course aren’t the only strategies that work, just the ones that I have had the most success with in my experience versus the Orre Colosseum. Depending on how interesting you find the challenges, you may build only one team or acquire boxes of Pokemon dedicated to this challenge. Teambuilding itself does not need to be a meticulous process; however, the AI will exploit overlapping weaknesses. In particular, teams with numerous weaknesses to Earthquake will struggle against any AI team that packs the move. Earthquake is powerful enough that, if super effective, it will usually get a KO; the few exceptions are Pokemon such as Metagross, Regirock, and Registeel, which have enough physical bulk to stomach the onslaught. Stacking weaknesses to powerful special attacks such as Thunderbolt is also something to be avoided, because it makes taking down the AI’s Raikou or Electabuzz significantly more difficult. Bringing teams that have multiple immunities to common offensive types is very useful, because most of the time the AI is somewhat predictable, and switching in Pokemon immune to the AI’s attack can yield an advantage.
The fast pace of the battles in Orre Colosseum does invalidate switching to some extent. Switching a Pokemon that would be OHKOed with a Pokemon that takes neutral damage offers little in terms of absolute material. Most attacks from the AI will 2HKO Pokemon that take neutral damage anyway, effectively eliminating the advantage gained by switching in some scenarios because it gives up that Pokemon’s attacking turn. It is sometimes hard to predict what the AI will do to what Pokemon, meaning that switching in a Pokemon that is crucial to the battle can result in a surprise KO from the AI because you didn’t expect it to choose that target. This shouldn’t entirely discourage switching, however; in many situations the best option is to switch in order to distract one of the AI’s Pokemon for a turn while you attack it with your other Pokemon.
Last edited: