


Title: SS In-Game Tips and Tricks
Introduction
In this article, I will discuss tips and tricks that will be helpful for your Pokemon Sword or Pokemon Shield playthrough. Please note that some of the tips and tricks you are about to find below can only be done once you have become the Champion of the Galar region. By the end of this article, you should be able to make a lot of things considerably faster and easier for yourself, allowing you to fully focus on your objectives without having to waste too much time. Everything I will mention over the course of this article can be done in both versions of the games, and no Nintendo Switch Online membership is required. I would also like to give a shoutout to Light Sanctity for providing the screenshots.
1. Helpful NPCs
Since you will find many helpful NPCs in Galar, it can sometimes be hard to remember which one offers which service, as well as their locations. For that reason, I decided to dedicate the first section to a compilation of the NPCs that you will likely find yourself visiting the most.
1. a The Name Rater, Memory Checker, Move Reminder & Move Deleter
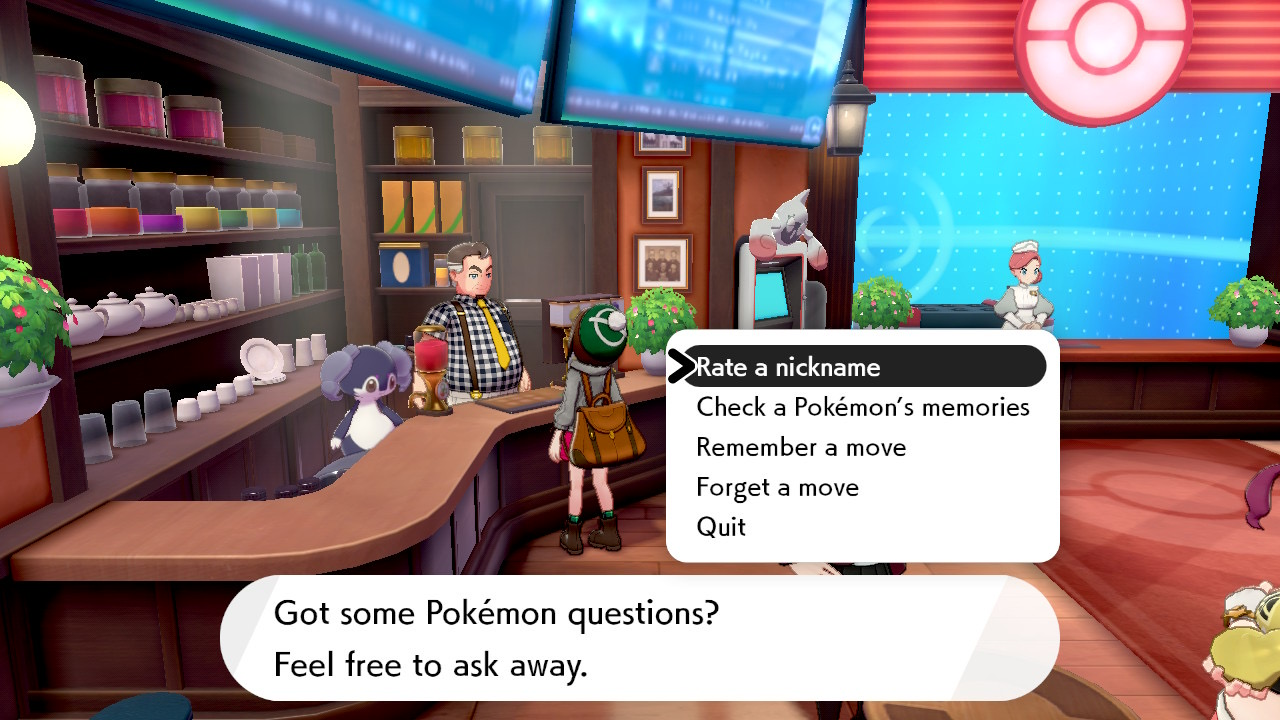
Yes, your eyes do not deceive you. While you had to travel around quite a bit in previous regions to access all of the mentioned services, Game Freak finally decided to make things considerably more convenient; in the Galar region, the Name Rater, the Memory Checker, the Move Reminder and the Move Deleter are now one and the same person. What's more, this NPC can be found behind the left counter in every single Pokémon Center across the Galar region. You can easily spot the man in question, since he is always accompanied by his partner Indeedee.
The first service he offers allows you to change the nickname of a Pokémon you have caught or hatched. You can also remove the nickname by typing the Pokémon's standard species name as long as you are the Pokémon's Original Trainer (OT). In addition, starting with Generation 8, it is now possible to nickname another Trainer's Pokémon only once if it does not already have one, provided that the Pokémon's language/region matches the language/region of your game. This mechanic is very interesting, as you are now able to give Pokémon from older games longer nicknames thanks to the increased character limit and can also pick from a variety of characters that were never available before. This also allows you to nickname Pokémon obtained from Generation 8 events; events from past generations cannot be renamed in this manner, however, as they are labeled as "Fateful Encounters".
The second service he offers involves checking the memories of your own Pokémon, as well as the ones of Pokémon you received in trades with other Trainers from all around the world. In addition to this, the man will also be able to tell you the emotions that the Pokémon felt in specific moments during your adventures.
The third service he offers involves helping your Pokémon remember deleted or "forgotten" moves. This works for moves that your Pokémon learns normally via leveling up, as well as moves that it inherited from its parents via breeding. However, this does not work for moves that you taught your Pokémon via specific tutors, moves that have been acquired via the new Egg Moves (EMs) mechanic that I am going explain further below, or moves that are tied to specific events. You should hence not act hastily and carefully think things through if you decide to replace these kinds of moves. Another significant improvement in Generation 8 consists in the fact that the Move Reminder no longer takes Heart Scales as a currency in exchange for his services; all of his services are completely free.
The fourth and final service he offers involves helping your Pokémon forget moves. However, while this service is pretty much self-explanatory, I still want to welcome the opportunity to remind you that you need to be particularly careful when deleting moves. As I have already mentioned in the paragraph above, moves that were acquired via specific tutor moves in previous generations cannot be remembered once they were forgotten. The same also applies to moves that are exclusive to certain events.
1. b Happiness Checker

The Happiness Checker can be found in the house to the right of Hammerlocke's central Pokémon Center. You can check the Happiness level of your Pokémon by showing them to the little boy. However, since you cannot check the exact value of the Happiness level, and since the responses of the boy are rather vague, I decided to include a table that shows you which response corresponds to which Happiness level range, ranging from lowest (0) to highest (255):
Once your Pokémon has reached the maximum Happiness level of 255, the boy will reward your Pokémon with the Best Friends Ribbon.
Below you can find a list of easy ways to raise your Pokémon's Happiness efficiently. I would like to give a shout out to Lego for helping research some of the data.
Throughout the following list, I will refer to "the use of consumable items that increase the Happiness level by a non-zero amount", walking, and battling as "actions":
Now, if you want to fully max out the remaining 95 Happiness points, you will have to do so by playing with your Pokémon in Pokémon Camp and by cooking delicious Curry for it. A single Copperajah class Curry is enough to raise the Pokémon's Happiness level from 160 straight to 255.
1. c Effort Value (EV) Judge
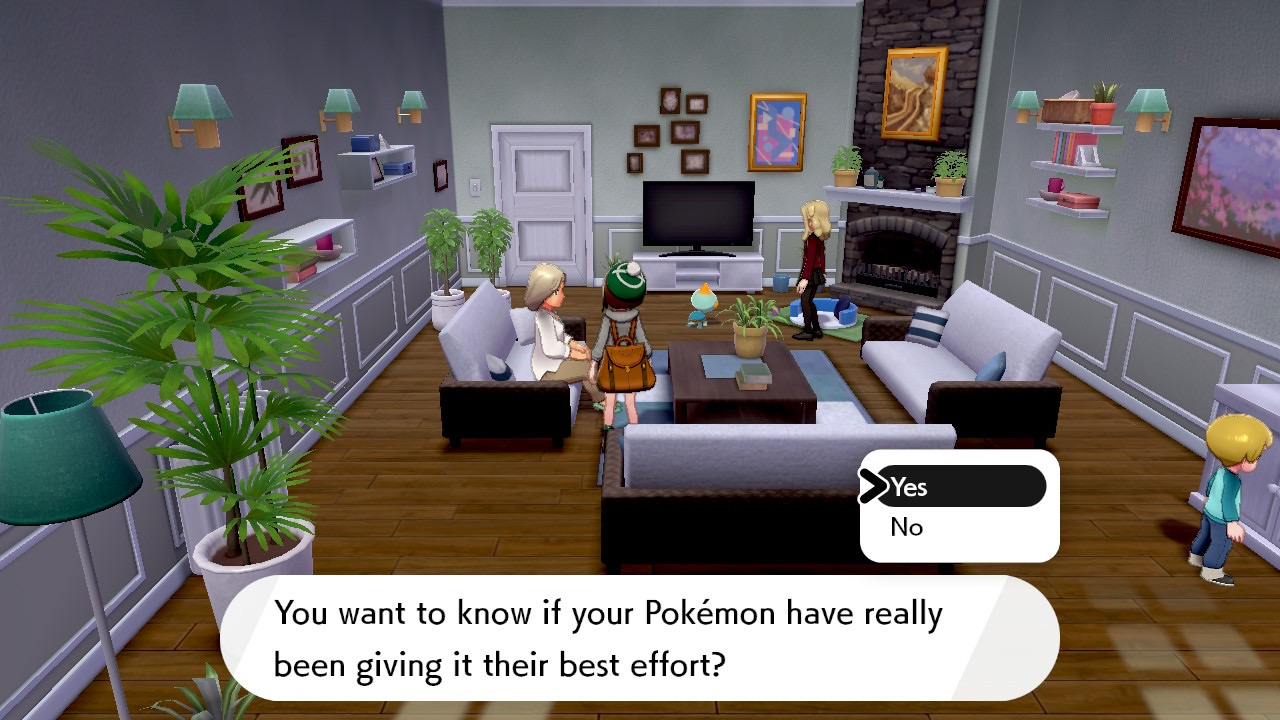
While you could check to see if a Pokémon has earned all of the available 510 EVs by checking its summary and by pressing "X" while on the stats tab, you can also check this by visiting a very specific NPC in the game. The Effort Value (EV) Judge can be found to the right of Hammerlocke's central Pokémon Center in the same house as the Happiness Checker. If your Pokémon has earned the maximum amount of 510 EVs, the lady on the couch will reward your Pokémon with the Effort Ribbon.
1. d Battle-Ready Mark NPC
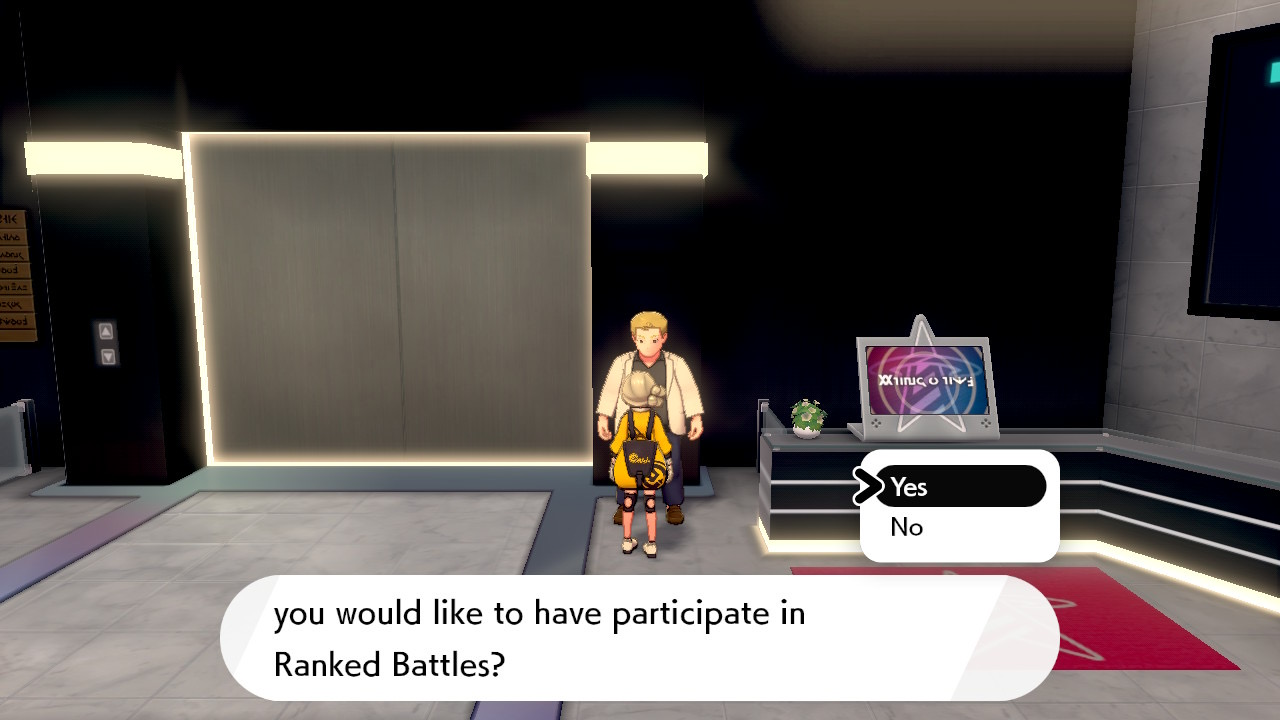
With the release of the Isle of Armor DLC expansion, Game Freak now allows Pokémon that were transfered via HOME from past generation games to participate in the official ranked battle formats (Battle Stadium Singles and Battle Stadium Doubles/VGC). In order to make a Pokémon from a past generation game eligible, you need to visit the new NPC that is waiting for you next to the right counter in Wyndon's Battle Tower. However, while this does sound promising in theory at first, I do want to place great emphasis on informing you that, once the NPC marks your Pokémon, all of the moves that it would normally not be able to legally learn in Generation 8 games will be completely removed from its movepool and replaced by some of its standard Level Up moves. I hence recommend thinking twice before removing an old event-exclusive move or an old tutor move, since your Pokémon might never be able to learn it again in future games.
1. e Steel Beam Tutor
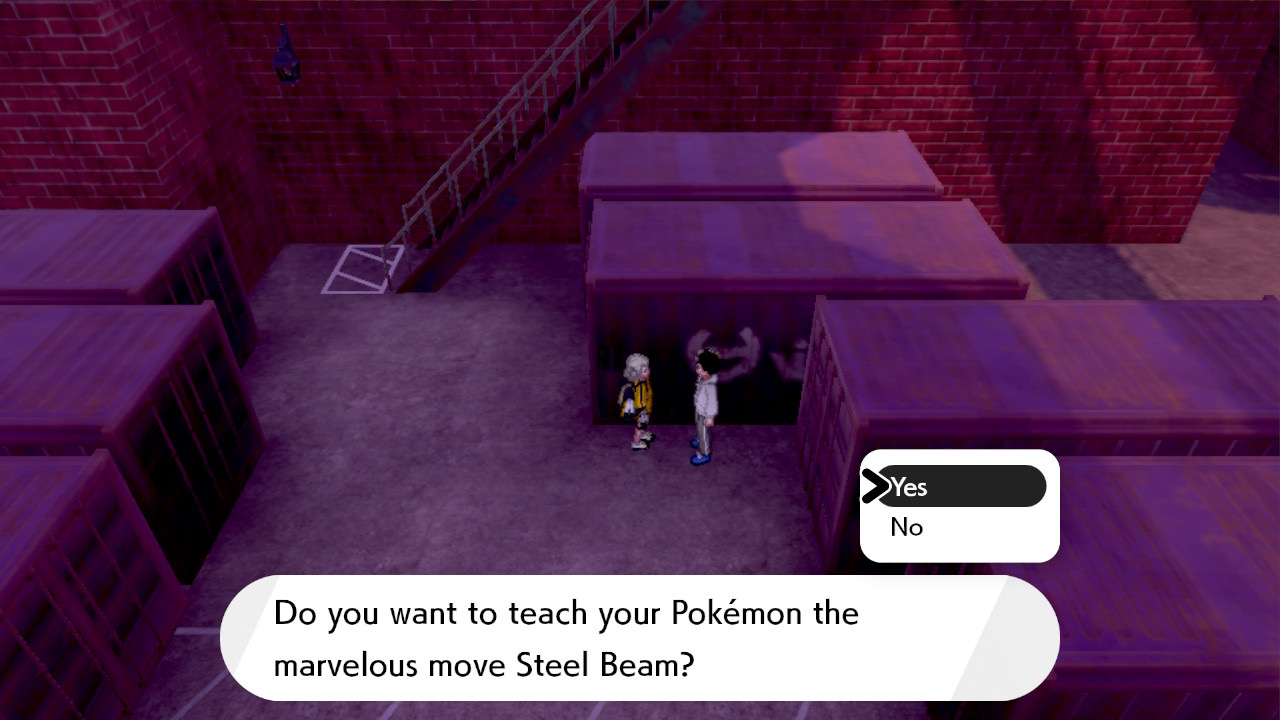
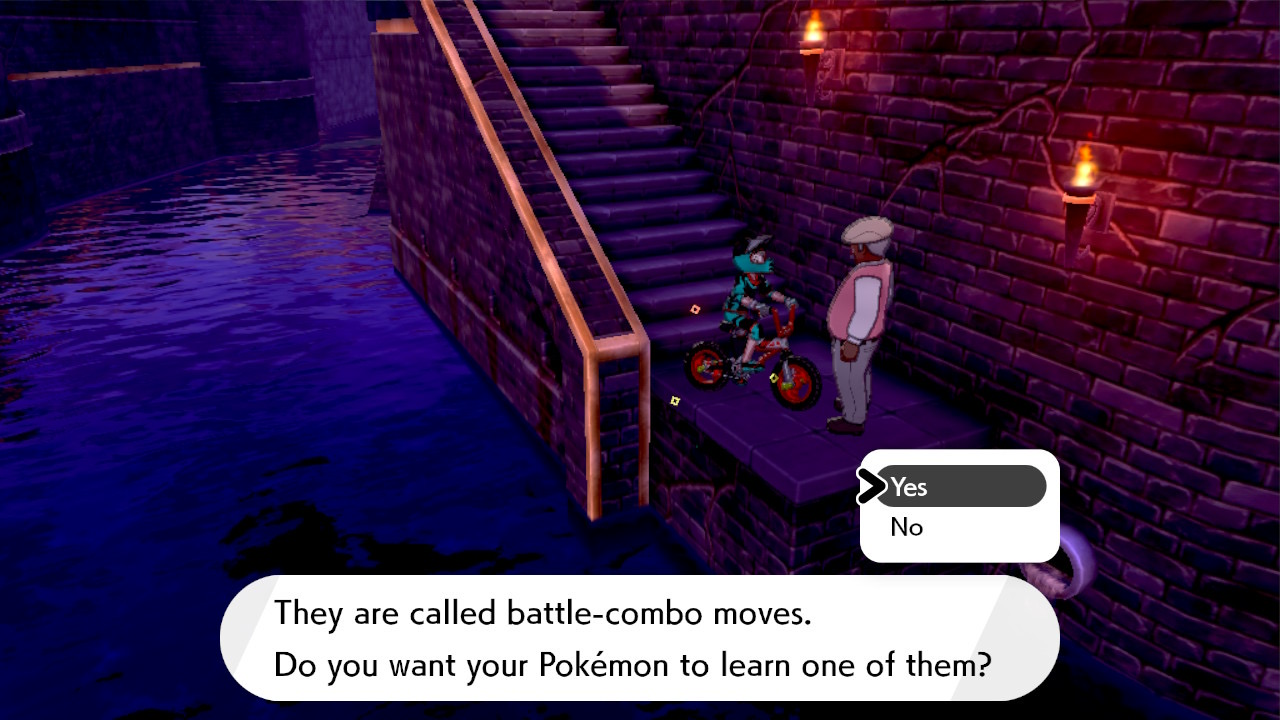
The Steel Beam tutor can be found in Motostoke. In order to find him easily, I recommend going to the Pokémon Center in the western part of Motostoke and then heading to the right until you reach the warehouse facility with the children playing with their Minccino. Next, you want to follow the path to the south that leads through the turning industrial infrastructures tunnel until you reach a staircase. Follow the stairs, and you will find the tutor waiting for you down at the docks with the containers, ready to teach this powerful move to any of your Steel-type Pokémon — including Steel-type Silvally! However, please keep in mind that, while Motostoke can be accessed early on in the playthrough, the tutor will only start offering his service once you have become the Champion of the Galar region.
1. f Fire Pledge, Grass Pledge, and Water Pledge Tutor
The tutor for the moves Fire Pledge, Grass Pledge, and Water Pledge can be found in Hammerlocke. In order to find him easily, I recommend going to the Pokémon Center in the western part of Motostoke and then heading to the left past the park until you reach the drawbridge that leads to Route 6. However, instead of crossing the drawbridge, you need to head to the South and follow down a staircase until you find the tutor waiting for you. Each Starter Pokémon can learn the move that corresponds to its typing: the Bulbasaur line and the Grookey line can learn Grass Pledge, the Charmander line and the Scorbunny line can learn Fire Pledge, and the Squirtle line and the Sobble line can learn Water Pledge.
1. g Draco Meteor Tutor
The Draco Meteor tutor can be found in Circhester. In order to find him easily, I recommend starting at the Pokémon Center and the moving to the north until you reach the Circhester Bath to the right of the restaurant. You will find the tutor waiting for you on the left poolside, ready to teach this powerful move to some of your Dragon-type Pokémon — including Dragon-type Silvally!
1. h Blast Burn, Frenzy Plant, and Hydro Cannon Tutor

The tutor for the moves Blast Burn, Frenzy Plant, and Hydro Cannon can be found in Wyndon. You can easily find the tutor waiting for you at the benches in the park in the East of Wyndon. However, while this tutor is also specialized in tutoring Starter Pokémon, just like the tutor for the moves Fire Pledge, Grass Pledge, and Water Pledge, this tutor here only teaches moves that match the corresponding typing of Starter Pokémon that have reached their final evolution stage: Venusaur and Rillaboom can learn Frenzy Plant, Charizard and Cinderace can learn Blast Burn, and Blastoise and Inteleon can learn Hydro Cannon.
1. i Master Dojo Tutor (Isle of Armor)
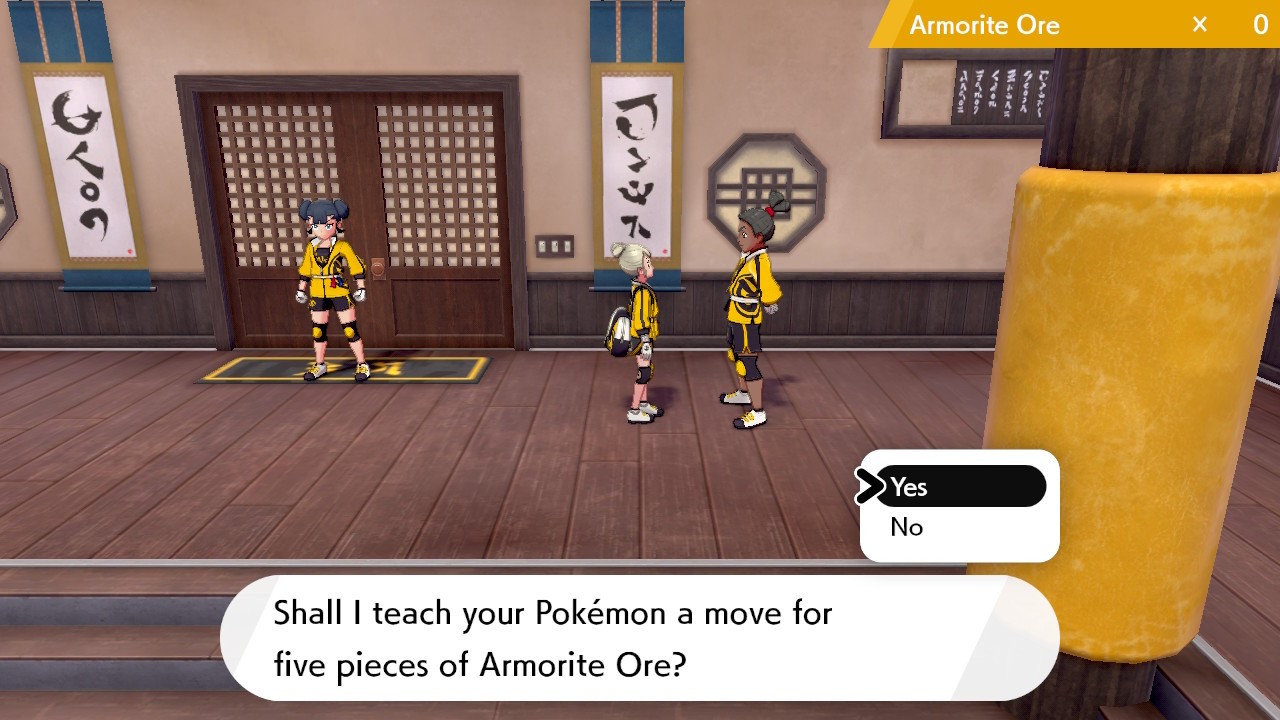
The Master Dojo tutor can be found in the Master Dojo of Pokémon Sword and Pokémon Shield's Isle of Armor DLC expansion. You will unlock this useful NPC once you have completed Mustard's first trial and brought back Avery's/Klara's uniform from the thievish Galarian Slowpoke. The NPC will stand to the right of the doors that lead to the Battle Court outside and tutors the following moves in exchange for 5 Armorite Ores each:
2. Exploits
I dedicate the second section to two major kinds of exploits that you can perform in Pokémon Sword and Pokémon Shield. However, keep in mind that Game Freak may patch these exploits in the future, meaning that while they worked at the time I wrote this guide, they might unfortunately not work anymore by the time you are reading this. So, let us not waste any time and make good use of them for as long as we can!
2. a Purple Beam Den Exploit
To efficiently aim for Purple Beam Dens, you need to follow the instructions below:
The Date Skip Exploit requires a bit of a different setup. Please keep in mind that skipping the date in Pokémon will also affect time-based events of other games on your Switch!
To get it to work, you need to follow the instructions below:
The Hammerlocke University hosts daily EV training Poké Job seminars during which your Pokémon gain 4 EVs for every passing hour.
If you want to speed up this process, remember to send your Pokémon to do these Poké Jobs before doing this exploit. Once you have followed the steps above correctly, you can go and pick up your fully EV trained Pokémon again at the PC in the nearest Pokémon Center. Remember that the effects of factors such as the Pokérus and the Power Items are also taken into account when EV training with this method.
While you are already at the PC, you might as well use this exploit repeatedly to replay the Loto-ID for a chance to win items such as Moomoo Milk, PP Up, PP Max, Rare Candy, or even the highly sought-after Master Ball!
Since the den stays active every single time you skip a day, this also means that there will be 2000 Watts pouring out of it every single time you repeat this trick. Please do, however, note that you need to have finished the game in order to reap the full 2000 Watts. The notable amount of Watts that you can collect in a short amount of time allows you to buy many Wishing Pieces, Technical Records (TRs) and even Luxury Balls for only 100 Watts each. You can then proceed to sell the Luxury Balls that you got from the traders in the Wild Area at any Pokémon Center for 1500 Poké Dollars. This way, you can earn huge amounts of money in no time, allowing you to purchase the expensive Technical Machines (TMs), as well as clothes. You can also spend your Watts at the Digging Duo near the Daycare in Bridge Field (Wild Area) and collect more Wishing Pieces, fossils, evolution stones, and Bottle Caps, all while also collecting items that you can sell for Poké Dollars, such as Rare Bones, Stardust, and Star Pieces. This method of earning money is a lot faster and more efficient than the one that requires you to redo the Champion's Cup with your Gigantamax Meowth and the Amulet Coin over and over again. However, doing the Champion's Cup has the advantage of simultaneously earning you a lot of money and, with a bit of luck, rewards such as Apricorn Balls, Life Orbs, Toxic Orbs, and Flame Orbs.
This exploit can also be used to change the weather in the Wild Area. Some Pokémon in the Wild Area can only be encountered during very specific weather conditions, and it can be quite annoying to wait for the right weather because you have to wait an entire day. However, please note that you will have to have beaten the first three Gyms and made your way to Hammerlocke in order to unlock both the Sandstorm and the Snowstorm weather. In a similar manner, you need to have beaten the game in order to unlock the Fog weather!
On the first day of every month, the weather is the exact same in all the places in the Wild Area.
Below you can find a list with key dates, their respective weather conditions and the Pokémon that will show up in the Wild Area:
3. Charm Items
I dedicate the third section to the five Charm Items. They are very useful Key Items, meaning that their respective influence will become effective the moment you obtain them and store them away in the designated Key Items section in your inventory. You will hence not have to constantly equip them to a Pokémon in your party for them to work.
3. a Catching Charm
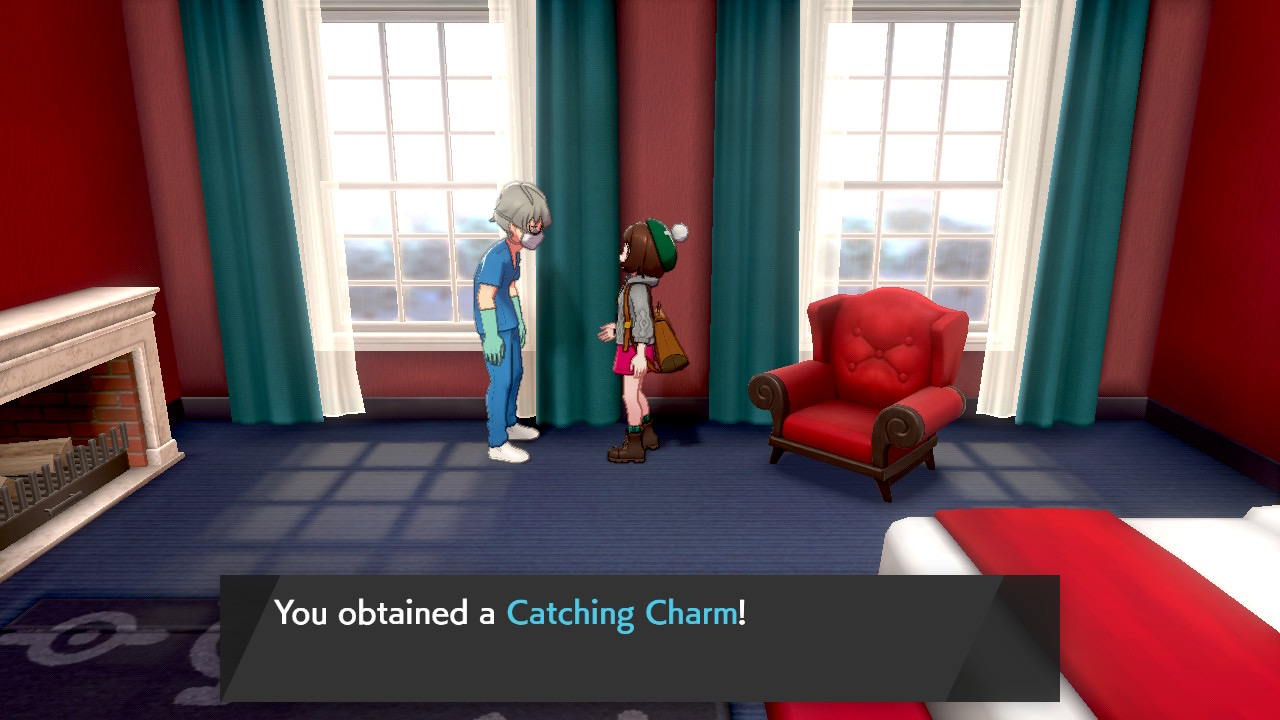
The first Charm Item on our list is the Catching Charm. As the name suggests, this item will increase the odds of Critical Catches when trying to catch wild Pokémon. You will notice a Critical Catch when the ball makes what players describe as a "whistling sound" before it shakes only once and then either catches the Pokémon or breaks. While the catch rate is undeniably increased during a Critical Catch, this does not mean that you are guaranteed the Pokémon whenever one occurs.
You do not need to have completed the game to obtain this item. To obtain this item, follow the instructions below:
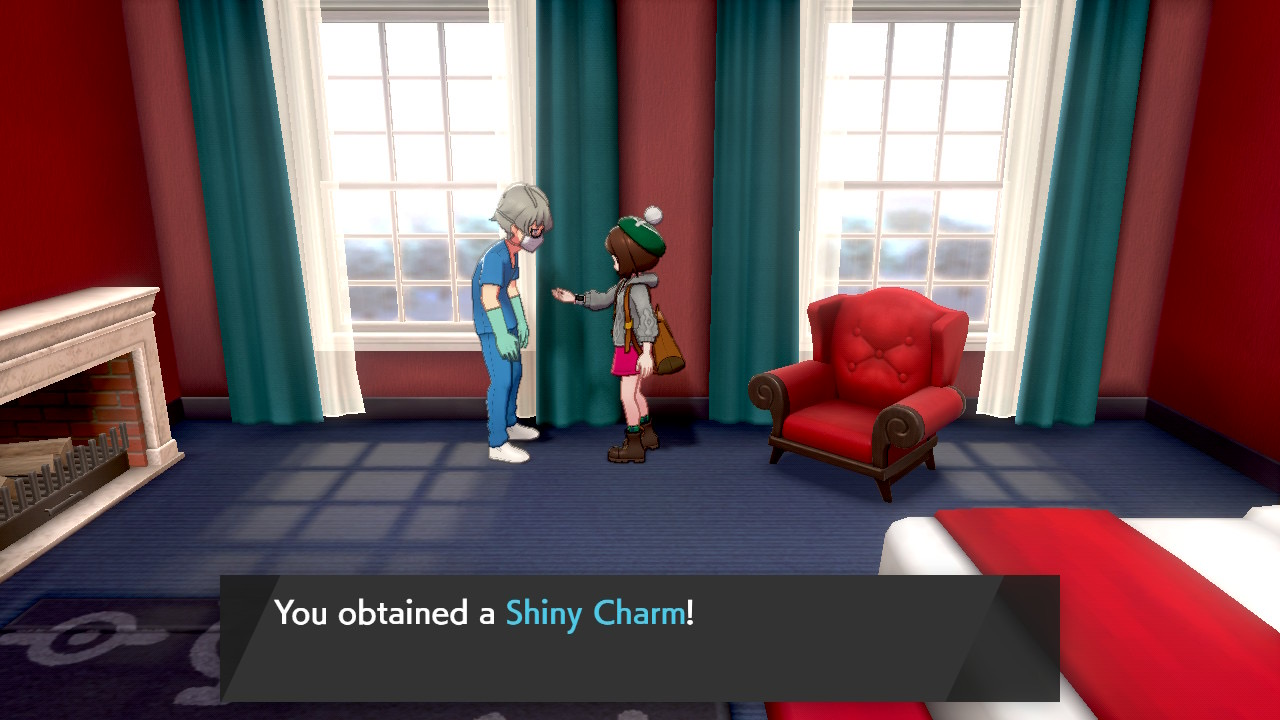
The second Charm Item on our list is the Shiny Charm. As the name suggests, this item will increase the odds of encountering a shiny Pokémon. Despite the fact that you need to have all 400 Pokémon of the Galar region registered in your Pokédex, the time and effort spent to earn this item is well worth it in the end. It significantly increases the standard 1/4096 odds of finding a shiny Pokémon to 1/1365. Not only does the Shiny Charm influence the odds of finding shiny Pokémon in the wild, it also influences the odds of hatching a shiny Pokémon from an egg: the 1/683 odds of hatching a shiny Pokémon via the Masuda Method, meaning with two breeding parents that have different language origins, are increased additionally to 1/512 odds thanks to the Shiny Charm. However, please note that the Shiny Charm does not influence the odds of gifted Pokémon, revived Fossil Pokémon, or Raid Pokémon.
You do not need to have completed the game to obtain this item. To obtain this item, follow the instructions below:

The third Charm Item on our list is the Oval Charm. As the name suggests, this item will speed up Egg production at the Daycares on Route 5 and in Bridge Field (Wild Area). Unlike the Catching Charm and the Shiny Charm, the Oval Charm can only be obtained after completing the main story.
To obtain this item, follow the instructions below:
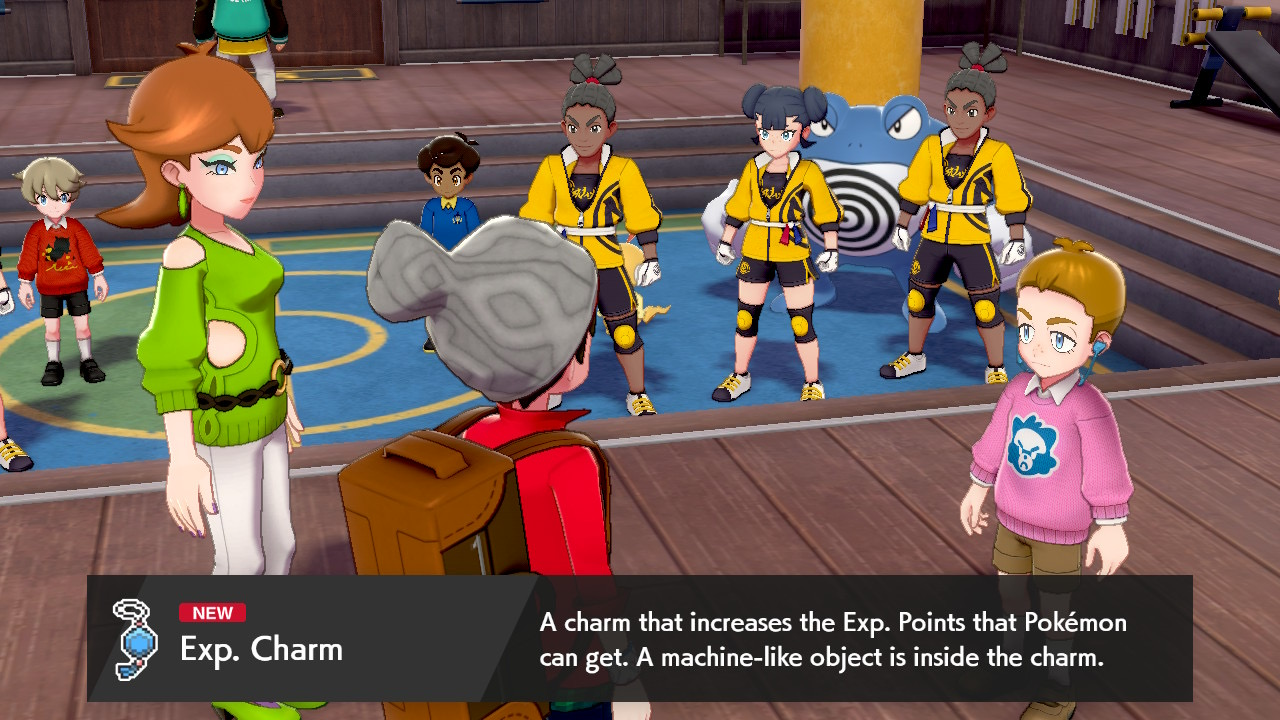
3. d Exp. Charm (Isle of Armor)
The fourth Charm Item on our list is the Exp. Charm. As the name suggests, this item will increase the amount of Exp. Points (EXP) that your Pokémon can earn through battling. The Exp. Charm can only be obtained in the Isle of Armor DLC expansion for Pokémon Sword and Pokémon Shield. You receive the Exp. Charm early on in the campaign. Hyde hands it to you as a welcome gift once you become the Master Dojo's new trainee.
3. e Mark Charm (Isle of Armor)
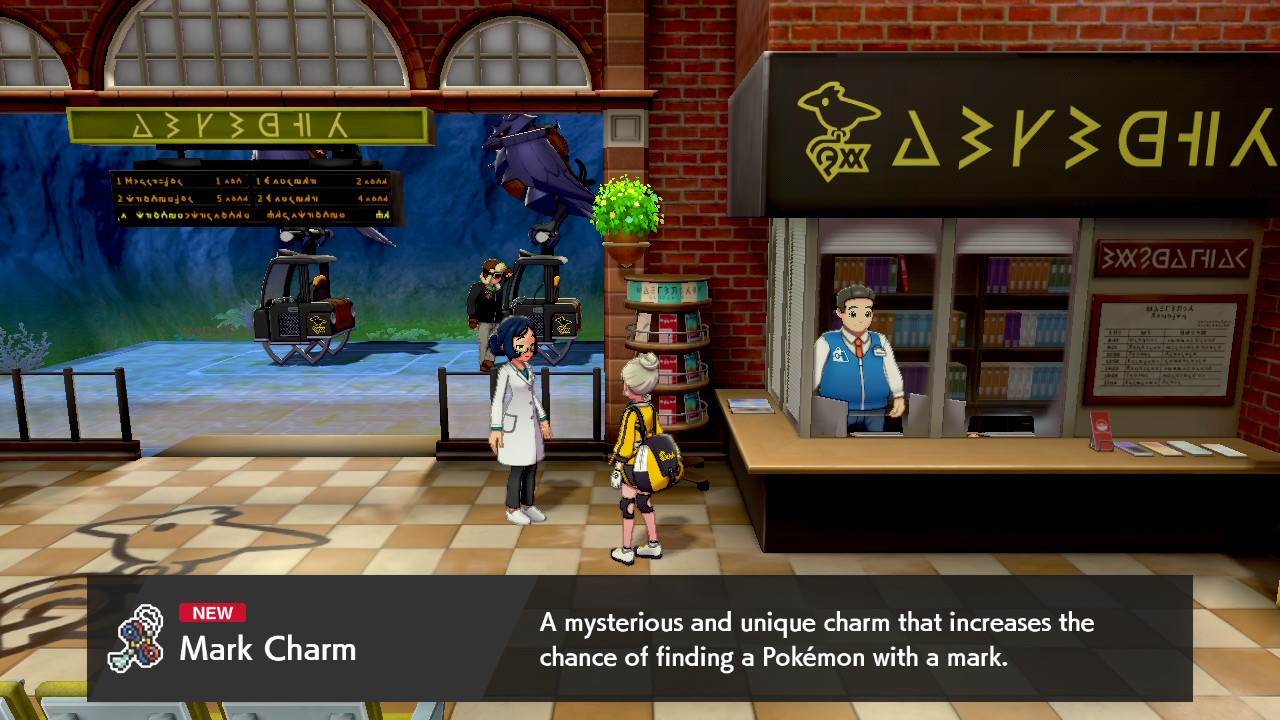
The fifth Charm Item on our list is the Mark Charm. As the name suggests, this item will increase the odds of finding marked Pokémon in the wild. Marks are similar to ribbons, and they can be checked on the exact same status screen tab. Just like the Exp. Charm, the Mark Charm can only be obtained in the Isle of Armor DLC expansion for Pokémon Sword and Pokémon Shield. You receive the Mark Charm from the female Doctor at the Armor Station as a reward for completing the Isle of Armor Pokédex.
4. Pickup
The fourth paragraph is dedicated to the Pickup ability. This notably useful ability allows certain Pokémon in your party to literally "pick up" random items after battles.
The following Pickup Pokémon can be found in the Galar region without a Nintendo Switch Online membership:
Below you can find a list of all of the items that can be picked up with the help of this ability, as well as the rarity for each level range:
I hence recommend using a full party consisting of 6 Pickup Pokémon with a level of 91 or higher in order to get as many rare items as quickly as possible.
Before I conclude this paragraph, I would also like to highlight a useful trick that DaWoblefet documented in this YouTube video. As it turns out, Pickup Pokémon in Generation 8 will keep picking up items in your party even while you battle Trainers in the Battle Tower with a team in your Battle Box. Using this trick, you can find items and earn Battle Points (BP) simultaneously. Ever since the release of the Isle of Armor DLC expansion, this trick is also confirmed to work when battling in the Restricted Sparring mode at the Master Dojo.
5. Egg Move Mechanics
The fifth paragraph is dedicated to a notable improvement that Game Freak implemented with regards to Egg Moves (EMs). EMs are special moves that are passed down by the parent Pokémon to their offspring while breeding at the Daycare. Veteran Breeders among our readers will remember how annoying and time consuming it can be to get parents with the right EMs. However, while you can still pass down EMs the old-fashioned way, there is also a new EM mechanic in Generation 8 that allows you to breed EMs onto Pokémon even after they have already hatched. In order to do so, you need both the Pokémon that you want to breed an EM onto, as well as a Pokémon of the same species that knows the EM in question. You can also teach multiple EMs at once via this method; however, do ensure that the Pokémon that will inherit them has enough free slots in its moveset. If you need to make room for more than one move, you can easily do so at the Move Deleter that you can find in any of the Galar region's Pokémon Centers. The gender of the Pokémon does not matter; our main goal is not to collect an Egg, but to pass down the move.
I will use an example from personal experience to demonstrate this:
Let us for example take my Raboot that already knew the EMs High Jump Kick and Sand Attack through regular inheritance.
Because I also wanted to get the EMs Sucker Punch and Super Fang for completionist's sake, I borrowed a second Raboot with the two missing EMs from a fellow community member. I then ensured that my own Raboot had two free moveslots available, went to the nearest Pokémon Center, and got the Move Deleter that I introduced a few paragraphs earlier to delete two unwanted moves. I then took both Raboot to the Daycare and left them there for a minute or two while I cycled back and forth. After a few minutes, I went and picked both Pokémon up again from the Daycare, and upon inspecting the summary screens of my own Raboot, noted that the two missing moves had indeed been passed down.
This useful mechanic also works for Pokémon that you either caught in the wild or during a raid, meaning that you can get Sparkling Aria for your Gigantamax Lapras or Fake Out for your Gigantamax Pikachu, just to name a few notable examples.
6. Berry Tree Shaking
Finally, last but not least, I am going to dedicate the sixth section to the Berry Trees and how to shake them properly in order to get as many Berries as possible. In contrast to how you would approach Berry Trees in previous games, you have to be careful and pay attention when shaking Berry Trees in Pokémon Sword and Pokémon Shield. If you are not careful enough, you will have wild Pokémon such as Cherubi, Skwovet, and Greedent attack you when they fall down from the tree. As if this was not annoying enough, they will also proceed to steal all of the Berries of a random type from right under your nose after the battle, escaping with the literal fruits of your labor. In order to prevent this from happening to the best of your abilities, take a quick break after each shake to pay attention to the rhythm to which the leaves at the treetop shake. A slower rhythm means that you can still continue to shake; however, once the leaves start to shake wildly, that's when you want to stop shaking the tree. Defeating the Pokémon that fall down from trees does not, unfortunately, help you recover any of the stolen Berries. I would also like to mention that, in addition to Berries, you can also occasionally find the very useful Leftovers while shaking the Berry Trees.
Final Thoughts
This about sums up all of the helpful tips and tricks you need to know about in Generation 8. Ironically, the various unintentional Den-related exploits are the most useful ones, and here's to hoping that they will not be patched anytime soon. Feel free to use them to your advantage for as long as possible to significantly speed up certain in-game tasks and get the most out of your game. Other than that, I can also only highly recommend the Shiny Charm and the Oval Charm to the shiny hunters among our readers—especially the ones that like to breed via the Masuda Method. Time is money, after all. So, what are you waiting for? Go out there and be the best and most efficient Trainer you can be!
Introduction
In this article, I will discuss tips and tricks that will be helpful for your Pokemon Sword or Pokemon Shield playthrough. Please note that some of the tips and tricks you are about to find below can only be done once you have become the Champion of the Galar region. By the end of this article, you should be able to make a lot of things considerably faster and easier for yourself, allowing you to fully focus on your objectives without having to waste too much time. Everything I will mention over the course of this article can be done in both versions of the games, and no Nintendo Switch Online membership is required. I would also like to give a shoutout to Light Sanctity for providing the screenshots.
1. Helpful NPCs
Since you will find many helpful NPCs in Galar, it can sometimes be hard to remember which one offers which service, as well as their locations. For that reason, I decided to dedicate the first section to a compilation of the NPCs that you will likely find yourself visiting the most.
1. a The Name Rater, Memory Checker, Move Reminder & Move Deleter
Yes, your eyes do not deceive you. While you had to travel around quite a bit in previous regions to access all of the mentioned services, Game Freak finally decided to make things considerably more convenient; in the Galar region, the Name Rater, the Memory Checker, the Move Reminder and the Move Deleter are now one and the same person. What's more, this NPC can be found behind the left counter in every single Pokémon Center across the Galar region. You can easily spot the man in question, since he is always accompanied by his partner Indeedee.
The first service he offers allows you to change the nickname of a Pokémon you have caught or hatched. You can also remove the nickname by typing the Pokémon's standard species name as long as you are the Pokémon's Original Trainer (OT). In addition, starting with Generation 8, it is now possible to nickname another Trainer's Pokémon only once if it does not already have one, provided that the Pokémon's language/region matches the language/region of your game. This mechanic is very interesting, as you are now able to give Pokémon from older games longer nicknames thanks to the increased character limit and can also pick from a variety of characters that were never available before. This also allows you to nickname Pokémon obtained from Generation 8 events; events from past generations cannot be renamed in this manner, however, as they are labeled as "Fateful Encounters".
The second service he offers involves checking the memories of your own Pokémon, as well as the ones of Pokémon you received in trades with other Trainers from all around the world. In addition to this, the man will also be able to tell you the emotions that the Pokémon felt in specific moments during your adventures.
The third service he offers involves helping your Pokémon remember deleted or "forgotten" moves. This works for moves that your Pokémon learns normally via leveling up, as well as moves that it inherited from its parents via breeding. However, this does not work for moves that you taught your Pokémon via specific tutors, moves that have been acquired via the new Egg Moves (EMs) mechanic that I am going explain further below, or moves that are tied to specific events. You should hence not act hastily and carefully think things through if you decide to replace these kinds of moves. Another significant improvement in Generation 8 consists in the fact that the Move Reminder no longer takes Heart Scales as a currency in exchange for his services; all of his services are completely free.
The fourth and final service he offers involves helping your Pokémon forget moves. However, while this service is pretty much self-explanatory, I still want to welcome the opportunity to remind you that you need to be particularly careful when deleting moves. As I have already mentioned in the paragraph above, moves that were acquired via specific tutor moves in previous generations cannot be remembered once they were forgotten. The same also applies to moves that are exclusive to certain events.
1. b Happiness Checker
The Happiness Checker can be found in the house to the right of Hammerlocke's central Pokémon Center. You can check the Happiness level of your Pokémon by showing them to the little boy. However, since you cannot check the exact value of the Happiness level, and since the responses of the boy are rather vague, I decided to include a table that shows you which response corresponds to which Happiness level range, ranging from lowest (0) to highest (255):
| Response | Happiness Level Range |
|---|---|
"Maybe you're a bit too strict? It doesn't seem like you're friends at all..." | 0 |
"I guess you two just met? It's still getting used to things." | 1-49 |
"Seems like it likes you an average amount! Don't worry—you two will get closer as time passes!" | 50-89 |
"Wow, I think you're on your way to becoming real good friends!" | 100-149 |
"Seems like you're pretty good friends! Still, I bet you could become even closer!" | 150-199 |
"You two get along great! Together is always better—am I right?" | 200-229 |
"You two are almost best friends! I can see you really care about each other!" | 230-254 |
"Oh wow, you're best buddies! I can tell you're so happy to be together!" | 255 |
Once your Pokémon has reached the maximum Happiness level of 255, the boy will reward your Pokémon with the Best Friends Ribbon.
Below you can find a list of easy ways to raise your Pokémon's Happiness efficiently. I would like to give a shout out to Lego for helping research some of the data.
Throughout the following list, I will refer to "the use of consumable items that increase the Happiness level by a non-zero amount", walking, and battling as "actions":
- Catch the Pokémon in a Friend Ball. Doing so will immediately raise a Pokémon's Happiness level to 150, regardless of its initial base level. For example, a Mudbray with a base Happiness level of 50 will immediately have its level raised to 150, and a Duskull with a base Happiness level of 35 will also have its level raised to 150.
- Walking around with the Pokémon in front of your party will also increase its Happiness level by +1 for every few steps taken. However, this method will stop working once the threshold of 160 has been reached.
- Feed the Pokémon EV-increasing Vitamins, such as HP Up, Protein, Iron, Calcium, Zinc, and Carbos. They can be purchased in exchange for 2 Battle Points (BP) each from the League Staff lady in Hammerlocke's central Pokémon Center or for 10,000 Poké Dollars each at the right counter of Wyndon's southern Pokémon Center. In addition to this, they can also be randomly obtained after winning ranked battles in Battle Stadium. The Vitamins will raise the Pokémon's Happiness level by +4 if its level is 0-99, by +2 if its level is 100-159, and by +0 once the threshold of 160 has been reached.
- Feed the Pokémon Rare Candies. The Candies will raise the Pokémon's Happiness level by +3 if its level is 0-99 and by +2 if its level is 100-159, and, much like the Vitamins, they will stop raising the level once the threshold of 160 has been reached.
- Feed the Pokémon EV-reducing Berries, such as Pomeg Berries (found on Route 7, Bridge Field, Dappled Grove, Giant's Mirror, Hammerlocke Hills, and Motostoke Riverbank), Kelpsy Berries (found on Route 7, Bridge Field, Giant's Mirror, Hammerlocke Hills, Motostoke Riverbank, and Rolling Fields), Qualot Berries (found on Route 7, Bridge Field, Giant's Cap, Giant's Mirror, Giant's Seat, and Motostoke Riverbank), Hondew Berries (found on Route 7, Bridge Field, Giant's Mirror, Hammerlocke Hills, Motostoke Riverbank, and North Lake Miloch), Grepa Berries (found on Route 7, Bridge Field, Dappled Grove, Giant's Mirror, Hammerlocke Hills, and Motostoke Riverbank), and Tamato Berries (found on Route 7, Bridge Field, Giant's Cap, Giant's Mirror, and Motostoke Riverbank). These Berries will raise the Pokémon's Happiness level by +10 if its level is 0-99, by +5 if its level is 100-159, and by +1 even after the threshold of 160 has been reached.
- Catch the Pokémon in a Luxury Ball. There is no immediate increase when catching a Pokémon in a Luxury Ball, instead, it will raise the Happiness level of the Pokémon by an additional +1 for every action after it is caught.
- Let the Pokémon hold the Soothe Bell, which increases your Pokémon's Happiness level when you walk around or battle with it. Similar to the Luxury Ball, this item will also increase the Pokémon's Happiness level by an additional +1 for every action as long as it is equipped to the Pokémon. You can obtain this item by talking to the Happiness Checker in Hammerlocke.
Now, if you want to fully max out the remaining 95 Happiness points, you will have to do so by playing with your Pokémon in Pokémon Camp and by cooking delicious Curry for it. A single Copperajah class Curry is enough to raise the Pokémon's Happiness level from 160 straight to 255.
1. c Effort Value (EV) Judge
While you could check to see if a Pokémon has earned all of the available 510 EVs by checking its summary and by pressing "X" while on the stats tab, you can also check this by visiting a very specific NPC in the game. The Effort Value (EV) Judge can be found to the right of Hammerlocke's central Pokémon Center in the same house as the Happiness Checker. If your Pokémon has earned the maximum amount of 510 EVs, the lady on the couch will reward your Pokémon with the Effort Ribbon.
1. d Battle-Ready Mark NPC
With the release of the Isle of Armor DLC expansion, Game Freak now allows Pokémon that were transfered via HOME from past generation games to participate in the official ranked battle formats (Battle Stadium Singles and Battle Stadium Doubles/VGC). In order to make a Pokémon from a past generation game eligible, you need to visit the new NPC that is waiting for you next to the right counter in Wyndon's Battle Tower. However, while this does sound promising in theory at first, I do want to place great emphasis on informing you that, once the NPC marks your Pokémon, all of the moves that it would normally not be able to legally learn in Generation 8 games will be completely removed from its movepool and replaced by some of its standard Level Up moves. I hence recommend thinking twice before removing an old event-exclusive move or an old tutor move, since your Pokémon might never be able to learn it again in future games.
1. e Steel Beam Tutor
The Steel Beam tutor can be found in Motostoke. In order to find him easily, I recommend going to the Pokémon Center in the western part of Motostoke and then heading to the right until you reach the warehouse facility with the children playing with their Minccino. Next, you want to follow the path to the south that leads through the turning industrial infrastructures tunnel until you reach a staircase. Follow the stairs, and you will find the tutor waiting for you down at the docks with the containers, ready to teach this powerful move to any of your Steel-type Pokémon — including Steel-type Silvally! However, please keep in mind that, while Motostoke can be accessed early on in the playthrough, the tutor will only start offering his service once you have become the Champion of the Galar region.
1. f Fire Pledge, Grass Pledge, and Water Pledge Tutor
The tutor for the moves Fire Pledge, Grass Pledge, and Water Pledge can be found in Hammerlocke. In order to find him easily, I recommend going to the Pokémon Center in the western part of Motostoke and then heading to the left past the park until you reach the drawbridge that leads to Route 6. However, instead of crossing the drawbridge, you need to head to the South and follow down a staircase until you find the tutor waiting for you. Each Starter Pokémon can learn the move that corresponds to its typing: the Bulbasaur line and the Grookey line can learn Grass Pledge, the Charmander line and the Scorbunny line can learn Fire Pledge, and the Squirtle line and the Sobble line can learn Water Pledge.
1. g Draco Meteor Tutor
The Draco Meteor tutor can be found in Circhester. In order to find him easily, I recommend starting at the Pokémon Center and the moving to the north until you reach the Circhester Bath to the right of the restaurant. You will find the tutor waiting for you on the left poolside, ready to teach this powerful move to some of your Dragon-type Pokémon — including Dragon-type Silvally!
1. h Blast Burn, Frenzy Plant, and Hydro Cannon Tutor
The tutor for the moves Blast Burn, Frenzy Plant, and Hydro Cannon can be found in Wyndon. You can easily find the tutor waiting for you at the benches in the park in the East of Wyndon. However, while this tutor is also specialized in tutoring Starter Pokémon, just like the tutor for the moves Fire Pledge, Grass Pledge, and Water Pledge, this tutor here only teaches moves that match the corresponding typing of Starter Pokémon that have reached their final evolution stage: Venusaur and Rillaboom can learn Frenzy Plant, Charizard and Cinderace can learn Blast Burn, and Blastoise and Inteleon can learn Hydro Cannon.
1. i Master Dojo Tutor (Isle of Armor)
The Master Dojo tutor can be found in the Master Dojo of Pokémon Sword and Pokémon Shield's Isle of Armor DLC expansion. You will unlock this useful NPC once you have completed Mustard's first trial and brought back Avery's/Klara's uniform from the thievish Galarian Slowpoke. The NPC will stand to the right of the doors that lead to the Battle Court outside and tutors the following moves in exchange for 5 Armorite Ores each:
Terrain Pulse |
Burning Jealousy |
Flip Turn |
Rising Voltage |
Grassy Glide |
Triple Axel |
Coaching |
Corrosive Gas |
Scorching Sands |
Dual Wingbeat |
Expanding Force |
Skitter Smack |
Meteor Beam |
Poltergeist |
Scale Shot |
Lash Out |
Steel Roller |
Misty Explosion |
2. Exploits
I dedicate the second section to two major kinds of exploits that you can perform in Pokémon Sword and Pokémon Shield. However, keep in mind that Game Freak may patch these exploits in the future, meaning that while they worked at the time I wrote this guide, they might unfortunately not work anymore by the time you are reading this. So, let us not waste any time and make good use of them for as long as we can!
2. a Purple Beam Den Exploit
To efficiently aim for Purple Beam Dens, you need to follow the instructions below:
- Press "X" and go to "Options" in order to set the Text Speed to "Slow".
- Scroll a bit further down in the "Options" menu and ensure that the "Autosave" feature is set to "Off".
- Make sure that you have one or more Wishing Pieces in your inventory.
- Go and find an inactive den in the Wild Area and save the game in front of it.
- Interact with the den and use a Wishing Piece.
- The game will ask you if you want to save the game; as soon as you see the beam color, press "HOME". The reason why we set the Text Speed to "Slow" earlier is that it gives us slightly more time to react to the color of the beam that will shoot out of the den.
- Sometimes the beam will be red. In this case, just reset your game by pressing "X" and then selecting "Close" and try again until you get the purple beam.
The Date Skip Exploit requires a bit of a different setup. Please keep in mind that skipping the date in Pokémon will also affect time-based events of other games on your Switch!
To get it to work, you need to follow the instructions below:
- Go and find a den in the Wild Area. It can either be a den that is already active or an inactive den that you activate yourself using a Wishing Piece. Both methods work. However, if you are going to skip multiple days one at a time (in order to roll for a specific weather for example), I recommend using Wishing Pieces, as natural dens will move after the first skip.
- Interact with the den and click the "Invite Others" option.
- Press the "HOME" button to access the main menu and proceed to open the System Settings.
- Scroll all the way down to "System" and pick the "Date and Time" option under "Language" and "Region".
- For it to work, you need to ensure that the "Synchronize Time via Internet" option is set to "Off".
- Change the date on your console to the next day and click "OK" once you have done so.
- Press "B" to go back into the main menu and go back to your Pokémon Sword or Pokémon Shield game.
- Go back in-game and cancel the raid.
The Hammerlocke University hosts daily EV training Poké Job seminars during which your Pokémon gain 4 EVs for every passing hour.
If you want to speed up this process, remember to send your Pokémon to do these Poké Jobs before doing this exploit. Once you have followed the steps above correctly, you can go and pick up your fully EV trained Pokémon again at the PC in the nearest Pokémon Center. Remember that the effects of factors such as the Pokérus and the Power Items are also taken into account when EV training with this method.
While you are already at the PC, you might as well use this exploit repeatedly to replay the Loto-ID for a chance to win items such as Moomoo Milk, PP Up, PP Max, Rare Candy, or even the highly sought-after Master Ball!
Since the den stays active every single time you skip a day, this also means that there will be 2000 Watts pouring out of it every single time you repeat this trick. Please do, however, note that you need to have finished the game in order to reap the full 2000 Watts. The notable amount of Watts that you can collect in a short amount of time allows you to buy many Wishing Pieces, Technical Records (TRs) and even Luxury Balls for only 100 Watts each. You can then proceed to sell the Luxury Balls that you got from the traders in the Wild Area at any Pokémon Center for 1500 Poké Dollars. This way, you can earn huge amounts of money in no time, allowing you to purchase the expensive Technical Machines (TMs), as well as clothes. You can also spend your Watts at the Digging Duo near the Daycare in Bridge Field (Wild Area) and collect more Wishing Pieces, fossils, evolution stones, and Bottle Caps, all while also collecting items that you can sell for Poké Dollars, such as Rare Bones, Stardust, and Star Pieces. This method of earning money is a lot faster and more efficient than the one that requires you to redo the Champion's Cup with your Gigantamax Meowth and the Amulet Coin over and over again. However, doing the Champion's Cup has the advantage of simultaneously earning you a lot of money and, with a bit of luck, rewards such as Apricorn Balls, Life Orbs, Toxic Orbs, and Flame Orbs.
This exploit can also be used to change the weather in the Wild Area. Some Pokémon in the Wild Area can only be encountered during very specific weather conditions, and it can be quite annoying to wait for the right weather because you have to wait an entire day. However, please note that you will have to have beaten the first three Gyms and made your way to Hammerlocke in order to unlock both the Sandstorm and the Snowstorm weather. In a similar manner, you need to have beaten the game in order to unlock the Fog weather!
On the first day of every month, the weather is the exact same in all the places in the Wild Area.
Below you can find a list with key dates, their respective weather conditions and the Pokémon that will show up in the Wild Area:
| Date | Weather | Pokémon |
|---|---|---|
February 1st | Snowstorm: | Sneasel, Swinub, Piloswine, Delibird, Mawile, Snorunt, Glalie, Mime Jr., Riolu, Snover, Abomasnow, Weavile, Glaceon, Vanillite, Vanillish, Vanilluxe, Cubchoo, Pawniard, Honedge, Avalugg, Togedemaru, Eiscue (Shield) |
March 1st | Overcast | Farfetch'd (Sword), Kingler, Hitmonlee (Sword), Hitmonchan (Shield), Togepi, Espeon, Corsola (Shield), Hitmontop, Larvitar (Shield), Ralts, Roserade, Croagunk (Shield), Toxicroak (Shield), Munna, Throh (Shield), Sawk (Shield), Cottonee, Scraggy, Cinccino, Karrablast, Elgyem, Shelmet, Spritzee (Shield), Swirlix (Sword), Barbaracle, Shiinotic, Jangmo-o (Sword), Rookidee, Falinks, Dreepy |
April 1st | Sandstorm | Umbreon, Pupitar (Shield), Nincada, Trapinch, Flygon, Bonsly, Hippopotas, Hippowdon, Croagunk (Shield), Gigalith, Drilbur, Scraggy, Stunfisk, Zweilous (Sword), Mudbray, Carkol, Stonjourner (Sword) |
May 1st | Normal Weather | Cloyster, Kingler, Lanturn, Togepi, Bellossom, Gardevoir, Flygon, Crawdaunt, Combee, Vespiquen, Munchlax, Lucario, Croagunk (Shield), Leafeon, Gigalith, Scraggy, Cinccino, Elgyem, Steenee, Golisopod, Blipbug, Gossilfeur, Wooloo, Applin, Toxel |
June 1st | Fog | Clefairy, Clefable, Cloyster, Lanturn, Togepi, Togetic, Ralts, Kirlia, Gardevoir, Sableye (Shield), Milotic, Roserade, Togekiss, Munna, Musharna, Cinccino, Gothita (Sword), Gothorita (Sword), Gothitelle (Sword), Solosis (Shield), Duosion (Shield), Reuniclus (Shield), Elgyem, Litwick, Meowstic, Honedge, Aegislash, Spritzee (Shield), Swirlix (Sword), Sylveon, Morelull, Mimikyu, Hatenna, Milcery, Indeedee, Dreepy |
July 1st | Intense Sun | Vulpix, Ninetales (Sword), Growlithe, Arcanine (Shield), Flareon, Larvitar (Shield), Nincada, Torkoal, Flygon, Hippopotas, Gigalith, Drilbur, Maractus, Litwick, Lampent, Chandelure, Stunfisk, Heatmor, Durant, Mudbray, Salandit, Turtonator (Sword), Jangmo-o (Sword), Carkol, Stonjourner (Sword) |
October 1st | Raining | Pikachu, Vaporeon, Electrike, Crawdaunt, Rotom, Karrablast, Shelmet, Deino (Sword), Binacle, Barbaracle, Goomy (Shield), Grubbin, Charjabug, Dewpider, Araquanid, Shiinotic, Wimpod, Golisopod, Toxel |
November 1st | Thunderstorm | Pikachu, Kingler, Jolteon, Chinchou, Lanturn, Gardevoir, Electrike, Manectric, Crawdaunt, Rotom, Karrablast, Joltik, Shelmet, Zweilous (Sword), Binacle, Barbaracle, Helioptile, Sliggo (Shield), Grubbin, Charjabug, Mareanie, Dewpider, Araquanid, Shiinotic, Wimpod, Golisopod, Pyukumuku, Drampa (Shield), Hakamo-o (Sword), Yamper, Applin, Toxel, Morpeko, Dreepy |
December 1st | Snowing | Mr. Mime, Sneasel, Swinub, Piloswine, Delibird, Snorunt, Glalie, Snover, Abomasnow, Glaceon, Vanillite, Vanillish, Vanilluxe, Cubchoo, Beartic, Bergmite, Avalugg, Wooloo, Snom, Eiscue (Shield) |
3. Charm Items
I dedicate the third section to the five Charm Items. They are very useful Key Items, meaning that their respective influence will become effective the moment you obtain them and store them away in the designated Key Items section in your inventory. You will hence not have to constantly equip them to a Pokémon in your party for them to work.
3. a Catching Charm
The first Charm Item on our list is the Catching Charm. As the name suggests, this item will increase the odds of Critical Catches when trying to catch wild Pokémon. You will notice a Critical Catch when the ball makes what players describe as a "whistling sound" before it shakes only once and then either catches the Pokémon or breaks. While the catch rate is undeniably increased during a Critical Catch, this does not mean that you are guaranteed the Pokémon whenever one occurs.
You do not need to have completed the game to obtain this item. To obtain this item, follow the instructions below:
- Visit Circhester and head to Hotel Ionia (the hotel on the left).
- Take the elevator to reach the second floor and then follow the corridor until you reach the second room.
- Proceed to talk to the Game Director (depicted as a Doctor) and he will hand you the Catching Charm.
The second Charm Item on our list is the Shiny Charm. As the name suggests, this item will increase the odds of encountering a shiny Pokémon. Despite the fact that you need to have all 400 Pokémon of the Galar region registered in your Pokédex, the time and effort spent to earn this item is well worth it in the end. It significantly increases the standard 1/4096 odds of finding a shiny Pokémon to 1/1365. Not only does the Shiny Charm influence the odds of finding shiny Pokémon in the wild, it also influences the odds of hatching a shiny Pokémon from an egg: the 1/683 odds of hatching a shiny Pokémon via the Masuda Method, meaning with two breeding parents that have different language origins, are increased additionally to 1/512 odds thanks to the Shiny Charm. However, please note that the Shiny Charm does not influence the odds of gifted Pokémon, revived Fossil Pokémon, or Raid Pokémon.
You do not need to have completed the game to obtain this item. To obtain this item, follow the instructions below:
- Once you have registered all 400 Pokémon in your Pokédex, visit Circhester and head to Hotel Ionia (the hotel on the left).
- Take the elevator to reach the second floor and then follow the corridor until you reach the second room.
- Proceed to talk to the Game Director (depicted as a Doctor) and he will hand you the Shiny Charm, a diploma, as well as a League Card sticker.
The third Charm Item on our list is the Oval Charm. As the name suggests, this item will speed up Egg production at the Daycares on Route 5 and in Bridge Field (Wild Area). Unlike the Catching Charm and the Shiny Charm, the Oval Charm can only be obtained after completing the main story.
To obtain this item, follow the instructions below:
- Once you have become the Champion of the Galar region, visit Circhester and head to Hotel Ionia (the hotel on the left).
- Take the elevator to reach the second floor and then follow the corridor until you reach the first room.
- Proceed to talk to GAME FREAK's Morimoto (depicted as a Police Officer), and he will hand you the Oval Charm after you defeat him in a battle.
3. d Exp. Charm (Isle of Armor)
The fourth Charm Item on our list is the Exp. Charm. As the name suggests, this item will increase the amount of Exp. Points (EXP) that your Pokémon can earn through battling. The Exp. Charm can only be obtained in the Isle of Armor DLC expansion for Pokémon Sword and Pokémon Shield. You receive the Exp. Charm early on in the campaign. Hyde hands it to you as a welcome gift once you become the Master Dojo's new trainee.
3. e Mark Charm (Isle of Armor)
The fifth Charm Item on our list is the Mark Charm. As the name suggests, this item will increase the odds of finding marked Pokémon in the wild. Marks are similar to ribbons, and they can be checked on the exact same status screen tab. Just like the Exp. Charm, the Mark Charm can only be obtained in the Isle of Armor DLC expansion for Pokémon Sword and Pokémon Shield. You receive the Mark Charm from the female Doctor at the Armor Station as a reward for completing the Isle of Armor Pokédex.
4. Pickup
The fourth paragraph is dedicated to the Pickup ability. This notably useful ability allows certain Pokémon in your party to literally "pick up" random items after battles.
The following Pickup Pokémon can be found in the Galar region without a Nintendo Switch Online membership:
- Meowth (Galarian forme)
- Zigzagoon (Galarian forme)
- Linoone (Galarian forme)
- Munchlax
- Bunnelby
- Diggersby
- Pumpkaboo
- Gourgeist
- Meowth (Kantonian forme & Alolan forme)
- Zigzagoon (Hoennite forme)
- Linoone (Hoennite forme)
- Lillipup
- Dedenne
Below you can find a list of all of the items that can be picked up with the help of this ability, as well as the rarity for each level range:
| Level Range | Very Common Items | Common Items | Uncommon Items | Rare Items | Very Rare Items |
|---|---|---|---|---|---|
1-10 | Potion | Tiny Mushroom | Poké Doll, Repel, Super Potion | Big Mushroom, Full Heal, Hyper Potion, Revive, Super Repel | Ether |
11-20 | Repel | Big Mushroom, Poké Doll, Super Potion, Super Repel, Tiny Mushroom | Full Heal, Hyper Potion, Max Repel, Moon Stone, Revive, Sun Stone | Ether, Rare Candy | |
21-30 | Super Potion | Big Mushroom, Full Heal, Poké Doll, Super Repel, Tiny Mushroom | Ether, Hyper Potion, Max Potion, Max Repel, Moon Stone, Nugget, Revive, Sun Stone | Balm Mushroom, Big Nugget, Destiny Knot, Leftovers, Max Ether, Mental Herb, Power Herb, PP Up, Rare Candy, White Herb | |
31-40 | Poké Doll | Full Heal, Revive, Super Repel | Balm Mushroom, Ether, Hyper Potion, Max Potion, Max Repel, Max Revive, Moon Stone, Nugget, Sun Stone | Big Nugget, Destiny Knot, Leftovers, Max Ether, Mental Herb, Power Herb, PP Up, Rare Candy, White Herb | |
41-50 | Super Repel | Full Heal, Hyper Potion, Revive | Balm Mushroom, Ether, Max Potion, Max Repel, Max Revive, Moon Stone, Nugget, Sun Stone | Big Nugget, Destiny Knot, Elixir, Leftovers, Mental Herb, Power Herb, PP Up, Rare Candy, White Herb | |
51-60 | Full Heal | Hyper Potion, Max Repel, Revive | Balm Mushroom, Max Potion, Max Revive, Moon Stone, Nugget, PP Up, Rare Candy, Sun Stone | Big Nugget, Destiny Knot, Elixir, Leftovers, Mental Herb, Power Herb, White Herb | |
61-70 | Revive | Hyper Potion, Max Potion, Max Repel | Balm Mushroom, Big Nugget, Elixir, Max Ether, Max Revive, Moon Stone, Nugget, PP Up, Rare Candy, Sun Stone | Destiny Knot, Leftovers, Max Elixir, Mental Herb, Power Herb, White Herb | |
71-80 | Hyper Potion | Max Potion, Max Repel, Max Revive | Balm Mushroom, Big Nugget, Elixir, Max Ether, Moon Stone, Nugget, PP Up, Rare Candy, Sun Stone | Bottle Cap, Destiny Knot, Leftovers, Max Elixir, Mental Herb, Power Herb, White Herb | |
81-90 | Max Repel | Max Potion, Max Revive, Moon Stone, Sun Stone | Balm Mushroom, Big Nugget, Elixir, Max Elixir, Nugget, PP Up, Rare Candy | Bottle Cap, Destiny Knot, Leftovers, Mental Herb, Power Herb, White Herb | |
91-100 | Max Potion | Big Nugget, Max Revive, Moon Stone, Sun Stone | Balm Mushroom, Elixir, Max Elixir, Nugget, PP Up, Rare Candy | Bottle Cap, Destiny Knot, Leftovers, Mental Herb, Power Herb, White Herb |
I hence recommend using a full party consisting of 6 Pickup Pokémon with a level of 91 or higher in order to get as many rare items as quickly as possible.
Before I conclude this paragraph, I would also like to highlight a useful trick that DaWoblefet documented in this YouTube video. As it turns out, Pickup Pokémon in Generation 8 will keep picking up items in your party even while you battle Trainers in the Battle Tower with a team in your Battle Box. Using this trick, you can find items and earn Battle Points (BP) simultaneously. Ever since the release of the Isle of Armor DLC expansion, this trick is also confirmed to work when battling in the Restricted Sparring mode at the Master Dojo.
5. Egg Move Mechanics
The fifth paragraph is dedicated to a notable improvement that Game Freak implemented with regards to Egg Moves (EMs). EMs are special moves that are passed down by the parent Pokémon to their offspring while breeding at the Daycare. Veteran Breeders among our readers will remember how annoying and time consuming it can be to get parents with the right EMs. However, while you can still pass down EMs the old-fashioned way, there is also a new EM mechanic in Generation 8 that allows you to breed EMs onto Pokémon even after they have already hatched. In order to do so, you need both the Pokémon that you want to breed an EM onto, as well as a Pokémon of the same species that knows the EM in question. You can also teach multiple EMs at once via this method; however, do ensure that the Pokémon that will inherit them has enough free slots in its moveset. If you need to make room for more than one move, you can easily do so at the Move Deleter that you can find in any of the Galar region's Pokémon Centers. The gender of the Pokémon does not matter; our main goal is not to collect an Egg, but to pass down the move.
I will use an example from personal experience to demonstrate this:
Let us for example take my Raboot that already knew the EMs High Jump Kick and Sand Attack through regular inheritance.
Because I also wanted to get the EMs Sucker Punch and Super Fang for completionist's sake, I borrowed a second Raboot with the two missing EMs from a fellow community member. I then ensured that my own Raboot had two free moveslots available, went to the nearest Pokémon Center, and got the Move Deleter that I introduced a few paragraphs earlier to delete two unwanted moves. I then took both Raboot to the Daycare and left them there for a minute or two while I cycled back and forth. After a few minutes, I went and picked both Pokémon up again from the Daycare, and upon inspecting the summary screens of my own Raboot, noted that the two missing moves had indeed been passed down.
This useful mechanic also works for Pokémon that you either caught in the wild or during a raid, meaning that you can get Sparkling Aria for your Gigantamax Lapras or Fake Out for your Gigantamax Pikachu, just to name a few notable examples.
6. Berry Tree Shaking
Finally, last but not least, I am going to dedicate the sixth section to the Berry Trees and how to shake them properly in order to get as many Berries as possible. In contrast to how you would approach Berry Trees in previous games, you have to be careful and pay attention when shaking Berry Trees in Pokémon Sword and Pokémon Shield. If you are not careful enough, you will have wild Pokémon such as Cherubi, Skwovet, and Greedent attack you when they fall down from the tree. As if this was not annoying enough, they will also proceed to steal all of the Berries of a random type from right under your nose after the battle, escaping with the literal fruits of your labor. In order to prevent this from happening to the best of your abilities, take a quick break after each shake to pay attention to the rhythm to which the leaves at the treetop shake. A slower rhythm means that you can still continue to shake; however, once the leaves start to shake wildly, that's when you want to stop shaking the tree. Defeating the Pokémon that fall down from trees does not, unfortunately, help you recover any of the stolen Berries. I would also like to mention that, in addition to Berries, you can also occasionally find the very useful Leftovers while shaking the Berry Trees.
Final Thoughts
This about sums up all of the helpful tips and tricks you need to know about in Generation 8. Ironically, the various unintentional Den-related exploits are the most useful ones, and here's to hoping that they will not be patched anytime soon. Feel free to use them to your advantage for as long as possible to significantly speed up certain in-game tasks and get the most out of your game. Other than that, I can also only highly recommend the Shiny Charm and the Oval Charm to the shiny hunters among our readers—especially the ones that like to breed via the Masuda Method. Time is money, after all. So, what are you waiting for? Go out there and be the best and most efficient Trainer you can be!
Last edited by a moderator:


