Battle Tree Discussion and Records

Togedemaru3 will get its Sturdy broken by Spiky Shield, as all of its moves make contact.


These beasts (Cresselia2, Dusknoir3, Zapdos2, Registeel4...) only need to "get lucky" with you once to end your run. If your streak goal is 100, which is reasonable when you're consciously building teams around mons you just want to use, rather than trying to "solve the Tree", then you may rightly feel that the threat is not as consistent as that of high-damage opponents living exactly one hit, and "often enough" (over a 100-streak) they do end up doing little; but then the same can be said for nearly all OHKO move users, none of which are a laughing matter to you, I should assume, although of course Misty Terrain does not protect you from those (and Misty only does it while you can still switch, for that matter -- I've recently lost a streak at 125 due to a 7% Blizzard freeze from Suicune4 on the one turn that I did no longer have terrain and needed to move for the victory; and in fact, I did have the option to reset terrain by switching in a sacrifice, but found it difficult to assess whether that was the safer play).

Entering the Tree with a team whose win rate against the totality of possible opposing teams is 99% (not that this will be easy to verify, particularly for Doubles) means you'll land a 100-streak 36.6% of the time, and a 200-streak 13.4% of the time (notably, it's more than half as unlikely), and a 500-streak 0.6% of the time. If the team's win rate is 99.9% instead, these chances become 90.4%, 81.8%, and 60.6% respectively. The difference between 99% and 99.9% may well be that one's best answer to evasion stall will have been spent in a minority of encounters with them, seeing as it will fulfill multiple roles on one's team.

On a side note, if your win rate is 98%, the 100-streak is already only as likely as the 200-streak at 99%. That is also to say, even if the Tree only occasionally rewards player skill, it will eventually.

You've been missing out if you've never had a choice-locked Steel-typed lastmon die to Struggle recoil against any of the Toxic DT stallers (and Noir carries WoW, Gigas Confuse Ray), or enjoyed losing the PP war against Zapdos2 drawing Pressure. And this certainly happens in Doubles as well, and my current team is nothing but high-damage threats that usually need to win within the four turns that they are given.
Yes, I get what you are saying in how they can end a streak. But when something like Regigigas is paired with a Pokemon that can straight up OTK my guys, the choice between going after the guy who might kill me versus the guy who will definitely kill me is pretty easy to make.
 
Hi everyone, I sometimes scan this forum and I'm currently trying to get a streak of 200 with the following team :


Volcarona @ Focus Sash
Ability : Swarm
EVs : 4 HP / 252 SpA / 252 Spe
Modest Nature
- Bug Buzz
- Quiver Dance
- Fiery Dance
- Giga Drain


Salamence @ Salamencite
Ability : Intimidate → Aerilate
EVs : 4 HP / 252 Atk / 252 Spe
Adamant Nature
- Dragon Dance
- Roost
- Earthquake
- Return


Aegislash @ Steelium Z
Ability : Stance Change
EVs : 252 HP / 252 Atk / 4 Spe
Adamant Nature
- Iron Head
- King's Shield
- Shadow Sneak
- Swords Dance


My record is a streak of 77 (I lost because of two critical hits) for now but I know I'm going to improve. I began the streak of 200 challenge yesterday, I'm making my debut with this team.
Do you think I'm going to quickly achieve my objective ?
 
So I've managed to get 205 wins using a psyspam team.

Video: 3XWG-WWWW-WWWM-NGQX

Team:


Zapdos @ Psychic Seed
Ability: Pressure
EVs: 4 HP / 252 SpA / 252 Spe
Modest Nature
- Thunderbolt
- Heat Wave
- Roost
- Tailwind

Zapdos is one half of my lead pair, aiming to get up Tailwind quickly if it benefits or just attacking against Trick Room. Thunderbolt is the main attack, Heat Wave for coverage, Tailwind for speed control, and Roost if it is safe to let it live longer. Psychic Seed is used for the extra special bulk to make it easier to set up Tailwind.


Tapu Lele @ Psychium Z
Ability: Psychic Surge
EVs: 4 Def / 252 SpA / 252 Spe
Timid Nature
- Psychic
- Moonblast
- Dazzling Gleam
- Protect

Tapu Lele is the other half of the lead pair. Psychic and Moonblast are the spammable STABs while Dazzling Gleam is used for spread damage. Psychium Z is used for the one-time nuke of getting rid of any problematic Pokemon (usually Thunder Wave users).


Metagross @ Metagrossite
Ability: Clear Body
EVs: 4 HP / 252 Atk / 252 Spe
Jolly Nature
- Iron Head
- Zen Headbutt
- Ice Punch
- Protect

Metagross comes in after either one of my leads is KO'd. It then proceeds the wreck havoc on the foe along with its teammates with its powerful Tough Claws-boosted attacks. Ice Punch is used to allow me to hit dragons and grounds without relying on Zen Headbutt.


Incineroar @ Assault Vest
Ability: Intimidate
Level: 50
EVs: 252 HP / 252 Atk / 4 Spe
Adamant Nature
- Fake Out
- Knock Off
- Flare Blitz
- Low Kick

Incineroar is my intimidator, psychic check, Weavile check, and steel check. Assault Vest is used for that extra bulk. Fake Out is a wonderful move to have in some situations while Low Kick mainly hits Tyranitar and Heatran.
 
(plus it's always worth mentioning that pre 50 tree is significantly easier than post 50, due to the absence of set 34 before battle 40 and most strong legendary based trainers also absent pre 50)
 

Smuckem

Resident Facility Bot Wannabe
is a Community Contributor Alumnus
Firefighter Calder - Set34, soft Water-type preference with slight amounts of other types - large roster
Firefighter Presta - Set34, soft Water-type preference with slight amounts of other types - large roster
A small aside/musing on this bit...

I have previously discussed this with turskain elsewhere, but there is a way to better categorize the 'mons listed here. The issue is, it's more flavor-based and thematic than anything one can neatly place for the purposes of a cheatsheet like this. Still, I've been hung up on these two Trainer rosters and I'm not sure why, so I figure I should give it a shot and see if anyone else here can refine what I come up with.

Take a look at Calder's roster (Presta's is virtually the same): https://www.serebii.net/ultrasunultramoon/battle/calder.shtml

There are a few common threads to be had:
- Just about everything on here is either a Fire resist or super-effective against it: Fire/Water/Rock/Ground/Dragon. A-Ninetales2 is here due to being part of the (originally Fire-exclusive) Vulpix line. Most of these types, as real-life substances, except for Dragon, are used as firefighting "tools."
- Machamp/Conkeldurr are there mainly for flavor, as Machamp are shown to be quite helpful to people around Alola and Conkeldurr would be the sort of thing that would help rebuild the infrastructure of a location ravaged by fire. Gameplay-wise, it gives Conkeldurr4 more excuses to be a douche towards TR teams, and No Guard Machamp3 more excuses to be a douche in general

Calling these rosters "anti-Fire" isn't helpful enough, but saying "Set34, soft Water-type preference with slight amounts of Fire/Rock/Ground/Dragon + Machamp/Conkeldurr - large roster" feels like a lateral move to what is there on the sheet now. Anyone have other ways to interpret this?
 
Last edited:
Subless Mence should use Double-Edge since it'll get the opportunity to reach +6 safely much less often, but if you're using Aegislash on the same team, there's little reason already not to run DE/Sub/DD/Roost (apply PP Ups) in the first place. Sacred Sword surpasses Iron Head for coverage (Steel is a mediocre type on the offense, certainly worse than Fighting; to boot, Ghost/Fighting gives you neutral hits on everything); use Leftovers instead of a Z-crystal, as Ae's role will more often be to cycle Intimidates / use King's Shield to set up one of the fast mons, rather than KO the opponent before +6 Atk. Replace Volcarona with Minimize Sub Chansey. Lead Mence, generally to have Intimidate up immediately (only a disadvantage against Milotic/Lurantis/Bisharp/Braviary), and particularly to make yourself less susceptible to Mega Charizard X, which is always a threat to Aegi/Mence due to Dragon Rush potentially flinching and 2HKOing Mence at -1 Atk while outspeeding at +1 Spd, or OHKOing non-invested Mence at +0 for that matter, and not checked by Volcarona at all. If your goal is 200, that'll do, as several previous Mence/Ae/Chansey streaks have demonstrated.

If your goal is 200 with Volcarona, that's marvellous, as is Volcarona; I've found that it suffers from a lack of either Sub/Roost (both of which it'll need to get to +6 without adequate support vs special attackers, such as Confide, or Chansey to PP stall STAB/super-effective moves) or coverage, as +6 Bug Buzz misses OHKOs on roughly 1/4 of the Tree. Status protection could be provided by Tapu Fini, but crit prevention cannot, which severely hampers your Volcarona's ability to set up safely on special attackers (including Nasty Plot / Calm Mind sets especially), which is an important area Aegi/Mence needs support in from the third team member.

If you've looked at the Volcarona team I made a year ago, which I suspect given that you're running the same (bad) Mence moveset and the luxurious Fiery Dance Volcarona (FD was intended as a remedy for Volca's inherent problems with QDing safely), I should inform you that I completely sucked at that time and that team is not worth emulating, nor can it get to 200 without absurd luck. Keep in mind that you're not necessarily one third of the way there if you've managed ~70 -- it might be as little as 1/20 of the way (if your chance of victory in each battle is 98%).
First of all, thanks for your detailed answer. I've had a bit of trouble reading your message (I'm French and I don't speak english fluently ^^) but I've ultimately almost all understood.
Regarding Salamence, to my mind both Double-Edge and Return have their advantages and drawbacks. Currently, I'm using Double-Edge.
Why +6 ? At +4, Salamence destroys everything with Earthquake or Double-Edge/Return :)
I know that Sacred Sword allows Aegislash to hit neutrally or super effectively but I prefer Iron Head to have a strong Steel STAB, which sometimes has a 30% to flinching (my Aegislash has 81 in Speed, it can outspeed many Pokémon anyway). And I also need to hit as strongly as possible the Rock types due to my quite big general weakness to Rock (even if I have several ways to beat them as you can see it). In addition, for me a Z-Crystal is better than Leftovers (in particular because it allows me to quickly annihilate a thread).
Yes, I know Minimize Chansey is a terrifying Pokémon with Eviolite in the Tree, but to my mind, the challenge becomes a little too much easy with it x)

I've taken a look at your team yes. You used an original Volcarona ^^ And did Tapu Fini pose problem ? Did you ultimately get a streak of 200 with that team ?
" I completely sucked at that time and that team is not worth emulating " : what does this mean ? I didn't understand.
 
Last edited:
He means that the team comp didn't work. It was very easily prone to haxes and RNG due to the difficulties of setting up without a stable double staller core.
 
First of all, thanks for your detailed answer. I've had a bit of trouble reading your message (I'm French and I don't speak english fluently ^^) but I've ultimately almost all understood.
Regarding Salamence, to my mind both Double-Edge and Return have their advantages and drawbacks. Currently, I'm using Double-Edge.
Why +6 ? At +4, Salamence destroys everything with Earthquake or Double-Edge/Return :)
I know that Sacred Sword allows Aegislash to hit neutrally or super effectively but I prefer Iron Head to have a strong Steel STAB, which sometimes has a 30% to flinching (my Aegislash has 81 in Speed, it can outspeed many Pokémon anyway). And I also need to hit as strongly as possible the Rock types due to my quite big general weakness to Rock (even if I have several ways to beat them as you can see it). In addition, for me a Z-Crystal is better than Leftovers (in particular because it allows me to quickly annihilate a thread).
Yes, I know Minimize Chansey is a terrifying Pokémon with Eviolite in the Tree, but to my mind, the challenge becomes a little too much easy with it x)

I've taken a look at your team yes. You used an original Volcarona ^^ And did Tapu Fini pose problem ? Did you ultimately get a streak of 200 with that team ?
" I completely sucked at that time and that team is not worth emulating " : what does this mean ? I didn't understand.
Salamence would much rather prefer the ability to safely get to +6 on a large portion of the tree (with substitute) instead of more coverage (which is only relevant if you aren't at +6, since at +6 return/double-edge OHKOes resists). If you can safely set up to +6 on something, you're going to set up to +6 - even if you could probably sweep only at +3 or +4, you need the extra safety in the tree.
Return vs Double-Edge comes down to mainly the OHKOes you get at +0: Being able to safely dispatch lead Starmie, Porygon-Z, Haxorus, and Goodra 100% of the time can be a big deal depending on the team.
 

turskain

activated its Quick Claw!
is a Community Contributor Alumnus
A small aside/musing on this bit...

I have previously discussed this with turskain elsewhere, but there is a way to better categorize the 'mons listed here. The issue is, it's more flavor-based and thematic than anything one can neatly place for the purposes of a cheatsheet like this. Still, I've been hung up on these two Trainer rosters and I'm not sure why, so I figure I should give it a shot and see if anyone else here can refine what I come up with.

Take a look at Calder's roster (Presta's is virtually the same): https://www.serebii.net/ultrasunultramoon/battle/calder.shtml

There are a few common threads to be had:
- Just about everything on here is either a Fire resist or super-effective against it: Fire/Water/Rock/Ground/Dragon. A-Ninetales2 is here due to being part of the (originally Fire-exclusive) Vulpix line. Most of these types, as real-life substances, except for Dragon, are used as firefighting "tools."
- Machamp/Conkeldurr are there mainly for flavor, as Machamp are shown to be quite helpful to people around Alola and Conkeldurr would be the sort of thing that would help rebuild the infrastructure of a location ravaged by fire. Gameplay-wise, it gives Conkeldurr4 more excuses to be a douche towards TR teams, and No Guard Machamp3 more excuses to be a douche in general

Calling these rosters "anti-Fire" isn't helpful enough, but saying "Set34, soft Water-type preference with slight amounts of Fire/Rock/Ground/Dragon + Machamp/Conkeldurr - large roster" feels like a lateral move to what is there on the sheet now. Anyone have other ways to interpret this?
All valid points. I looked at the Presta/Calder roster and found the exact non-Water species:

Rock-types: Aerodactyl, Archeops, Lycanroc (both formes)
Dragon-types: Goodra, Salamence
Ground-types: Palossand, Hippowdon
Fighting-types: Machamp, Conkeldurr
Fire-types: Ninetales, Flareon, Salazzle, Pyroar
Ice-types: Alolan Ninetales

The roster has 40 different species on it total - these non-Waters account for 13 species. A substantial amount and the anti-Fire theme is undeniable, but with 5% of the roster being Dragon-type, listing Dragons as one of the trainer's notable types seems misleading - it might suggest that dragons in combination with bulky waters present a threat on this roster, which would be a very rare occurrence in practical terms.

My aim with trainer descriptions is to list the overall set numbers ran, and major exceptions to that - what stands most out from a trainer's roster as an easily digested reminder when facing them. The various non-absolute patterns make this more ambigous than I'd like - in addition to Presta and Calder, I have Punk Girl Zed/Edda, and Cook Larry/Tony listed as "soft type specialists", but a similar list of types or species as proposed for Calder could describe their exceptions. That might face the same issue of too much specific information, which I try to limit to species that make exceptions to the trainer's default set numbers, and mixed legendary rosters which always tend to overlap with the former.
 
As far as keeping it "easily digested" I think it's more important to alert someone to the inclusion of Set12 or 1234s than guard someone against the curveball of one of those soft specialists bringing something that doesn't suit their theme. In most of those cases, the enemy will still be Set34 and it's up to the player to call it from there. Likewise, this also goes for trainers who use almost all set4s with random exceptions, Perri and her 234s, whichever sets carry TR (Scientists and Hikers) etc.

You already do that, so to me, anything beyond "X preference with other types" is mostly unnecessary fluff unless it pertains to specific sets outside of 41+
 
Submitting a streak of 279 in Ultra Sun Super Doubles (QR code link for those interested in trying it; I played it pretty carelessly and believe it could definitely go higher!).

The losing battle: BCFG-WWWW-WWWJ-5LM2 vs. Sina. Looking back at it, this was very winnable. I had been playing pretty recklessly for quite some time and rarely looked up the sets since by now, I know a lot of them already. I'm pretty sure this was the first time I ever saw Sandslash go for an Aurora Veil (I must have KOed them before in my previous encounters with that set), and that put me in a very bad spot... but the biggest problem is that I completely forgot about Ice Shard on M-Abomasnow; I thought I was about to win until the last turn! I should simply have double-Flamethrowered Abomasnow in case the 1st didn't KO (I was pretty confident it would KO with the Clanging Scales chip damage, but I was obviously wrong). Oh well! I do have more fun overall when I don't research everything to play optimally, so I'm ok with this streak ending earlier than it could have, there's many other teams I want to test!

The team started as a different one where I had a Mega Gyarados and Togedemaru lead with Comfey in the back to provide Gyarados with healing after setting up. But I quickly realized that most of the time Comfey was on the field, it was the star of the show, being way more useful than just another support Pokémon with priority healing. So I decided to build a team around Comfey; it was put together pretty quickly from what I had in my boxes. A few changes were made to the sets here and there as I progressed, but I discovered the team had a lot more synergy than I originally thought. Let's get into it with more detail!

The team:

@ Pixie Plate

Modest | Triage
IVs: 31/0/31/30/30/31 [HP Ground] (Hyper trained to 31/0/31/31/31/31)
EVs: 116 HP / 252 SpAtk / 140 Spe
Calm Mind / Draining Kiss / Hidden Power Ground / Floral Healing


The star of the show! Which is pretty difficult to believe given how tiny Comfey is on the screen compared to most Pokémon, especially the other members of the team (the sprite here and on Showdown really don't do it justice, it's much smaller in game!). I was very surprised by how well this Pokémon - and set - did in the Tree. I'm sure most people are familiar with what it does at this point, since it's Comfey's niche in about every tier it's in, but for anyone who doesn't know, thanks to Triage, Comfey gets +3 (!) priority on Draining Kiss. As weak as the attack is, it heals Comfey by 75% of the damage dealt; pair this with Comfey's low base 51 HP, and you're certain to heal by a good amount, making Comfey very hard to take out if it's not through a Z-move or a really powerful hit that OHKOs.

Originally, I was especially appealed by the priority Floral Healing since it's a great pairing with bulky set-up Pokémon. This was the idea behind every teammate I gave Comfey: Mega Salamence's power and bulk needs no introduction anymore, but it gets worn down quickly when using Double-Edge for its insane damage output; Floral Healing can entirely mitigate the recoil. Aegislash's bulk is also famous, in shield forme at least, so I figured having recovery would be beneficial, not to mention Aegislash's legendary synergy with M-Salamence. I added Kommo-o to that core since I wanted something that could set up, and Kommo-o becomes so bulky from using its Z-move, it loves getting healed at the start of a turn too.

However, after running the team for a while, I realized Flower Healing was barely an option that came in handy every once in a while: Comfey's true greatness comes from the Calm Mind-Draining Kiss combo. I usually set up a Calm Mind turn 1, since Comfey can usually tank a couple of hits, and protect Salamence if it's threatened by anything. This usually resulted in Comfey being reasonably low in HP at the start of turn 2, in which I Draining Kissed back to 75%+ HP and finished off one of the targets with M-Salamence. In some occasions, for example against Trick Room or some bulky Special threats, I went full greed and boosted Comfey to +6, using Draining Kiss a couple of times in between to heal back. But generally, the chip damage from a +1 Draining Kiss at the start of every turn is just what the rest of the team needs to score KOs. It's worth noting that unless you need chip damage right away against a big threat, it's important to use Calm Mind as soon as possible, since it can't contribute as much without it.

The last slot of the moveset is really open for debate. I originally had HP Ground on the set, so I just left it there to see if it would come in handy. Tailwind and Leech Seed were appealing options, I also considered Giga Drain for a priority Grass move, and Protect as well. In the end, HP Ground ended up being a lot more useful than I thought it would, I actually used it a lot. Comfey's speed EVs ensure it outspeeds Toxicroak and Nidoking, so it's safe to HP Ground into them if need be, but it's against Magnezone, Togedemaru and Mawile that it came in the most handy. M-Mawile is one of the biggest threats to the team, but a turn 1 Flamethrower + HP Ground has a really high chance to KO instantly. So ultimately, I left HP Ground and was very satisfied with it, but I can't compare to how the other options would fare since I didn't test any of them. The best choice would probably depend on Comfey's partners.

The item was the other piece of the puzzle I was hesitant on. I originally had Leftovers (I left them on until battle 50, which is when I started to be a bit more serious about the team), thinking that an extra bit of healing at the end of each turn would stack well with Draining Kiss recovery and make Comfey really hard to take out. But in practice, the Leftovers were practically useless, that chip recovery barely ever made any difference, and the battles didn't go on long enough to justify them. I considered a 50% berry, which I still think would have been a good choice, and a Life Orb, which's reasoning is basically the opposite of Leftovers (since Draining Kiss heals so much every turn, the chip damage from LO isn't as bad, especially since it helps heal more HP in the first place). But then I realized Pixie Plate was the perfect compromise: added damage to the one move I spam all the time = extra recovery every time as well, without the inconvenience of the Life Orb (HP Ground isn't used enough to be worth boosting anyway). To be honest, I don't think this Comfey set even needs an item at all to function well, but the extra Pixie Plate damage helps with a lot of 2HKOs at +1, so I think it's the optimal choice.

All in all, to my surprise, the set performed really well in the Tree and I believe it could be paired with a wide array of partners and do well, since it basically does its own thing on the side and assists whatever's there. It works really well in Trick Room too because of the +3 priority, which was very handy since my team was pretty Trick Room-weak.
Nice to see some more Comfey love! My streak to 76 with my self-made team (designed to get to 50 for my first ever time in a battle facility in any gen) was really early, so a lot of megas and legendaries weren't options for me, although healing boosting pokemon was certainly a big part of the outlook. I had Gyarados and would probably consider running it again given its bulk as mega, not to mention the free turns against electric attacks were so good (protect, then switch to immunity nullifying two turns from one mon).

My Comfey was fairly different though, Bold heavy defense investment which paired with Intimidate makes it possible to hold up well against physical attacks, Synthesis and Leftovers really shined on this one and it typically sat on the field the whole game apart from the occasional switch out to Metagross when a poison or steel attack was incoming. I do like HP Ground on there, and I've considered Aromatherapy too to ease hacks (from memory my streak ended with paralysis). Agree that any of several items could work. Probably need to reevaluate things now in a post-Mega/Legendary/move tutor world. I see a few move tutor moves with possibilities, but not much in its move pool that benefits from Z-move effects.

I'm starting to have some formative thoughts on doubles tree currently, after shiny hunting put a brake on my tree efforts for a while (5000+ for that shiny Poipole), so Comfey might feature again...
 
Haven't posted in a while but since I picked up Ultra Moon a few weeks ago, I've hopped back into the Tree and I'm posting a completed streak of 186 wins.

778.png

Mimikyu @ Ghostium-Z
Ability: Disguise
EVs: 252 Atk / 4 SpD / 252 Spe
Jolly Nature
- Play Rough
- Shadow Claw
- Shadow Sneak
- Swords Dance


I switched my Adamant Mimikyu for Jolly, but other than that it's the same set. The bonus speed is honestly worth the kills that it no longer picks up, as it can more reliably nuke something with Z-Shadow Claw before death. I also tried using the new Mimikium-Z but although it's really nice to not have to be paranoid about Play Rough misses, you need Z-Shadow Claw to at the bare minimum chip the bulkier Steel types down to OHKO range for Garchomp. Play Rough misses nearly cost me the run a couple times, and I honestly thought that was how I'd eventually fall, but it didn't end up being the case.


445.png


Garchomp @ Choice Scarf
Ability: Rough Skin
EVs: 252 Atk / 4 Def / 252 Spe
Jolly Nature
- Outrage
- Earthquake
- Poison Jab
- Rock Slide


Exactly the same set. I tried using Fire Blast over Poison Jab but I didn't really find any use for it, while Poison Jab was useful for KOs on some Fairy Types that somehow escaped Mega Scizor.


212-m.png


Scizor @ Scizorite
Ability: Technician
EVs: 252 HP / 4 Atk / 252 Spe
Adamant Nature
- Bullet Punch
- Brutal Swing
- Swords Dance
- Roost


This was my one actual change, which was switching Kartana for Hamber's Mega Scizor. Having Mega Scizor created a second potential setup sweep for my team, but most importantly it worked really well to cover for Garchomp. Kartana's issue was it's frailty, but with Scizor, I could freely switch between Garchomp and Scizor, with Scizor taking ice hits and Garchomp taking the fire hits. I only PP Maxed Roost, which I found was necessary for stalling out PP for a better set up after I had a scare in my first run that could've been avoided with some more stall with Roost. I also agreed with Brutal Swing over Brick Break, as I rarely was placed in situations where I would've preferred the Brick Break and even then, I found more situations where I would've preferred Bug Bite to Brick Break anyway. I may genuinely switch to Bug Bite just because my team's biggest threat is Mega Gyarados, which I don't have a great way to deal with and will always lose Mimikyu in the process.
Loss: V6WW-WWWW-WWWN-872Y

Was forced to switch out of Mimikyu because Excadrill had Mold Breaker, but it landed a crit on Garchomp and after that I didn't really have a good way to deal with it. I could've Shadow Sneaked for a KO on Excadrill but I forgot about Mold Breaker momentarily after accepting my fate, and looking at his team I would've lost anyway due to a lack of firepower.

I fully believe that I can do better with this team so hopefully I'll have a new post in the next week or so. My highest streak (198 on Moon) was a very similar team and the run I had required a lot more luck than this one. This was my second run with this team and it won't be my last - I'm thirsting for that 200 streak.
 
I haven't updated because I'm on a hiatus, I haven't even reached 1100 yet. GG Unit was (until late january) fairly active on Discord, and last we heard of him he was in the 1700s. Silverlining is the kind of streak that's dubious, and he probably only posted for the attention and I doubt he'll come back to the streak.
 
-Once the item on the Pokemon is revealed, eliminate other sets that have the same item. (Like the player, opponents cannot have duplicate items. For example, Trainers will not have Weavile-3 and Weavile-4 because they both hold a Focus Sash)
trainers will not have weavile3 and weavile4 because of species clause dude

Much of the time, when a trainer runs both sets of a 34 Mega (not very often outside of Charizard) you're not really going to learn anything from it until you scout. Frisk helps immensely with Zards, but merely knowing both 34 can evolve is a limited benefit. It bears repeating that trainers who run both sets of a mega are very uncommon. The only coin flip you'll see with any degree of frequency outside of Charizard is Mawile, as 34 appear on a good handful of teams. The post-40 bellhops run both Lopunnies, and Veteran Dooley runs both Kangas. Female Breeders run both Camerupts. The majority of the time it's pointless to concern yourself with them.

Anyway, a lot of this advice can be condensed to "look up trainer pools until you're familiar with them, and keep looking them up to remain familiar with them." Knowledge of the base rules will already tell you that items don't repeat.
 
Last edited:
Game: Ultra Sun
Format: Super Singles
Streak length: 811

In tropical environs far away
It's natural, at some point, you'd expect
The isolation lures the best to play
Amongst themselves, and find who's most correct.

Just one decision carries so much weight
Which team persists through all who interpose?
My trusted three, to you I delegate
The slow, complete subversion of our foes.

At last, collecting steam: we're on a roll
But streaks, like all things, must in time portend
That key unlucky break; upon its toll
Resolve to hold back tears--accept the end.

Imagine if my eyes should never see
A rollercoaster like the Battle Tree.


Now, join me as you may, for this presentation of the team and their adventures. And above all:


----------


Repentant (Durant) (M) @ Choice Scarf
Ability: Truant
Jolly Nature
EVs: 174 HP / 108 Atk / 228 Spe
- Entrainment
- Iron Head
- X-Scissor
- Superpower

The durable ant with a durable niche. Obviously most of the time you just click the first move and get out of there, assuming you even need to get out of there (because sometimes it gets KO'd on turn 1 in exchange for the Entrainment and you can think of it as a sacrifice for momentum). Other times, it makes sense to stay in for turn 2 when both sides are truant, just to goad them into choosing a particular attack on turn 3 so you have a safer switch. Regigigas is a bit of an unusual case: after replacing one negative ability with another, it almost always leads with Confuse Ray, in which case Repentant stays in not just for turn 2 but for turn 3 as well, so I can see what its set is and know the way to handle it. Even if it hits itself in confusion rather than fail a second Entrainment, that's not so bad.

228 Speed EVs is of course the benchmark for getting to a raw speed to 259, outrunning Scarf Manectric and its Overheat. I could conceivably see a case for dropping as low as 241, and getting 88 EVs to put elsewhere (the three sets where that makes a difference will all predictably lock themselves into Fire moves against a Durant, which is mostly manageable--though switching out on turn 1 against a lead Manectric would become essentially mandatory in that case, and that gets awkward if it turns out to be mega and the Overheat misses), but matchups in which those points would make a material difference are at least as rare as the benefit from dumping them in speed, so there they stay for now.

108 Attack EVs are the minimum necessary to guarantee the Iron Head OHKO on Mimikyu 1/3/4 (set 2 is bulkier, but pretty harmless) after the disguise is broken; conveniently, the amount left for HP is also enough to guarantee surviving a +2 critical Shadow Claw against set 3. 4 is a bit more annoying between Rocky Helmet, Destiny Bond, and a priority move, but generally I can break the disguise turn 1 and take Helmet + Shadow Claw, switch turn 2, switch back turn 3 to take a Play Rough, and still stay out of Shadow Sneak range to get the KO on turn 4...or hell, Mimikyu4 doesn't actually hit all that hard without a setup move, so after the turn 2 switch I also have the option of going for the setup "raw", with either partner.

X-Scissor is basically just for Espeon leads, if I don't want to risk a failed Entrainment. Against Absol and Sableye leads, it's worth the risk to try Entrainment anyway, even though Sableye 3/4 will always block a turn 1 Entrainment, either by going mega or using Fake Out--with the partners I use, those two Pokemon are harmless enough that I can treat them like Mimikyu4 if necessary, and just tank whatever they have to offer.

Durant's fourth move has always been an open question; any move you could possibly put there has such vanishingly small utility anyway. I decided to pick Superpower, if only for the possibility to OHKO Komala4 before it can dish out any damage that might weaken the team to whatever's lurking behind it. Incidentally, if you go all the way to 252 Atk, Superpower is a guaranteed OHKO against that set, but that's no help against set 3 which would already get OHKO'd by the current spread as-is if not for its sash. Against that, you're forced to switch and have someone take a Flail, then finish off the last HP with whatever weak move, or I suppose you could fish for a flinch and a 2HKO with Iron Head, in which case you're back to finding something worth spending slot 4 on.

Somewhat unusually for a Durant-based team, I don't even mind daring to entrain lead Darmanitan (!), as even if it's Zen Mode and the move fails, just making sure that it doesn't have Sheer Force also means it's not threatening enough to disrupt a "raw" setup. That doesn't mean it's always worth giving up Repentant as a sack against fire-type leads; with some opponents (Salazzle is notoriously susceptible) I can generally switch-stall them out of all the PP on their fire move, then shoot the Entrainment on turn 7 or 9 when it'll not only stick, but have everyone still alive afterwards, which is a better result in case of unfriendly backups.


Soliloqueen (Drapion) (F) @ Black Sludge
Ability: Battle Armor
Adamant Nature
EVs: 252 HP / 252 Atk / 6 SpD
- Protect
- Acupressure
- Substitute
- Throat Chop

When given a suitably passive opponent, most commonly via Truant, this set is of course designed to do one thing: cram the most thorough setup we can possibly fit into 4 moves while still having room to do something afterwards. Some rules of thumb to keep in mind when you use this:

-On the offensive, being at +6 is equivalent to turning a resisted hit at +0 into a weakness, or a normal hit into a double weakness.
-Defensively, being at +6 is equivalent to a two-step move in the opposite direction on the type chart.
-The only way an attack can one-shot your sub when you're at +6 is if it would have been a straight-up OHKO at +0. (Unless it's Sacred Sword. Screw Sacred Sword.)
-Often if you're faster than the opponent (either naturally or after you finally pulled out that key speed boost), and the opponent has a status move like Thunder Wave, and they don't have anything like Quick Claw that could possibly counteract that, it's better to go without a sub until you put it up right before their move, on the attacking turn, rather than resetting your sub on their truant turn. Given the CPU propensity for spamming such moves whenever they appear to do something, you can often get the opponent to waste turns on useless moves that way while you're setting up. So instead of the traditional P-S-A-A move order, in these situations you can use S-A-P-A instead; given the order the moves are positioned, this conveniently corresponds to the button inputs A-up-A, A-up-A, A-down-A, A-down-A, repeat (because as everyone knows, gathering up boosts with Drapion is a real slog--anything to ease the trek). Although if it succeeds in tricking them into picking a wasted their move, it'll really be at least S-A-P-A-A-A.
-The same can be true, to a lesser extent, when it comes to drawing out weaker moves that may have side effects that can only do something when you don't have a sub. For example, if you're up against an opponent like Nidoqueen4, and you have +4 Defense so that EQ will immediately break the sub but Bulldoze doesn't, you might nonetheless be able to convince them to go for Bulldoze (or better yet, Dragon Tail) with the "delayed sub" move order.
-Against opponents who love to spam Taunt, like Weavile4 and Electrode4, if you're really in a pinch and want to set up with Soliloqueen anyway, you can force through at least 15 out of the 21 boosts by using the move order P-S-P-A-P-A-P...and in all likelihood a 16th as well, unless somehow none of those boosts were in speed. With that many boosts, they have to go somewhere, and in particular between attack, evasion, and whichever defense they're hitting on, you're guaranteed to have some of those boosts filled. If you have at least a halfway serviceable boost set already, you might even be willing to risk going for multiple A's in a row to conserve some Protect PP, in the hope that they either pick a move other than Taunt that turn or (if that boost set includes some in evasion) simply miss, because Taunt thankfully doesn't ignore evasion modifiers. Since this does limit your flexibility afterwards, try not to go for that if you can reliably handle the opponent some other way, such as Crobat4, whose weak attacks mean it can be easily (but tediously) stalled out of everything just by repeated switches.

With the new move tutors in USUM, I went with Throat Chop as the attacking move, rather than Knock Off or Crunch. Being able to block random moves like Roar (which otherwise goes through Substitute and even Protect) is always nice; while the prospect of facing second-mon Sturdy Skarmory2 isn't something that persists very long into a streak, and Skarmory4 has learned well enough to use Whirlwind instead, it can even buy some free turns in desperation scenarios like Drampa3, assuming I decide to react to a turn-1 Quick Claw by trying to go directly on the offensive against it, as opposed to settling on a plan of merely wasting as many Hyper Voice PP as possible (usually 4, so in its remaining three shots it would have to get two criticals). It's just too bad Taunt isn't one of the moves Throat Chop blocks--what are they doing, spitting in your face?

The other thing about Throat Chop is it has consistent damage even against megas and Z-users, and Pokemon that take multiple hits to go down. All in all, basically the same number of Pokemon take guaranteed OHKOs from either move, just distributed differently, but in particular a +6 Throat Chop gets the drop on Mega Swampert, Mega Salamence, and a pretty good chance against Mega Garchomp. But equivalently, that +6 hit can break down into two +2 hits, for example if you're trying to set up on something with a 10-PP choice lock and only manage to get one boost in Attack before they run out of PP: hitting it once on the switch and a second time on the following turn before it can move is just as good (or even better, since one of those hits comes against the non-mega form which usually has lower defense). It's not as though Knock Off actually stops a Focus Sash from working, and Drapion is still looking for that elusive physical, non-contact Dark move (not counting the comically useless Fling, of course), so for now it's a matter of choice, and this the the choice that works for us.

I actually thought about dropping a point in speed, because speed ties are awkward to use Substitute around and the 114 slot is empty. Even knowing that I'd consistently go second against the 115 crowd at least lets me know what sequence of moves to try against them. But speed ties, just like Quick Claws, can mostly be mitigated if necessary by adopting a different strategy that puts all the subs up on Truant turns, and besides 114 suddenly means that going to +2 speed actually creates a speed tie with scarf Typhlosion (not that Soliloqueen would ever be called upon to fight that thing). More relevantly, it means Landorus2 would outspeed until we get a second speed boost, and that set really puts a timer on how long we have to find that boost.

One change that might actually make sense is to use a male Drapion. There are very few factors in which it makes a difference, let alone that aren't simply symmetric around a 50/50 roll, but in the specific case of a second-mon Sylveon, a female attacker with a contact move has a 17.6% chance to trip Cute Charm and possibly be subject to attraction turns against whomever's up third, whereas for a male that chance is just 2.4%. Clefable, Wigglytuff, Delcatty, and Cinccino are all Cute Charmers that are biased toward female, which would appear to more than compensate, but none of those species actually appear in the Tree pool. There's also Attract, which has five holders, none of which are in the set 3-4 range. Three of them are an even 50/50 split, and the other two are Serperior1 and Blissey1 with their biases in opposite directions (and an early disappearance from the rosters). Captivate likewise appears only on early sets, including Serperior, Tsareena, and Vespiquen, but no Drapion is going to be using special attacks anyway, so even if an opponent can be convinced to use Captivate, they're just wasting time (in effect, it says "reroll one Acupressure"). Finally, there's Rivalry, where the biased holders are Pyroar, Nidoking, and Nidoqueen. Nidoking has three sets with Protect, while none of the others have any (and two of those sets also include fire moves), but Soliloqueen certainly isn't going to dare try a "raw" setup in front of Nidoking, and if they successfully gain Truant then it means they don't have Rivalry anyway. After setting up, all Rivalry users that come out second or third take a clean OHKO, so it doesn't really matter what the incoming damage rolls would be. If and when that theoretical Sylveon nuisance ever proves a problem, I guess I can go hunt for another Drapion from the wormhole or something. Otherwise it hasn't been worth the effort to do so thus far.


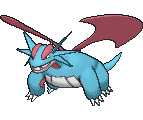
Charithmia (Suicune) @ Leftovers
Ability: Pressure
Bold Nature
EVs: 242 HP / 252 Def / 4 SpD / 12 Spe
IVs: 18 Atk
- Substitute
- Calm Mind
- Rest
- Scald

Charithmia...cute...lovely...smart...plus...amazing...you think so?...Oh yes...it...stunning...kindly...love it! Hug it...when...sleeping...warm and cuddly...spectacular...ravishing...Oops! Look at your PP, I guess it all ran out! Too bad, no refunds.

My so-called "Miracle in Blue" is a bit of an unconventional partner for Durant, not least of all due to a lack of Protect. But as you get used to it, Substitute's role as a pseudo-Protect in its own right often shows through well enough. Even against a move that breaks the substitute every time, it costs 27 HP per truant cycle, which is more than 0 but plenty low enough to be an effective "cap" at wasting away most dangerous moves that generally only have to be used 5 or 8 times before they're out of PP. And if they ever use a move that fails to break the substitute, then that usually means gaining 3 CMs at the cost of just 3 HP over two cycles.

The main benefits to having this as one of the sweepers, besides being able to "cheat" and effectively use Leftovers twice, are that I know how exactly how fast the stats are going to get boosted (and this is less time than Soliloqueen needs), I have at least a bit of resilience to getting hit by status like paralysis and burn, and that a lot of the Fire-types that threaten Repentant are utterly helpless in Charithmia's presence.

Furthermore, passive Water-types like other Suicune, Milotic, and Toxapex (plus the obviously-unentrainable Wishiwashi) are just as harmless, if not more so, and in those cases I don't even want to use Entrainment: by simply switching on turn 1, I deny them the ability to waste half their turns by loafing around instead of using PP, so it costs fewer of our own PP to bide time while they run themselves out. Then by keeping track of all the moves they've used, once they're rid of the last attack, I know the turn on which they'll be switching for lack of PP, and can get a free +6 hit on whatever they decide to bring in. Sometimes they'll have stuff like Grass-types in the back, in which case that free hit can make a big difference between them being able to strike back just once instead of twice on a 3HKO, or sometimes even zero times instead of once on a 2HKO. Even if the switch goes to one of the sets that this can't realistically beat even with a full head start and a free move, like Exeggutor-A2, by going down this path I still have Repentant at full health for a working backup plan.

The speed EVs get to 107 and creep past most Rotom sets, which is really important. Just like with Soliloqueen, it's usually better to present yourself without a sub against slower opponents with status moves to psych them out, and the Rotoms are the supreme example of this, with their propensity for spamming Thunder Wave and Will-O-Wisp proving to be the downfall that allows them to be played like a fiddle (or a Rotom-Synthesizer form?) in spite of the nominal Electric weakness.

Suicune has, of course, always been notoriously bulky, and can often thus serve as a raw switch without necessarily having the idea of a sacrifice in mind; on the physical side, Hippowdon4's Earthquake, Carracosta34's Rock Slide, most Psyshocks, and even Lopunny2's Thunderpunch (not that you're likely to see much of that last one) all fail to break a substitute. The EVs are devoted more to the physical side because Calm Mind can buff up the special stats over time; here's a sampling of special moves that the sub begins to hold against as we get more and more set up:

+0 - Houndoom3 Sludge Bomb, Vanilluxe3 Blizzard, Lanturn4 +0 Charge Beam
+1 - Salazzle3 +0 Sludge Bomb, Regice2 Thunderbolt, Ninetales-A2 Freeze-Dry
+2 - Glaceon3 Hyper Beam, Tornadus4 Hurricane, Ludicolo3 Giga Drain
+3 - Drampa4 -0 Draco Meteor, Latias2 Thunder, Lilligant3 Energy Ball
+4 - Pidgeot3 Hyper Beam, Espeon4 Grass Knot, Thundurus4 Discharge
+5 - Charizard3 Solarbeam, Manectric3 -0 Thunderbolt
+6 - Zapdos3 Thunder, Vikavolt3 Thunderbolt

Given the benefit of that first substitute, even stuff like Gengar4 isn't all that scary to try setting up on. Pokemon with timed-duration status moves like weather or Tailwind are especially passive, since they can't seem to help setting up these moves at every chance, even when those chances account for a third to half of the turns they actually get to move. That just means more Calm Minds and leftovers recovery for free. If you do get worn down over time and have to rest up, at least if the opponent is faster, it's generally better to click Rest on the attacking turn instead of the truant turn--assuming they can break the sub on the rest turn, they'll get one chance at a subless opponent no matter what, but this way you wake up on their truant turn and can react properly to whatever happened, instead of being surprised by "Whoops, they got a critical for 80%, so putting up the sub failed." And while it generally doesn't matter what move you click on sleeping turns, don't be silly enough to go for Scald on those turns against the few opponents who pack Sucker Punch.

When I've elected to go this route in a battle, the goal is to hopefully take whatever hits may come while you mow down 3 opponents at your own pace (where, as mentioned earlier, that "pace" is 107). A lack of offensive prowess and even the occasional Brightpowder miss is generally tolerable at that point. Still, it's worth noting that +6 Scald will be a OHKO on any Raikou (at least if it hasn't used its own Calm Mind or Z-Thunder Wave), Gallade, and anything failer than those.

The fact that Scald can cause burns is a mixed blessing: sometimes it puts the opponent on a timer I'd rather not force, such as KO'ing them on the wrong turn instead of waiting for exactly the turn where sun or Trick Room runs out. Then again, the ability to fish for "Your physical attacks are only half as strong now" can come in handy in an emergency. For example, there was a match where I misclicked Protect on the wrong turn with Soliloqueen against a Mega Latios that had already set up to +6; the ensuing double Protect failed and forced an Earthquake OHKO. But by adopting a loop of "Sub-Scald" instead of the usual "Sub-CM", I was able to get the burn down in time before the depleting health forced a Rest, so that the one hit we had to take while asleep without a sub was effectively +2 instead of +6, and that's at least survivable for long enough to hold out and win.

Yes, I know that in level 50 contexts, 242 HP EV is no different than 238 or 236. Still, this beautiful miracle has developed a history with me, and the Battle Tree isn't the only place we perform together. Some of that even involves battling in level 100 contexts such as No Holds Barred, in which case the same HP corresponds to 401. If you want to move that 4 HP elsewhere, the only sensible place to put in is SpA, in which case the main practical effect is to eliminate the 1/16 chances for Rotom-Fan 3, Rotom-Heat 3, Rotom-Frost 3/4, and Unfezant 4 to survive a +6 hit. Most of those, again, aren't problematic even if they do fluke the survival.

Another variation you could make is to drop the HP further, to 193 or 195 instead of 205. At that level, each Substitute/Truant cycle will cost only 24 HP instead of 27, and in particular you can fit seven of those cycles in (assuming no prior damage) before being forced to rest, instead of just six. Having the sub hold on attacks that deal 48, 49, or 50 damage also has its benefits, though, so you have to choose between the two. Seismic Toss and Night Shade aren't really a thing, appearing a total of three times in the entire pool, all on pre-40 sets, but those benchmarks I cited above will have to be scaled down to the next weaker options, since those particular guarantees are lost at 48.

The 18 Attack IV is what it is; the incarnation of this character who appeared to me in Gold originally had a 0/D/7/5 spread, but in order to have Pressure (or indeed make the trip with me to Alola at all), a different snapshot (caught in Omega Ruby later the same day) was necessary. As it turns out, 18 means that a regular STAB Foul Play has a 90% chance to 2HKO a substitute, as opposed to 60% (at 15 or less) or 9% (at 7 or less). Still, even that isn't all bad: it means the CPU may promote its importance and choose Foul Play instead of a move that can cause stat drops, such as Sableye3 from early on (against whom I won't have the benefit of Truant), or Oranguru4 late into the setup after it's run out of Thunders.

----------

A sampling of notable battles along the way:

RL4W-WWWW-WWWG-HPDQ

#114: vs. Mechabob (Raikou3, Regigigas4, Virizion2)

Protect users, of course, are trouble spots, especially Raikou3 who threatens a Z-move that I have no resists for and can OHKO anyone on the team (which eliminates the benefit of having a tank to switch in), along with the potential to Volt Switch out of trouble if it ever finds itself being too lazy. Soliloqueen at least has a chance, slim as it is, of surviving the Z-move so after the first Protect, I make that switch in the hope that maybe it'll buy a few extra turns. Instead it takes a regular Thunderbolt; the Z-move comes the following turn, into Protect, so even there it gets some damage, and the KO on turn 4. Turn 5 is another successful Protect, at which point I get the sense that the streak might be over. I can't really switch out again, so I have to stay in and take the attack on turn 6. Thankfully it doesn't get a critical or paralyze, and even more thankfully, Raikou smells blood and finally accepts the Entrainment on turn 7 in exchange for a sack. This leaves Charithmia vs. Raikou3 plus two unknowns from Mechabob's roster, with the sole saving grace being that Raikou is at least truant with a loafing turn coming immediately ahead.

The setup goes without a hitch, except that I lost track of the fact that the final sub had already taken a hit, plus Raikou's final turn was a critical anyway ahead of a +6 Scald on the non-truant turn. Out comes...Virizion when we have 172 HP and no sub. If this is set 1 or 3, the only way to win at this point is by getting a burn on the first try; set 4 offers a bit more leeway at first but can rapidly spiral out of control with Swords Dance. However, it turns out to be the special-based set 2, which is at least manageable with the help of a +6 head start, and the final Regigigas is completely uneventful. Not that there's anything bad about being uneventful.

---

JDLG-WWWW-WWWM-RSKU

#342: vs. Thamina (Alakazam4, Raikou1, Greninja3)

Repentant at least manages to get the lead Entrainment only to get OHKO'd by Specs Focus Blast, and while this is a "might as well" moment to bring out Soliloqueen, I know Alakazam will be switching out in just 8 more turns. During that time I manage to get a sub and 3 boosts, but two of those boosts are in Attack, which isn't the worst thing in the world. Sure enough, Raikou1 switches in and takes a Throat Chop to the face for the KO without getting a chance to pick any moves (which is possible at +2, but guaranteed at +4). Alakazam comes back and obviously gets KO'd as well, but not before getting off a Trick, forcing Soliloqueen to suffer the tunnel vision of Choice Specs!

Greninja then manages to get four Rock Slide flinches in a row, but it would have needed a lot more than that to become any kind of threat.

---

BLUW-WWWW-WWWM-RSL8

#485: vs. Arnold (Breloom4, Aurorus4, Tyrantrum4)

Ugh, Breloom. After the lead Protect confirmed set 4 along with Toxic Orb, I figured the best shot at that point was to hope it went for Leech Seed on turn 2, but instead it put up its own Substitute to preemptively cut off any further attempts, and right away I knew this was bad. Repentant is the only team member who can OHKO the sub, but right now it's locked into Entrainment, and even if I did have the freedom to use some other move, Breloom can just put it back on the truant turn. That means Breloom gets to start spamming Focus Punches with impunity, and those hit pretty hard. Furthermore, with 20 PP, even Pressure doesn't do much to stem the tide of Focus Punch.

The one piece of good news was that the end-of-turn message popped up with Breloom taking poison damage, instead of getting Poison Heal (it actually turned out to be Technician). This gave me an out: Charithmia would try to stall for time as long as she could, followed by a switch back to Repentant on the turn the poison is slated to be fatal, and hopefully entrain whomever's up next. Those turns took a pretty harsh toll, forcing a rest with only one sleep turn consumed before getting hit deep into the red, but the next turn went as planned with the switch and toxic damage ending Breloom's rampage.

...Then Tyrantrum4 came out. The Entrainment was successful, but obviously Repentant takes a big Head Smash in return, and once again it's up to Soliloqueen to scramble for boosts in what little time we have. This time the boosts are less favorable: Special Defense, Defense, Special Attack. And Tyrantrum switches out to...Aurorus. Let's think here. No Snow Warning broadcast, so it must be Refrigerate. Then Set 4's best move would be Hyper Beam, which is tolerable: I can sub up in front of that, treat it like it's truant for a while, and hopefully grab a few more key boosts (because it's not safe to KO Aurorus unless and until we're also equipped for the Tyrantrum behind it which will now be free to lock into CB Earthquake). Meanwhile, set 3...nope, can't win a race with that, unless I get really lucky at mising an evasion boost right now and having it pay off. If Charithmia had more than 52 HP left, we could burn off the last sleep turn and Rest to safety, but Breloom denied us even that luxury, so it's a 50/50 that's decided right now, right?

Hold on, Arnold doesn't even have Aurorus3 as a possibility, only 2 and 4 for some reason! Set 2 is obviously a big joke, so it looks like we can pull through regardless. It turned out to be set 4, we got the evasion boost early on anyway, and everything after that was much less stressful.

This battle did force me to reconsider my approach to lead Breloom, as this one was just a Poison Heal roll away from total domination. Any setup sweeper will have its match somewhere, and this is evidently ours. Cloyster-based teams, for instance, don't really care about Breloom4 since they can break both its sub and its focus effortlessly in the same turn. But evidently in exchange for patching up matchups against stuff like Milotic, Lapras, and Salazzle, we have to suffer a bad matchup against this particular foe, and that's fine.

Anyway, the plan I eventually settled on was to switch directly to Charithmia on turn 1(!!) without even trying to entrain a lead Breloom. If it's set 3, it'll probably lead with Spore, but that means it won't try to Spore again on turn 2, and also telegraphs that it's safe to entrain after Repentant switches back in on what's probably a harmless Seed Bomb. Meanwhile, if it is set 4, then the turn-1 Protect is wasted, and having more time to set up will make it not so frantic. Instead of escaping at red health, asleep, and with one more sleep turn to burn, Charithmia will generally be awake with at least half health against non-PH variants at the time of the fatal switch, and if it is PH, then the added time gives us the only opportunity to pull through, by hoping to prey on that killer instinct again. The key is to break Breloom's sub, either with two Scald hits or a +2 hit, on exactly the turn when I do not have a sub, but have 128 HP or less. Breloom can Focus Punch down to 70 or less, and hopefully it notices that's KO range for one more Focus Punch, and goes for it again on a switch back to Repentant, who takes about 60% there. Then I have to hope that it smells blood again, and tries to KO Repentant rather than using Protect again, so that the Entrainment can go off first. It sounds like a longshot, but it's the best line this team is able to put together against the terror that is a lead Poison Heal Breloom4, and in all the battles afterward I never had to put this plan to the test with any subsequent lead Brelooms.

---

THE END: MPRG-WWWW-WWWN-BF66

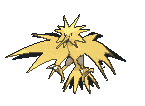
#812 vs. Buddy (Accelgor3, Greninja3, Jolteon4)

I had fought Accelgors before, usually without much fanfare. This one didn't stop the Entrainment, but rather missed a Focus Blast. If anything, that miss led to a sort of false confidence later on that contributed to the loss. Still, Charithmia normally handles these, and of course we start off with a Calm Mind: there's no point putting up a sub in front of Bug Buzz, and having set 4 put an Encore on Substitute is enormously wasteful (whereas being Encored into CM is tolerable, even if that means trying to boost beyond +6). Accelgor turns out to be set 3 though, and makes the unusual choice of immediately using U-turn on turn 3, bringing in Jolteon.

Jolteon is another foe who hasn't seemed all that threatening; even Charithmia has set up in its face many times. But that's with the benefit of Truant, instead of just a +1 head start. Still, I figured that maybe it would go for Yawn, and being able to set up to +2 and +3 in that time would help weather an oncoming storm of Thunder; if nothing else I still had the other two in reserve. Instead, Jolteon went for a true rarity in Z-Fake Tears, getting a special attack boost.

From +2/+0, I guess I figured that "switching isn't losing anything". Somehow expecting another Fake Tears, I make the fateful switch...to Repentant, thinking it would be a sacrifice in two turns but losing just one would be better than two, and if Jolteon went for a stray Shadow Ball or Hyper Beam (just as Accelgor's U-turn earlier seemed to be "stray", given how much less damage it did than the other options), we would survive that. But instead it went directly for Thunderbolt and the free OHKO.

If that first Focus Blast from Accelgor had hit, I certainly wouldn't have entertained that switch, knowing that the buffer of full health to survive those stray off-type attacks wouldn't be there. In fact, either of the sweepers would have been expendable at this point, as long as it was only one of them: just by getting Repentant back in for free to make the Entrainment before Jolteon can move again, the other one would have had an easy win for the rest of the battle (the unseen third mon turned out to be a Torrent Greninja3, which is once again no big deal). The one thing that just needed to stick around until turn 6 before it could be labeled "expendable"...went away on turn 5. Even a turn-4 switch would have turned out okay, and given Jolteon3's usual move preferences the same is probably true against that too, but somehow having +1 SpD on that turn was something I deemed too much to let go of.

Soliloqueen did at least do rather admirably in an attempt to waste time, getting an evasion boost in the one crack at Acupressure. A speed boost would have been better, guaranteeing the ability to waste a bunch more PP even from -2, but evasion at least had a chance. Nevertheless, it was not to be, and Jolteon hit a Thunderbolt through +2 evasion, with four Hyper Beams and twelve Thunderbolts left.

This time Jolteon did go for the Fake Tears to get Charithmia to -2, which at least enabled a sub to go up, but it was already bleak. All we could do was hope for Jolteon to use Hyper Beam instead of Thunderbolt, so that the recharge would at least buy a free turn to claw back out of that -2 hole. But they wouldn't oblige, and the EV distribution even reared its head in at one point: with 203 HP, we would have been able to put up one extra sub, as opposed to being stuck with 49 out of 205. It was a fait accompli anyway: Jolteon still had four Thunderbolts left after breaking the last sub, all we could play for at that point was a Hyper Beam miss, and it did switch up for the finishing blow...but to Shadow Ball, which likewise lacks a miss chance.

----------


And the curtain tumbles down. Chased not by a bear, but by a spiky fox thing. Who's pretending to cry for some reason.
 
GG Unit, HeadsILoseTailsYouWin, SilverLining: I think the community would like to know how your streaks are doing! Update please?

TimG57867, I was wondering how your smeargle team deals with roar/whirlwind. Does the AI ever use it against smeargle?
The AI probably would use Roar/Whirlwind on a boosted Smeargle if it got the chance. Given this, the logical thing to do would be to go Mimikyu, Taunt and force a swap. The thing is, pretty much all Roar/Whirlwind mons are 1 and 2 set mons which means they'll vanish beyond battle 30 and generally have suboptimal IVs when you face them. The only non 1-2 phaser is Skarmory 4 and it only has defensive moves which you can exploit. It becomes even less threatening if it doesn't have Sturdy.
 
There is another niche option for dealing with Whirlwind (and perhaps Red Card), which is to make two sacrifices before bringing your sweeper in (then they won't be able to blow it away). That can leave you hamstrung in case of a bad matchup in the back, but if you're certain you can go all the way given the simple luxury of not being flung out the door repeatedly, it is an option.
 
There is another niche option for dealing with Whirlwind (and perhaps Red Card), which is to make two sacrifices before bringing your sweeper in (then they won't be able to blow it away). That can leave you hamstrung in case of a bad matchup in the back, but if you're certain you can go all the way given the simple luxury of not being flung out the door repeatedly, it is an option.
Not sure how it would be considered a niche thing when the best Truant teams in every game since it was introduced have used Durant + a utility Pokemon and sacrificed both if necessary to ensure set-up; Taunt is also on every single one of these teams for a reason, but it's no guarantee that the Taunt user(s) will always be on the field or healthy enough to switch in when need be.

A second sweeper adds little marginal value over the first and, as your replays show, makes the team weaker to relatively common leads that bother Durant such as Poison Heal Breloom and anything with Protect + Thunderbolt, where a paralysis and/or crit on turn 2 results in an almost assured loss barring Drapion pulling off some lucky Acupressure boosts. Those types of leads seem more like '2-3 times every 100 battles' sort of threats to me rather than 0 in 800+, but I suppose there's a lot of variance in luck across each run.

As for Throat Chop vs. Knock Off, the non-existent Roar doesn't earn Throat Chop any points. Against Drampa it seems a lot more winnable to me for Drapion to first get rid of the Quick Claw so you can sacrifice Suicune (or if it's the lead, switch in Suicune, try to set up and if you can't then bring in Drapion after Suicune's KOed) and then get the Entrainment off safely. Primarina seems like something Suicune should handle easily on its own, or it would at least be a simple pivot to switch to Suicune and bring Durant in on Dazzling Gleam. I can't think of any other relevant voice move users, and if the doing more damage over repeated hits aspect is such an important plus this generation, it seems strange to not prefer Crunch's constant 20% defense drop over the very limited Throat Chop applications.

When it comes to things that require multiple hits to take down, it takes 3 hits for Throat Chop/Crunch to have more BP than Knock Off against a foe with an item. If something takes 3 or more hits, that means you probably have no attack boosts against a bulky Mega or Dark resist and will be relying on your other boosts regardless of the attack you're actually using. At +0, Throat Chop is a guaranteed 4HKO against Mega Salamence and Knock Off is a 40% 4HKO; that seems like a scant enough increase in damage (especially because if you're 1 on 1 against that, either you don't have Defense/Evasion boosts and Drapion's losing either way or you do and Drapion can continue to set up either way) for the item debuff/set identification aspect of Knock Off to really shine through.
 
Last edited:
I haven't updated because I'm on a hiatus, I haven't even reached 1100 yet. GG Unit was (until late january) fairly active on Discord, and last we heard of him he was in the 1700s. Silverlining is the kind of streak that's dubious, and he probably only posted for the attention and I doubt he'll come back to the streak.
I posted about my streak because I was excited back then about having a streak that was growing, and it is absolutely true now that I won't go back to it. Reaching 1000 was my personal goal with it, and I feel extremely lucky to have reached that number with that team, especially given its poor matchups against certain threats (e.g. Dragon Dance). Perhaps posting so hastily about the team was my own shortcoming, as I didn't give much evidence other than a picture about it, and certainly that detracts from my credibility, which lumps me in with the others who have posted here and subsequently left the thread for "greener pastures," so to speak, or at least places less Tree-like. For now, I don't have any motivation to pick up and continue with that team, since I don't wish to reach 2000 or anything so extravagant like that, so I haven't had much reason to post (and I haven't even been playing Pokemon that much for now, though hopefully that will change soon enough what with the Switch game seeming imminent). That said, my streak could feasibly be labeled as complete, though in truth it is an abandoned run.

I hope to re-enter these threads in a more serious manner (certainly one that is more than just posting a few times and then leaving because I forgot that this thread contains so much valuable information about in-game battle facilities, not to mention people who are so passionate about discussing everything battle-facility-related) once I've found more motivation to begin anew and make a team or two. Despite my inactivity in the Tree, perhaps I'll try to contribute a little more here (though if I want to do that, I have a lot of reading to do in order to fully catch up with what everyone has been doing here). Maybe I'll even find the motivation for a new streak before the Switch game comes out…
 
Perhaps posting so hastily about the team was my own shortcoming, as I didn't give much evidence other than a picture about it, and certainly that detracts from my credibility, which lumps me in with the others who have posted here and subsequently left the thread for "greener pastures," so to speak, or at least places less Tree-like.
No, it wasn't a lack of detail per se. When R Inanimate posted his team, he didn't go into great detail about why his Salamence had a lot of HP/Special Defense EVs rather than Attack and Speed; it was pretty intuitive that speed wasn't necessary due to Thunder Wave support and the special bulk was for Mence's substitute to withstand certain neutral attacks from special attackers that had their stats reduced from Parting Shot. Even without looking at his words ("Wide Lens is crucial for comfort for using this team. While there is still that 1% chance I can miss with Thunder Wave (which happened about 6 or 7 times in 450 games), it still makes Thunder Wave into a move I can rely on repeatedly, game after game.") it was pretty clear that Thunder Wave was the most important element of his crippling lead as it allowed his Salamence to sacrifice speed for bulk and set up against special attackers more often than the typical Salamence would have.

I thought at the time the streak was on the high end of what one could expect with such a team since in addition to the issues with VoltTurn/Explosion type of stuff that any crippling team has, its strategy relied on switching the main set-up sweeper directly into attacks, which will eventually go badly with a crit or status. A year and a half later this seems true given nobody's gotten higher with a Silvally crippling team in the year and a half since then, despite people having more time to theorymon a better Silvally spread, try it over multiple streaks, and so on. However, you allegedly got a streak over twice as long (which by any understanding of probability is obviously more than twice as rare or "lucky") with the Aegislash and Salamence sets copypasted from that team but no crippling lead with Thunder Wave - that was kind of the whole point of the team!

That was a pretty major red flag made more glaring by you hand-waving it with something along the lines of 'Porygon2 is a beast and 3-0s most battles by Toxic stalling.' Anyone who's used an AegiMence team knows that those two already 3-0 most battles and just run into issues against a few specific Pokemon, and Toxic stalling a lead that isn't one of those few specific Pokemon only increases the likelihood of encountering one of those threats without a set-up Mega Salamence, which is basically the only way a team with Aegislash and Salamence can lose in the first place. Not only that, but you bypassed the much more useful defensive ability in Trace in favor of Download on a Pokemon that had uninvested non-STAB Ice Beam as its only attack.

There's no need to shift the goalposts and act as though people were demanding hundreds of battle videos/warstories and a novel about your team. I asked a pretty straightforward question right after you claimed 1000 straight wins, which was how the team would handle a Charizard lead when you're not sure which set it is, and that led to this change in tone from "long story short Aegislash + Salamence + Normal type definitely works! Hopefully I run into Anabel soon" to "don't use my team it was extremely lucky and I'm not using it anymore" without even responding to any of the issues I raised.
 
Last edited:
↑ True; further apologies.

To finally answer the Charizard question (which yes, I should have responded to that a long time ago), my plan was always to start with Toxic, which already was placing my streak in jeopardy (considering Toxic's 90 accuracy). If I faced Charizard Y, it had a strong tendency to use Solar Beam rather than Focus Blast (or even Heat Wave), which allowed Porygon2 time to use Confide. If it was Charizard X instead, I would have Porygon2 survive as long as possible until it fainted, letting recoil and Toxic damage build up, where Charizard would faint at the same time as Porygon2, or the turn after (which was stalled by Aegislash). Clearly this left me in a bad spot, as I was down to two not-set-up Pokemon and a King's Shield turn just used up. As it was, I knew Charizard was the likeliest of ways that the streak was going to end, and me saying that I was extremely lucky mostly referred to not running into Charizard very often at all, lead or otherwise. Charizard X did appear when I battled Red, but it used Dragon Dance instead of an attacking move when it was down to its last attack. There were a few other instances of Charizard appearing, but some of them were the Y situation, which was more favorable. I say all these things about my battles against Charizard and I have no way of backing myself up because I don't have videos of them, and I'm not sure I'd be able to upload them at this point even if I did have them.

Of course, posting about it at the beginning was celebratory and attention-seeking because I had reached 1000 wins in a row. I will still claim now that I consistently had good luck in terms of who I faced, as there were surprisingly few battles where Dragon Dance users led (or any other threat came up), but of course, I can't back that up either. I threw the team together not expecting to get anywhere near 1000 (despite it being a goal to reach quadruple digits; it wasn't my intention to reach 1000 with this team), and I had previously attempted a streak with R Inanimate's team with its listed EVs, so I used those because I hadn't bothered to do any calculations that might have led me to make changes. From there, I honestly didn't create strategies against opponents (other than Dragon Dance users once it began clear that they were going to be an issue); rather, I just tried to have Porygon2 use Toxic and Recover against as many things as it could, and use Salamence and Aegislash as necessary.

At this point, I don't think I can offer much more in terms of information about the streak or its legitimacy. I apologize for seeming shifty about the streak in general (especially to GG Unit). I'm not sure what more can be gained by talking about my streak other than how unlikely it is to be in existence at all. I certainly realize that the streak is suspicious because of its length and the seemingly random EV spreads blatantly stolen from a different user. I can try to answer other questions if there are any.
 

Users Who Are Viewing This Thread (Users: 1, Guests: 7)

Top