
-
Check out the relaunch of our general collection, with classic designs and new ones by our very own Pissog!
-
Welcome to Smogon! Take a moment to read the Introduction to Smogon for a run-down on everything Smogon, and make sure you take some time to read the global rules.
You are using an out of date browser. It may not display this or other websites correctly.
You should upgrade or use an alternative browser.
You should upgrade or use an alternative browser.
Battle Tree Discussion and Records
- Thread starter Eisenherz
- Start date


Are you sure? I thought female parents determine only the species but cant pass egg moves, which means that after breeding with Lombre there will be no Water Spout on that baby? Or did the breeding mechanics change on that?
Yeah, I'm very sure, female parents not only pass egg moves, but they also get priority if the male and female parent have more than 4 possible egg moves together. I think this might have been added in Gen 6? That's when I started breeding stuff so I'm not entirely sure on the pre-Gen 6 mechanics though...!
That got changed a few gens ago :)Are you sure? I thought female parents determine only the species but cant pass egg moves, which means that after breeding with Lombre there will be no Water Spout on that baby? Or did the breeding mechanics change on that?
Right now, Male parents can pass about everything (egg moves, hidden ability, pokeball) except their species (except with Ditto, obv).


Males can only pass HA if it's with Ditto, just like species. Poke Ball type is slightly more liberating: they can do that if it's with Ditto or if both parents are the exact same species. This is a strict check; NidoranM and NidoranF are not considered "the same species" which, for one thing, makes it impossible to have HA Nidoran in an apricorn ball (each parent would need to pass down one of those traits, but the father cannot be eligible to pass down either of them).


Update to the USUM Battle Tree Informant:
edit: fixed a bug with the color formatting soon after this post, if you copied it and the color functionality wasn't working try making a new copy
- Fixed a bug where Alolan Golem-2 was listed as having a Speed of 97, when it actually has 106
- Fixed a bug where the abilities of certain Pokemon (Oricorio, Minior, etc.) didn't show
- Fixed a bug where selecting "All" and "Oricorio" would give a message saying that "All" cannot have Oricorio
- Renamed the nameless Oricorio form to "Oricorio (Baile Style)"
- Added a function to let users select what moves and items to highlight in red or orange; use the "Color Warning Settings" tab to add and delete things from these lists
- Added a "last updated" counter so you can see how long it's been since I last bothered updating this thing
edit: fixed a bug with the color formatting soon after this post, if you copied it and the color functionality wasn't working try making a new copy
Last edited:
The customizable Warn Settings list has now been merged into mine too. It also now masks out forms properly if you choose to specify a form along with the species (for example, All/Oricorio will display all four variants, but All/Oricorio-Baile or Oricorio-Fire will only show the fourth one).
BLIZZSPOUT
Submitting a completed streak of 329 in Ultra Moon Super Doubles with a team of Musharna / Alolan Golem / Octillery / Mega Abomasnow (QR team).
HISTORY & TEAMBUILDING
Just like DrifLele, this was a team I used on the side, in Ultra Moon, while my rain streak was ongoing in Ultra Sun. And just like DrifLele, it was very much inspired by a VGC team; however, this time, I didn't try to emulate someone else's team, but rather my own!
It started when I was breeding and training Pokémon for my competitive dex project, in which I plan on having a competitive version of each Pokémon. When Alolan Golem's time came, I was looking into its options for a Doubles set; I knew Galvanize Explosion was probably the best thing it had to offer, but wasn't sure on how to take full advantage of it. Explosion obviously pairs best with either a Ground type, or a Telepathy user, which points at having a Trick Room setter by its side. I'll go into the whole set in the team details below, but what came out of that process was a "dedicated Trick Room suicide lead", which I thought sounded good in theory, but also super silly. I assumed it probably was just a theorymon spur that would fail once it hit the field for some reason I hadn't considered. But that was the best niche I could find for it, so I bred and trained it anyway, added it to my collection and... left it in a box for a while, forgetting about it.
A few months later, as I started building a VGC18 Trick Room team built around Mega Abomasnow, I wanted Musharna as my setter since I really enjoyed its Z-Trick Room+Hypnosis set (I already used it on other teams that season), and as I was wondering how I could take full advantage of Telepathy with the team, I suddenly remembered Golem's existence in my boxes, and how it ended up going untested. "The time has come to unleash the Alolem!". The rest of the team came together pretty easily since I already had a rough idea of what I wanted on it (basically, a bunch of my favourite TR abusers at the time), and thus the final team was this:


This is probably the very last VGC 2018 team I built, late into the season. It started as a bit of a meme, but as I successfully laddered with it, I became really fond of its options, and the fact it actually worked decently well made me really happy. I believe it peaked somewhere in the mid/high-1600s on Showdown, which is definitely better than I had anticipated.
In late September, when the VGC season was decidedly over, I decided this team's legacy should live on, and I undertook the project of adapting it for Tree. I found picking a core of 4 out of these 6 to be extremely difficult. Incineroar was more of a supportive outsider to the rest, so it was clear it could be left out, but the other five felt really necessary. The Golem lead is what the whole thing was built upon, so even though I wasn't sure it would hold up in Tree, I definitely wanted to give it a try. Mega Abomasnow being the centrepiece of the backline, that was pretty much a no-brainer as well, leaving me with the extra tough call of Primarina vs. Mudsdale. From experience, Primarina complimented Abomasnow a bit better, and one of my favourite things about that combo was the double-spread move spam of Blizzard + Hyper Voice (this was Specs Primarina, mind you), so I defaulted to Primarina. Battles 1-50 were played with this team:
I had no idea whether it would find any success in Tree, especially with this wild lead, so I was surprised when I handily reached 50 on the first run. Figuring it had some actual potential, I looked at 2 things that felt shaky from my first impressions:
I started to look at other options, but nothing seemed like it could fit a similar role and do it better. What I wanted was something that could spam a strong spread move, complimented Abomasnow's typing defensively (which meant handling Fire-types), but could also deal with Steel-types like Ferrothorn and Escavalier. As I browsed the Pokédex, my hopes were low and I thought I would end up sticking to Primarina, but when I searched for Pokémon that learn Water Spout, Octillery showed up, a Pokémon I hadn't remotely thought of. Looking at its dex page was like a revelation. Low speed? Check. Spread move? Water Spout. Can take on Fire types? Check. Can take on Ferrothorn and Escavalier? Learns Flamethrower (!!). Powerful enough to score OHKOs? To my surprise: check! Did you know it has base 105 SpAtk? I sure didn't! Clearly that's not Primarina's 126, but the extra power of Water Spout made up for that. Moreover, the aggressive nature of the team meant Octillery would be provided with a free switch when Trick Room goes up, which is a big help in preserving HP. The one downside that scared me was my own hail chip damage weakening Water Spout over time, but since my goal was to sweep in just a few turns, hopefully this wasn't going to be a huge deal. More than anything, I was very excited that the Pokémon that best fit the criteria I had placed ended up being an unconventional Johto Pokémon that gets forgotten a lot!

Looking at Octillery's movepool is also when I decided Musharna should have Gravity as its last support move, since it enabled Hydro Pump (I was worried about the lack of damage once Water Spout was weakened) and Fire Blast, but also allowed me to have Focus Blast on Abomasnow, which would definitely be a big help in facing Steels - not to mention Golem's Rock Slides at the front! And thus, from battle 51, the team was complete!
THE TEAM
 @ Psychium Z

Relaxed | Telepathy
IVs: 31/0/31/31/31/0
EVs: 220 HP / 252 Def / 36 SpDef
Trick Room / Psychic / Gravity / Helping Hand
Musharna's base role is pretty straightforward, it's one of the best Trick Room setters available thanks to its very low speed tier, amazing bulk and wide array of support moves, not to mention that with 107 base SpAtk, it can deal decent damage even without any investment. Trick Room, Psychic and Helping Hand were non-negotiable moves which set the foundation on which the team was built. After setting Trick Room with the assistance of Golem, it can either go on the offensive, or, more commonly, boost the damage of its partner's spread move with HH.
But why Psychium Z? Isn't a Lum Berry a better item in Tree to offer an additional shield against the prominence of status moves? I generally do believe it is, but I also wanted to give Psychium Z a try since I had been a huge fan of the item in VGC. It allows Musharna to bypass Taunt by going for Z-Trick Room, which also boosts its accuracy by one stage. This enabled a more reliable Hypnosis, which I originally had as the last move. If for some reason I ended up using a regular Trick Room, it gave the option for Shattered Psyche instead, which is an option I initially severely underrated. When you're under pressure to sweep as quickly as possible within 4 turns of Trick Room, having the setter be a really good damage dealer for a turn is pretty amazing. That's, ultimately, why I decided to stick to that item even after I replaced Hypnosis with Gravity on battle 51, after Octillery's entry on the team.
Thanks to Golem's Ally Switch assistance, Thunder Wave was not much of an issue on turn 1, and that was a huge factor in deciding to forego the Lum Berry - especially with the pseudo-Mental Herb that the Psychium Z provided - I figured that it was kind of a "best of both worlds".
The EVs ensure Musharna lives as much stuff as possible to set Trick Room reliably. As a matter of fact, the list of Pokémon that can OHKO Musharna in Tree with this spread is incredibly small: 8 in total, of which 3 need max rolls, and 1 is Mega Heracross picking Pin Missile (which it doesn't, because the AI doesn't recognize the damage of multi-hitting moves properly). More specifically, the spread ensures Vikavolt4's Bug Buzz never OHKOs, while leaving Escavalier4 only a 6% chance to OHKO with Megahorn (I would rather guarantee survival on Vikavolt than Escavalier, since the latter could be Escavalier3, which has a very guaranteed OHKO with Megahorn anyway).
 @ Focus Sash

Brave | Galvanize
IVs: 31/31/31/31/31/0
EVs: 252 HP / 252 Atk / 4 SpDef
Rock Slide / Explosion / Wide Guard / Ally Switch
I'm a huge fan of Alolan Golem's design, and I was really looking forward to finding a way to utilize it in battle. I think this "suicide lead" role is perfect, since it offers really good tools to help to setup Trick Room, almost like a Fake Out user would, but it also provides a ton of offensive pressure, like my Exploding Silvally did on my MimiLax team, and most importantly, a valuable free switch into one of the backline sweepers.
First off, Galvanize Explosion's damage output is absolutely insane, especially when Helping Hand-boosted (yes, those all take into account spread damage):
252+ Atk Galvanize Golem-Alola Helping Hand Explosion vs. 252 HP / 0+ Def Cresselia: 234-276 (103 - 121.5%) -- guaranteed OHKO
252+ Atk Galvanize Golem-Alola Helping Hand Explosion vs. 252 HP / 252+ Def Umbreon: 202-238 (100 - 117.8%) -- guaranteed OHKO
252+ Atk Galvanize Golem-Alola Helping Hand Explosion vs. 252 HP / 0 Def Shiinotic: 179-211 (107.1 - 126.3%) -- guaranteed OHKO
252+ Atk Galvanize Golem-Alola Helping Hand Explosion vs. 0 HP / 252+ Def Audino-Mega: 184-217 (103.3 - 121.9%) -- guaranteed OHKO
The list goes on; and the best part is, since most leads you'll face are not such bulky Pokémon, Helping Hand is often unnecessary to score a double-OHKO, which means it's a free turn to setup Gravity!
Rock Slide is a really good option as well, since A-Golem sometimes has good matchups and isn't threatened, and it'd be a shame to let that go to waste by just going BOOM every time. Thus, when the lead can be handled by Rock Slide, or even one of the leads, delaying by a turn or 2 can mean the Explosion will either clean up their backline instead of their frontline, or bring the opponent down to a single Pokémon. A Rock move is also the perfect tool to remove the pesky Fire-types Abomasnow hates if I envision going Abomasnow over Octillery after the free switch. I favour Rock Slide over Stone Edge because 1. It doesn't *require* Gravity, so I can go for it semi-safely turn 1 if I need to, 2. It's a spread move, perfect to accumulate chip damage/break a sash while scoring a KO on the side and 3.Sorry, I couldn't resist D:
The 2 other moves are what make Golem such a great Trick Room-lead partner. I have gushed over how amazing Wide Guard is already in my rain team reports, but Golem takes its usefulness to the next level thanks to its 4x weakness to Ground. About every Pokémon with Earthquake in Tree will reliably go for it, making Wide Guard a pretty safe pick against the Garchomps & co. of the Tree, and also drawing all the attention away from Musharna while at it. The best part? The AI was often baited into picking Earthquake even if it damaged their partner heavily - in one instance, an opposing Garchomp3 swept its entire team with Earthquake, while I joyfully watched with popcorn (since I'm a nice guy, I set Gravity for him too)! Of course, looking up sets is not optional in order to make the best use of Wide Guard on turn 1. Thanks to the Focus Sash, in case of doubt, picking Wide Guard was also just a very safe move "just in case"; this is especially true when a Blizzard is susceptible to be coming, since without a Lum Berry, Musharna is vulnerable to a freeze.
Ally Switch is another of Golem's tools to ensure Trick Room reliably goes up. Not only is this with the idea of letting Golem tank attacks aimed at Musharna, but it worked both ways pretty well, since Golem's weakness to Fighting meant Musharna could tank plenty of these. There is obviously a certain gambling factor to Ally Switching, since the AI isn't always consistent in what moves it goes for, but there were plenty of occasions where the move had very small odds of a drawback. For example, some of the most threatening Pokémon leads that Musharna hate, such as Escavalier and Mega Sharpedo, are perfect to Ally Switch around. Just like in the case of Wide Guard, looking up sets makes a big difference in using Ally Switch properly.
I found that between the Focus Sash, Wide Guard, Ally Switch, Golem's typing, Musharna's bulk and the Psychium Z to bypass Taunt, this was one of the best toolboxes I could wish for to reliably setup Trick Room on turn 1 (or 2), and while the success rate is never 100%, it was close enough. And of course, as soon as that's done, Golem shows off its other role, as a damage dealer, and that damage never ceased to amazing me through the streak! Granted, there were some games where in ensuring Trick Room goes up, Golem sacrificed himself and no damage was dealt, but that's the idea of a suicide lead: its primary role is ensuring Trick Room, and the Explosion is the cherry on top.
 @ Mystic Water

Quiet | Sniper
IVs: 31/0/31/31/31/0
EVs: 252 HP / 252 SpAtk / 4 SpDef
Water Spout / Hydro Pump / Fire Blast / Energy Ball
While the backline was initially built around Mega Abomasnow, I will admit that Primarina/Octillery quickly became my favourite initial switch-in after Golem's Explosion. Mega Abomasnow is cool and all, but Blizzard really doesn't hit that hard, and Ice is more difficult to reliably spam than Water. Moreover, Abomasnow being in the back provided a perfect switch-in if Octillery found itself threatened by Grass- or Electric-Moves.
When I switched from Primarina to Octillery, it was very important to me to preserve the damage output Specs Primarina offered, yet, using Specs Octillery was out of the question, because 1. One of the main reasons for the switch was the access to a Fire-move, which locking myself into sounded terrible and 2. After taking damage, being locked into Water Spout was a liability, especially when I had a secondary Water move precisely for that. I figured achieving Primarina's damage output without the Specs may be too much to ask from Octillery, but it turns out it really wasn't:
252+ SpA Choice Specs Liquid Voice Primarina Helping Hand Hyper Voice vs. 0 HP / 0 SpD Garchomp: 159-187 (86.8 - 102.1%) -- 18.8% chance to OHKO
252+ SpA Mystic Water Octillery Helping Hand Water Spout (150 BP) vs. 0 HP / 0 SpD Garchomp: 186-220 (101.6 - 120.2%) -- guaranteed OHKO
With the help of Mystic Water, Octillery's damage is actually significantly higher. Since Water Spout was this Pokémon's main purpose on the team, boosting that move specifically was good enough for me; in any case, a Life Orb would have obviously been counterproductive. While its bulk is definitely underwhelming, Octillery's damage output was all but disappointing. Water Spout exceeded my expectations by a mile. Hydro Pump is the single-target alternative of the move, and allows for basically the same damage when Octillery's HP is down (252+ SpA Mystic Water Octillery Helping Hand Hydro Pump vs. 0 HP / 0 SpD Garchomp: 183-216 (100 - 118%) -- guaranteed OHKO), though it does have the downside of requiring Gravity. It felt great to use something better than Scald on a Water-type for once, something one can rarely afford.
Fire Blast is also part of the reason Octillery took over Primarina's spot on the team; I figured that since I had Gravity, I might as well go all-in and add that extra power over Flamethrower. Its main purpose is to deal with Ferrothorn and Escavalier, but it was also handy against Grass types in general.
Finally, the last moveslot should usually have been Protect, but I took a page out of ReptoAbysmal's book and went 4 attacks, taking the gamble that I was actually going to successfully sweep during Trick Room and wouldn't need to reposition too often. I figured the team played aggressively enough to try it out. I can't say the experiment entirely convinced me of one thing or the other; I definitely appreciated the extra coverage, and it contributed to Octillery's success without a doubt. At the same time, there were definitely plenty of occasions where I wish I had Protect, especially with Octillery's poor bulk. Most bad positions gave me the option to either sacrifice it or switch; if the switch was unsafe, it forced my hand, and Octillery got sacrificed more often than I would have liked.
Nonetheless, it mostly worked out, and the extra coverage did feel essential at times. The choice was between Ice Beam and Energy Ball; one could argue Abomasnow covered for both of these with its STABs, so none were necessary, but the way the team worked, Abomasnow+Octillery being together on the board was very uncommon, and Musharna was usually Octillery's partner. With Ice Beam, this combo was walled pretty hard by opposing Water-types, while using Energy Ball meant Dragon-types "walled" Octillery (Water Spout did significant amounts, still). I had to pick the lesser evil, and from what little experience I had with the team, being walled by Water-types was the most frustrating of the two, so I went with Energy Ball, and it did prove itself very useful.
Overall, I was delighted with Octillery's contribution to the team; it ended up outshining Mega Abomasnow as far as damage goes!
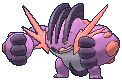
 @ Abomasite

IVs: 31/31/31/31/31/0
Quiet | Snow Warning -> Snow Warning
EVs: 252 HP / 220 SpAtk / 36 SpDef
Blizzard / Energy Ball / Focus Blast / Protect
Surprisingly, I think the best thing I would have to say about Mega Abomasnow is that its bulk is way underrated. It kept living hits that I didn't anticipate, especially Fighting and Rock moves. Those survivals were sometimes really big; in about every game where Trick Room expired and I was in a bad spot, Abomasnow was the one who clutched it out for me (and he almost did in the loss again). For that, and also because its typing complimented Octillery really well, I won't question its contribution, but it definitely was not what I was anticipating on the offensive spectrum.
Blizzard is usually pictured as the strongest Ice move, probably in part because like Thunder or Hydro Pump, its accuracy is a tradeoff for the additional power; with Hail (or Gravity) fixing the accuracy problem, surely spamming Blizzard must be amazing? Well, in Doubles, spread damage comes into play... did you know Blizzard actually does significantly less damage than Ice Beam?
220+ SpA Abomasnow-Mega Blizzard vs. 0 HP / 0 SpD Latios: 140-168 (90.3 - 108.3%) -- 50% chance to OHKO
220+ SpA Abomasnow-Mega Ice Beam vs. 0 HP / 0 SpD Latios: 156-186 (100.6 - 120%) -- guaranteed OHKO
Even though I knew about it, I still had this preconception that spamming Blizzard would be pretty good, and I was disappointed. It didn't help that I was used to using "this team" (close enough, anyway) in VGC, where Ice moves are a lot more valuable generally than they are in Tree (probably because what you encounter here is more evenly distributed typing-wise). So rather than sweeping with Blizzard as envisioned, I often tried to put things in range with Musharna and Octillery to use it as the "finishing blow" at the end.
Otherwise, Energy Ball was reliable damage; I preferred it over Wood Hammer because I was investing fully in SpAtk anyway, and the recoil was undesirable, as it basically meant mitigating Mega Abomasnow's best selling point, its bulk. This was also my only reliable way of breaking through full Water teams (Octillery's Energy Ball prevents it from being walled, but it doesn't score OHKOs!). Thankfully, Abomasnow also walled most of these teams defensively to a degree.
Focus Blast was originally Ice Shard, but with the addition of Gravity, I wasn't going to pass on this occasion to stop being walled by Steel types. As a matter of fact, I think I used Focus Blast as often as both of Abomasnow's STABs, it was just the right coverage for the team, and the move's base power made it feel like more than just coverage. Definitely, there were times where I missed Ice Shard dearly (like in that losing battle), but unlike on Octillery, I don't think Abomasnow could afford to not have Protect; having the entire team Protect-less would have made it susceptible to falling apart extremely quickly (this was already a bit of a problem because of Octillery). Abomasnow was also good at baiting moves due to its typing, not only through that 4x weakness, but also the fact Fighting moves are very common among Tree sets.
The EVs allow Mega Abomasnow to live a Focus Blast from Mega Ampharos, while having a guaranteed OHKO on Mega Slowbro with Energy Ball (a big deal for this team, since it could reset Trick Room). More generally, 220 is a pretty good SpAtk number since it hits a jump point.
THE LOSS // 330 vs. POKÉMON TRAINER WALLY (TXKW-WWWW-WWX3-6XWM)
This entire battle basically consisted of me trying to greedily dance around Altaria4, unsuccessfully. It highlights a very serious problem with the team: sleep. While Golem helps Musharna avoid Paralysis issues, I have no means of preventing or helping the case of sleep. Due to the very aggressive nature of the team, it also doesn't offer a lot of opportunities to break the mold of "Set TR -> Explode -> Sweep" by switching around. However, sleep isn't very common and comes in very specific forms: Spore through Amoonguss and Shiinotic and Hypnosis through Crobat, all of which the team can pretty reliably handle generally (especially Abomasnow and Musharna), Yawn, which as annoying as it is, can be played around, and Altaria4's Sing. In Altaria's case, Mega Abomasnow and Golem can both OHKO, but trying to play around Sing means potential gambles. The battle was winnable, but the fact the team has no reliable answer to sleep is also undeniable, and something I would try to work around if I was to build another team featuring this lead. I found what Psychium Z brought to the table too important to discard it, so I would try to find a solution involving the backline. In any case, here we go...
TURN 1:
vs.


From the get-go, I basically hoped that Altaria was either not set 4, or wasn't going to Sing, or would miss if it did. In front of Gallade, my obvious play was to Ally Switch since no matter what it went for, changing positions meant it was going to do negligible damage (I was particularly concerned of a crit X-Scissor on Musharna, though it only does 63% so I didn't have to be overly concerned about it). I was obviously aware that Sing was a threat, but since I had no way of predicting what slot it would go into, I figured ignoring it was probably the best I could do, and then take it from there. My Ally Switch, on that turn, proved lucky; Golem did absorb the X-Scissor, and Altaria4 went for Sing in the Musharna slot, which meant I got my Trick Room up safely, though I now had a sleepy Golem on the field.
Even though this kind of worked out, in hindsight, the right play was to Trick Room and Explode. Whatever damage Gallade went for, it couldn't OHKO Musharna, and allowing Golem to take a Close Combat from Mega Gallade wasn't that bad thanks to the sash. If potential Altaria4 Sang into Musharna's slot, Golem was guaranteed to score a double-KO, and I had decent odds of dancing around Wally's backline with my other 3, even with Musharna asleep. If Altaria Sang into Golem's slot, it meant I got Trick Room up as I did here, which is not a terrible position.
TURN 2:
vs.
With Trick Room up and Golem asleep, my position was a bit awkward. I figured going Abomasnow in front of Gallade was unsafe (basically forgetting that Gallade3 has no Fighting STAB and that the worst that could go into that slot was Psycho Cut), so I attempted to sacrifice Golem for a free switch into Abomasnow. In the meantime, I used my Z-move on Gallade to put it in range of any attack on the next turn (the Z-move was handy there, since Psychic isn't a 2HKO!). Gallade X-Scissors Musharna for a reasonable chunk.
I hindsight, the switch to Abomasnow was relatively safe and very desirable, especially since Altaria was guaranteed not to Sing that slot, and was very likely to go for Dream Eater into it. This turn is my biggest regret of the battle.
TURN 3:
vs.
As expected, Altaria ate Golem's dream (I wonder what Alolan Golem dreams of), but it doesn't do much, and I didn't get my free switch. This turn, I decide to be proactive since Musharna was about to take Gallade out, and I go for the Abomasnow switch on the next expected Dream Eater. This was the right play, but one turn too late. Now that I made the switch on the same turn as Wally got a free switch, he obviously gets initiative, and forces out Abomasnow...
TURN 4:
 vs.
vs.

Seeing Magnezone was obviously bad news. Knowing Wally's usual roster, I figured Abomasnow was extremely important, since the last was likely to be Garchomp, so I didn't want to lose it. If Magnezone was Magnezone4 and had Analytic, it had a 56% chance to OHKO with Flash Cannon (admittedly I didn't calc at the time, and assumed this would always KO), which I didn't want to let happen. Seeing the end of Trick Room coming, if I protected Abomasnow this turn, I couldn't protect again on the following turn as I reset Trick Room, so I switched right back to Golem, which was expandable at that point. I went for Psychic into Magnezone to get some prior damage, which was potentially going to be nice for a future Focus Blast. One of my concerns was that I couldn't Gravity unless Altaria was out of the way, otherwise I was just basically ensuring its Sings would hit. Psychic did decent damage, but unfortunately, Magnezone was set 3 and wanted to spread that yellow color... Meanwhile, Altaria tries to Sing Abomasnow and obviously fails on the incoming Golem, which is excellent Dream Eater bait for the next turn.
TURN 5:
vs.
Last turn of Trick Room, and at this point, I just want to sacrifice Golem and get a fresh Trick Room up next turn. I "randomly" go for Psychic into Altaria (not a good call, should have gone into Magnezone to put it in range of Blizzard since I got a SpDef drop on my first Psychic - this comes into play later). Golem is successfully sacrificed (a first turn wake would have been amazing, but oh well), doubled up with Dream Eater and Flash Cannon. Trick Room is over.
TURN 6:
vs.
This turn, my obvious play is Protect + Trick Room. Unfortunately, the yellow magic does its thing and this leaves me in a really awkward spot. Altaria goes for Cotton Guard, which is pretty irrelevant. At least, I know where the Sing will go next turn...
TURN 7:
vs.
Knowing Abomasnow is most likely my winning condition at this point, I switch to Octillery to sacrifice it if need be. It does get Sung, so that was the right call... however, Magnezone goes for Thunder into Musharna and gets the KO. No new Trick Room, and now things are entirely falling apart.
TURN 8:
vs.
Desperate times call for desperate measures; time to go all-in and attack with both, since I don't see any possible advantage in protecting Abomasnow this turn; if anything, Altaria is likely to be baited to Dream Eater Octillery, which would prevent Abomasnow from going to sleep. If Magnezone Flash Cannons, Abomasnow survives, and maybe Octillery can contribute next turn...?
The AI doubles up on Octillery with Dream Eater and Thunder, so it obviously goes down, but Blizzard finally KOs Altaria and brings Magnezone very low, potentially even in range of another turn of hail (not convinced on that, but it's extremely close). This is where I bitterly regret not going for Psychic into Magnezone earlier; it would have meant a double-KO here, and most likely a win, even after all this mess!
TURN 9:
vs.

Just as I thought, Garchomp was in the back. At this point, I have a 50/50: if this is Garchomp3, it will go for Fire Fang or Outrage, and Abomasnow can survive any of the 2 and OHKO with Blizzard. However, I won't survive a double-up from Garchomp and Magnezone. If it's Garchomp4, I'm thinking it might go for Stone Edge, which also KOs in combination with Flash Cannon, but can miss. It could also set sand, in which case going for Blizzard right now wins if it hits. If it's Garchomp3, I lose nothing by going for Protect, and gain everything if Magnezone is indeed in range of Hail; in that case, my win is basically guaranteed barring a Fire Fang flinch or crit. I decide that my odds are slightly more favourable with that option, so I take it and Protect.
TURN 10:
vs.

However, it's Garchomp4, and it goes for Sandstorm, which means I don't even get to find whether Magnezone was in range of hail. At this point, I can still hope for a Stone Edge miss, so I think all in all, Protect still gave me the slightly better odds in that "50/50". But Stone Edge connects, and Flash Cannon finishes me off, and that's the end of the streak.
There are obviously many regrets to have about that battle, but many of these calls were difficult to make on the spot - in hindsight, things are a lot clearer, which definitely means this will have been a learning experience; I find that I improve my play the most when I take the time to look at what I did wrong in detail, and losses are unfortunately the best occasion for that to happen...!
CONCLUSION
Ultimately, I'm still stoked about taking Octillery & co. above 300. But most importantly, I feel like this team will leave a lasting impact on future Trick Room Tree teams I'll be running, because I think the Musharna-Golem lead was fantastic, to the point where it felt as powerful as FEAR; I had fun Pokémon in the back, but I would imagine that with some of the best TR sweepers instead, there's a ton of potential in store for this duo. In particular, Psychium Z felt like it opened up Musharna's options a lot more. I used it in almost every single game. This makes me very excited for some future teams, and this is definitely not the last you'll see of it!

This concludes post #3 of my series! I was also planning on posting 2 team reports in this one, and once again, things are a lot longer than expected so you can now count on a total of... 6 posts?
Until the next one, thanks a lot for reading!
Submitting a completed streak of 329 in Ultra Moon Super Doubles with a team of Musharna / Alolan Golem / Octillery / Mega Abomasnow (QR team).
HISTORY & TEAMBUILDING
Just like DrifLele, this was a team I used on the side, in Ultra Moon, while my rain streak was ongoing in Ultra Sun. And just like DrifLele, it was very much inspired by a VGC team; however, this time, I didn't try to emulate someone else's team, but rather my own!
It started when I was breeding and training Pokémon for my competitive dex project, in which I plan on having a competitive version of each Pokémon. When Alolan Golem's time came, I was looking into its options for a Doubles set; I knew Galvanize Explosion was probably the best thing it had to offer, but wasn't sure on how to take full advantage of it. Explosion obviously pairs best with either a Ground type, or a Telepathy user, which points at having a Trick Room setter by its side. I'll go into the whole set in the team details below, but what came out of that process was a "dedicated Trick Room suicide lead", which I thought sounded good in theory, but also super silly. I assumed it probably was just a theorymon spur that would fail once it hit the field for some reason I hadn't considered. But that was the best niche I could find for it, so I bred and trained it anyway, added it to my collection and... left it in a box for a while, forgetting about it.
A few months later, as I started building a VGC18 Trick Room team built around Mega Abomasnow, I wanted Musharna as my setter since I really enjoyed its Z-Trick Room+Hypnosis set (I already used it on other teams that season), and as I was wondering how I could take full advantage of Telepathy with the team, I suddenly remembered Golem's existence in my boxes, and how it ended up going untested. "The time has come to unleash the Alolem!". The rest of the team came together pretty easily since I already had a rough idea of what I wanted on it (basically, a bunch of my favourite TR abusers at the time), and thus the final team was this:
This is probably the very last VGC 2018 team I built, late into the season. It started as a bit of a meme, but as I successfully laddered with it, I became really fond of its options, and the fact it actually worked decently well made me really happy. I believe it peaked somewhere in the mid/high-1600s on Showdown, which is definitely better than I had anticipated.
In late September, when the VGC season was decidedly over, I decided this team's legacy should live on, and I undertook the project of adapting it for Tree. I found picking a core of 4 out of these 6 to be extremely difficult. Incineroar was more of a supportive outsider to the rest, so it was clear it could be left out, but the other five felt really necessary. The Golem lead is what the whole thing was built upon, so even though I wasn't sure it would hold up in Tree, I definitely wanted to give it a try. Mega Abomasnow being the centrepiece of the backline, that was pretty much a no-brainer as well, leaving me with the extra tough call of Primarina vs. Mudsdale. From experience, Primarina complimented Abomasnow a bit better, and one of my favourite things about that combo was the double-spread move spam of Blizzard + Hyper Voice (this was Specs Primarina, mind you), so I defaulted to Primarina. Battles 1-50 were played with this team:
I had no idea whether it would find any success in Tree, especially with this wild lead, so I was surprised when I handily reached 50 on the first run. Figuring it had some actual potential, I looked at 2 things that felt shaky from my first impressions:
- Primarina's speed tier : Base 60 with min speed was totally fine in VGC, but in Tree, you don't know how mediocre it is until you try it. It regularly got outsped in Trick Room, making things very awkward.
- Steel types : Especially Ferrothorn. At the time, Abomasnow didn't have Focus Blast, because I wasn't using Gravity (not that much reason to, really, other than Rock Slide), but even then, if Focus Blast was the main check to Ferrothorn and Steel-types in general, it would have been very shaky. A close call vs Mega Metagross in the 40-50 stretch raised a red flag for me, I definitely needed a better answer for these.
I started to look at other options, but nothing seemed like it could fit a similar role and do it better. What I wanted was something that could spam a strong spread move, complimented Abomasnow's typing defensively (which meant handling Fire-types), but could also deal with Steel-types like Ferrothorn and Escavalier. As I browsed the Pokédex, my hopes were low and I thought I would end up sticking to Primarina, but when I searched for Pokémon that learn Water Spout, Octillery showed up, a Pokémon I hadn't remotely thought of. Looking at its dex page was like a revelation. Low speed? Check. Spread move? Water Spout. Can take on Fire types? Check. Can take on Ferrothorn and Escavalier? Learns Flamethrower (!!). Powerful enough to score OHKOs? To my surprise: check! Did you know it has base 105 SpAtk? I sure didn't! Clearly that's not Primarina's 126, but the extra power of Water Spout made up for that. Moreover, the aggressive nature of the team meant Octillery would be provided with a free switch when Trick Room goes up, which is a big help in preserving HP. The one downside that scared me was my own hail chip damage weakening Water Spout over time, but since my goal was to sweep in just a few turns, hopefully this wasn't going to be a huge deal. More than anything, I was very excited that the Pokémon that best fit the criteria I had placed ended up being an unconventional Johto Pokémon that gets forgotten a lot!
Looking at Octillery's movepool is also when I decided Musharna should have Gravity as its last support move, since it enabled Hydro Pump (I was worried about the lack of damage once Water Spout was weakened) and Fire Blast, but also allowed me to have Focus Blast on Abomasnow, which would definitely be a big help in facing Steels - not to mention Golem's Rock Slides at the front! And thus, from battle 51, the team was complete!
THE TEAM
Relaxed | Telepathy
IVs: 31/0/31/31/31/0
EVs: 220 HP / 252 Def / 36 SpDef
Trick Room / Psychic / Gravity / Helping Hand
Musharna's base role is pretty straightforward, it's one of the best Trick Room setters available thanks to its very low speed tier, amazing bulk and wide array of support moves, not to mention that with 107 base SpAtk, it can deal decent damage even without any investment. Trick Room, Psychic and Helping Hand were non-negotiable moves which set the foundation on which the team was built. After setting Trick Room with the assistance of Golem, it can either go on the offensive, or, more commonly, boost the damage of its partner's spread move with HH.
But why Psychium Z? Isn't a Lum Berry a better item in Tree to offer an additional shield against the prominence of status moves? I generally do believe it is, but I also wanted to give Psychium Z a try since I had been a huge fan of the item in VGC. It allows Musharna to bypass Taunt by going for Z-Trick Room, which also boosts its accuracy by one stage. This enabled a more reliable Hypnosis, which I originally had as the last move. If for some reason I ended up using a regular Trick Room, it gave the option for Shattered Psyche instead, which is an option I initially severely underrated. When you're under pressure to sweep as quickly as possible within 4 turns of Trick Room, having the setter be a really good damage dealer for a turn is pretty amazing. That's, ultimately, why I decided to stick to that item even after I replaced Hypnosis with Gravity on battle 51, after Octillery's entry on the team.
Thanks to Golem's Ally Switch assistance, Thunder Wave was not much of an issue on turn 1, and that was a huge factor in deciding to forego the Lum Berry - especially with the pseudo-Mental Herb that the Psychium Z provided - I figured that it was kind of a "best of both worlds".
The EVs ensure Musharna lives as much stuff as possible to set Trick Room reliably. As a matter of fact, the list of Pokémon that can OHKO Musharna in Tree with this spread is incredibly small: 8 in total, of which 3 need max rolls, and 1 is Mega Heracross picking Pin Missile (which it doesn't, because the AI doesn't recognize the damage of multi-hitting moves properly). More specifically, the spread ensures Vikavolt4's Bug Buzz never OHKOs, while leaving Escavalier4 only a 6% chance to OHKO with Megahorn (I would rather guarantee survival on Vikavolt than Escavalier, since the latter could be Escavalier3, which has a very guaranteed OHKO with Megahorn anyway).
Brave | Galvanize
IVs: 31/31/31/31/31/0
EVs: 252 HP / 252 Atk / 4 SpDef
Rock Slide / Explosion / Wide Guard / Ally Switch
I'm a huge fan of Alolan Golem's design, and I was really looking forward to finding a way to utilize it in battle. I think this "suicide lead" role is perfect, since it offers really good tools to help to setup Trick Room, almost like a Fake Out user would, but it also provides a ton of offensive pressure, like my Exploding Silvally did on my MimiLax team, and most importantly, a valuable free switch into one of the backline sweepers.
First off, Galvanize Explosion's damage output is absolutely insane, especially when Helping Hand-boosted (yes, those all take into account spread damage):
252+ Atk Galvanize Golem-Alola Helping Hand Explosion vs. 252 HP / 0+ Def Cresselia: 234-276 (103 - 121.5%) -- guaranteed OHKO
252+ Atk Galvanize Golem-Alola Helping Hand Explosion vs. 252 HP / 252+ Def Umbreon: 202-238 (100 - 117.8%) -- guaranteed OHKO
252+ Atk Galvanize Golem-Alola Helping Hand Explosion vs. 252 HP / 0 Def Shiinotic: 179-211 (107.1 - 126.3%) -- guaranteed OHKO
252+ Atk Galvanize Golem-Alola Helping Hand Explosion vs. 0 HP / 252+ Def Audino-Mega: 184-217 (103.3 - 121.9%) -- guaranteed OHKO
The list goes on; and the best part is, since most leads you'll face are not such bulky Pokémon, Helping Hand is often unnecessary to score a double-OHKO, which means it's a free turn to setup Gravity!
Rock Slide is a really good option as well, since A-Golem sometimes has good matchups and isn't threatened, and it'd be a shame to let that go to waste by just going BOOM every time. Thus, when the lead can be handled by Rock Slide, or even one of the leads, delaying by a turn or 2 can mean the Explosion will either clean up their backline instead of their frontline, or bring the opponent down to a single Pokémon. A Rock move is also the perfect tool to remove the pesky Fire-types Abomasnow hates if I envision going Abomasnow over Octillery after the free switch. I favour Rock Slide over Stone Edge because 1. It doesn't *require* Gravity, so I can go for it semi-safely turn 1 if I need to, 2. It's a spread move, perfect to accumulate chip damage/break a sash while scoring a KO on the side and 3.
The 2 other moves are what make Golem such a great Trick Room-lead partner. I have gushed over how amazing Wide Guard is already in my rain team reports, but Golem takes its usefulness to the next level thanks to its 4x weakness to Ground. About every Pokémon with Earthquake in Tree will reliably go for it, making Wide Guard a pretty safe pick against the Garchomps & co. of the Tree, and also drawing all the attention away from Musharna while at it. The best part? The AI was often baited into picking Earthquake even if it damaged their partner heavily - in one instance, an opposing Garchomp3 swept its entire team with Earthquake, while I joyfully watched with popcorn (since I'm a nice guy, I set Gravity for him too)! Of course, looking up sets is not optional in order to make the best use of Wide Guard on turn 1. Thanks to the Focus Sash, in case of doubt, picking Wide Guard was also just a very safe move "just in case"; this is especially true when a Blizzard is susceptible to be coming, since without a Lum Berry, Musharna is vulnerable to a freeze.
Ally Switch is another of Golem's tools to ensure Trick Room reliably goes up. Not only is this with the idea of letting Golem tank attacks aimed at Musharna, but it worked both ways pretty well, since Golem's weakness to Fighting meant Musharna could tank plenty of these. There is obviously a certain gambling factor to Ally Switching, since the AI isn't always consistent in what moves it goes for, but there were plenty of occasions where the move had very small odds of a drawback. For example, some of the most threatening Pokémon leads that Musharna hate, such as Escavalier and Mega Sharpedo, are perfect to Ally Switch around. Just like in the case of Wide Guard, looking up sets makes a big difference in using Ally Switch properly.
I found that between the Focus Sash, Wide Guard, Ally Switch, Golem's typing, Musharna's bulk and the Psychium Z to bypass Taunt, this was one of the best toolboxes I could wish for to reliably setup Trick Room on turn 1 (or 2), and while the success rate is never 100%, it was close enough. And of course, as soon as that's done, Golem shows off its other role, as a damage dealer, and that damage never ceased to amazing me through the streak! Granted, there were some games where in ensuring Trick Room goes up, Golem sacrificed himself and no damage was dealt, but that's the idea of a suicide lead: its primary role is ensuring Trick Room, and the Explosion is the cherry on top.
Quiet | Sniper
IVs: 31/0/31/31/31/0
EVs: 252 HP / 252 SpAtk / 4 SpDef
Water Spout / Hydro Pump / Fire Blast / Energy Ball
While the backline was initially built around Mega Abomasnow, I will admit that Primarina/Octillery quickly became my favourite initial switch-in after Golem's Explosion. Mega Abomasnow is cool and all, but Blizzard really doesn't hit that hard, and Ice is more difficult to reliably spam than Water. Moreover, Abomasnow being in the back provided a perfect switch-in if Octillery found itself threatened by Grass- or Electric-Moves.
When I switched from Primarina to Octillery, it was very important to me to preserve the damage output Specs Primarina offered, yet, using Specs Octillery was out of the question, because 1. One of the main reasons for the switch was the access to a Fire-move, which locking myself into sounded terrible and 2. After taking damage, being locked into Water Spout was a liability, especially when I had a secondary Water move precisely for that. I figured achieving Primarina's damage output without the Specs may be too much to ask from Octillery, but it turns out it really wasn't:
252+ SpA Choice Specs Liquid Voice Primarina Helping Hand Hyper Voice vs. 0 HP / 0 SpD Garchomp: 159-187 (86.8 - 102.1%) -- 18.8% chance to OHKO
252+ SpA Mystic Water Octillery Helping Hand Water Spout (150 BP) vs. 0 HP / 0 SpD Garchomp: 186-220 (101.6 - 120.2%) -- guaranteed OHKO
With the help of Mystic Water, Octillery's damage is actually significantly higher. Since Water Spout was this Pokémon's main purpose on the team, boosting that move specifically was good enough for me; in any case, a Life Orb would have obviously been counterproductive. While its bulk is definitely underwhelming, Octillery's damage output was all but disappointing. Water Spout exceeded my expectations by a mile. Hydro Pump is the single-target alternative of the move, and allows for basically the same damage when Octillery's HP is down (252+ SpA Mystic Water Octillery Helping Hand Hydro Pump vs. 0 HP / 0 SpD Garchomp: 183-216 (100 - 118%) -- guaranteed OHKO), though it does have the downside of requiring Gravity. It felt great to use something better than Scald on a Water-type for once, something one can rarely afford.
Fire Blast is also part of the reason Octillery took over Primarina's spot on the team; I figured that since I had Gravity, I might as well go all-in and add that extra power over Flamethrower. Its main purpose is to deal with Ferrothorn and Escavalier, but it was also handy against Grass types in general.
Finally, the last moveslot should usually have been Protect, but I took a page out of ReptoAbysmal's book and went 4 attacks, taking the gamble that I was actually going to successfully sweep during Trick Room and wouldn't need to reposition too often. I figured the team played aggressively enough to try it out. I can't say the experiment entirely convinced me of one thing or the other; I definitely appreciated the extra coverage, and it contributed to Octillery's success without a doubt. At the same time, there were definitely plenty of occasions where I wish I had Protect, especially with Octillery's poor bulk. Most bad positions gave me the option to either sacrifice it or switch; if the switch was unsafe, it forced my hand, and Octillery got sacrificed more often than I would have liked.
Nonetheless, it mostly worked out, and the extra coverage did feel essential at times. The choice was between Ice Beam and Energy Ball; one could argue Abomasnow covered for both of these with its STABs, so none were necessary, but the way the team worked, Abomasnow+Octillery being together on the board was very uncommon, and Musharna was usually Octillery's partner. With Ice Beam, this combo was walled pretty hard by opposing Water-types, while using Energy Ball meant Dragon-types "walled" Octillery (Water Spout did significant amounts, still). I had to pick the lesser evil, and from what little experience I had with the team, being walled by Water-types was the most frustrating of the two, so I went with Energy Ball, and it did prove itself very useful.
Overall, I was delighted with Octillery's contribution to the team; it ended up outshining Mega Abomasnow as far as damage goes!
IVs: 31/31/31/31/31/0
Quiet | Snow Warning -> Snow Warning
EVs: 252 HP / 220 SpAtk / 36 SpDef
Blizzard / Energy Ball / Focus Blast / Protect
Surprisingly, I think the best thing I would have to say about Mega Abomasnow is that its bulk is way underrated. It kept living hits that I didn't anticipate, especially Fighting and Rock moves. Those survivals were sometimes really big; in about every game where Trick Room expired and I was in a bad spot, Abomasnow was the one who clutched it out for me (and he almost did in the loss again). For that, and also because its typing complimented Octillery really well, I won't question its contribution, but it definitely was not what I was anticipating on the offensive spectrum.
Blizzard is usually pictured as the strongest Ice move, probably in part because like Thunder or Hydro Pump, its accuracy is a tradeoff for the additional power; with Hail (or Gravity) fixing the accuracy problem, surely spamming Blizzard must be amazing? Well, in Doubles, spread damage comes into play... did you know Blizzard actually does significantly less damage than Ice Beam?
220+ SpA Abomasnow-Mega Blizzard vs. 0 HP / 0 SpD Latios: 140-168 (90.3 - 108.3%) -- 50% chance to OHKO
220+ SpA Abomasnow-Mega Ice Beam vs. 0 HP / 0 SpD Latios: 156-186 (100.6 - 120%) -- guaranteed OHKO
Even though I knew about it, I still had this preconception that spamming Blizzard would be pretty good, and I was disappointed. It didn't help that I was used to using "this team" (close enough, anyway) in VGC, where Ice moves are a lot more valuable generally than they are in Tree (probably because what you encounter here is more evenly distributed typing-wise). So rather than sweeping with Blizzard as envisioned, I often tried to put things in range with Musharna and Octillery to use it as the "finishing blow" at the end.
Otherwise, Energy Ball was reliable damage; I preferred it over Wood Hammer because I was investing fully in SpAtk anyway, and the recoil was undesirable, as it basically meant mitigating Mega Abomasnow's best selling point, its bulk. This was also my only reliable way of breaking through full Water teams (Octillery's Energy Ball prevents it from being walled, but it doesn't score OHKOs!). Thankfully, Abomasnow also walled most of these teams defensively to a degree.
Focus Blast was originally Ice Shard, but with the addition of Gravity, I wasn't going to pass on this occasion to stop being walled by Steel types. As a matter of fact, I think I used Focus Blast as often as both of Abomasnow's STABs, it was just the right coverage for the team, and the move's base power made it feel like more than just coverage. Definitely, there were times where I missed Ice Shard dearly (like in that losing battle), but unlike on Octillery, I don't think Abomasnow could afford to not have Protect; having the entire team Protect-less would have made it susceptible to falling apart extremely quickly (this was already a bit of a problem because of Octillery). Abomasnow was also good at baiting moves due to its typing, not only through that 4x weakness, but also the fact Fighting moves are very common among Tree sets.
The EVs allow Mega Abomasnow to live a Focus Blast from Mega Ampharos, while having a guaranteed OHKO on Mega Slowbro with Energy Ball (a big deal for this team, since it could reset Trick Room). More generally, 220 is a pretty good SpAtk number since it hits a jump point.
THE LOSS // 330 vs. POKÉMON TRAINER WALLY (TXKW-WWWW-WWX3-6XWM)
This entire battle basically consisted of me trying to greedily dance around Altaria4, unsuccessfully. It highlights a very serious problem with the team: sleep. While Golem helps Musharna avoid Paralysis issues, I have no means of preventing or helping the case of sleep. Due to the very aggressive nature of the team, it also doesn't offer a lot of opportunities to break the mold of "Set TR -> Explode -> Sweep" by switching around. However, sleep isn't very common and comes in very specific forms: Spore through Amoonguss and Shiinotic and Hypnosis through Crobat, all of which the team can pretty reliably handle generally (especially Abomasnow and Musharna), Yawn, which as annoying as it is, can be played around, and Altaria4's Sing. In Altaria's case, Mega Abomasnow and Golem can both OHKO, but trying to play around Sing means potential gambles. The battle was winnable, but the fact the team has no reliable answer to sleep is also undeniable, and something I would try to work around if I was to build another team featuring this lead. I found what Psychium Z brought to the table too important to discard it, so I would try to find a solution involving the backline. In any case, here we go...
TURN 1:
From the get-go, I basically hoped that Altaria was either not set 4, or wasn't going to Sing, or would miss if it did. In front of Gallade, my obvious play was to Ally Switch since no matter what it went for, changing positions meant it was going to do negligible damage (I was particularly concerned of a crit X-Scissor on Musharna, though it only does 63% so I didn't have to be overly concerned about it). I was obviously aware that Sing was a threat, but since I had no way of predicting what slot it would go into, I figured ignoring it was probably the best I could do, and then take it from there. My Ally Switch, on that turn, proved lucky; Golem did absorb the X-Scissor, and Altaria4 went for Sing in the Musharna slot, which meant I got my Trick Room up safely, though I now had a sleepy Golem on the field.
Even though this kind of worked out, in hindsight, the right play was to Trick Room and Explode. Whatever damage Gallade went for, it couldn't OHKO Musharna, and allowing Golem to take a Close Combat from Mega Gallade wasn't that bad thanks to the sash. If potential Altaria4 Sang into Musharna's slot, Golem was guaranteed to score a double-KO, and I had decent odds of dancing around Wally's backline with my other 3, even with Musharna asleep. If Altaria Sang into Golem's slot, it meant I got Trick Room up as I did here, which is not a terrible position.
TURN 2:
With Trick Room up and Golem asleep, my position was a bit awkward. I figured going Abomasnow in front of Gallade was unsafe (basically forgetting that Gallade3 has no Fighting STAB and that the worst that could go into that slot was Psycho Cut), so I attempted to sacrifice Golem for a free switch into Abomasnow. In the meantime, I used my Z-move on Gallade to put it in range of any attack on the next turn (the Z-move was handy there, since Psychic isn't a 2HKO!). Gallade X-Scissors Musharna for a reasonable chunk.
I hindsight, the switch to Abomasnow was relatively safe and very desirable, especially since Altaria was guaranteed not to Sing that slot, and was very likely to go for Dream Eater into it. This turn is my biggest regret of the battle.
TURN 3:
As expected, Altaria ate Golem's dream (I wonder what Alolan Golem dreams of), but it doesn't do much, and I didn't get my free switch. This turn, I decide to be proactive since Musharna was about to take Gallade out, and I go for the Abomasnow switch on the next expected Dream Eater. This was the right play, but one turn too late. Now that I made the switch on the same turn as Wally got a free switch, he obviously gets initiative, and forces out Abomasnow...
TURN 4:
Seeing Magnezone was obviously bad news. Knowing Wally's usual roster, I figured Abomasnow was extremely important, since the last was likely to be Garchomp, so I didn't want to lose it. If Magnezone was Magnezone4 and had Analytic, it had a 56% chance to OHKO with Flash Cannon (admittedly I didn't calc at the time, and assumed this would always KO), which I didn't want to let happen. Seeing the end of Trick Room coming, if I protected Abomasnow this turn, I couldn't protect again on the following turn as I reset Trick Room, so I switched right back to Golem, which was expandable at that point. I went for Psychic into Magnezone to get some prior damage, which was potentially going to be nice for a future Focus Blast. One of my concerns was that I couldn't Gravity unless Altaria was out of the way, otherwise I was just basically ensuring its Sings would hit. Psychic did decent damage, but unfortunately, Magnezone was set 3 and wanted to spread that yellow color... Meanwhile, Altaria tries to Sing Abomasnow and obviously fails on the incoming Golem, which is excellent Dream Eater bait for the next turn.
TURN 5:
Last turn of Trick Room, and at this point, I just want to sacrifice Golem and get a fresh Trick Room up next turn. I "randomly" go for Psychic into Altaria (not a good call, should have gone into Magnezone to put it in range of Blizzard since I got a SpDef drop on my first Psychic - this comes into play later). Golem is successfully sacrificed (a first turn wake would have been amazing, but oh well), doubled up with Dream Eater and Flash Cannon. Trick Room is over.
TURN 6:
This turn, my obvious play is Protect + Trick Room. Unfortunately, the yellow magic does its thing and this leaves me in a really awkward spot. Altaria goes for Cotton Guard, which is pretty irrelevant. At least, I know where the Sing will go next turn...
TURN 7:
Knowing Abomasnow is most likely my winning condition at this point, I switch to Octillery to sacrifice it if need be. It does get Sung, so that was the right call... however, Magnezone goes for Thunder into Musharna and gets the KO. No new Trick Room, and now things are entirely falling apart.
TURN 8:
Desperate times call for desperate measures; time to go all-in and attack with both, since I don't see any possible advantage in protecting Abomasnow this turn; if anything, Altaria is likely to be baited to Dream Eater Octillery, which would prevent Abomasnow from going to sleep. If Magnezone Flash Cannons, Abomasnow survives, and maybe Octillery can contribute next turn...?
The AI doubles up on Octillery with Dream Eater and Thunder, so it obviously goes down, but Blizzard finally KOs Altaria and brings Magnezone very low, potentially even in range of another turn of hail (not convinced on that, but it's extremely close). This is where I bitterly regret not going for Psychic into Magnezone earlier; it would have meant a double-KO here, and most likely a win, even after all this mess!
TURN 9:
Just as I thought, Garchomp was in the back. At this point, I have a 50/50: if this is Garchomp3, it will go for Fire Fang or Outrage, and Abomasnow can survive any of the 2 and OHKO with Blizzard. However, I won't survive a double-up from Garchomp and Magnezone. If it's Garchomp4, I'm thinking it might go for Stone Edge, which also KOs in combination with Flash Cannon, but can miss. It could also set sand, in which case going for Blizzard right now wins if it hits. If it's Garchomp3, I lose nothing by going for Protect, and gain everything if Magnezone is indeed in range of Hail; in that case, my win is basically guaranteed barring a Fire Fang flinch or crit. I decide that my odds are slightly more favourable with that option, so I take it and Protect.
TURN 10:
However, it's Garchomp4, and it goes for Sandstorm, which means I don't even get to find whether Magnezone was in range of hail. At this point, I can still hope for a Stone Edge miss, so I think all in all, Protect still gave me the slightly better odds in that "50/50". But Stone Edge connects, and Flash Cannon finishes me off, and that's the end of the streak.
There are obviously many regrets to have about that battle, but many of these calls were difficult to make on the spot - in hindsight, things are a lot clearer, which definitely means this will have been a learning experience; I find that I improve my play the most when I take the time to look at what I did wrong in detail, and losses are unfortunately the best occasion for that to happen...!
CONCLUSION
Ultimately, I'm still stoked about taking Octillery & co. above 300. But most importantly, I feel like this team will leave a lasting impact on future Trick Room Tree teams I'll be running, because I think the Musharna-Golem lead was fantastic, to the point where it felt as powerful as FEAR; I had fun Pokémon in the back, but I would imagine that with some of the best TR sweepers instead, there's a ton of potential in store for this duo. In particular, Psychium Z felt like it opened up Musharna's options a lot more. I used it in almost every single game. This makes me very excited for some future teams, and this is definitely not the last you'll see of it!
This concludes post #3 of my series! I was also planning on posting 2 team reports in this one, and once again, things are a lot longer than expected so you can now count on a total of... 6 posts?
Until the next one, thanks a lot for reading!
Posting a completed USUM Super Multis streak, with a human partner of 789 wins. That human partner being myself on a second 2DS XL!
#789: KXYW-WWWW-WWX3-7LAN (Feat. Round Florges2 & Bullet Punch Metagross3)
First, the ~"loss"~:

 Indeed, I severely underestimated the battery’s ability to drain rapidly even with the screen closed - curse those wireless communications. Blissfully unaware of my carelessness while getting a bite of lunch, I came to the rude awakening upon seeing a suspicious lack of lit LEDs on the black/blue 2DS, followed by feelings of mild frustration and disbelief mixed with hilarity and relief.
So why did this outcome not elicit a more distressing reaction? Two main factors were responsible:
1. I wouldn’t say severe, but a notable lack of interest in the Tree that developed over time. I believe the Multis plan overlapped with and was executed with Grassy TR in motion, and timeframes are hazy (blame my tendency to hardly document anything), but for a large chunk of 2018, the desire to theorymon, teambuild, playtest new teams was lacking. In fact, after the Ultra Sun loss in May, Pokemon in general took a significant backseat to PS4 and Switch; Tree-climbing had turned into an uninteresting slog for a while, only enhanced by the forced animations and requirement to operate two systems for Multis. I started playing again (with a little rejuvenation) towards the tail end of the year progressing until now, but never fully enjoyed the journey up to its conclusion. You could say my current outlook on USUM is a stagnant one with a desire for something fresh to arrive, hence the relief in a sense that this dragged out ride had come to an end.
2. Satisfaction in the streak length; 1000 was ultimately the goal, but upon approaching then cruising past the halfway mark, I was convinced of the team’s ability to function at a consistent level in the Multis environment. Disappointing to lose to such a blunder, sure, but still content with the final number. Encountering dual AI Megas every now and then is cool, but the format to me isn’t as interesting/rewarding to warrant repeated attempts as Doubles is; inflexible switching during battles being another price to pay.
As for the team, I opted for a rainy flavour:-


I believe my thought process way back when was adopting an offensive playstyle with the potential for quick wins, but one that also would not falter in non ideal conditions. Rain was the first to spring to mind, partially because I myself was keen to get some Swift Swimmer’s legs out of the PC to stretch, and partially because the archetype itself had been fairly underutilized this generation. However, certain aspects did take inspiration from two players’ rain teams on the leaderboard – lolnub and Eisen. As part of the Pelipper + Swampert core, Ludicolo sounded great in the lead position to threaten opposing Waters with its unique typing, while offering Fake Out as well. Scizor also looked at me longingly to be taken along for the journey and could occupy a secondary Mega slot. The bug was a solid backup for a rain team, I knew that much, and it again seeing limited exposure in Doubles played into my decision, but I probably couldn’t argue how it was undisputedly the best fourth selection in my lineup; one could make a strong M-Metagross case for example, but scrutinising all possible options….yeah, just wasn’t bothered here haha.
Without further delay, the set details and what each Pokemon contributes to the cause:
[Left slot #1]

 Pelipper (F) (“Birdemic”) @ Focus Sash
Nature: Modest
Ability: Drizzle
IVs: 31/0/31/31/31/31
EVs: 4 HP / 252 SpA / 252 Spe
- Hurricane
- Brine
- Tailwind
- Protect

 Ludicolo (F) (“T.A.K.O.S”) @ Waterium Z
Nature: Modest
Ability: Swift Swim
IVs: 31/0/31/x[HT]/31/31
EVs: 4 HP / 252 SpA / 252 Spe
- Fake Out
- Scald {Hydro Vortex}
- Energy Ball
- Ice Beam
 Swampert (M) (“Leg Day…?”) @ Swampertite
Nature: Adamant
Ability: Torrent ---> Swift Swim
IVs: 31/31/x[HT]/31/31/31
EVs: 44 HP / 244 Atk / 4 Def / 12 SpD / 204 Spe
- Waterfall
- Earthquake
- Ice Punch
- Protect

 Scizor (F) (“Ronda Rousey”) @ Scizorite
Nature: Adamant
Ability: Technician
IVs: 31/31/x[HT]/31/31/31
EVs: 156 HP / 252 Atk / 4 Def / 4 SpD / 92 Spe
- Bullet Punch
- Bug Bite
- Superpower
- Protect
/
Lead options include:
Hurricane/Brine + Hydro Vortex
Commonly used to net early KO(s) that Ludicolo’s regular attacks wouldn’t achieve, especially handy for ganging up on TR setters. Depends on the AI trainers of course, but a fair amount of the time the team appreciates Pelipper putting her Sash on the line and throwing out a Hurricane or Brine; if the opportunity to dispose of one side early presents itself, within reason it’s a good idea to take it. This line of play is often very advantageous, and is why I think Waterium Ludicolo, not to mention an archetype such as Rain has performed so admirably in Multis. Vortex and Brine synergize well, while Hurricane is of course great for the likes of Decidueye, Trevenant, Exeggutor, Golisopod (First Impression rectified by Fake Out/Scizor switch), Scrafty to name a few.
Switch + Hydro Vortex
Swampert gets plenty of screen time and Rain turns through switching into Electric attacks that Pelipper baits, Rock moves to a lesser extent, or to take advantage of more passive sets that don’t pose much offensive threat. This most importantly cycles Drizzle to the ‘backline’ for replenishment later and preserves Sash in the event of dire situations. Provided Ludicolo’s life isn’t in great danger, this is what I like to dub an ideal momentum turn – perhaps only second to Pelipper/Ludicolo scoring an immediate double down – Swampert getting in safely with the max amount of rain turns available, while Vortex OHKOs or heavily dents a slot.
Attack + Fake Out
This combo is used often to prevent TR deployment while setting up for KO range next turn (Slowking4), or to scout diverse 1-4 set trainers with some more threatening than others.
Tailwind + Attack
Pelipper’s obviously the most immediate Tailwind candidate – evaluate the trainers you’re up against and determine whether it’s the efficient route to take; not always a clear cut choice (even against speed trainers) as although TW can set up future turns well, sometimes Ludicolo benefits from TW being skipped and something weakened via Hurricane/Brine to prime for a next turn KO.
Tailwind + Fake Out/switch
Exclusively seen against leads threatening to outspeed Ludicolo via a weather change or Mega evolution – aka Charizard, Alakazam or M-Latios. Ludicolo can stay in on Charizard leads since Vortex + Brine in the sun still KOs Y; ideal strategy for Zam is TW + Scizor switch so as not to gamble Inner Focus and remove any possibility of Tracing Swift Swim. M-Latios conveniently is 1 point slower than Ludicolo after a Dragon Dance, but is bulky so Ice Beam + Hurricane isn’t a guaranteed KO; TW bides more time and typically entices more boosting.
Protect is used sparingly in select encounters where Pelipper’s threatened (mostly by Electrics/Rocks) with other slot dissuading Swampert from switching in her place, or at 1 HP when attack-baiting is high. These moments however are few and far between, as Swampert is much preferred to be next to Ludicolo against almost everything that is not a Grass type.
/
My personal favourite orientation - damage out the wazoo and it happens fast! Pretty self-explanatory that the two Swift Swimmers in tandem enjoy each other’s company; 2x Ice coverage useful for teaming up on Water resists, and Ludicolo taking the odd EQ a worthy trade-off for clearing the field or eliminating one side. Few weaknesses exist with this duo, however one of the more prominent is Rotom-Wash; Energy Ball 2HKO’s both sets but be prepared to eat a Thunder Wave on Ludicolo.
/
Double switch is uncommon but might arise when SE hits are threatened on both Pelipper and Ludicolo. Scizor may not be as intertwined with Rain as the other members but still forms a healthy dynamic with Swampert – they can alternate Protects and possess the means to take out each other’s problem Pokemon. Between the former and good natural bulk on both Pokemon, this is also the best base for stalling out TR.
/
The rarest matchup, possibly executed through TW + switch if extra anti-Grass firepower is required (Sceptile, Whimsicott etc.) or the odd Poison move, but still very dependant on what’s occupying the other slot; Poison types for example are common Vortex targets regardless, same deal with Exploders but Protect + Scizor switch could be an alternate avenue. I’ve been guilty of gambling Alakazam’s Inner Focus with Fake Out during the streak, but TW + switch is the safer line of play.
I have a decent number of Battle Videos saved after 500, but truthfully none are too standout or differ from the assortment already on YouTube which I uploaded a while ago; I’ll keep them for now butdue to laziness or the fact no one cares about Multis I believe the selection here showcases how the team plays well enough.
To conclude, flat battery is a silly way to go out lol – I wish I remembered to plug in my 2DS during lunch! Didn’t achieve the goal that I legitimately considered possible, and thoughts of regret scattered throughout my playtime due to the slow progression, but ultimately happy with the end result; this writeup is likely incomplete or lacking true detail in parts but I’m glad there’s still something to show, and I hope you as the readers can at least glean something from my messy train of thought translated into text. Enjoy!
#789: KXYW-WWWW-WWX3-7LAN (Feat. Round Florges2 & Bullet Punch Metagross3)
First, the ~"loss"~:
So why did this outcome not elicit a more distressing reaction? Two main factors were responsible:
1. I wouldn’t say severe, but a notable lack of interest in the Tree that developed over time. I believe the Multis plan overlapped with and was executed with Grassy TR in motion, and timeframes are hazy (blame my tendency to hardly document anything), but for a large chunk of 2018, the desire to theorymon, teambuild, playtest new teams was lacking. In fact, after the Ultra Sun loss in May, Pokemon in general took a significant backseat to PS4 and Switch; Tree-climbing had turned into an uninteresting slog for a while, only enhanced by the forced animations and requirement to operate two systems for Multis. I started playing again (with a little rejuvenation) towards the tail end of the year progressing until now, but never fully enjoyed the journey up to its conclusion. You could say my current outlook on USUM is a stagnant one with a desire for something fresh to arrive, hence the relief in a sense that this dragged out ride had come to an end.
2. Satisfaction in the streak length; 1000 was ultimately the goal, but upon approaching then cruising past the halfway mark, I was convinced of the team’s ability to function at a consistent level in the Multis environment. Disappointing to lose to such a blunder, sure, but still content with the final number. Encountering dual AI Megas every now and then is cool, but the format to me isn’t as interesting/rewarding to warrant repeated attempts as Doubles is; inflexible switching during battles being another price to pay.
------------
As for the team, I opted for a rainy flavour:-
I believe my thought process way back when was adopting an offensive playstyle with the potential for quick wins, but one that also would not falter in non ideal conditions. Rain was the first to spring to mind, partially because I myself was keen to get some Swift Swimmer’s legs out of the PC to stretch, and partially because the archetype itself had been fairly underutilized this generation. However, certain aspects did take inspiration from two players’ rain teams on the leaderboard – lolnub and Eisen. As part of the Pelipper + Swampert core, Ludicolo sounded great in the lead position to threaten opposing Waters with its unique typing, while offering Fake Out as well. Scizor also looked at me longingly to be taken along for the journey and could occupy a secondary Mega slot. The bug was a solid backup for a rain team, I knew that much, and it again seeing limited exposure in Doubles played into my decision, but I probably couldn’t argue how it was undisputedly the best fourth selection in my lineup; one could make a strong M-Metagross case for example, but scrutinising all possible options….yeah, just wasn’t bothered here haha.
Without further delay, the set details and what each Pokemon contributes to the cause:
[Left slot #1]
Nature: Modest
Ability: Drizzle
IVs: 31/0/31/31/31/31
EVs: 4 HP / 252 SpA / 252 Spe
- Hurricane
- Brine
- Tailwind
- Protect
- Mandatory inclement weather lead, effective bait for Electric attacks
- Temporary fully accurate secondary STAB, launch at Grasses among other things, occasionally gets free turns via confusion
- Offers additional speed control against opposing Swift Swimmers, Gyarados, M-Latios, Volcarona, anything else Pelipper would appreciate outspeeding first before damaging
- Affinity with Swampert is strong – possesses high preservation value at 1 HP if rain replenishment is required later
- Modest max Speed to function sufficiently without and with Tailwind, + boost damage output to honestly impressive levels
- Underpowered Brine has negligible drawbacks, overpowered Brine prevalent especially when Vortex is present, synergy present even with Bullet Punch; overall a move I like a fair bit more on the pelican than Scald
- Not always in a position to instantly switch/leave Ludicolo alone if rain is overridden; whether it’s to scout, Tailwind or chip in with a weaker Brine, sacrificing Sash sometimes is in best interest
- Sash therefore the item of choice for emergency situations in which Pelipper doesn’t want to Protect or switch in favour of a different play – Electric, Rock, other powerful moves base Swampert wouldn’t appreciate taking
- Considering Pelipper is the weather setter, actually deals damage, can become fast and bait moves means her presence, or lack of should be assessed carefully in every battle – contribution potential can still be high by virtue of these factors, regardless of health
Nature: Modest
Ability: Swift Swim
IVs: 31/0/31/x[HT]/31/31
EVs: 4 HP / 252 SpA / 252 Spe
- Fake Out
- Scald {Hydro Vortex}
- Energy Ball
- Ice Beam
- Swift Swim lead, fastest FO tied with opposing Ludicolo4
- Speedy one-time nuke, all-important reliable Grass STAB (for Rotom-W) + Ice coverage means only select Pokemon are unfazed by Ludicolo’s toolkit
- Scald chosen for consistency – Z-Surf decently more powerful but normally weaker from spread damage, induces friendly fire which is bad especially with Sash on the team, requires more Protecting
- Doesn’t hit that hard with Z-move expended/against Water-resistant foes, but works well regardless with Pelipper + Swampert dynamic
- Barely considered Protect as it seems a waste here – Ludicolo really enjoys STABs + coverage, aside from switching out of the odd Poison attack a fast rain-boosted Vortex or FO to scout/free up the left slot are very common and momentum-gaining opening plays
- Preservation level changes depending on matchup but should always be assessed, whether it’s to reset the weather or help stall out midgame Trick Room; Charizard leads threatening Drought or Slowking4 (survives Energy Ball + Hurricane) being examples
- 244 Speed stat in rain outruns Terrakion2; max may appear as wasted points here but 244 EVs means Ludicolo now ties with Landorus1/4 outside rain, anything lower and the Terrakion2 outspeed is lost – not worth it in my eyes
Nature: Adamant
Ability: Torrent ---> Swift Swim
IVs: 31/31/x[HT]/31/31/31
EVs: 44 HP / 244 Atk / 4 Def / 12 SpD / 204 Spe
- Waterfall
- Earthquake
- Ice Punch
- Protect
- Second Swift Swim beneficiary, premier bruiser
- Electric immunity and Rock resistance primes Swampert for early switches to take advantage of Rain turns; he therefore often gets to stay on field a lot of the time to sweep or punch large holes at the least
- Standard moveset with Ice coverage again chosen to hit Grass, airborne Dragons etc. for SE damage
- Thanks to natural bulk Grass is the one type that truly threatens Swampert’s life expectancy during rainy conditions; he and all other members having a SE hit on them helps the cause significantly, and can often be focused down with double targets/Protect + Ice Beam or Bug Bite
- Opted for a slight Speed cut to hit 232 in rain and 116 outside rain, respectively outrunning Landorus2 and the 115s; didn’t consider Terrakion2 an important target here, with Ludicolo being faster and M-Scizor having Bullet Punch
- Following from this, important that Ludicolo is faster since friendly fire EQ without Protect is inevitable, and a semi-common occurrence
- Additional bulk EVs allocated to give Downloaders an Attack boost
Nature: Adamant
Ability: Technician
IVs: 31/31/x[HT]/31/31/31
EVs: 156 HP / 252 Atk / 4 Def / 4 SpD / 92 Spe
- Bullet Punch
- Bug Bite
- Superpower
- Protect
- Backline glue Mega
- Doesn’t directly thrive in the rain but matches up well against many things that threaten the other three; occasionally gets use out of Poison immunity but often the Poison types are good Vortex targets
- As mentioned earlier Bug Bite puts a nice target on Grass types and is appreciated for Cresselia, Uxie, Mesprit etc.
- Superpower patches up the Bug/Steel hole well, hitting Ferrothorn, Snorlax, Lickilicky for 2HKOs
- Even if Superpower isn’t the killing blow, stat drops aren’t the worst thing if follow-up KOs are ensured through using it
- 1 point faster than the uninvested Rotoms, outspeeds everything up to Heatran4 in Tailwind
- Protect useful for shielding from Fire moves that Pelipper/Swampert can’t immediately remove, and to preserve health when EQ is used; a fourth move more reliable than any other option for Scizor
Lead options include:
Hurricane/Brine + Hydro Vortex
Commonly used to net early KO(s) that Ludicolo’s regular attacks wouldn’t achieve, especially handy for ganging up on TR setters. Depends on the AI trainers of course, but a fair amount of the time the team appreciates Pelipper putting her Sash on the line and throwing out a Hurricane or Brine; if the opportunity to dispose of one side early presents itself, within reason it’s a good idea to take it. This line of play is often very advantageous, and is why I think Waterium Ludicolo, not to mention an archetype such as Rain has performed so admirably in Multis. Vortex and Brine synergize well, while Hurricane is of course great for the likes of Decidueye, Trevenant, Exeggutor, Golisopod (First Impression rectified by Fake Out/Scizor switch), Scrafty to name a few.
Switch + Hydro Vortex
Swampert gets plenty of screen time and Rain turns through switching into Electric attacks that Pelipper baits, Rock moves to a lesser extent, or to take advantage of more passive sets that don’t pose much offensive threat. This most importantly cycles Drizzle to the ‘backline’ for replenishment later and preserves Sash in the event of dire situations. Provided Ludicolo’s life isn’t in great danger, this is what I like to dub an ideal momentum turn – perhaps only second to Pelipper/Ludicolo scoring an immediate double down – Swampert getting in safely with the max amount of rain turns available, while Vortex OHKOs or heavily dents a slot.
Attack + Fake Out
This combo is used often to prevent TR deployment while setting up for KO range next turn (Slowking4), or to scout diverse 1-4 set trainers with some more threatening than others.
Tailwind + Attack
Pelipper’s obviously the most immediate Tailwind candidate – evaluate the trainers you’re up against and determine whether it’s the efficient route to take; not always a clear cut choice (even against speed trainers) as although TW can set up future turns well, sometimes Ludicolo benefits from TW being skipped and something weakened via Hurricane/Brine to prime for a next turn KO.
Tailwind + Fake Out/switch
Exclusively seen against leads threatening to outspeed Ludicolo via a weather change or Mega evolution – aka Charizard, Alakazam or M-Latios. Ludicolo can stay in on Charizard leads since Vortex + Brine in the sun still KOs Y; ideal strategy for Zam is TW + Scizor switch so as not to gamble Inner Focus and remove any possibility of Tracing Swift Swim. M-Latios conveniently is 1 point slower than Ludicolo after a Dragon Dance, but is bulky so Ice Beam + Hurricane isn’t a guaranteed KO; TW bides more time and typically entices more boosting.
Protect is used sparingly in select encounters where Pelipper’s threatened (mostly by Electrics/Rocks) with other slot dissuading Swampert from switching in her place, or at 1 HP when attack-baiting is high. These moments however are few and far between, as Swampert is much preferred to be next to Ludicolo against almost everything that is not a Grass type.
My personal favourite orientation - damage out the wazoo and it happens fast! Pretty self-explanatory that the two Swift Swimmers in tandem enjoy each other’s company; 2x Ice coverage useful for teaming up on Water resists, and Ludicolo taking the odd EQ a worthy trade-off for clearing the field or eliminating one side. Few weaknesses exist with this duo, however one of the more prominent is Rotom-Wash; Energy Ball 2HKO’s both sets but be prepared to eat a Thunder Wave on Ludicolo.
Double switch is uncommon but might arise when SE hits are threatened on both Pelipper and Ludicolo. Scizor may not be as intertwined with Rain as the other members but still forms a healthy dynamic with Swampert – they can alternate Protects and possess the means to take out each other’s problem Pokemon. Between the former and good natural bulk on both Pokemon, this is also the best base for stalling out TR.
The rarest matchup, possibly executed through TW + switch if extra anti-Grass firepower is required (Sceptile, Whimsicott etc.) or the odd Poison move, but still very dependant on what’s occupying the other slot; Poison types for example are common Vortex targets regardless, same deal with Exploders but Protect + Scizor switch could be an alternate avenue. I’ve been guilty of gambling Alakazam’s Inner Focus with Fake Out during the streak, but TW + switch is the safer line of play.
I have a decent number of Battle Videos saved after 500, but truthfully none are too standout or differ from the assortment already on YouTube which I uploaded a while ago; I’ll keep them for now but
To conclude, flat battery is a silly way to go out lol – I wish I remembered to plug in my 2DS during lunch! Didn’t achieve the goal that I legitimately considered possible, and thoughts of regret scattered throughout my playtime due to the slow progression, but ultimately happy with the end result; this writeup is likely incomplete or lacking true detail in parts but I’m glad there’s still something to show, and I hope you as the readers can at least glean something from my messy train of thought translated into text. Enjoy!
Last edited:
Do you know what's required to actually obtain a legitimate 0 Atk Modest HA Suicune?
North Wind (Suicune) @ Sitrus Berry
Ability: Inner Focus
EVs: 252 HP / 92 Def / 100 SpA / 4 SpD / 60 Spe
Modest Nature
IVs: 0 Atk
- Scald
- Ice Beam
- Tailwind
- Protect
Regardless, please make your writeups relevant to the tree itself to avoid coming off so abundantly Fluke-ish from last gen's Maison thread. While I realise on the surface this looks like a targeted nitpick, the post is loaded with unhelpful info that never came into play during your streak, and has no real benefit to the reader. Some examples:
-The only Thundurus sets to carry Thunderbolt are Sets12; Thundurus 1 is uninvested and can't OHKO 0/0 Modest Suicune; Thundurus 2 holds Choice Specs and murders your cune from full health 75% of the time. No one will dispute that 252/92/4 carries semblence of bulk, but Thundurus had to have been pulled out of thin air because both damage calcs are on the exact opposite sides of the spectrum of irrelevancy.
-Coeur running Seviper with Z-Belch for the sheer irony is one thing, but unless I missed something, your team isn't built to glorify shitmons and give them a spotlight. There is nothing remarkable about indicating Hydreigon learns Belch (it does make a fun egg move to include, though.)
-Flash Cannon is not useful for hitting Fairies because the type is known for its special bulk and the move will only result in a bad trade. You're aware of Xio choking your leads pretty hard, so why even point out it learns the move? You don't even use it for likely the same rational thought.
-Fire is a useful attack type on Hydreigon, absolutely. But you give the impression that the threat posed by Ice types is largely mitigated by the move. A number of the less bulky sets it OHKOs carry Focus Sash on at least one set, among them Glaceon3, Froslass4, Abomasnow3, and both Weaviles; Vanilluxe34 survive this without needing a sash; Mamoswine34 may carry Thick Fat, tanking it more easily than Vanilluxe; handling these pokes safely would generally require Metagross or Lele to be present to compensate for the poor odds it has by itself. As an aside, Mega Abomasnow in TR is possible only against Sina, but I remember you as a Sun player.
-Mildly interesting to note Hydreigon fares the worst on your team against Volcarona when it fares far better than Metagross in most respects, including being able to attack without fear of Flame Body. Bug Buzz has pretty poor odds of a T1 OHKO and you carry Protect, and Dragon Pulse inflicts 51% minimum. Scald from that Suicune inflicts 53% minimum. While not inconceivable that circumstances (such as weather or partners) make this a huge gray area, it's a bit much to say it counters your entire team unless you were simply eyeballing all of your shots and repeatedly calling them poorly.
-Z-Focus Blast: See: Belch. There is little to be gleamed from this, so why?
-You greatly underplay the raw muscle of Z-Psychic in terrain for someone who used it. Mega Aggron and Steelix take so much damage from this that a hit from its partner finishes them off (31% min from Megagross ST, allowing for a low roll from Lele) and the vanilla versions have little hope beyond Sturdy. Volcarona and Zard Y are easily murdered by this move, and doubling into these targets with vanilla Psychic doesn't create hopeless scenarios either (as with Mega Steelix, Ice Punch from gross easily compensates for a cursed low roll from Lele.) Ignoring my own thoughts as to the layout of the team, having a backline trump card like that should solve more problems than it creates unless it's being used haphazardly and wasted. Unlike my Drampa, you have a huge boost from terrain by itself and the move isn't a liability when uncrystallized.
-You might point out that only Colress carries Alolan Muk 1 past any point with significance to players.
-If anything was just made up as you went along, it's the Metagross section. Blanket statements like "high attack specifically ignores steel being a weak offensive typing" when it's far more apt to say its perk is having Tough Claws with decent coverage moves that utilize it. Fully offensive Megagross has considerably poor bulk and yours has but four EVs off from the one used by the AI. You proceed to list a number of additional moves and discount them one by one for having either zero relevance or being suboptimal. People read writeups to gain insight to a team as it functions cohesively, not admire a single pokemon as an exhibit and learn (excuse me, "learn") how to use it by itself without relevance to the other three pokes alongside it.
It will be much easier to take your work seriously if you put less time into fluff and more into credible info. At the moment there's very little to set you apart from players marred by dishonesty/suspicion, such as the aforementioned Fluke.
The Battle Tree damage calculator has just been updated!
In the last couple of weeks, I did a few changes and additions to the known and well-used calculator brought by turskain. I only had a couple of major wishes, but while I was at it, I ended up doing a little more than planned. Turskain ended up liking the changes enough to add them to his main calculator (turskain.github.io), so don't be too surprised if it looks different next time you use it!
Here is a full changelog:
Let me know, here or by PM, if you encounter any issues and I'll do my best to resolve them.
Cheers!
In the last couple of weeks, I did a few changes and additions to the known and well-used calculator brought by turskain. I only had a couple of major wishes, but while I was at it, I ended up doing a little more than planned. Turskain ended up liking the changes enough to add them to his main calculator (turskain.github.io), so don't be too surprised if it looks different next time you use it!
Here is a full changelog:
- All missing moves and items have been added to the sets (items are especially valuable when mass calculating Knock Off damage);
- All post-40 Pokémon should now be included in the mass calculator (Legendaries12 and a couple others were previously missing);
- An EV tool has been added under the EV boxes, they show how many EVs have been used and how many are left, to help create complex spreads while calculating;
- Custom sets can now be selected in the mass calculator;
- The KO chance now takes into account Sitrus and 50% Berries (YUM!);
- Added some default abilities that affect the damage output for some Tree sets (Sheer Force on the Nidos, Pure Power on Medicham, Steelworker on Dhelmise, etc.);
- Imported sets now default to level 50 when no level was specified;
- Added a Battery button (dedicated to PikaCuber);
- Added a Minimize button, which should provide accurate calcs for moves affected by Minimize such as Heavy Slam and Dragon Rush; the stat boost will also be taken into account when using Stored Power/Power Trip;
- Added an Evoboost button
(perfect time to try out my Eevee QR Code team!! :D); - Now defaults to Doubles (please don't kill me D:);
- A few visual changes like the logo, colors, addition of a Cowmoo button...
Let me know, here or by PM, if you encounter any issues and I'll do my best to resolve them.
Cheers!
Last edited:
Thank you very much!
How do i select the mass calculator for past 40 sets?
(What i would find very useful was when you are looking at for Instance Latios-2, that there is a faster way to go to other Latios-sets than entering its first letters again and scrolling to the right set. By default you see Abomasnow as he is first in lexicographical order, but way more often you want to do calcs against several sets of the same specie than against Abomasnow. Maybe a button where you can click quickly through all 4 sets of the pokemon? I dont expect this to be done but i guess suggestions are welcome. I would find this very useful.)
Thank you very much!
How do i select the mass calculator for past 40 sets?
(What i would find very useful was when you are looking at for Instance Latios-2, that there is a faster way to go to other Latios-sets than entering its first letters again and scrolling to the right set. By default you see Abomasnow as he is first in lexicographical order, but way more often you want to do calcs against several sets of the same specie than against Abomasnow. Maybe a button where you can click quickly through all 4 sets of the pokemon? I dont expect this to be done but i guess suggestions are welcome. I would find this very useful.)
The mass calculator is the "One vs All" and "All vs One" buttons, once you're in one of those modes just select the 40+ button and then Honkalculate once your Pokémon's info is in. If you want to calc against all Latios sets at once, this is probably the more useful way since you can scroll down to Latios and see all 4 results. Though I guess this is only helpful for planning, if you mean during a game you're playing where you don't know which set you're facing, going to the mass calc every time is probably not worth. This might be doable, I can't promise anything but I'll look into it!
Thank you! Wow that's useful, i didn't know that.
(I just noticed that Tyrantrum has Tough Claws as default ability which according to serebii should be Strong Jaw.)
Good catch, that was indeed a mistake, fixed now!
DANCEDANCEJEJUNUM
Submitting a completed streak of 259 in Sun Super Doubles with a team of Oricorio-Pom-Pom / Ribombee / Tapu Fini / Mega Kangaskhan (QR team).
HISTORY & TEAMBUILDING
This team and run hold a special place in my heart, because it's basically a spin-off of the first doubles team I ever ran in Battle Tree. Beside the joy of rediscovering how much I loved the Oricorio-Ribombee combo, it allowed me to see how far I've come as a battler and teambuilder since then. Looking back at the team I had built back then, I can't help but facepalm heavily at the Life Orb Tapu Lele, and the fact I thought it was a good idea to systematically Baton Pass to it, even stating that Tapu Lele's bulk was usually good enough to tank a Poison move on the switch if need be (it's not entirely wrong, but why I would want to ever tank that, especially when I'm just going to KO myself to Life Orb recoil afterwards, is beyond my understanding - I guess I hadn't asked myself that question). Also, Fightinium Z Kartana, really? No wonder I struggled to even reach 50 in the first place (I'm pretty sure I played poorly in general too)! But about 2 years later, here I am, still battling in Tree, and that old post really helps me measure the distance I've crossed since then; this team and streak provide the other end of that measurement.
The idea to rework the team came after Coeur7 talked about making a Dancer team on the Discord server, which was an instant throwback for me. While several options of Quiver Dancers and Oricorio got discussed, I knew I personally wanted to go with these two again, if only because I love them both dearly, but also because I still believe they probably are the best options (at least, I'm convinced about Oricorio Pom-Pom - having not tested other Quiver Dancers, I can't really compare these to be honest). Other than reworking the movesets, the main question was the backline, did I want (Life Orb-less) Lele and Kartana, or some new stuff? There is no doubt on Tapu Lele potency, but after having a quick look at Psych Up options, I decided Tapu Fini was a better choice: what I needed wasn't the hardest hitter, since I'm copying boosts anyway, but rather something that would be both offensively potent and very tanky with the boosts, yet still could function without the boosts, and Fini fit that role perfectly. Of course, Misty Terrain is an immensely welcome addition to most Tree teams, providing a safety layer against so many things. As for the last slot, I didn't spend too much time thinking about it, I just wanted a goodstuffs Pokémon which's typing wouldn't clash with what I already had. Going through my boxes, it immediately clicked when I saw JEJUNUM waiting for her moment in the limelight: YES! Can't go wrong with adding Fake Out, and the Normal typing was a great compliment to the fact all three other team members could murder Fighting-types.
A bit like the DrifLele streak, I went into this not with high streak hopes, but rather with what I thought would be a fun team to stream. In that regard, it certainly delivered! I streamed everything from battle 100, and those were some of the most fun streams I've had thus far.
THE TEAM
 @ Flyinium Z

Modest | Dancer
IVs: 31/x/31/30/30/31 [HP Ground] (Hyper trained to 31/x/31/31/31/31)
EVs: 52 HP / 52 Def / 204 SpAtk / 4 SpDef / 196 Spe
Revelation Dance / Air Slash / Hidden Power Ground / Protect
Watching Oricorio Pom-Pom bounce and dance and cheer on the field was probably the very best part about this whole streak! Watching this Pokémon moving around just makes me so happy; I remember loving it from my very first encounter in Melemele Meadow (I'm sorry to all Sensu fans, but nothing can rival this cute little joyful birb, don't @ me), and my love hasn't faded since!
While Sitrus Berry wasn't an awful item to run (how could a berry ever be awful when it matches colors so well?), I remember that it really didn't make that much of a difference to Oricorio's survivals on the last team, so I definitely wanted to find a replacement. Having run Flyinium Z on Oricorio on different teams in the past (yes, I've used several Oricorio teams in other formats, why wouldn't you!), I knew it really helped its potency as a sweeper to break through things it otherwise wouldn't. The problem is that Flyinium Z is usually paired with Hurricane for actual big damage: Z-Air Slash is not that great (140 BP)... but running Hurricane would put me in a terrible situation whenever the Z-move has been used and I want my Flying move. Such a shame that Z-Revelation Dance turns into Breakneck Blitz... I could have gone with both Air Slash and Hurricane, and actually heavily considered that possibility, but I wasn't the biggest fan of using a moveslot just for the Z-move either.
I decided to start with HP Ground as planned and to switch that slot to Hurricane if I felt I didn't use HP Ground enough to justify it. As it turns out HP Ground was actually extremely useful; Electric-types can be a problem to the team in general, and without HP Ground, they can basically wall Oricorio (especially something with Volt Absorb like Jolteon), not to mention Magnezone which both Oricorio and Ribombee would not be able to hit were it not for HP Ground.
Ultimately, I remained stuck with Z-Air Slash as my Z-move and while it was nowhere near the damage I would have gotten from Z-Hurricane, it was better than nothing, and still very useful to break through stuff, or just not miss (don't forget it's usually fired at +1 or +2 SpAtk!).
Revelation Dance is Oricorio's move of choice in about every situation where Air Slash isn't super effective; just a good, reliable STAB move (basically, Thunderbolt without the chance to paralyze, which is unfortunate). Air Slash is the best compromise I could get between accuracy and power, though I don't think there were any costly misses during the streak, while I definitely did get a bunch of helpful flinches!
Since Oricorio isn't the strongest (or bravest) of all birbs, I prioritized damage output over trying to outspeed stuff at all costs; Modest with 196 Spe allows it to outspeed Mega Lopunny and Scarf Tsareena after a QD, both of which are relevant Air Slash targets. I was comfortable with not outspeeding the stuff above since 1. Ribombee outspeeds them after the QD and 2. It was often possible to get multiple QDs. 204 SpA allows it to nuke M-Abomasnow instantly with Supersonic Skystrike and always OHKO (well, if it doesn't Protect, that is), as well as OHKO Rampardos3 (obviously a big threat) at +1 with RevDance. Bonus, 94% chance to OHKO Audino4 at +1 and prevent Trick Room on turn 1; this calc actually mattered a lot, since I did go for that KO several times. The bulk allows it to tank a Garchomp3 Outrage (Garchomp3 unsurprisingly still outspeeds +1 Oricorio) as well as a Flare Blitz from Incineroar (relevant because Quick Claw!), and on the special side, a Fire Blast from Mega Camerupt at +1.
 @ Focus Sash
Timid | Shield Dust
IVs: 31/0/31/30/31/30 [HP Fire] (Hyper trained to 31/0/31/31/31/31)
EVs: 4 Def / 252 SpAtk / 252 Spe
Quiver Dance / Moonblast / Pollen Puff / Protect
Ribombee compliments Oricorio perfectly in terms of cuteness, and that in itself is enough of a reason to pair them. But in addition to dazzling my opponents with their charm, the lead's intention is to set up a double Quiver Dance on turn 1; the combination of the Focus Sash, its very high speed tier and Shield Dust allows Ribombee to make that happen reliably, and more often than not, make it through the turn to attack with surprisingly good power right after. And I think this is where I went wrong last time about how I thought of Ribombee: Baton Bassing the boosts, in my opinion, is a waste of a turn where a lot of damage could be dealt. Fairy is a premium offensive typing, and Moonblast is a strong STAB attack; +1 from Ribombee hits hard and, in addition to a reasonable list of OHKOs, can put things in range for Oricorio, which is a lot more productive than taking a turn to pass the boosts and then stay as fodder in the back.
Granted, it's easy to be excited by Ribombee's support movepool: between the healing properties of Pollen Puff, Speed Swap, Tailwind, Struggle Bug, Powder, Ally Switch and After You... Ribombee seems like the ultimate team player. But in practice, after using it quite a bit now, I think Ribombee needs a really good, specific reason to run any of these moves, because it's likely to trade its life to get one of them off. And in truth, as helpful as they are, getting a KO is simply more valuable the majority of the time given the possibility, and Quiver Dance often provides Ribombee with that possibility. I found Bug and Fairy to be a really good combination of STAB offensively; even though Moonblast was undeniably used more frequently, Pollen Puff is a nice help against the several bulky Psychics, some of which happen to be Trick Room setters. Several people asked me if I actually used Pollen Puff to heal my ally much, and the answer is no. I think I used it... once in the entire streak, maybe twice. And it's not because I wasn't thinking of it, it just wasn't worth wasting a turn for that when I could hit the opponent with a +1 Moonblast instead, which comes back to what I was saying of support moves, they look amazing for Ribombee on paper, but unless you have a very clear plan/reason for using them, it's just not optimal. The move would definitely be better on a bulkier Pokémon whose role is to support by sticking around for a long time, which is not Ribombee's case.
In addition to enabling Oricorio and providing good offense, Ribombee also provided a really good lure, thanks to its bad physical defense and the fact it often went down to Sash, making Protect all the more valuable on it for a free turn for Oricorio. Shield Dust is an amazing ability to pair with a Sash lead that's guarantee to be the target of a multitude of Fire hits, since none of them can burn; not having to be scared of freezes was also really nice. I would definitely rank Shield Dust among the top 10 underappreciated abilities in Pokémon, especially in Battle Tree! It felt like almost like having both Inner Focus and a semi-Lum Berry, as well as a semi-White Herb (not being slowed down by stuff like Bulldoze was great). I hadn't realized what a perfect fit for the Battle Tree that ability was until then.
Because of the Focus Sash and the bait aspect, I saw no reason to invest in any bulk (unlike last time) and went with the simplest of EV spreads.
 @ Wiki Berry

Modest | Misty Surge
IVs: 31/2/31/22/31/28 (Hyper trained to 31/2/31/31/31/31)
EVs: 252 HP / 28 Def / 68 SpAtk / 4 SpDef / 156 Spe
Moonblast / Scald / Psych Up / Protect
As mentioned previously, Tapu Fini was added as a Psych Up user over Tapu Lele for its bulk and solid presence, with or without the boosts. Because I decided to forego Baton Pass, I wanted to rely less on the "QD Chain", and more on the Oricorio-Ribombee combo, with the option of also sweeping with Tapu Fini after a simple Psych Up. However, the way things went, the majority of battles were an Oricorio-Ribombee sweep, with either Fini or JEJUNUM coming in to clean up with only a hit or 2; no real need to Psych Up. In that sense, I think the team could probably be improved further, it felt like a gimmicky (yet potent) lead that swept most of the time, and a super solid, all-star backup line that I could simply rely on to carry the team when the gimmick failed.
The moveset is very straightforward and I doubt it needs much explanation, double STAB, with Scald over Muddy Water because reliability matters a lot in Tree. Psych Up is what the whole idea of the team was, but I'm not as convinced on its necessity anymore, though I'm also not sure whether Fini has much better options in that moveslot. Due to how the team functions, support moves like Heal Pulse don't feel like they would contribute that much, while Psych Up probably remains a better setup option than Calm Mind in the context of this team.
There might be better options than Fini for this team slot overall, but Fini's reliability and bulk is something I think the team heavily benefitted from. Besides, I'll simply be partial to Tapu Fini in a large number of scenarios; it's one of my very favourite Pokémon and, competitively, probably the one I've used the most in any format overall at this point. Having it on my team is just a pillar of comfort for me, and at that point, it was like a "feel good" team for me overall since it basically featured some of my very favourite Pokémon all grouped together, and having such a team working well just made me really happy!
The EV spread was not tailored for this team, I simply used the spread I've been using and loving on a different team out of laziness. This definitely came back to bite me a few times, since the spread is actually made with a Tailwind option in mind, while this Fini, when boosted, was usually at +1 speed, and 156 Spe EVs really made no sense for these cases. It also sometimes came in after the option of Psyching Up boosts was gone, in which case, with the absence of Calm Mind, the Berry activation a bit less reliable / in my control as I would have liked, but I didn't find that to be too bothersome overall; if I was trying to make a deep run with this team, I would definitely review the spread though.
#BelieveInJEJUNUM
 @ Kangaskhanite

Adamant | Scrappy -> Parental Bond
IVs: x/x/x/x/x/x (Hyper trained to 31/31/31/x/31/31)
EVs: 244 HP / 44 Atk / 28 Def / 52 SpDef / 140 Spe
Fake Out / Body Slam / Seismic Toss / Sucker Punch
And here is one of the main stars of the team in her own right, JEJUNUM! If you don't hang out in our Discord server, you may not know about JEJUNUM, in which case, let me tell you her life story...
Mega Kangaskhan is pretty much the archetypal goodstuffs Pokémon, offering a perfect balance of offence and bulk, a good speed tier, Fake Out, priority, and so many potent offensive options! It can fit on a wide array of teams without disturbing much of the pre-established synergy, and is usually certain to contribute positively. Because of JEJUNUM's life story, I was very keen on using it in battle, and didn't think twice when I came across it in my boxes when building this team. [Disclaimer for the sake of clarity: the original level 5 JEJUNUM with her 4 transfer moves is and will remained untouched in my boxes; the trained version(s) I use are cloned from that one and trained individually for the freedom of having different movesets.]
As far as the moveset goes, Fake Out and Seismic Toss were no-brainers, those are the two moves I expect every JEJUNUM set to be consistently running no matter the team. In case anyone wasn't aware, Parental Bond doesn't reduce the set damage of Seismic Toss like it does for regular attacks, so both hits do the same 50 HP. A reliable 100 HP per hit, no matter the foe's stats or bulk, is an incredible tool to break through bulky things, put things in range for its partner or finish them off with no guessing games or gambling with rolls.
I decided to add Sucker Punch because I wanted to benefit from this Kangaskhan's Adamant nature which, as carefully planned by Level 51, allowed it to always OHKO Mega Alakazam. In any case, the team heavily benefitted from a priority user since it had no other. But I didn't want Double-Edge; as powerful as it is, I value Kangaskhan's bulk too much to want any recoil. I thought about going with the safe and yet still potent Return, but I was a bit scared of being walled by Ghost-types, some of which were likely to refuse to attack, and would thus entirely wall Kangaskhan as soon as it goes Mega. Since JEJUNUM's role was to finish things off reliably, I wasn't comfortable with the thought of being hard-walled, so initially opted for Crunch as the last move (as displayed in one of the early battles of the replays). However, a nearly fatal encounter with Blissey4 in the 70s forced my hand, as I realized I had absolutely no reliable way of dealing with Blissey4 (which is a Minimize set); as a lead, it was free to setup at will and take very little damage from my own lead, after which Tapu Fini and Kangaskhan would need to rely on sheer luck to break through it. This meant I needed to either try to find a solution within the confines of my team, or change a member just for Blissey. Thankfully, JEJUNUM had brought the answer along with her from Kanto: Body Slam. Like Heavy Slam and a few other moves, Body Slam doesn't miss a target that has used Minimize, and also hits it for double damage; this is the sole reason for this move on the team. It was sort of useful as a decent STAB every once in a while, but JEJUNUM generally spammed Seismic Toss as its damaging move - Body Slam's damage was, in any case, very underwhelming compared to even Return.
The EV spread was collaboratively created by Level 51 and me; it's JEJUNUM's EV spread and I don't think I'll change it unless the team she's on has extremely specific needs. At 138 speed, she notably outspeeds Articuno4, Sawk, Nidoking and Toxicroak. 44 Atk, as previously mentioned, guarantees the OHKO on Mega Alakazam, as well as on Mega Gengar after non-mega Scrappy Fake Out damage. Since this was the only important offensive benchmark, the rest went into bulk, mostly HP to maximize the investment, but 52 SpDef allows her to always live a Specs Focus Blast from Slowking (and 2HKO it with Sucker Punch), as well as a Bewear34 Hammer Arm, an Explosion from Mega Glalie or A-Golem, and a Close Combat from Lucario3 on the physical side.
THE LOSS // 260 vs. CAPTAIN KIAWE (KZGG-WWWW-WWX3-EQH4)
(This is a short compilation of four battles I had during the streak; the first is probably the closest call I had, the second [3:18] is a funny one, the third [5:24] has Encore messing me up, and the fourth [8:30] is the loss.)
CONCLUSION
The loss shows how, when it's not sweeping, the lead can go down very quickly and put a lot of pressure on the shoulders of the backline. However, the lead successfully swept so much that it felt worth having it work that way; maybe the backline could be improved even further? In any case, I honestly didn't think an Oricorio-Ribombee team could get much further past 100, so I'm thrilled to have gone that far with it. On both the teambuilding and playing aspects, I do feel like this streak reflects the journey I had from a Battle Tree Doubles (and doubles in general) newbie to the player I now am. Most importantly, I'm glad I can still have as much fun as I used to, if not more, using teams like these; if ever this joy fades, I think my time will have come to quit battle facilities!
This concludes post #4 of my series! Shout outs and thanks to Level 51, JustinTR and Megamite who were in chat for a lot of that streak, it was a ton of fun!
The next post will be pretty different in content; this has been the last from my backlog of "fun teams with a pretty good streak" I wanted to post.
Until the next one, thanks a lot for reading!
Submitting a completed streak of 259 in Sun Super Doubles with a team of Oricorio-Pom-Pom / Ribombee / Tapu Fini / Mega Kangaskhan (QR team).
HISTORY & TEAMBUILDING
This team and run hold a special place in my heart, because it's basically a spin-off of the first doubles team I ever ran in Battle Tree. Beside the joy of rediscovering how much I loved the Oricorio-Ribombee combo, it allowed me to see how far I've come as a battler and teambuilder since then. Looking back at the team I had built back then, I can't help but facepalm heavily at the Life Orb Tapu Lele, and the fact I thought it was a good idea to systematically Baton Pass to it, even stating that Tapu Lele's bulk was usually good enough to tank a Poison move on the switch if need be (it's not entirely wrong, but why I would want to ever tank that, especially when I'm just going to KO myself to Life Orb recoil afterwards, is beyond my understanding - I guess I hadn't asked myself that question). Also, Fightinium Z Kartana, really? No wonder I struggled to even reach 50 in the first place (I'm pretty sure I played poorly in general too)! But about 2 years later, here I am, still battling in Tree, and that old post really helps me measure the distance I've crossed since then; this team and streak provide the other end of that measurement.
The idea to rework the team came after Coeur7 talked about making a Dancer team on the Discord server, which was an instant throwback for me. While several options of Quiver Dancers and Oricorio got discussed, I knew I personally wanted to go with these two again, if only because I love them both dearly, but also because I still believe they probably are the best options (at least, I'm convinced about Oricorio Pom-Pom - having not tested other Quiver Dancers, I can't really compare these to be honest). Other than reworking the movesets, the main question was the backline, did I want (Life Orb-less) Lele and Kartana, or some new stuff? There is no doubt on Tapu Lele potency, but after having a quick look at Psych Up options, I decided Tapu Fini was a better choice: what I needed wasn't the hardest hitter, since I'm copying boosts anyway, but rather something that would be both offensively potent and very tanky with the boosts, yet still could function without the boosts, and Fini fit that role perfectly. Of course, Misty Terrain is an immensely welcome addition to most Tree teams, providing a safety layer against so many things. As for the last slot, I didn't spend too much time thinking about it, I just wanted a goodstuffs Pokémon which's typing wouldn't clash with what I already had. Going through my boxes, it immediately clicked when I saw JEJUNUM waiting for her moment in the limelight: YES! Can't go wrong with adding Fake Out, and the Normal typing was a great compliment to the fact all three other team members could murder Fighting-types.
A bit like the DrifLele streak, I went into this not with high streak hopes, but rather with what I thought would be a fun team to stream. In that regard, it certainly delivered! I streamed everything from battle 100, and those were some of the most fun streams I've had thus far.
THE TEAM
Modest | Dancer
IVs: 31/x/31/30/30/31 [HP Ground] (Hyper trained to 31/x/31/31/31/31)
EVs: 52 HP / 52 Def / 204 SpAtk / 4 SpDef / 196 Spe
Revelation Dance / Air Slash / Hidden Power Ground / Protect
Watching Oricorio Pom-Pom bounce and dance and cheer on the field was probably the very best part about this whole streak! Watching this Pokémon moving around just makes me so happy; I remember loving it from my very first encounter in Melemele Meadow (I'm sorry to all Sensu fans, but nothing can rival this cute little joyful birb, don't @ me), and my love hasn't faded since!
While Sitrus Berry wasn't an awful item to run (how could a berry ever be awful when it matches colors so well?), I remember that it really didn't make that much of a difference to Oricorio's survivals on the last team, so I definitely wanted to find a replacement. Having run Flyinium Z on Oricorio on different teams in the past (yes, I've used several Oricorio teams in other formats, why wouldn't you!), I knew it really helped its potency as a sweeper to break through things it otherwise wouldn't. The problem is that Flyinium Z is usually paired with Hurricane for actual big damage: Z-Air Slash is not that great (140 BP)... but running Hurricane would put me in a terrible situation whenever the Z-move has been used and I want my Flying move. Such a shame that Z-Revelation Dance turns into Breakneck Blitz... I could have gone with both Air Slash and Hurricane, and actually heavily considered that possibility, but I wasn't the biggest fan of using a moveslot just for the Z-move either.
I decided to start with HP Ground as planned and to switch that slot to Hurricane if I felt I didn't use HP Ground enough to justify it. As it turns out HP Ground was actually extremely useful; Electric-types can be a problem to the team in general, and without HP Ground, they can basically wall Oricorio (especially something with Volt Absorb like Jolteon), not to mention Magnezone which both Oricorio and Ribombee would not be able to hit were it not for HP Ground.
Ultimately, I remained stuck with Z-Air Slash as my Z-move and while it was nowhere near the damage I would have gotten from Z-Hurricane, it was better than nothing, and still very useful to break through stuff, or just not miss (don't forget it's usually fired at +1 or +2 SpAtk!).
Revelation Dance is Oricorio's move of choice in about every situation where Air Slash isn't super effective; just a good, reliable STAB move (basically, Thunderbolt without the chance to paralyze, which is unfortunate). Air Slash is the best compromise I could get between accuracy and power, though I don't think there were any costly misses during the streak, while I definitely did get a bunch of helpful flinches!
Since Oricorio isn't the strongest (or bravest) of all birbs, I prioritized damage output over trying to outspeed stuff at all costs; Modest with 196 Spe allows it to outspeed Mega Lopunny and Scarf Tsareena after a QD, both of which are relevant Air Slash targets. I was comfortable with not outspeeding the stuff above since 1. Ribombee outspeeds them after the QD and 2. It was often possible to get multiple QDs. 204 SpA allows it to nuke M-Abomasnow instantly with Supersonic Skystrike and always OHKO (well, if it doesn't Protect, that is), as well as OHKO Rampardos3 (obviously a big threat) at +1 with RevDance. Bonus, 94% chance to OHKO Audino4 at +1 and prevent Trick Room on turn 1; this calc actually mattered a lot, since I did go for that KO several times. The bulk allows it to tank a Garchomp3 Outrage (Garchomp3 unsurprisingly still outspeeds +1 Oricorio) as well as a Flare Blitz from Incineroar (relevant because Quick Claw!), and on the special side, a Fire Blast from Mega Camerupt at +1.
Timid | Shield Dust
IVs: 31/0/31/30/31/30 [HP Fire] (Hyper trained to 31/0/31/31/31/31)
EVs: 4 Def / 252 SpAtk / 252 Spe
Quiver Dance / Moonblast / Pollen Puff / Protect
Ribombee compliments Oricorio perfectly in terms of cuteness, and that in itself is enough of a reason to pair them. But in addition to dazzling my opponents with their charm, the lead's intention is to set up a double Quiver Dance on turn 1; the combination of the Focus Sash, its very high speed tier and Shield Dust allows Ribombee to make that happen reliably, and more often than not, make it through the turn to attack with surprisingly good power right after. And I think this is where I went wrong last time about how I thought of Ribombee: Baton Bassing the boosts, in my opinion, is a waste of a turn where a lot of damage could be dealt. Fairy is a premium offensive typing, and Moonblast is a strong STAB attack; +1 from Ribombee hits hard and, in addition to a reasonable list of OHKOs, can put things in range for Oricorio, which is a lot more productive than taking a turn to pass the boosts and then stay as fodder in the back.
Granted, it's easy to be excited by Ribombee's support movepool: between the healing properties of Pollen Puff, Speed Swap, Tailwind, Struggle Bug, Powder, Ally Switch and After You... Ribombee seems like the ultimate team player. But in practice, after using it quite a bit now, I think Ribombee needs a really good, specific reason to run any of these moves, because it's likely to trade its life to get one of them off. And in truth, as helpful as they are, getting a KO is simply more valuable the majority of the time given the possibility, and Quiver Dance often provides Ribombee with that possibility. I found Bug and Fairy to be a really good combination of STAB offensively; even though Moonblast was undeniably used more frequently, Pollen Puff is a nice help against the several bulky Psychics, some of which happen to be Trick Room setters. Several people asked me if I actually used Pollen Puff to heal my ally much, and the answer is no. I think I used it... once in the entire streak, maybe twice. And it's not because I wasn't thinking of it, it just wasn't worth wasting a turn for that when I could hit the opponent with a +1 Moonblast instead, which comes back to what I was saying of support moves, they look amazing for Ribombee on paper, but unless you have a very clear plan/reason for using them, it's just not optimal. The move would definitely be better on a bulkier Pokémon whose role is to support by sticking around for a long time, which is not Ribombee's case.
In addition to enabling Oricorio and providing good offense, Ribombee also provided a really good lure, thanks to its bad physical defense and the fact it often went down to Sash, making Protect all the more valuable on it for a free turn for Oricorio. Shield Dust is an amazing ability to pair with a Sash lead that's guarantee to be the target of a multitude of Fire hits, since none of them can burn; not having to be scared of freezes was also really nice. I would definitely rank Shield Dust among the top 10 underappreciated abilities in Pokémon, especially in Battle Tree! It felt like almost like having both Inner Focus and a semi-Lum Berry, as well as a semi-White Herb (not being slowed down by stuff like Bulldoze was great). I hadn't realized what a perfect fit for the Battle Tree that ability was until then.
Because of the Focus Sash and the bait aspect, I saw no reason to invest in any bulk (unlike last time) and went with the simplest of EV spreads.
Modest | Misty Surge
IVs: 31/2/31/22/31/28 (Hyper trained to 31/2/31/31/31/31)
EVs: 252 HP / 28 Def / 68 SpAtk / 4 SpDef / 156 Spe
Moonblast / Scald / Psych Up / Protect
As mentioned previously, Tapu Fini was added as a Psych Up user over Tapu Lele for its bulk and solid presence, with or without the boosts. Because I decided to forego Baton Pass, I wanted to rely less on the "QD Chain", and more on the Oricorio-Ribombee combo, with the option of also sweeping with Tapu Fini after a simple Psych Up. However, the way things went, the majority of battles were an Oricorio-Ribombee sweep, with either Fini or JEJUNUM coming in to clean up with only a hit or 2; no real need to Psych Up. In that sense, I think the team could probably be improved further, it felt like a gimmicky (yet potent) lead that swept most of the time, and a super solid, all-star backup line that I could simply rely on to carry the team when the gimmick failed.
The moveset is very straightforward and I doubt it needs much explanation, double STAB, with Scald over Muddy Water because reliability matters a lot in Tree. Psych Up is what the whole idea of the team was, but I'm not as convinced on its necessity anymore, though I'm also not sure whether Fini has much better options in that moveslot. Due to how the team functions, support moves like Heal Pulse don't feel like they would contribute that much, while Psych Up probably remains a better setup option than Calm Mind in the context of this team.
There might be better options than Fini for this team slot overall, but Fini's reliability and bulk is something I think the team heavily benefitted from. Besides, I'll simply be partial to Tapu Fini in a large number of scenarios; it's one of my very favourite Pokémon and, competitively, probably the one I've used the most in any format overall at this point. Having it on my team is just a pillar of comfort for me, and at that point, it was like a "feel good" team for me overall since it basically featured some of my very favourite Pokémon all grouped together, and having such a team working well just made me really happy!
The EV spread was not tailored for this team, I simply used the spread I've been using and loving on a different team out of laziness. This definitely came back to bite me a few times, since the spread is actually made with a Tailwind option in mind, while this Fini, when boosted, was usually at +1 speed, and 156 Spe EVs really made no sense for these cases. It also sometimes came in after the option of Psyching Up boosts was gone, in which case, with the absence of Calm Mind, the Berry activation a bit less reliable / in my control as I would have liked, but I didn't find that to be too bothersome overall; if I was trying to make a deep run with this team, I would definitely review the spread though.
#BelieveInJEJUNUM
Adamant | Scrappy -> Parental Bond
IVs: x/x/x/x/x/x (Hyper trained to 31/31/31/x/31/31)
EVs: 244 HP / 44 Atk / 28 Def / 52 SpDef / 140 Spe
Fake Out / Body Slam / Seismic Toss / Sucker Punch
And here is one of the main stars of the team in her own right, JEJUNUM! If you don't hang out in our Discord server, you may not know about JEJUNUM, in which case, let me tell you her life story...
It all began in July 2018, when esteemed user Level 51 asked for a Seismic Toss Kangaskhan on the server, offering his eternal love and affection in return. This is obviously a deal I wouldn't ever want to miss out on (who in their right mind would?!), so I buckled up and booted my LeafGreen game on my old DS Lite to find out, as I feared, that I had used up the Seismic Toss move tutor already (yup, tutors are single-use only in FRLG!).
Obviously, this is not the kind of hurdle that would ever keep me from a goal, so I left all the memories I had stored on that cartridge behind, took a deep breath, and started a new run, which I was able to accomplish in one evening thanks to following a speedrunning guide (it was quite enjoyable, actually!). Upon entering the Safari Zone on that early August evening, I couldn't anticipate the nightmare that was awaiting me on the other side.
See, as much as providing Level 51 with his dream Pokémon for the Battle Tree run of a lifetime motivated me, I was also very enticed by the idea of using Seismic Toss Kangaskhan myself, and I needed no convincing on how amazing being able to 2HKO the vast majority of Tree, including some of the bulkiest threats, without taking a hint of recoil was. While I would myself have opted for Bold or Careful to take full advantage of the fact S-Toss requires no Attack investment, Level 51 was Adamant on the nature he wanted, with the idea of being able to OHKO Mega Alakazam with Sucker Punch. Because aesthetics matter to me, I saw it as absolutely essential to catch the Kangaskhan in a Safari Ball.
Well then, I only needed to catch a few Kangaskhan until I got an Adamant one, and then it could simply be hyper trained, right? With that thought in mind, my descent into madness and despair began. The first aggravating discovery I made was that Synchronize doesn't work in FRLG, which was unfortunate since I only learned about it after I already soft-reset an Adamant Abra from the Game Corner. Oh well, 1/24 chances to get the right nature is still decent...
The second aggravating discovery was Kangaskhan's 5% encounter rate. My routine quickly became: encountering Pokémon until I ran out of Safari steps, and then soft-resetting to the entrance of the Safari Zone to try again without having wasted the money, until I found a Kangaskhan. On average, in one session of Safari, before I soft-reset, I encountered one Kangaskhan; sometimes, I went several attempts without seeing one, and sometimes, I could see up to three in one go, but it basically averaged to one. And then came the third aggravating discovery, which is by far the worst of all: most of them flee. After a heated discussion on the server (accompanied by much research), it was determined that there is no reason to throw a rock or bait, and that simply throwing balls at it optimized my odds of catching one before it fled.
At that point, I was committed, and I was determined to get one, no matter the time investment. I don't know what the exact catch rate is, but after gathering statistics for a while, it seemed relatively consistent for me to successfully catch about 1 in 10 Kangaskhan I encountered (the catch rate was probably lower than 10% though, since some of the encounters featured several balls thrown; they usually fled after turn 1, but not always). So it basically boiled down to a 10% chance to be able to catch a 5% encounter before it flees. I started gathering stats about the project in order to preserve my sanity, and counted the number of encountered Kangaskhan, the number of caught Kangaskhan, and the natures of those caught.
With some luck, I could have gotten the Adamant one pretty quickly. One of the first few was actually Jolly! According to odds, since I needed a 1/24 nature, I should be able to catch an Adamant one within 240 encounters. Shortly after 100, as my sanity slowly vanished, I lost track of the number caught and the precise order of the natures, but I kept my encounter counter updated the whole way through.
I spent dozens of hours soft-resetting, running and throwing balls in that Safari Zone. I had no luck. I got several Jolly ones, a bunch of Impish and Careful as well, Brave too... basically every single viable nature, but not Adamant. By the end of October, about 3 months later, I was agonizing in a dark corner of the Safari Zone, begging Kangaskhan to just finish me off, which she couldn't even do because she lacked the necessary power due to not being Adamant, so she just fled like the others. Around that time, I reached the magical number of 240 encounters, the number that I kept thinking of like the promised land I could cling on to while luck was not cooperating. But no Adamant Kangaskhan had been caught. I kept going... maybe the next one? But the next one was not Adamant... nor was the following one.
After 260 encounters, I decided to discard the dozens of hours I spent doing this, and to settle for subpar aesthetics...
With a mix of regret and relief, I left the Safari Zone, which had basically been my second home for months now, and I headed toward Cinnabar Island with the mission to complete LeafGreen all the way through the Sevii Islands and access the breeding center. It took a few hours, but it certainly felt refreshing to be progressing towards something after being stuck in a loop for so long. After unlocking the breeding center, I went back to the Safari Zone one last time to catch JEJUNUM's mother. And sure enough, less than 20 eggs later, JEJUNUM was born!

(excuse the dead pixels, my DS Lite has gone through a lot)
And shortly after, she knew her signature move.

(excuse the dead pixels, my DS Lite has gone through a lot)
And shortly after, she knew her signature move.
After officially getting baptized JEJUNUM after Puzzle 1-4 of the SPH, all in caps because this is Gen 3 and its style must be respected so that her origins are never forgotten, her departure towards Alola was imminent. I settled on three other important moves I wanted her to learn along her journey (Double-Edge being one of them since it's usually an egg move), and then documented her great adventure through the ages. Here is the full blog, as posted at the time on the server:
"I shall document her journey through the years and generations
ready for departure"

"Originally from the Sevii Islands, JEJUNUM traveled all across Kanto in the search of the the best move tutors of the land. Now, it's a brand new world we live in, with a brand new attitude, JEJUNUM enters Johto!"

"After a short stay in Johto, JEJUNUM finds herself craving new cultural horizons. She wants to see how things are overseas, in the wild land of Bouffalant and Stoutland... are they so different from us? It's time to investigate in person and cross the pacific ocean!"

"The refreshing stay overseas is over, JEJUNUM got homesick, and flew back to her homeland. after hearing of a region where they exclusively practice the arts of the Power-Up, she decides it's time to give up the Comet and learn new ways of punching, who knows, this might be her only chance to pick up on such obscure techniques!"

"After all this travelling, JEJUNUM is exhausted. she wants to go and settle down for a while... lured by the sun and the sweet malasadas, she decides Alola shall be her final destination for now. she heard a famous Tree, over there, might also respect and nurture her unique gifts, and put them to good use. She is greeted by a cheerful Comfey, who had a surprise gift for her as a recognition of her undeniable potential: an ability capsule! and thus, JEJUNUM's journey around the world ends for now!"

"I shall document her journey through the years and generations
ready for departure"
"Originally from the Sevii Islands, JEJUNUM traveled all across Kanto in the search of the the best move tutors of the land. Now, it's a brand new world we live in, with a brand new attitude, JEJUNUM enters Johto!"
"After a short stay in Johto, JEJUNUM finds herself craving new cultural horizons. She wants to see how things are overseas, in the wild land of Bouffalant and Stoutland... are they so different from us? It's time to investigate in person and cross the pacific ocean!"
"The refreshing stay overseas is over, JEJUNUM got homesick, and flew back to her homeland. after hearing of a region where they exclusively practice the arts of the Power-Up, she decides it's time to give up the Comet and learn new ways of punching, who knows, this might be her only chance to pick up on such obscure techniques!"
"After all this travelling, JEJUNUM is exhausted. she wants to go and settle down for a while... lured by the sun and the sweet malasadas, she decides Alola shall be her final destination for now. she heard a famous Tree, over there, might also respect and nurture her unique gifts, and put them to good use. She is greeted by a cheerful Comfey, who had a surprise gift for her as a recognition of her undeniable potential: an ability capsule! and thus, JEJUNUM's journey around the world ends for now!"
As far as the moveset goes, Fake Out and Seismic Toss were no-brainers, those are the two moves I expect every JEJUNUM set to be consistently running no matter the team. In case anyone wasn't aware, Parental Bond doesn't reduce the set damage of Seismic Toss like it does for regular attacks, so both hits do the same 50 HP. A reliable 100 HP per hit, no matter the foe's stats or bulk, is an incredible tool to break through bulky things, put things in range for its partner or finish them off with no guessing games or gambling with rolls.
I decided to add Sucker Punch because I wanted to benefit from this Kangaskhan's Adamant nature which, as carefully planned by Level 51, allowed it to always OHKO Mega Alakazam. In any case, the team heavily benefitted from a priority user since it had no other. But I didn't want Double-Edge; as powerful as it is, I value Kangaskhan's bulk too much to want any recoil. I thought about going with the safe and yet still potent Return, but I was a bit scared of being walled by Ghost-types, some of which were likely to refuse to attack, and would thus entirely wall Kangaskhan as soon as it goes Mega. Since JEJUNUM's role was to finish things off reliably, I wasn't comfortable with the thought of being hard-walled, so initially opted for Crunch as the last move (as displayed in one of the early battles of the replays). However, a nearly fatal encounter with Blissey4 in the 70s forced my hand, as I realized I had absolutely no reliable way of dealing with Blissey4 (which is a Minimize set); as a lead, it was free to setup at will and take very little damage from my own lead, after which Tapu Fini and Kangaskhan would need to rely on sheer luck to break through it. This meant I needed to either try to find a solution within the confines of my team, or change a member just for Blissey. Thankfully, JEJUNUM had brought the answer along with her from Kanto: Body Slam. Like Heavy Slam and a few other moves, Body Slam doesn't miss a target that has used Minimize, and also hits it for double damage; this is the sole reason for this move on the team. It was sort of useful as a decent STAB every once in a while, but JEJUNUM generally spammed Seismic Toss as its damaging move - Body Slam's damage was, in any case, very underwhelming compared to even Return.
The EV spread was collaboratively created by Level 51 and me; it's JEJUNUM's EV spread and I don't think I'll change it unless the team she's on has extremely specific needs. At 138 speed, she notably outspeeds Articuno4, Sawk, Nidoking and Toxicroak. 44 Atk, as previously mentioned, guarantees the OHKO on Mega Alakazam, as well as on Mega Gengar after non-mega Scrappy Fake Out damage. Since this was the only important offensive benchmark, the rest went into bulk, mostly HP to maximize the investment, but 52 SpDef allows her to always live a Specs Focus Blast from Slowking (and 2HKO it with Sucker Punch), as well as a Bewear34 Hammer Arm, an Explosion from Mega Glalie or A-Golem, and a Close Combat from Lucario3 on the physical side.
THE LOSS // 260 vs. CAPTAIN KIAWE (KZGG-WWWW-WWX3-EQH4)
(This is a short compilation of four battles I had during the streak; the first is probably the closest call I had, the second [3:18] is a funny one, the third [5:24] has Encore messing me up, and the fourth [8:30] is the loss.)
For once, I'm actually satisfied of how I played during this loss. I think I made the right plays in the circumstances of a bad match-up, somehow put myself in a winning position, and then got struck by bad luck. If there's one thing I regret, it's doing this battle at all; I had been streaming for several hours and had only planned to go through battles 200-250 during that stream, but I was having such a good time with the team that after 250 I said "alright... just 10 more!". The irony of proceeding to lose at exactly 260 isn't lost on me - this was definitely going to be the last one of that long stream!
TURN 1:

 vs.
vs.


On turn 1, no matter where Fake Out went, the classic Protect + QD was my best bet thanks to Shield Dust. Double Protecting would have made me have to tank a full-on attack from Kangaskhan on the setup turn, which was definitely not desirable. Arcanine was pretty obviously going for either a Fire move into Ribombee, or maybe for Sunny Day if it was Arcanine3.
TURN 2:
vs.

Fake Out went into Oricorio, best case scenario, and as expected, Arcanine4 Flare Blitzes Ribombee and brings it down to sash. At this point, I know Arcanine will want to Extreme Speed Ribombee, which buys me a turn by going for Protect. Unfortunately, even at +1, Oricorio only had a 20% chance to OHKO M-Kangaskhan with the Z-move, but in this situation it's still worth going for, it's not like I have a switch-in to a potential Double-Edge (which has 94% chance to OHKO Oricorio). I'm also hoping for it to be the much less threatening M-Kangaskhan3, which doesn't hit nearly as hard - or that it simply gets baited by Ribombee like Arcanine, which I think was very likely, the AI loves targeting those low HP Pokémon.
Unfortunately, the worst case scenario happens: Supersonic Skystrike doesn't KO, and M-Kangaskhan4 Double-Edges into Oricorio and gets the OHKO, taking itself out with recoil. As unfortunate as this was, M-Kangaskhan4 is an immense threat and I wasn't entirely unhappy to have simply traded Oricorio for it.
TURN 3:
 vs.
vs.

With Arcanine there, Tapu Fini was the obvious Pokémon to send out, especially since I knew Arcanine4 had Fightinium Z. Marowak's appearance confirmed Fini as the right choice. Knowing Arcanine would once again Extreme Speed Ribombee, and Marowak was likely to Flare Blitz it as well, I lost nothing from trying to get a double Protect: a 30% chance of a very free turn for Fini was better than none! Unsurprisingly, however, the double Protect fails and Ribombee goes down to Extreme Speed; thankfully, with the Flare Blitz recoil it took, Arcanine was already in range of Scald, so I could get it off the field before JEJUNUM's entrance. Marowak's Flare Blitz does 40% to Fini (it's so strong!), but takes some very helpful recoil in the process, putting itself into guaranteed Scald range as well. Things are looking up!
TURN 4:
vs.

Aaaand things aren't looking up anymore! Salazzle is definitely not the Pokémon Fini likes to see, especially after taking a hefty chunk of damage from Marowak. It could usually tank any hit from Salazzle, but not at this range. However, I felt like I still had the tools to win: Salazzle is frail and can go down to either a Scald or a Body Slam + Sucker Punch, while Marowak is already in range of Scald, but needs a little more chip for Sucker Punch to KO.
Here, I make a call which, I believe was worth: that Salazzle would Fake Out that turn. From my (now pretty extensive) experience facing both Salazzle sets, it's extremely uncommon for it to skip Fake Out, even when it has a guaranteed KO with one of its attacks, the AI seems to simply be programmed to give Fake Out a much higher priority no matter what. Thus, if I Protect Fini this turn from a Sludge Bomb/Wave and it goes for Fake Out, I look like a fool because on the following turn, where it's guaranteed to actually attack, I can't Protect reliably anymore. So I went for Scald into Salazzle and Faked Out Marowak to put it in Sucker Punch range. I figured that no matter where Salazzle's Fake Out went that turn, I wouldn't be in a terrible spot; if it was into Fini, I got the chip I needed on Marowak and Kangaskhan should be able to win, especially since I had Fini as a bait for the following turn, while if Fake Out went into Kangaskhan, Salazzle was either KOd or brought down to sash, while Marowak couldn't OHKO Kangaskhan, making a double KO possible on the next turn with Sucker Punch + Scald.
However, this is one of the very rare cases where the AI skipped Fake Out, and straight up KOd Fini with Sludge Bomb (confirming the Sash set). Not much could be done about that, Protecting definitely wasn't safer, and the odds were on my side. ¯\_(ツ)_/¯
TURN 5:
vs.
Even then, things were not entirely desperate. Marowak was now in Sucker Punch range; as long as it didn't Detect, I could KO it that turn, tank any hit from Salazzle (252 SpA Salazzle Fire Blast vs. 244 HP / 52 SpD Kangaskhan-Mega: 81-96 (38.3 - 45.4%) -- guaranteed 3HKO - JEJUNUM is so blukyyyy :hearteyes:), and then I would only need to tank one more hit to Body Slam it and finish it off with Sucker Punch if it survived Body Slam (that was a roll). Someone I will keep anonymous, in chat (you know who you are!! I swear I receive sabotage attempts sometimes!!! >:( ), tried to convince me I had to target Salazzle on that turn fearing Detect, but if it didn't Detect, it meant I straight up lost unless I got a max roll Body Slam on Salazzle, so my best odds were definitely going for Marowak to force the 1v1.
And what do you know, Marowak doesn't Detect! It falls for the Sucker Punch, and goes down, while Salazzle does exactly the expected amount of damage with Fire Blast! Things are going according to plan, and in a close finish, JEJUNUM should once again (it happened a couple of times already...) clutch it out for us! At this point, chat reaffirms that they #BelieveInJEJUNUM.
TURN 6:
vs.
The only way I can lose, at this point, is if Salazzle gets a Fire Blast crit. And right as I speak those very words, JEJUNUM goes down, to a crit.
TURN 1:
On turn 1, no matter where Fake Out went, the classic Protect + QD was my best bet thanks to Shield Dust. Double Protecting would have made me have to tank a full-on attack from Kangaskhan on the setup turn, which was definitely not desirable. Arcanine was pretty obviously going for either a Fire move into Ribombee, or maybe for Sunny Day if it was Arcanine3.
TURN 2:
Fake Out went into Oricorio, best case scenario, and as expected, Arcanine4 Flare Blitzes Ribombee and brings it down to sash. At this point, I know Arcanine will want to Extreme Speed Ribombee, which buys me a turn by going for Protect. Unfortunately, even at +1, Oricorio only had a 20% chance to OHKO M-Kangaskhan with the Z-move, but in this situation it's still worth going for, it's not like I have a switch-in to a potential Double-Edge (which has 94% chance to OHKO Oricorio). I'm also hoping for it to be the much less threatening M-Kangaskhan3, which doesn't hit nearly as hard - or that it simply gets baited by Ribombee like Arcanine, which I think was very likely, the AI loves targeting those low HP Pokémon.
Unfortunately, the worst case scenario happens: Supersonic Skystrike doesn't KO, and M-Kangaskhan4 Double-Edges into Oricorio and gets the OHKO, taking itself out with recoil. As unfortunate as this was, M-Kangaskhan4 is an immense threat and I wasn't entirely unhappy to have simply traded Oricorio for it.
TURN 3:
With Arcanine there, Tapu Fini was the obvious Pokémon to send out, especially since I knew Arcanine4 had Fightinium Z. Marowak's appearance confirmed Fini as the right choice. Knowing Arcanine would once again Extreme Speed Ribombee, and Marowak was likely to Flare Blitz it as well, I lost nothing from trying to get a double Protect: a 30% chance of a very free turn for Fini was better than none! Unsurprisingly, however, the double Protect fails and Ribombee goes down to Extreme Speed; thankfully, with the Flare Blitz recoil it took, Arcanine was already in range of Scald, so I could get it off the field before JEJUNUM's entrance. Marowak's Flare Blitz does 40% to Fini (it's so strong!), but takes some very helpful recoil in the process, putting itself into guaranteed Scald range as well. Things are looking up!
TURN 4:
Aaaand things aren't looking up anymore! Salazzle is definitely not the Pokémon Fini likes to see, especially after taking a hefty chunk of damage from Marowak. It could usually tank any hit from Salazzle, but not at this range. However, I felt like I still had the tools to win: Salazzle is frail and can go down to either a Scald or a Body Slam + Sucker Punch, while Marowak is already in range of Scald, but needs a little more chip for Sucker Punch to KO.
Here, I make a call which, I believe was worth: that Salazzle would Fake Out that turn. From my (now pretty extensive) experience facing both Salazzle sets, it's extremely uncommon for it to skip Fake Out, even when it has a guaranteed KO with one of its attacks, the AI seems to simply be programmed to give Fake Out a much higher priority no matter what. Thus, if I Protect Fini this turn from a Sludge Bomb/Wave and it goes for Fake Out, I look like a fool because on the following turn, where it's guaranteed to actually attack, I can't Protect reliably anymore. So I went for Scald into Salazzle and Faked Out Marowak to put it in Sucker Punch range. I figured that no matter where Salazzle's Fake Out went that turn, I wouldn't be in a terrible spot; if it was into Fini, I got the chip I needed on Marowak and Kangaskhan should be able to win, especially since I had Fini as a bait for the following turn, while if Fake Out went into Kangaskhan, Salazzle was either KOd or brought down to sash, while Marowak couldn't OHKO Kangaskhan, making a double KO possible on the next turn with Sucker Punch + Scald.
However, this is one of the very rare cases where the AI skipped Fake Out, and straight up KOd Fini with Sludge Bomb (confirming the Sash set). Not much could be done about that, Protecting definitely wasn't safer, and the odds were on my side. ¯\_(ツ)_/¯
TURN 5:
Even then, things were not entirely desperate. Marowak was now in Sucker Punch range; as long as it didn't Detect, I could KO it that turn, tank any hit from Salazzle (252 SpA Salazzle Fire Blast vs. 244 HP / 52 SpD Kangaskhan-Mega: 81-96 (38.3 - 45.4%) -- guaranteed 3HKO - JEJUNUM is so blukyyyy :hearteyes:), and then I would only need to tank one more hit to Body Slam it and finish it off with Sucker Punch if it survived Body Slam (that was a roll). Someone I will keep anonymous, in chat (you know who you are!! I swear I receive sabotage attempts sometimes!!! >:( ), tried to convince me I had to target Salazzle on that turn fearing Detect, but if it didn't Detect, it meant I straight up lost unless I got a max roll Body Slam on Salazzle, so my best odds were definitely going for Marowak to force the 1v1.
And what do you know, Marowak doesn't Detect! It falls for the Sucker Punch, and goes down, while Salazzle does exactly the expected amount of damage with Fire Blast! Things are going according to plan, and in a close finish, JEJUNUM should once again (it happened a couple of times already...) clutch it out for us! At this point, chat reaffirms that they #BelieveInJEJUNUM.
TURN 6:
The only way I can lose, at this point, is if Salazzle gets a Fire Blast crit. And right as I speak those very words, JEJUNUM goes down, to a crit.
The loss shows how, when it's not sweeping, the lead can go down very quickly and put a lot of pressure on the shoulders of the backline. However, the lead successfully swept so much that it felt worth having it work that way; maybe the backline could be improved even further? In any case, I honestly didn't think an Oricorio-Ribombee team could get much further past 100, so I'm thrilled to have gone that far with it. On both the teambuilding and playing aspects, I do feel like this streak reflects the journey I had from a Battle Tree Doubles (and doubles in general) newbie to the player I now am. Most importantly, I'm glad I can still have as much fun as I used to, if not more, using teams like these; if ever this joy fades, I think my time will have come to quit battle facilities!
This concludes post #4 of my series! Shout outs and thanks to Level 51, JustinTR and Megamite who were in chat for a lot of that streak, it was a ton of fun!
The next post will be pretty different in content; this has been the last from my backlog of "fun teams with a pretty good streak" I wanted to post.
Until the next one, thanks a lot for reading!
Last edited:
New feature on the Battle Tree Calculator!
Thanks to LegoFigure11's fantastic work, there is now a PP counter for every move (displayed on the far-right of that move's options row). This was suggested by ANTS since a lot of us end up having to PP stall the AI on a regular basis, and keeping track of it can be a pain. This is also why the displayed PP is the default number, without PP Ups/Max (your DS keeps track of your own PP anyway).
Also, neat bonus: if your ability is Pressure, the PP counter will automatically go down by 2 instead of 1!
Last edited:
The Pressure implementation is a bit off: with a 15-PP move like Thunderbolt, setting the opponent's ability to Pressure immediately causes a red box to form around that PP total, just like the one for "your EVs aren't divisible by 4". From there, clicking the down button causes it to drop to 14 (not 13), and it goes by 2s from there, and clicking up from 12 goes back to 14 but clicking it from 14 does nothing at all, as though the emergence of Pressure makes it suddenly become deathly allergic to odd numbers.
If Oricorio copies a move like Fiery Dance, what pokemon will be hit by the copied move? A random opponent?
If you dance on an opponent's targeting move, you hit that opponent.
If you dance on a teammate's targeting move, you double up on hitting whatever target your teammate picked (unless the first hit was a KO, then it gets redirected into the only remaining opponent by default)
If you dance on a teammate's targeting move, you double up on hitting whatever target your teammate picked (unless the first hit was a KO, then it gets redirected into the only remaining opponent by default)

The QR-UNO has gone through a couple of major changes:
- Eisenherz is working on new projects for QR teams to share but needs some space for them; therefore, we sadly have had to say goodbye to 'Floral Kisses'...if you are interested in continuing the glory that Comfey has achieved on this thread, you are encouraged to check out the Floral Kisses writeup and just rip the damn team off
- Our first Singles entry on the list is now available, as HeadsILoseTailsYouWin has generously provided a Dragonite/Aegislash/Tapu Fini comp to help out those who want to do Singles right but the lack the patience to run with some of our "slow" top teams. CHECK IT~!
02/25 EDIT: Er, I missed a few things in the recent updates--Eisen's three new QR teams, 'W A T E R S P O U T', 'B L I Z Z S P O U T', and 'DanceDanceJEJUNUM' have also been added. I think we're back up to 20 entries on the overall list...I think.
Last edited:
Eyyy, nice to see Comfey get some more love. Was the star of my first team to get past 50, similar team composition to this one paired with a DD Intimidate partner (Gyarados, Z), steel type in the back (Mega-Metagross, before move tutors so inaccurate moves, before a lot of megastones were available too), and Dragon in the back (Garchomp). Had been pondering rebuilding for Comfey recently as I still haven't got my badges in USUM (tiring of shiny hunting in Let's Go, so appetite for Battle Tree rising), and may just do that. I used a very different Comfey though, Bold nature, heavy HP and defence investment, Leftovers - paired with Intimidate sat on the field the whole time almost every match when it wasn't switching out to a poison immunity. Needed a lot of boosts to do meaningful damage though, so had been wondering if Pixie Plate may be better, so will take a look at it.
I guess all good things must come to an end, huh? Reporting an Ultra Moon Super Doubles streak of 1470. The team has remained unchanged since my 1000 update. I’m not sure what else there is to say except that this team has performed much better than I originally anticipated, and I’m really happy with the final number. Let’s begin...
And that’s it! Overall, a fun streak and a very fun team. However, since I’ve been working on Lucha-Lele for such a long time, I’m definitely taking a break from it. I’m going to miss this team, and maybe one day I will return to it. I would also like to thank everyone on the Discord for always being so awesome. Great place to hang out and lurk, ha. Anyway, until next time. See ya.
#1471 vs Scientist Tivon (Rotom-Frost-4 / Lickilicky-4 / Reuniclus-3 / Steelix-4): 2RUG-WWWW-WWX3-MQ29
Alright, so this one was played poorly, as most losses can be. I feel like I misplayed multiple times during this battle, and I dragged it on a little too long.
Turn 1 – Tivon leads with Rotom-Frost and Lickilicky. I start off with a Low Kick into Lickilicky, and a Taunt to Rotom. I was afraid of a lot here, and I feel this may have been the wrong move. I should have probably just OHKO’d the Rotom with Shattered Psyche. Can’t really think of a good reason why I did taunt it. However, it did end up going for Will-o-Wisp, so it wasn’t all bad, I think. Lickilicky then goes for something I’ve never seen it do vs Hawlucha/Lele: Brutal Swing. What? That was weird.
Turn 2 – Lickilicky resist-switches to Reuniclus. I have both Hawlucha and Lele use Protect as I was kinda hoping Lickilicky would use Explosion or Breakneck Blitz here since it was low. But it ended up switching to Reuniclus because of the Low Kick from last turn. Rotom then uses Thunder into the Lele slot. Expected Blizzard, but nothing lost here.
Turn 3 – I go for the double-up onto Rotom with Acrobatics and Psychic, and take it out thanks to the earlier damage from Lickilicky’s Brutal Swing. Rotom faints. Reuniclus uses Psychic to take out Hawlucha. I wanted to save my Z-Move as I still didn’t know what Tivon’s last Pokemon was. The better play was to obviously just double up on Reuniclus with Acrobatics and Moonblast. I basically threw Hawlucha away stupidly here.
Turn 4 – I send out Hydreigon, Tivon sends out Lickilicky. Alright, so here I have both Lele and Hydreigon use Protect, anticipating Explosion or Breakneck Blitz into one of them. As for Reuniclus, I was expecting a Focus Blast going to the Hydreigon slot. Lickilicky did indeed use Breakneck Blitz into the Protecting Lele. But Reuniclus goes for Calm Mind! Oh no.
Turn 5 – Alright. Reuniclus has a Calm Mind set up. This is very bad. I end up using Dark Pulse into Reuniclus, hoping for a flinch or a crit. The Colbur Berry, along with the +1 in Special Defence make the attack do pitiful damage. Lele uses Psychic into Lickilicky, finishing it off. Reuniclus, unfortunately, does not flinch, and goes for the Focus Blast into Hydreigon, knocking it out.
Turn 6 – Psychic Terrain expires. Tivon sends out his final Pokemon, Steelix. I send out Metagross. Knowing that this could have potentially been set 3 with the Explosion, I could have gone for Protect with both Metagross and Lele. Mega Steelix would also be a problem as Earthquake does a lot of damage, even without the Sand Force boost. Protect was the play. It was very much was.... except I didn’t do that. Stupid, stupid, stupid. Instead, I go for the Stomping Tantrum and Shattered Psyche into Steelix, and it ended up surviving with just a little bit of HP. Steelix goes for the Earthquake, heavily damaging Mega Metagross, and finishing off Lele. Reuniclus then goes for the Shadow Ball to finish the battle.
Something inside me was telling me to just use Protect. Scout the Steelix set. Hope it was set 3. I mean, the damage from Steelix-4’s Earthquake did some nice damage to Reuniclus. I could have potentially taken it out the next turn, and hope that Steelix went for Sandstorm. Taking out Reuniclus should have been the priority here, but I played poorly and let it destroy me. Oh well. Great run.
Alright I have 3 more battles to share, so here we go.
#1448 vs Backpacker Gwenny (Azelf-2 / Mesprit-2 / Articuno-1 / Cresselia-?): 7BVW-WWWW-WWX3-MQ2L
Turn 1 – Gwenny leads with Azelf and Mesprit. I was already not feeling good about this lead. An Explosion from Azelf-1 can hurt, and Z-Thunder Wave can go into either of my two leads (although it has a preference to paralyze Hawlucha). Mesprit, on the other hand, is either the harmless set 1, or the annoyingly dangerous set 2 with its Bright Powder. I have Lele use Protect, while Hawlucha sets Tailwind. At least with that, Hawlucha will still out-speed everything. Azelf reveals set 2, and goes for the very much expected Z-Thunder Wave into Hawlucha and gains a +1 in Special Defence, while Mesprit also uses its Thunder Wave into Hawlucha. Y’know, in case the first one misses.
Turn 2 – I start the turn off with Lele using Taunt on Mesprit. I tried to have Hawlucha use Acrobatics into the Azelf, but the poor thing ends up fully paralyzed. Azelf then uses Thunder Wave into Lele, and now I have both of my Pokemon paralyzed. Yikes. And of course, Mesprit also tries to use Thunder Wave into Lele, but not only is it taunted, but Lele is also already paralyzed. Since Mesprit might be here a while, I wanted to stop its paralyzing spree for a bit.
Turn 3 – I switch out Hawlucha and send in Hydreigon. Azelf uses Extrasensory but Hydreigon is immune, so she doesn’t care. I try to have Lele use Moonblast into Azelf, but now Lele is fully paralyzed! Ugh. Mesprit then uses Future Sight into the Lele slot. The switch to Hydreigon was mainly so I can take Azelf out with Dark Pulse on the next turn after the chip from Moonblast. But since Lele was fully paralyzed, Azelf does not take any damage. Again.
Turn 4 – One thing I did find out this battle, however, was that Hydreigon takes out Azelf with the Dark Pulse, even if Azelf has a +1 Special Defence boost (244+ SpA Life Orb Hydreigon Dark Pulse vs. +1 0 HP / 0- SpD Azelf: 190-226 (126.6 - 150.6%) -- guaranteed OHKO). Anyway, I end up doing that and take the Azelf out, finally. Lele does not get fully paralyzed and uses Moonblast into Mesprit. Mesprit then uses Future Sight, but it fails. Probably because it was using it into Lele again, since Hydreigon is a Dark-type.
Turn 5 – Mesprit’s Taunt expires, and Tailwind also expires. Gwenny sends out Articuno. This could have been bad if Articuno was set 2. Sheer Cold can be a streak ender if I’m not careful. I switch out Lele to Metagross, and have Hydreigon use Protect, since I didn’t want to take a potential Blizzard or Ice Beam. Articuno uses Blizzard, revealing set 1, but it misses Metagross and Hydreigon doesn’t take any damage, thanks to Protect. Mesprit then goes for Thunder Wave into Hydreigon, which also does nothing, thanks to Protect. Heh.
Turn 6 – Metagross takes the Future Sight that Mesprit used earlier. Psychic Terrain expires. I have Metagross mega evolve and use Iron Head into Articuno, which goes down. Hydreigon uses Dark Pulse into Mesprit, as it also goes down. Thank god that didn’t miss. Stupid Bright Powder.
Turn 7 – Gwenny sends out her final Pokemon, Cresselia. Iron Head and Dark Pulse make quick work of it as it goes down, and the battle is over.
#1353 vs Ace Trainer Raz (Accelgor-4 / Crobat-3 / Sceptile-? / Alakazam-3): WP2G-WWWW-WWX3-MQ3K
Turn 1 – Raz starts off with Accelgor and Crobat. Speed trainers are normally very easy to deal with, as my turn 1 is usually Protect with Lele, and set up Tailwind. Since Crobat was one of the leads, a switch to Metagross didn’t seem so bad since it can potentially go for that into Lele. So, I did that. Hawlucha sets up Tailwind, and Accelgor uses Encore onto Hawlucha. What? I expected a Bug Buzz into the former Lele slot (since it usually does that), but Encore was a new one. Better yet, I hadn’t used a single move yet so it made this turn a little more confusing. Crobat ends the turn off with Cross Poison going into Metagross, who takes no damage thanks to the Steel-typing.
Turn 2 – With Hawlucha encored into Tailwind, obviously I had to switch. So I switched Hawlucha back into Lele. Metagross mega evolves and uses Ice Punch into Crobat. Accelgor then uses Bug Buzz into Metagross, who gets a Special Defence drop. Ugh. Crobat then goes for Brave Bird into the former Hawlucha slot, and Lele takes a bunch of damage. Crobat faints to recoil.
Turn 3 – Raz sends out Alakazam, which then mega evolves. Metagross uses Iron Head into Alakazam and takes it out. Lele then uses Psychic into Accelgor, bringing it down to its Focus Sash. Accelgor then takes Lele out with the Bug Buzz. This turn wasn’t so bad. Alakazam dishes out a lot of damage, so having Metagross take it out immediately is kind of a no-brainer. Bringing Accelgor down to its Sash can be scary, since if it rolls Unburden, it will out-speed the team even under Tailwind. Yikes. Anyway, I was prepared to lose one of my Pokemon here to the Bug Buzz, so I wasn’t too bothered by that.
Turn 4 – Raz sends out his final Pokemon, Sceptile. I send out Hydreigon. So this could have been bad. Accelgor possibly has an Unburden boost up, meaning it can finish off Metagross or severely damage Hydreigon with Bug Buzz. Meanwhile, Sceptile could be set 3 and have Detect. Of course, Accelgor also has Protect, which can be an issue too if it decides to do that. I end up risking it, and have Metagross take Sceptile out with the Ice Punch, and Hydreigon finishes the battle with a Flamethrower into Accelgor. Of course, even if the worst happened, I still had Hawlucha in the back who can deal with both of these sets.
#1280 vs Pokemon Trainer Colress (Alolan Muk-1 / Magnezone-4 / Metagross-4 / Klinklang-3): 8YYG-WWWW-WWX3-MQ4W
Turn 1 – Colress leads with Alolan Muk and Magnezone. Muk’s set is revealed immediately thanks to the Air Balloon. Colress decided to be a problem trainer this battle thanks to this lead though. Magnezone is a pretty threatening Pokemon since it can OHKO Lele with Flash Cannon, or cripple both of my leads with Thunder Wave. A paralysis from Thunderbolt or Thunder is also potentially dangerous. Anyway, I start the battle off with a Low Kick to Magnezone, and a Taunt to Muk. I did this so I can prevent Muk from setting up Minimize and becoming a giant pain later. Magnezone then goes for Thunderbolt into Hawlucha, bringing it down to 3 HP. Muk tries to use Minimize, but fails.
Turn 2 – I double up on Muk with Acrobatics and Moonblast, but it ends up surviving. Magnezone then goes for Flash Cannon into Lele, bringing it down to 2 HP! Muk then uses Snarl to finish off both Hawlucha and Lele. I really should have taken out Magnezone. I did think about doing that, but I fully expected Magnezone to finish off Hawlucha since he was at 3 HP. The Flash Cannon was honestly, unexpected, but maybe I should have figured that was a possibility.
Turn 3 – I send out Metagross and Hydreigon. Metagross mega evolves and uses Stomping Tantrum to finish off Magnezone, while Hydreigon finishes Muk off with a Dragon Pulse. Pretty straight-forward turn.
Turn 4 – Colress sends out his last two Pokemon, Metagross and Klinklang. Alright, this was bad. Metagross-4 can straight up destroy me if I don’t play this right. Klinklang-3 can use Shift Gear and out-speed me and also dish out a lot of damage as well. Opposing Metagross then mega evolves. Hydreigon uses Protect, as enemy Metagross uses Brick Break into that slot. My own Metagross uses Stomping Tantrum into enemy Metagross. Klinklang then uses Z-Shift Gear and boosts its Speed and Attack. I expected the Brick Break into Hydreigon, so that’s why I used Protect. I needed to weaken the enemy Metagross as well. If the Metagross ended up being set 3, this obviously wouldn’t be as bad since set 3 can’t really touch my Metagross (Earthquake is a 3HKO, so I wasn’t too bothered by that either).
Turn 5 – Klinklang uses Giga Impact into Hydreigon, who survives with 6 HP. My Metagross wins the speed-tie with opposing Metagross and finishes it off with Stomping Tantrum. Hydreigon then finishes the battle with Flamethrower into Klinklang. Even if opposing Metagross won the speed-tie and finished off my Hydreigon with Brick Break, I still would have won this battle with Metagross since Klinklang would have to recharge next turn.
And that’s it! Overall, a fun streak and a very fun team. However, since I’ve been working on Lucha-Lele for such a long time, I’m definitely taking a break from it. I’m going to miss this team, and maybe one day I will return to it. I would also like to thank everyone on the Discord for always being so awesome. Great place to hang out and lurk, ha. Anyway, until next time. See ya.
Long time no post! I didn't come to post a streak, because I have nothing to show yet, but to ask for some advice. I'm working on the super singles format in the tree, and I want to be able to earn a respectable streak (100 or so) on my Ultra Sun cart before the new games drop, and this is what I'm working with right now:
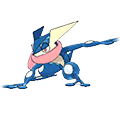
Greninja (M) @ Life Orb
Nature: Timid
Ability: Protean
IVs: 31/x/31/31/31/31
EVs: 4 HP / 252 SpA / 252 Spe
- Surf
- Ice Beam
- Grass Knot
- Dark Pulse
In many ways, I regard Greninja as the spiritual successor of the Starmie that carried me far into the Battle Subway in gen five, and even back then it was paired with the same team mates as this Greninja. There isn't much to be said about the set itself, it's very self-explanatory.

Scizor (M) @ Scizorite
Nature: Adamant
Ability: Technician -> Technician
IVs: 31/31/31/x/31/31
EVs: 252 HP / 252 Atk / 4 SDef
- Bullet Punch
- Superpower
- Swords Dance
- Roost
Scizor switches in on many ice types and dragon types as well as grass attacks aimed at Greninja. I used to run Bug Bite over Superpower but reconsidered after reading a lot of posts in this thread, using Superpower provides better coverage against stuff like Ferrothorn and the plethora of bulky normal types in the tree (Snorlax, M-Kangaskhan, etc.). Otherwise it's all standard stuff.
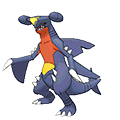
Garchomp (M) @ Dragonium-Z
Nature: Jolly
Ability: Rough Skin
IVs: 31/31/31/x/31/31
EVs: 4 HP / 252 Atk / 252 Spd
- Earthquake
- Outrage
- Swords Dance
- Substitute
Sub-Chomp rounds out the team well and switches in on some things neither of the other two want to touch with a ten-foot pole. I used to run a team of DD-Dragonite/Suicune/M-Scizor, but I lost to random things like Magnezone (admittedly with some hax), and Rotom-Frost of all things. I needed an electric immunity it seemed, and it made me reconsider the team in its entirety. I've seen some others use Dragon Claw on Garchomp, but I think the immediate power of Outrage is needed with Jolly, though I hate locking into it without a sub up. Thankfully, it doens't happen very often.
I lost my streak at 59 hilariously to Sina who used Glaceon-3, in a loss involving both getting my Scizor frozen and her getting Snow Cloak hax. :( I know that the team is capable of a longer streak, at least to my goal of 100 wins, since others have cleared 100+ wins with the same team (more or less), so I'm back at it and I just beat Red.
Before proceeding though, I wanted to ask the experts here on whether or not I could fix something with my team before I keep going? My main questions are:
- I've only PP-Up:ed Scizor's Roost; are there any other moves you think I need to PP-Up? None of my mons are going to stall anything out, bar Scizor stalling out some 5 PP moves, most notably Stone Edges and Focus Blasts. Is there any use using any PP-Ups?
- The EV-spreads are super simple, and while both Garchomp and Greninja are pretty self-explanatory, I don't think Scizor's EV:s are optimal. Should I spend more in SDef for example? Are there any useful speed tiers I could hit with some investment?
Greninja (M) @ Life Orb
Nature: Timid
Ability: Protean
IVs: 31/x/31/31/31/31
EVs: 4 HP / 252 SpA / 252 Spe
- Surf
- Ice Beam
- Grass Knot
- Dark Pulse
In many ways, I regard Greninja as the spiritual successor of the Starmie that carried me far into the Battle Subway in gen five, and even back then it was paired with the same team mates as this Greninja. There isn't much to be said about the set itself, it's very self-explanatory.
Scizor (M) @ Scizorite
Nature: Adamant
Ability: Technician -> Technician
IVs: 31/31/31/x/31/31
EVs: 252 HP / 252 Atk / 4 SDef
- Bullet Punch
- Superpower
- Swords Dance
- Roost
Scizor switches in on many ice types and dragon types as well as grass attacks aimed at Greninja. I used to run Bug Bite over Superpower but reconsidered after reading a lot of posts in this thread, using Superpower provides better coverage against stuff like Ferrothorn and the plethora of bulky normal types in the tree (Snorlax, M-Kangaskhan, etc.). Otherwise it's all standard stuff.
Garchomp (M) @ Dragonium-Z
Nature: Jolly
Ability: Rough Skin
IVs: 31/31/31/x/31/31
EVs: 4 HP / 252 Atk / 252 Spd
- Earthquake
- Outrage
- Swords Dance
- Substitute
Sub-Chomp rounds out the team well and switches in on some things neither of the other two want to touch with a ten-foot pole. I used to run a team of DD-Dragonite/Suicune/M-Scizor, but I lost to random things like Magnezone (admittedly with some hax), and Rotom-Frost of all things. I needed an electric immunity it seemed, and it made me reconsider the team in its entirety. I've seen some others use Dragon Claw on Garchomp, but I think the immediate power of Outrage is needed with Jolly, though I hate locking into it without a sub up. Thankfully, it doens't happen very often.
I lost my streak at 59 hilariously to Sina who used Glaceon-3, in a loss involving both getting my Scizor frozen and her getting Snow Cloak hax. :( I know that the team is capable of a longer streak, at least to my goal of 100 wins, since others have cleared 100+ wins with the same team (more or less), so I'm back at it and I just beat Red.
Before proceeding though, I wanted to ask the experts here on whether or not I could fix something with my team before I keep going? My main questions are:
- I've only PP-Up:ed Scizor's Roost; are there any other moves you think I need to PP-Up? None of my mons are going to stall anything out, bar Scizor stalling out some 5 PP moves, most notably Stone Edges and Focus Blasts. Is there any use using any PP-Ups?
- The EV-spreads are super simple, and while both Garchomp and Greninja are pretty self-explanatory, I don't think Scizor's EV:s are optimal. Should I spend more in SDef for example? Are there any useful speed tiers I could hit with some investment?
Welcome to the "Sina is the devil" club, do not worry, you are not alone in this :DI lost my streak at 59 hilariously to Sina who used Glaceon-3, in a loss involving both getting my Scizor frozen and her getting Snow Cloak hax. :(