Team help please! Super singles looking to get higher streaks to unlock Wally for multibattles. My current team only got to battle 52 before falling to something I forgot. Here is my current team:
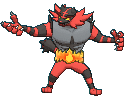
Salamence Salamencite
Nature: jolly
Ability: intimidate (aerilate upon mega-evolving)
IVs: all 31 except spA
EVs: 252 spe 252 atk 6 spdef
Return
Dragon claw
Earthquake
Dragon dance
This guy leads the team. Intimidate ability to start guarantees the opposition’s lead will be crippled from the start if it uses physical attacks, granting mence a turn of DD setup. Usually he doesn’t need it, especially between battles 1-35, wherein the opposition uses weaker Pokémon. Return hits like a truck, dragon claw is reliable neutral coverage for other dragons and mons that resist return and earthquake, and dragon dance is for breaking through more defensive mons provided they aren’t ones that use status. My other mons can cover mence’s weaknesses really well, and both don’t really mind status, so there’s the added benefit of status protection, which mence really, REALLY enjoys. Usually mence can rip through teams, but if he runs into trouble, I have my other two mons: ...
tapu-koko Life Orb
Nature: timid
Ability: electric surge
IVs: all 31 except attack
EVs: 252 spe 252 spA 6 spdef
Thunderbolt
Dazzling gleam
Grass knot
Taunt
Tapu-koko is really, really good at 3 things: 1) cleaning and even wallbreaking provided electric terrain is up, 2) eating status like paralysis and burns which really hurt salamence, and 3) shutting down annoying status users and even causing some to struggle to death. It has the added benefit of being immune to dragon moves that threaten salamence, and can also take physical hits reasonably well after salamence’s intimidate kicks in, guaranteeing it will be in play for at least 2 turns almost every time. Life orb is of course for extra power, dazzling gleam is extra stab for mons immune to or resistant to electric attacks, and grass knot is for breaking through heavy and electric-immune ground or rock types like rhyperior, hippowdown, etc. Taunt is extra and has proven useful in certain situations, freeing up salamence to set up more easily, especially if it hasn’t gone mega yet, and also really helps out my next mon...
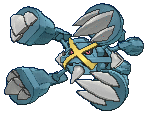
aegislash Leftovers
Nature: quiet
Ability: stance change
IVs: all 31 except speed, which is low but not 0, unfortunately. Too difficult to breed that on
EVs: 252 hp 252 spA 6 atk
Flash cannon
Shadow ball
Shadow sneak
Kings shield
Aegislash...where do I begin?! It eats up ice, dragon, rock, and fairy attacks for Salamence. It eats up poison for Tapu Koko and can even take earthquakes for it. It is both an offensive and defensive behemoth, and I’ve saved salamence and Tapu-koko from certain death too many times to count with this monster. Its low speed and low reliance on physical attack means it doesn’t mind paralysis or burns, and it can’t be whittled down with toxic. Leftovers provides passive recovery and can activate twice with King’s Shield. Speaking of kings shield, it can harshly lower the opposition’s physical attack if it’s using a contact move, which stacks with intimidate to render them practically useless. It can even take super effective stabs from the likes of weavile, which is a reasonably powerful physical sweeper that I tend to run into a lot. I opted for a speed reducing nature to almost guarantee that it eats up an attack while in shield form and then hits back extremely hard, paving the way for salamence or Tapu Koko when it goes down, if it does. shadow sneak, while somewhat weak without much investment, can pick off focus sash users or extremely weakened mons in a pinch. Flash cannon and shadow ball provide surprisingly good super effective coverage for mons that threaten mence and koko, as well as surprisingly good neutral coverage, even if it isn’t a physical set that uses sacred sword. They both also have a chance of lowering the opposition’s special defense, making destroying things easier. The reason I opted for a special set is because I really want to save salamence from burns, and it doesn’t mind paralysis since it’s meant to be slow anyway. Quiet nature is to ensure shadow sneak isn’t overly weakened, and the low speed IV is to help it move last. Anyway, eating up attacks and hitting back really hard is what this guy is meant to do, and he sort of serves as an essential glue for the team.
Thoughts? Comments? Advice? All greatly appreciated, as I want to achieve highest streaks possible until I can scout Wally with mega gallade and scarfed garchomp to use in multibattle since I’m not able to hook up with a friend who wants to conquer this with me..lol. Thanks in advance!!! :)
Salamence Salamencite
Nature: jolly
Ability: intimidate (aerilate upon mega-evolving)
IVs: all 31 except spA
EVs: 252 spe 252 atk 6 spdef
Return
Dragon claw
Earthquake
Dragon dance
This guy leads the team. Intimidate ability to start guarantees the opposition’s lead will be crippled from the start if it uses physical attacks, granting mence a turn of DD setup. Usually he doesn’t need it, especially between battles 1-35, wherein the opposition uses weaker Pokémon. Return hits like a truck, dragon claw is reliable neutral coverage for other dragons and mons that resist return and earthquake, and dragon dance is for breaking through more defensive mons provided they aren’t ones that use status. My other mons can cover mence’s weaknesses really well, and both don’t really mind status, so there’s the added benefit of status protection, which mence really, REALLY enjoys. Usually mence can rip through teams, but if he runs into trouble, I have my other two mons: ...
tapu-koko Life Orb
Nature: timid
Ability: electric surge
IVs: all 31 except attack
EVs: 252 spe 252 spA 6 spdef
Thunderbolt
Dazzling gleam
Grass knot
Taunt
Tapu-koko is really, really good at 3 things: 1) cleaning and even wallbreaking provided electric terrain is up, 2) eating status like paralysis and burns which really hurt salamence, and 3) shutting down annoying status users and even causing some to struggle to death. It has the added benefit of being immune to dragon moves that threaten salamence, and can also take physical hits reasonably well after salamence’s intimidate kicks in, guaranteeing it will be in play for at least 2 turns almost every time. Life orb is of course for extra power, dazzling gleam is extra stab for mons immune to or resistant to electric attacks, and grass knot is for breaking through heavy and electric-immune ground or rock types like rhyperior, hippowdown, etc. Taunt is extra and has proven useful in certain situations, freeing up salamence to set up more easily, especially if it hasn’t gone mega yet, and also really helps out my next mon...
aegislash Leftovers
Nature: quiet
Ability: stance change
IVs: all 31 except speed, which is low but not 0, unfortunately. Too difficult to breed that on
EVs: 252 hp 252 spA 6 atk
Flash cannon
Shadow ball
Shadow sneak
Kings shield
Aegislash...where do I begin?! It eats up ice, dragon, rock, and fairy attacks for Salamence. It eats up poison for Tapu Koko and can even take earthquakes for it. It is both an offensive and defensive behemoth, and I’ve saved salamence and Tapu-koko from certain death too many times to count with this monster. Its low speed and low reliance on physical attack means it doesn’t mind paralysis or burns, and it can’t be whittled down with toxic. Leftovers provides passive recovery and can activate twice with King’s Shield. Speaking of kings shield, it can harshly lower the opposition’s physical attack if it’s using a contact move, which stacks with intimidate to render them practically useless. It can even take super effective stabs from the likes of weavile, which is a reasonably powerful physical sweeper that I tend to run into a lot. I opted for a speed reducing nature to almost guarantee that it eats up an attack while in shield form and then hits back extremely hard, paving the way for salamence or Tapu Koko when it goes down, if it does. shadow sneak, while somewhat weak without much investment, can pick off focus sash users or extremely weakened mons in a pinch. Flash cannon and shadow ball provide surprisingly good super effective coverage for mons that threaten mence and koko, as well as surprisingly good neutral coverage, even if it isn’t a physical set that uses sacred sword. They both also have a chance of lowering the opposition’s special defense, making destroying things easier. The reason I opted for a special set is because I really want to save salamence from burns, and it doesn’t mind paralysis since it’s meant to be slow anyway. Quiet nature is to ensure shadow sneak isn’t overly weakened, and the low speed IV is to help it move last. Anyway, eating up attacks and hitting back really hard is what this guy is meant to do, and he sort of serves as an essential glue for the team.
Thoughts? Comments? Advice? All greatly appreciated, as I want to achieve highest streaks possible until I can scout Wally with mega gallade and scarfed garchomp to use in multibattle since I’m not able to hook up with a friend who wants to conquer this with me..lol. Thanks in advance!!! :)


 . You've definitely given me a lot to consider. Enough to make me rethink how heavily I weigh certain factors when choosing a Pokemon.