Gen III Battle Frontier Discussion and Records

This is a technical post again, for the interested reader. I decided to use my program to make a probability estimation in a more complicated situation than what I already did for n-HKO lead probabilities (factoring in crits and other random effects of moves, such as misses, status inflictions and stat raises/drops, taking into account items such as Sitrus/Lum Berry and Leftovers as well).

Lately I've had many discussions EV-ing the following Pokemon, informally called FatMence:

View attachment 321985
Salamence @ Leftovers
Ability: Intimidate
EVs: 52 HP / a lot of Atk / a lot of Def / maybe a tiny bit of SpD / 16 Spe
Adamant Nature (+Atk, -SpA)
IVs: either perfect or 30 SpA / 30 SpD / 30 Spe for HP[Flying]
- Dragon Dance
- Substitute
- Aerial Ace / Hidden Power [Flying]
- Earthquake

It is most commonly seen on cripple + setup teams and sometimes on a Trick team (such as Trick + Grudge Ninetales) because it makes Substitutes that are unbreakable by Struggle after Intimidate, and it sweeps nearly the entire pool of Frontier opponents after setting up to +6/+6.

In fact, the only non-Frontier Brain Pokemon that can survive its HP[Flying] after setup are Skarmory, Lunatone, Solrock, Zapdos, Slaking, Umbreon, Regice, Cloyster, Suicune, Aerodactyl, Lapras, Articuno and maybe Dewgong if you use Aerial Ace and less-than-max Attack. The Pokemon in red can be dangerous if your Substitute got broken before. Or they might break your Substitute and open up Salamence to Quick Claw / Brightpowder / Focus Band hax after that, for example. Or you simply might get two of them in succession during a bad matchup.

The most logical, straightforward thing to do is simply use Hidden Power [Flying] with 252+ Attack, since that indeed maximizes all the rolls and even eliminates Pokemon from the list above:
Skarmory (Skarmory-Boss [Noland Silver†])HP Flying52.9 - 62.7%0.4% chance to 2HKO after Sitrus Berry recovery
Skarmory (Skarmory-Boss [Noland Gold†])HP Flying52.9 - 62.7%0.4% chance to 2HKO after Sitrus Berry recovery
Skarmory (Skarmory-3 [579])HP Flying58.7 - 69.1%guaranteed 2HKO
Skarmory (Skarmory-4 [675])HP Flying58.7 - 69.1%guaranteed 2HKO
Skarmory (Skarmory-1 [387])HP Flying62.7 - 73.9%guaranteed 2HKO
Skarmory (Skarmory-2 [483])HP Flying62.7 - 73.9%guaranteed 2HKO
Lunatone (Lunatone-1 [223])HP Flying77.4 - 91.5%guaranteed 2HKO after Sitrus Berry recovery
Lunatone (Lunatone-2 [328])HP Flying77.4 - 91.5%guaranteed 2HKO
Solrock (Solrock-1 [224])HP Flying86.4 - 102.2%18.8% chance to OHKO
Solrock (Solrock-2 [329])HP Flying86.4 - 102.2%18.8% chance to OHKO
Zapdos (Zapdos-1 [758])HP Flying92.7 - 109.6%56.3% chance to OHKO
Zapdos (Zapdos-2 [769])HP Flying92.7 - 109.6%56.3% chance to OHKO
Zapdos (Zapdos-3 [780])HP Flying92.7 - 109.6%56.3% chance to OHKO
Zapdos (Zapdos-4 [791])HP Flying92.7 - 109.6%56.3% chance to OHKO
Zapdos (Zapdos-5 [873])HP Flying92.7 - 109.6%56.3% chance to OHKO
Zapdos (Zapdos-6 [874])HP Flying92.7 - 109.6%56.3% chance to OHKO
Shuckle (Shuckle-Boss [Lucy Silver])HP Flying92.9 - 109.4%56.3% chance to OHKO
Slaking (Slaking-1 [468])HP Flying93.4 - 110.1%62.5% chance to OHKO
Slaking (Slaking-2 [564])HP Flying95.1 - 112%68.8% chance to OHKO
Slaking (Slaking-3 [660])HP Flying95.1 - 112%68.8% chance to OHKO

But of course, some extra EVs in Defense are very welcome while setting up, and you might want to try Aerial Ace to prevent Brightpowder hax against many opponents in general. When using HP[Flying], general good marks are 202 Attack for the 50% against Zapdos, or even as low as 199 with 43.8% to OHKO Zapdos and still OHKO Aerodactyl, bulky Regice and Suicune.

But in this post I would like to give Skarmory-3 [579], the one with Curse, Fly, Toxic and Rest, some attention. If you played this kind of Salamence (or Gyarados for that matter) before, you're probably familiar with the risk of not 2HKOing (because it uses Curse after the first hit) and letting it setup because of Chesto Rest. If this Skarmory pulls through, it will counter you with +6 Fly eventually, as you won't be able to outstall all of its 15 PP by using Substitute usually.

Of course, if you critically hit somewhere, you win automatically, but in general it can be a very lengthy process, and there's always a chance you won't get it before Skarmory starts using attacks of its own. All-in-all, I kept wondering what the eventual winning probability is for Salamence, so I used my program to simulate this situation 10.000 times for different Attack stats and both for Aerial Ace and Hidden Power [Flying]. I didn't want to simulate a million battles, because I this PC can only do around 60~70 battles per second as some of them take long. With these settings I needed around 3 minutes per case. How little Attack can you afford to still have really good chance of beating it?

In these simulations, I assumed the following, which I hope reflect the actual game's strategy but to my feeling it does:
  • Skarmory uses Curse if its HP is greater than or equal to half its HP (86) and Rest otherwise (first time it consumes Chesto Berry ofc);
  • Salamence is at +6 Attack and only spams its Flying-type STAB;
  • If Skarmory faints, Salamence wins (duh);
  • If Skarmory gets to +6/+6/-6, is not sleeping, and has more than 65% HP left, Skarmory 'wins'.
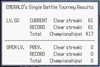
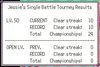
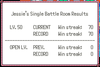
The last assumption is to prevent having to think about Fly mechanics, but reflects the situation where Skarmory will start using Fly, so Salamence won't be able to use many Hidden Powers anymore in fear of Toxic. While not a losing scenario per se, it sure looks bad for Salamence. This should be taken into account when looking at the final results. Note that the 2HKO from the start is present with decent Attack stat, but the probability of not critting diminishes as well.

The results
In the following table, I rounded the four-decimal ratio estimators to two places a bit arbitrarily, but since it's still a Monte Carlo simulation I decided to go for a lazy cutoff to reduce "arbitrary garbage info" as much as possible. Since it's a "Bernoulli trial" estimator of sorts, it's hard to build a good confidence interval, and even rounding to full percentages leaves room for small error, although not too likely.

Attack statEVs requiredAA win probabilityHP[Flying] win probability
2052520.741.00 (not guaranteed)
2042440.741.00 (not guaranteed)
2032360.720.99
2022280.720.98
2012200.710.98
2002120.710.98
1992040.700.96
194 (Gyarados)252-0.87

Note that some Atk stats are redundant, such as 201 Attack, since it doesn't change the range against Skarmory and only changes the range of Aerial Ace against Zapdos, which is a 2HKO anyway.

Conclusion
Use Sharp Beak if you want the guaranteed win, haha. On a more serious note, use this for your own team!

Of course, I could have made these calculations exact simply by analysing the damage range and crits after. But I wanted to illustrate the power of simulations and use the scenario as a practice case.

If you want to see more of these kind of calculations, please let me know.
Absolutely beautiful post. I've been running a lot of Mence lately and you've helped me a lot with running a spread.
My personal opinion on the best bulky Salamence spread is this one : 180 HP/ 220 Attack / 92 Def/ 16 Speed
HP Flying. 31/31/31/ 30/30 /30

Edit: 52 HP / 228 attack / 214 Def / 16 Speed. HP Flying. 31/31/31/ 30/30 /30.

This is also viable for limiting recoil on struggle teams.

Faster than: Slaking and Slow Zapdos before a DD. Only Jolteon 4 out speeds after a DD.
Achieves all the ohkoes/ 2 hit koes that you need to with HP flying.
Bulk level: THICKKK. An absolute tank. You absolutely need support to set up though, especially since it's speed tier before a DD is suboptimal.

If you want a faster DD user (so you aren't threatened as much before a DD), I would recommend using AT LEAST 220 speed (224 on 30 iv) for a faster variant.
I lost twice (once to Electabuzz 2 and Tentacruel 3) because of lack of speed. 252 speed is also viable if you feel more comfortable speed tying the base 100s and outspeeding Latios 8 and Latias 8 (which don't have super effective moves to hit you by the way). However, I will remind everyone that Mence's power isn't particularly great before a DD anyways.

For instance, you don't always ohko Pinsir 2 and Jolteon 3 before a DD.

252+ Atk Salamence Earthquake vs. 170 HP / 170+ Def Jolteon: 140-166 (86.9 - 103.1%) -- 18.8% chance to OHKO
252+ Atk Salamence Hidden Power Flying vs. 0 HP / 0 Def Pinsir: 134-162 (95.7 - 115.7%) -- 81.3% chance to OHKO


This is the reason I feel more comfortable running 220 speed and forgoing the extra speed. But I'll let everyone else decide for themselves how much speed to run on a faster variant.

Spread would look like this: 52 HP/ 236 Attack / 224 speed (For the 30 speed iv, Hp flying one).

If you do plan on running Aerial Ace, it's only really viable on the bulky Salamence spread (sacrifice some def for attack). You want at least 236 attack or 244 for the clean 2ko on Skarm. Here's the calculations.

+6 236+ Atk Salamence Earthquake vs. 170 HP / 170 Def Suicune: 196-231 (100 - 117.8%) -- guaranteed OHKO
+6 236+ Atk Salamence Earthquake vs. 252 HP / 252+ Def Regice: 182-215 (97.3 - 114.9%) -- 87.5% chance to OHKO
+6 244+ Atk Salamence Aerial Ace vs. 252 HP / 0 Def Skarmory: 86-102 (50 - 59.3%) -- guaranteed 2HKO
+6 236+ Atk Salamence Aerial Ace vs. +1 252 HP / 0 Def Skarmory: 57-68 (33.1 - 39.5%) -- 100% chance to 3HKO

Spread would look like this : 180 HP/ 244 Attack / 74 Def / 12 Speed.

Item choice: Leftovers/ Lum/ Sharp Beak is my preference for item on Mence. I rather have the rolls on damage than the extra power.
Lum in particular is very useful for the faster variant (which lowers your risk against t-wave Jolteon).
 
Last edited:
Absolutely beautiful post. I've been running a lot of Mence lately and you've helped me a lot with running a spread.
My personal opinion on the best bulky Salamence spread is this one : 52 HP / 228 attack / 214 Def / 16 Speed. HP Flying. 31/31/31/ 30/30 /30

Faster than: Slaking and Slow Zapdos before a DD. Only Jolteon 4 out speeds after a DD.
Achieves all the ohkoes/ 2 hit koes that you need to with HP flying.
Bulk level: THICKKK. An absolute tank. You absolutely need support to set up though, especially since it's speed tier before a DD is suboptimal.

If you want a faster DD user (so you aren't threatened as much before a DD), I would recommend using AT LEAST 220 speed for a faster variant.
I lost twice (once to Electabuzz 2 and Tentacruel 3) because of lack of speed. 252 speed is also viable if you feel more comfortable speed tying the base 100s and outspeeding Latios 8 and Latias 8 (which don't have super effective moves to hit you by the way). However, I will remind everyone that Mence's power isn't particularly great before a DD anyways.

For instance, you don't always ohko Pinsir 2 and Jolteon 3 before a DD.

252+ Atk Salamence Earthquake vs. 170 HP / 170+ Def Jolteon: 140-166 (86.9 - 103.1%) -- 18.8% chance to OHKO
252+ Atk Salamence Hidden Power Flying vs. 0 HP / 0 Def Pinsir: 134-162 (95.7 - 115.7%) -- 81.3% chance to OHKO


This is the reason I feel more comfortable running 220 speed and forgoing the extra speed. But I'll let everyone else decide for themselves how much speed to run on a faster variant.

Spread would look like this: 52 HP/ 236 Attack / 224 speed (For the 30 speed iv, Hp flying one).

If you do plan on running Aerial Ace, it's only really viable on the bulky Salamence spread (sacrifice some def for attack). You want at least 236 attack or 244 for the clean 2ko on Skarm. Here's the calculations.

+6 236+ Atk Salamence Earthquake vs. 170 HP / 170 Def Suicune: 196-231 (100 - 117.8%) -- guaranteed OHKO
+6 236+ Atk Salamence Earthquake vs. 252 HP / 252+ Def Regice: 182-215 (97.3 - 114.9%) -- 87.5% chance to OHKO
+6 244+ Atk Salamence Aerial Ace vs. 252 HP / 0 Def Skarmory: 86-102 (50 - 59.3%) -- guaranteed 2HKO
+6 236+ Atk Salamence Aerial Ace vs. +1 252 HP / 0 Def Skarmory: 57-68 (33.1 - 39.5%) -- 100% chance to 3HKO

Spread would look like this : 52 HP /244 Attack / 202 Def / 12 Speed.

Item choice: Leftovers/ Lum/ Sharp Beak is my preference for item on Mence. I rather have the rolls on damage than the extra power.
Lum in particular is very useful for the faster variant (which lowers your risk against t-wave Jolteon).
IMO there are several speed tiers worth considering for Salamence:

  • 140 Speed EVs (144 with 30 IVs in Spe): let's you outspeed all Heracross sets (Heracross 3 notably has Rock Slide which can bring down Salamence with flinches)
  • 164 Speed EVs (168 with 30 IVs in Spe): let's you outspeed all Alakazma sets. Never hurts getting an attack first against Alakazam

Additionally in regards to the EV spread you posted on Salamence, I think it can be improved:

  • -2 255+ SpA Houndoom Crunch vs. 52 HP / 0 SpD Salamence: 41-49 (23.1 - 27.6%) -- 56.3% chance to OHKO
The benefits of using 180 HP (which still gives a perfect Leftovers number) prevents -2 Houndoom from breaking your Substitute. With 52 HP, Houndoom has more than 50% chance of breaking it which makes it almost impossible to stall. Of course it comes at the price of making Ursaring take more damage from recoil but I'd argue that the extra HP makes you gain bulk from the special side which is always nice. This can be further optimized, but I only recommend using this with HP Flying as otherwise, it's almost impossible to optimize with AERO-ASS due to the sheer amount of Attack EVs it needs to actually do some damage.
  • -2 255+ SpA Houndoom Crunch vs. 180 HP / 0 SpD Salamence: 41-49 (21.2 - 25.3%) -- 6.3% chance to OHKO
 
Welcome back to the Battle Arena
Lati-Sandwich (with a side of Slaking)

latios gif.gif
snorlax gif.gif
latias gif.png
slaking gif.png
Well I'm back again still furthering my Battle Arena streak, with lots of bad luck and stupid losses as you'd expect. Today I'm updating with some new streaks going into the 200s as well as some testing with a new third PKMN, which I had some pretty successful streaks with. The Truant king Slaking.
To start here are two streaks, one that got to 210 with the new Slaking third, and one to 211 with Latias.


The team as of this point, is still the same from my last post on the Lati-Sandwich. Regardless here is the team again - spare of the explanations of the spreads and whatnot, of which can be seen in my last post.

latios gif.gif

LATIOS (Latios) @ Lum Berry
Ability: Levitate
Level: 50
EVs: 78 HP / 252 SpA / 180 Spe
Modest Nature
IVs: x Atk
- Psychic
- Ice Beam
- Thunderbolt
- Memento

snorlax gif.gif

SNORLAX (Snorlax) (F) @ Chesto Berry
Ability: Thick Fat
Level: 50
EVs: 138 HP / 252 Atk / 116 Def / 4 Spe
Adamant Nature
IVs: x SpA
- Curse
- Earthquake
- Shadow Ball
- Self-Destruct

latias gif.png

LATIAS (Latias) @ Twisted Spoon
Ability: Levitate
Level: 50
EVs: 74 HP / 252 SpA / 184 Spe
Modest Nature
IVs: 30 Atk / 30 SpA / 30 Spe
- Psychic
- Ice Beam
- Thunderbolt
- Hidden Power [Fire]

Not much new to say about this team, Latios and Snorlax are fantastic and fairly unmatched in usefulness in a team of this style in the Arena. Latias is good and effective, but isn't perfect and I have been willing to let it go in hope of further optimizing the team. Mostly in the past I'd tested with strong special attackers with hopefully a little bulk that would be able to carry out a similar role that Latias does, but Latias does it best, and HP Fire comes in handy VERY often. Metagross, Registeel, Steelix, Scizor, etc. All things that would otherwise be troublesome and threatening if they come out in the second or third slot are really stopped in their tracks by this coverage move. Again, like the rest of Latias it isn't perfect, but the best option so far in my opinion.

With the knowledge that Latias isn't perfect in mind, I moved away from special attackers and wanted to do some more testing with strong Choice Band users. I don't think set up is ideal in Arena, and without the Choice Band I feel that there isn't really any physical PKMN that can do what it needs to. With candidates like Tauros, Heracross, Metagross and more, Slaking was really a standout, and it makes me wonder why I haven't done more testing with it in the past.

slaking gif.png

SLAKING (Slaking) (F) @ Choice Band
Ability: Truant
Level: 50
EVs: 4 HP / 252 Atk / 252 Spe
Adamant Nature
- Return/Double-Edge
- Shadow Ball
- Earthquake
- Hyper Beam

I'm not sure if there is a better spread to be running Slaking, I don't really think it's worth sacrificing some OHKO's just to boost up the speed tier, especially when there isn't ALOT that can threaten it that outspeeds it, at the very least it has to worry about getting crit or 2HKO'd by a special attacker.

Using Slaking always feels reminiscent of old Battle Tower teams I used to use with something like Metagross with explosion in slot two just so I could switch Slaking back in for the last kill. This isn't exactly that, but when you look at Latios and Snorlax, Slaking has a surprisingly powerful synergy with them.

The way that this team is built, though in the previous iteration the plan was to keep Latias off of the field, Latios and Snorlax are readily able to take out the first two PKMN. Latios easily 1, 2, or 3HKO's a vast number of PKMN, with the few that can beat it, namely some special attackers, are all easy cleanup for Snorlax. With that Snorlax can easily use Selfdestruct and OHKO 95% of the Frontier. Having the first two members being able to take out the opponent first two of most possible teams, the amazing Slaking who can pick up so so many OHKO's just takes out the last opponent PKMN. As you'd be able to see in the first streak, many battles go this way. Latios takes out the first one(or more if possible), Snorlax finishes off the second one or blows up on it, and Slaking picks up the KO easily.

While in theory this works every time, Slaking has obvious flaws like the few KO's it can't pick up against things like Armaldo, Registeel and Regirock, Shuckle, certain Salamence sets, etc. And of course the biggest flaw with this idea is if Slaking has to come out against the second PKMN, in which case the game is likely lost. Not always, as it happens a couple times in the streak, but most obviously in the losing battle. Part of running Slaking is also knowing or at least checking the trainer you're up against. If they have the possibility to throw out a ghost or anything that can survive a blow from Slaking forces you to radically change the game plan.

little manectric.png
little regice.png
little misdreavus.png

In the Slaking streak the loss is pretty self explanatory. This loss was very avoidable. It was late and my brain wasn't completely in the game. Manectric crit on Latios didn't matter, both because Snorlax easily OHKO's it and the second PKMN was Regice, whom Latios does not touch. Based on what I said about how you'd want to play Slaking, I played this incorrectly. I should have used Selfdestruct on Regice and I would not have had the issue of being locked into a useless move vs. Misdreavus. Very avoidable, and just how the team works. My brain was still in Latias mode. At the very least this demonstrates the weaknesses in the Slaking pick, even if it was my fault I lost.

little metagross.png
little skarmory.png
little regirock.png

This is purely just a very difficult team for "Lati-Sandwich" to beat. Period. Metagross isn't something that I consider extremely threatening, but in the first slot is by far the worst, as unless it misses Meteor Mash, beats Latios and gets a hit in on Snorlax. That is exactly what happens, but unfortunately another steel type comes out who Snorlax is forced to blow up on. Had I not been crit by the Metagross EQ, maybe I could've used Shadow Ball, but after all it didn't matter because even if Snorlax took out Skarm, the odds were the same to take out Regirock with Latias.
This was either Regirock(1) or (2). Which incidentally, is the best case scenario for Latias to win.

252+ SpA Twisted Spoon Latias Psychic vs. 255 HP / 0 SpD Regirock: 84-99 (44.9 - 52.9%) -- 30.5% chance to 2HKO

With only 30.5% chance to win the streak was over. Not the highest I've ever streaked with this team, but I think matchups against teams like this are unavoidable and are just the reality of the Arena, bad luck or good luck, matchup will still be equally or more important.

In all these are just two of many streaks I've been doing. Slaking has lots of potential, but I'm not convinced it is better than Latias in the last slot, mostly because it can't KO PKMN like on this team here that I lost to in the Latias streak. Most of my streaks die to misplay or bad luck in the 147-196 range, but I think(as demonstrated in the Slaking loss) that if I take breaks at certain points I'll play better. The teams aren't getting harder at that point in the streak, so it just boils down to playing right and not getting haxed too much. Let me know what you think about Slaking or another CB user in the Latias slot.
 
Last edited:

QuentinQuonce

formerly green_typhlosion
Welcome back to the Battle Arena
Lati-Sandwich (with a side of Slaking)

View attachment 322293View attachment 322294View attachment 322295View attachment 322296
Well I'm back again still furthering my Battle Arena streak, with lots of bad luck and stupid losses as you'd expect. Today I'm updating with some new streaks going into the 200s as well as some testing with a new third PKMN, which I had some pretty successful streaks with. The Truant king Slaking.
To start here are two streaks, one that got to 210 with the new Slaking third, and one to 211 with Latias.


The team as of this point, is still the same from my last post on the Lati-Sandwich. Regardless here is the team again - spare of the explanations of the spreads and whatnot, of which can be seen in my last post.

View attachment 322297
LATIOS (Latios) @ Lum Berry
Ability: Levitate
Level: 50
EVs: 78 HP / 252 SpA / 180 Spe
Modest Nature
IVs: x Atk
- Psychic
- Ice Beam
- Thunderbolt
- Memento

View attachment 322298
SNORLAX (Snorlax) (F) @ Chesto Berry
Ability: Thick Fat
Level: 50
EVs: 138 HP / 252 Atk / 116 Def / 4 Spe
Adamant Nature
IVs: x SpA
- Curse
- Earthquake
- Shadow Ball
- Self-Destruct

View attachment 322299
LATIAS (Latias) @ Twisted Spoon
Ability: Levitate
Level: 50
EVs: 74 HP / 252 SpA / 184 Spe
Modest Nature
IVs: 30 Atk / 30 SpA / 30 Spe
- Psychic
- Ice Beam
- Thunderbolt
- Hidden Power [Fire]

Not much new to say about this team, Latios and Snorlax are fantastic and fairly unmatched in usefulness in a team of this style in the Arena. Latias is good and effective, but isn't perfect and I have been willing to let it go in hope of further optimizing the team. Mostly in the past I'd tested with strong special attackers with hopefully a little bulk that would be able to carry out a similar role that Latias does, but Latias does it best, and HP Fire comes in handy VERY often. Metagross, Registeel, Steelix, Scizor, etc. All things that would otherwise be troublesome and threatening if they come out in the second or third slot are really stopped in their tracks by this coverage move. Again, like the rest of Latias it isn't perfect, but the best option so far in my opinion.

With the knowledge that Latias isn't perfect in mind, I moved away from special attackers and wanted to do some more testing with strong Choice Band users. I don't think set up is ideal in Arena, and without the Choice Band I feel that there isn't really any physical PKMN that can do what it needs to. With candidates like Tauros, Heracross, Metagross and more, Slaking was really a standout, and it makes me wonder why I haven't done more testing with it in the past.

View attachment 322300
SLAKING (Slaking) (F) @ Choice Band
Ability: Truant
Level: 50
EVs: 4 HP / 252 Atk / 252 Spe
Adamant Nature
- Return/Double-Edge
- Shadow Ball
- Earthquake
- Hyper Beam

I'm not sure if there is a better spread to be running Slaking, I don't really think it's worth sacrificing some OHKO's just to boost up the speed tier, especially when there isn't ALOT that can threaten it that outspeeds it, at the very least it has to worry about getting crit or 2HKO'd by a special attacker.

Using Slaking always feels reminiscent of old Battle Tower teams I used to use with something like Metagross with explosion in slot two just so I could switch Slaking back in for the last kill. This isn't exactly that, but when you look at Latios and Snorlax, Slaking has a surprisingly powerful synergy with them.

The way that this team is built, though in the previous iteration the plan was to keep Latias off of the field, Latios and Snorlax are readily able to take out the first two PKMN. Latios easily 1, 2, or 3HKO's a vast number of PKMN, with the few that can beat it, namely some special attackers, are all easy cleanup for Snorlax. With that Snorlax can easily use Selfdestruct and OHKO 95% of the Frontier. Having the first two members being able to take out the opponent first two of most possible teams, the amazing Slaking who can pick up so so many OHKO's just takes out the last opponent PKMN. As you'd be able to see in the first streak, many battles go this way. Latios takes out the first one(or more if possible), slaking finishes off the second one or blows up on it, and Slaking picks up the KO easily.

While in theory this works every time, Slaking has obvious flaws like the few KO's it can't pick up against things like Armaldo, Registeel and Regirock, Shuckle, certain Salamence sets, etc. And of course the biggest flaw with this idea is if Slaking has to come out against the second PKMN, in which case the game is likely lost. Not always, as it happens a couple times in the streak, but most obviously in the losing battle. Part of running Slaking is also knowing or at least checking the trainer you're up against. If they have the possibility to throw out a ghost or anything that can survive a blow from Slaking forces you to radically change the game plan.

View attachment 322301View attachment 322302View attachment 322303
In the Slaking streak the loss is pretty self explanatory. This loss was very avoidable. It was late and my brain wasn't completely in the game. Manectric crit on Latios didn't matter, both because Snorlax easily OHKO's it and the second PKMN was Regice, whom Latios does not touch. Based on what I said about how you'd want to play Slaking, I played this incorrectly. I should have used Selfdestruct on Regice and I would not have had the issue of being locked into a useless move vs. Misdreavus. Very avoidable, and just how the team works. My brain was still in Latias mode. At the very least this demonstrates the weaknesses in the Slaking pick, even if it was my fault I lost.

View attachment 322304View attachment 322305View attachment 322306
This is purely just a very difficult team for "Lati-Sandwich" to beat. Period. Metagross isn't something that I consider extremely threatening, but in the first slot is by far the worst, as unless it misses Meteor Mash, beats Latios and gets a hit in on Snorlax. That is exactly what happens, but unfortunately another steel type comes out who Snorlax is forced to blow up on. Had I not been crit by the Metagross EQ, maybe I could've used Shadow Ball, but after all it didn't matter because even if Snorlax took out Skarm, the odds were the same to take out Regirock with Latias.
This was either Regirock(1) or (2). Which incidentally, is the best case scenario for Latias to win.

252+ SpA Twisted Spoon Latias Psychic vs. 255 HP / 0 SpD Regirock: 84-99 (44.9 - 52.9%) -- 30.5% chance to 2HKO

With only 30.5% chance to win the streak was over. Not the highest I've ever streaked with this team, but I think matchups against teams like this are unavoidable and are just the reality of the Arena, bad luck or good luck, matchup will still be equally or more important.

In all these are just two of many streaks I've been doing. Slaking has lots of potential, but I'm not convinced it is better than Latias in the last slot, mostly because it can't KO PKMN like on this team here that I lost to in the Latias streak. Most of my streaks die to misplay or bad luck in the 147-196 range, but I think(as demonstrated in the Slaking loss) that if I take breaks at certain points I'll play better. The teams aren't getting harder at that point in the streak, so it just boils down to playing right and not getting haxed too much. Let me know what you think about Slaking or another CB user in the Latias slot.
Gonna be honest, I would never consider using Slaking in the Arena since Truant makes it way too much of a liability imo, but I can see how it makes an effective finisher. Nor would I have a Choice Band in the backup slot since as you say, if it comes out against the second mon, you're finished. You've nailed what I think the key to success is though, which is being able to muscle through opponent teams with quick KOs.

Congrats on getting so far! Might have to try the Lati sandwich team for myself since I've always found the Arena very difficult.
 
IMO there are several speed tiers worth considering for Salamence:

  • 140 Speed EVs (144 with 30 IVs in Spe): let's you outspeed all Heracross sets (Heracross 3 notably has Rock Slide which can bring down Salamence with flinches)
  • 164 Speed EVs (168 with 30 IVs in Spe): let's you outspeed all Alakazma sets. Never hurts getting an attack first against Alakazam

Additionally in regards to the EV spread you posted on Salamence, I think it can be improved:

  • -2 255+ SpA Houndoom Crunch vs. 52 HP / 0 SpD Salamence: 41-49 (23.1 - 27.6%) -- 56.3% chance to OHKO
The benefits of using 180 HP (which still gives a perfect Leftovers number) prevents -2 Houndoom from breaking your Substitute. With 52 HP, Houndoom has more than 50% chance of breaking it which makes it almost impossible to stall. Of course it comes at the price of making Ursaring take more damage from recoil but I'd argue that the extra HP makes you gain bulk from the special side which is always nice. This can be further optimized, but I only recommend using this with HP Flying as otherwise, it's almost impossible to optimize with AERO-ASS due to the sheer amount of Attack EVs it needs to actually do some damage.
  • -2 255+ SpA Houndoom Crunch vs. 180 HP / 0 SpD Salamence: 41-49 (21.2 - 25.3%) -- 6.3% chance to OHKO
After putting it through the calculator again, I would have to agree. 180 HP is generally better. The extra defense/less recoil from struggling foe (is minimal at best). However, the 52 HP one is viable for the trick team to reduce recoil/ give yourself more chance to keep the struggling foe alive.
The additional spe def from the extra bulk won't make it live a ton of special hits, but maybe your substitutes can stay intact on resisted surfs better.

-1 252+ Atk Ursaring Double-Edge vs. 52 HP / 214 Def Salamence: 72-85 (40.6 - 48%)
-1 252+ Atk Ursaring Double-Edge vs. 180 HP / 92 Def Salamence: 81-96 (41.9 - 49.7%)
-1 252+ Atk Ursaring Struggle vs. 52 HP / 214 Def Salamence: 21-25 (11.8 - 14.1%)
-1 252+ Atk Ursaring Struggle vs. 180 HP / 92 Def Salamence: 23-28 (11.9 - 14.5%)

Regarding the speed tier, I don't see any reason not to invest in 220 (or 224 on 30 speed iv). This out speeds a whole host of additional mons. Tentacruel 3, Rapidash, Houndoom, Arcanine, Electabuzz 2, etc. All of these are out sped and dispatched with EQ before they can fire an attack. I don't see any point in investing more than this though on the DD set. You don't ohko anything faster than this besides Heracross 2 (which doesn't have rock coverage). I have too much experience getting haxxed by the pokemon in the 141-147 speed tier. If it's a faster Salamence, I will never run less than 220/224 speed from now on.

On the band set, max speed is viable because you have that attack boost immediately, so you have a shot at koing the base 100s from full.
 
Last edited:
I think I'm starting to be sold on Slaking....


Sad to lose on such a silly thing like missing hyper beam on Marowak but that's how it goes I guess.
I didn't realize that Marowak(2/3/4) all have 255 speed instead of only Marowak(1) who has HP invest, and has a chance to survive Return - so I should've used Return here. Live and learn lol.

 
Last edited:
Reached 61 tournament wins @ the Dome, with Gengar, Timid Suicune and Snorlax!

1589263593760.png


Gengar is an awesome pokemon to use in the Dome. I'm using Adedede's set, maximum special attack, with 228 speed EVS to reach 159 speed. I toyed with the idea of reducing special attack, but this actually hurts your ability to get 2 hit koes on neutral targets, so I kept the spread the same. Thunderbolt/Ice Punch/ Sub/ Destiny Bond is a great set, good coverage and other utility.


1589265331135.png


Shoutout to Adedede for letting me use his Timid Suicune. Suicune is a total beast in this format. The ability to out speed everything up to 110 BST is invaluable for pressure stalling. Unlike the Bold one, which is ridiculously tanky, but falls short on speed, Timid Suicune is useful in almost every matchup. As a reminder, the protect/substitute combination easily stalls out 32 PPs, just between these two moves.
Everyone at this point understands the power of a +6/+6 Suicune and it's an auto win against Tucker (always picks Swampert and Metagross)

The set as explained by Adedede is 140 HP EVs (Highest Leftovers Number) / 124 Def EVs / 244 Spe EVs

1615510205571.png
Snorlax is the third member of the core. I didn't want to use Slaking and I wanted the 3rd member to fill in for situations where Suicune and Gengar could have trouble. I basically wanted something that can help check dangerous psychic types, Jolteon 4 and Raikou and opposing Snorlax. I've had the most success with QC with Snorlax.

Edit: I was running 204 HP/ 108 Attack/ 104 Def/ 92 Speed Snorlax with Adamant. 92 speed outspeeds up to Whiscash 4, Ursaring and Machamp.

Adamant Nature Calculations
108+ Atk Snorlax Shadow Ball vs. 0 HP / 252 Def Alakazam: 116-138 (100 - 118.9%) -- guaranteed OHKO
108+ Atk Snorlax Shadow Ball vs. 170 HP / 170 Def Latias: 82-98 (50.6 - 60.4%) -- guaranteed 2HKO
108+ Atk Snorlax Self-Destruct vs. +1 170 HP / 170 Def Snorlax: 258-304 (106.6 - 125.6%) -- guaranteed OHKO


Threats
Shadowball Crobat
Thunder punch Metagross
Opposing Snorlax - Boom with Lax
QC users
Water absorb pokemon /double team Suicune are very annoying
 

Attachments

Last edited:
Over the last few days I've been able to get the gold symbol in both the Battle Tower and the Battle Dome (Both on emulator and lvl 50). Both are ongoing but I'm not interested in extending the Tower streak right now. Tower stands at 70 wins and the Dome at 10 (edit - run finished at 16).

Battle Tower

For the first 63 battles I used Werster's team from his all gold symbols run. I'll note any tweaks I make.

:rs/Latios:
Latios @ Lum Berry (Modest)
Psychic / Dragon Claw / Calm Mind / Thunderbolt
EVs: 28 HP / 252 SpA / 228 Spe [158 Speed]
IVs: {29, 21, 15, 31, 23, 29}

Latios as lead makes the first ~35 battles free. After that you really need to start doing smart switches and boosts.

:rs/Metagross:
Metagross @ Choice Band (Adamant)
Meteor Mash / Earthquake / Aerial Ace / Explosion
EVs: 44 HP / 252 Atk / 212 Spe [117 Speed]
IVs: {27, 25, 29, 11, 28, 31}

I've replaced Werster's Shadow Ball with Aerial Ace because this team has no real answer for evasion spam otherwise. It also helps with some grass types that Swampert REALLY doesn't want to meet.

:rs/Swampert:
Swampert @ Leftovers (Brave)
Earthquake / Surf / Ice Beam / Brick Break
EVs: 100 HP/ 132 Atk / 140 SpA / 108 Spe [81 Speed]
IVs: {17, 31, 31, 25, 22, 23}

Probably the weakest member of the team. Werster uses the last slot for various moves but I found Brick Break to be my best option for the Tower. It works well enough.

For the final 7 battles I switched to Adedede's Slaking/Gengar/Wobbuffet team for safety. My initial team gave fast clears early on but really started to show its weaknesses. Battle 63-70 were uneventful due to Adedede's incredibly solid team.

Battle Dome

The Battle Dome is really fun due to the enemy's fixed 3IV Pokemon. It's a buff across the board for your entire team and I decided to make use of that. This team's core duo is comprised of Metagross and Suicune. The game plan is for Metagross to go out in a blaze of glory and for Suicune to clean up whatever's left breathing.

:rs/Metagross:
Metagross @ Lum Berry (Adamant)
Earthquake / Rock Slide / Shadow Ball / Explosion
EVs: 28 HP / 252 Atk / 228 Spe [119 Speed]
IVs: {27, 25, 29, 11, 28, 31}

Meet the twin sibling of my Tower Metagross. Their speed stat is only a little bigger, but their speed tier in the Dome is way higher. You essentially get a free positive nature buff in every stat except better - my adamant Metagross with 228 EVs has an effective speed higher than a jolly Metagross with full speed investment in the Tower. They end up with the speed, bulk, and strength to get out at least three attacks per battle. And that third attack is explosion.

Double KOs in the Dome are settled with by comparing the BSTs of both teams. Two pseudo legendaries and one legendary gives you another win condition for everyone except Tucker (who wins by default).

:rs/Suicune:
Suicune @ Leftovers (Quiet)
Surf / Icy Wind / Calm Mind / Substitute
EVs: 20 HP / 12 Def / 252 SpA / 224 Spe [116 Speed]
IVs: {27, 24, 11, 9, 14, 22}

This is my ribbon master Suicune from Colosseum. She has such... unique stats because she was not RNG'd at all. But Suicune is so darn good in the Frontier that she still puts in work. The Dome further helps to smooth out her imperfections.

This is a basic substitute boost build tweaked to suit her IVs. Icy Wind is surprisingly powerful in this team. Surf almost always does more damage but that speed debuff is such a boon to Suicune and Metagross. Speed control just tips the scales in your favor in so many matchups.

:rs/Slaking:
Slaking @ Choice Band (Adamant)
Double-Edge / Shadow Ball / Earthquake / Brick Break
EVs: 4 HP/ 252 Atk / 252 Spe [152 Speed]
IVs: Perfect apart from 22 Def (due to a breeding mishap)

It never hurts to have the king of 1v1s in your back pocket. I'm sure you could strategize a better third party member but Slaking is strong enough to brute force your way through quite a few problematic matchups.

---

Threats: Pokemon carrying fire+electric coverage are not kind to Metagross and Suicune when they're paired up. Protect, double-team, and brightpowder can turn Metagross's blaze of glory into a spark of disappointment. edit - I forgot to mention another threat that actually ended my streak: critical hits. Both Metagross and Suicune need time to do their jobs and crits cut that time short.

Possible improvements: Getting perfect / near-perfect versions of Metagross and Suicune would not hurt.
 

Attachments

Last edited:
As another practice case for the program I wrote (now added Protect and Substitute to the mechanics too!), I took another test case. As any Trick team player knows, Metagross is always a risky matchup due to its sheer power, Clear Body and ability to raise its own Attack.

1615590981978.png
1615591004155.png


The 252/164/92 spread that has become standard now for Grumpig (unless you're using a team that minimizes recoil) survives a CB Meteor Mash (even Shadow Ball), outspeeds and can Skill Swap afterwards, solving some major problems for the setup. But of course, Metagross has Quick Claw as well, so Grumpig might not be able to do everything it wants. The probabilities of these events are quite easy to calculate by hand, but that's exactly why I wanted to use the program to see if gives logical outputs. Turns out it does, and I'll share the results.

I did 50.000 simulations and used Wilson Score intervals with z = 1.96, but all you need to know is that there's a 95% probability that the actual probability lies in the very small intervals given. Some cases overlap, but their probabilities are still good to know, e.g. Case D is a subcase of Case C.

Case A - Metagross gets Tricked and Skill Swapped and gets no Attack boost - 0.605 --- 0.614
Case B - Metagross gets Tricked and Skill Swapped and gets one Attack boost - 0.296 --- 0.304
Case C - Metagross doesn't get Skill Swapped - 0.050 --- 0.054
Case D - Metagross doesn't get Skill Swapped and gets one Attack boost - 0.011 --- 0.012
Case E - Metagross gets two Attack boosts - 0.038 --- 0.039


Oh yeah, Grumpig's strategy for "free turns" after it misses is use Splash in my program, this means that if you actually use Flash some probabilities might turn out a little different, but pretty negligibly so. I used 'nothing' because some teams like other fillers such as Torment, Icy Wind or even Reflect I guess. And Metagross was assumed to only pick Meteor Mash.

For example, my strange-but-effective Open Level Grumpig/Dugtrio/Latias team has about 5% to get in trouble against Metagross if it picks Meteor Mash, since I need Skill Swap (but don't care about Attack boosts).

If you want to see more of these kind of calculations, give me a shout! The complicatedness of the battle is not important as long as the strategy for both Pokemon is reasonably easy to describe.
 
Last edited:

QuentinQuonce

formerly green_typhlosion
I'm currently at 728 rooms in the Battle Pike with my streak still active. Haven't been able to play much this week due to real life inconveniently getting in the way, but I'm hoping to carry this on over the weekend. It's taken several tries to make it this far; I previously got to 618 and then 670, but as both losses were due to stupid and totally avoidable misplays I wasn't satisfied and resolved to keep trying.


My team:

1615592034382.png

Starmie @ Lum Berry
Surf
Ice Beam
Thunderbolt
Psychic
252 Sp.Atk/Speed, 6 HP (Modest)

1615592041688.png

Heracross @ Choice Band
Megahorn
Earthquake
Brick Break
HP Rock
252 Attack/Speed, 6 HP (Jolly)

1615592025245.png

Blissey @ Leftovers
Softboiled
Toxic
Flamethrower
Seismic Toss
252 HP/Defence, 6 Sp.Def (Bold)

This team is functionally identical to the one used in my previous streak, with which I eventually made it to 543 rooms. It's very standard and I'm pretty relaxed about that. Heracross replaces Metagross this time around and that's definitely made the team better. It works splendidly alongside Starmie and deals with status much more effectively. I'm playing Open Level, since Starmie and Heracross are both capable of taking on Dragonite and Tyranitar, though I'd be interested to see how well this plays on level 50.

Will update when the streak is over! After that, I've got a special challenge planned which I'm hoping you'll all enjoy reading about...
 
I'm currently at 728 rooms in the Battle Pike with my streak still active. Haven't been able to play much this week due to real life inconveniently getting in the way, but I'm hoping to carry this on over the weekend. It's taken several tries to make it this far; I previously got to 618 and then 670, but as both losses were due to stupid and totally avoidable misplays I wasn't satisfied and resolved to keep trying.


My team:

View attachment 322869
Starmie @ Lum Berry
Surf
Ice Beam
Thunderbolt
Psychic
252 Sp.Atk/Speed, 6 HP (Modest)

View attachment 322870
Heracross @ Choice Band
Megahorn
Earthquake
Brick Break
HP Rock
252 Attack/Speed, 6 HP (Jolly)

View attachment 322868
Blissey @ Leftovers
Softboiled
Toxic
Flamethrower
Seismic Toss
252 HP/Defence, 6 Sp.Def (Bold)

This team is functionally identical to the one used in my previous streak, with which I eventually made it to 543 rooms. It's very standard and I'm pretty relaxed about that. Heracross replaces Metagross this time around and that's definitely made the team better. It works splendidly alongside Starmie and deals with status much more effectively. I'm playing Open Level, since Starmie and Heracross are both capable of taking on Dragonite and Tyranitar, though I'd be interested to see how well this plays on level 50.

Will update when the streak is over! After that, I've got a special challenge planned which I'm hoping you'll all enjoy reading about...
Really nice job! I would probably die before 200 due to Megahorn's excellent Accuracy, haha!
 
I've been trying to decide on the best evs to run with Hariyama. Does anyone have any suggestions?

I've been researching Hariyama for a it's valuable moves, bulk, typing, and it's ability to counter and KO a lot of physical moves. Even Mence can't get a 1HKO
255 Atk Salamence Aerial Ace vs. 252 HP / 252+ Def Hariyama: 107-126 (42.6 - 50.1%) -- 0.4% chance to 2HKO
while Hariyama can counter back. However, this forgoes needed special bulk.

255 SpA Zapdos Thunderbolt vs. 0 HP / 200 SpD Hariyama on a critical hit: 183-216 (83.5 - 98.6%) -- guaranteed 2HKO
The above calc is to find a special bulk stat that stops Hariyama being 1HKOd by a critted strong special attack. This would give Hariyama more opportunities to use knock off as a lead. The first Salamence calc shows that despite max defense, a counter strategy can fall easily to crits.

Hariyama also has 50 base speed, so I've thought that investing in speed would not be worthwhile. Although, 252 speed + jolly = 112 speed, which outspeeds metagross 1,2,3,8 as well as a some OHKO users. 104evs + jolly = 91 speed. outspeeds the dreaded Dewgong that has 10pp worth of OHKO moves, rest and sleep talk.
I also considered Hariyama as a lead for Mono Fighting. But since Poliwrath had a more reliable speed-controlling move in Icy Wind and actually outspeeds things after it without giving up its bulk EVs, it seemed the only way to go for me. Also, both Damp and Water Absorb are very useful.

I also EVed Hariyama though because it was on the same team as a second Accuracy crippler and Item remover. I used Counter and Foresight and eventually ditched Knock Off in favor of Body Slam, but that's only because I didnt use it as the lead. The EV explanation is probably on page 12 somewhere.

On Hariyama, running Jolly max Speed is only useful if you have Belly Drum IMO.
 
I've been trying to decide on the best evs to run with Hariyama. Does anyone have any suggestions?

I've been researching Hariyama for a it's valuable moves, bulk, typing, and it's ability to counter and KO a lot of physical moves. Even Mence can't get a 1HKO
255 Atk Salamence Aerial Ace vs. 252 HP / 252+ Def Hariyama: 107-126 (42.6 - 50.1%) -- 0.4% chance to 2HKO
while Hariyama can counter back. However, this forgoes needed special bulk.

255 SpA Zapdos Thunderbolt vs. 0 HP / 200 SpD Hariyama on a critical hit: 183-216 (83.5 - 98.6%) -- guaranteed 2HKO
The above calc is to find a special bulk stat that stops Hariyama being 1HKOd by a critted strong special attack. This would give Hariyama more opportunities to use knock off as a lead. The first Salamence calc shows that despite max defense, a counter strategy can fall easily to crits.

Hariyama also has 50 base speed, so I've thought that investing in speed would not be worthwhile. Although, 252 speed + jolly = 112 speed, which outspeeds metagross 1,2,3,8 as well as a some OHKO users. 104evs + jolly = 91 speed. outspeeds the dreaded Dewgong that has 10pp worth of OHKO moves, rest and sleep talk.

255+ SpA Alakazam Psychic vs. 44 HP / 236 SpD Hariyama: 190-224 (84.4 - 99.5%) -- guaranteed 2HKO

255 SpA Zapdos Thunderbolt vs. 44 HP / 236 SpD Hariyama on a critical hit: 175-207 (77.7 - 92%) -- guaranteed 2HKO

170+ Atk Choice Band Aerodactyl Aerial Ace vs. 44 HP / 44 Def Hariyama: 190-224 (84.4 - 99.5%) -- guaranteed 2HKO

I wouldn't bother on running more Speed to outspeed Metagross or Dewgong because Hariyama is too slow and you're going to sacrifice a lot of bulk just for that benchmark and I'm sure that Hariyama won't OHKO that Dewgong even if it's using a Choice Band, unless you resort to the extremely unreliable Cross Chop:

252+ Atk Choice Band Hariyama Brick Break vs. 255 HP / 255+ Def Dewgong: 168-198 (85.2 - 100.5%) -- 6.3% chance to OHKO

That's how bulky it is.

If anything, 52 Speed EVs gives you a stat of 77 which is enough to outspeed Walrein 4. Other than that, depending on your team, I wouldn't consider Speed on Hariyama.
 

QuentinQuonce

formerly green_typhlosion
My Pike run is finished at 877 rooms.

This was actually a pretty easy run for the most part. Many rounds passed with minimal Trainer battles and I encountered very few legendary Pokemon (I think I only encountered Latias once). I also got quite lucky when going up against Lucy, more often than not getting healed before she arrived (though Starmie was all I ever needed to beat her).

I started to have some difficulty once Wobbuffet started showing up in wild Pokemon rooms - Starmie can't beat it without a crit and if it Mirror Coats - which it invariably did - that's Starmie out of the game. This caused a few problems, although it didn't cause my loss.

Had a couple of dicey battles that almost ended the run:

-Paralysed and not-at-full-health Blissey up against Pokefan Todd; luckily all three of his Pokemon were Special-oriented so she stalled them out
-Burned Heracross and Blissey against Jolteon and Misdreavus who used Perish Song on the first turn. Luckily was able to KO Jolteon with Megahorn and whittle Misdreavus down before the timer ran out

The losing match was against Fisherman Bailey. Blissey had been put to sleep in a previous room but otherwise my team was sound.

I sent out Starmie against Whiscash; it narrowly survived two Psychics and KOed in turn with Earthquake. Heracross revenge killed with Brick Break. Out comes Starmie so I switched to Blissey. And Blissey... stayed asleep for five consecutive turns. Starmie alternated Surf and Psychic, getting one Special Defence drop and a critical hit with Surf, resulting in it doing the unthinkable and defeating Blissey. Heracross was promptly OHKOed. Should have switched to trigger Natural Cure but I was too paranoid about Starmie randomly using Psychic.

Good run, though. Very proud of this.

1615726585668.png
 
Last edited:

QuentinQuonce

formerly green_typhlosion
Ladies and gentlemen, allow me to present my upcoming Pokemon Adventures: Emerald Battle Frontier Challenge!


1615737908384.png


Pokemon Adventures: Emerald - GBA

Can I Beat The Battle Frontier In Seven Days?


Introduction
Being a big fan of the Pokemon Adventures manga, and having wanted a new and individualised challenge to tackle after my Pokemon HOME challenge last year, I decided to bring the two together. In case you've never heard of Pokemon Adventures (also often referred to as Pokemon Special by some fans) it's perhaps the most prominent Pokemon manga, closely following the story of the games but frequently incorporating original elements and characters. It's known for being a somewhat more mature and occasionally somewhat dark take on the Pokemon world, but a thoroughly detailed and high-quality one, and has been praised by Satoshi Tajiri as the adaptation that most closely resembles the fictional world he envisaged.

Every chapter of the saga corresponds to one of the main series games, and the Emerald chapter is one of my favourites. The protagonist (also named Emerald) is depicted as a highly skilled battler who decides to conquer the newly-opened Battle Frontier during the course of a single week. Having access to nearly every Pokemon that existed at the time thanks to Crystal (a renowned capture specialist who works as Professor Oak’s trusted assistant) he uses a wide array of borrowed Pokemon to accomplish this task. Despite not personally owning any Pokemon and claiming not to like them, most of the strategies he comes up with are clever, innovative, and resourceful. But while they're entertaining to read about, part of me wondered how viable they realistically are.

So, the challenge I have given myself is to play as Emerald. To complete the Frontier in seven days, using the same Pokemon that he used. Can I beat all seven facilities in a week?

1615738980583.png

General rules
  • This challenge must be performed on a fresh save file that has not previously entered into any of the Frontier facilities.

  • The only Pokemon eligible for this challenge are those used by Emerald in the manga (a full list can be found on Bulbapedia's character page for Emerald, which I have used as a general reference for the whole challenge. These Pokemon must adhere to the facilities they were used in – for instance, Rapidash can only be used in the Pike, and Sudowoodo can be used in the Arena and the Palace but not the Dome*. The only exception is the Factory, since it’s not directly possible to control what species I’m given. However, if a Pokemon appears which was used by Emerald in the Factory, it must be chosen or swapped for. These species are:
    Ivysaur
    Farfetch’d
    Rhyhorn
    Pinsir
    Togetic
    Chinchou
    Skarmory
    Grovyle
    Sceptile
    Linoone
    Ludicolo
    Gardevoir
    Slaking
    Delcatty
    Illumise


  • Note that the former rule requires playing at level 50, but this is specified as Emerald's choice on-page regardless. This will be the case for all seven challenges, for the sake of consistency.

  • Different individuals of the same species are permitted, as are different EV spreads and movesets. However, if the Nature or Ability of a particular Pokemon was specified in the manga, this must be respected. So Sceptile can only be Hasty, Dusclops must be Rash, etc. Exact movesets or items do not have to be adhered to since Pokemon in the manga often use far more than four moves.

  • Each facility must be completed in one day over the course of a week and in the order taken in the manga (Factory-Pike-Pyramid-Arena-Dome-Palace-Tower). Multiple attempts in any given facility are permitted in order to reach the target streak. I’m doing the final three in this order specifically as it was Emerald’s stated intention to do it this way originally; in the manga, Emerald loses at the Dome, challenges the Palace and the Tower, then does the Dome again on the final day without battling Tucker.

*Note that while Emerald initially does use Sceptile, Sudowoodo, and Dusclops in the Dome before changing his team, I intend to use his final picks for the entire Dome streak to give the challenge more variety.


1615739048739.png

Facility-specific rules
  • In the Battle Pyramid, Emerald uses different Pokemon for the non-Brandon rounds vs the Brandon round, and this must be adhered to. This applies for the second Brandon fight too even though Brandon only uses the Regi trio in the manga (for an additional layer of challenge). Therefore, for rounds 1-2 and 4-9 my team must be Alakazam, Shedinja, and Phanpy, while in rounds 3 and 10 my team must be Hitmonchan, Cubone, and Sceptile. These can be in any order I choose. In the Pike, Arena, Palace, and Tower, I am also permitted to mix up the order of my Pokemon between rounds should I choose to.

  • In the Dome, Emerald’s third Pokemon is not specified. Therefore, while I must use Metagross and Alakazam, I am allowed to bring any other Pokemon used in the Pike, Pyramid, or Arena, but not Sceptile, Dusclops, or Sudowoodo, and not the three Pokemon used in the Tower (Mantine, Mr. Mime, and Snorlax).

  • If an opponent in the Factory is carrying one or more species used by Emerald, I can freely choose which one to swap for. If all three of my Pokemon are species which were used by Emerald, and the opponent also has a Pokemon used by Emerald, I must swap one of them regardless.

1615739143425.png


The challenge formally commences this Wednesday, 17th of March. I'll be taking on the Battle Factory first, so stay tuned for the results.​
 
Reached 61 tournament wins @ the Dome, with Gengar, Timid Suicune and Snorlax!

1589263593760.png


Gengar is an awesome pokemon to use in the Dome. I'm using Adedede's set, maximum special attack, with 228 speed EVS to reach 159 speed. I toyed with the idea of reducing special attack, but this actually hurts your ability to get 2 hit koes on neutral targets, so I kept the spread the same. Thunderbolt/Ice Punch/ Sub/ Destiny Bond is a great set, good coverage and other utility.


1589265331135.png


Shoutout to Adedede for letting me use his Timid Suicune. Suicune is a total beast in this format. The ability to out speed everything up to 110 BST is invaluable for pressure stalling. Unlike the Bold one, which is ridiculously tanky, but falls short on speed, Timid Suicune is useful in almost every matchup. As a reminder, the protect/substitute combination easily stalls out 32 PPs, just between these two moves.
Everyone at this point understands the power of a +6/+6 Suicune and it's an auto win against Tucker (always picks Swampert and Metagross)

The set as explained by Adedede is 140 HP EVs (Highest Leftovers Number) / 124 Def EVs / 244 Spe EVs

View attachment 322591
Snorlax is the third member of the core. I didn't want to use Slaking and I wanted the 3rd member to fill in for situations where Suicune and Gengar could have trouble. I basically wanted something that can help check dangerous psychic types, Jolteon 4 and Raikou and opposing Snorlax. I've had the most success with QC with Snorlax.

Edit: I was running 204 HP/ 108 Attack/ 104 Def/ 92 Speed Snorlax with Adamant. 92 speed outspeeds up to Whiscash 4, Ursaring and Machamp.

Adamant Nature Calculations
108+ Atk Snorlax Shadow Ball vs. 0 HP / 252 Def Alakazam: 116-138 (100 - 118.9%) -- guaranteed OHKO
108+ Atk Snorlax Shadow Ball vs. 170 HP / 170 Def Latias: 82-98 (50.6 - 60.4%) -- guaranteed 2HKO
108+ Atk Snorlax Self-Destruct vs. +1 170 HP / 170 Def Snorlax: 258-304 (106.6 - 125.6%) -- guaranteed OHKO


Threats
Shadowball Crobat
Thunder punch Metagross
Opposing Snorlax - Boom with Lax
QC users
Water absorb pokemon /double team Suicune are very annoying
I reached 110 tournament wins in the dome. Going to stop here. I made some changes to the Snorlax set by deciding to run a CAREFUL nature. I needed it to be more specially bulky, as it's main role is as a pivot into Jolteon and Latias/Latios and it needs all the special bulk it can get.
Item Choice : cheri berry for the consistency in checking Jolteon and white herb to prevent Latias/Latios from ever beating you from full.

Here's the set explanation: 204 HP, 116 Def / 52 Attack /86 SpD / 52 Speed. This defensive spread tanks Snorlax and Metagross, has enough attack to 2ko 252 Latias, with 52 speed to out speed Aggron & co.

Counter is my hipster move mainly for metagross. This was Actaeon's idea. It's very situational, but comes in handy every now and then.

Here are the Careful Nature Offensive Calculations
52 Atk Snorlax Shadow Ball vs. 0 HP / 0 Def Gengar: 126-150 (104.1 - 123.9%) -- guaranteed OHKO
52 Atk Snorlax Shadow Ball vs. 252 HP / 0 Def Latias: 88-104 (50.8 - 60.1%) -- guaranteed 2HKO
52 Atk Snorlax Self-Destruct vs. 170 HP / 0 Def Latias through Reflect: 161-189 (99.3 - 116.6%) -- 93.8% chance to OHKO

Careful Nature Defensive Calculations
252+ Atk Snorlax Double-Edge vs. 204 HP / 116 Def Snorlax: 109-130 (41.7 - 49.8%) -- guaranteed 3HKO
170+ Atk Metagross Meteor Mash vs. 204 HP / 116 Def Snorlax: 91-108 (34.8 - 41.3%)- guaranteed 3HKO
252+ SpA Latios Psychic vs. 204 HP / 86+ SpD Snorlax: 61-73 (23.3 - 27.9%) -- 88% chance to 4HKO

Edit: The speed investment isn't necessary if you don't care about outspeeding Aggron, Regirock and Registeel. Either invest more into SpD or a bit into attack (to improve the damage roll against 0 HP gardevoir. A good number is 92 Attack EVs with Careful (62.5 % chance to ohko)

52 Atk Snorlax Shadow Ball vs. 0 HP / 0 Def Gardevoir: 116-138 (89.9 - 106.9%) -- 37.5% chance to OHKO

Edit: Counter is also useful for Crobat (which is a pain in the ass for this team). If Crobat attacks with sludgebomb, counter will ko 14/15 times. Guaranteed if you lower the def to 108. Immunity is also not a bad idea, because the fire/ice resistances aren't even needed. Honestly, Persim Berry/ Lum Berry is not even a bad idea on Snorlax because that guarantees that it will be able to handle both Jolteon and Crobat. Gengar only really fears paralysis and freeze anyways. I'm shook because Actaeon witnessed me almost losing to Crobat which confused Suicune and left me with 22 hp at the end.

Edit: Actaeon put Snorlax vs Crobat on a simulator. Snorlax wins in 831 of the 1000 cases. 0.95 confidence interval: 0.807 0.853
The probability of winning is between 80- 85%, with persim and immunity as the ability.


https://pokepast.es/69fc3b90de9b0663
 

Attachments

Last edited:
Here's another funny (set of) result(s) from the simulator. It's about the following set, referred to as a SleepStall machine from now on:


1615756921316.png

Pokemon @ Leftovers
Ability: Pressure
EVs: 1 mod 16 HP + important Speed + important bulk
Variable Nature
- Protect
- Substitute
- Rest
- Sleep Talk

I originally made this set for Aerodactyl on Mono Rock because of its blistering Speed as a last resort to stall stuff like Starmie and Lapras, but of course it's an option for any (fast) Pressure-user, such as Raikou, for general teams. What's the appeal? Well it steals 32 PP to begin with, guaranteed. Then it Rests up, hopefully tanks a hit, and has 2/3 chance to pick something that blocks another attack while sleeping. It can even double Protect (potential second one has the usual 50% probability of working), but there's an acceptable albeit shaky probability of just continuing SubTect while sleeping. Then when it wakes up, it continues using Protect and Substitute and Rest up again, et cetera.

Since the process of move selection in the Sleep Talk turns, as well as all the effects that could take place from the opponent's move (e.g. crits and SpD drops) during the "naked hit while Resting up", all add a lot of variance to this scenario, it's a very interesting case to simulate against different (4-attack) opponents.

For the SleepStall machine, I made the following assumptions:
  • If it is sleeping and doesn't wake up this turn, it uses Sleep Talk;
  • If it is awake or is going to wake up, it uses Protect unless it (succesfully) did so previous turn. Otherwise it uses Substitute if possible.
  • If it wants to use Substitute but its HP is too low, it uses Rest;
  • (Note that it also uses Substitute if it already has one and has Protected previous turn. This is the best strat against Quick Claw opponents anyway.)
The all-out attacking opponent behaves as follows to simulate very accurately the Frontier AI:
  • Makes a list of all moves with positive PP;
  • From this list, it calculates the most (raw, so unvarianced by e.g. crits and the random number) damage it could do, capped by the SleepStaller's current HP;
  • Then it makes a list of all the moves that actually output this raw damage (may be more if the SleepStaller is at low HP for example);
  • Then it makes a random choice of these moves, weighted by how much PP is left for them (low PP makes it less probable to select).
  • If this final list is empty, it apparently has no PP at all and uses Struggle.
The simulation ends if the SleepStaller faints, or when the attacker is out of PP.

Then the program does 10.000 simulations (these battles take long, I can only do ~15 per second) and makes 95% confidence intervals as usual. Here's the probabilities I am calculating in the following section:
  • Case A: the attacker is fully outstalled
  • Case B: the attacker has between 1 and 4 PP left at the end of the battle
  • Case C: the attacker has between 5 and 10 PP left at the end of the battle
  • Case D: the attacker has between 11 and 15 PP left at the end of the battle
  • Case E: the attacker has more than 15 PP left at the end of the battle

Results for Aerodactyl
Here's the Aerodactyl set I used for the following simulations:

1615757517928.png

Aerodactyl @ Leftovers ** cancerAero
Ability: Pressure
EVs: 172 HP / 204 SpD / 132 Spe
Timid Nature (+Spe, -Atk)
- Protect
- Substitute
- Rest
- Sleep Talk

0.95
confidence
1615757947410.png

Starmie-3
Surf
Ice Beam
Thunderbolt
Psychic
1615757962881.png

Latios-1
Psychic
Ice Beam
Thunderbolt
Dragon Claw
1615757984224.png

Lapras-4
Surf
Ice Beam
Thunderbolt
Psychic
1615758007357.png

Gardevoir-4
Psychic
Ice Punch
Thunderbolt
Fire Punch
Case A0.185-0.2000.167-0.1820.286-0.3040.560-0.579
Case B0.053-0.0620.061-0.0700.024-0.0300.000-0.001
Case C0.095-0.1070.102-0.1140.086-0.0970.014-0.019
Case D0.308-0.3260.081-0.0920.234-0.2510.068-0.079
Case E0.323-0.3410.557-0.5760.336-0.3540.332-0.350

As you can see, Gardevoir having Fire Punch greatly improves the odds of course. The worst opponent is clearly Latios, closely followed by Starmie.

Keep in mind that while these calcs don't look good for Aerodactyl, these are probably the worst opponents it can face (while Omastar takes care of a lot of other problems like Dragon Dance).

Results for Raikou
Here's the Raikou set I used during the simulations. It has a lot better typing, and usually stalls out the really dangerous moves before the first Rest. Aside from Starmie to show the difference, I picked some really tough opponents, sometimes even still with Quick Claw (note the @ in the table).

1615759229714.png

Raikou @ Leftovers ** cancerKou
Ability: Pressure
EVs: 220 HP / 108 Def / 180 Spe
Timid Nature (+Spe, -Atk)
- Protect
- Substitute
- Rest
- Sleep Talk

0.95
confidence
1615759387695.png

Starmie-3
Surf
Ice Beam
Thunderbolt
Psychic
1615759515267.png

Metagross-4 @ QC
Meteor Mash
Psychic
Earthquake
Shadow Ball
1615759620944.png

Metagross-4
Meteor Mash
Psychic
Earthquake
Shadow Ball
1615759883481.png

Latios-2 @ QC
Psychic
Thunderbolt
Ice Beam
Earthquake
1615759999183.png

Ursaring-4
Double-Edge
Earthquake
Aerial Ace
Rock Slide
Case A0.989-0.9930.460-0.4790.938-0.9510.564-0.5840.860-0.874
Case B0.000-0.0010.025-0.0320.002-0.0060.000-0.0020.000-0.000
Case C0.000-0.0010.054-0.0630.041-0.0520.006-0.0090.000-0.000
Case D0.007 0.0100.063-0.0720.004-0.0080.072-0.0830.002-0.004
Case E0.000-0.0010.367-0.3860.000-0.0010.332-0.3500.124-0.137

Ursaring's distribution might look odd, but keep in mind that at low Raikou HP, it could use Rock Slide, preventing Earthquake from being stalled out.

Finally, here's an example log to show the 'realness' of the simulation against Quick Claw Metagross-4:

=== 1 ===
Raikou used Protect!
Raikou protected itself!
Metagross used Earthquake!
Metagross's attack missed!
Raikou has 193 / 193 HP left. Its status is HLT
Metagross has 155 / 155 HP left. Its status is HLT
This turn took 4.837202141061425e-05 seconds to calculate.
=== 2 ===
Raikou used Substitute!
Raikou made a Substitute!
Metagross used Earthquake!
It's super effective!
The Substitute took 48 damage for Raikou!
Raikou's Substitute faded!
Raikou restored HP with its Leftovers!
Raikou has 157 / 193 HP left. Its status is HLT
Metagross has 155 / 155 HP left. Its status is HLT
This turn took 0.0004137969808652997 seconds to calculate.
=== 3 ===
Raikou used Protect!
Raikou protected itself!
Metagross used Earthquake!
Metagross's attack missed!
Raikou restored HP with its Leftovers!
Raikou has 169 / 193 HP left. Its status is HLT
Metagross has 155 / 155 HP left. Its status is HLT
This turn took 4.1538034565746784e-05 seconds to calculate.
=== 4 ===
Raikou used Substitute!
Raikou made a Substitute!
Metagross used Earthquake!
It's super effective!
The Substitute took 48 damage for Raikou!
Raikou's Substitute faded!
Raikou restored HP with its Leftovers!
Raikou has 133 / 193 HP left. Its status is HLT
Metagross has 155 / 155 HP left. Its status is HLT
This turn took 0.0004178360104560852 seconds to calculate.
=== 5 ===
Raikou used Protect!
Raikou protected itself!
Metagross used Earthquake!
Metagross's attack missed!
Raikou restored HP with its Leftovers!
Raikou has 145 / 193 HP left. Its status is HLT
Metagross has 155 / 155 HP left. Its status is HLT
This turn took 0.0001005250378511846 seconds to calculate.
=== 6 ===
Raikou used Substitute!
Raikou made a Substitute!
Metagross used Psychic!
The Substitute took 48 damage for Raikou!
Raikou's Substitute faded!
Raikou restored HP with its Leftovers!
Raikou has 109 / 193 HP left. Its status is HLT
Metagross has 155 / 155 HP left. Its status is HLT
This turn took 0.0004985040286555886 seconds to calculate.
=== 7 ===
Raikou used Protect!
Raikou protected itself!
Metagross used Psychic!
Metagross's attack missed!
Raikou restored HP with its Leftovers!
Raikou has 121 / 193 HP left. Its status is HLT
Metagross has 155 / 155 HP left. Its status is HLT
This turn took 7.02749821357429e-05 seconds to calculate.
=== 8 ===
Raikou used Substitute!
Raikou made a Substitute!
Metagross used Psychic!
It's a critical hit!
The Substitute took 48 damage for Raikou!
Raikou's Substitute faded!
Raikou restored HP with its Leftovers!
Raikou has 85 / 193 HP left. Its status is HLT
Metagross has 155 / 155 HP left. Its status is HLT
This turn took 0.00048033997882157564 seconds to calculate.
=== 9 ===
Raikou used Protect!
Raikou protected itself!
Metagross used Psychic!
Metagross's attack missed!
Raikou restored HP with its Leftovers!
Raikou has 97 / 193 HP left. Its status is HLT
Metagross has 155 / 155 HP left. Its status is HLT
This turn took 6.601196946576238e-05 seconds to calculate.
=== 10 ===
Raikou used Substitute!
Raikou made a Substitute!
Metagross used Psychic!
The Substitute took 48 damage for Raikou!
Raikou's Substitute faded!
Raikou restored HP with its Leftovers!
Raikou has 61 / 193 HP left. Its status is HLT
Metagross has 155 / 155 HP left. Its status is HLT
This turn took 0.0005237850127741694 seconds to calculate.
=== 11 ===
Raikou used Protect!
Raikou protected itself!
Metagross used Shadow Ball!
Metagross's attack missed!
Raikou restored HP with its Leftovers!
Raikou has 73 / 193 HP left. Its status is HLT
Metagross has 155 / 155 HP left. Its status is HLT
This turn took 0.00012001895811408758 seconds to calculate.
=== 12 ===
Raikou used Substitute!
Raikou made a Substitute!
Metagross used Shadow Ball!
The Substitute took 48 damage for Raikou!
Raikou's Substitute faded!
Raikou restored HP with its Leftovers!
Raikou has 37 / 193 HP left. Its status is HLT
Metagross has 155 / 155 HP left. Its status is HLT
This turn took 0.0005310039850883186 seconds to calculate.
=== 13 ===
Raikou used Protect!
Raikou protected itself!
Metagross used Shadow Ball!
Metagross's attack missed!
Raikou restored HP with its Leftovers!
Raikou has 49 / 193 HP left. Its status is HLT
Metagross has 155 / 155 HP left. Its status is HLT
This turn took 0.00012007402256131172 seconds to calculate.
=== 14 ===
Raikou used Substitute!
Raikou made a Substitute!
Metagross used Meteor Mash!
Metagross's attack missed!
Raikou restored HP with its Leftovers!
Raikou has 13 / 193 HP left. Its status is HLT
Metagross has 155 / 155 HP left. Its status is HLT
This turn took 7.711502257734537e-05 seconds to calculate.
=== 15 ===
Raikou used Protect!
Raikou protected itself!
Metagross used Shadow Ball!
Metagross's attack missed!
Raikou restored HP with its Leftovers!
Raikou has 25 / 193 HP left. Its status is HLT
Metagross has 155 / 155 HP left. Its status is HLT
This turn took 4.46949852630496e-05 seconds to calculate.
=== 16 ===
Raikou used Rest!
Raikou slept and became healthy!
Metagross used Shadow Ball!
The Substitute took 48 damage for Raikou!
Raikou's Substitute faded!
Raikou has 193 / 193 HP left. Its status is SLP
Metagross has 155 / 155 HP left. Its status is HLT
This turn took 0.0004166020080447197 seconds to calculate.
=== 17 ===
Raikou is fast asleep!
Raikou used Sleep Talk!
Raikou used Protect!
Raikou protected itself!
Metagross used Shadow Ball!
Metagross's attack missed!
Raikou has 193 / 193 HP left. Its status is SLP
Metagross has 155 / 155 HP left. Its status is HLT
This turn took 6.876303814351559e-05 seconds to calculate.
=== 18 ===
Metagross used Shadow Ball!
It's a critical hit!
Raikou lost 105 HP!
Raikou is fast asleep!
Raikou used Sleep Talk!
Raikou used Substitute!
Raikou made a Substitute!
Raikou restored HP with its Leftovers!
Raikou has 52 / 193 HP left. Its status is SLP
Metagross has 155 / 155 HP left. Its status is HLT
This turn took 0.0007169960299506783 seconds to calculate.
=== 19 ===
Raikou woke up!
Raikou used Protect!
Raikou protected itself!
Metagross used Meteor Mash!
Metagross's attack missed!
Raikou restored HP with its Leftovers!
Raikou has 64 / 193 HP left. Its status is HLT
Metagross has 155 / 155 HP left. Its status is HLT
This turn took 7.279397686943412e-05 seconds to calculate.
=== 20 ===
Raikou used Substitute!
But it failed!
Metagross used Shadow Ball!
The Substitute took 48 damage for Raikou!
Raikou's Substitute faded!
Raikou restored HP with its Leftovers!
Raikou has 76 / 193 HP left. Its status is HLT
Metagross has 155 / 155 HP left. Its status is HLT
This turn took 0.0004729360225610435 seconds to calculate.
=== 21 ===
Raikou used Protect!
Raikou protected itself!
Metagross used Meteor Mash!
Metagross's attack missed!
Raikou restored HP with its Leftovers!
Raikou has 88 / 193 HP left. Its status is HLT
Metagross has 155 / 155 HP left. Its status is HLT
This turn took 6.611197022721171e-05 seconds to calculate.
=== 22 ===
Metagross used Meteor Mash!
It's not very effective...
Raikou lost 56 HP!
Raikou used Substitute!
But it failed!
Raikou restored HP with its Leftovers!
Raikou has 44 / 193 HP left. Its status is HLT
Metagross has 155 / 155 HP left. Its status is HLT
This turn took 0.0004885949892923236 seconds to calculate.
=== 23 ===
Raikou used Protect!
Raikou protected itself!
Metagross used Meteor Mash!
Metagross's attack missed!
Raikou restored HP with its Leftovers!
Raikou has 56 / 193 HP left. Its status is HLT
Metagross has 155 / 155 HP left. Its status is HLT
This turn took 4.821800393983722e-05 seconds to calculate.
=== 24 ===
Raikou used Substitute!
Raikou made a Substitute!
Metagross used Struggle!
The Substitute took 37 damage for Raikou!
Metagross is hit with recoil!
Metagross lost 9 HP!
Raikou restored HP with its Leftovers!
Raikou has 20 / 193 HP left. Its status is HLT
Metagross has 146 / 155 HP left. Its status is HLT
This turn took 0.0005012369947507977 seconds to calculate.


Conclusion
SleepTalkPressureStalling is not a great nor smart strategy, although it has some merit if prepared with a Thief Pokemon, and it's especially useful after the player can get off merely one Sand-Attack (most of the probabilities above then become 90% or more, even against the really threatening matchups). In the case of Mono Rock, it's amongst the best strategies that are available.


I must say I really like these calculations, since everything is factored in by the Monte Carlo simulation; critical hits, secondary effects, misses, fullparas, really everything. Changing a mechanic, such as adding Accuracy reduction or paralysis to an opponent, or merely subtracting like 4 Thunderbolt PP, is possible and can greatly improve or affect the odds.
 

Attachments

Welcome back to the Battle Arena
Lati-Sandwich (with a side of Slaking)

View attachment 322293View attachment 322294View attachment 322295View attachment 322296
Well I'm back again still furthering my Battle Arena streak, with lots of bad luck and stupid losses as you'd expect. Today I'm updating with some new streaks going into the 200s as well as some testing with a new third PKMN, which I had some pretty successful streaks with. The Truant king Slaking.
To start here are two streaks, one that got to 210 with the new Slaking third, and one to 211 with Latias.


The team as of this point, is still the same from my last post on the Lati-Sandwich. Regardless here is the team again - spare of the explanations of the spreads and whatnot, of which can be seen in my last post.

View attachment 322297
LATIOS (Latios) @ Lum Berry
Ability: Levitate
Level: 50
EVs: 78 HP / 252 SpA / 180 Spe
Modest Nature
IVs: x Atk
- Psychic
- Ice Beam
- Thunderbolt
- Memento

View attachment 322298
SNORLAX (Snorlax) (F) @ Chesto Berry
Ability: Thick Fat
Level: 50
EVs: 138 HP / 252 Atk / 116 Def / 4 Spe
Adamant Nature
IVs: x SpA
- Curse
- Earthquake
- Shadow Ball
- Self-Destruct

View attachment 322299
LATIAS (Latias) @ Twisted Spoon
Ability: Levitate
Level: 50
EVs: 74 HP / 252 SpA / 184 Spe
Modest Nature
IVs: 30 Atk / 30 SpA / 30 Spe
- Psychic
- Ice Beam
- Thunderbolt
- Hidden Power [Fire]

Not much new to say about this team, Latios and Snorlax are fantastic and fairly unmatched in usefulness in a team of this style in the Arena. Latias is good and effective, but isn't perfect and I have been willing to let it go in hope of further optimizing the team. Mostly in the past I'd tested with strong special attackers with hopefully a little bulk that would be able to carry out a similar role that Latias does, but Latias does it best, and HP Fire comes in handy VERY often. Metagross, Registeel, Steelix, Scizor, etc. All things that would otherwise be troublesome and threatening if they come out in the second or third slot are really stopped in their tracks by this coverage move. Again, like the rest of Latias it isn't perfect, but the best option so far in my opinion.

With the knowledge that Latias isn't perfect in mind, I moved away from special attackers and wanted to do some more testing with strong Choice Band users. I don't think set up is ideal in Arena, and without the Choice Band I feel that there isn't really any physical PKMN that can do what it needs to. With candidates like Tauros, Heracross, Metagross and more, Slaking was really a standout, and it makes me wonder why I haven't done more testing with it in the past.

View attachment 322300
SLAKING (Slaking) (F) @ Choice Band
Ability: Truant
Level: 50
EVs: 4 HP / 252 Atk / 252 Spe
Adamant Nature
- Return/Double-Edge
- Shadow Ball
- Earthquake
- Hyper Beam

I'm not sure if there is a better spread to be running Slaking, I don't really think it's worth sacrificing some OHKO's just to boost up the speed tier, especially when there isn't ALOT that can threaten it that outspeeds it, at the very least it has to worry about getting crit or 2HKO'd by a special attacker.

Using Slaking always feels reminiscent of old Battle Tower teams I used to use with something like Metagross with explosion in slot two just so I could switch Slaking back in for the last kill. This isn't exactly that, but when you look at Latios and Snorlax, Slaking has a surprisingly powerful synergy with them.

The way that this team is built, though in the previous iteration the plan was to keep Latias off of the field, Latios and Snorlax are readily able to take out the first two PKMN. Latios easily 1, 2, or 3HKO's a vast number of PKMN, with the few that can beat it, namely some special attackers, are all easy cleanup for Snorlax. With that Snorlax can easily use Selfdestruct and OHKO 95% of the Frontier. Having the first two members being able to take out the opponent first two of most possible teams, the amazing Slaking who can pick up so so many OHKO's just takes out the last opponent PKMN. As you'd be able to see in the first streak, many battles go this way. Latios takes out the first one(or more if possible), Snorlax finishes off the second one or blows up on it, and Slaking picks up the KO easily.

While in theory this works every time, Slaking has obvious flaws like the few KO's it can't pick up against things like Armaldo, Registeel and Regirock, Shuckle, certain Salamence sets, etc. And of course the biggest flaw with this idea is if Slaking has to come out against the second PKMN, in which case the game is likely lost. Not always, as it happens a couple times in the streak, but most obviously in the losing battle. Part of running Slaking is also knowing or at least checking the trainer you're up against. If they have the possibility to throw out a ghost or anything that can survive a blow from Slaking forces you to radically change the game plan.

View attachment 322301View attachment 322302View attachment 322303
In the Slaking streak the loss is pretty self explanatory. This loss was very avoidable. It was late and my brain wasn't completely in the game. Manectric crit on Latios didn't matter, both because Snorlax easily OHKO's it and the second PKMN was Regice, whom Latios does not touch. Based on what I said about how you'd want to play Slaking, I played this incorrectly. I should have used Selfdestruct on Regice and I would not have had the issue of being locked into a useless move vs. Misdreavus. Very avoidable, and just how the team works. My brain was still in Latias mode. At the very least this demonstrates the weaknesses in the Slaking pick, even if it was my fault I lost.

View attachment 322304View attachment 322305View attachment 322306
This is purely just a very difficult team for "Lati-Sandwich" to beat. Period. Metagross isn't something that I consider extremely threatening, but in the first slot is by far the worst, as unless it misses Meteor Mash, beats Latios and gets a hit in on Snorlax. That is exactly what happens, but unfortunately another steel type comes out who Snorlax is forced to blow up on. Had I not been crit by the Metagross EQ, maybe I could've used Shadow Ball, but after all it didn't matter because even if Snorlax took out Skarm, the odds were the same to take out Regirock with Latias.
This was either Regirock(1) or (2). Which incidentally, is the best case scenario for Latias to win.

252+ SpA Twisted Spoon Latias Psychic vs. 255 HP / 0 SpD Regirock: 84-99 (44.9 - 52.9%) -- 30.5% chance to 2HKO

With only 30.5% chance to win the streak was over. Not the highest I've ever streaked with this team, but I think matchups against teams like this are unavoidable and are just the reality of the Arena, bad luck or good luck, matchup will still be equally or more important.

In all these are just two of many streaks I've been doing. Slaking has lots of potential, but I'm not convinced it is better than Latias in the last slot, mostly because it can't KO PKMN like on this team here that I lost to in the Latias streak. Most of my streaks die to misplay or bad luck in the 147-196 range, but I think(as demonstrated in the Slaking loss) that if I take breaks at certain points I'll play better. The teams aren't getting harder at that point in the streak, so it just boils down to playing right and not getting haxed too much. Let me know what you think about Slaking or another CB user in the Latias slot.
I don't know what to say, but I'm really disappointed and I'm really tired of this. I genuinely gave you a chance to redeem yourself and it seems that you're more focused on trying to fool people out rather than making a real commitment. I saw the first 10 minutes of this new team and it was enough to prove that it was a mistake from my part to accept the first video you posted in here.

The main reason why I accepted your first streak once you submitted the video from 56-150 was because the improved team was born from the feedback of various users who joined the debate. Rather than flaming you, after you attempted to fool us the first time, everyone participated on a healthy debate which developed various ideas on how we could improve the "Lati-Sandwich" concept and our improved versions of Pokemon sets. You went ahead and used what was developed out of it and got a 150 win streak which seemed to be, on good faith, to be the product of genuine research and good sportsmanship.

However, you later went back to the short video samples and started to submit 3 new streaks with more than +200 wins each on Arena. Most of us know how unforgiving this facility is due to the lack of switching and despite the tools at our disposal (Trainer databases which seems to be something you ignore, calculators and sets) we know how hard it is to get those numbers. But it seems that you somehow imagined that you earned everyone's trust in here and once again these videos shows how volatile and unreliable the teams are.

Going back to Modest Latios: You seem to be fixated on the extra power which is fine if you can back up the loss in Speed and cover its weaknesses. However, you went back to the 153 benchmark and I think some of us explained why this benchmark was so inefficient. Mind you, we did explained why Timid works better and it not only comes down to the lack of power, but because of the possibility of winning match-ups against threats such as Gengar, Sceptile, Manectric where Latios gets to outspeed them and 2HKO/OHKO them before they do something. This doesn't forces you to send Snorlax because you still get to keep Latios and if the next opponent is something that Latios can't beat, you can either go for the chip damage or use Memento to give Snorlax a chance to set-up. You're always at an advantage when you're winning 3-2 on the Battle Arena and your lead Pokemon gets to stay as much as possible... Maybe even 159 Speed on Modest would've been much better if you wanted to avoid Manectric from either killing you with Crunch after a SpD drop or a critical hit.

At 8:42, you ended up facing Gengar 4/6 since it runs Ice Punch after you used your Lum Berry against Starmie 6 who attempted to paralyze your Latios on its first attempt? How is this not seen as a hindrance considering that Gengar 4 could have used Destiny Bond against Snorlax and leave Slaking alone vs two Pokemon? How is Timid not seen as an option when it can outspeed and kill this Gengar? Of course it wouldn't have changed the outcome since you ended up winning (most likely it was Gengar 6). But still, someone who has done a lot of climbing in Arena would know better about these threats? +800 wins (if we combine all your streaks) in Arena would pretty much ingrain in my memory some of these specific threats but it doesn't seems to be the case here.

If that doesn't seems enough, let's rewind to 9:50 where you face up Electrode 3. Even though Modest could actually be EV'd to outspeed this Electrode (244 Speed min), it had no issues on Enduring and then Exploding to take your Latios down. What would've happened with Timid or a faster Modest spread instead? Because you have the Speed advantage, the AI prioritizes gaining it over your Pokemon. As a result, Electrode will be more than happy to spam Thunder Wave to make sure that it goes first next turn. AI prioritizes crippling your stats over raising theirs, so the risk of using Endure to gain the Speed advantage is minimal. This mechanic is present on the first page of this thread.

Another sample that shows that you're not aware of the trainer databases is this battle at 0:31 vs Dragon Tamer Maddox. You decided to go for Hyper Beam even though Adamant Banded Shadow Ball can OHKO Latias.

  • 252+ Atk Choice Band Slaking Shadow Ball vs. 255 HP / 0 Def Latias: 192-226 (102.6 - 120.8%) -- guaranteed OHKO

The only Latias that can actually survive Shadow Ball is Set 5 which does not carry Psychic and therefore it eliminates the possibility. Why would you risk your streak so early using the 90% accurate move when the super-effective coverage move already does the job?

At 4:46 vs Expert Weston there are a lot of egregious misplays which could've lead to a loss under the most unfortunate circumstances. Why would you blow up vs Gardevoir considering that Set 4/8 can potentially carry Brightpowder? I personally believe that it's really embarrassing to lose my nuke for nothing and it's happened to me before, which is why I have to look up for sets and determine on which target it's worth exploding into, what I know of the set and the possible scenarios out of it. Is it really worth to lose Snorlax knowing that Expert Weston can carry set 1-8 of some Legendaries, Psychic types like Starmie or Gardevoir and various special attackers that Snorlax can beat? Wouldn't Shadow Ball be the safest bet? Even if it came out as Gardevoir 2, as long as you can land at least one hit, you can easily beat most Gardevoir sets while keeping a boosted Snorlax via judgement.

Considering that ever since the first attempt, after you were called out by most of the veteran users in here and most of the decision making on your video samples does not proves to me how you validly reached those numbers, I will be removing your streaks from the leaderboard (Including the 150 win streak I previously accepted). You've shown me that you cannot be trusted in good faith to submit a legitimate streak and some of the decision making on these video samples simply prove my point. I'm not going to bother on cherry picking any further streaks from you considering that ever since you started to raise some eyebrows in here, you've shown that you're willing to reach high benchmarks at the expense of lying.
 
I reached 110 tournament wins in the dome. Going to stop here. I made some changes to the Snorlax set by deciding to run a CAREFUL nature. I needed it to be more specially bulky, as it's main role is as a pivot into Jolteon and Latias/Latios and it needs all the special bulk it can get.
Item Choice : cheri berry for the consistency in checking Jolteon and white herb to prevent Latias/Latios from ever beating you from full.

Here's the set explanation: 204 HP, 116 Def / 52 Attack /86 SpD / 52 Speed. This defensive spread tanks Snorlax and Metagross, has enough attack to 2ko 252 Latias, with 52 speed to out speed Aggron & co.

Counter is my hipster move mainly for metagross. This was Actaeon's idea. It's very situational, but comes in handy every now and then.

Here are the Careful Nature Offensive Calculations
52 Atk Snorlax Shadow Ball vs. 0 HP / 0 Def Gengar: 126-150 (104.1 - 123.9%) -- guaranteed OHKO
52 Atk Snorlax Shadow Ball vs. 252 HP / 0 Def Latias: 88-104 (50.8 - 60.1%) -- guaranteed 2HKO
52 Atk Snorlax Self-Destruct vs. 170 HP / 0 Def Latias through Reflect: 161-189 (99.3 - 116.6%) -- 93.8% chance to OHKO

Careful Nature Defensive Calculations
252+ Atk Snorlax Double-Edge vs. 204 HP / 116 Def Snorlax: 109-130 (41.7 - 49.8%) -- guaranteed 3HKO
170+ Atk Metagross Meteor Mash vs. 204 HP / 116 Def Snorlax: 91-108 (34.8 - 41.3%)- guaranteed 3HKO
252+ SpA Latios Psychic vs. 204 HP / 86+ SpD Snorlax: 61-73 (23.3 - 27.9%) -- 88% chance to 4HKO

Edit: The speed investment isn't necessary if you don't care about outspeeding Aggron, Regirock and Registeel. Either invest more into SpD or a bit into attack (to improve the damage roll against 0 HP gardevoir. A good number is 92 Attack EVs with Careful (62.5 % chance to ohko)

52 Atk Snorlax Shadow Ball vs. 0 HP / 0 Def Gardevoir: 116-138 (89.9 - 106.9%) -- 37.5% chance to OHKO

Edit: Counter is also useful for Crobat (which is a pain in the ass for this team). If Crobat attacks with sludgebomb, counter will ko 14/15 times. Guaranteed if you lower the def to 108. Immunity is also not a bad idea, because the fire/ice resistances aren't even needed. Honestly, Persim Berry/ Lum Berry is not even a bad idea on Snorlax because that guarantees that it will be able to handle both Jolteon and Crobat. Gengar only really fears paralysis and freeze anyways. I'm shook because Actaeon witnessed me almost losing to Crobat which confused Suicune and left me with 22 hp at the end.

Edit: Actaeon put Snorlax vs Crobat on a simulator. Snorlax wins in 831 of the 1000 cases. 0.95 confidence interval: 0.807 0.853
The probability of winning is between 80- 85%, with persim and immunity as the ability.


https://pokepast.es/117fe1bf3c3e1ceb
This is really cool. Thanks for the credit. I'd like to add some details about the simulated calc vs Crobat-4, and also add some probabilities about switching into really strong Psychics, with the following set. Note that it has Immunity to not only increase the chance of living through Crobat-4, but also increase its expected HP after beating it, and Thick Fat is probably not needed as you stated as well. Moreover, it seals the game against any annoying Shuckle you would get stuck against in a pinch scenario for example. I used the 108 Defense, because otherwise Countering Crobat's Sludge Bomb and not KO'ing would be a real pain and reduce the odds significantly. Its Brightpowder is bad enough already if you ask me. The leftover EVs were used to increase the SpD from 155 to 156, which actually helps a little against strong Psychics and Thunderbolts.

1615807825938.png

Snorlax @ Cheri Berry
Ability: Immunity
EVs: 204 HP / 52 Atk / 108 Def / 92 SpD / 52 Spe
Careful Nature
- Counter
- Shadow Ball
- Earthquake
- Selfdestruct

For the situation against Crobat, I assumed the following simple strategies for both Pokemon:
  • If Snorlax is in KO-range of a raw damage Sludge Bomb (87 HP), Crobat uses Sludge Bomb
  • Otherwise, if Snorlax is not confused, it uses Confuse Ray
  • Snorlax only spams Counter
  • Note that Crobat-4 only has 3 IVs in every stat.
This way, we get the probability of winning/losing even when Crobat battles "as smart as possible", e.g. if it would just Sludge Bomb turn 1 it loses for free. So the probability we are calculating is a minimum probability in a sense.
=== 1 ===
Crobat used Confuse Ray!
Snorlax became confused!
Snorlax is confused!
It hurt itself in its confusion!
Snorlax lost 22 HP!
Snorlax has 239 / 261 HP left. Its status is HLT
Crobat has 146 / 146 HP left. Its status is HLT
=== 2 ===
Crobat used Sludge Bomb!
Snorlax lost 86 HP!
Snorlax is confused!
Snorlax used Counter!
Crobat lost 146 HP!
Crobat fainted!
Snorlax has 153 / 261 HP left. Its status is HLT
Crobat has 0 / 146 HP left. Its status is FNT

=== 1 ===
Crobat used Confuse Ray!
Snorlax became confused!
Snorlax is confused!
It hurt itself in its confusion!
Snorlax lost 22 HP!
Snorlax has 239 / 261 HP left. Its status is HLT
Crobat has 146 / 146 HP left. Its status is HLT
=== 2 ===
Crobat used Sludge Bomb!
Snorlax lost 85 HP!
Snorlax is confused!
It hurt itself in its confusion!
Snorlax lost 22 HP!
Snorlax has 132 / 261 HP left. Its status is HLT
Crobat has 146 / 146 HP left. Its status is HLT
=== 3 ===
Crobat used Sludge Bomb!
Snorlax lost 84 HP!
Snorlax is confused!
It hurt itself in its confusion!
Snorlax lost 23 HP!
Snorlax has 25 / 261 HP left. Its status is HLT
Crobat has 146 / 146 HP left. Its status is HLT
=== 4 ===
Crobat used Sludge Bomb!
Snorlax lost 25 HP!
Snorlax fainted!

The results from 50.000 simulations (took about 15 mins) are as follows (as usual, the intervals given are 95% sure to contain the actual probability):

Snorlax wins (has more than 0 HP left)0.801-0.808
Snorlax wins with more than 50 HP left0.758-0.765
Snorlax wins with more than 100 HP left0.535-0.544
Snorlax wins with more than 150 HP left0.507-0.516
Snorlax wins with more than 200 HP left0.000-0.000
(as expected, because it's impossible)

Still, losing 20% of the time against this Crobat (without even damaging it!) will eventually end a streak as it's a consistent problem. In fact, the Modest Gengar you have only has 1/16 chance to lose, i.e. when Crobat critically hits Shadow Ball. So I think that should still be the main strategy. You could also play around with swapstalling Crobat, but that's pretty dangerous as well since it might eat Lum Berries with Confuse Ray or bust out the random Aerial Ace for some reason.

As an extra bit of info, let's look at the following calc copypasted from the Turskain calculator (useful to know when switching Lax into Latios-1 for example):

255+ SpA, 3 IV SpA Latios Psychic vs. 204 HP / 92+ SpD Snorlax: 61-72 (23.3 - 27.5%) -- 71.5% chance to 4HKO

This doesn't take into account critical hits and SpD drops from Psychic, and since we're talking about 2/3/4/5 possible hits, the probability given doesn't mean a thing anymore. In fact, the odds favor Latios way more. Here's what my simulator says about it (again 50.000 sims):

1615818034427.png

1HKO2HKO3HKO4HKO5HKO
0.000-0.000
(duh)
0.002-0.003
(really shitty hax)
0.185-0.192
(a bit of hax)
0.642-0.650
("standard")
0.159-0.165
(low rolls)

Note that the 5HKO probability indeed corresponds to what Turskain's calc is saying since there would occur no effects (it's like Snorlax would be shrouded in Mist and has Shell Armor and the rolls are good). So switching Snorlax into Latios is not as safe as we would want it to be (one of the reasons for choosing Snorlax in the first place), because the '3HKO' case means you can't switch in and win with the 2HKO-ing (OHKO on a crit!) Shadow Ball. Still it's a pretty safe switch, and you can always decide to Selfdestruct if Latios crits or SpD drops on the switch.

Of course, the switch into Jolteon is way better for Snorlax (especially because of Cheri Berry; the exact reason to run it):

1615818064629.png

1HKO2HKO3HKO4HKO5HKO
0.000-0.0000.000-0.001
(it can happen, but only if it has two crit max rolls!)
0.016-0.0190.214-0.2210.761-0.768
 
This is really cool. Thanks for the credit. I'd like to add some details about the simulated calc vs Crobat-4, and also add some probabilities about switching into really strong Psychics, with the following set. Note that it has Immunity to not only increase the chance of living through Crobat-4, but also increase its expected HP after beating it, and Thick Fat is probably not needed as you stated as well. Moreover, it seals the game against any annoying Shuckle you would get stuck against in a pinch scenario for example. I used the 108 Defense, because otherwise Countering Crobat's Sludge Bomb and not KO'ing would be a real pain and reduce the odds significantly. Its Brightpowder is bad enough already if you ask me. The leftover EVs were used to increase the SpD from 155 to 156, which actually helps a little against strong Psychics and Thunderbolts.

View attachment 323394
Snorlax @ Cheri Berry
Ability: Immunity
EVs: 204 HP / 52 Atk / 108 Def / 92 SpD / 52 Spe
Careful Nature
- Counter
- Shadow Ball
- Earthquake
- Selfdestruct

For the situation against Crobat, I assumed the following simple strategies for both Pokemon:
  • If Snorlax is in KO-range of a raw damage Sludge Bomb (87 HP), Crobat uses Sludge Bomb
  • Otherwise, if Snorlax is not confused, it uses Confuse Ray
  • Snorlax only spams Counter
  • Note that Crobat-4 only has 3 IVs in every stat.
This way, we get the probability of winning/losing even when Crobat battles "as smart as possible", e.g. if it would just Sludge Bomb turn 1 it loses for free. So the probability we are calculating is a minimum probability in a sense.
=== 1 ===
Crobat used Confuse Ray!
Snorlax became confused!
Snorlax is confused!
It hurt itself in its confusion!
Snorlax lost 22 HP!
Snorlax has 239 / 261 HP left. Its status is HLT
Crobat has 146 / 146 HP left. Its status is HLT
=== 2 ===
Crobat used Sludge Bomb!
Snorlax lost 86 HP!
Snorlax is confused!
Snorlax used Counter!
Crobat lost 146 HP!
Crobat fainted!
Snorlax has 153 / 261 HP left. Its status is HLT
Crobat has 0 / 146 HP left. Its status is FNT

=== 1 ===
Crobat used Confuse Ray!
Snorlax became confused!
Snorlax is confused!
It hurt itself in its confusion!
Snorlax lost 22 HP!
Snorlax has 239 / 261 HP left. Its status is HLT
Crobat has 146 / 146 HP left. Its status is HLT
=== 2 ===
Crobat used Sludge Bomb!
Snorlax lost 85 HP!
Snorlax is confused!
It hurt itself in its confusion!
Snorlax lost 22 HP!
Snorlax has 132 / 261 HP left. Its status is HLT
Crobat has 146 / 146 HP left. Its status is HLT
=== 3 ===
Crobat used Sludge Bomb!
Snorlax lost 84 HP!
Snorlax is confused!
It hurt itself in its confusion!
Snorlax lost 23 HP!
Snorlax has 25 / 261 HP left. Its status is HLT
Crobat has 146 / 146 HP left. Its status is HLT
=== 4 ===
Crobat used Sludge Bomb!
Snorlax lost 25 HP!
Snorlax fainted!

The results from 50.000 simulations (took about 15 mins) are as follows (as usual, the intervals given are 95% sure to contain the actual probability):

Snorlax wins (has more than 0 HP left)0.801-0.808
Snorlax wins with more than 50 HP left0.758-0.765
Snorlax wins with more than 100 HP left0.535-0.544
Snorlax wins with more than 150 HP left0.507-0.516
Snorlax wins with more than 200 HP left0.000-0.000
(as expected, because it's impossible)

Still, losing 20% of the time against this Crobat (without even damaging it!) will eventually end a streak as it's a consistent problem. In fact, the Modest Gengar you have only has 1/16 chance to lose, i.e. when Crobat critically hits Shadow Ball. So I think that should still be the main strategy. You could also play around with swapstalling Crobat, but that's pretty dangerous as well since it might eat Lum Berries with Confuse Ray or bust out the random Aerial Ace for some reason.

As an extra bit of info, let's look at the following calc copypasted from the Turskain calculator (useful to know when switching Lax into Latios-1 for example):

255+ SpA, 3 IV SpA Latios Psychic vs. 204 HP / 92+ SpD Snorlax: 61-72 (23.3 - 27.5%) -- 71.5% chance to 4HKO

This doesn't take into account critical hits and SpD drops from Psychic, and since we're talking about 2/3/4/5 possible hits, the probability given doesn't mean a thing anymore. In fact, the odds favor Latios way more. Here's what my simulator says about it (again 50.000 sims):

View attachment 323413
1HKO2HKO3HKO4HKO5HKO
0.000-0.000
(duh)
0.002-0.003
(really shitty hax)
0.185-0.192
(a bit of hax)
0.642-0.650
("standard")
0.159-0.165
(low rolls)

Note that the 5HKO probability indeed corresponds to what Turskain's calc is saying since there would occur no effects (it's like Snorlax would be shrouded in Mist and has Shell Armor and the rolls are good). So switching Snorlax into Latios is not as safe as we would want it to be (one of the reasons for choosing Snorlax in the first place), because the '3HKO' case means you can't switch in and win with the 2HKO-ing (OHKO on a crit!) Shadow Ball. Still it's a pretty safe switch, and you can always decide to Selfdestruct if Latios crits or SpD drops on the switch.

Of course, the switch into Jolteon is way better for Snorlax (especially because of Cheri Berry; the exact reason to run it):

View attachment 323414
1HKO2HKO3HKO4HKO5HKO
0.000-0.0000.000-0.001
(it can happen!)
0.016-0.0190.214-0.2210.761-0.768
This is very good stuff. The only reason to use Snorlax over something like Slaking is for it's special bulk/pivot. It merely takes hits well enough to keep these targets in check with Careful. This is exactly what I want it to do, as Gengar and Suicune can handle basically every other scenario.
If I were to give an example scenario, Snorlax should lead if the opposing team is Latias/Latios/Metagross. If the AI lead is Metagross, I wouldn't even use counter in this scenario, as a crit MM would leave you too weak to check Latios/Latias. You pivot in Suicune, who is less important in this matchup. I never really choose Gengar in matchups like this because of the risk of QC on any of these sets.
Cheri Berry/Lum is definitely the item for Snorlax. It basically guarantees you'll never lose to Jolteon, while without it, you can be para haxxed/crit. Again, I noticed this matchup was significantly worse without cheri berry and while I was using the Adamant spread.

Another hypothetical scenario that's always dangerous is some combination of Snorlax/ QC Latios/Latias/Crobat/ Metagross/ Lapras/Haxrein.
If it's QC snorlax, you have to lead your Snorlax and self-destruct, or you could easily get swept. This spread barely avoids a 2hko, so if Snorlax was to switch into a curse and got crit, you lose. Something like this will happen eventually.
 
Hi there! Some quick updates I have managed to improve my Battle Pyramid streak which now's stands at 420 wins. A small change is that I teached my Metagross Brick Break and got rid of Explosion since it wasn't usefully at all and the Rock/Normal rooms gave me some troubles! I did also put my newly RNGed Latios to the test and managed to achieve 210 rooms cleared in Battle Pike. Here's the team I used:

latios.png

Latios@ Lum Berry
Nature: Timid
Shiny: No
Ability: Levitate
IV's: 31/12/31/31/31/31
EV's: 12 HP/ 28 Def. / 236 Sp.Atk. / 12 Sp.Def. / 220 Spe.
Moves:
- Psyhic
- Ice Beam
- Thuderbolt
- Calm Mind

metagross.png

Metagross@ Choice Band
Nature: Adamant
Shiny: Yes
Ability: Clear Body
IV's: 31/31/31/X/31/31
EV's: 184 HP / 252 Atk. / 72 Spe.
Moves:
- Meteor Mash
- Earthquake
- Shadow Ball
- Brick Break


blissey.png

Blissey@ Leftovers
Nature: Bold
Shiny: No
Ability: Natural Care
IV's: 31/X/31/31/31/31
EV's: 252 HP / 252 Def. / 4 Sp.Def.
Moves:
- Seismic Toss
- Toxic
- Soft-boiled
- Aromatherapy

Nothing new here just my standard Metagross/Bliss from Pyramid along with the new Lati. Metagross EV's can probably be optimised for some more speed but oh well I am a bit lazy atm :)
Will update the streaks as we go! I am planning some Dome/Arena and Palace teams but will take some time to RNG what is needed.. but we will get there!

IMG_20210315_235611.jpg
IMG_20210315_235556.jpg
 
Last edited:

QuentinQuonce

formerly green_typhlosion
Ladies and gentlemen, allow me to present my upcoming Pokemon Adventures: Emerald Battle Frontier Challenge!


View attachment 323138

Pokemon Adventures: Emerald - GBA

Can I Beat The Battle Frontier In Seven Days?


Introduction
Being a big fan of the Pokemon Adventures manga, and having wanted a new and individualised challenge to tackle after my Pokemon HOME challenge last year, I decided to bring the two together. In case you've never heard of Pokemon Adventures (also often referred to as Pokemon Special by some fans) it's perhaps the most prominent Pokemon manga, closely following the story of the games but frequently incorporating original elements and characters. It's known for being a somewhat more mature and occasionally somewhat dark take on the Pokemon world, but a thoroughly detailed and high-quality one, and has been praised by Satoshi Tajiri as the adaptation that most closely resembles the fictional world he envisaged.

Every chapter of the saga corresponds to one of the main series games, and the Emerald chapter is one of my favourites. The protagonist (also named Emerald) is depicted as a highly skilled battler who decides to conquer the newly-opened Battle Frontier during the course of a single week. Having access to nearly every Pokemon that existed at the time thanks to Crystal (a renowned capture specialist who works as Professor Oak’s trusted assistant) he uses a wide array of borrowed Pokemon to accomplish this task. Despite not personally owning any Pokemon and claiming not to like them, most of the strategies he comes up with are clever, innovative, and resourceful. But while they're entertaining to read about, part of me wondered how viable they realistically are.

So, the challenge I have given myself is to play as Emerald. To complete the Frontier in seven days, using the same Pokemon that he used. Can I beat all seven facilities in a week?

View attachment 323144

General rules
  • This challenge must be performed on a fresh save file that has not previously entered into any of the Frontier facilities.

  • The only Pokemon eligible for this challenge are those used by Emerald in the manga (a full list can be found on Bulbapedia's character page for Emerald, which I have used as a general reference for the whole challenge. These Pokemon must adhere to the facilities they were used in – for instance, Rapidash can only be used in the Pike, and Sudowoodo can be used in the Arena and the Palace but not the Dome*. The only exception is the Factory, since it’s not directly possible to control what species I’m given. However, if a Pokemon appears which was used by Emerald in the Factory, it must be chosen or swapped for. These species are:
    Ivysaur
    Farfetch’d
    Rhyhorn
    Pinsir
    Togetic
    Chinchou
    Skarmory
    Grovyle
    Sceptile
    Linoone
    Ludicolo
    Gardevoir
    Slaking
    Delcatty
    Illumise


  • Note that the former rule requires playing at level 50, but this is specified as Emerald's choice on-page regardless. This will be the case for all seven challenges, for the sake of consistency.

  • Different individuals of the same species are permitted, as are different EV spreads and movesets. However, if the Nature or Ability of a particular Pokemon was specified in the manga, this must be respected. So Sceptile can only be Hasty, Dusclops must be Rash, etc. Exact movesets or items do not have to be adhered to since Pokemon in the manga often use far more than four moves.

  • Each facility must be completed in one day over the course of a week and in the order taken in the manga (Factory-Pike-Pyramid-Arena-Dome-Palace-Tower). Multiple attempts in any given facility are permitted in order to reach the target streak. I’m doing the final three in this order specifically as it was Emerald’s stated intention to do it this way originally; in the manga, Emerald loses at the Dome, challenges the Palace and the Tower, then does the Dome again on the final day without battling Tucker.

*Note that while Emerald initially does use Sceptile, Sudowoodo, and Dusclops in the Dome before changing his team, I intend to use his final picks for the entire Dome streak to give the challenge more variety.


View attachment 323145

Facility-specific rules
  • In the Battle Pyramid, Emerald uses different Pokemon for the non-Brandon rounds vs the Brandon round, and this must be adhered to. This applies for the second Brandon fight too even though Brandon only uses the Regi trio in the manga (for an additional layer of challenge). Therefore, for rounds 1-2 and 4-9 my team must be Alakazam, Shedinja, and Phanpy, while in rounds 3 and 10 my team must be Hitmonchan, Cubone, and Sceptile. These can be in any order I choose. In the Pike, Arena, Palace, and Tower, I am also permitted to mix up the order of my Pokemon between rounds should I choose to.

  • In the Dome, Emerald’s third Pokemon is not specified. Therefore, while I must use Metagross and Alakazam, I am allowed to bring any other Pokemon used in the Pike, Pyramid, or Arena, but not Sceptile, Dusclops, or Sudowoodo, and not the three Pokemon used in the Tower (Mantine, Mr. Mime, and Snorlax).

  • If an opponent in the Factory is carrying one or more species used by Emerald, I can freely choose which one to swap for. If all three of my Pokemon are species which were used by Emerald, and the opponent also has a Pokemon used by Emerald, I must swap one of them regardless.

View attachment 323146

The challenge formally commences this Wednesday, 17th of March. I'll be taking on the Battle Factory first, so stay tuned for the results.


Pokemon Adventures: Emerald - GBA

1615938493028.png


Day 1
Battle Factory

1615938458711.png


Time to start my Battle Frontier Challenge! And we're starting with one of the most difficult challenges of all. Having gatecrashed the Frontier's opening ceremony and announced to the world his intention to beat all seven facilities, the Frontier Brains have no option but to allow Emerald to participate. Enraged by Emerald's flippant attitude and perceived lack of knowledge, Factory Head Noland demands that Emerald take on the Battle Factory first.

Analysis
Starting with the Factory is both a blessing and a curse. While I'm duty-bound to pick certain species if they appear, I'm largely free to play as I like. But either way, the Factory is one of the hardest facilities to get the Gold symbol in, and I'm feeling some trepidation. I started early because I knew it would take multiple tries.

To my surprise, it only took 4 attempts to make it to the end. The first attempt got me to 15, the second to 20 (I lost to Noland, who wrecked me with a Scyther), the third to 33, and the fourth successfully to 42.

I opted to swap as much as possible where I could to improve the opening draft faster, though it's impossible to max out your swaps before the second Noland round. I expected the mandatory picks to make this significantly harder (I'm mandated to swap for certain species if they show up). However, because most of the species used are lower-tier mons such as Togetic and Illumise, this became less relevant in the later rounds, and did not impact things materially in earlier rounds since I only ran into a couple of them. Luckily, once I've swapped for them, I'm not obligated to keep them for the entire round and can trade them away after if they're a hindrance.

Writeups of all six rounds are as follows.

I start with an opening draft of Ponyta1, Combusken1, Spoink, Sealeo1, Flaaffy, and Loudred. None of those are species I'm required to take, so I'm free to choose as I like. I go for Combuske, Sealeo, and Spoink and work my way through. This round is pretty easy - the randomised AI neuters threatening foes - so I pretty quickly make it through. Swaps are as follows:

-Spoink for Kadabra
-Sealeo for Omanyte
-The next opponent has Rhyhorn, which is a mandatory swap, so I exchange it for Omanyte
-Kadabra for Elekid
-Rhyhorn for Kabuto
-The final trainer specialises in Water types, so I swap Combusken for Lickitung

The opening draft is Scyther1, Torkoal1, Machoke1, Sealeo1, Banette1, Swellow1. I take Swellow, Banette, and Torkoal.

-Torkoal for Combusken
-As the next opponent specialises in Psychic types, I trade Combusken for Solrock
-Solrock for Metang
-Illumise shows up, which is a mandatory swap, so I trade away Metang
-Illumise for Ninjask
-Banette for Kingler

Round Three
Silver Symbol time. I'm presented with an opening draft of Sandslash2, Ivysaur2, Mightyena2, Graveler2, Weepinbell2, and Magneton2. I'm obligated to take Ivysaur, so I opt for Mightyena first, Ivysaur second, and Graveler third. Surprisingly, it turns out to be one of the most reliable Pokemon I've ever used in the Factory, winning several matches almost single-handledly. I fully intended to keep it for Noland... and then the guide tells me the next opponent is skilled in the Fire type, so I reluctantly swap it. In hindsight I very much wish I'd kept it, but I coped nonetheless.

Swaps:
-Graveler for Gligar
-Gligar for Pidgeot
-Pidgeot for Sandslash
-Sandslash for Arbok
-due to the next opponent specialising in Fire types, I swap Ivysaur for Poliwrath
-Mightyena for Grumpig

This meant that my team for Noland was Grumpig2, Arbok2, and Poliwrath2.


1615981185948.png

Noland (Silver)
I swapped for Grumpig2 just before fighting Noland assuming that its elemental punches would make for a quick and easy match. No such luck... his first Pokemon was Wobbuffet, which Grumpig cannot hope to beat. I opted for Ice Punch desperately hoping for a freeze; while I was able to get three hits in as it Countered on the first turn, it promptly wised up and 2HKO'd with Mirror Coat.

Luckily, Poliwrath was able to patch things up, first Belly Drumming and then Resting back up to full health. And here is where I majorly misplayed. I should have Hypnotised it, but I stupidly assumed why bother - at half health +6 Brick Break should do just enough to KO. It didn't. Wobbuffet survived with a shred of health and Countered. 100% my fault for getting sloppy.

My hopes of surviving this fight are low. I send out Arbok and finish Wobbuffet off. Wigglytuff comes out next. Miraculously, it misses with Sing, allowing me to 2HKO with Sludge Bomb. And then his final Pokemon is Seviper, which dies to Earthquake.

And breathe. I did not remotely deserve that win, but you bet I was glad to get it.

Onto the next half of the challenge...

And we're onto having fully-evolved Pokemon. I'm presented with Vaporeon1, Snorlax1, Muk1, Aggron1, Lanturn1, Exploud1. None of these are much good, but my hopes weren't high. I opt to take Vaporeon, Muk, and Aggron and rapidly start swapping, exchanging Muk for Cradily after the first match.

Then Sceptile shows up. This is one of the mandatory species I have to swap for, but I have no problem with this; it proves to be an excellent lead, until I'm forced to abandon it. Rhydon shows up early and I was hoping to hang onto it, since it's one of those hateful Quick Claw sets I'm always paranoid about facing, but I end up having to ditch that soon after, too.

Swaps:

-Muk for Cradily
-Vaporeon for Sceptile
-Aggron for Rhydon
-Skarmory shows up (another mandatory species) so I swap Rhydon for it
-Due to the next opponent specialising in Flying types, I swap Sceptile for Kingdra
-Skarmory for Salamence

This was the hardest round by far; I never really found a rhythm in this round roster-wise. Sceptile would have been a great lead for the whole round if not for the Flying team - ironically, the hardest foe on that team was Miltank, which I had to stall out of PP with Cradily until it couldn't heal with Milk Drink any more.

The opening draft in this round was a somewhat more promising Kingdra2, Glalie3, Typhlosion2, Umbreon2, Jynx3, and Lapras2. I took Typhlosion, Glalie, and Lapras - not a great combination, in hindsight. The lack of defensive synergy immediately proved to be a problem when the first opponent brought out a fearsome Choice Band Aerodactyl. Lapras only narrowly survived and KO'd in turn with Surf. However, things turned around a few battles in...

Swaps:
-after narrowly surviving Aerodactyl's rampage, Glalie was swapped for Aerodactyl
-Typhlosion for Blaziken
-for the first time in the challenge, no swap; none of the opponent's picks justified it
-no swap again
-no swap again: the upcoming trainer was skilled with normal types. Blaziken smashed through the opposing Porygon2 and Blissey
-no swap again
-the upcoming trainer was skilled with Ground types; swapped Blaziken for Kingdra

Proper test of willpower, that. Blaziken/Aerodactyl/Lapras isn't, on the face of it, the best team, but they worked together well enough to get things done for long enough that it didn't feel right to switch it up. I worried that I'd hobbled myself for the Gold round, but there was nothing to be done.

Round Six
Here we go... the final challenge. Opening draft was Magmar3, Muk4, Blissey4, Golem3, Glalie3, and Lapras3.

A truly terrible opening selection, but somehow I made it through. I go with Glalie, Muk, and Blissey, rapidly swapping Glalie for Kingdra and Muk for Victreebel. Kingdra did the job well enough, but Victreebel3 does not remotely pull its weight so I swap for Cradily3, which is equally terrible.

However, it all turns around when the fourth opponent has the fabled Starmie3 - a SPIT Starmie with max Speed and Special Attack. It even turns out to have Natural Cure! Naturally, I swap Kingdra for it and it proves to be a wonderful lead. I quickly dump Cradily for Ampharos3, thinking that Starmie/Ampharos/Blissey is a pretty decent roster for Noland. However, the penultimate opponent has Blaziken3, so I exchange Ampharos.

FINALLY feeling like I had a good strong team, I prepare to fight for my first Gold symbol.

1615981185948.png

Noland (Gold)

He opens with Miltank and I pause for a second and try to guess if it's 3 or 4. Neither is particularly good news, but even if Blaziken can't KO it can bring it down to KO range for Starmie. Blaziken eats a Shadow Ball and then Endures as Miltank uses Earthquake, smashing it with a full-powered Reversal on the next turn.

Out comes Donphan. Nothing Blaziken can do can KO, so I use Reversal for about ~40%. As it's Donphan3, I worry about the likelihood of a Quick Claw Fissure, but mercifully Starmie gets in first and drops it with Surf. His final Pokemon is Cradily.

Praise be. If it's the abysmal third set, I've won. Cradily eats an Ice Beam, then prepares to use Solarbeam. Oh, thank god. It is! Starmie Ice Beams again, bringing it to ~5%, and dies to Solarbeam. Blissey comes out and finishes the job with an Ice Beam of her own.

________________________________________________​

And that's day 1 done! One down, six to go. Tomorrow, it's onto the next facility, and it couldn't be more different - we're headed to the Battle Pike...

1615995727675.png


____________________________________________​


1615995365284.png
 
Last edited:
Not sure if this knowledge is already out there but the game's source code can inform a strategy to navigate the Battle Pyramid.

When building a floor the game will populate it with trainers in one of three ways based on 16 scenarios: uniform distribution (11/16), clustering at the entrance (2/16), or clustering at the exit (3/16). The 16 map scenarios define how many trainers and items there are and how to distribute them. Items are always distributed uniformly so they can't tell us anything. A cluster at the entrance will include 4 trainers, an exit cluster will include 5 or 6. (edit - clusters are also extremely likely to set up double battle encounters)

So your options are:
Are trainers around the entrance?Is first trainer you see in a cluster?Ideal search method:Chance
YesYesDo a uniform search.12.5% (2/16)
NoNoDo a uniform search.68.75% (11/16)
NoYesExit is nearby - search around cluster.18.75% (3/16)

Another way to look at it is that if you don't start surrounded by trainers then you have a ~20% chance that the first trainer you see will be near the exit (3/14).

edit - To not double-post I'll share another thing I learned through this edit.

Fleeing from Pyramid wild Pokémon uses a calculation even if you're faster than the opponent. It also changes the normal calculation to require a higher ratio of your speed to your opponent to flee. Normally a speed-tie would let you flee 100% of the time, but in the Pyramid you'd need to have a speed stat 2-3 times higher than your opponent to always flee. Ninjask is the fastest Frontier-legal Pokémon with a max speed stat of 223 at level 50. The worst-case scenario would only allow Ninjask to reliably flee from Pokémon with a base speed of 48 or lower. Even under the best conditions possible you wouldn't be able to reliably flee from a level 50 Gengar.

Flee chance = (A/B)*(P/256)
A = Your unmodified speed
B = Enemy's unmodified speed
P {80, 88, 96, 104, 112, 120, 128} depending on your floor's scenario.
 
Last edited:

Pokemon Adventures: Emerald - GBA

View attachment 323769


Day 1
Battle Factory

View attachment 323768


Time to start my Battle Frontier Challenge! And we're starting with one of the most difficult challenges of all. Having gatecrashed the Frontier's opening ceremony and announced to the world his intention to beat all seven facilities, the Frontier Brains have no option but to allow Emerald to participate. Enraged by Emerald's flippant attitude and perceived lack of knowledge, Factory Head Noland demands that Emerald take on the Battle Factory first.

Analysis
Starting with the Factory is both a blessing and a curse. While I'm duty-bound to pick certain species if they appear, I'm largely free to play as I like. But either way, the Factory is one of the hardest facilities to get the Gold symbol in, and I'm feeling some trepidation. I started early because I knew it would take multiple tries.

To my surprise, it only took 4 attempts to make it to the end. The first attempt got me to 15, the second to 20 (I lost to Noland, who wrecked me with a Scyther), the third to 33, and the fourth successfully to 42.

I opted to swap as much as possible where I could to improve the opening draft faster, though it's impossible to max out your swaps before the second Noland round. I expected the mandatory picks to make this significantly harder (I'm mandated to swap for certain species if they show up). However, because most of the species used are lower-tier mons such as Togetic and Illumise, this became less relevant in the later rounds, and did not impact things materially in earlier rounds since I only ran into a couple of them. Luckily, once I've swapped for them, I'm not obligated to keep them for the entire round and can trade them away after if they're a hindrance.

Writeups of all six rounds are as follows.

I start with an opening draft of Ponyta1, Combusken1, Spoink, Sealeo1, Flaaffy, and Loudred. None of those are species I'm required to take, so I'm free to choose as I like. I go for Combuske, Sealeo, and Spoink and work my way through. This round is pretty easy - the randomised AI neuters threatening foes - so I pretty quickly make it through. Swaps are as follows:

-Spoink for Kadabra
-Sealeo for Omanyte
-The next opponent has Rhyhorn, which is a mandatory swap, so I exchange it for Omanyte
-Kadabra for Elekid
-Rhyhorn for Kabuto
-The final trainer specialises in Water types, so I swap Combusken for Lickitung

The opening draft is Scyther1, Torkoal1, Machoke1, Sealeo1, Banette1, Swellow1. I take Swellow, Banette, and Torkoal.

-Torkoal for Combusken
-As the next opponent specialises in Psychic types, I trade Combusken for Solrock
-Solrock for Metang
-Illumise shows up, which is a mandatory swap, so I trade away Metang
-Illumise for Ninjask
-Banette for Kingler

Round Three
Silver Symbol time. I'm presented with an opening draft of Sandslash2, Ivysaur2, Mightyena2, Graveler2, Weepinbell2, and Magneton2. I'm obligated to take Ivysaur, so I opt for Mightyena first, Ivysaur second, and Graveler third. Surprisingly, it turns out to be one of the most reliable Pokemon I've ever used in the Factory, winning several matches almost single-handledly. I fully intended to keep it for Noland... and then the guide tells me the next opponent is skilled in the Fire type, so I reluctantly swap it. In hindsight I very much wish I'd kept it, but I coped nonetheless.

Swaps:
-Graveler for Gligar
-Gligar for Pidgeot
-Pidgeot for Sandslash
-Sandslash for Arbok
-due to the next opponent specialising in Fire types, I swap Ivysaur for Poliwrath
-Mightyena for Grumpig

This meant that my team for Noland was Grumpig2, Arbok2, and Poliwrath2.


View attachment 323833
Noland (Silver)
I swapped for Grumpig2 just before fighting Noland assuming that its elemental punches would make for a quick and easy match. No such luck... his first Pokemon was Wobbuffet, which Grumpig cannot hope to beat. I opted for Ice Punch desperately hoping for a freeze; while I was able to get three hits in as it Countered on the first turn, it promptly wised up and 2HKO'd with Mirror Coat.

Luckily, Poliwrath was able to patch things up, first Belly Drumming and then Resting back up to full health. And here is where I majorly misplayed. I should have Hypnotised it, but I stupidly assumed why bother - at half health +6 Brick Break should do just enough to KO. It didn't. Wobbuffet survived with a shred of health and Countered. 100% my fault for getting sloppy.

My hopes of surviving this fight are low. I send out Arbok and finish Wobbuffet off. Wigglytuff comes out next. Miraculously, it misses with Sing, allowing me to 2HKO with Sludge Bomb. And then his final Pokemon is Seviper, which dies to Earthquake.

And breathe. I did not remotely deserve that win, but you bet I was glad to get it.

Onto the next half of the challenge...

And we're onto having fully-evolved Pokemon. I'm presented with Vaporeon1, Snorlax1, Muk1, Aggron1, Lanturn1, Exploud1. None of these are much good, but my hopes weren't high. I opt to take Vaporeon, Muk, and Aggron and rapidly start swapping, exchanging Muk for Cradily after the first match.

Then Sceptile shows up. This is one of the mandatory species I have to swap for, but I have no problem with this; it proves to be an excellent lead, until I'm forced to abandon it. Rhydon shows up early and I was hoping to hang onto it, since it's one of those hateful Quick Claw sets I'm always paranoid about facing, but I end up having to ditch that soon after, too.

Swaps:

-Muk for Cradily
-Vaporeon for Sceptile
-Aggron for Rhydon
-Skarmory shows up (another mandatory species) so I swap Rhydon for it
-Due to the next opponent specialising in Flying types, I swap Sceptile for Kingdra
-Skarmory for Salamence

This was the hardest round by far; I never really found a rhythm in this round roster-wise. Sceptile would have been a great lead for the whole round if not for the Flying team - ironically, the hardest foe on that team was Miltank, which I had to stall out of PP with Cradily until it couldn't heal with Milk Drink any more.

The opening draft in this round was a somewhat more promising Kingdra2, Glalie3, Typhlosion2, Umbreon2, Jynx3, and Lapras2. I took Typhlosion, Glalie, and Lapras - not a great combination, in hindsight. The lack of defensive synergy immediately proved to be a problem when the first opponent brought out a fearsome Choice Band Aerodactyl. Lapras only narrowly survived and KO'd in turn with Surf. However, things turned around a few battles in...

Swaps:
-after narrowly surviving Aerodactyl's rampage, Glalie was swapped for Aerodactyl
-Typhlosion for Blaziken
-for the first time in the challenge, no swap; none of the opponent's picks justified it
-no swap again
-no swap again: the upcoming trainer was skilled with normal types. Blaziken smashed through the opposing Porygon2 and Blissey
-no swap again
-the upcoming trainer was skilled with Ground types; swapped Blaziken for Kingdra

Proper test of willpower, that. Blaziken/Aerodactyl/Lapras isn't, on the face of it, the best team, but they worked together well enough to get things done for long enough that it didn't feel right to switch it up. I worried that I'd hobbled myself for the Gold round, but there was nothing to be done.

Round Six
Here we go... the final challenge. Opening draft was Magmar3, Muk4, Blissey4, Golem3, Glalie3, and Lapras3.

A truly terrible opening selection, but somehow I made it through. I go with Glalie, Muk, and Blissey, rapidly swapping Glalie for Kingdra and Muk for Victreebel. Kingdra did the job well enough, but Victreebel3 does not remotely pull its weight so I swap for Cradily3, which is equally terrible.

However, it all turns around when the fourth opponent has the fabled Starmie3 - a SPIT Starmie with max Speed and Special Attack. It even turns out to have Natural Cure! Naturally, I swap Kingdra for it and it proves to be a wonderful lead. I quickly dump Cradily for Ampharos3, thinking that Starmie/Ampharos/Blissey is a pretty decent roster for Noland. However, the penultimate opponent has Blaziken3, so I exchange Ampharos.

FINALLY feeling like I had a good strong team, I prepare to fight for my first Gold symbol.

View attachment 323833
Noland (Gold)

He opens with Miltank and I pause for a second and try to guess if it's 3 or 4. Neither is particularly good news, but even if Blaziken can't KO it can bring it down to KO range for Starmie. Blaziken eats a Shadow Ball and then Endures as Miltank uses Earthquake, smashing it with a full-powered Reversal on the next turn.

Out comes Donphan. Nothing Blaziken can do can KO, so I use Reversal for about ~40%. As it's Donphan3, I worry about the likelihood of a Quick Claw Fissure, but mercifully Starmie gets in first and drops it with Surf. His final Pokemon is Cradily.

Praise be. If it's the abysmal third set, I've won. Cradily eats an Ice Beam, then prepares to use Solarbeam. Oh, thank god. It is! Starmie Ice Beams again, bringing it to ~5%, and dies to Solarbeam. Blissey comes out and finishes the job with an Ice Beam of her own.

________________________________________________​

And that's day 1 done! One down, six to go. Tomorrow, it's onto the next facility, and it couldn't be more different - we're headed to the Battle Pike...

View attachment 323857

____________________________________________​


View attachment 323854
Very nice writeup and exciting to read. You're clearly putting a lot of energy into this. Getting to gold Noland in 4 attempts is great as well! I'm curious to see the next!
 

Users Who Are Viewing This Thread (Users: 1, Guests: 6)

Top