Singles
I've been prevaricating over an attempt at a Singles run for years. Literally, years. Read back if you care to and you'll see multiple posts from me where I mull over how precisely to do it, what to use, how to play them. But something always held me back - namely, my dissatisfaction with the kind of team needed to achieve a really long streak.
Here's the thing. I've always been a fan of hyper offense. Why exactly this is is fairly simple to explain: I'm not the most patient person (though the length of time it took to accomplish this kind of speaks against that) and bulky offence, in my mind, allows one to have their cake and eat it too. This in no way diminishes my awe of strategies used by those who've gotten four-figure streaks, like
Kommo-o's Die Deutsche Wissenschaft or
Adedede's Iridescence. But I wanted to do things my own way - which, as various characters in the games remind us, is what Pokemon is all about. And I am so happy to finally prove to myself and others that hyper offense can go the distance.
Anyway, enough of getting mushy. Time for some hard numbers.
The team
I decided to bring my old team out of retirement, though the individual Pokemon are new.
1. Green_typhlosion's old team
Several years ago on an old save file, I made it past 100 wins with this team:
Slaking @ Choice Band
Double-Edge
Earthquake
Shadow Ball
Aerial Ace
252 Attack/Speed, 6 HP (Adamant)
As discussed on other teams in this thread, an incredible lead. Nine times out of ten it can one-shot the opponent and give you an instant 3-2 advantage. Double-Edge is essential here over Return as it allows you to KO bulkier foes like Venusaur and Blastoise reliably, while Slaking has enough HP to eat the recoil multiple times. It's often tempting to KO the first foe and switch out, but against a lot of weaker foes it's so bulky you can simply leave it in, take a hit, and KO the next turn as long as you chose the right move.
Latios @ Lum Berry
Dragon Claw
Thunderbolt
Psychic
Ice Beam/Calm Mind
252 Sp.Attack/Speed, 6 HP (Modest)
Best special attacker in the game; there's precious little to say about it that hasn't already been said. The fourth move is your call - I generally ran Ice Beam to have the versatility, but a single CM makes Latios extremely hard to stop.
Metagross @ Scope Lens
Meteor Mash
Earthquake
Aerial Ace/Agility
Explosion
252 Attack, 170 HP, 88 Speed (Adamant)
Plays a dual role as a pivot and a bulky attacker. A lot of matches can be very easily won by KOing with Slaking, switching to Metagross, exploding, and switching back to Slaking. But don't sacrifice Metagross unless you absolutely have to; it's the best option against the Regi trio and bulkier things like Shuckle that don't die in one hit. Aerial Ace is invaluable against Double Teamers (especially Blissey) while Agility can come in handy if you need to sweep. The given EVs outrun everything in the Frontier after one Agility, but tweak them if you decide not to run it.
This team was crafted years ago. It's not the most novel, but it worked at the time. But that was when I was a lot less experienced and a lot less knowledgeable about how the Frontier works. I was curious as to whether I could improve on it - and really take it to the next level. As mentioned, on my old file, I got to 100 wins with this - but on my current save, I hadn't touched Tower Singles. I was determined that this team should not only get past 100 wins, but make it far enough to stake out a place on the leaderboard.
A slightly modified version of Green_typhlosions's old team
Slaking @ Choice Band
Double-Edge
Earthquake
Shadow Ball
Aerial Ace
252 Attack/Speed, 6 HP (Adamant)
Metagross @ Cheri Berry
HP Steel
Earthquake
Agility
Explosion
252 Attack, 170 HP, 88 Speed (Adamant)
Latios @ Lum Berry
Psychic
Thunderbolt
Ice Beam
Surf
252 Sp.Attack/Speed, 6 HP (Modest)
As you can see, there are a few small changes. Latios now runs Surf and Metagross runs HP Steel over Meteor Mash. It also holds a Cheri Berry. Scope Lens was very much a filler item - though Leftovers had some initial appeal, paralysis is the one status that really shuts Metagross down (that and being frozen, but that's uncommon enough to discount).
I got to 105 wins with this team, which was really all I wanted (at last, that Gold Shield - hurrah). But something occurred to me. Why was I running this team in Open Level? What was the point? Would it in fact not be better at level 50 - and if so, what was the point in continuing?
In fact, I've come around to the school of thought that
any team which doesn't run Tyranitar or Dragonite should just be level 50 by default. You remove a small cohort of enemies (Articuno/Zapdos/Moltres/Raikou/Entei/Suicune sets 5&6 don't show up in Level 50 either, which makes them marginally less common) for basically no downside. So I went back to basics and redid the team for level 50.
The final draft
Slaking @ Choice Band
Double-Edge
Earthquake
Shadow Ball
Aerial Ace
252 Attack/Speed, 6 HP (Adamant)
Metagross @ Cheri Berry
HP Steel
Earthquake
Agility
Explosion
252 Attack, 174 HP, 84 Speed (Adamant)
Latios @ Lum Berry
Psychic
Thunderbolt
Ice Beam
Surf
252 Sp.Attack/Speed, 6 HP (Modest)
There's no difference at all except for the slight tweaking of Metagross's EVs to account for it being level 50. 84 Speed EVs hits 101 Speed which outruns the entire Frontier after one Agility. Explosion on Metagross is the key move here. Not only does it easily wipe out a multitude of opponents, it also has a slight niche in that it prevents slower opponents making their move that turn if you don't kill them. This is relevant when up against things like Snorlax and Blissey, for whom any opportunity to boost can prove disastrous. So many matches are won on the model of:
Slaking gets a kill > switch to Metagross and explode for a second kill > back to Slaking for a third kill
This team operates incredibly cleanly. It's fast, very powerful, and perhaps most importantly has the bulk to weather blows from opponents and respond in kind. It is by no means perfect (as my loss demonstrates) but it's got the result I wanted, and that's good enough.
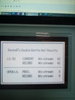
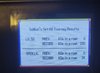
I got to
168 wins with this team after just two attempts. I hadn't realistically expected to get over 200, but a part of me really wanted to get past 191 just so I could pip sixth place on the leaderboard. Nevertheless, I'm happy with seventh for now - though probably not forever; others will probably overtake in time. I don't expect I'll be trying again in a hurry when there are other modes to be busy with. It's not that I don't aspire to do better than this, it's more that I'm not that interested in singles at the moment compared to the more interesting experience doubles and multi offer. But for now, I'm pretty happy with this.
Some usage comments
-If the opponent has two Pokemon left and Metagross has just fainted, ALWAYS switch to Slaking unless there's an ironclad reason not to. I learned this the hard way when I took down the opponent's first Pokemon, blew up on the Snorlax that came out second and it managed to get in a Quick Claw'd Curse (leaving it at around 5%). I stupidly figured Latios could take care of it but what do you know, its Quick Claw activated again and it killed me with Shadow Ball. Slaking destroyed it with Double-Edge but that left it helpless against the Metagross that came out third.
-Did consider Calm Mind on Latios, but eventually opted not to pursue it. I'm in two minds about whether this would actually manifestly improve the squad (most things it can't beat it still can't with CM, and it wouldn't have prevented my loss) but given the opportunities Latios sometimes finds to set up it's worth comment.
-Lum Berry might have been more worthy of Metagross than Latios, especially given the sheer number of battles where Latios saw no action at all. The Cheri Berry came in handy quite often, though. It's especially good against Electrics like Jolteon - get T'Waved, recover from paralysis, use Agility, smack them with Earthquake next turn.
-Threats:
- Intimidate leads can be troublesome, particularly Salamence (see below for more on this); Double-Edge usually still scrapes a KO, but not always.
- Boosting leads, particularly those which can survive one hit. Some variants of Registeel, Regirock, and Metagross can all tank an Earthquake and potentially boost themselves.
- Anything faster than Slaking. Not necessarily dangerous, but disruptive. Aerodactyl in particular loves to fish for flinches.
- Fake Out users, obviously. Most can be taken care of, but the free turn they get out of it can be deadly if played right.
- Endure users - not usually too tough as Latios can stomach Reversal and Metagross laughs at Flail users. But they, also, can be disruptive.
- As ever, OHKO users. Though fortunately I didn't meet many this time around.
My loss
Losing match was against Cooltrainer Carrie. Salamence came out first - I used Double-Edge for about 90%, while it got off a Dragon Dance. I switched to Metagross as it danced again, then predictably got hit with Earthquake next turn. I switched in Latios and promptly ate a Double-Edge. This had the beneficial effect of causing a double KO, but I knew there was no chance of me killing both remaining mons without dying first. Slaking OHKOed Machamp with Double-Edge but of course her third mon was Snorlax, who Hyper Beamed me to death.
Possibly could have played that one better, but DD Salamence is very hard to stop. Latios would have been the better switch, but at +2 it would have won regardless. Still, I've had worse losses.
I also had a particularly tense but brilliant win at battle 131. After Slaking killed the first mon with Double-Edge, Dusclops #1 came out and nastily got the upper hand against Metagross on the switch, burning it and then inflicting confusion for an eventual KO. After Slaking finished it offwith Shadow Ball, Blissey came out and started Double Teaming as I switch to Latios. Despite it getting in 5 Double Teams and using Toxic, I miraculously managed to freeze it with Ice Beam and was subsequently able to wear it down with Aerial Ace while it even more miraculously stayed frozen for 7 turns. Definitely the best - but most nail-biting - battle of the run.